|
|
 Posted - February 11 2015 : 7:50:07 PM Posted - February 11 2015 : 7:50:07 PM


|
A little while ago, I posted a thread about upgrading a locomotive shell for a Prairie I didn't yet have:
http://www.tycoforums.com/tyco/forum/topic.asp?TOPIC_ID=15757
I found a Prairie at the Great Midwest Train Show last weekend. Here it is with the new shell and a back driver pair without the traction tire:
/tyco/forum/uploaded/scsshaggy/20150211193514_IMG_0028.JPG
It came with a plastic boiler and a traction tire, but I don't like that arrangement for electrical pickup. The tire lifts some of the drivers up off the rail and the light weight just doesn't make a tight connection with the rail. The heavier metal boiler gives ample traction without the tire and better electrical contact.
Having plans for further modifications, I disassembled the locomotive back into kit form:
/tyco/forum/uploaded/scsshaggy/20150211193834_IMG_0029.JPG
At this point, the old paint is gone and flash and mold parting lines are filed clean. Soon after this shot screw holes were drilled and tapped all the way through, allowing for longer screws and smaller odds of stripping out the threaded holes. Also, the screw hole for the front coupler was drilled and tapped for a 2-56 screw and the pilot beam was drilled for brackets to mount an uncoupling lever.
I've primed the wheels, cover plate and cylinder saddle so the primer can dry while I work on further modifications to the frame:
/tyco/forum/uploaded/scsshaggy/20150211194429_IMG_0030.JPG
Yet to come: Pickup wipers on the left drivers and the wiring to go with them, a front coupler, an uncoupling lever on the pilot beam and a deck behind the pilot beam.
Carpe Manana!
|
Country:  USA ~
Posts: 2417 ~
Member Since: September 17 2013 ~
Last Visit: June 17 2026 USA ~
Posts: 2417 ~
Member Since: September 17 2013 ~
Last Visit: June 17 2026
|
 Alert Moderator
|
|
|
|
Posted - February 11 2015 : 8:40:15 PM
|
 I look forward to seeing what you do with this little beaut. I look forward to seeing what you do with this little beaut. 
-Steve
"A lot of modellers out there who go to these train shows see broken HO stuff and go, 'This is useless' when, in reality, they can still be used for modeling whether it's as a prop on your layout or a cool project to make something old new again."
|
|
Country: USA ~
Posts: 3533 ~
Member Since: February 17 2014 ~
Last Visit: January 11 2023
|
Alert Moderator

|
|
|
|
Posted - February 11 2015 : 9:03:59 PM
|
Stupid question: what'd you use to strip the paint on the frame? I know this question has come up before but I have horrible luck with stripping paint from anything, using anything.
--CRC
|
|
Country: USA ~
Posts: 930 ~
Member Since: January 25 2012 ~
Last Visit: August 23 2023
|
Alert Moderator
|
|
|
|
Posted - February 12 2015 : 12:01:55 AM
|
quote:What'd you use to strip the paint on the frame?
Originally posted by PRR 4800 - February 11 2015 : 9:03:59 PM
|
Mostly, I used alcohol and a tooth brush. It wasn't very good paint. I soaked it for a while and then brushed it. Whatever remained I picked off with a knife point.
Carpe Manana!
|
|
Country: USA ~
Posts: 2417 ~
Member Since: September 17 2013 ~
Last Visit: June 17 2026
|
Alert Moderator
|
|
|
|
Posted - February 12 2015 : 09:38:03 AM
|
quote: quote:What'd you use to strip the paint on the frame?
Originally posted by PRR 4800 - February 11 2015 : 9:03:59 PM
|
Mostly, I used alcohol and a tooth brush. It wasn't very good paint. I soaked it for a while and then brushed it. Whatever remained I picked off with a knife point.
Originally posted by scsshaggy - February 12 2015 : 12:01:55 AM
|
[okay]So that's why the paint wears off easily on these Mantuas. It all makes sense now and honestly, that's not a very good design choice.
-Steve
"A lot of modellers out there who go to these train shows see broken HO stuff and go, 'This is useless' when, in reality, they can still be used for modeling whether it's as a prop on your layout or a cool project to make something old new again."
Edited by - kovacste000 on February 12 2015 09:38:29 AM
|
|
Country: USA ~
Posts: 3533 ~
Member Since: February 17 2014 ~
Last Visit: January 11 2023
|
Alert Moderator
|
|
|
|
Posted - February 12 2015 : 10:33:21 AM
|
| Man, you are in a takin' care of business mode Don.
|
|
Country: USA ~
Posts: 2087 ~
Member Since: March 16 2013 ~
Last Visit: July 05 2018
|
Alert Moderator
|
|
|
|
Posted - February 12 2015 : 10:38:02 AM
|
quote:So that's why the paint wears off easily on these Mantuas.
Originally posted by kovacste000 - February 12 2015 : 09:38:03 AM
|
To be fair to Mantua, this was not a factory paint job. If you buy a RTR Mantua, the frame is blackened with some kind of chemical or anodizing process. Kits come as bare metal. This engine is so very non-stock that I think it is a heavily modified kit.
Carpe Manana!
|
|
Country: USA ~
Posts: 2417 ~
Member Since: September 17 2013 ~
Last Visit: June 17 2026
|
Alert Moderator
|
|
|
|
Posted - February 12 2015 : 11:03:10 AM
|
| I have two for those. One has the traction tire and a plastic boiler and the other has a metal boiler with no traction tire. The metal boiler has a painted chassis and the other is anodized. For their size I have found them to be great pullers with the metal boiler.
|
|
Country: USA ~
Posts: 332 ~
Member Since: August 28 2010 ~
Last Visit: April 23 2020
|
Alert Moderator
|
|
|
|
Posted - February 12 2015 : 6:20:59 PM
|
quote: quote:So that's why the paint wears off easily on these Mantuas.
Originally posted by kovacste000 - February 12 2015 : 09:38:03 AM
|
To be fair to Mantua, this was not a factory paint job. If you buy a RTR Mantua, the frame is blackened with some kind of chemical or anodizing process. Kits come as bare metal. This engine is so very non-stock that I think it is a heavily modified kit.
Originally posted by scsshaggy - February 12 2015 : 10:38:02 AM
|
 I did find one in the same NYC livery in a mid 90s Mantua catalog but this looks far superior in detail than that. I did find one in the same NYC livery in a mid 90s Mantua catalog but this looks far superior in detail than that.
-Steve
"A lot of modellers out there who go to these train shows see broken HO stuff and go, 'This is useless' when, in reality, they can still be used for modeling whether it's as a prop on your layout or a cool project to make something old new again."
|
|
Country: USA ~
Posts: 3533 ~
Member Since: February 17 2014 ~
Last Visit: January 11 2023
|
Alert Moderator
|
|
|
|
Posted - February 12 2015 : 6:59:51 PM
|
quote:I did find one in the same NYC livery in a mid 90s Mantua catalog.
Originally posted by kovacste000 - February 12 2015 : 6:20:59 PM
|
I'm curious about that. Did the one in the catalog have that same old-fashioned tender? I'm used to a boxier tender on the Prairie and thought this was someone's own tender swap but am not sure.
Carpe Manana!
|
|
Country: USA ~
Posts: 2417 ~
Member Since: September 17 2013 ~
Last Visit: June 17 2026
|
Alert Moderator
|
|
|
|
Posted - February 14 2015 : 7:57:14 PM
|
Today we get to the heart of the upgrades on the frame. Here, the pickup wipers for the left (insulated side) drivers are being added:
/tyco/forum/uploaded/scsshaggy/20150214192137_IMG_0030.JPG
The front left driver contacts the wiper ahead of the crosshead guide yoke. There's a piece of printed circuit board epoxied to the frame. A piece of brass with a tab sticking off of the left side ahead of the driver is soldered to the PC board. It's large and rigid to keep it from peeling the copper off the plastic like a piece of tape peeled off by the corner. Soldered to that tab is the wiper, itself. That's just a strip of springy phosphor bronze. The stepped brass strip coming up off the brass plate carries power to the motor and headlight.
A wire goes back to a smaller strip of rigid brass. This is epoxied to the frame with a small piece of plastic mosquito screen keeping metal from touching metal through the epoxy. There's a stepped piece of brass rising off of this to support a bronze wiper for the middle and rear left drivers. Another wire continues back toward the tender.
This shot shows how power reaches the motor and headlight:
/tyco/forum/uploaded/scsshaggy/20150214193249_IMG_0039.JPG
The motor has a small springy bronze strip from the post that holds the spring for the left brush. That presses on the brass riser from the wiper mounting plate. On the shell, you can see another bronze strip curling down toward the same brass riser. That makes contact to feed the light. The other wire from the light is grounded to the frame through the boiler.
The front coupler is converted to a Kadee:
/tyco/forum/uploaded/scsshaggy/20150214193440_IMG_0040.JPG /tyco/forum/uploaded/scsshaggy/20150214193507_IMG_0079.JPG
I mounted a Kadee #143 medium center shank standard head whisker coupler in a Kadee #213 box. The box is trimmed a little at the back. This takes the least space of any arrangement I've tried, so far, and doesn't foul the pilot truck, even in pretty sharp curves.
I also made an uncoupling lever from .020" brass wire and mounted it in long shank Cal-Scale eyebolts. The wire is soldered to the eyebolts to keep it from flopping up and down. The shanks of the eyebolts pass through holes drilled through the pilot beam with a #80 drill, then bent over to hold them in place.
Here's the frame with all the modifications:
/tyco/forum/uploaded/scsshaggy/20150214194237_IMG_0099.JPG
The wheel wipers have been trimmed and shaped to ride the wheels right and a deck has been added just behind the pilot beam. The deck is plastic from a Subway gift card roughed up with sand paper, blackened with permanent marker and epoxied in place.
The frame has been primed and all the other parts, except the tender are completed in this shot:
/tyco/forum/uploaded/scsshaggy/20150214194636_IMG_0119.JPG
There's a new drawbar, 1/4" shorter than the original for better looking engine/tender spacing. This is made from that same Subway gift card. The mold parting lines are filed off of the cylinder saddle and it's been repainted. The pilot and trailing trucks have different wheelsets with metal wheels on the right side to help the right drivers with electrical pickup (a little).
When the primer on the frame is fully dry, I'll paint the frame black and then finish the assembly of the engine. The tender will be next after that. It'll be modified for two-rail pickup as was the tender in this thread:
http://www.tycoforums.com/tyco/forum/topic.asp?TOPIC_ID=15790
Carpe Manana!
|
|
Country: USA ~
Posts: 2417 ~
Member Since: September 17 2013 ~
Last Visit: June 17 2026
|
Alert Moderator
|
|
|
|
Posted - February 15 2015 : 5:07:16 PM
|
The engine is completed, but not the tender. It's being tested and broken in using the slope back tender modified in this thread:
http://www.tycoforums.com/tyco/forum/topic.asp?TOPIC_ID=15790
Here it is:
/tyco/forum/uploaded/scsshaggy/20150215170443_IMG_0039.JPG
/tyco/forum/uploaded/scsshaggy/20150215170505_IMG_0049.JPG
The slope back tender is only temporary while I tinker with the box tender that came with the engine.
Carpe Manana!
|
|
Country: USA ~
Posts: 2417 ~
Member Since: September 17 2013 ~
Last Visit: June 17 2026
|
Alert Moderator
|
|
|
|
Posted - February 15 2015 : 5:46:00 PM
|
That's some really fantastic work ... love the wheel stripes!
~ Dave
They're ALL toys
|
|
Country: USA ~
Posts: 547 ~
Member Since: December 25 2010 ~
Last Visit: May 20 2019
|
Alert Moderator
|
|
|
|
Posted - February 15 2015 : 6:15:57 PM
|
Thanks. With that engine, the pilot and trailing wheels tend to disappear into the shadows without the whitewalls.
Carpe Manana!
|
|
Country: USA ~
Posts: 2417 ~
Member Since: September 17 2013 ~
Last Visit: June 17 2026
|
Alert Moderator
|
|
|
|
Posted - February 15 2015 : 7:12:53 PM
|
Love it! Any plans for steps between the pilot and running boards?
--CRC
|
|
Country: USA ~
Posts: 930 ~
Member Since: January 25 2012 ~
Last Visit: August 23 2023
|
Alert Moderator
|
|
|
|
Posted - February 15 2015 : 9:36:14 PM
|
 Looks great, scsshaggy. I can't believe how much it's transformed. Looks great, scsshaggy. I can't believe how much it's transformed.
-Steve
"A lot of modellers out there who go to these train shows see broken HO stuff and go, 'This is useless' when, in reality, they can still be used for modeling whether it's as a prop on your layout or a cool project to make something old new again."
|
|
Country: USA ~
Posts: 3533 ~
Member Since: February 17 2014 ~
Last Visit: January 11 2023
|
Alert Moderator
|
|
|
|
Posted - February 15 2015 : 10:21:33 PM
|
| Nice little consist behind that loco Don. Almost seems like the drivers should have whitewalls as well?
|
|
Country: USA ~
Posts: 2087 ~
Member Since: March 16 2013 ~
Last Visit: July 05 2018
|
Alert Moderator
|
|
|
|
Posted - February 15 2015 : 10:37:06 PM
|
quote:Love it! Any plans for steps between the pilot and running boards?
Originally posted by PRR 4800 - February 15 2015 : 7:12:53 PM
|
Thanks. I had no plans for steps. I kind of just imagined the valve cylinders as the intermediate step. It makes for a kind of high step from the valve to the running board, but my HO people don't have a very active union.
quote:Almost seems like the drivers should have whitewalls as well?
Originally posted by Barry - February 15 2015 : 10:21:33 PM
|
I'm thinking about that. Sometimes it looks right and sometimes, at a distance, it looks like the shiny nickel tires I was trying to avoid by painting the wheels. I'll probably try it and if it works it stays. If not, it wouldn't be hard to change back.
Carpe Manana!
|
|
Country: USA ~
Posts: 2417 ~
Member Since: September 17 2013 ~
Last Visit: June 17 2026
|
Alert Moderator
|
|
|
|
Posted - March 25 2015 : 2:32:07 PM
|
After a month out of town, I have returned to this project and dragged it from the musty archives.
The engine is pretty much done, but the tender now needs attention. As usual, I've cut the frame so the rear half is grounded to the right rail and the front half is grounded to the left rail. This allows electrical pickup on both rails, supplementing the fact that the engine also picks up on both rails.
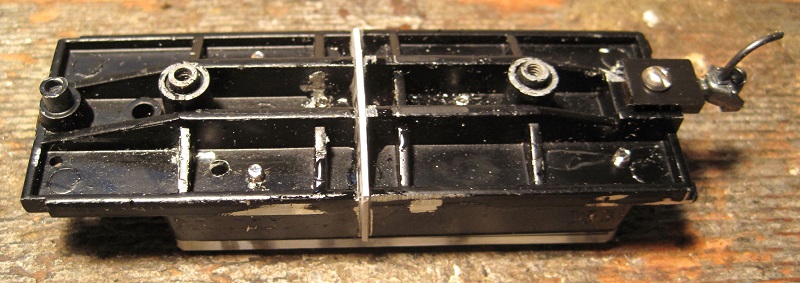
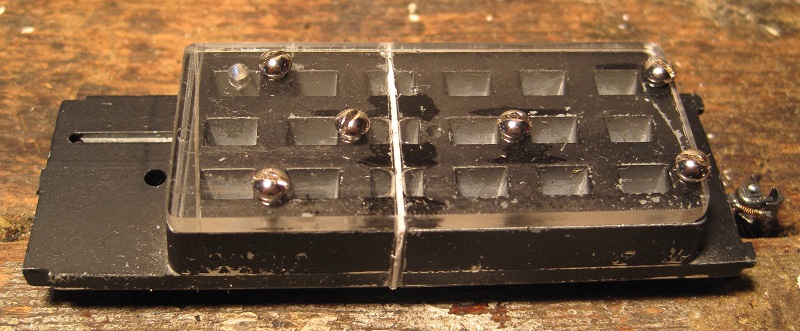
The halves are connected by a nice, rigid piece of 1/8" plexiglass. The saw kerf is filled by gluing a piece of an expired insurance card into the gap with epoxy. Also, the coupler has been changed to a Kadee.
Originally, the tender had a brake cylinder hanging on the outside of the side sill. While this might very well be prototypical for Sierra #3, it's hardly typical, so I removed the brake cylinder and patched the gap through which it protruded.

The bumps that look like rivets on the patch are just embossed by poking the other side with a knife point.
I put a home made spade connector on a piece of flexible wire. This will connect to the engine frame using the drawbar screw. It'll be routed up into the tender and soldered to a brass tab on one of the screws from the back half of the tender. The frame has been primed where there was no paint already:
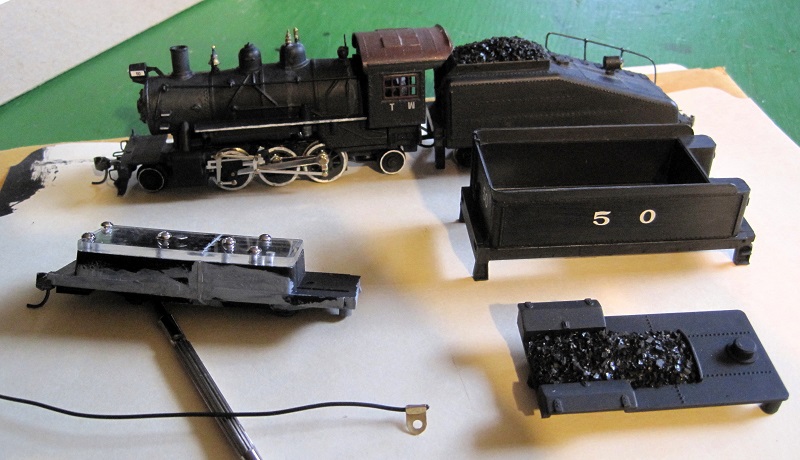
Also in this photo, you can see that I've removed the NYC lettering and painted the tender to match the engine then added a road number. Real coal has been glued over the cast plastic coal load with Duco Cement. White sidewalls have been painted on the driver tires to match the pilot and trailing wheels.
The road number and the white walls will be weathered with a thin black wash to tone them down. This is especially important on the drivers, since white side walls don't much stay white on a locomotive's drivers.
Carpe Manana!
|
|
Country: USA ~
Posts: 2417 ~
Member Since: September 17 2013 ~
Last Visit: June 17 2026
|
Alert Moderator
|
|
|
|
Posted - March 25 2015 : 3:27:24 PM
|
| Now THAT is a good looking steamer Shaggy. Great job on the rebuild. Hope my UP E7 set turns out this good.
|
|
Country: USA ~
Posts: 865 ~
Member Since: September 23 2014 ~
Last Visit: May 01 2023
|
Alert Moderator
|
|
|
|
Posted - March 25 2015 : 6:14:41 PM
|
quote:Now THAT is a good looking steamer Shaggy. Great job on the rebuild. Hope my UP E7 set turns out this good.
Originally posted by oldtimer52 - March 25 2015 : 3:27:24 PM
|
Thanks! I'm betting it will.
Carpe Manana!
|
|
Country: USA ~
Posts: 2417 ~
Member Since: September 17 2013 ~
Last Visit: June 17 2026
|
Alert Moderator
|
|
|
|
Posted - March 25 2015 : 7:10:21 PM
|
Really neat work as usual, Shaggy. I like your wiper and contact design. Are you mounting them to styrene or old PCB?
The full valve gear & white walls really complete it. That Prairie is cute as bug.
The Tyco Depot
|
|
Country: USA ~
Posts: 3927 ~
Member Since: June 20 2007 ~
Last Visit: November 19 2015
|
Alert Moderator
|
|
|
|
Posted - March 25 2015 : 8:36:16 PM
|
quote:I like your wiper and contact design. Are you mounting them to styrene or old PCB?
Originally posted by NickelPlate759 - March 25 2015 : 7:10:21 PM
|
Thanks for your kind words. The front wiper is mounted to PC board. The back one is epoxied to the frame with a piece of nylon mosquito screen in between to make sure the metal doesn't touch the frame through the epoxy, anywhere.
Carpe Manana!
|
|
Country: USA ~
Posts: 2417 ~
Member Since: September 17 2013 ~
Last Visit: June 17 2026
|
Alert Moderator
|
|
|
|
Posted - March 26 2015 : 10:37:15 AM
|
Shaggy, thanks for taking the time to document your work. It is very beneficial to the rest of us who are repairing the old stuff with few parts available.
Randy
|
|
Country: USA ~
Posts: 369 ~
Member Since: April 30 2011 ~
Last Visit: June 17 2026
|
Alert Moderator
|
|
|
|
Posted - March 26 2015 : 5:06:27 PM
|
I'm pleased to do it. Especially if it kind of wakes up the thread and prompts others to post projects where I can watch and learn.
Carpe Manana!
|
|
Country: USA ~
Posts: 2417 ~
Member Since: September 17 2013 ~
Last Visit: June 17 2026
|
Alert Moderator
|
|
|
|
Posted - March 26 2015 : 5:15:47 PM
|
The primer on the tender frame is fully dry, so I put on the acrylic finish coat. This dries a bunch faster, so things have moved along. In this shot, the frame is painted and I've added the wire from the back half of the frame to the engine frame:
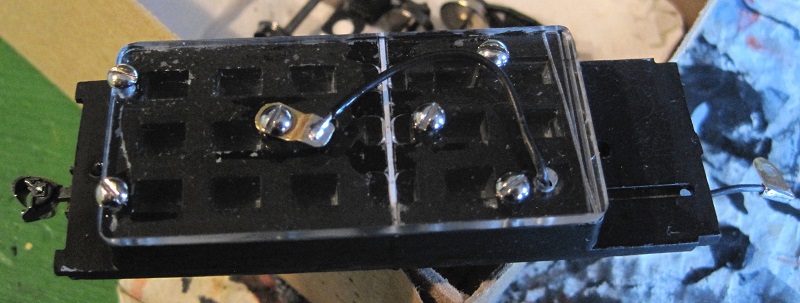
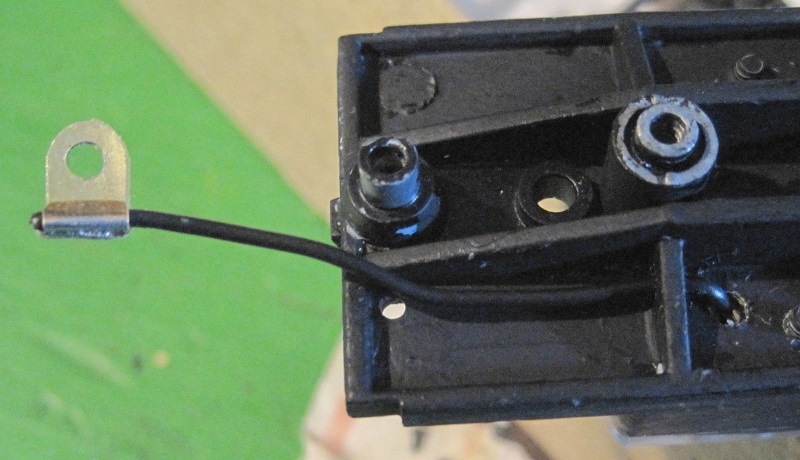
In the second picture, you can see that the wire is routed through a hole in the cross brace to make it run along the underside of the frame and out of the way of the wheels.
Here, the final product is assembled and being tested with the equipment it'll normally pull:
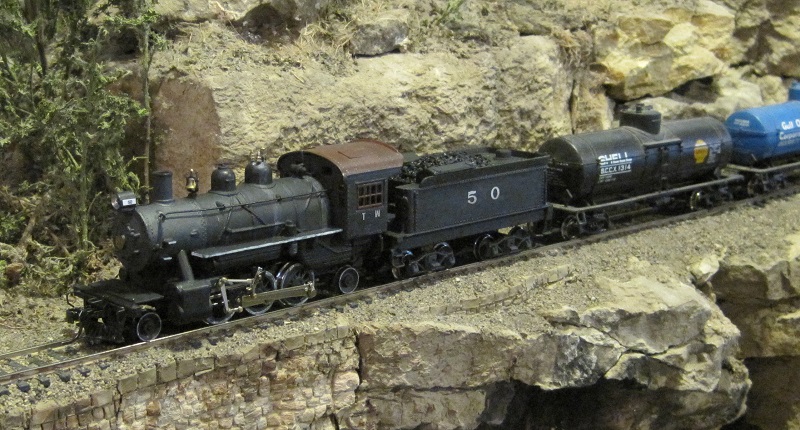
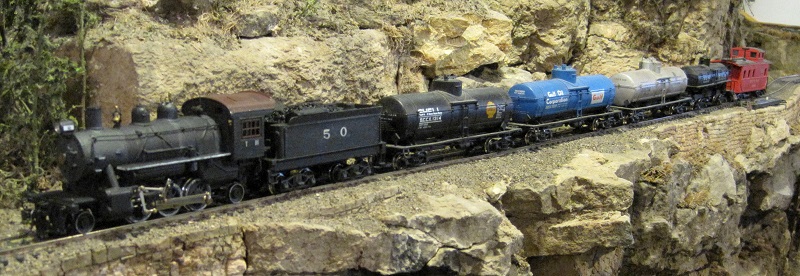
Another engine joins the stable.
Carpe Manana!
|
|
Country: USA ~
Posts: 2417 ~
Member Since: September 17 2013 ~
Last Visit: June 17 2026
|
Alert Moderator
|
|
|
|
Posted - March 26 2015 : 6:56:32 PM
|
| Yes. I need a wake up call from time to time. I dig looking at your work Don.
|
|
Country: USA ~
Posts: 2087 ~
Member Since: March 16 2013 ~
Last Visit: July 05 2018
|
Alert Moderator
|
|
|
|
Posted - March 26 2015 : 9:03:00 PM
|
Dang, that is a really sweet looking construct. That loco and tender turned out
fantastic. Love what ya did with it.
|
|
Country: USA ~
Posts: 865 ~
Member Since: September 23 2014 ~
Last Visit: May 01 2023
|
Alert Moderator
|
|
|
|
Posted - March 26 2015 : 9:17:47 PM
|
Bravo! I never would have tried to split a tender like that .. pretty awesome.
~ Dave
They're ALL toys
|
|
Country: USA ~
Posts: 547 ~
Member Since: December 25 2010 ~
Last Visit: May 20 2019
|
Alert Moderator
|
|
|
|
Posted - March 26 2015 : 9:32:27 PM
|
Love the attention to detail in the build. Impressive work.
http://tycodepot.com/
|
|
|
|
|
Posted - March 27 2015 : 11:38:46 PM
|
Thanks to all for the encouraging words.
Carpe Manana!
|
|
Country: USA ~
Posts: 2417 ~
Member Since: September 17 2013 ~
Last Visit: June 17 2026
|
Alert Moderator
|
|
|
blaneo
Switcher
.JPG)
Status:
offline
| |
Posted - March 28 2015 : 08:25:47 AM
|
Wow, great work there! That is one good looking Prairie you have now.
And thank you for the detailed posts that write. I love getting new ideas for fabricating and kit bashing, and you seem to come up with new ways of doing things all the time.
I hope that #50 brings you years of enjoyment.
Blane
|
|
Country: USA ~
Posts: 96 ~
Member Since: December 03 2012 ~
Last Visit: June 24 2019
|
Alert Moderator
|
|