|
|
 Posted - January 25 2016 : 8:26:31 PM Posted - January 25 2016 : 8:26:31 PM


|
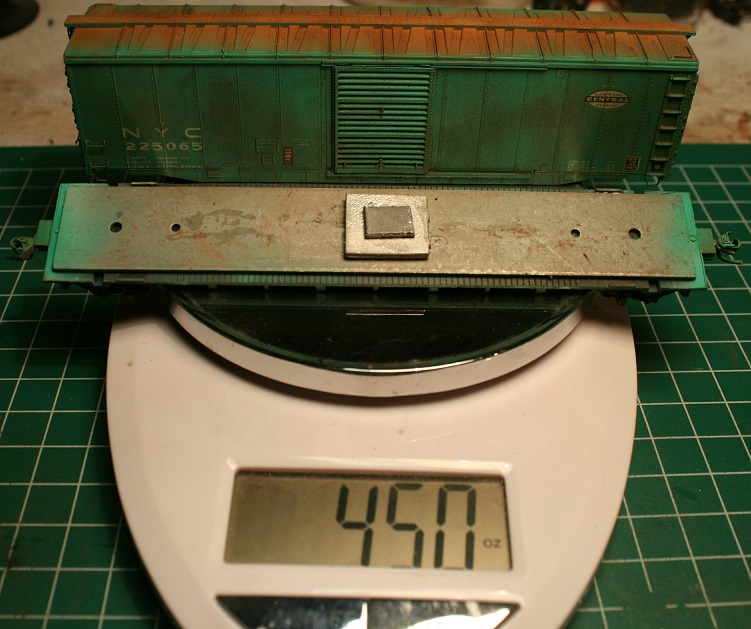
In this post I was going to show how I would add weight to my Tyco plug door rebuilds to get them up to NMRA standards.
According to the NMRA web site, the formula used to determine proper weight for an HO scale car is:
1 ounce + 1/2 ounce x per inch of car body = proper NMRA weight
so if you plug in the numbers for a 50 foot car you will get the following...
1 ounce + 1/2 x 7 inches = 4 and 1/2 ounces
Once the standard weight was determined I placed one of my cars on a scale to determine how much additional weight I needed to add...
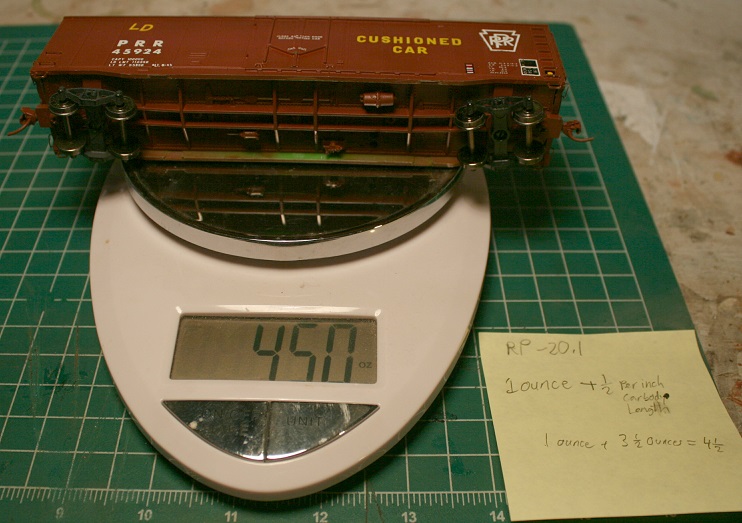
WOW! Perfect weight, no ballast needed!!!
Not to worry, I will be showing another method of upgrading these cars for new trucks and couplers which will require additional weight. Stay tuned...
Proudly keeping Tyco Pluggers out of landfills since 2016
|
Country:  USA ~
Posts: 821 ~
Member Since: December 26 2009 ~
Last Visit: June 28 2026 USA ~
Posts: 821 ~
Member Since: December 26 2009 ~
Last Visit: June 28 2026
|
 Alert Moderator

|
|
|
|
Posted - January 25 2016 : 11:34:59 PM
|
Well I am three cars closer to my 50 car goal! Here are my three finished PRR cars....
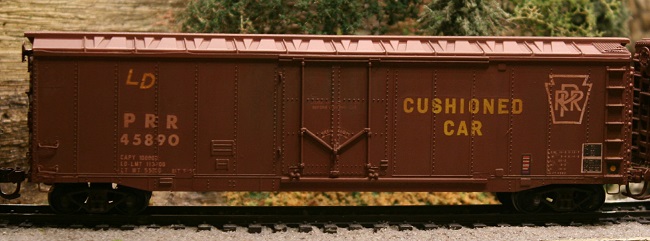
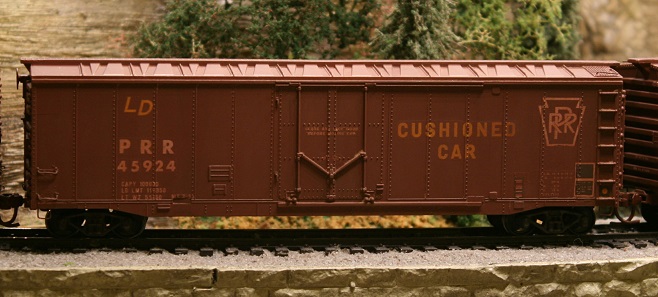
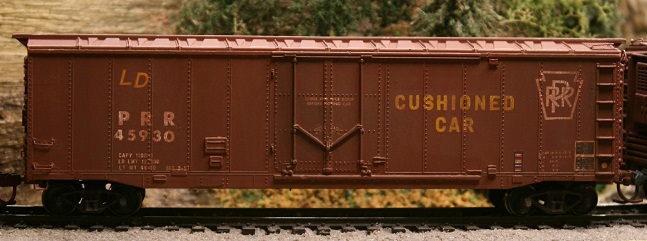
My next group will be New York Central cars, stay tuned!
Proudly keeping Tyco Pluggers out of landfills since 2016
|
|
Country: USA ~
Posts: 821 ~
Member Since: December 26 2009 ~
Last Visit: June 28 2026
|
Alert Moderator
|
|
|
|
Posted - January 26 2016 : 3:03:43 PM
|
quote:First I would like to show off some of the candidates for rebuilding....
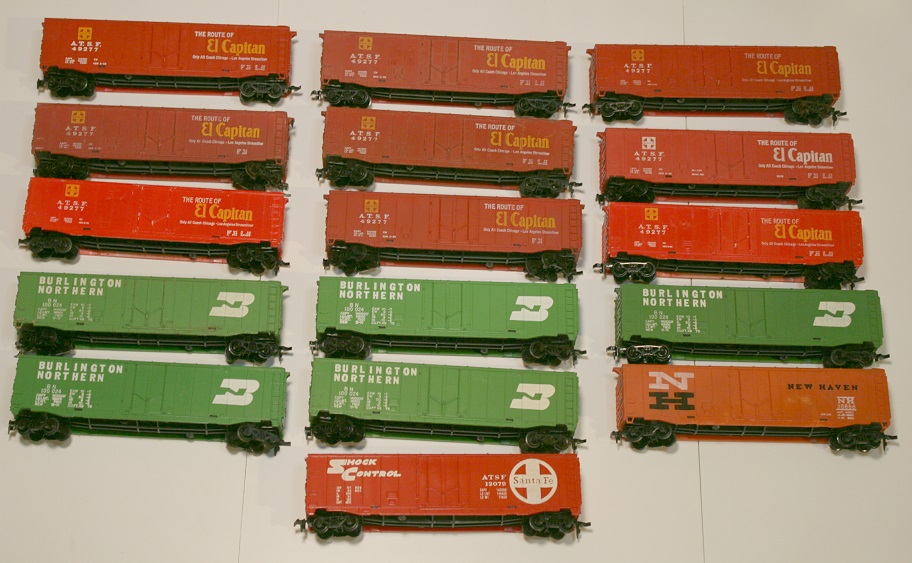
If anyone sees a car that is of special collector value, speak soon or
forever hold your peace!!!
Originally posted by Srenchin - January 04 2016 : 10:45:27 PM
|
I might be speaking too late, but I saw this thread for the first time yesterday. The El Capitan at the upper right with the all-white lettering is less common than the other El Capitans; it was produced only during the first year of production. I wouldn't say it's rare (I have two), but anyway...
I am enjoying this thread! I always figured the Tyco plug door had as much modeling potential as an Athearn blue box kit. In all of your research into prototypes that can be represented by this car, have you determined what prototype it's actually based on, if any?
Glenn
I was thinking of the immortal words of Socrates, who said, "... I drank what?"
Edited by - gmoney on January 26 2016 3:15:59 PM
|
|
Country: USA ~
Posts: 1709 ~
Member Since: December 13 2008 ~
Last Visit: July 05 2026
|
Alert Moderator
|
|
|
|
Posted - January 26 2016 : 4:44:47 PM
|
quote: quote:First I would like to show off some of the candidates for rebuilding....
If anyone sees a car that is of special collector value, speak soon or
forever hold your peace!!!
Originally posted by Srenchin - January 04 2016 : 10:45:27 PM
|
I might be speaking too late, but I saw this thread for the first time yesterday. The El Capitan at the upper right with the all-white lettering is less common than the other El Capitans; it was produced only during the first year of production. I wouldn't say it's rare (I have two), but anyway...
In all of your research into prototypes that can be represented by the Tyco plug door, have you determined what prototype it's actually based on, if any?
Originally posted by gmoney - January 26 2016 : 3:17:09 PM
|
Actually I did know about the rarity of the white lettered El Capitan car, I did read GIC's article. But if you look closely you can see that the stirrups are broken off, not exactly a car in collectible condition.
As for a prototype, my hypothesis is that Mantua/Tyco simply copied Irv Athearn's plug door boxcar tooling. This is unfortunate because if Mantua/Tyco had done their own work, they may have avoided duplicating all of Athearn's detail mistakes. i.e. incorrect car ends and backwards brake details.
What is really ironic is that if Tyco had done their own homework they may have discovered the welded construction Pullman-Standard PS-1 boxcar design. Imagine how much easier it would have been to decorate a smooth sided car with no rivet detail to get in the way of the printing proses.
Proudly keeping Tyco Pluggers out of landfills since 2016
Edited by - Srenchin on January 26 2016 5:49:18 PM
|
|
Country: USA ~
Posts: 821 ~
Member Since: December 26 2009 ~
Last Visit: June 28 2026
|
Alert Moderator
|
|
|
|
Posted - January 26 2016 : 6:47:50 PM
|
quote: quote: quote:First I would like to show off some of the candidates for rebuilding....
If anyone sees a car that is of special collector value, speak soon or
forever hold your peace!!!
Originally posted by Srenchin - January 04 2016 : 10:45:27 PM
|
I might be speaking too late, but I saw this thread for the first time yesterday. The El Capitan at the upper right with the all-white lettering is less common than the other El Capitans; it was produced only during the first year of production. I wouldn't say it's rare (I have two), but anyway...
In all of your research into prototypes that can be represented by the Tyco plug door, have you determined what prototype it's actually based on, if any?
Originally posted by gmoney - January 26 2016 : 3:17:09 PM
|
Actually I did know about the rarity of the white lettered El Capitan car, I did read GIC's article. But if you look closely you can see that the stirrups are broken off, not exactly a car in collectible condition.
As for a prototype, my hypothesis is that Mantua/Tyco simply copied Irv Athearn's plug door boxcar tooling. This is unfortunate because if Mantua/Tyco had done their own work, they may have avoided duplicating all of Athearn's detail mistakes. i.e. incorrect car ends and backwards brake details.
What is really ironic is that if Tyco had done their own homework they may have discovered the welded construction Pullman-Standard PS-1 boxcar design. Imagine how much easier it would have been to decorate a smooth sided car with no rivet detail to get in the way of the printing process.
Originally posted by Srenchin - January 26 2016 : 4:44:47 PM
|
Proudly keeping Tyco Pluggers out of landfills since 2016
|
|
Country: USA ~
Posts: 821 ~
Member Since: December 26 2009 ~
Last Visit: June 28 2026
|
Alert Moderator
|
|
|
|
Posted - January 26 2016 : 10:31:52 PM
|
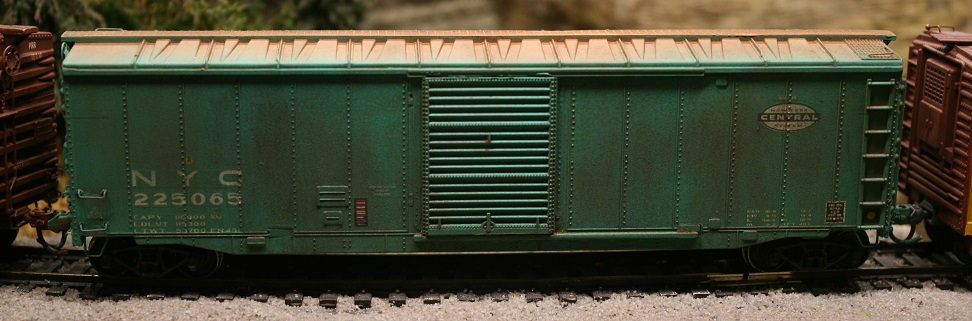
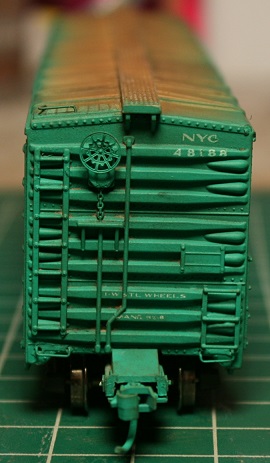
Here is a photo of my next batch of rebuilds, four New York Central Cars....

Proudly keeping Tyco Pluggers out of landfills since 2016
|
|
Country: USA ~
Posts: 821 ~
Member Since: December 26 2009 ~
Last Visit: June 28 2026
|
Alert Moderator
|
|
|
|
Posted - January 28 2016 : 12:07:22 PM
|
Wow! Amazing. Although cost wise, these conversions might scare some folks away, there is no greater satisfaction that taking a toy model and conversting it into some thing special. Keeep up the amazing work.
If you are not having fun, you are not doing it right.
|
|
Country: USA ~
Posts: 881 ~
Member Since: August 31 2011 ~
Last Visit: September 30 2025
|
Alert Moderator
|
|
|
|
Posted - January 28 2016 : 2:24:35 PM
|
quote:
What is really ironic is that if Tyco had done their own homework they may have discovered the welded construction Pullman-Standard PS-1 boxcar design. Imagine how much easier it would have been to decorate a smooth sided car with no rivet detail to get in the way of the printing proses.
Originally posted by Srenchin - January 26 2016 : 4:44:47 PM
|
Perhaps. But at the same time, they might not have gone with it. They knew that a lot of modellers find something satisfying about the presence of rivet detail - after all, they made their 62' triple-dome tank cars (cars that they seem to have invented out of whole cloth) of riveted-construction instead of welded.
Feedback-hungry attention w****
|
|
Country: USA ~
Posts: 750 ~
Member Since: December 05 2015 ~
Last Visit: January 24 2024
|
Alert Moderator
|
|
|
|
Posted - January 28 2016 : 9:33:21 PM
|
quote: quote:
What is really ironic is that if Tyco had done their own homework they may have discovered the welded construction Pullman-Standard PS-1 boxcar design. Imagine how much easier it would have been to decorate a smooth sided car with no rivet detail to get in the way of the printing proses.
Originally posted by Srenchin - January 26 2016 : 4:44:47 PM
|
Perhaps. But at the same time, they might not have gone with it. They knew that a lot of modellers find something satisfying about the presence of rivet detail - after all, they made their 62' triple-dome tank cars (cars that they seem to have invented out of whole cloth) of riveted-construction instead of welded.
Originally posted by ZeldaTheSwordsman - January 28 2016 : 2:24:35 PM
|
By that logic Tyco would not have made their jumbo hopper cars. No, Tyco just copied other manufacture's work without even considering cheaper alternatives.
Proudly keeping Tyco Pluggers out of landfills since 2016
|
|
Country: USA ~
Posts: 821 ~
Member Since: December 26 2009 ~
Last Visit: June 28 2026
|
Alert Moderator
|
|
|
|
Posted - January 29 2016 : 10:03:00 PM
|
quote: quote: quote:
What is really ironic is that if Tyco had done their own homework they may have discovered the welded construction Pullman-Standard PS-1 boxcar design. Imagine how much easier it would have been to decorate a smooth sided car with no rivet detail to get in the way of the printing proses.
Originally posted by Srenchin - January 26 2016 : 4:44:47 PM
|
Perhaps. But at the same time, they might not have gone with it. They knew that a lot of modellers find something satisfying about the presence of rivet detail - after all, they made their 62' triple-dome tank cars (cars that they seem to have invented out of whole cloth) of riveted-construction instead of welded.
Originally posted by ZeldaTheSwordsman - January 28 2016 : 2:24:35 PM
|
By that logic Tyco would not have made their jumbo hopper cars. No, Tyco just copied other manufacture's work without even considering better alternatives.
Originally posted by Srenchin - January 28 2016 : 9:33:21 PM
|
Proudly keeping Tyco Pluggers out of landfills since 2016
|
|
Country: USA ~
Posts: 821 ~
Member Since: December 26 2009 ~
Last Visit: June 28 2026
|
Alert Moderator
|
|
|
|
Posted - January 29 2016 : 10:06:28 PM
|
quote: quote: quote:First I would like to show off some of the candidates for rebuilding....
If anyone sees a car that is of special collector value, speak soon or
forever hold your peace!!!
Originally posted by Srenchin - January 04 2016 : 10:45:27 PM
|
I might be speaking too late, but I saw this thread for the first time yesterday. The El Capitan at the upper right with the all-white lettering is less common than the other El Capitans; it was produced only during the first year of production. I wouldn't say it's rare (I have two), but anyway...
In all of your research into prototypes that can be represented by the Tyco plug door, have you determined what prototype it's actually based on, if any?
Originally posted by gmoney - January 26 2016 : 3:17:09 PM
|
Actually I did know about the rarity of the white lettered El Capitan car, I did read GIC's article. But if you look closely you can see that the stirrups are broken off, not exactly a car in collectible condition.
As for a prototype, my hypothesis is that Mantua/Tyco simply copied Irv Athearn's plug door boxcar tooling. This is unfortunate because if Mantua/Tyco had done their own work, they may have avoided duplicating all of Athearn's detail mistakes. i.e. incorrect car ends and backwards brake details.
What is really ironic is that if Tyco had done their own homework they may have discovered the welded construction Pullman-Standard PS-1 boxcar design. Imagine how much easier it would have been to decorate a smooth sided car with no rivet detail to get in the way of the printing process.
Originally posted by Srenchin - January 26 2016 : 4:44:47 PM
|
Proudly keeping Tyco Pluggers out of landfills since 2016
|
|
Country: USA ~
Posts: 821 ~
Member Since: December 26 2009 ~
Last Visit: June 28 2026
|
Alert Moderator
|
|
|
|
Posted - January 29 2016 : 11:06:13 PM
|
Srenchin, sign out of the board, clear your browser's temp files and the cookies for this site, and sign back in. You're quoting your own posts without adding anything, you're quoting posts without replying... Something's going screwy.
Feedback-hungry attention w****
|
|
Country: USA ~
Posts: 750 ~
Member Since: December 05 2015 ~
Last Visit: January 24 2024
|
Alert Moderator
|
|
|
|
Posted - February 02 2016 : 8:22:15 PM
|
Hello everyone,
My life has gotten a little hectic lately so my box car rebuilding program has been shoved to the back burner. Keep tuned I will be back with more posts soon!
Proudly keeping Tyco Pluggers out of landfills since 2016
|
|
Country: USA ~
Posts: 821 ~
Member Since: December 26 2009 ~
Last Visit: June 28 2026
|
Alert Moderator
|
|
|
|
Posted - February 02 2016 : 10:57:38 PM
|
ahh bummer, hope ever thing works out.
Modeling on the cheap
|
|
Country: USA ~
Posts: 137 ~
Member Since: December 08 2015 ~
Last Visit: June 26 2017
|
Alert Moderator
|
|
|
|
Posted - February 08 2016 : 7:32:23 PM
|
Hi everyone, thank you for your patience while I have been preoccupied with other issues.
In this installment of this ongoing project I would like to discuss boxcar frames. Up to this point the rebuilds I have demonstrated have all used the original frames that Tyco supplied, while this is certainly an effective way to upgrade these cars it is not necessarily the easiest or best.
Consider the work that must go into a single frame...
1. Drill out the bolster holes
2. Plug the bolster holes.
3. Drill new holes for the truck screws (which must be perfectly centered)
4. Install draft gear and couplers
5. File down the bolsters to get the couplers to the proper height
6. Install new brake details
and the additional material....
1. Styrene rod
2. Styrene tubing
3. Machine screws
4, Coupler draft gear
5. Drills
6. Butane Torch and hot dental pick
7. Razor saw
8. Files
9. After market brake detail parts
Bottom line, a lot of time and energy is needed to get the old Tyco frames up to par!
Fortunately there is an alternative that eliminates many of the headaches that are associated with rebuilding the old Tyco frame; Accurail's part #120 "50 Foot Steel Underframe"...
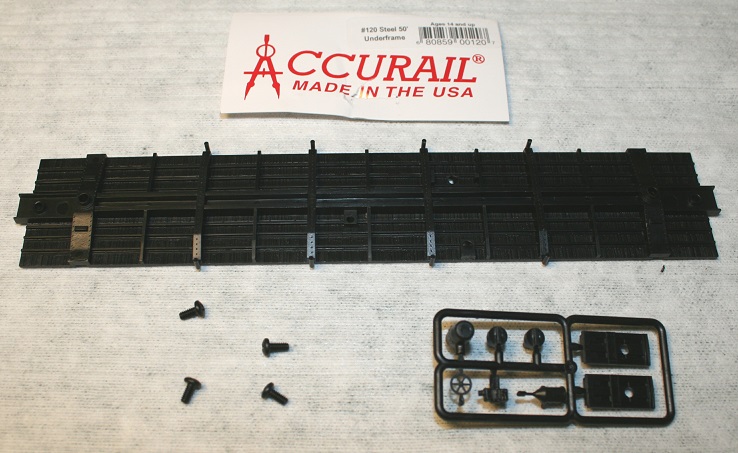
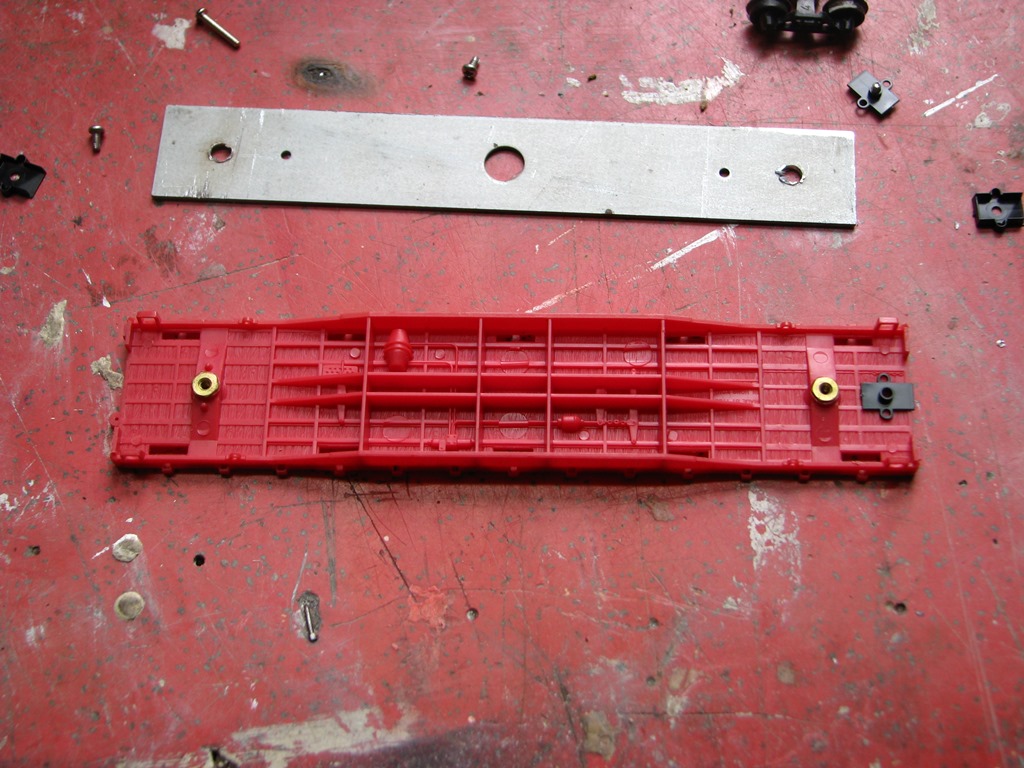
As the photo shows, this product has everything you need to upgrade a Tyco Plugger...
1. Body Mounted Coupler draft gear
2. Bolsters with centered screw holes (complete with a "nipple" that mates with the truck bolster hole).
3. Separate brake gear component details
4. Four machine screws
Best of all, when the frame is fitted with trucks and couplers, no height adjustment is need!!
Of course there is a catch...
The Accurail frame is too long and wide to just slip inside the Tyco shell, fortunately this is easy to fix by trimming about one 16th of an inch from all edges of the Accurail frame's floor....
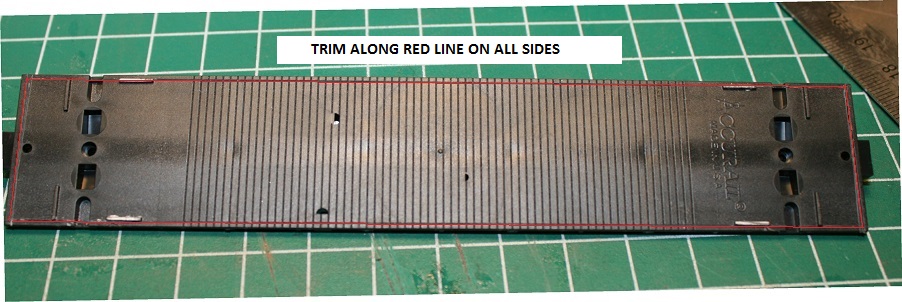
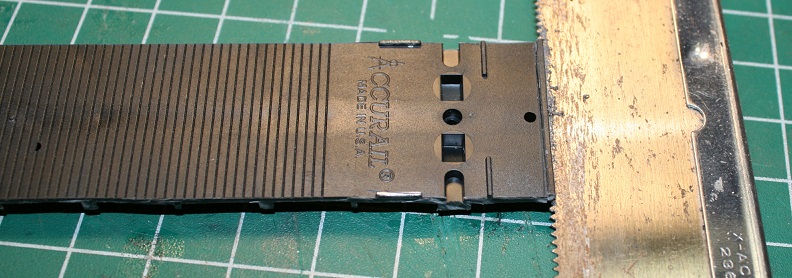
To remove the excess material use a sharp X-acto knife to trim the edges using a steel ruler as a straight edge. A razor saw is then used to cut away the excess floor material above the coupler draft gear...
Once all four sides are trimmed to fit, the Accurail frame simply drops right in...
In my next post I will show how to install an Accurail frame on a finished car. Stay tunned...
Proudly keeping Tyco Pluggers out of landfills since 2016
Edited by - Srenchin on February 08 2016 7:46:38 PM
|
|
Country: USA ~
Posts: 821 ~
Member Since: December 26 2009 ~
Last Visit: June 28 2026
|
Alert Moderator
|
|
|
|
Posted - February 09 2016 : 7:16:05 PM
|
Srenchin, I use these inserts instead of drilling the bolsters. Just glue them in and you are ready to go.
http://www.ebay.com/itm/280897951122?_trksid=p2060353.m1438.l2649&ssPageName=STRK%3AMEBIDX%3AIT
|
|
Country: USA ~
Posts: 338 ~
Member Since: February 08 2013 ~
Last Visit: January 27 2019
|
Alert Moderator
|
|
|
|
Posted - February 09 2016 : 9:10:52 PM
|
Alternatively, couldn't you just glue some small nuts over the holes to serve as lugs?
And I question 5, 7, and 8 on the the materials list. If one does modelling and customizing, wouldn't those be in the general toolkit anyway? Including them on the materials list makes it sound like you end up breaking them every job :P
quote: quote: quote:
What is really ironic is that if Tyco had done their own homework they may have discovered the welded construction Pullman-Standard PS-1 boxcar design. Imagine how much easier it would have been to decorate a smooth sided car with no rivet detail to get in the way of the printing proses.
Originally posted by Srenchin - January 26 2016 : 4:44:47 PM
|
Perhaps. But at the same time, they might not have gone with it. They knew that a lot of modellers find something satisfying about the presence of rivet detail - after all, they made their 62' triple-dome tank cars (cars that they seem to have invented out of whole cloth) of riveted-construction instead of welded.
Originally posted by ZeldaTheSwordsman - January 28 2016 : 2:24:35 PM
|
By that logic Tyco would not have made their jumbo hopper cars. No, Tyco just copied other manufacture's work without even considering cheaper alternatives.
Originally posted by Srenchin - January 28 2016 : 9:33:21 PM
|
And your point is? Tyco plainly did not always copy other manufacturers, as their unique streamline caboose and the completely-imagineered 62' triple-dome tank cars prove. The detail on those cars also demonstrates that even when doing their own work Tyco did not always go for that which would have been cheaper and simpler for them.
Feedback-hungry attention w****
|
|
Country: USA ~
Posts: 750 ~
Member Since: December 05 2015 ~
Last Visit: January 24 2024
|
Alert Moderator
|
|
|
|
Posted - February 10 2016 : 06:32:13 AM
|
quote:
I like those! A step up from my usual system of melting a 2-56 nut into the bolster hole.
http://tycodepot.com/
|
|
|
|
|
Posted - February 10 2016 : 10:47:38 AM
|
quote:
That's an interesting idea, I just ordered some from the eBay listing you linked to. I'll give them a try!
Proudly keeping Tyco Pluggers out of landfills since 2016
|
|
Country: USA ~
Posts: 821 ~
Member Since: December 26 2009 ~
Last Visit: June 28 2026
|
Alert Moderator
|
|
|
|
Posted - February 10 2016 : 11:04:28 AM
|
quote:Alternatively, couldn't you just glue some small nuts over the holes to serve as lugs?
And I question 5, 7, and 8 on the the materials list. If one does modelling and customizing, wouldn't those be in the general toolkit anyway? Including them on the materials list makes it sound like you end up breaking them every job :P
My point was is that the more tools you need to get a job completed, the more complicated and time consuming the project is. I am all about getting the job done with as few tools and materials as possible.
quote: quote: quote:
What is really ironic is that if Tyco had done their own homework they may have discovered the welded construction Pullman-Standard PS-1 boxcar design. Imagine how much easier it would have been to decorate a smooth sided car with no rivet detail to get in the way of the printing proses.
Originally posted by Srenchin - January 26 2016 : 4:44:47 PM
|
Perhaps. But at the same time, they might not have gone with it. They knew that a lot of modellers find something satisfying about the presence of rivet detail - after all, they made their 62' triple-dome tank cars (cars that they seem to have invented out of whole cloth) of riveted-construction instead of welded.
Originally posted by ZeldaTheSwordsman - January 28 2016 : 2:24:35 PM
|
By that logic Tyco would not have made their jumbo hopper cars. No, Tyco just copied other manufacture's work without even considering cheaper alternatives.
Originally posted by Srenchin - January 28 2016 : 9:33:21 PM
|
And your point is? Tyco plainly did not always copy other manufacturers, as their unique streamline caboose and the completely-imagineered 62' triple-dome tank cars prove. The detail on those cars also demonstrates that even when doing their own work Tyco did not always go for that which would have been cheaper and simpler for them.
Actually I have no real point, I was just airing my frustration with some of the decisions that Tyco made in the distant past. Now that you brought them up though, Tyco's streamlined caboose is clearly based off of Pennsylvania Railroad's N8 cabin car, why did they screw up the model by off-setting the cupola? As for the jumbo tank car, there are several prototype jumbo sized tank cars they could have modeled, why did Tyco insist on making up that ridiculous caricature of a tank car instead?
Originally posted by ZeldaTheSwordsman - February 09 2016 : 9:10:52 PM
|
Proudly keeping Tyco Pluggers out of landfills since 2016
|
|
Country: USA ~
Posts: 821 ~
Member Since: December 26 2009 ~
Last Visit: June 28 2026
|
Alert Moderator
|
|
|
|
Posted - February 10 2016 : 11:29:02 AM
|
quote:
Actually I have no real point, I was just airing my frustration with some of the decisions that Tyco made in the distant past. Now that you brought them up though, Tyco's streamlined caboose is clearly based off of Pennsylvania Railroad's N8 cabin car, why did they screw up the model by off-setting the cupola? As for the jumbo tank car, there are several prototype jumbo sized tank cars they could have modeled, why did Tyco insist on making up that ridiculous caricature of a tank car instead?
Originally posted by ZeldaTheSwordsman - February 09 2016 : 9:10:52 PM
|
Originally posted by Srenchin - February 10 2016 : 11:04:28 AM
[/quote]
Nailed it.
The Streamline caboose is my pet gripe - or mystery - about Tyco. Yes indeed, it is a screwed up N8. I have kitbashed a couple of correctly configured N8 cabeese, using Tyco Streamline cabeese as donor cars. It takes two to make one, but it's all there. Tyco could have EASILY made a correct one, so why did they shove the cupola down to one end and screw with the windows? Makes no sense.
http://tycodepot.com/
|
|
|
|
|
Posted - February 10 2016 : 3:32:31 PM
|
Here is a picture of an insert installed.
|
|
Country: USA ~
Posts: 338 ~
Member Since: February 08 2013 ~
Last Visit: January 27 2019
|
Alert Moderator
|
|
|
|
Posted - February 10 2016 : 4:04:16 PM
|
A bit different from my idea, which would be to cement a nut down on the top of the chassis and use longer screws.
Feedback-hungry attention w****
|
|
Country: USA ~
Posts: 750 ~
Member Since: December 05 2015 ~
Last Visit: January 24 2024
|
Alert Moderator
|
|
|
|
Posted - February 10 2016 : 7:52:24 PM
|
quote:A bit different from my idea, which would be to cement a nut down on the top of the chassis and use longer screws.
Originally posted by ZeldaTheSwordsman - February 10 2016 : 4:04:16 PM
|
To me, these inserts work best. Insert them into the bolster hole and cement in and you are done. It is lined up and level like it is suppose to be -- hassle free.
Edited by - thetramp on February 10 2016 7:54:23 PM
|
|
Country: USA ~
Posts: 338 ~
Member Since: February 08 2013 ~
Last Visit: January 27 2019
|
Alert Moderator
|
|
|
|
Posted - February 10 2016 : 9:31:52 PM
|
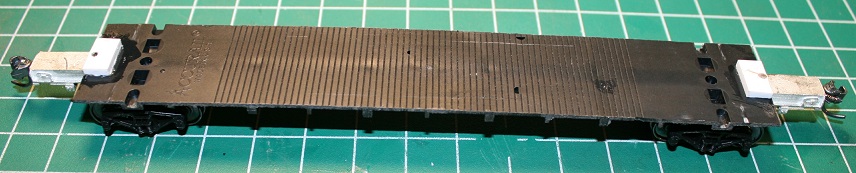
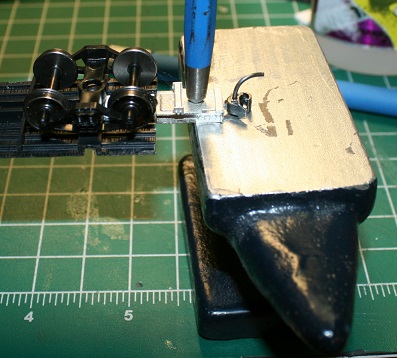
Anyway, in this post I would like to show how I assemble a Plugger with an Accurail frame...
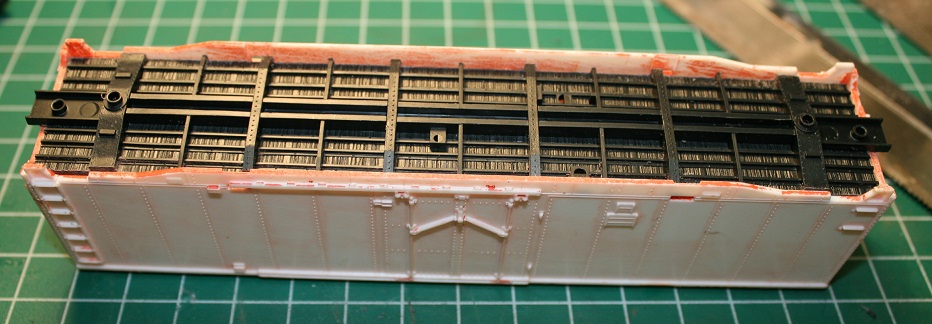
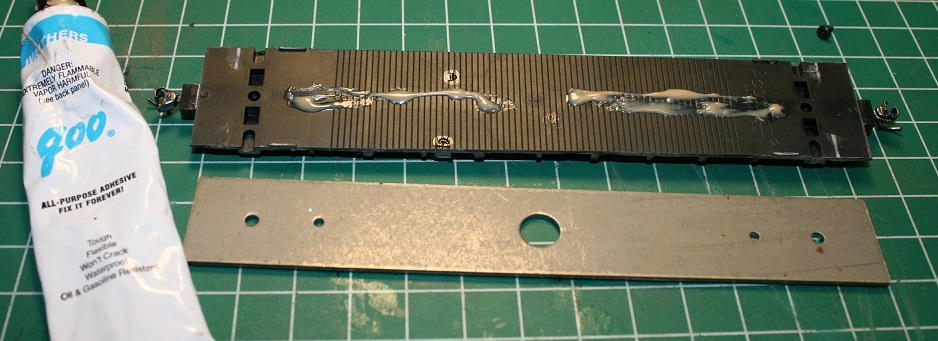
After modifying the floor of the Accurail frame as described in my last post, it is time to add the weight. The original Tyco sheet steel weight is a perfect fit, simply glue it onto the new frame using Walthers Goo..
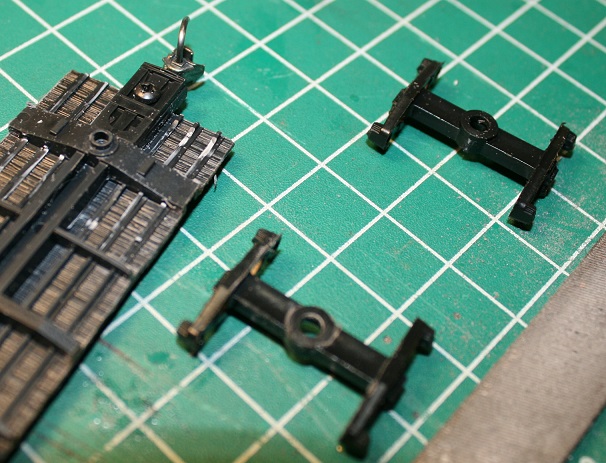
Once this is done it is time to make sure the couplers are the proper height. Umm.. Remember when I said in my last post that the Accurail frame needed no modification to get the couplers to the proper height? I discovered today that is only true if you use Accurail trucks. I chose Tichy Train Group (TTG) trucks for this particular car and discovered to my surprise that my couplers were too high.  Fortunately it is easy to lower the frame by simply filing down the TTG truck bolsters as the photo below shows. It is also necessary to trim some of the ribs on the floor to allow the trucks to swivel properly... Fortunately it is easy to lower the frame by simply filing down the TTG truck bolsters as the photo below shows. It is also necessary to trim some of the ribs on the floor to allow the trucks to swivel properly...
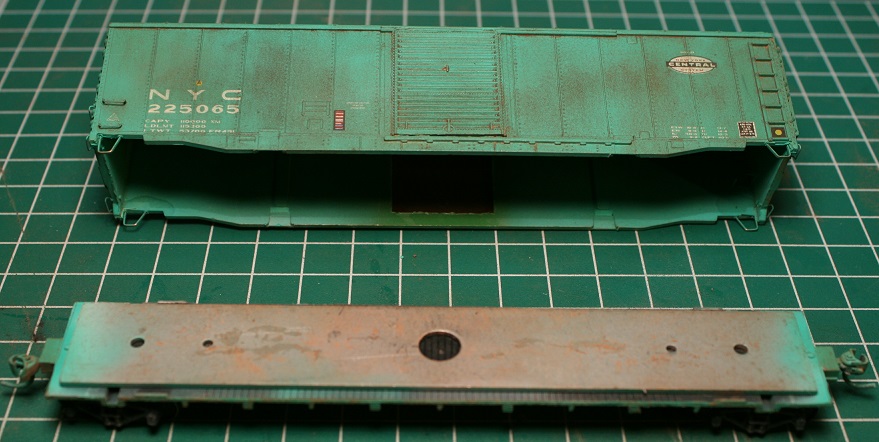
Now that the couplers are at the proper height and the weight is attached, it is time to paint the assembly in the appropriate color. Incidentally the undersides of most cars are painted the same color as the sides.
Once the under frame is painted and weathered, it is time to assemble all the parts and weigh them collectively on a scale. As you can see in the photo below, the car is too light...
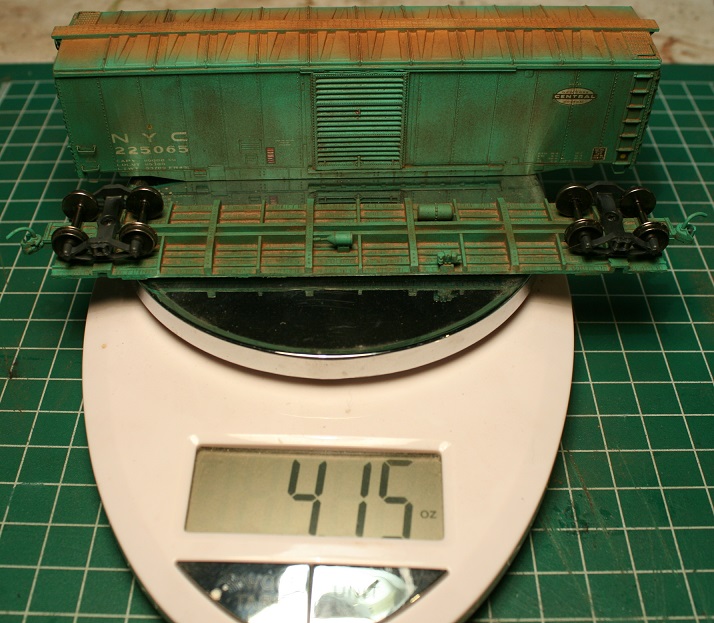
A little extra weight added to the center of the car gets the car up to standard...
Once the car is properly weighted painted and weathered, it is simply a mater of putting the car together. If the frame is loose when placed inside the shell, a little Walther Goo placed on top of the coupler draft gear to stick the shell to the frame is all that is needed to secure the assembly....
Another car down, many more to go!!! Stay tuned...
Proudly keeping Tyco Pluggers out of landfills since 2016
Edited by - Srenchin on February 11 2016 10:27:38 PM
|
|
Country: USA ~
Posts: 821 ~
Member Since: December 26 2009 ~
Last Visit: June 28 2026
|
Alert Moderator
|
|
|
|
 Posted - February 10 2016 : 11:52:51 PM Posted - February 10 2016 : 11:52:51 PM
|
Correct height only if you use Accurail trucks, eh? Yeah, that kind of thing sounds about right XD That is just typical.
quote: quote:
Actually I have no real point, I was just airing my frustration with some of the decisions that Tyco made in the distant past. Now that you brought them up though, Tyco's streamlined caboose is clearly based off of Pennsylvania Railroad's N8 cabin car, why did they screw up the model by off-setting the cupola? As for the jumbo tank car, there are several prototype jumbo sized tank cars they could have modeled, why did Tyco insist on making up that ridiculous caricature of a tank car instead?
Originally posted by Srenchin - February 10 2016 : 11:04:28 AM
|
Nailed it.
The Streamline caboose is my pet gripe - or mystery - about Tyco. Yes indeed, it is a screwed up N8. I have kitbashed a couple of correctly configured N8 cabeese, using Tyco Streamline cabeese as donor cars. It takes two to make one, but it's all there. Tyco could have EASILY made a correct one, so why did they shove the cupola down to one end and screw with the windows? Makes no sense.
Originally posted by JNXT 7707 - February 10 2016 : 11:29:02 AM
|
I still think they might have muddled references for different cabooses together. That kind of muddling does happen sometimes. For example: Bachmann's EMD F9 that they used to make and offered in several sets. The grilles are correct for an F9. The abbreviated skirts are correct for some F9s (such as some of the ones ordered by the Santa Fe, which were no doubt the primary references). But the cab side windows, the cab doors, the back door window, the sand hatches, and the number molded into the numberboards... are those of a first-run F7.
Feedback-hungry attention w****
Edited by - ZeldaTheSwordsman on February 10 2016 11:59:13 PM
|
|
Country: USA ~
Posts: 750 ~
Member Since: December 05 2015 ~
Last Visit: January 24 2024
|
Alert Moderator
|
|
|
|
Posted - February 11 2016 : 12:26:23 AM
|
quote:| The original Tyco sheet steel weight is a perfect fit, simply glue it onto the new frame using Walthers Goo.. Originally posted by Srenchin - February 10 2016 : 9:31:52 PM
|
I don't know if this is alarmist or real, but I could vaguely recall reading that solvent fumes come out of Goo for a long time and enclosed spaces need to be ventilated a bit to keep the fumes from accumulating and damaging the plastic. I found a reference to that on this forum:
http://www.railroad-line.com/forum/topic.asp?TOPIC_ID=31653
The relevant post said:
quote:| Glues like Walthers Goo tend to out-gas for a long time, so if you use them on styrene, make sure the gas can escape. There are lots of sad stories about styrene car kits where Goo was used to, for example, secure weights inside the car. The outgassing caused the car to warp. |
Maybe a hole in an inconspicuous part of the floor might help?
Carpe Manana!
|
|
Country: USA ~
Posts: 2417 ~
Member Since: September 17 2013 ~
Last Visit: July 02 2026
|
Alert Moderator
|
|
|
|
Posted - February 11 2016 : 01:43:46 AM
|
I had a bunch of boxcars that I lost the under frames to. So I built new under frames with plastic, I still have to order the trucks and the brake gear. How much does the Accurail frame cost? What about using double sided tape to hold the weight in place?
Modeling on the cheap
Edited by - fourteen on February 11 2016 01:53:54 AM
|
|
Country: USA ~
Posts: 137 ~
Member Since: December 08 2015 ~
Last Visit: June 26 2017
|
Alert Moderator
|
|
|
|
Posted - February 11 2016 : 06:49:37 AM
|
quote: What about using double sided tape to hold the weight in place?
Originally posted by fourteen - February 11 2016 : 01:43:46 AM
|
That works. I also use stick-on automotive wheel weights that come in 1/2 and 1/4 oz. sizes.
http://tycodepot.com/
|
|
|
|
|
Posted - February 11 2016 : 12:08:32 PM
|
quote:I had a bunch of boxcars that I lost the under frames to. So I built new under frames with plastic, I still have to order the trucks and the brake gear. How much does the Accurail frame cost? What about using double sided tape to hold the weight in place?
Originally posted by fourteen - February 11 2016 : 01:43:46 AM
|
Accurail frames are very reasonable, you can buy them from Walthers or directly from Accurail for $3.98 each. When you consider that you also get the brake component parts and the screws, Accurail's frame set is quite a bargain! Especially when you consider that the Details West brake detail set (consisting only of a single brake cylinder, piston, and control valve) on my upgraded Tyco under frames cost $2.75 per car alone!
Double sided tape will work for attaching weights to the floor of the frame, however I recommend that you use a material that is sufficiently tacky enough to permanently hold the pieces together (i.e. foam tape rather than double sided scotch tape).
As for Goo warping frames, yes that is a concern, however if you use Goo sparingly it should not be a problem. I have been using Goo for attaching weights to plastic frames for years without any ill effects.
Proudly keeping Tyco Pluggers out of landfills since 2016
Edited by - Srenchin on February 11 2016 12:14:48 PM
|
|
Country: USA ~
Posts: 821 ~
Member Since: December 26 2009 ~
Last Visit: June 28 2026
|
Alert Moderator
|
|
|
|
Posted - February 11 2016 : 6:59:02 PM
|
In this post I am going to show how I attached Details West part #1009 cushion draft gear to Accurail frames...
This first picture shows the basic parts of the kit, it's just two parts; a housing and a bottom cover plate...
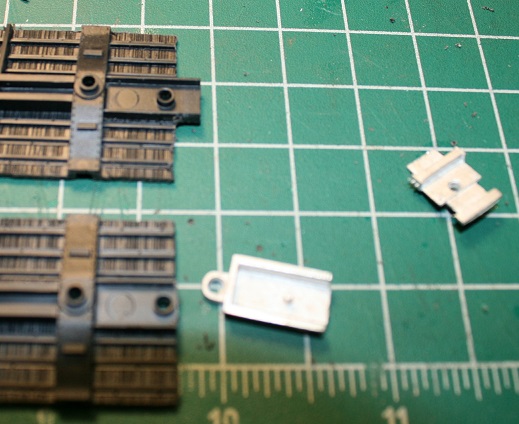
As the photo above shows, you must modify the frame's draft gear so that the hole on the "tab" of the new draft gear lines up with the original draft gear screw hole.
The next step is to modify the frame so that the tab on the new draft gear can be inserted into the floor of the frame...
If you are careful, you can make the slot in the frame tight enough to allow the new draft gear "tab" to be press-fit into the slot.
The next step is to extend the center sill from the bolster to the end of the new draft gear, I did this by cementing a strip of styrene between the bolster and draft gear....
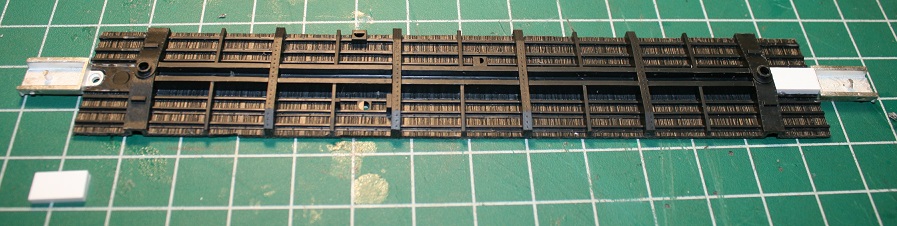
Once the styrene strip is glued in place, drill a hole through the styrene so that a screw can be inserted through the hole in the draft gear tab.
The next step is to cement another strip of styrene above the tab so that a pocket is formed for the draft gear tab to be inserted into...
Once the pocket is formed attach the draft gear to the frame by inserting the tab into the socket with a dab of CA glue and then screw the whole assembly together.
To install the coupler it is necessary to flare out the pin that the cover plate slips over with a center punch. Be careful, the soft white metal parts don't need much force! Be sure to use a hard surface to support the draft gear assembly when you flare the pin....
Once this is done you should have two sturdy cushion draft gear units with couplers attached to your frame.

At this point you can cement the original Tyco sheet steel weight to the floor of the frame...

The frame is now ready for brake detail installation, painting, and weathering as shone in previous posts.
In the next post the modified frames will be mated to the shells, stay tuned....
Proudly keeping Tyco Pluggers out of landfills since 2016
Edited by - Srenchin on February 11 2016 10:40:22 PM
|
|
Country: USA ~
Posts: 821 ~
Member Since: December 26 2009 ~
Last Visit: June 28 2026
|
Alert Moderator
|
|
|
|
Posted - February 11 2016 : 9:46:37 PM
|
In this post the modified Accurail frames with cushioned draft gear will be mated to the Tyco Shells.
First, test fit the frame to the shell, in my case the cushion draft gear housing kept the shell from settling down onto the frame's floor. To solve this problem, a notch must be made in the shell to accommodate the draft draft gear housing...
Once this is done it's time to install the trucks and weigh the car. These cars were slightly underweight so a little additional ballast was added as shone in a previous post.
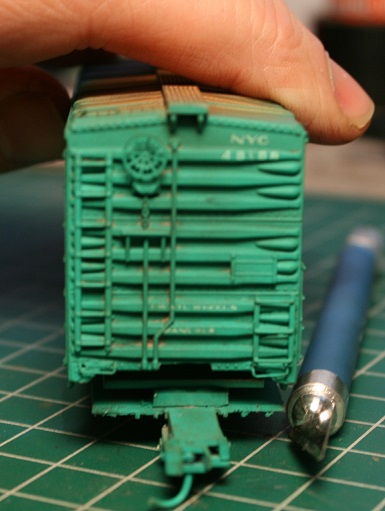
Here are photos of my three completed NYC pluggers....

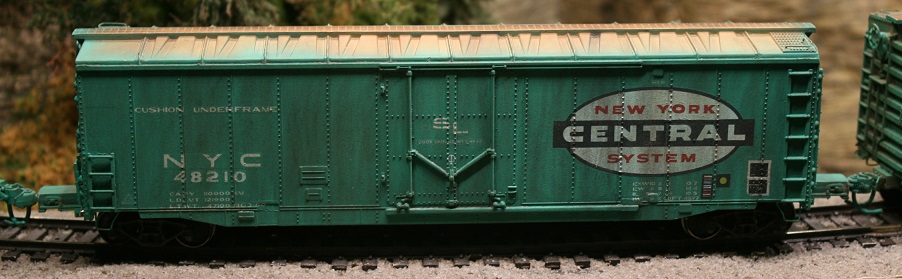
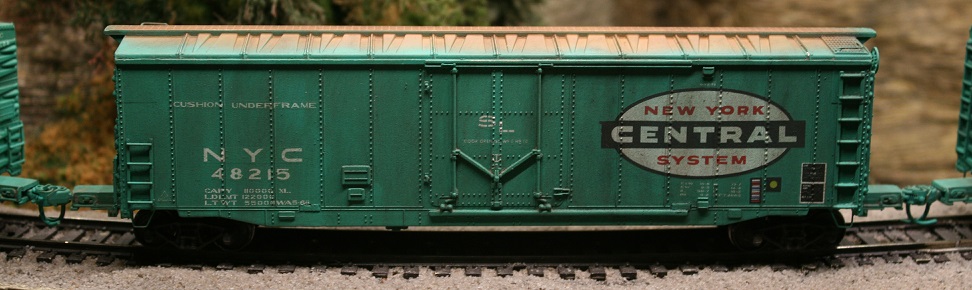
Three more cars down, several more to go! My next cars will be three Louisville and Nashville blue sliding door boxcars. Stay Tuned!
Proudly keeping Tyco Pluggers out of landfills since 2016
Edited by - Srenchin on February 11 2016 10:09:05 PM
|
|
Country: USA ~
Posts: 821 ~
Member Since: December 26 2009 ~
Last Visit: June 28 2026
|
Alert Moderator
|
|
|
|
 Posted - February 11 2016 : 10:19:26 PM Posted - February 11 2016 : 10:19:26 PM
|
Dear Readers,
I would like to thank everyone who has posted questions and comments to this topic, please keep the questions, comments, and suggestions coming; this boxcar project is as much a learning experience for me as it is for you!
If there are any questions about the methods that I use that have not been made clear in my posts, please feel free to ask for clarifications!
It is my hope that the Great Tyco Plugdoor Boxcar Rebuilding Program will inspire others to try similar modeling projects of their own.
Keep the comments coming!!!
Scott
Proudly keeping Tyco Pluggers out of landfills since 2016
Edited by - Srenchin on February 11 2016 10:22:45 PM
|
|
Country: USA ~
Posts: 821 ~
Member Since: December 26 2009 ~
Last Visit: June 28 2026
|
Alert Moderator
|
|
|
|
Posted - February 11 2016 : 10:40:30 PM
|
I would suggest you paint those couplers the iron color of the unpainted real deal. As your cars are now, with the couplers painted, they would be barred from interchange use.
Feedback-hungry attention w****
|
|
Country: USA ~
Posts: 750 ~
Member Since: December 05 2015 ~
Last Visit: January 24 2024
|
Alert Moderator
|
|
|
|
Posted - February 11 2016 : 10:55:42 PM
|
quote:I would suggest you paint those couplers the iron color of the unpainted real deal. As your cars are now, with the couplers painted, they would be barred from interchange use.
Originally posted by ZeldaTheSwordsman - February 11 2016 : 10:40:30 PM
|
Yes I know, but I like my couplers painted like that. Besides if I want to play with 100% realistic equipment, I'll just go to work.
Proudly keeping Tyco Pluggers out of landfills since 2016
Edited by - Srenchin on February 11 2016 10:56:30 PM
|
|
Country: USA ~
Posts: 821 ~
Member Since: December 26 2009 ~
Last Visit: June 28 2026
|
Alert Moderator
|
|
|
|
Posted - February 11 2016 : 11:22:18 PM
|
Ditto to that. Nice job on those boxcars. Good to see that there are still some good
kitbashers running around.
|
|
Country: USA ~
Posts: 865 ~
Member Since: September 23 2014 ~
Last Visit: May 01 2023
|
Alert Moderator
|
|
|
|
Posted - February 12 2016 : 01:19:28 AM
|
Wish I had known about the Accurail frame before I built my new frame. Will have to wait till the first of the month to order the parts that I need. Looking forward to more of your work
Modeling on the cheap
|
|
Country: USA ~
Posts: 137 ~
Member Since: December 08 2015 ~
Last Visit: June 26 2017
|
Alert Moderator
|
|
|
|
Posted - February 12 2016 : 3:23:44 PM
|
| Those New York Central cars look real fine Scott. Great color pick.
|
|
Country: USA ~
Posts: 2087 ~
Member Since: March 16 2013 ~
Last Visit: July 05 2018
|
Alert Moderator
|
|
|
|
Posted - February 12 2016 : 4:45:58 PM
|
I had some time after work to swing by my favorite local hobby shop to see what's new today. I love this place because they sell used HO equipment at very reasonable prices, a must if you happen to be scrounging for every Tyco plugger you can get your hands on.
Anyway among the shelves of the latest trade-ins, I found a couple pluggers that had already been repainted....
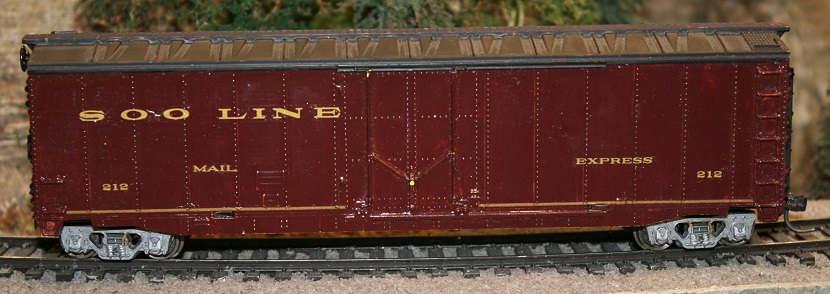
Apparently the previous modeler got a good deal on surplus NMRA Twin Cities Convention cars, since he repainted several of them into custom painted "express boxcars".
Sadly the previous modeler choose not to strip the original paint off the shells before repainting. As a result he had to use several extremely thick coats of glossy enamel paint to keep the original factory paint and lettering from showing through (of course he buried all the cast on detail as well). The cool thing is that he invested in some nice trucks, one car has some supper neat express trucks and the other car has Kadee wheel sets! The first one is soaking in paint stripper as I write this.
Proudly keeping Tyco Pluggers out of landfills since 2016
Edited by - Srenchin on February 12 2016 4:56:49 PM
|
|
Country: USA ~
Posts: 821 ~
Member Since: December 26 2009 ~
Last Visit: June 28 2026
|
Alert Moderator
|
|
|
|
Posted - February 12 2016 : 8:43:35 PM
|
Oh good grief enamel... I'm amazed it even dried all the way on the plastic. Or was Tyco casting its shells in something other than ABS at the time the cars were made?
Feedback-hungry attention w****
|
|
Country: USA ~
Posts: 750 ~
Member Since: December 05 2015 ~
Last Visit: January 24 2024
|
Alert Moderator
|
|
|
|
Posted - February 12 2016 : 9:21:14 PM
|
quote:Oh good grief enamel... I'm amazed it even dried all the way on the plastic. Or was Tyco casting its shells in something other than ABS at the time the cars were made?
Originally posted by ZeldaTheSwordsman - February 12 2016 : 8:43:35 PM
|
I have no idea what paint the guy used, but the plastic appears to intact.
Proudly keeping Tyco Pluggers out of landfills since 2016
|
|
Country: USA ~
Posts: 821 ~
Member Since: December 26 2009 ~
Last Visit: June 28 2026
|
Alert Moderator
|
|
|
|
Posted - February 12 2016 : 9:35:09 PM
|
Well, my experience with painting ABS plastic with enamels is that the enamel paint will stay perpetually tacky and get grimed up from absorbing household dust
Feedback-hungry attention w****
|
|
Country: USA ~
Posts: 750 ~
Member Since: December 05 2015 ~
Last Visit: January 24 2024
|
Alert Moderator
|
|
|
|
Posted - February 12 2016 : 9:59:01 PM
|
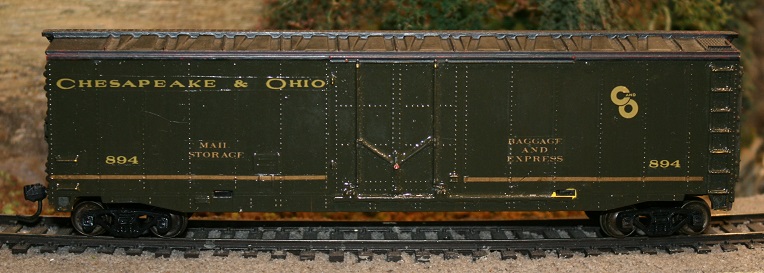
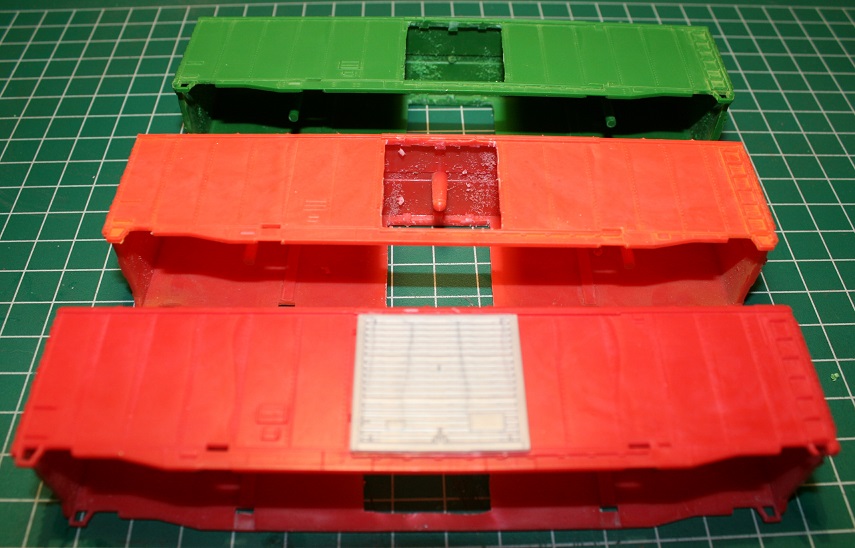
In this post I will show how I convert the Tyco plugger into a standard sliding door boxcar.
As you may have noticed, I have done this surgery to several pluggers already. The method described below is the one that I find works best. The main obstacle to installing a sliding door on the Tyco plugger is the molded on plug door detail. In order for the new sliding door to lay flat on the surface of the car, the original detail needs to be removed. I have tried using a chisel blade to gently remove the unwanted detail but I found this to be a time consuming and dangerous task (knife slips may accidentally damage detail you want to keep). The technique described below is the fastest and safest means of removing the unwanted plug door detail.
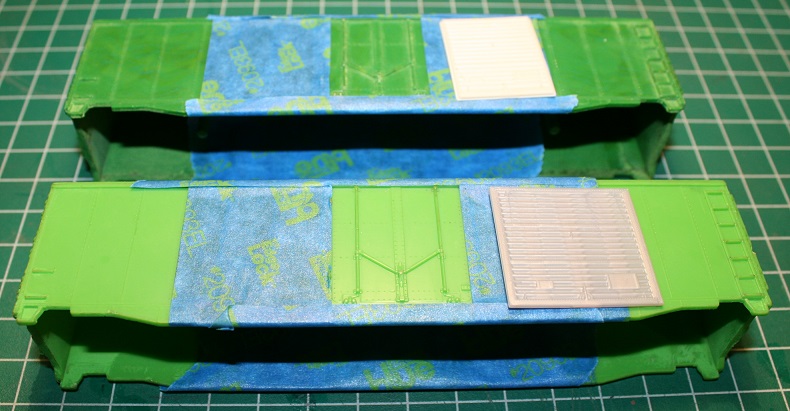
This first photo shows the aftermarket sliding doors I plan on installing on my cars. Note that there are two different sizes (8 foot wide and 10 foot wide) of doors....

The first step is to use masking tape to mark your cut lines, be sure to avoid removing more material than your replacement door will cover...
Once you have your tape marking your cut lines in place, use a Dremmel Tool to cut along the edges....
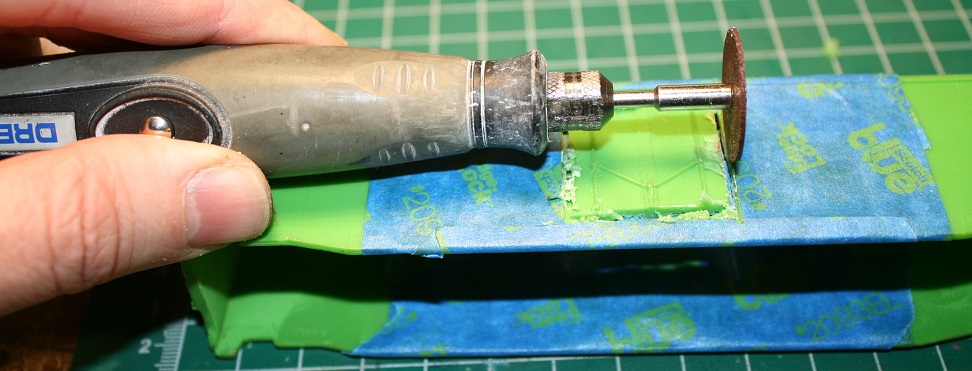
Be careful not to cut to close to the corners with the Dremmel tool or you may accidentally cut to far into the shell. To remove the old door from the shell without accidentally cutting away to much, finish the cut with a jig saw blade....
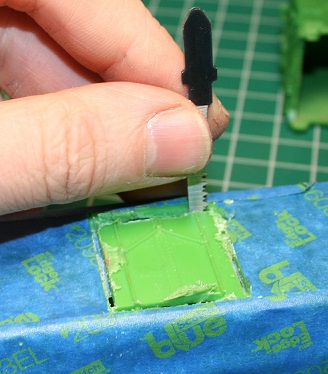
When the initial cuts are completed and the original door is removed you end up with a rough opening...

At this point you may remove the masking tape and clean up the edges of the door opening with a hobby knife...
I prefer to model my cars with the doors closed so this is as far as I go with the new door opening, a model of a car with an open door would require making the edges of the opening as "true" as possible.
In the next post we will attach the new sliding doors on the shells and extend the door tracks to accommodate the 10 foot sliding door. Stay tuned.
Proudly keeping Tyco Pluggers out of landfills since 2016
Edited by - Srenchin on February 12 2016 10:08:00 PM
|
|
Country: USA ~
Posts: 821 ~
Member Since: December 26 2009 ~
Last Visit: June 28 2026
|
Alert Moderator
|
|
|
|
Posted - February 13 2016 : 7:23:20 PM
|
After removing the original plug doors, the next step is removing the unwanted molded on detail that escaped the door removal. The picture below shows the parts that need to be gently shaved off...
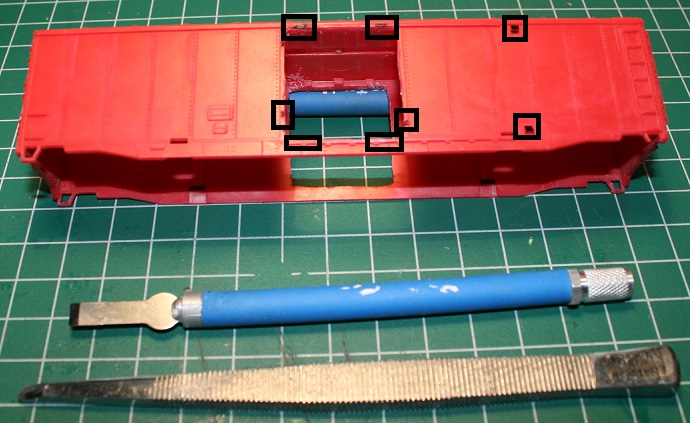
Among the items that need to be removed are the door stops on both the left and right sides of the door and the plug door rollers that are molded on the door track.
My tools of choice are a hobby knife chisel blade and a "detail chiseler" sold by Mircro Mark.
NOTE: Be very careful when removing details, a slip with a sharp chisel blade can damage the shell and possibly even hurt you!
Stand by for more posts, stay tuned....
Proudly keeping Tyco Pluggers out of landfills since 2016
|
|
Country: USA ~
Posts: 821 ~
Member Since: December 26 2009 ~
Last Visit: June 28 2026
|
Alert Moderator
|
|
|
|
Posted - February 17 2016 : 6:29:34 PM
|
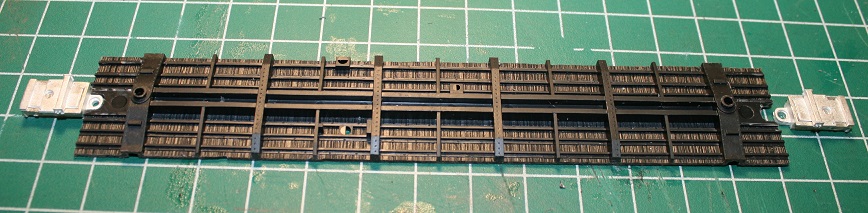
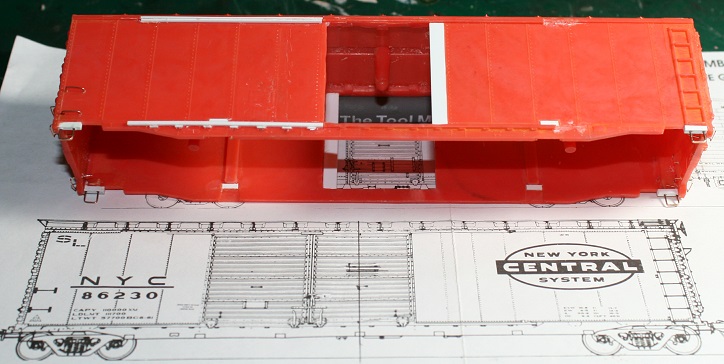
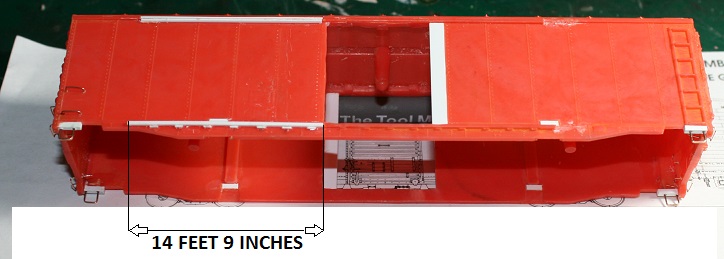
In this post I will show how I modified the Tyco plugger shell to accommodate a 10 foot sliding door.
First I must note that this modification is needed only for new doors that are greater than 9 feet wide. The detail molded onto the shell represents the hardware needed to support the 9 foot plug door represented on the model, a larger door needs a longer door track.
The first photo shows the Evergreen Scale Models styrene strip products that are needed to lengthen the door tracks....

For simplicity the photo below shows the Evergreen Scale Models product part numbers rather than the styrene strip dimensions. The product numbers used are...
1.) Item No. 100 .010 x .020"
2.) Item No. 110 .015 x .020"
3.) Item No. 131 .030 x .030"
4.) Item No. 132 .030 x .040"
5.) Item No. 153 .060 x .060"
This photo show where the different sized styrene strips are used, essentially you are extending the existing door track detail to accommodate a 10 foot door...

and this photo shows the scale length of the new door track parts....
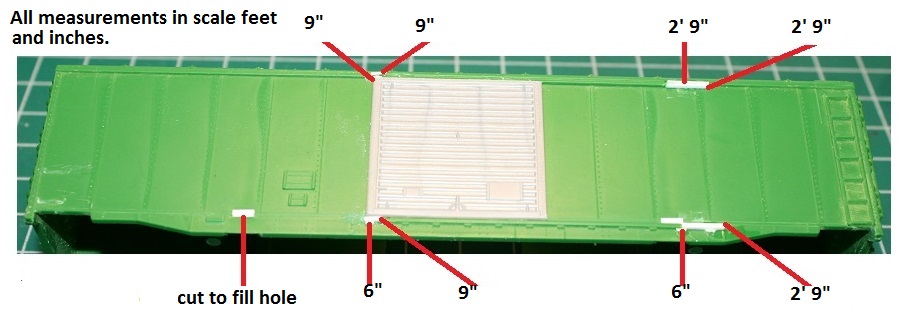
Use a sharp hobby knife to cut the material and the tiny drop of liquid plastic cement to attach the new parts to the shell. Be careful not to use more liquid cement than you need otherwise you may mare the surrounding surface of the shell.
Once the door tracks are finished, in most cases it is OK to cement the new door over the opening, however if the door is to be painted a different color than the shell it is best to paint the door separately.
Next step, add the grab irons and brake wheel then off to the paint booth!!! Stay tuned...
Proudly keeping Tyco Pluggers out of landfills since 2016
Edited by - Srenchin on February 17 2016 6:36:35 PM
|
|
Country: USA ~
Posts: 821 ~
Member Since: December 26 2009 ~
Last Visit: June 28 2026
|
Alert Moderator
|
|
|
|
Posted - February 23 2016 : 2:39:05 PM
|
"When life gives you lemons, make lemonade."
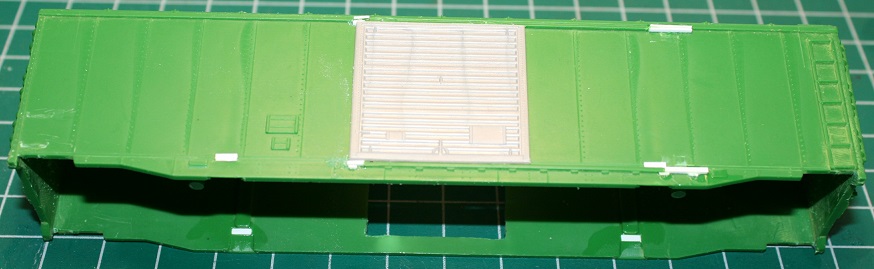
I have no idea who said that first but it's a useful metaphor for model railroading. In my last post I showed how I converted the Tyco Plugger into a single sliding door boxcar. I was not planning on trying a double door car but events conspired to force this particular conversion.
In this case I had just finished adding all the details to this particular shell when I set it aside on my work bench, a moment later I realized that I had just set it down on top of the puddle of super glue that I had been dipping my grab irons into before inserting them into their pre-drilled holes. 
At first I was going to write this shell off as a loss, the marred side was impossible to fix. Then I realized that if I converted the shell for double doors I could hide the blemish and salvage all my work. The photos below show the revised door tracks to accommodate two 8 foot doors. Use the same materials listed in my last post about modifying the door tracks.
The vertical strip of styrene was added to reduce the size of the door opening, I was originally going to add a single 10 foot door to the shell before my work bench accident. Stay tuned for more posts...
Proudly keeping Tyco Pluggers out of landfills since 2016
Edited by - Srenchin on February 23 2016 11:15:26 PM
|
|
Country: USA ~
Posts: 821 ~
Member Since: December 26 2009 ~
Last Visit: June 28 2026
|
Alert Moderator
|
|
|
|
Posted - February 23 2016 : 2:45:21 PM
|
You know, if you're not making the sliding doors operate, why do you go to the trouble of cutting the plug doors out instead of just shaving and sanding the original door detail away? Just wondering.
Another question: Will a Tyco truck still plug into a bolster if the height-spacer ring has been shaved down?
Feedback-hungry attention w****
|
|
Country: USA ~
Posts: 750 ~
Member Since: December 05 2015 ~
Last Visit: January 24 2024
|
Alert Moderator
|
|
|
|
Posted - February 23 2016 : 3:08:50 PM
|
quote:You know, if you're not making the sliding doors operate, why do you go to the trouble of cutting the plug doors out instead of just shaving and sanding the original door detail away? Just wondering.
Another question: Will a Tyco truck still plug into a bolster if the height-spacer ring has been shaved down?
Originally posted by ZeldaTheSwordsman - February 23 2016 : 2:45:21 PM
|
In a previous post I mentioned that I prefer to cut the old plug door out because it is faster and easier than trying to shave the cast on details off with a chisel.
Your second question is an interesting one, the original Tyco truck may still work on a trimmed bolster assuming you remove the truck's coupler pocket to allow for clearance between the truck and car floor. The biggest problem you may run into is excessive play between the truck bolster and frame bolster, this could lead to excessive wobbling during operation.
Proudly keeping Tyco Pluggers out of landfills since 2016
Edited by - Srenchin on February 23 2016 3:09:27 PM
|
|
Country: USA ~
Posts: 821 ~
Member Since: December 26 2009 ~
Last Visit: June 28 2026
|
Alert Moderator
|
|
|
|
Posted - February 23 2016 : 7:28:29 PM
|
quote: quote:You know, if you're not making the sliding doors operate, why do you go to the trouble of cutting the plug doors out instead of just shaving and sanding the original door detail away? Just wondering.
Another question: Will a Tyco truck still plug into a bolster if the height-spacer ring has been shaved down?
Originally posted by ZeldaTheSwordsman - February 23 2016 : 2:45:21 PM
|
In a previous post I mentioned that I prefer to cut the old plug door out because it is faster and easier than trying to shave the cast on details off with a chisel.
Your second question is an interesting one, the original Tyco truck may still work on a trimmed bolster assuming you remove the truck's coupler pocket to allow for clearance between the truck and car floor. The biggest problem you may run into is excessive play between the truck bolster and frame bolster, this could lead to excessive wobbling during operation.
Originally posted by Srenchin - February 23 2016 : 3:08:50 PM
|
Fair enough on the first point.
I think the original truck sans coupler pocket might be worth at keast trying, if it works out that should save you some effort at the very least.
Feedback-hungry attention w****
|
|
Country: USA ~
Posts: 750 ~
Member Since: December 05 2015 ~
Last Visit: January 24 2024
|
Alert Moderator
|
|
|
|
Posted - February 23 2016 : 9:39:12 PM
|
I discovered today that the Tyco plugger can be converted into a welded car! Check out my latest rebuild project...
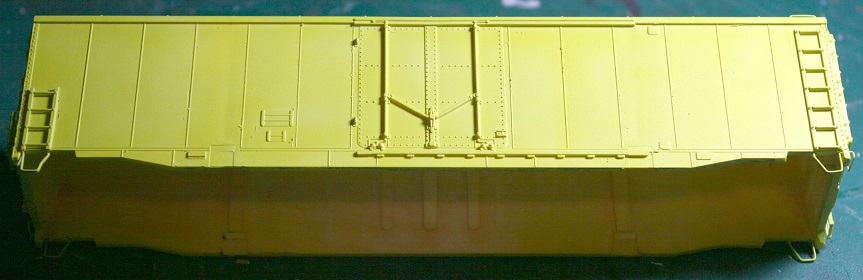
Turns out that it is possible to remove the rivet detail by carefully shaving them off with a hobby knife chisel blade. I was concerned that the chisel would leave tell tale gouges in the plastic but the blemishes disappear when the shell is painted.
This shell is among four I am going to paint as CNW insulated boxcars, stay tuned...
Proudly keeping Tyco Pluggers out of landfills since 2016
Edited by - Srenchin on February 24 2016 12:25:44 PM
|
|
Country: USA ~
Posts: 821 ~
Member Since: December 26 2009 ~
Last Visit: June 28 2026
|
Alert Moderator
|
|