|
|
 Posted - October 28 2015 : 3:16:17 PM Posted - October 28 2015 : 3:16:17 PM


|
cream for cab interior
catfordken
if you cannot see the light at the end of the tunnel,try turning around
|
Country:  United Kingdom ~
Posts: 8294 ~
Member Since: September 28 2006 ~
Last Visit: October 20 2021 United Kingdom ~
Posts: 8294 ~
Member Since: September 28 2006 ~
Last Visit: October 20 2021
|
 Alert Moderator

|
|
|
|
Posted - October 28 2015 : 8:25:28 PM
|
| Interesting. I just Googled cream and there's a pretty wide range of hues and tints to choose from.
|
Country:  USA ~
Posts: 2087 ~
Member Since: March 16 2013 ~
Last Visit: July 05 2018 USA ~
Posts: 2087 ~
Member Since: March 16 2013 ~
Last Visit: July 05 2018
|
Alert Moderator
|
|
|
|
Posted - October 28 2015 : 11:13:36 PM
|
Here in the U.S., most cabs I've been in have been painted light green on the walls and ceiling. The floors are typically black as is the backhead of the boiler.
In the pictures I could dig up of 1860's locomotives, Leviathan and E&P 4 have varnished wood cab interiors.
Carpe Manana!
|
|
Country: USA ~
Posts: 2418 ~
Member Since: September 17 2013 ~
Last Visit: July 12 2026
|
Alert Moderator
|
|
|
|
Posted - October 29 2015 : 12:25:18 AM
|
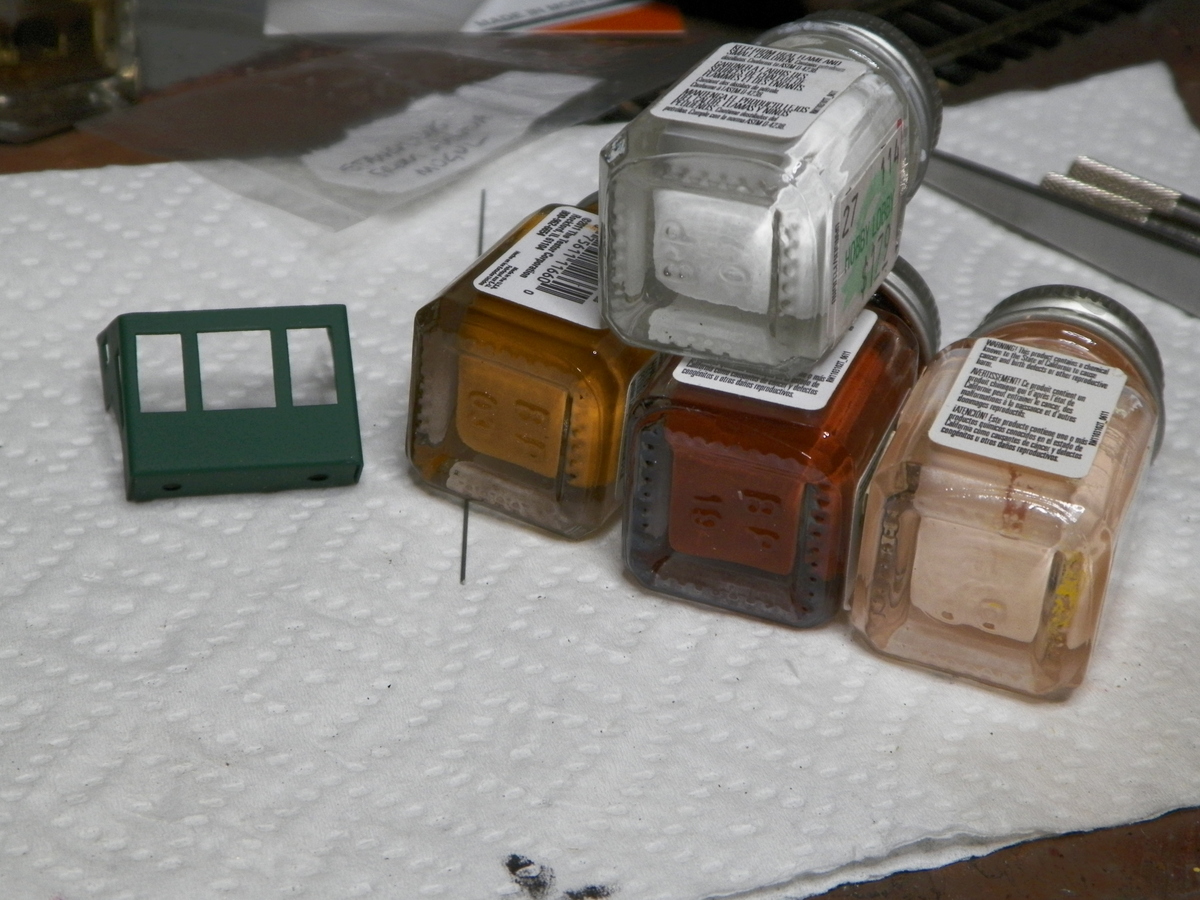
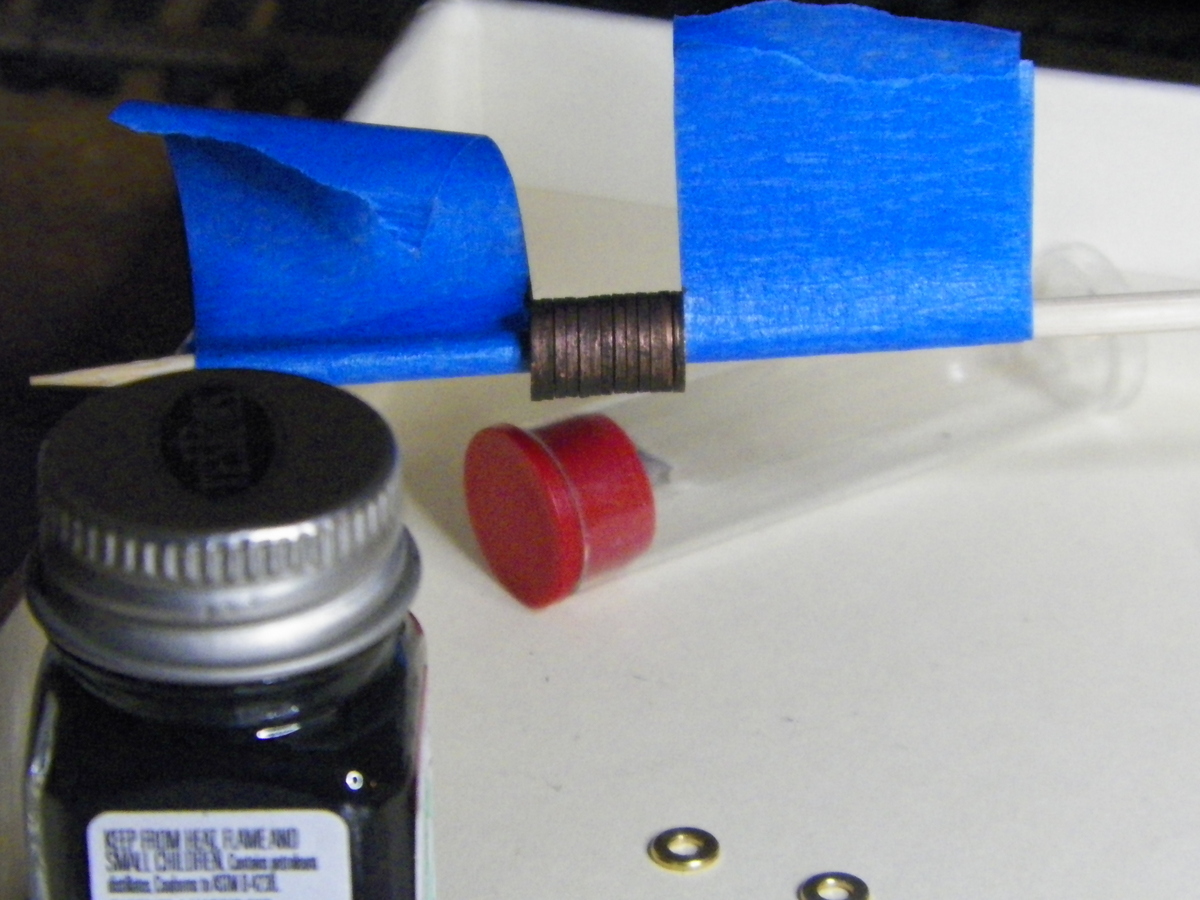
I've heard that about green cab interiors Don, and I think I've typically painted my cab interiors a light or medium green. In this case, with the exterior already a tone of green, I'm thinking I need a bit more contrast. I was thinking about trying to mimic wood for this one, and I imagine you could go so far as to panel the entire cab inside and out with something pretty thin. That idea of cream intrigues me, though and I've mixed up a bit out of the colors in the photo below. I didn't get a picture of it yet, but I did apply some to some scrap metal to see what it looks like when it dries. It could be interesting to see how that "lights up" a cab interior, but, as my mother might say "that's gonna show the dirt", Ha! I haven't ruled out going with the "rust" color, for whatever appearance that might present (the rust color I'm thinking of is the bottle in the middle below the white).
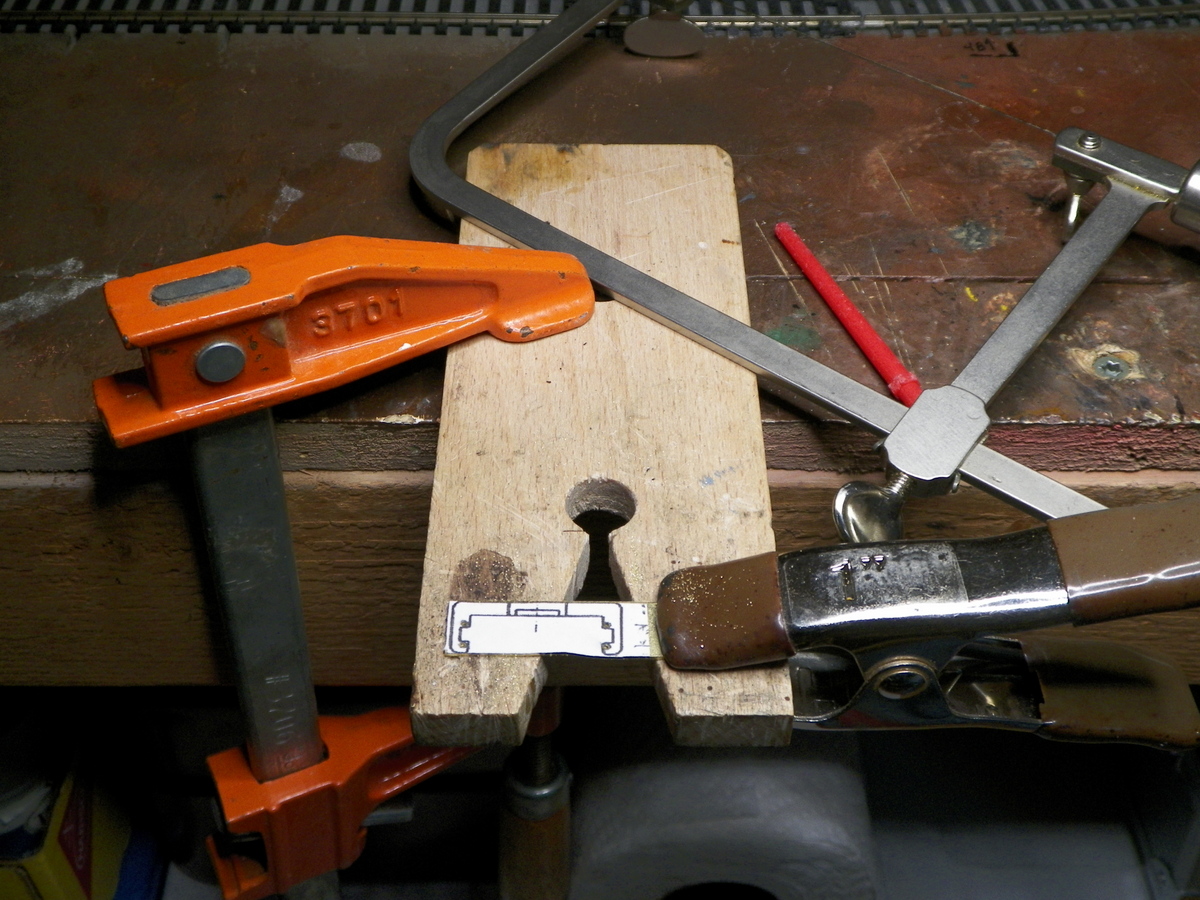
Did some work on the handrails. I found it best for me to cut the stanchions from the mold stuff using a jewelers saw. Fine blade allows pretty fair control (since those things are so tiny). I cut them about 2/3 of the way through and then hold them while I bend them off . . . as opposed to cutting it all the way and having it drop to the floor where I'll never find it.
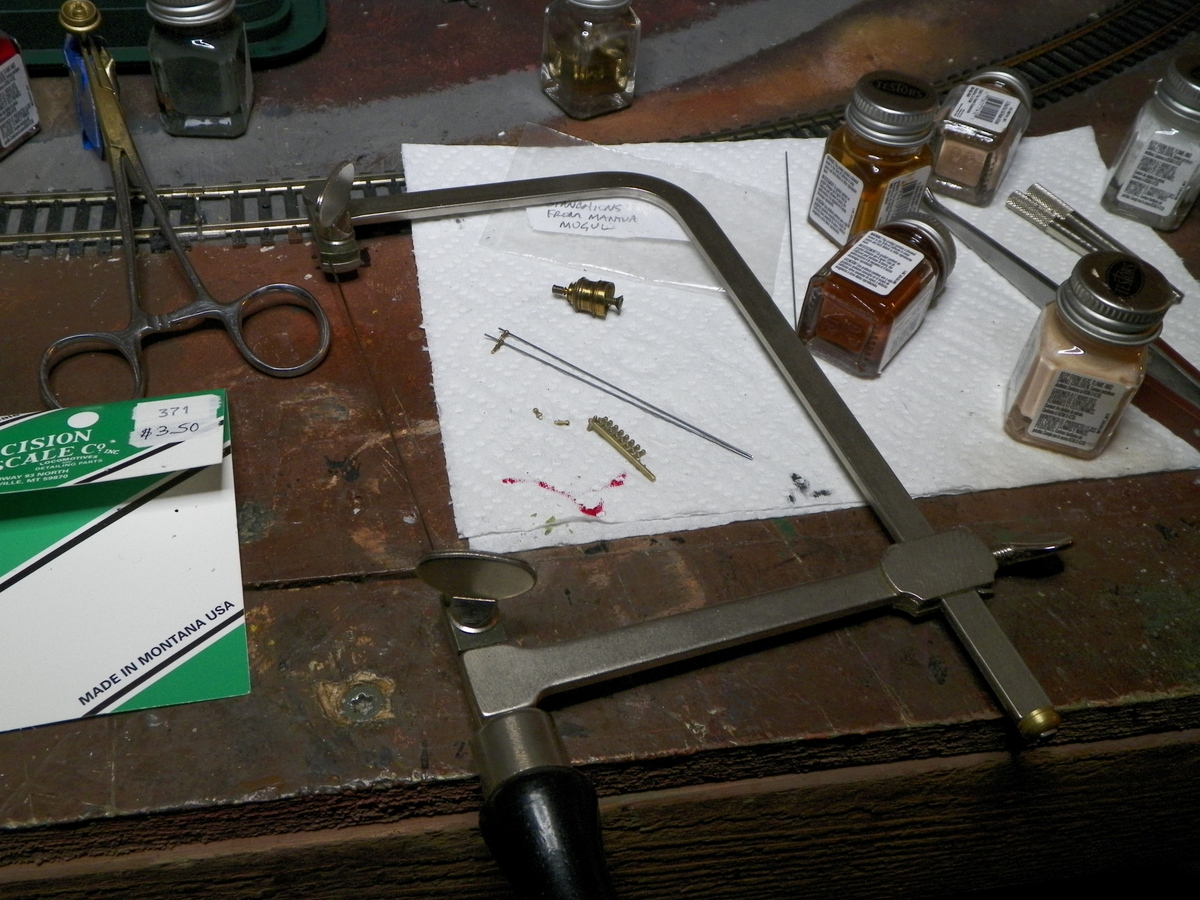
Then I'll keep the wire through them to help place them while gluing. Otherwise, I'll make a mess with the glue trying to get the eyelets all line up by "eye". I was thinking of gluing them before painting and having them match the boiler. But with the boiler being Russian iron, I'm not sure the stanchions would have been made from the same. Also, with all the "decoration" that was present on this era of locomotive, I'm thinking maybe brass handrails wouldn't be out of line ? ? ?
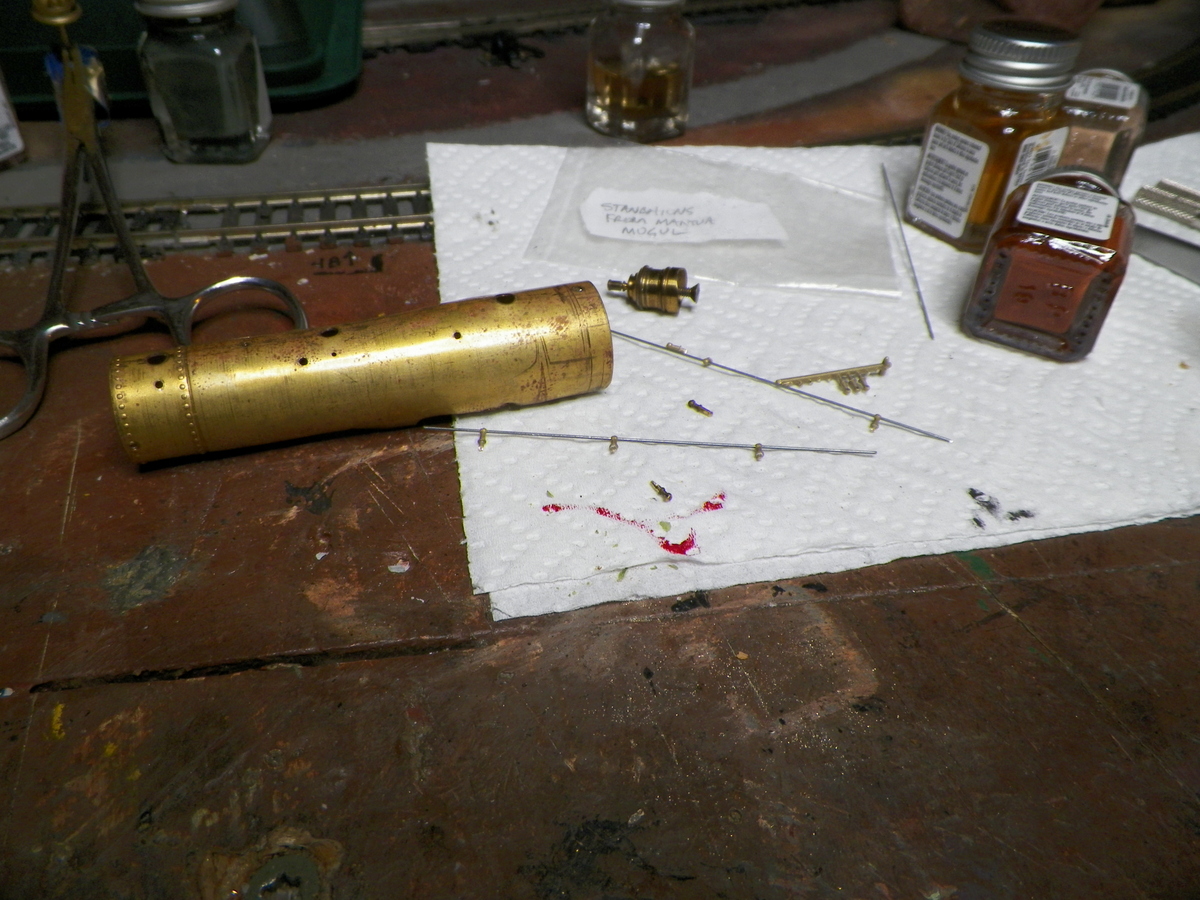
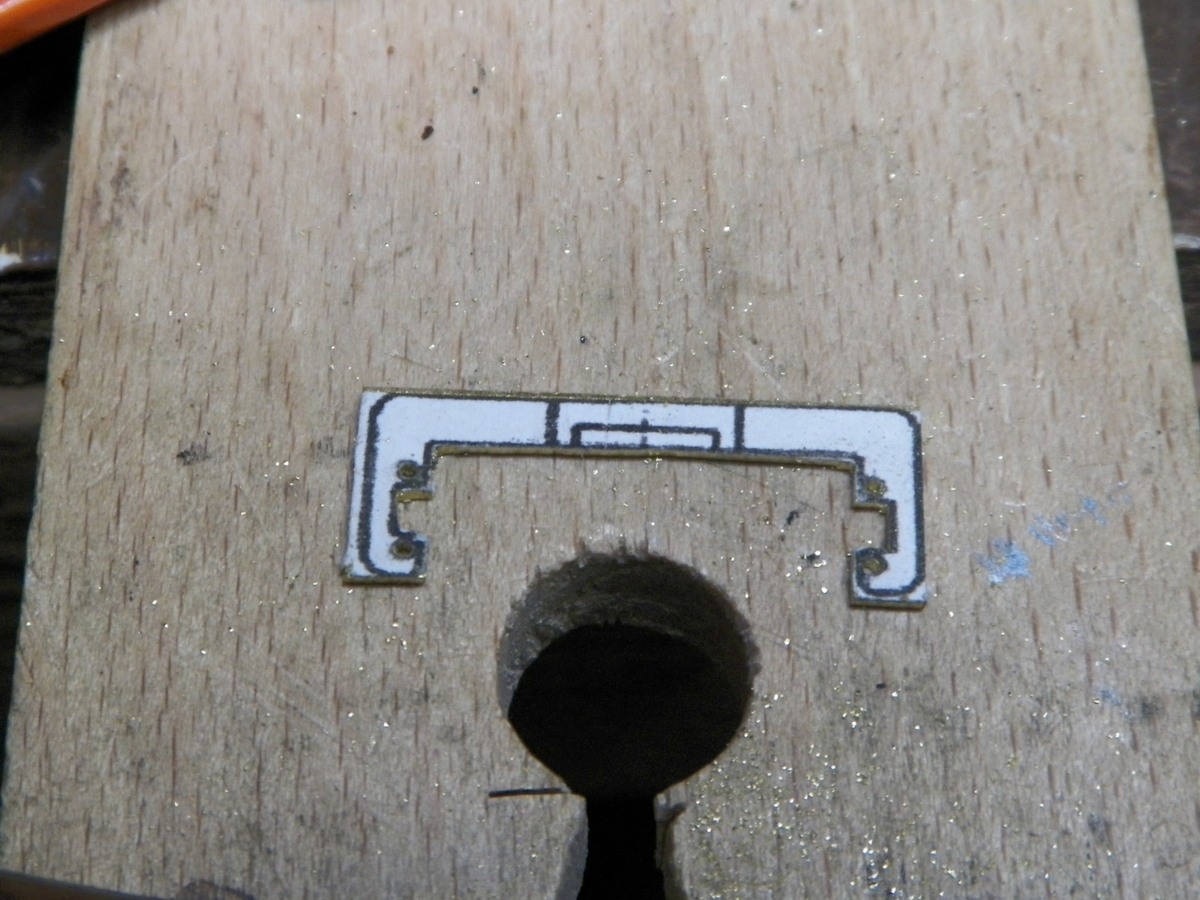
I'm considering using stanchions for the handrails/grab irons on the tender. I think that also might add to the decorum of an 1860's loco. The catch I see here is waiting for a month to get shorter stanchions than what you see in the photo below. They make some that are just a 1/2 mm shorter which I think would look more to scale. I'm going to try the LHS, though, and see, if by a stroke of luck they happen to have them. I can also see in this photo, that those tiny little things are going to need some clean up of the mold lines running down the sides.
|
|
Country: USA ~
Posts: 2087 ~
Member Since: March 16 2013 ~
Last Visit: July 05 2018
|
Alert Moderator
|
|
|
|
Posted - October 29 2015 : 08:28:33 AM
|
I think you're right about the handrails not matching Russia iron. Russia Iron is a kind of oxidation like blued steel. It would be highly unlikely that the railings could match. Brass hand rails are fairly common, generally, and very common on the old 4-4-0's.

It's hard to see from this angle, but the railings on the tender are also brass.
I think the owners of the old-style 4-4-0's buy Brasso by the bucket. 
Carpe Manana!
|
|
Country: USA ~
Posts: 2418 ~
Member Since: September 17 2013 ~
Last Visit: July 12 2026
|
Alert Moderator
|
|
|
|
Posted - October 29 2015 : 11:16:14 AM
|
| Good photo Don. Thanks. I always wonder about those brass boiler bands, though. Do you think they did that routinely on locomotives manufactured in the 1860-1870 era? Do you think they would ever use Russian iron bands on a Russian iron boiler? Reason I ask, is that I don't have the proper width strip brass and I've been thinking of doing the bands using something like pin-striping tape, and then, with the boiler and the bands painted, the bands would stand out in "relief". ? ? ?
|
|
Country: USA ~
Posts: 2087 ~
Member Since: March 16 2013 ~
Last Visit: July 05 2018
|
Alert Moderator
|
|
|
|
Posted - October 29 2015 : 11:17:49 AM
|
| And, like the brass steam chests in the photo . . . do you think that was common? Or were those restoring the locomotive a bit over-zealous with their décor?
|
|
Country: USA ~
Posts: 2087 ~
Member Since: March 16 2013 ~
Last Visit: July 05 2018
|
Alert Moderator
|
|
|
|
Posted - October 29 2015 : 12:48:50 PM
|
I was just looking at a picture of Union Pacific Locomotive 119. It has brass boiler bands on a Russia Iron boiler jacket, so we know that would look authentic.
UP 119 appeared at the Gold Spike Ceremony across from Central Pacific's Jupiter. It was not originally supposed to be there, but was borrowed when the engine pulling the dignitaries could not safely cross a damaged bridge. This means it was not especially decorated for the ceremony, and according to what I was told at the Gold Spike Monument, it was even a freight engine. Even so, it is more ornate than the Sistine Chapel, indicating that even workaday engines were fancy in 1869.
Leviathan, the engine in my previous posting is a replica of a sister engine to the Jupiter and was contemporary to Jupiter and 119, so we should assume that it was likewise incredibly ornate. In short, I think today's Leviathan is authentic and not overdone for what it represents.
Carpe Manana!
|
|
Country: USA ~
Posts: 2418 ~
Member Since: September 17 2013 ~
Last Visit: July 12 2026
|
Alert Moderator
|
|
|
|
Posted - November 01 2015 : 12:35:58 PM
|
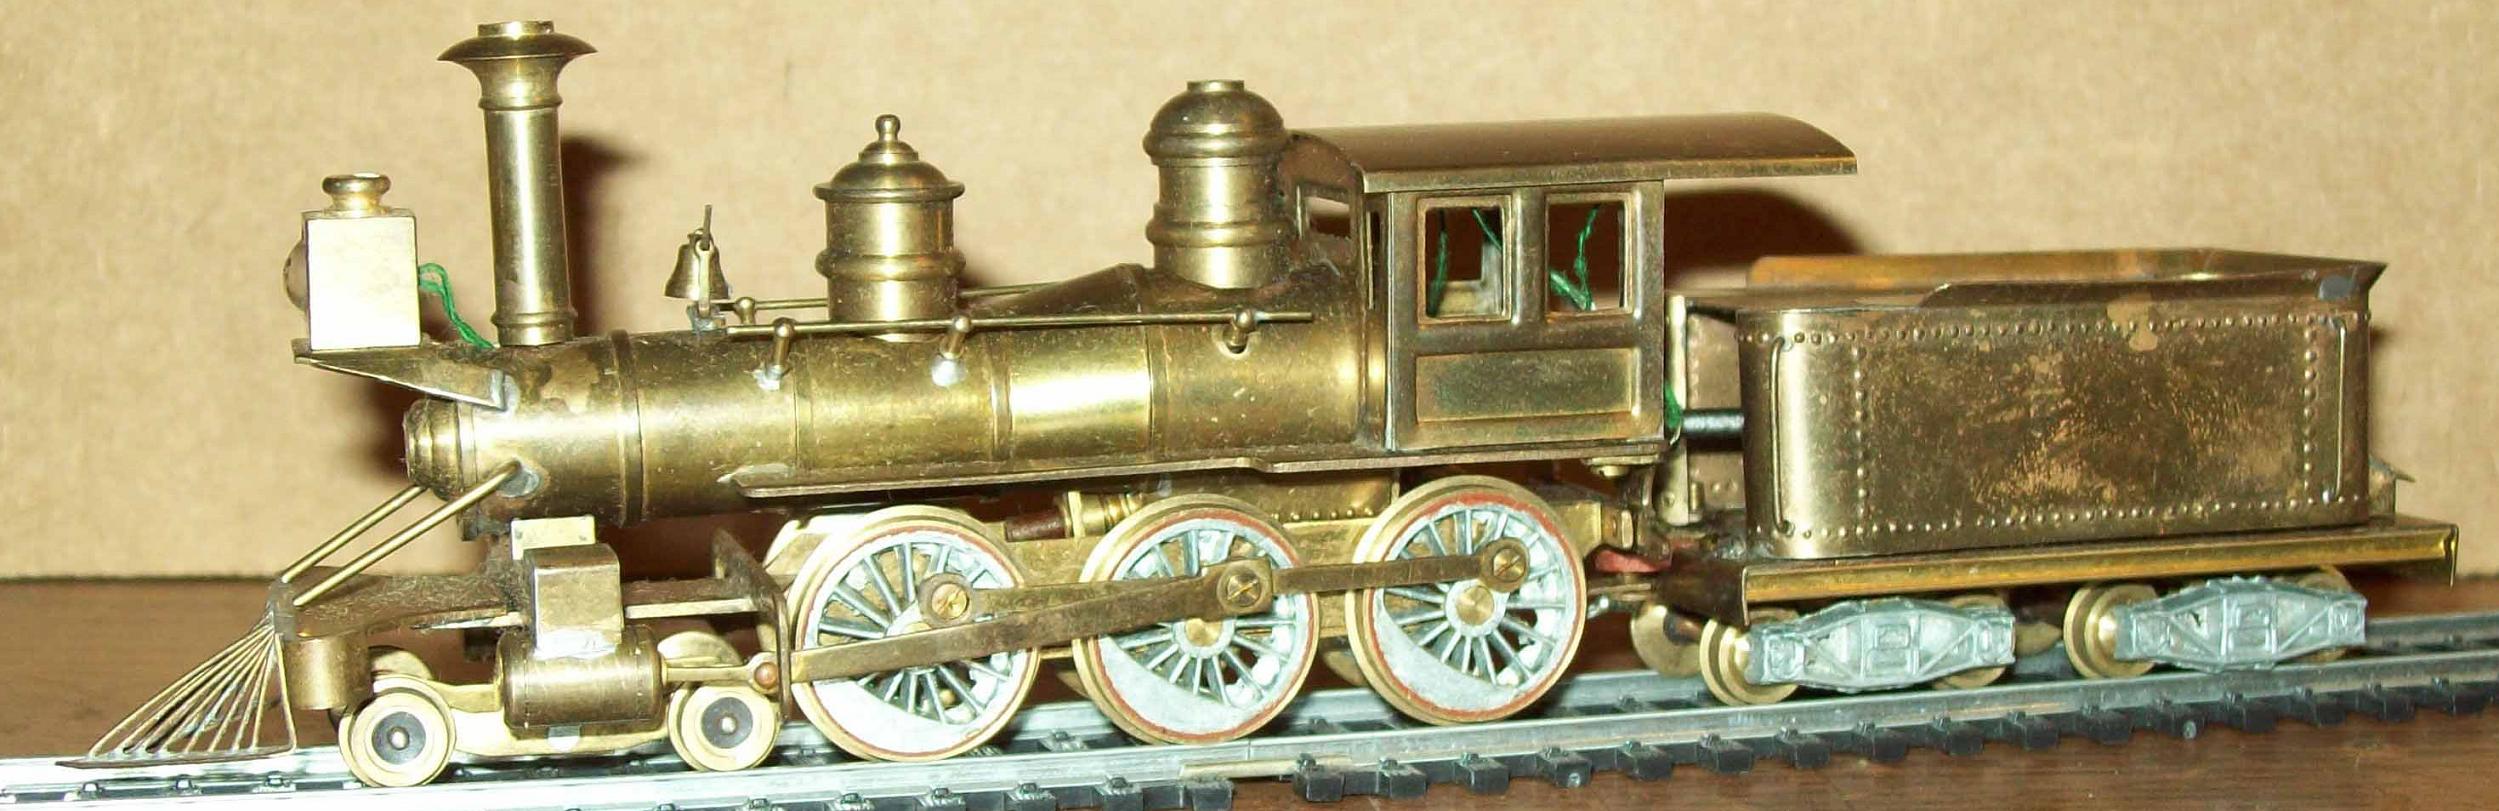
I'm going to start today's note with a few photos that Don turned me on to from this link on the Tyco Forum http://www.tycoforums.com/tyco/forum/topic.asp?TOPIC_ID=9491 . . .

We've been talking about boiler bands and boiler jackets. Boiler jackets is a new concept to me (still have very much to learn about steam locomotives). If I do them, as Mantua intended, with brass strip, I would prefer to use 1mm wide brass strip which would scale down to just a couple, three inches . . . as opposed to the ones that came with the original Mogul I got and are probably a scale 9 inches. I'd thought about using pin-striping tape and then just painting over it, but after looking at a bunch of 1870 era photos, there are many of those photos where the band is barely visible; maybe only a slight change in the tint or hue that reveals there may be a band. And, even some that appeared not to have bands ? ? ? No boiler jacket ? So . . . I may even forego the bands ?
I did some painting. In the past, I've used "graphite" for the smoke box. This time I just used the flat black spray and I kind of like it. While the graphite maybe is suppose to give the look of cast iron, I'm thinking now that might be a bit of overkill ?
Spent an hour or so cleaning paint from the journals and axles and wheel rims so that they might conduct electricity after my slapping paint on them . . . all the while wondering why I didn't spend time doing some masking. Slow learner.
Started some assembly again (now that pilot mounting repair and guide yoke repair have been done . . . hope they work) . . .
I've been playing around with tones of brown and overlay contrasting brush strokes to see if I might arrive at a reasonable representation of "rich wood" for the cab interior. Nothing I'm sold on yet, and I do remain intrigued by Ken's suggestion of cream color for the cab interior. That could highlight things with the motor heart of the locomotive and might be right in-line with "tin-plate" colors. As much as my imagination let's me enjoy the era of steam locomotives, it also lets me enjoy the era of this particular type and quality of toy/model. Whatever.
I did find (I believe; know for sure when they arrive) some short stanchions to use for the tender grab irons and hand rails.
Happy Sunday!
|
|
Country: USA ~
Posts: 2087 ~
Member Since: March 16 2013 ~
Last Visit: July 05 2018
|
Alert Moderator
|
|
|
|
Posted - November 02 2015 : 12:24:22 AM
|
Keep it coming. It's enjoyable to watch, not only the project but the thought process unfold.
Carpe Manana!
|
|
Country: USA ~
Posts: 2418 ~
Member Since: September 17 2013 ~
Last Visit: July 12 2026
|
Alert Moderator
|
|
|
|
Posted - November 02 2015 : 12:23:03 PM
|
|
|
Country: USA ~
Posts: 2087 ~
Member Since: March 16 2013 ~
Last Visit: July 05 2018
|
Alert Moderator
|
|
|
|
Posted - November 02 2015 : 12:25:15 PM
|
not much to say,other than a great standard of modeling
catfordken
if you cannot see the light at the end of the tunnel,try turning around
|
|
Country: United Kingdom ~
Posts: 8294 ~
Member Since: September 28 2006 ~
Last Visit: October 20 2021
|
Alert Moderator
|
|
|
|
Posted - November 02 2015 : 12:30:15 PM
|
| . . . or a social misfit that spends way too much time in the attic.
|
|
Country: USA ~
Posts: 2087 ~
Member Since: March 16 2013 ~
Last Visit: July 05 2018
|
Alert Moderator
|
|
|
|
Posted - November 03 2015 : 8:02:12 PM
|
Things are coming along and I'm fantasizing what this thing may look like. Got some cream color and I'm looking forward to seein' how that looks in the cab. So I assemble the side rods and get binding and not the "rolling freely" . . . now after a couple hours of gently filing on the bearings and side rod mounting holes, to "free" the movement up, I believe it is now rolling freely. I think by the time I get this locomotive assembled and running, I'll have an idea how to assemble a Belle . . . and maybe in the appropriate order . . . instead of . . . paint . . . assemble . . . disassemble for repair or adjust . . . repeat .
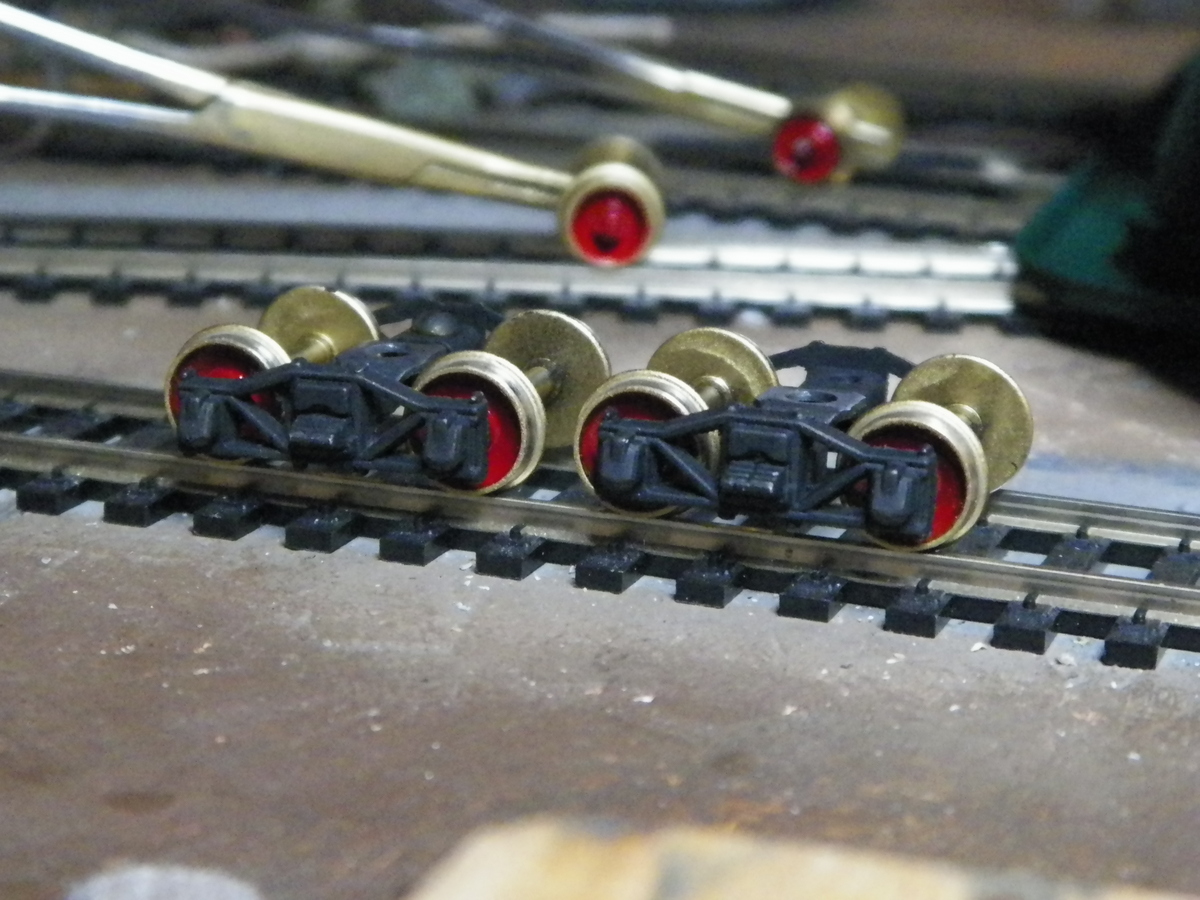
Then, I'm getting the tender trucks and coupler on and liking that, but set the tender body on and it really rocks side to side; the mounting holes in the later model Tyco/Mantua arch bar trucks I'm using have a pretty large bolster mounting hole, compared to the earlier stuff . . . so need to get creative with some spacers before the tender is functional . . .

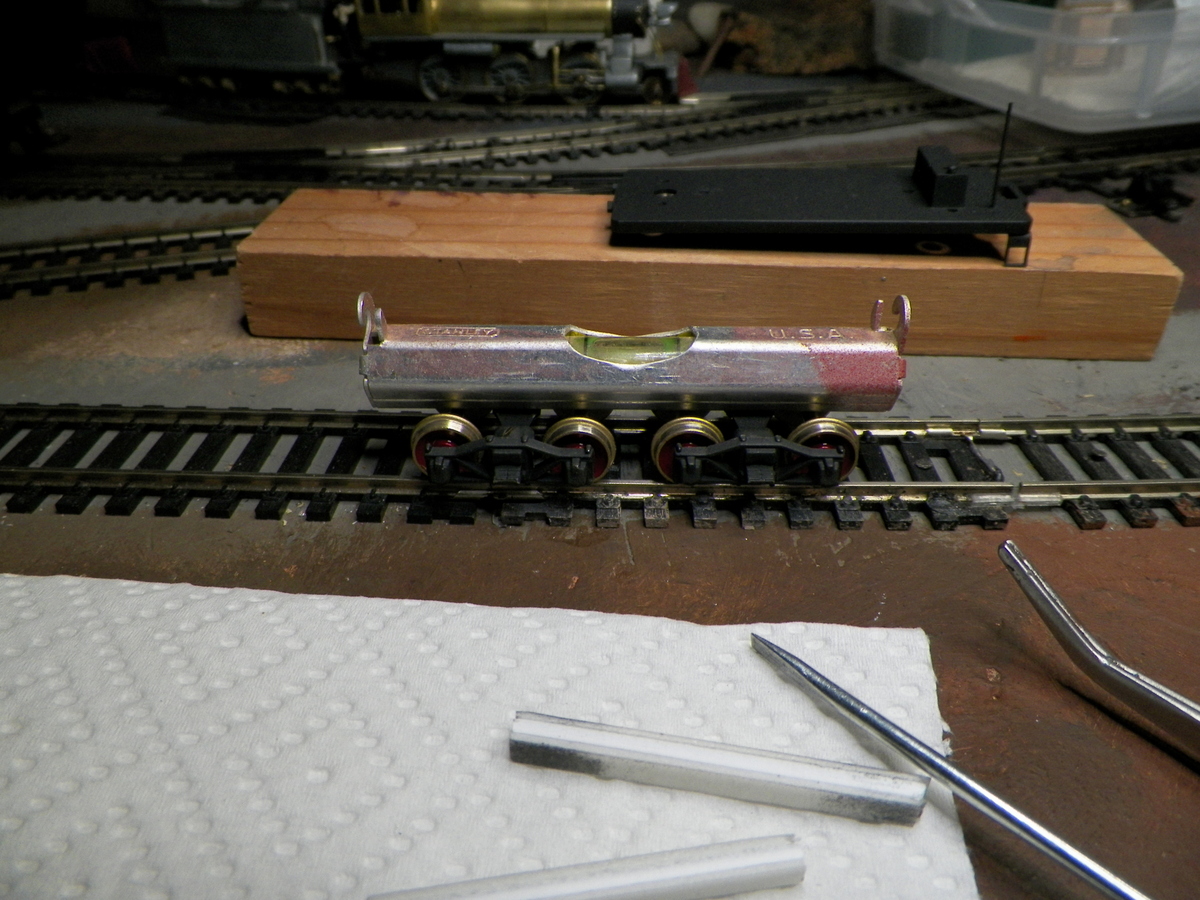
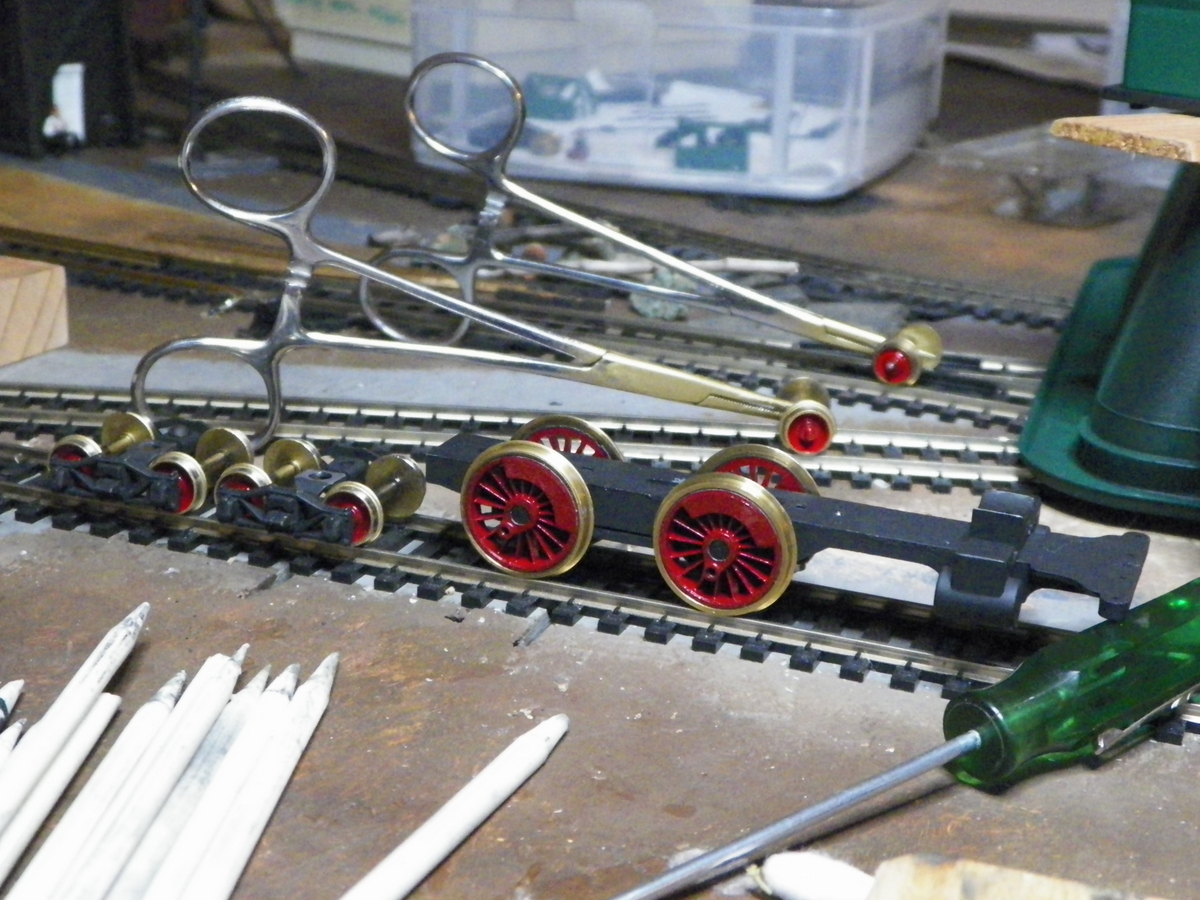
This probably looks pretty crazy (could be fun to build a "grade" measuring car ?), but I'd messed with these trucks so much, I wanted to try and make sure they were about the same for mounting depth.
Lastly, as long as I'm sort of back at the beginning with the running gear, I'm going to make a different guide bar yoke. The mounting lug for this one never held well. I believe, with a yoke made as intended, that will sit solid on the frame, I can try Don's suggestion of hooking it down with some sort of "U" clamp holding it down.
|
|
Country: USA ~
Posts: 2087 ~
Member Since: March 16 2013 ~
Last Visit: July 05 2018
|
Alert Moderator
|
|
|
|
Posted - November 04 2015 : 11:13:10 PM
|
Glued the pattern for the guide bar yoke to the metal yesterday. I like to think that letting it "cure" makes the pattern a bit more durable, but that's likely an illusion.
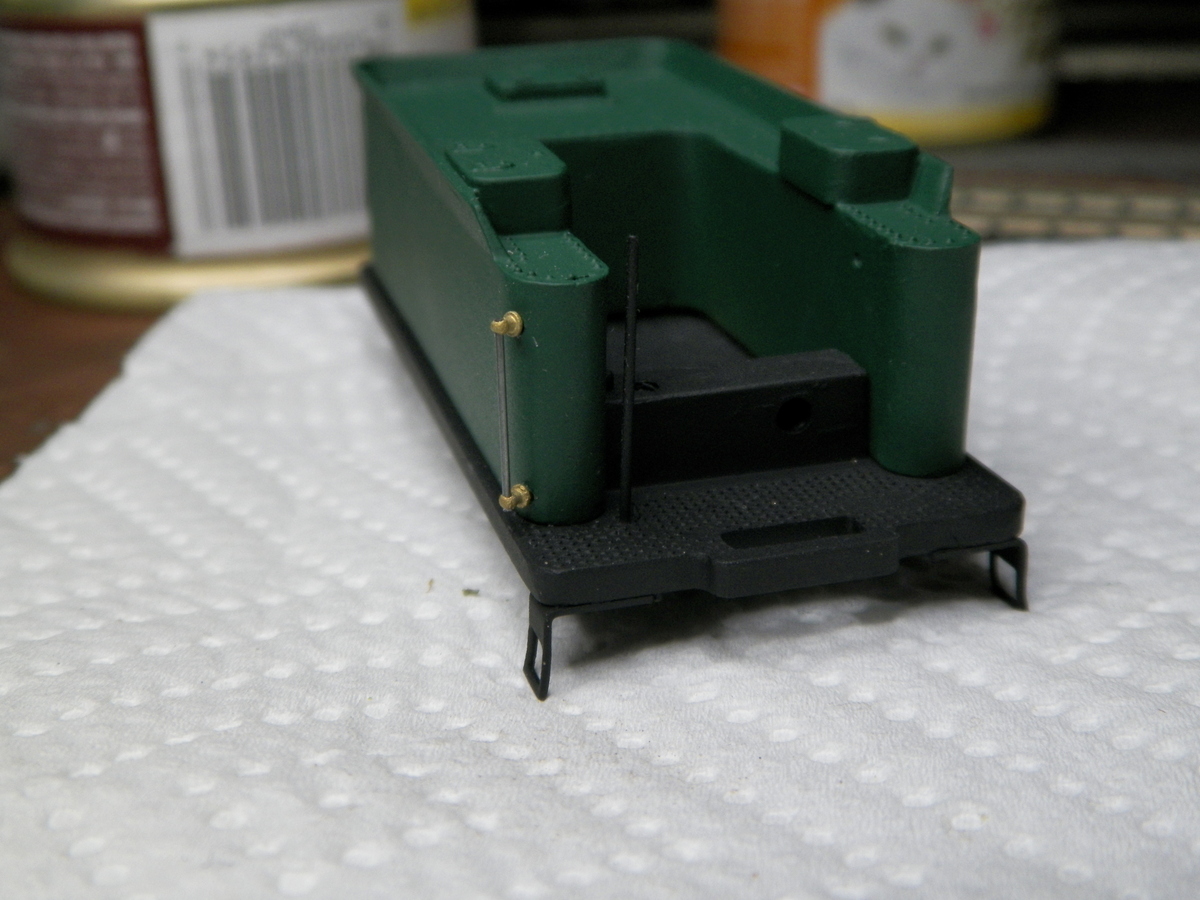
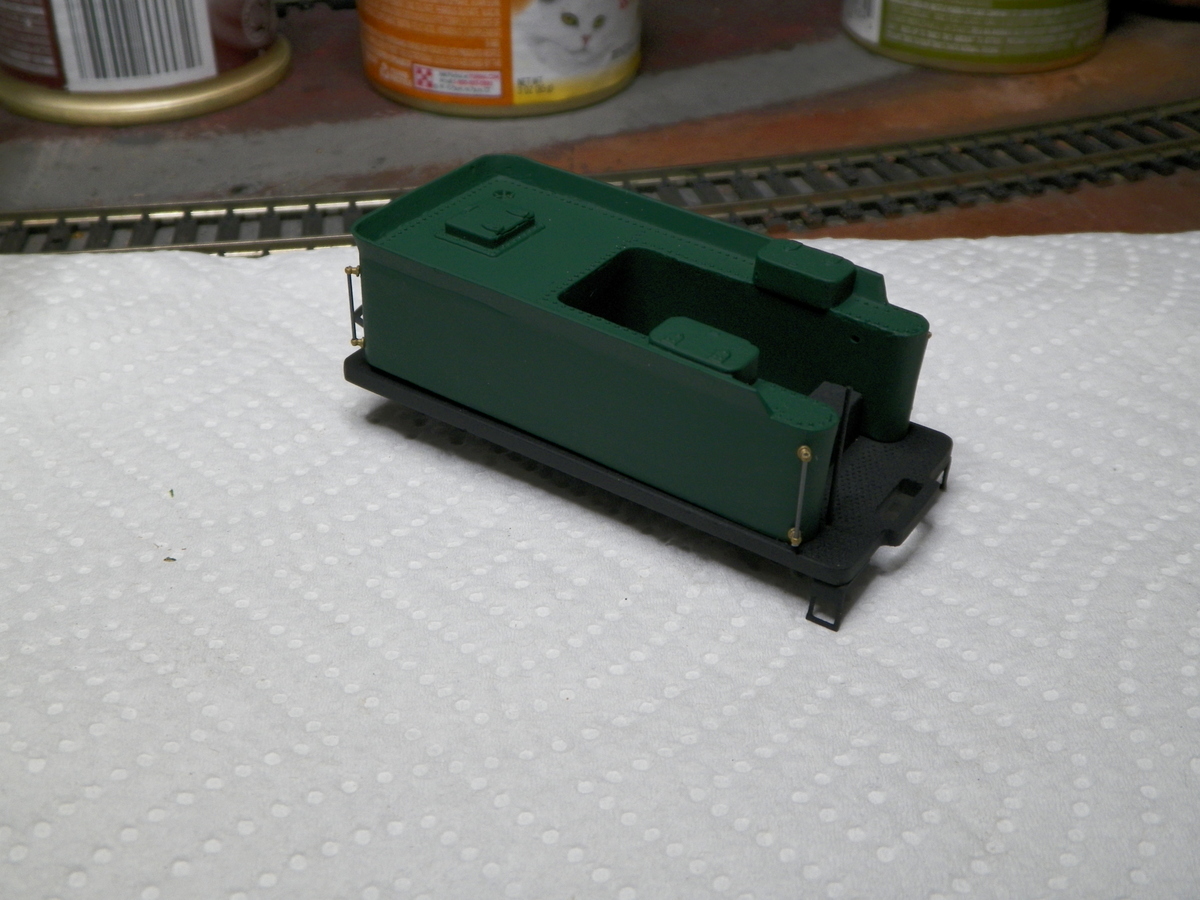
Put an initial coat of cream on the cab interior and "rust" on the cab ceiling . . .
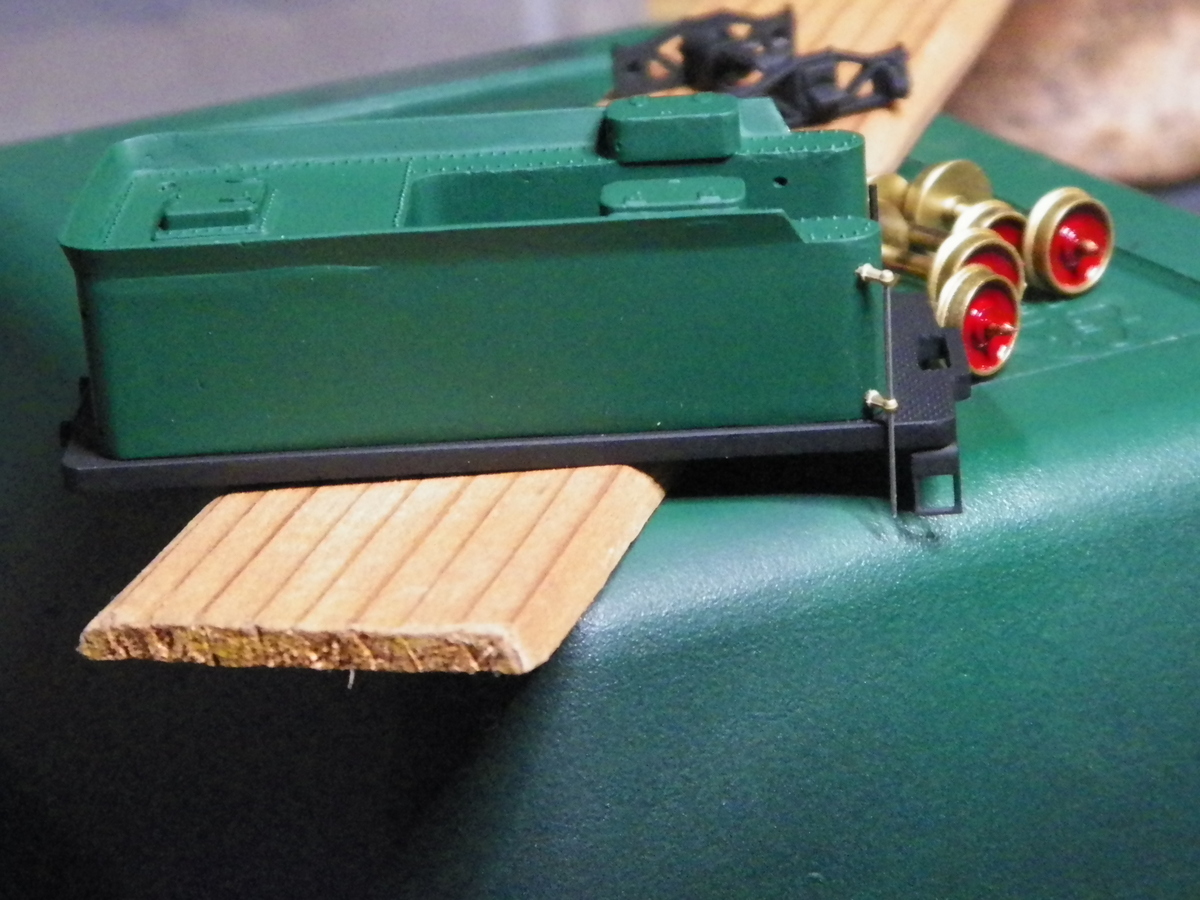
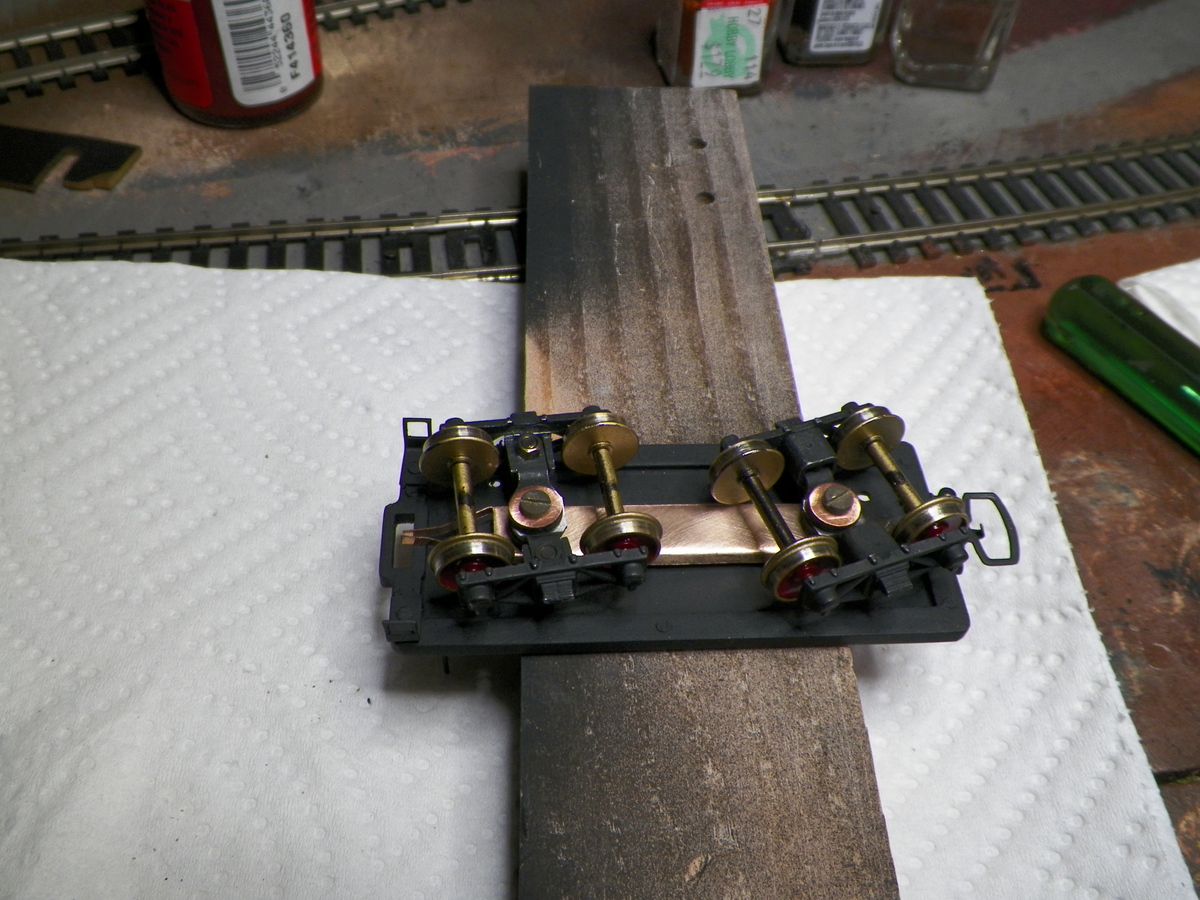
Found some copper washers (#4) that seem a pretty good size for the truck mounting screws of the tender. Needed something that would contain the screw better than the "large" mounting hole of the later model Tyco/Mantua trucks. These #4's have an inside diameter just a bit larger than the truck mounting screws and seem to have a large enough outside diameter to keep the tender from rocking side to side (quite drastically it was). A little flat black to make them feel more comfortable on the darkside . . . be interesting to see if they aid conduction since copper is suppose to be quite a bit more conductive than brass . . .
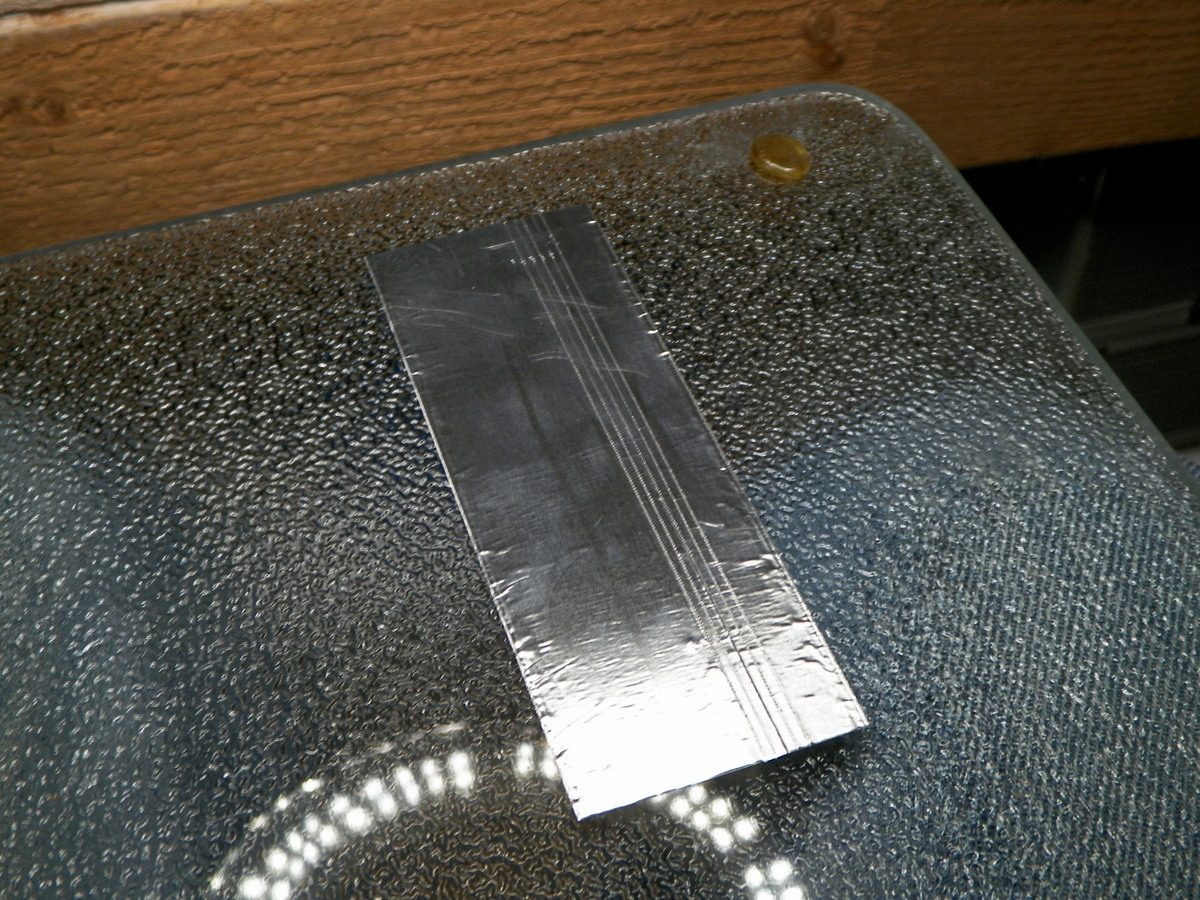
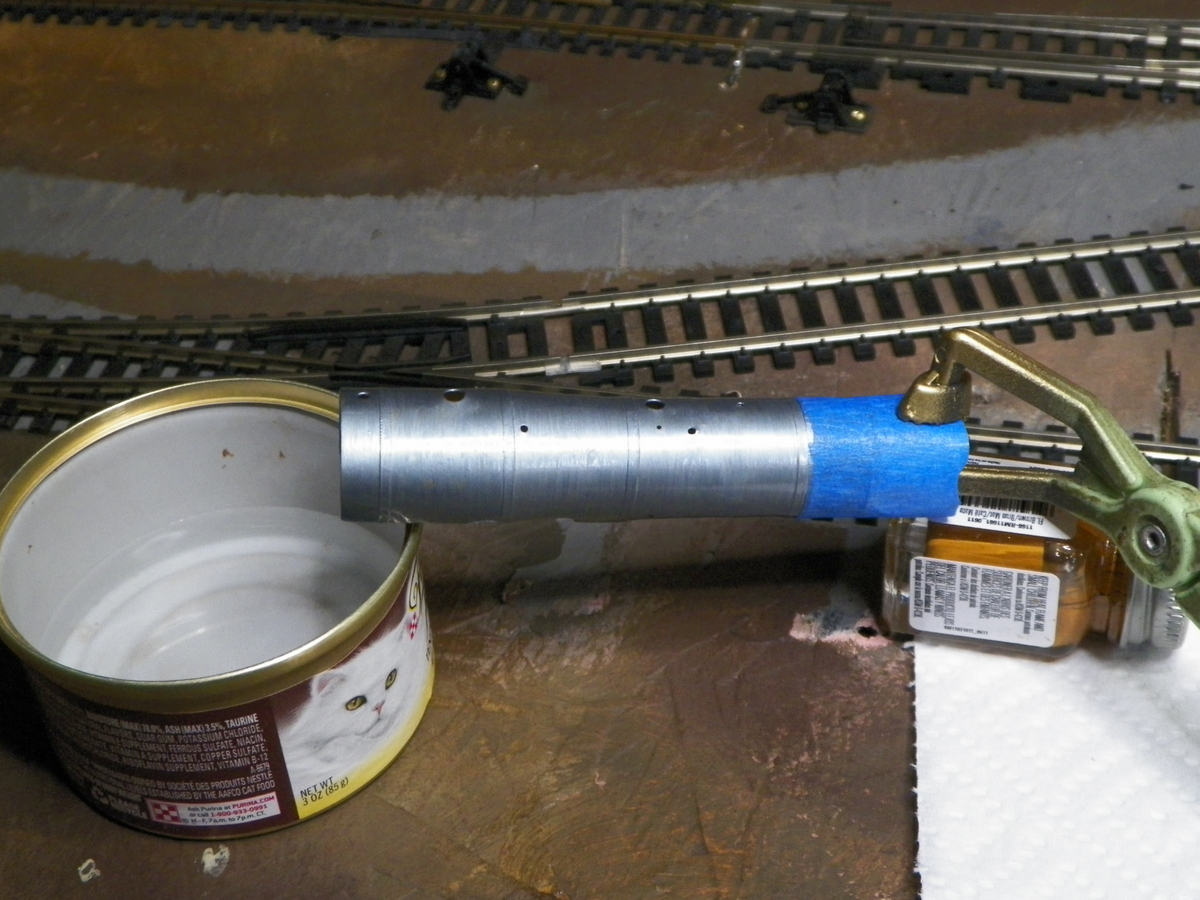
Came across some aluminum (heat duct) tape as well. Tried to be careful in the cutting; getting it smoothed out straight on a piece of glass and try to peel it up nice and steady. Looking at it closely, you can see stress along the edges . . . pretty fine, but in people scale, it's pretty ragged. I'm going to go ahead and try some paint to see what it looks like.
|
|
Country: USA ~
Posts: 2087 ~
Member Since: March 16 2013 ~
Last Visit: July 05 2018
|
Alert Moderator
|
|
|
|
Posted - November 04 2015 : 11:50:33 PM
|
That's a tidy job on those boiler bands. I expect that they'll look pretty good once the paint is applied. The washers look like a simple, elegant solution to stop the rocking, too.
Your patient approach to experimentation serves as an example for keeping the hobby a hobby. Too many people seem to shoot for productivity, in a hobby, as if they were at work and being paid to earn a profit. Tinker away! 
Carpe Manana!
|
|
Country: USA ~
Posts: 2418 ~
Member Since: September 17 2013 ~
Last Visit: July 12 2026
|
Alert Moderator
|
|
|
|
Posted - November 05 2015 : 12:20:50 PM
|
Well Don, I just tried some paint on that boiler. We'll see how the tape handles that. Scrutinizing this photo, I can see spots of wrinkles and maybe some lifting; see what happens as the paint cures, and if light sanding and more coats exaggerate them or hide them. So far, though, I'm pleased (in the sense that you know the technique might work if you're more careful the "next time" . . . Ha!). I'm also hoping the one I placed next to the cab will actually be parallel with the cab. I thought about measuring and making sure distances were equal before hand (and I did some spot checking after with a ruler, but you know how even a 1/32 looks big when something's out of whack in HO), but I really just "went for it". I found I was able to lift the tape up and move it some when it didn't look right. Not sure how that affects the bond in the long run?
Yeah, I'll be interested to see how those washers work out. Would have been nice to find a bushing and not have so many pieces. I'm thinkin' a drill press with the capacity for tiny bits would be a really useful tool.
|
|
Country: USA ~
Posts: 2087 ~
Member Since: March 16 2013 ~
Last Visit: July 05 2018
|
Alert Moderator
|
|
|
|
Posted - November 05 2015 : 12:51:11 PM
|
Looks pretty good to me.
Carpe Manana!
|
|
Country: USA ~
Posts: 2418 ~
Member Since: September 17 2013 ~
Last Visit: July 12 2026
|
Alert Moderator
|
|
|
|
Posted - November 05 2015 : 12:52:51 PM
|
Just a thought on the side rod binding problem you encountered. Did you
think the check the quartering on the drivers? A lot of times when one
set or the other of the drivers gets "out of quarter" you will get some
rather nasty binding. These older models have a better chance of that
happening to them. Just my 2 cents.
Edited by - oldtimer52 on November 05 2015 8:34:50 PM
|
|
Country: USA ~
Posts: 865 ~
Member Since: September 23 2014 ~
Last Visit: May 01 2023
|
Alert Moderator
|
|
|
|
Posted - November 05 2015 : 9:59:53 PM
|
| Well GW, I did not check the quartering. I'd have to study up to remind myself how that works. It does seem to be rolling freely now; see what happens when it's powered.
|
|
Country: USA ~
Posts: 2087 ~
Member Since: March 16 2013 ~
Last Visit: July 05 2018
|
Alert Moderator
|
|
|
|
Posted - November 06 2015 : 12:45:24 PM
|
A second coat of Russian iron after a very minimal wet sanding.
|
|
Country: USA ~
Posts: 2087 ~
Member Since: March 16 2013 ~
Last Visit: July 05 2018
|
Alert Moderator
|
|
|
|
Posted - November 07 2015 : 1:20:09 PM
|
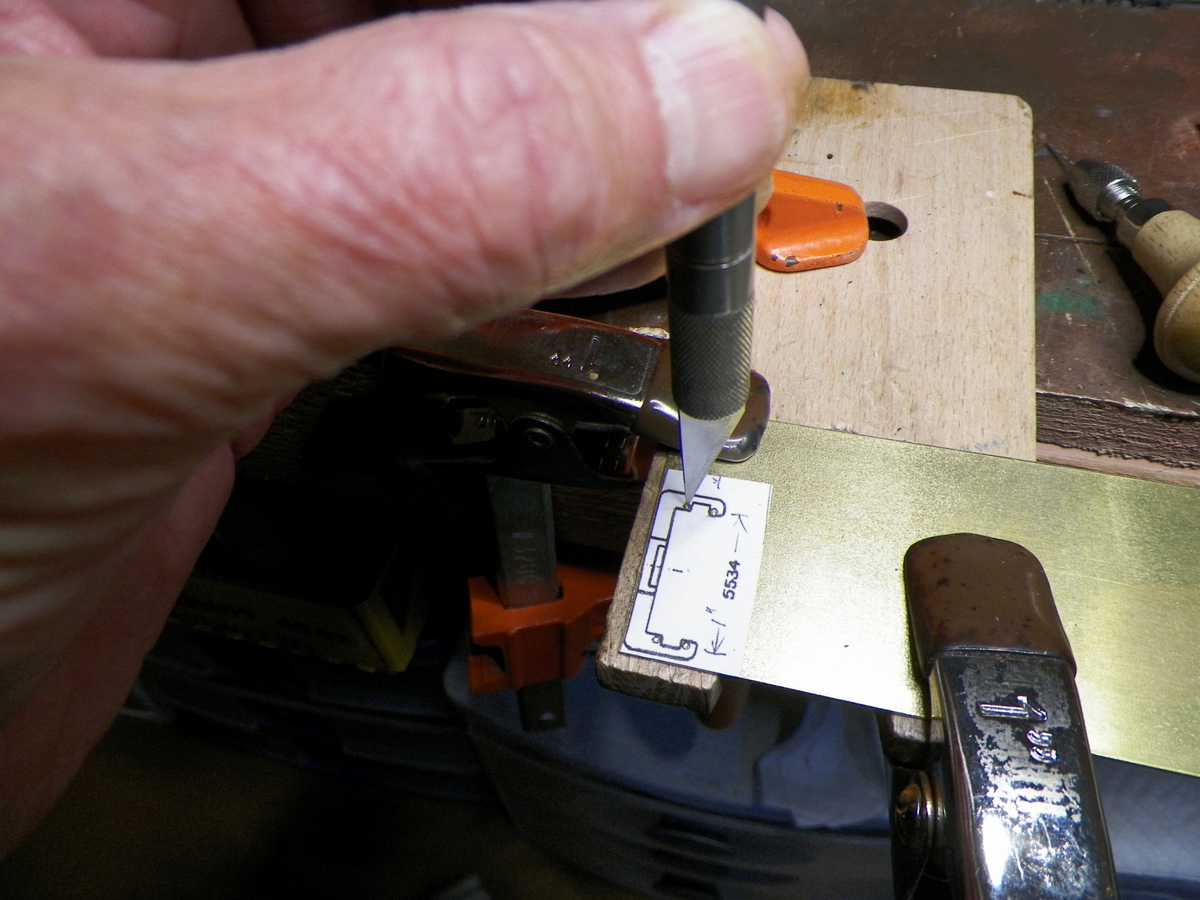
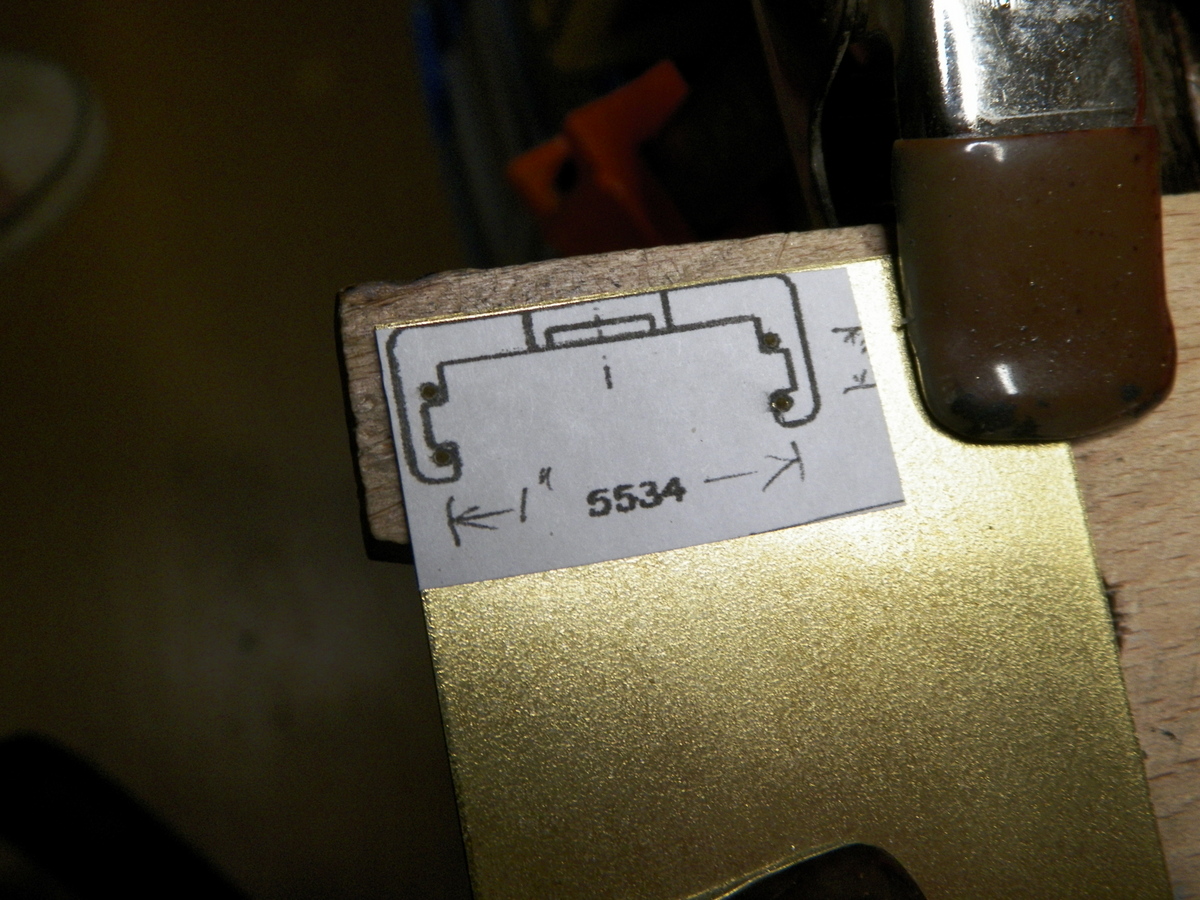
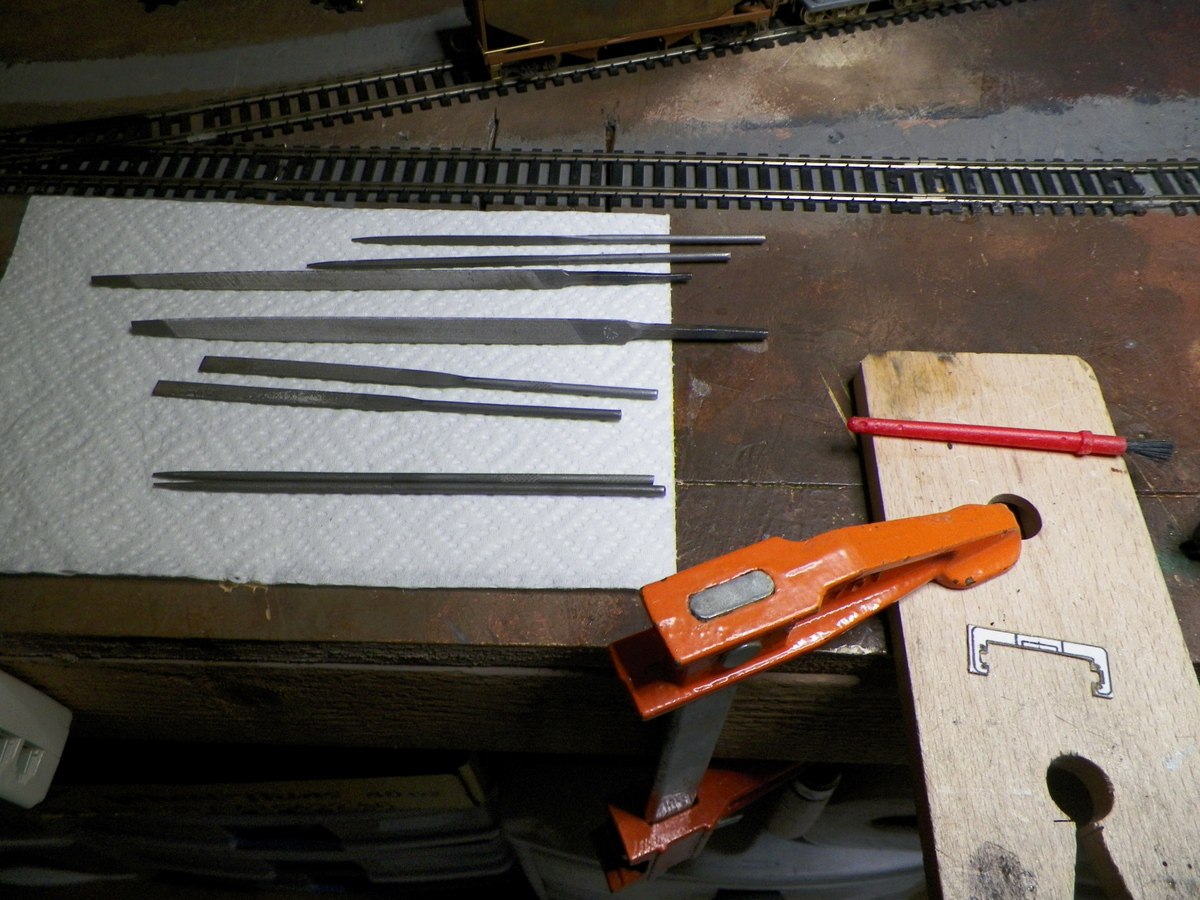
I've been neglecting what I need to do to get this thing running and that is get a guide bar yoke (e.g., original design instead of the one I was trying to use that was really for a Mogul). This morning I bit the bullet and stole about 90 minutes to drill the guide bar holes. In my limited experience, I've found if I don't get the holes placed right, there's not much point in cutting the yoke out. I've also found (and please note that I'm open to suggestion for an improvement in my process) that starting/marking the hole placement with a sharp knife blade gives me a bit more precision in the location. Then I stick the tip of the drill bit in soap or beeswax which is suppose to help, though I think elbow grease and patient persistence does about as much as anything with these tiny bits (#67) . . .
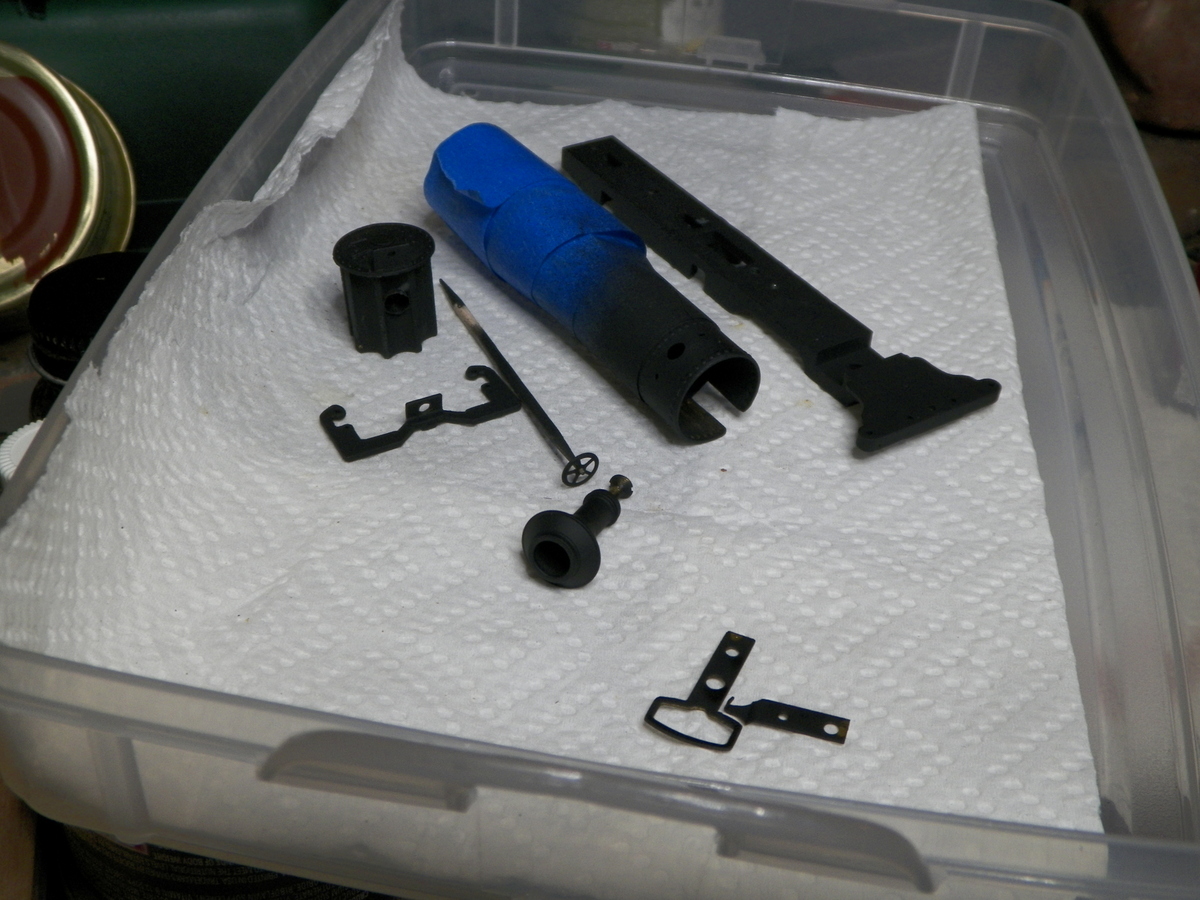
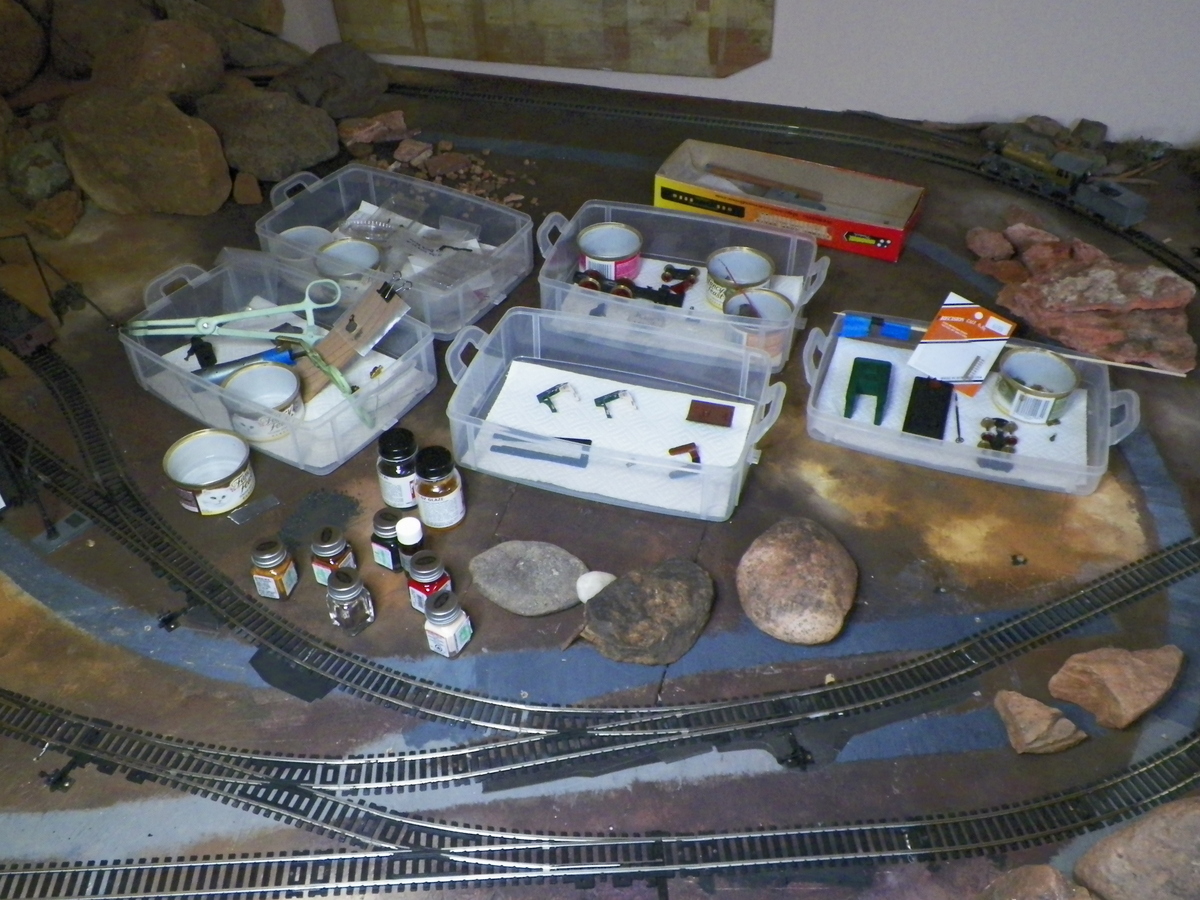
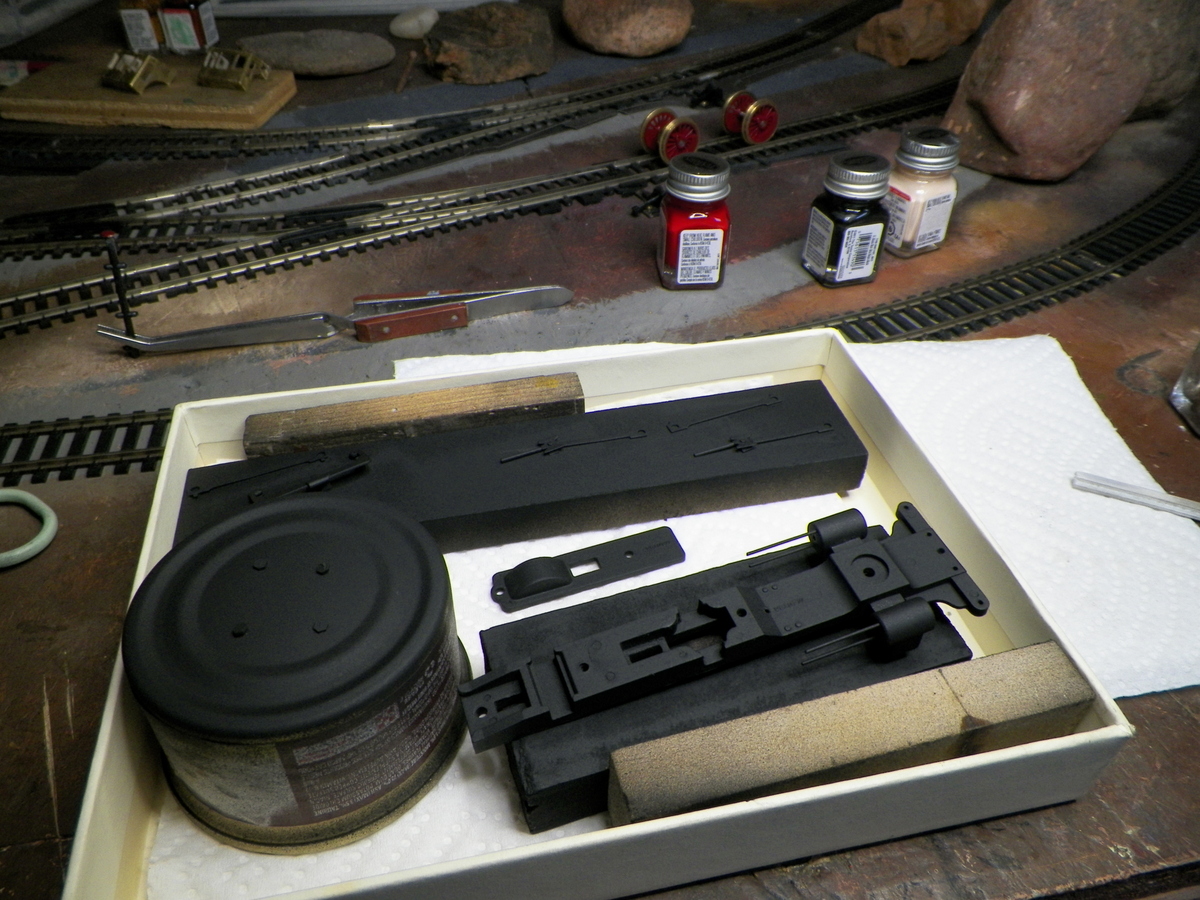
I also did some straightening and organizing since paint bottles and parts and tools were getting scattered enough that I was thinking I would lose some tiny part if I didn't get a handle on it. So I've got the sections of the model separated in trays with boiler parts, cab parts, frame and running gear parts, tender parts, and miscellaneous stuff that may be needed . . .
|
|
Country: USA ~
Posts: 2087 ~
Member Since: March 16 2013 ~
Last Visit: July 05 2018
|
Alert Moderator
|
|
|
|
Posted - November 07 2015 : 7:16:26 PM
|
quote: Then I stick the tip of the drill bit in soap or beeswax which is suppose to help, though I think elbow grease and patient persistence does about as much as anything with these tiny bits (#67)
Originally posted by Barry - November 07 2015 : 1:20:09 PM
|
I think the point of the soap or wax is more to keep the bit from breaking than to make it cut faster. It's altogether too easy to break these little bits.
I have a little drill chuck with a hexagonal shaft that plugs into an electric screwdriver the same way that screwdriver bits do. I use that in a small electric screw driver rather than a pin vise, most of the time. I find that I can hold the bit straighter if my hand is not also supplying the rotation.
Another trick for not breaking bits is to pull the bit from the hole at intervals to clear the chips. That's not a big deal in thin brass, but it helps a lot in zamac which tends to clog bits, taps, files and any other tool it gets a chance to.
Carpe Manana!
|
|
Country: USA ~
Posts: 2418 ~
Member Since: September 17 2013 ~
Last Visit: July 12 2026
|
Alert Moderator
|
|
|
|
Posted - November 07 2015 : 10:45:50 PM
|
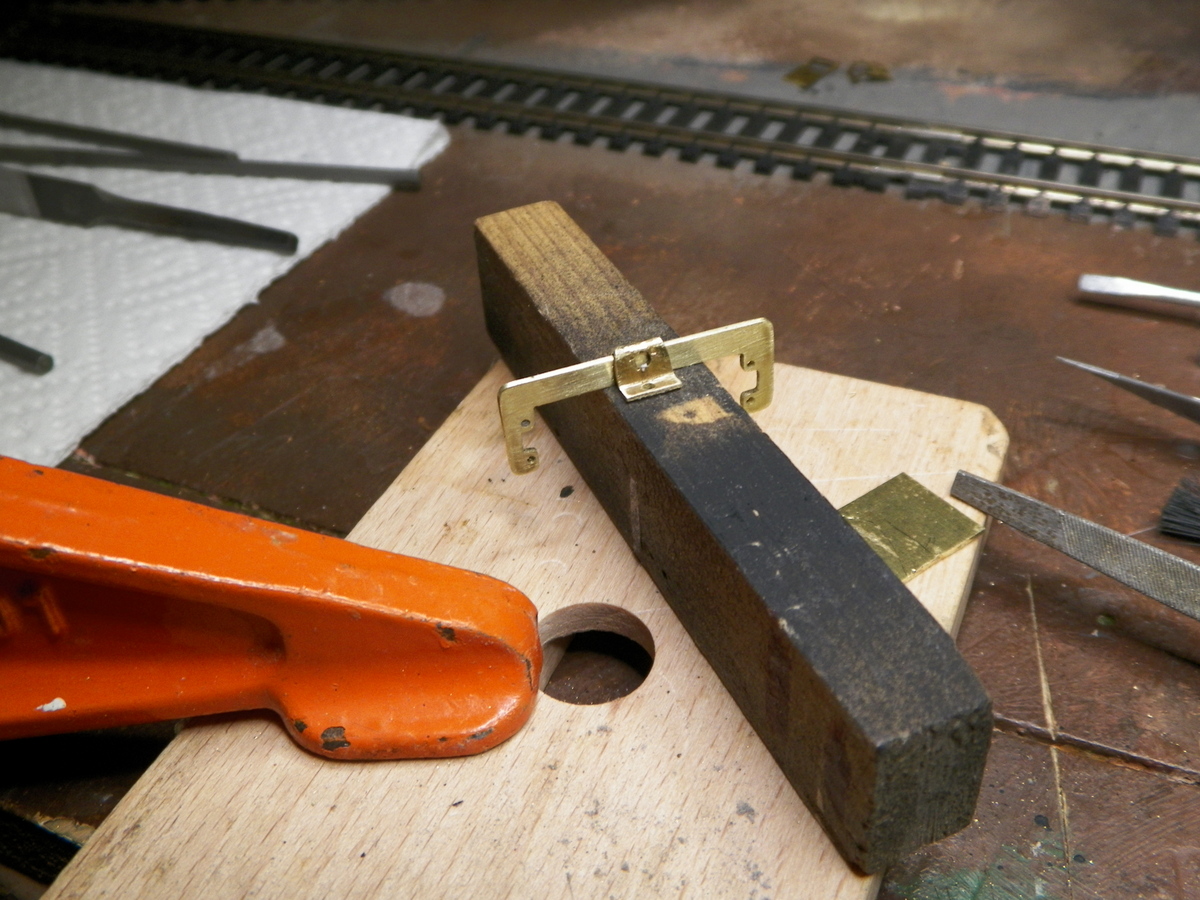
I like that electric screwdriver business Don . . . "next time". Yeah, I definitely make it a point to clear chips. It takes long enough, that I'm frequently peeking to see how much progress I've made. I did make it back to the attic for enough time to get the guide bar yoke made, along with what I hope will work for a hold down bracket. The hold down bracket is made from the 'coupler pocket' that comes with the old Mantua "Perfection Automatic Couplers" . . . bent and a hole drilled for the mounting screw. Appreciating that my soldering skills leave much to be learned, I'm gonna try soldering these together. Then if that works a little finish filing and maybe I can proceed to see if the running gear and motor will actually work together to move this thing down the track . . .
|
|
Country: USA ~
Posts: 2087 ~
Member Since: March 16 2013 ~
Last Visit: July 05 2018
|
Alert Moderator
|
|
|
|
Posted - November 08 2015 : 5:46:02 PM
|
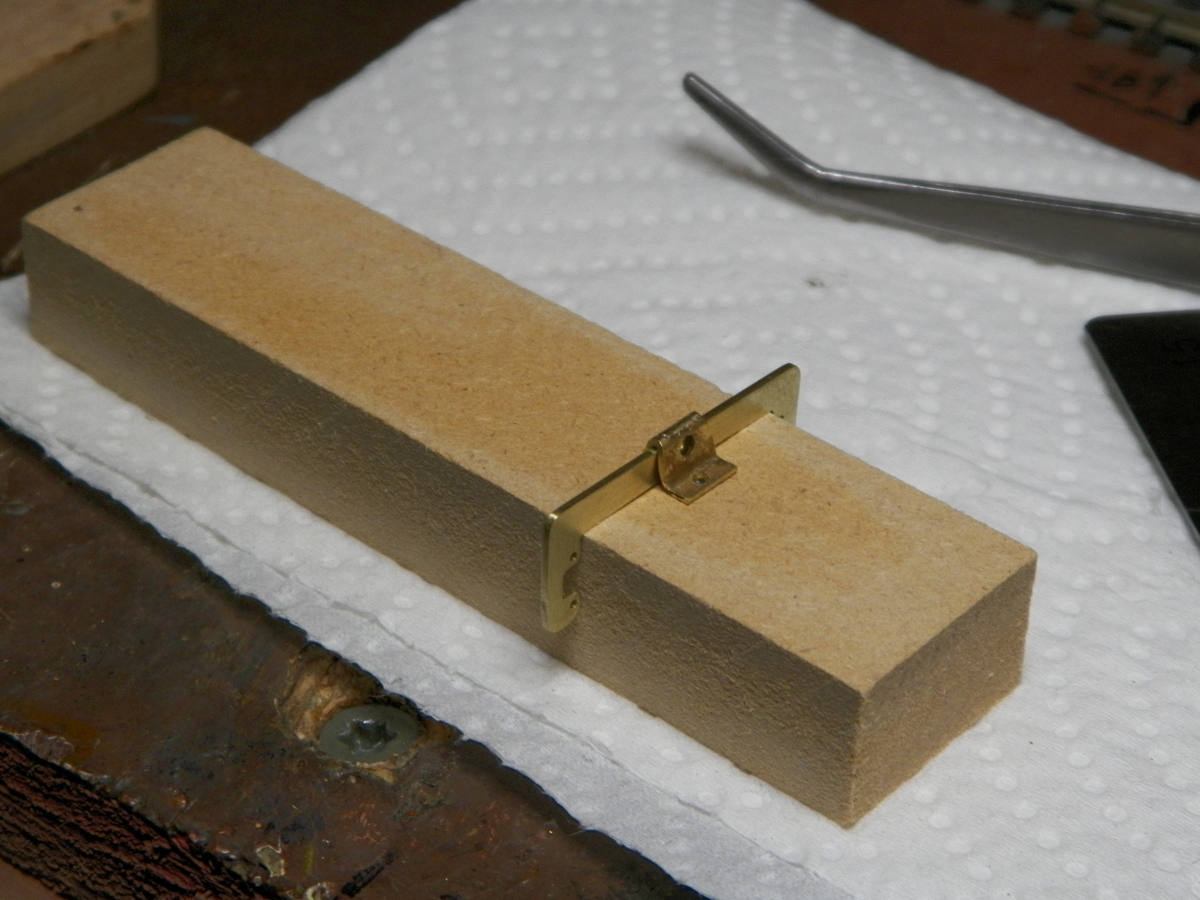
So I'm getting ready to solder these two pieces together and doing everything I can to increase my odds of success. I cut a piece of wood 7/8" width to support the guide bar yoke and then mounted it with the bracket to be soldered and clamped it up so everything'd be still . . . using squared pencil marks to line everything square. And with the desired places for the solder to flow facing me so I don't run a bunch of solder over the screw.
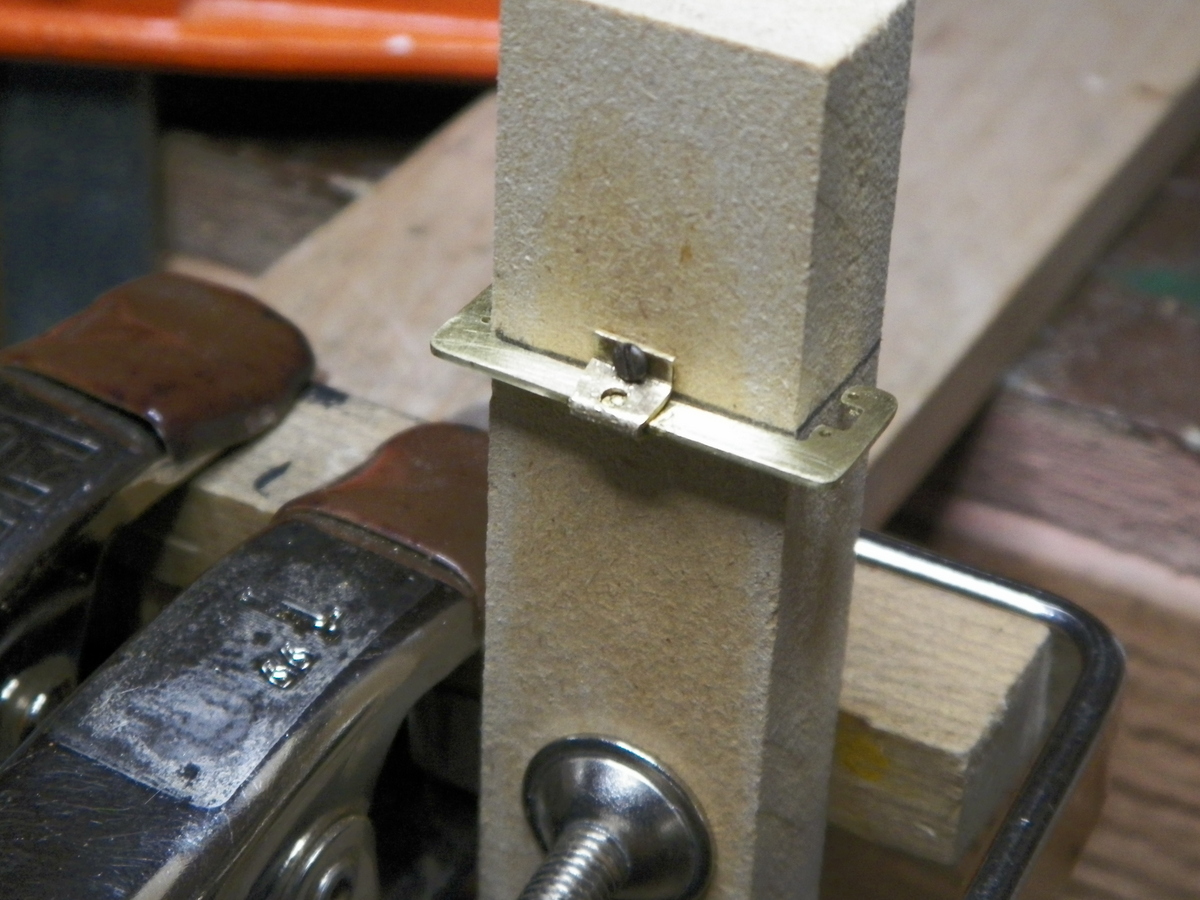
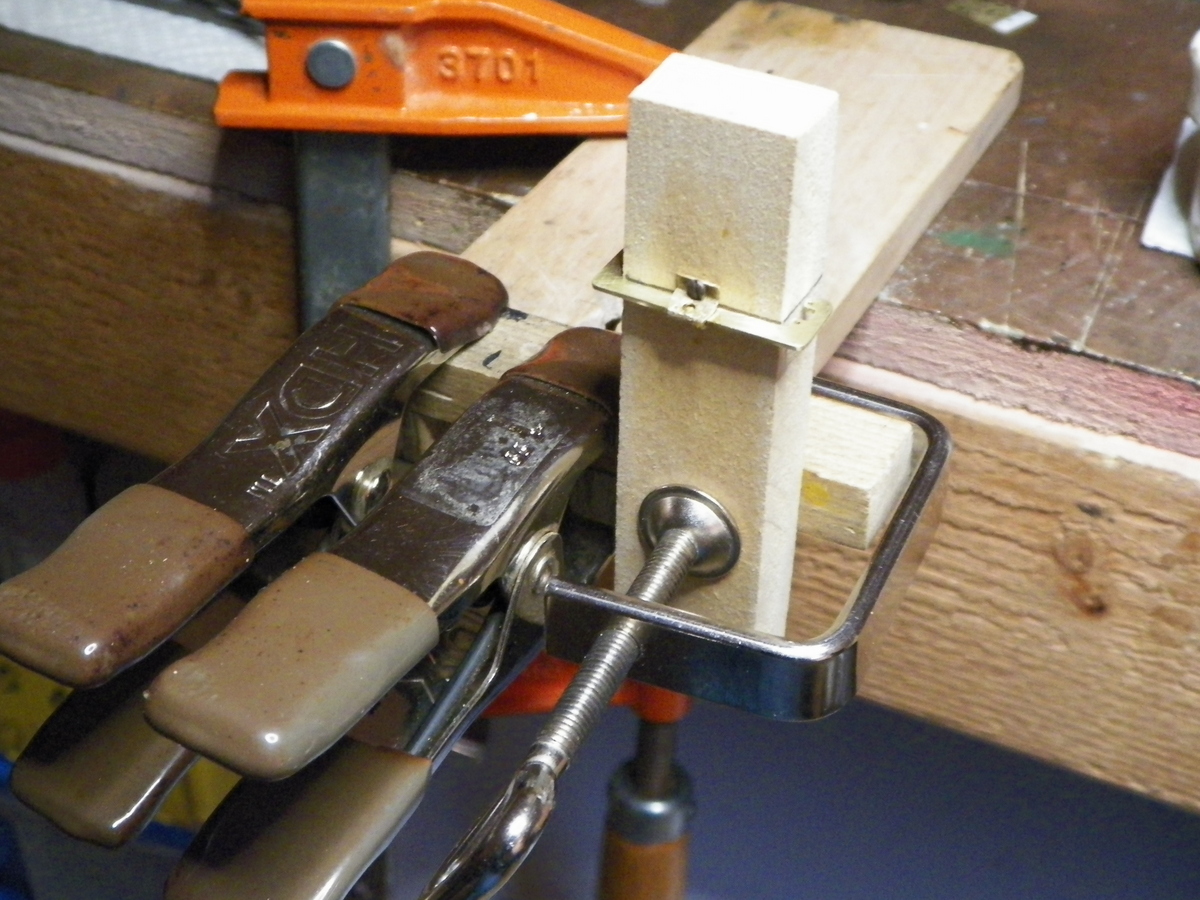
Turned out to be good competition for maybe the messiest soldering job I ever did . . .
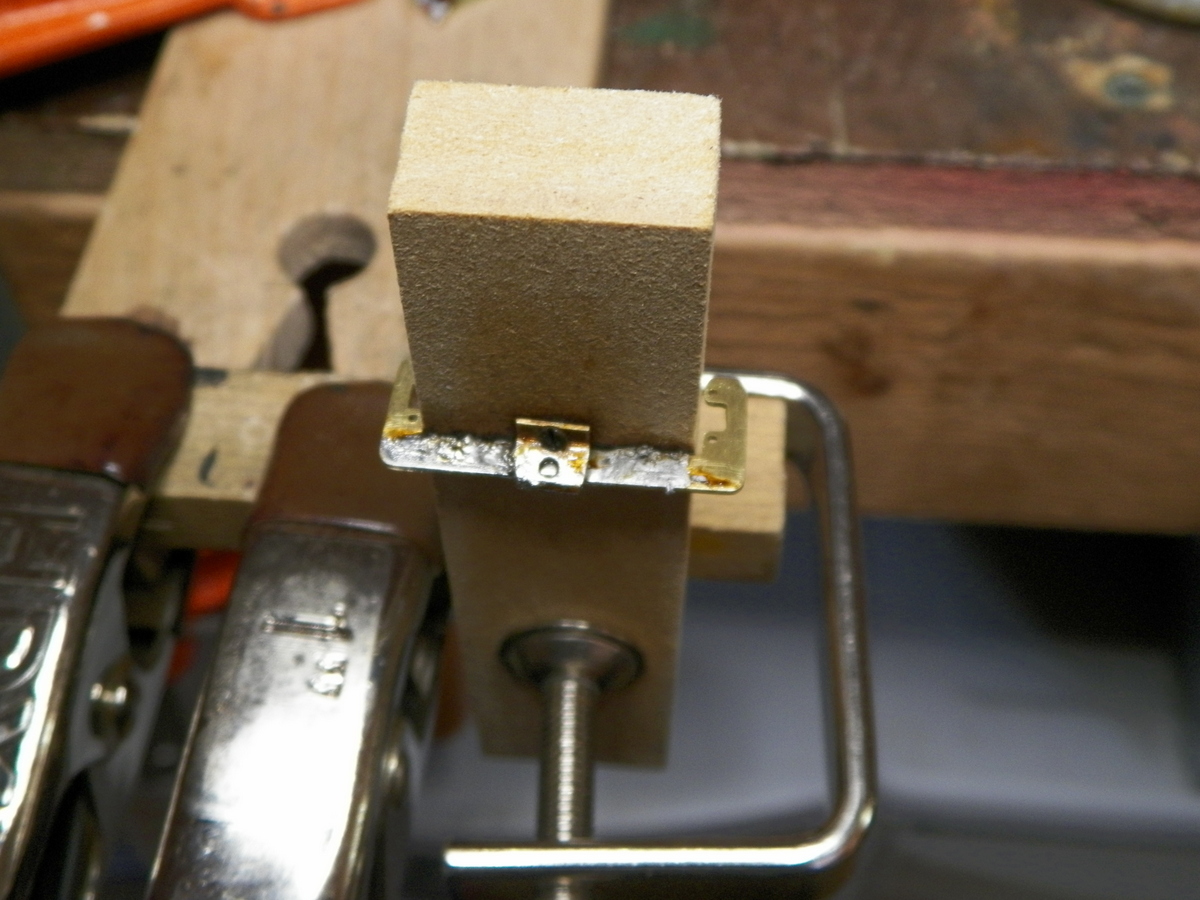
but . . . I'll tell you what, the thing stayed together while I manhandled it cleaning up the mess. I can see by the photo that a little more clean up is in order, but getting closer to a trial run of the running gear.
|
|
Country: USA ~
Posts: 2087 ~
Member Since: March 16 2013 ~
Last Visit: July 05 2018
|
Alert Moderator
|
|
|
|
Posted - November 08 2015 : 11:13:00 PM
|
That's a tidy job of cutting and filing on that yoke. Everything is so straight, square and exact that a person would think it was made by a machine.
What did you use for heat on the solder joint? The yoke is a heavy enough piece of brass that it would have soaked up a lot of heat before it got to the melting point of solder.
Carpe Manana!
|
|
Country: USA ~
Posts: 2418 ~
Member Since: September 17 2013 ~
Last Visit: July 12 2026
|
Alert Moderator
|
|
|
|
Posted - November 09 2015 : 2:04:35 PM
|
Well if you could move it around in your hand and look at it from all angles Don, you would see that it's not perfect, but . . . it is the straightest I've made to date. What I used for heat was a small soldering iron that came with a wood burning kit I'd gotten the kids years ago. It's a nice size in the hand, but I hadn't much faith in it because it never seems to get hot enough. So this weird thing happened. I was soaking the tip (connected to the iron yet, though not plugged in) in vinegar, thinking I wanted to get it as clean as possible. Then, when I plugged it in, there was a sizzle. So I'm thinking that either the vinegar in the jar must have been deeper than I thought and some got up in the iron. Well, whatever happened, the thing heats up pretty good now. What really made the solder look "crumbly" was me trying to clean off excess with wire strands.
Anyway, a bunch more careful filing (the clearances on these yokes are so tight, that you end up leaving like a paper thickness of metal around the guide bar hole to allow room for the rods to move) and I think I've gotten the thing to work. I'm hoping that some "run-in-time" will do good so I don't have to try and ream out the rod mounting holes any more. I suppose there could be some quartering issue, but I'm thinking keep it simple right now. "We'll see".
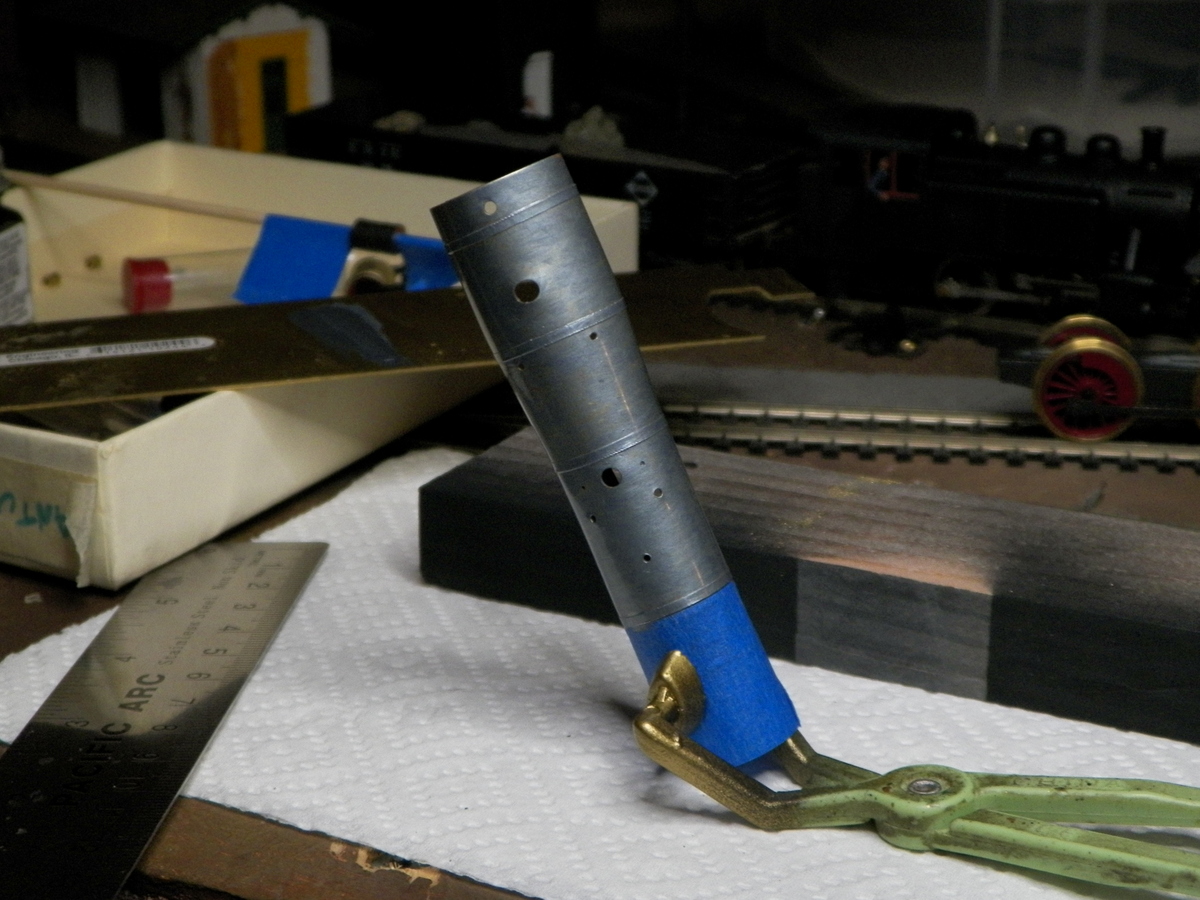
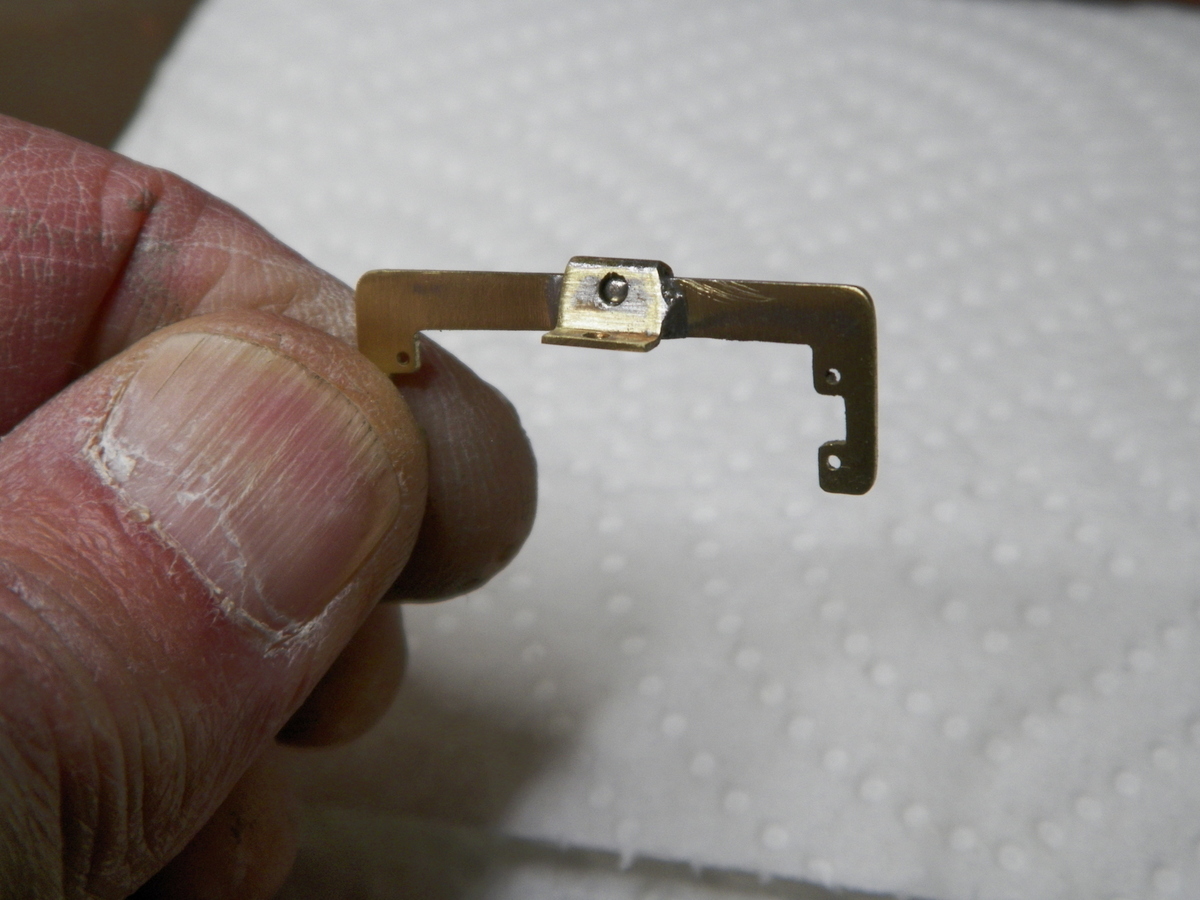
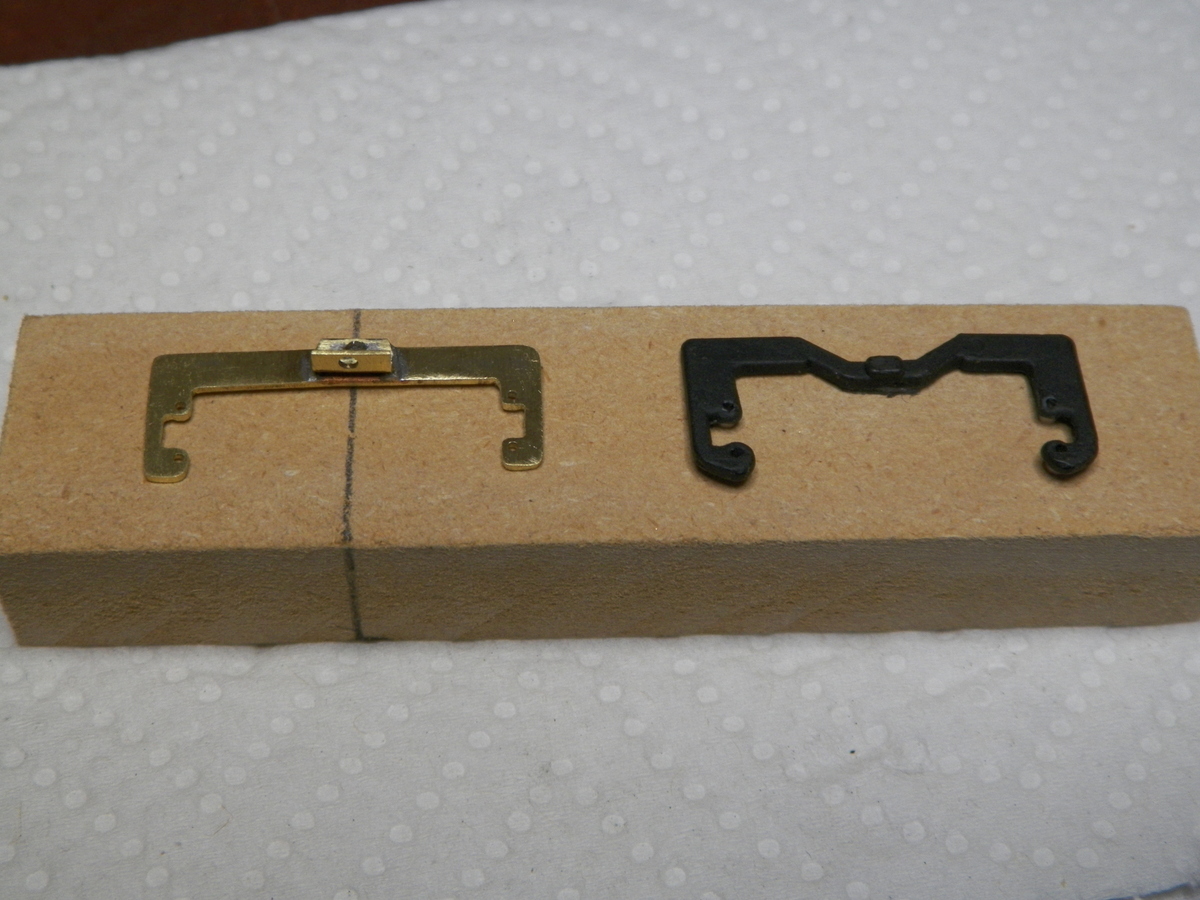
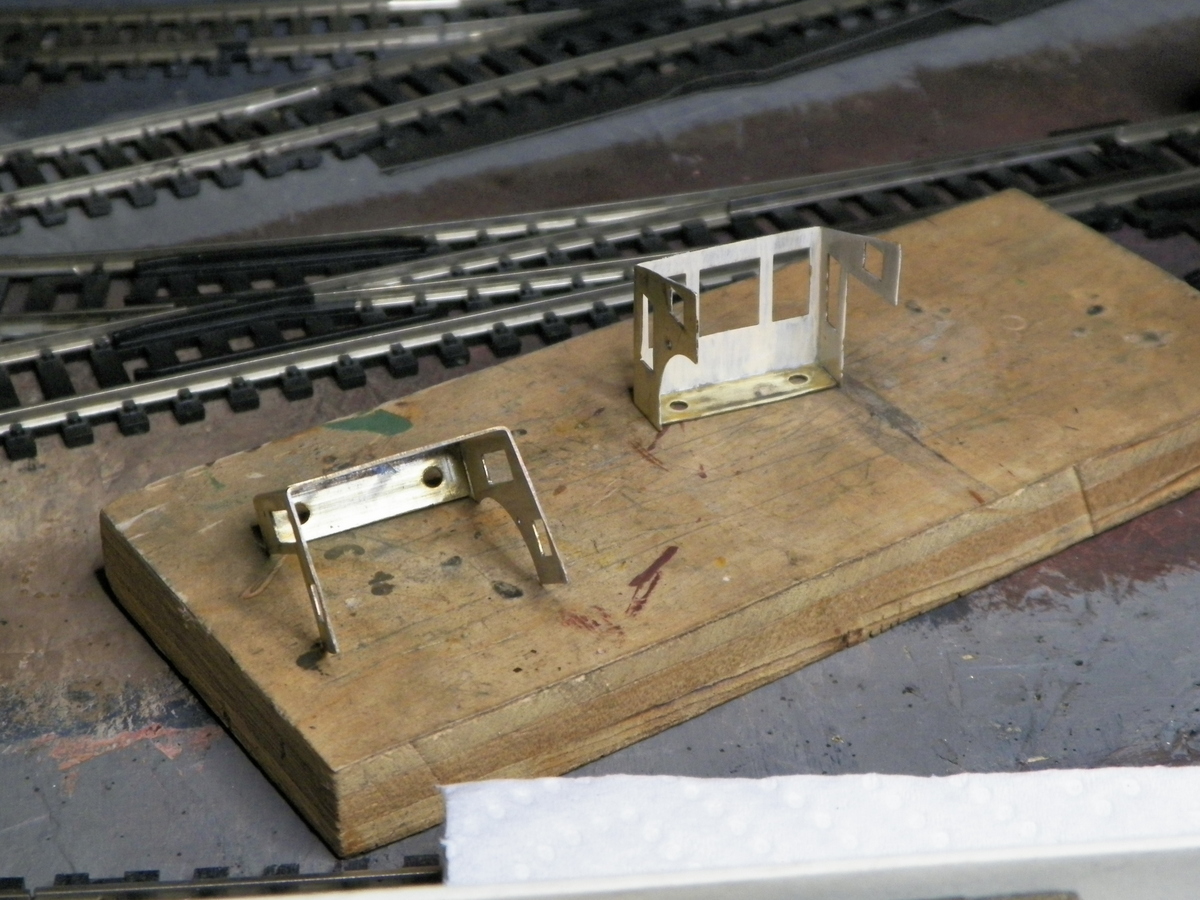
This first photo shows the Belle yoke to the left, compared to the Mogul yoke to the right. The Mogul yoke fits down in a slot compared to the Belle yoke that sits flat on the frame which renders the mounted height and subsequently the yoke/rod interface different. It probably would be a good modification to make the Belle yoke sit down in a slot to discourage any potential swivel that can occur with only one mounting screw coming loose.
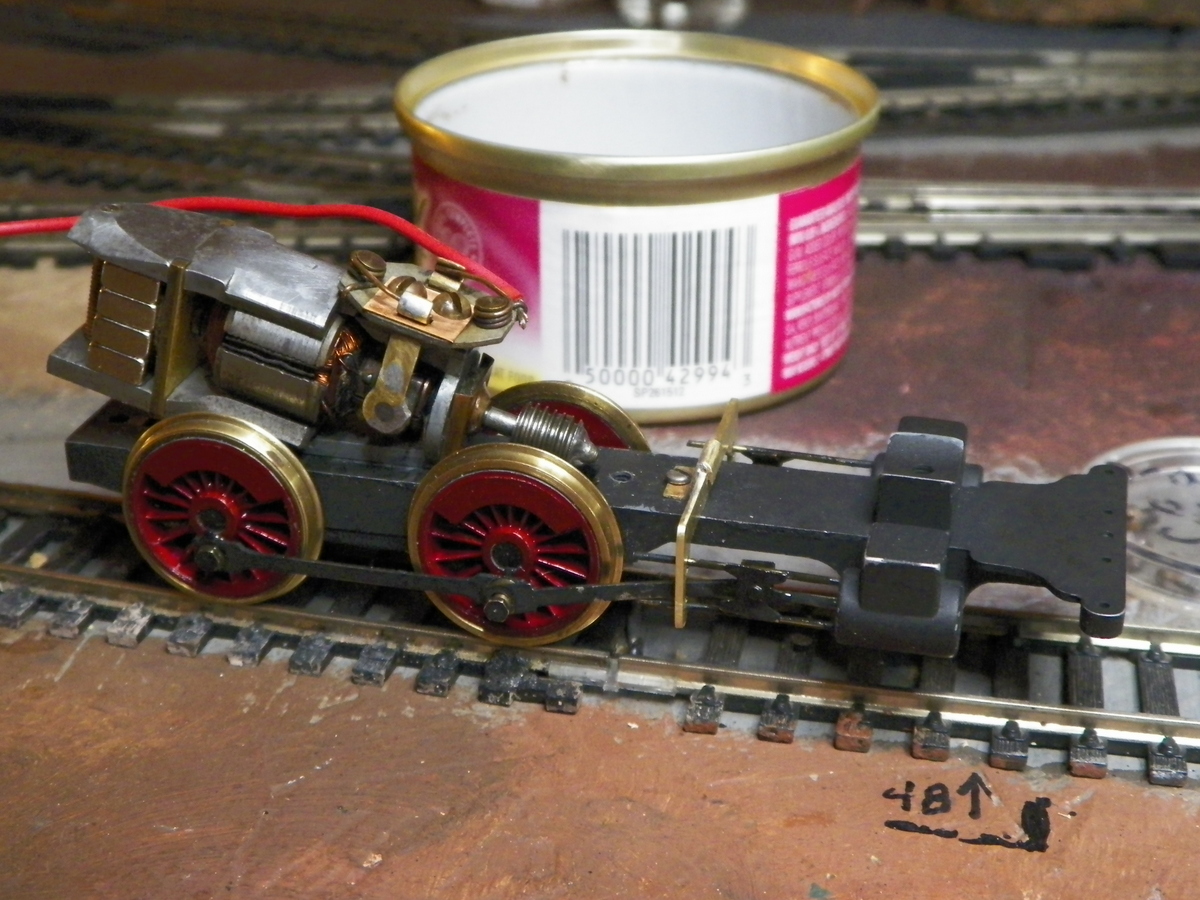
You can see/hear in the video, there is some fine tuning to be done yet to get this running more smoothly.
|
|
Country: USA ~
Posts: 2087 ~
Member Since: March 16 2013 ~
Last Visit: July 05 2018
|
Alert Moderator
|
|
|
|
Posted - November 09 2015 : 2:15:07 PM
|
fantastic barry,that's going to be a great loco,when its finished,wish i had the eyes for detail you have,long gone,i would have trouble hitting a barn at ten feet lol
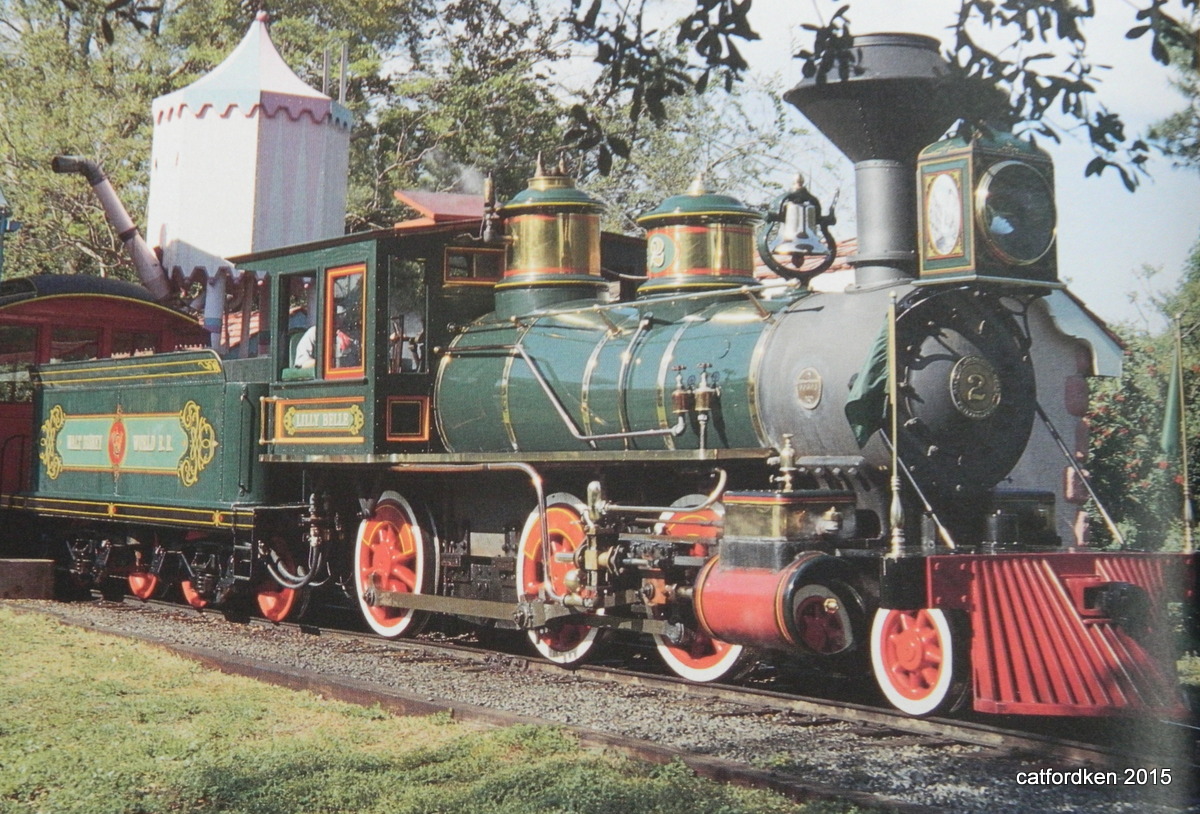
whilst going through the walt disney book i came across his loco lillie belle look familiar
catfordken
if you cannot see the light at the end of the tunnel,try turning around
Edited by - catfordken on November 10 2015 08:12:23 AM
|
|
Country: United Kingdom ~
Posts: 8294 ~
Member Since: September 28 2006 ~
Last Visit: October 20 2021
|
Alert Moderator
|
|
|
|
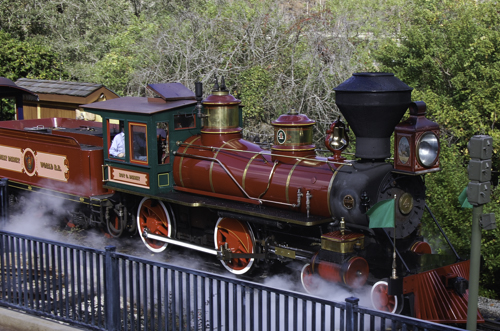
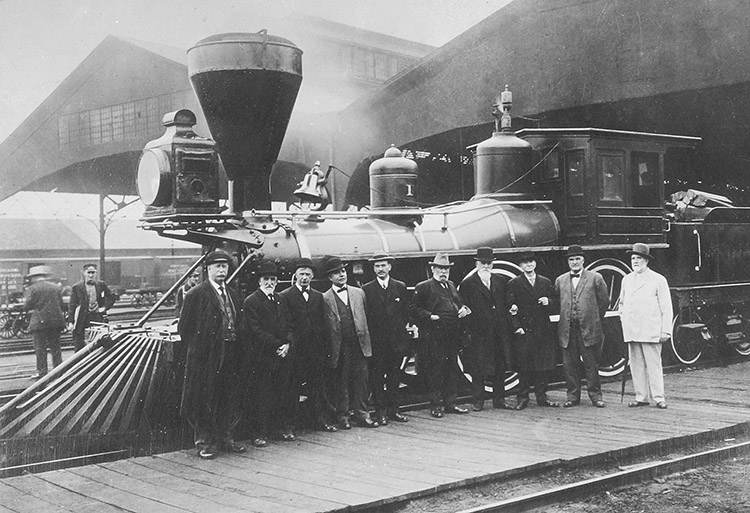
Posted - November 10 2015 : 7:29:46 PM
|
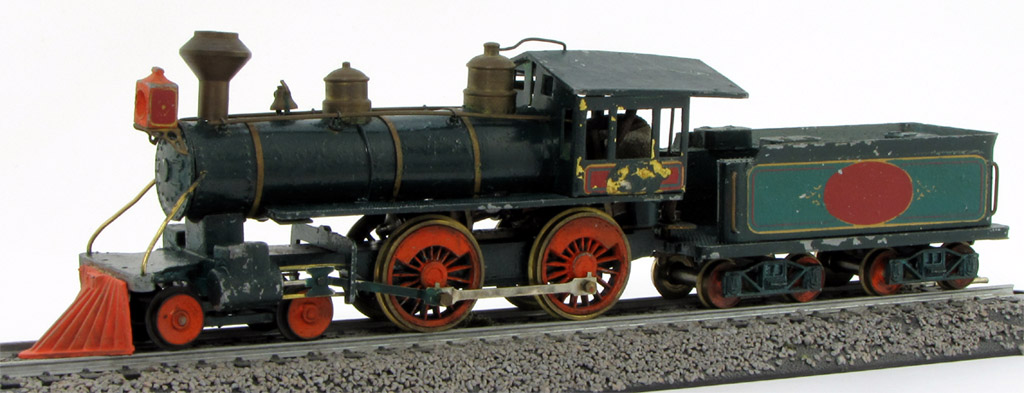
That's a nicely finished locomotive that Mr. Disney has there Ken. It caused me to do a quick search and I also found this 4-4-0. These older locomotives seem so much less complicated that you could almost detail them without going overboard; given whatever. Looking at these Disney locomotives, the Mantua models look a great deal like them. Be interesting to read the story behind them.
I'm feelin' just a bit overwhelmed by this project presently; getting the motor and drive train to match up is progressing pretty slowly and I've presently resorted to following the Mantua instructions to "run the locomotive for several hours if it seems sluggish or slow; like breaking in a car". Right. I'm not sure I'd take a car off the lot if it sounded like this locomotive. I've tried different size shims and washers and an array of motor positions and it all gets noisy and sporadic running at slow speeds. So . . . see what's up in a few hours ? ? ?
|
|
Country: USA ~
Posts: 2087 ~
Member Since: March 16 2013 ~
Last Visit: July 05 2018
|
Alert Moderator
|
|
|
|
Posted - November 11 2015 : 11:48:32 AM
|
| Well I ran it for a few hours last night, checking on it occasionally. I did find that moving the motor forward a bit more (enough so that the rear motor mount screw cant be placed) smoothed things out enough to warrant leaving the motor that much more forward. I've just started it running again now. I can get it down to like 20% throttle before it stalls and at that slow of a throttle it sort of "lopes" yet. There's a little "catch" somewhere that I still need to find . . . and then an oily mess to clean up and get ready to start again with paint and such on the frame and running gear.
|
|
Country: USA ~
Posts: 2087 ~
Member Since: March 16 2013 ~
Last Visit: July 05 2018
|
Alert Moderator
|
|
|
|
Posted - November 11 2015 : 2:36:54 PM
|
Somewhere I read that, without the motor, you should be able to push the mechanism across a plate of glass without the wheels dragging and slipping.
If without the motor things still roll and jam a bit, it's the connecting rods, main rods or piston rods jamming. Otherwise, it might be gear alignment or mesh.
Sometimes, I've seen things drag a little at the crossheads because the guides were not exactly parallel or because the stroke was a bit short on the guide and long on the rods.
You might want to watch if the slow spot in the rotation happens at the extreme end of a crosshead's movement.
Carpe Manana!
|
|
Country: USA ~
Posts: 2418 ~
Member Since: September 17 2013 ~
Last Visit: July 12 2026
|
Alert Moderator
|
|
|
|
Posted - November 11 2015 : 8:32:46 PM
|
| Now you've raised the bar Don. Man, if I could roll that thing across a piece of glass and have the drivers turn! That would be one smooth running locomotive. All those tips you've just suggested are good ones and I'm wading my way through them. I was kind of thinking I was making some headway and now the goal is to have it roll across a piece of glass. Hmmmm? As I write this the locomotive is running at 50% throttle. All told, it's been running probably 4 hours now? This is like throwing your parts in the rock tumbler and letting it do the finishing machine work. But it does seem to be gradually improving and I don't feel any motor overheating or observe any unusual wear. Presently I can reduce the throttle to 20% before performance becomes inconsistent and mechanism noise increases (whereas, initially, it was doing good to run consistent at 40% with a pretty good bunch of noise). In a way, I don't feel quite right about using this "break in" method, but so far I don't believe I've ruined anything.
|
|
Country: USA ~
Posts: 2087 ~
Member Since: March 16 2013 ~
Last Visit: July 05 2018
|
Alert Moderator
|
|
|
|
Posted - November 11 2015 : 9:35:48 PM
|
If it's working and hasn't ruined anything, maybe the directions have a point.
Carpe Manana!
|
|
Country: USA ~
Posts: 2418 ~
Member Since: September 17 2013 ~
Last Visit: July 12 2026
|
Alert Moderator
|
|
|
|
Posted - November 12 2015 : 12:32:56 PM
|
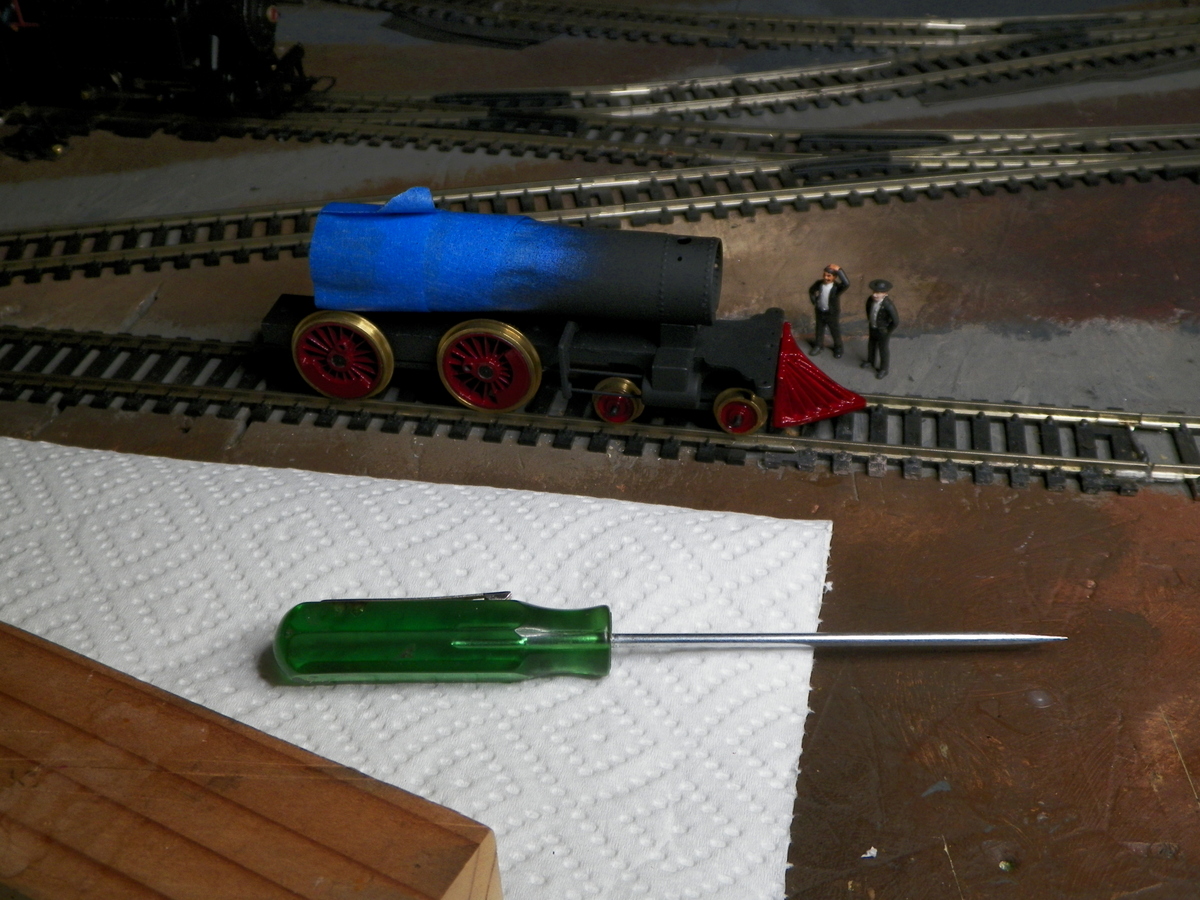
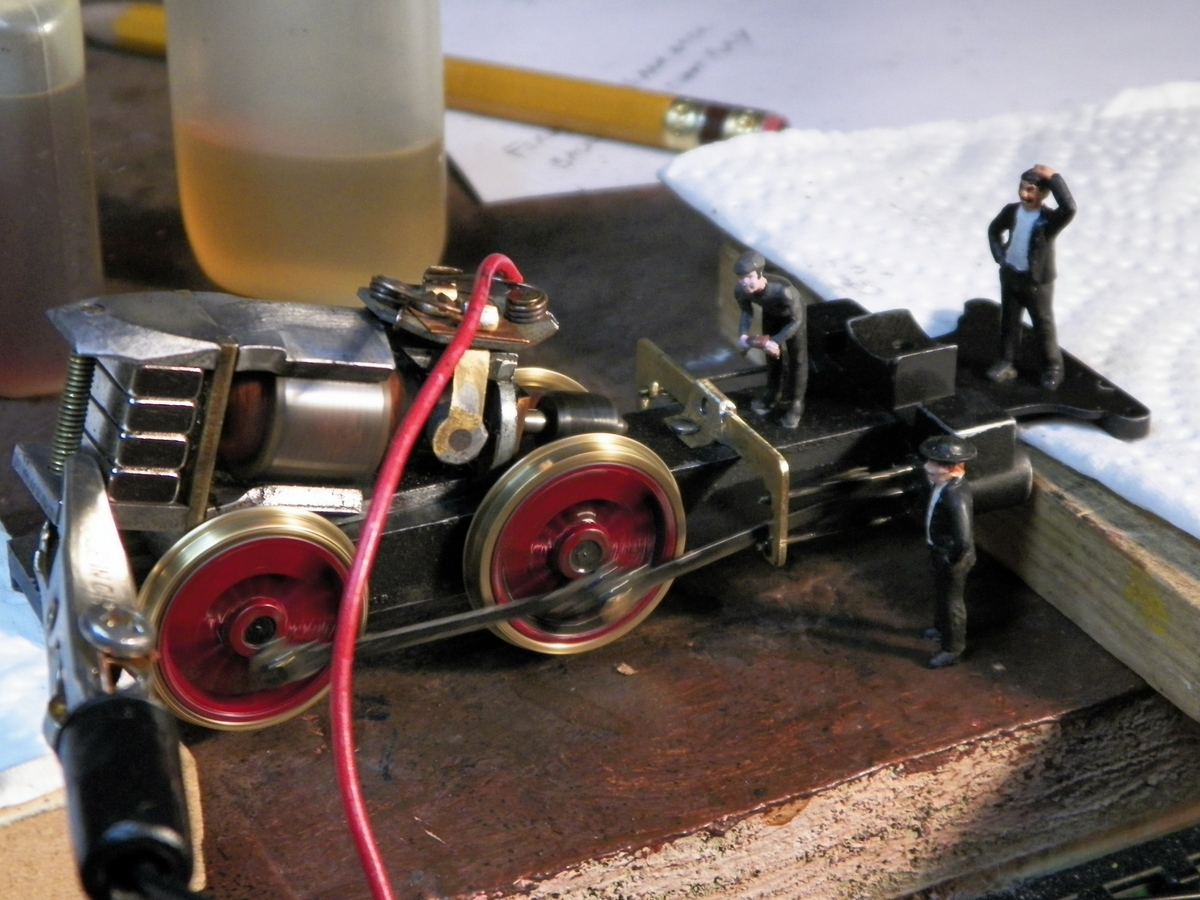
Don, I took a break from the "run-it-in" and removed the motor and tried rolling the running gear across a piece of glass. I was surprised that it actually came close to proving itself. A little "catch" when rolling backwards. I examined things, best I could while running at slow as possible RPM and didn't see anything that I felt could be chased after with a file, so . . . back to the rock polishing technique . . . like using a rock tumbler to do your machine work. But, I've got the little guys from the shop keepin' an eye on things . . .
|
|
Country: USA ~
Posts: 2087 ~
Member Since: March 16 2013 ~
Last Visit: July 05 2018
|
Alert Moderator
|
|
|
|
Posted - November 12 2015 : 12:39:08 PM
|
looks good/sounds good to me,will sound much different once body etc is added to it,
barry
catfordken
if you cannot see the light at the end of the tunnel,try turning around
|
|
Country: United Kingdom ~
Posts: 8294 ~
Member Since: September 28 2006 ~
Last Visit: October 20 2021
|
Alert Moderator
|
|
|
|
Posted - November 13 2015 : 11:49:21 PM
|
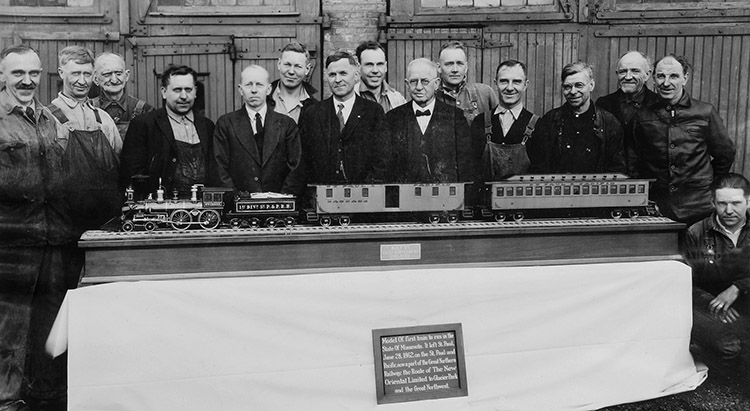
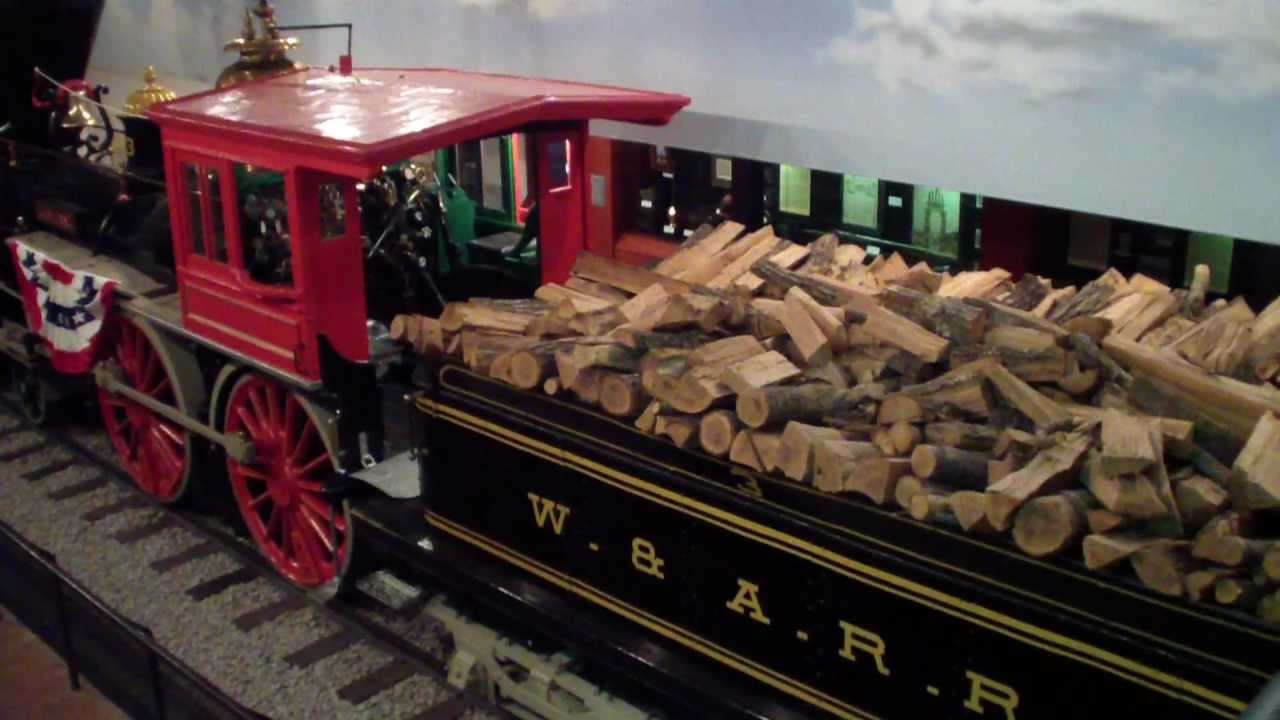
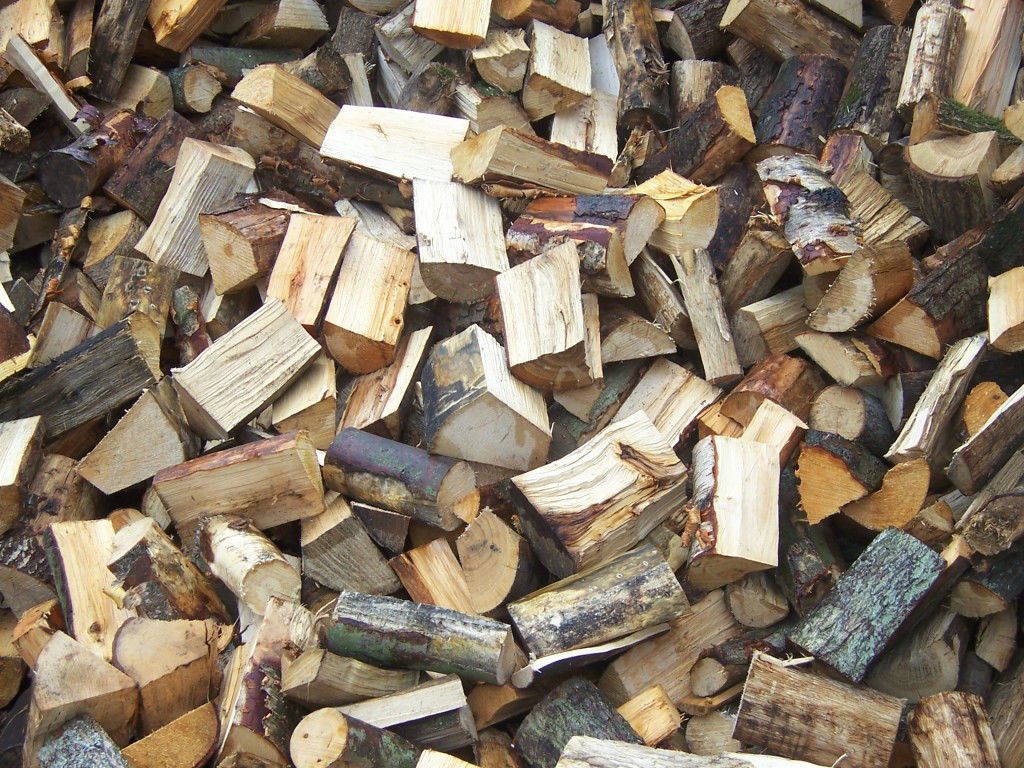
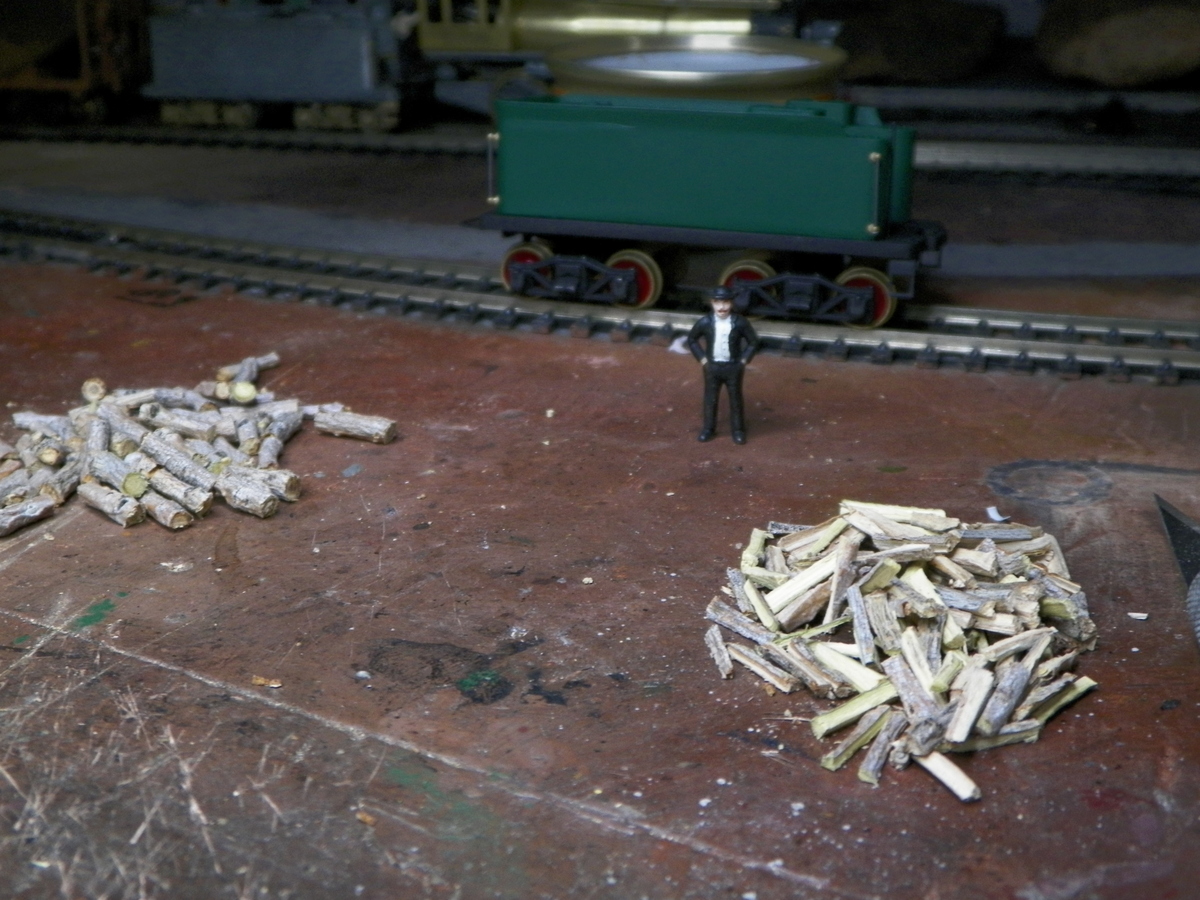
Not doing much today. Put the frame and running gear parts in brake fluid to remove old paint, which will be good anyway because I had noticed in earlier pictures when the frame was all pretty there was some mold slag that hadn't been cleaned off (hey, what the hell, I'm an unemployed old man with seemingly nothing else to do). I'm getting ready to resume work on the tender and I've been wondering what size the wood should be cut to and how it is stacked in a tender, so I was pleased to learn from these photos about those things . . .
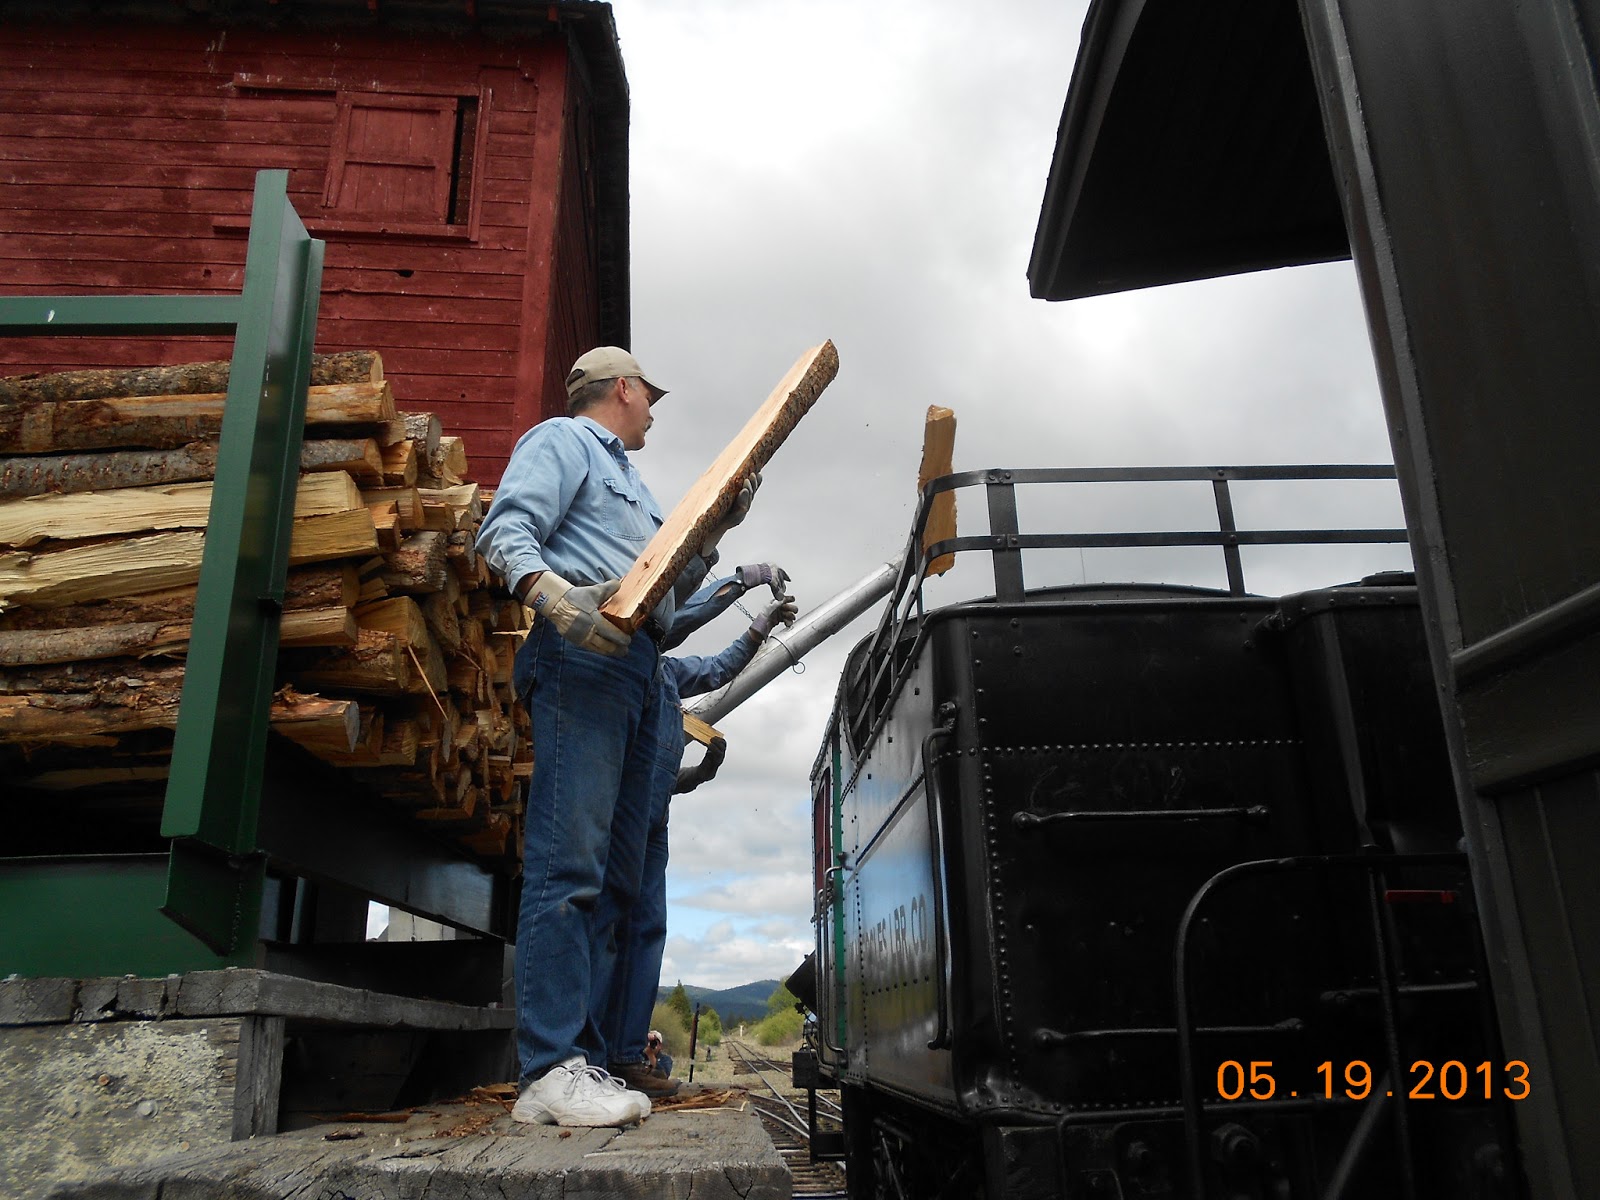
One source (something to do with Comstock) talked of 4 foot lengths and the above photo doesn't look far from that. More than a 2 foot fireplace log, anyway.
Interestingly, most of the photos that show up on a Google search are of model trains, but the one below I enjoyed of the William J. Crooks locomotive circa 1908 and then below that a model of the William J Crooks train. The top photo was one of the few I found with a stacked load which looks pretty orderly. I did see another actual wood burning steam locomotive with wood in more like 2 foot lengths. ? ?
|
|
Country: USA ~
Posts: 2087 ~
Member Since: March 16 2013 ~
Last Visit: July 05 2018
|
Alert Moderator
|
|
|
|
Posted - November 14 2015 : 08:30:59 AM
|
I once helped load wood on the Eureka and Palisades #4 and it used wood the size of the wood in your Wm. J. Crooks photo. At the Gold Spike memorial, I recall them using chunks about as fat as those and maybe 6 or 8 inches shorter than the ones in your Sumpter Valley photo.
Thinking about how the wood is split, long pieces are harder to split than short ones. If you have a machine, such as a hydraulic splitter, they can't split a log longer than the splitter. I'd love to see the Sumpter Valley's splitter, since I don't think I've seen one that long before.
If you are splitting by hand, it takes a lot more force to split a long log. Beyond a certain point, an ax or splitting maul is not enough, and you start in on a tedious process of pounding in multiple wedges. I doubt that anyone would want to invest that much time in splitting each log when producing firewood by the ton.
Since you're modeling an era when more things were done by hand, I would find the size in the Wm. J. Crooks photo most believable. This is mostly a guess, but that being a vintage photo, you couldn't be proven wrong if you imitated it.
Carpe Manana!
|
|
Country: USA ~
Posts: 2418 ~
Member Since: September 17 2013 ~
Last Visit: July 12 2026
|
Alert Moderator
|
|
|
|
Posted - November 14 2015 : 10:07:13 AM
|
i would agree that if hand split they would be small logs,ken

catfordken
if you cannot see the light at the end of the tunnel,try turning around
|
|
Country: United Kingdom ~
Posts: 8294 ~
Member Since: September 28 2006 ~
Last Visit: October 20 2021
|
Alert Moderator
|
|
|
|
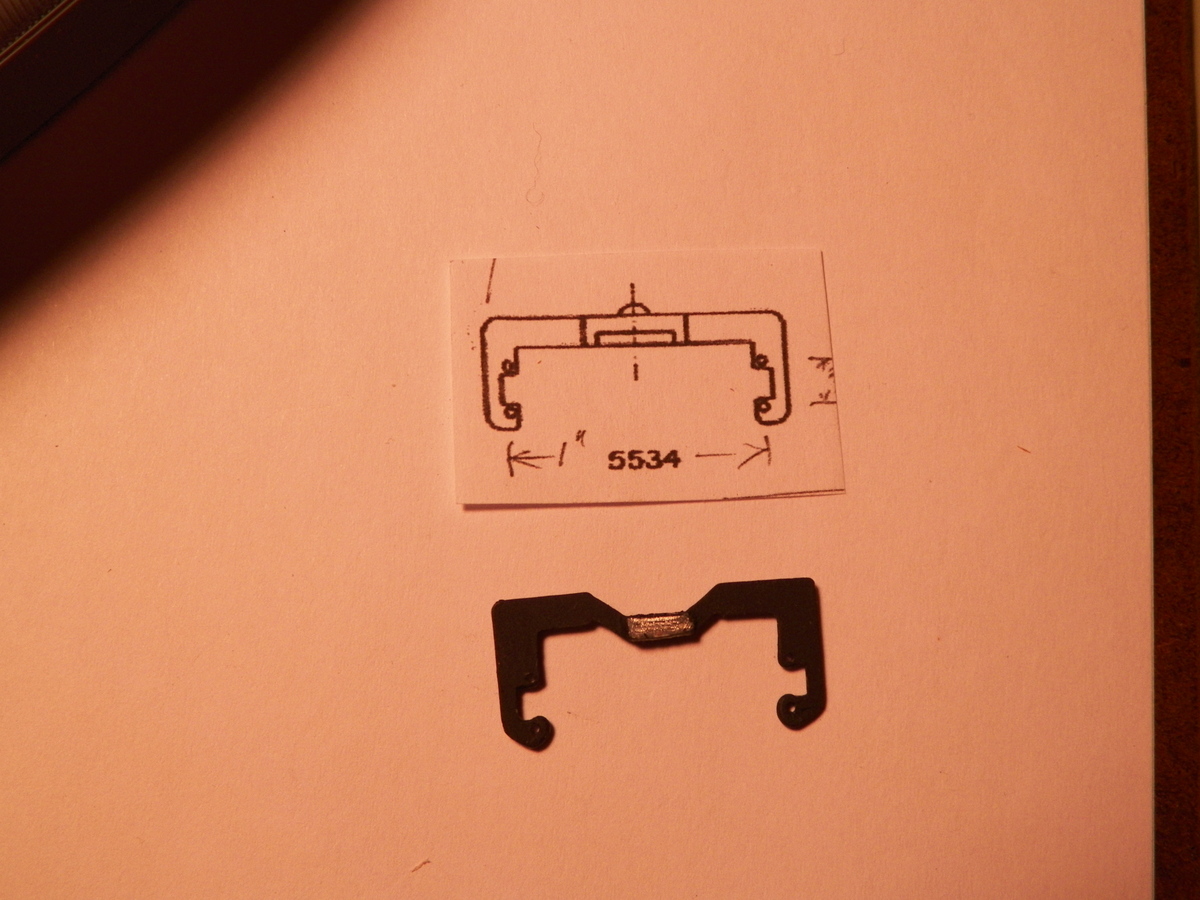
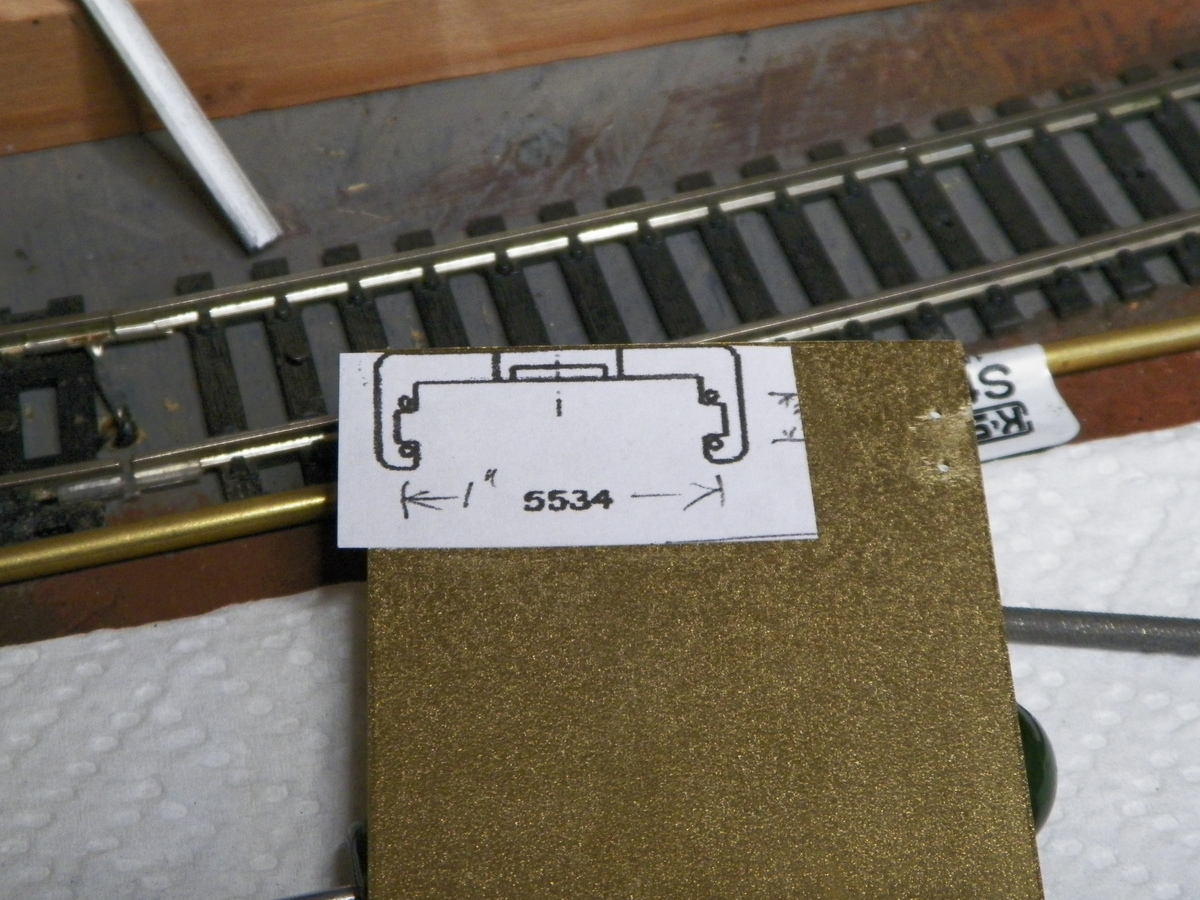
Posted - November 14 2015 : 7:04:55 PM
|
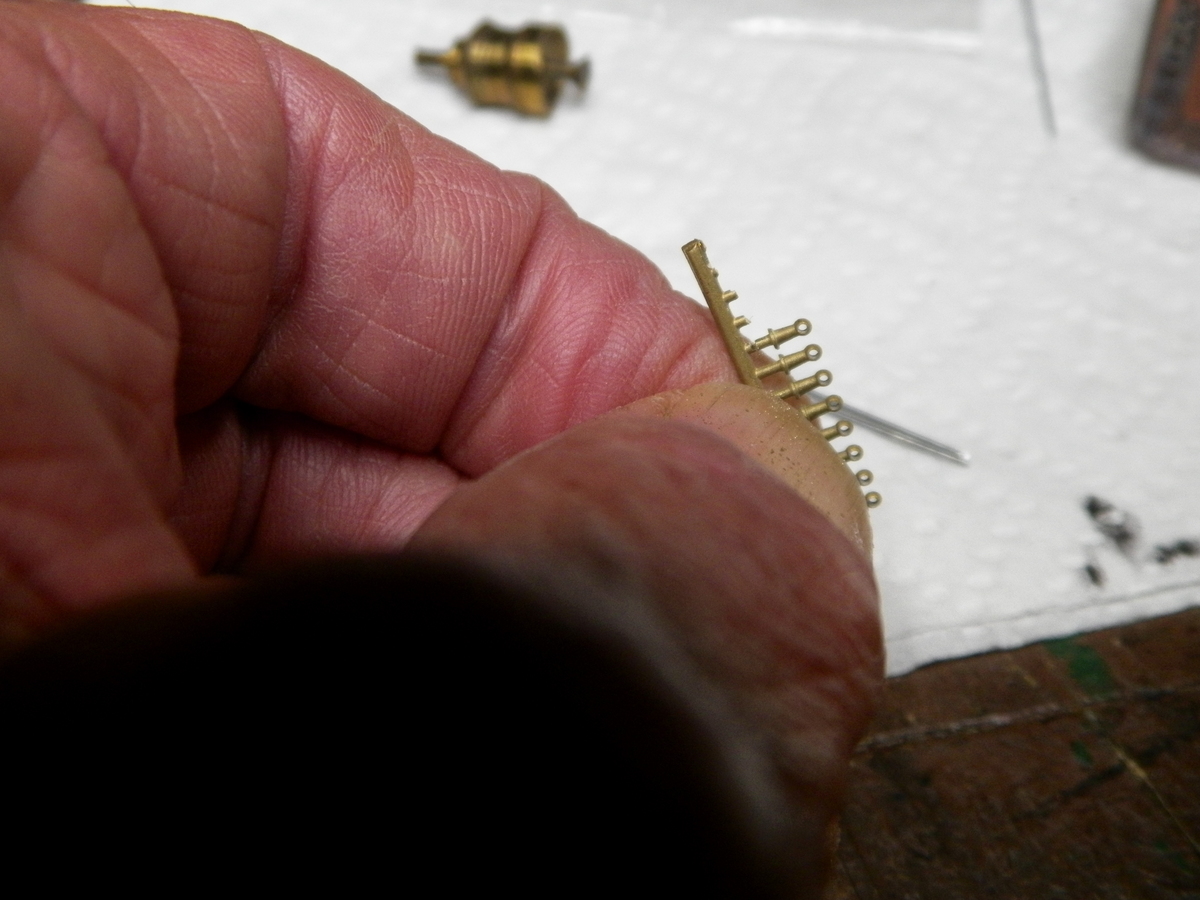
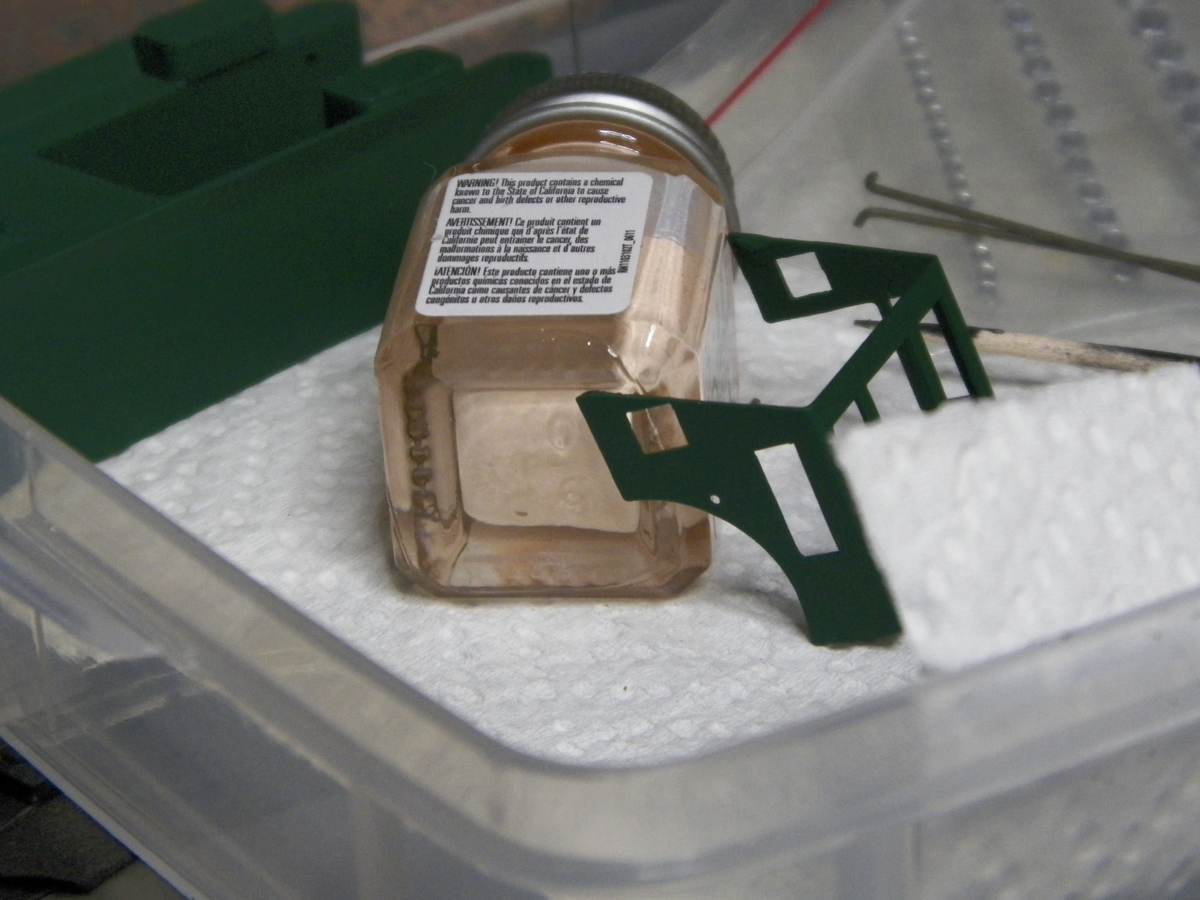
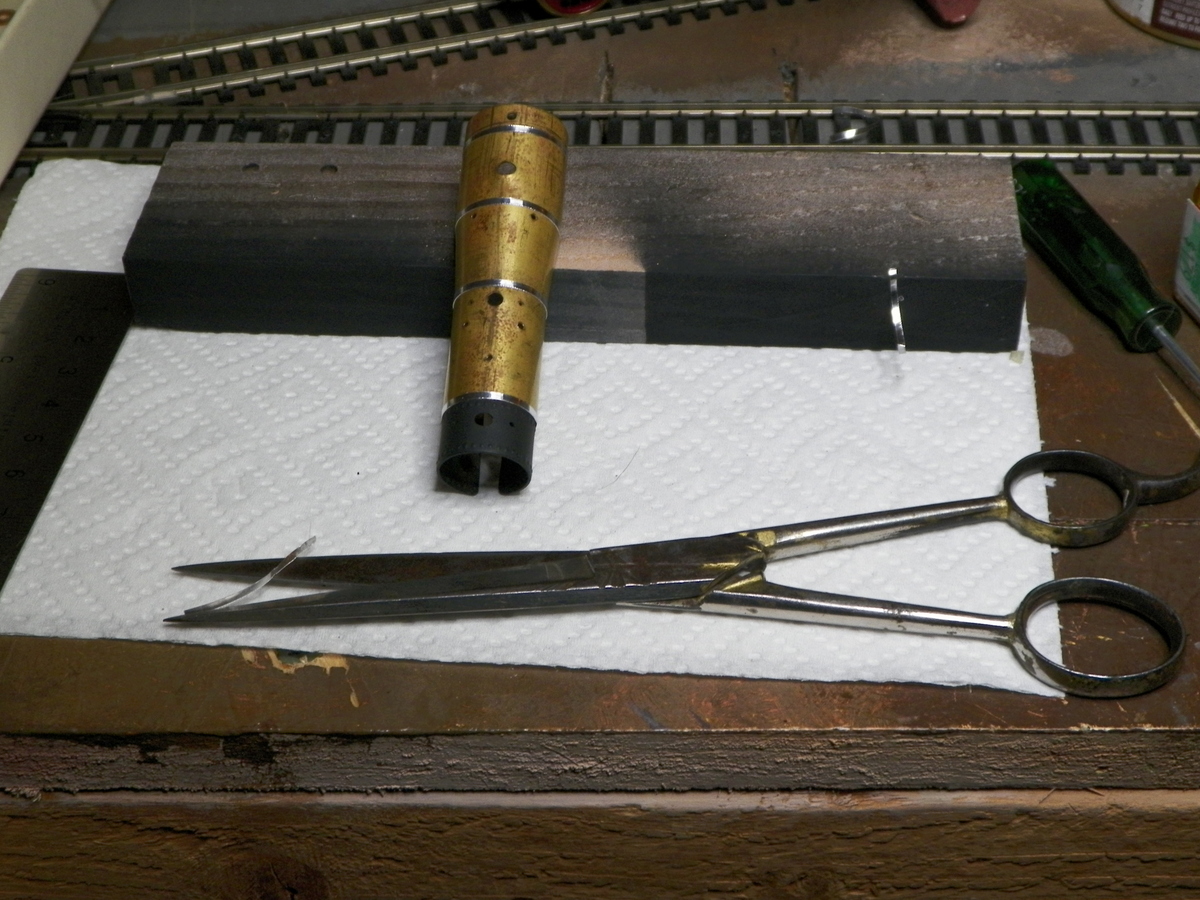
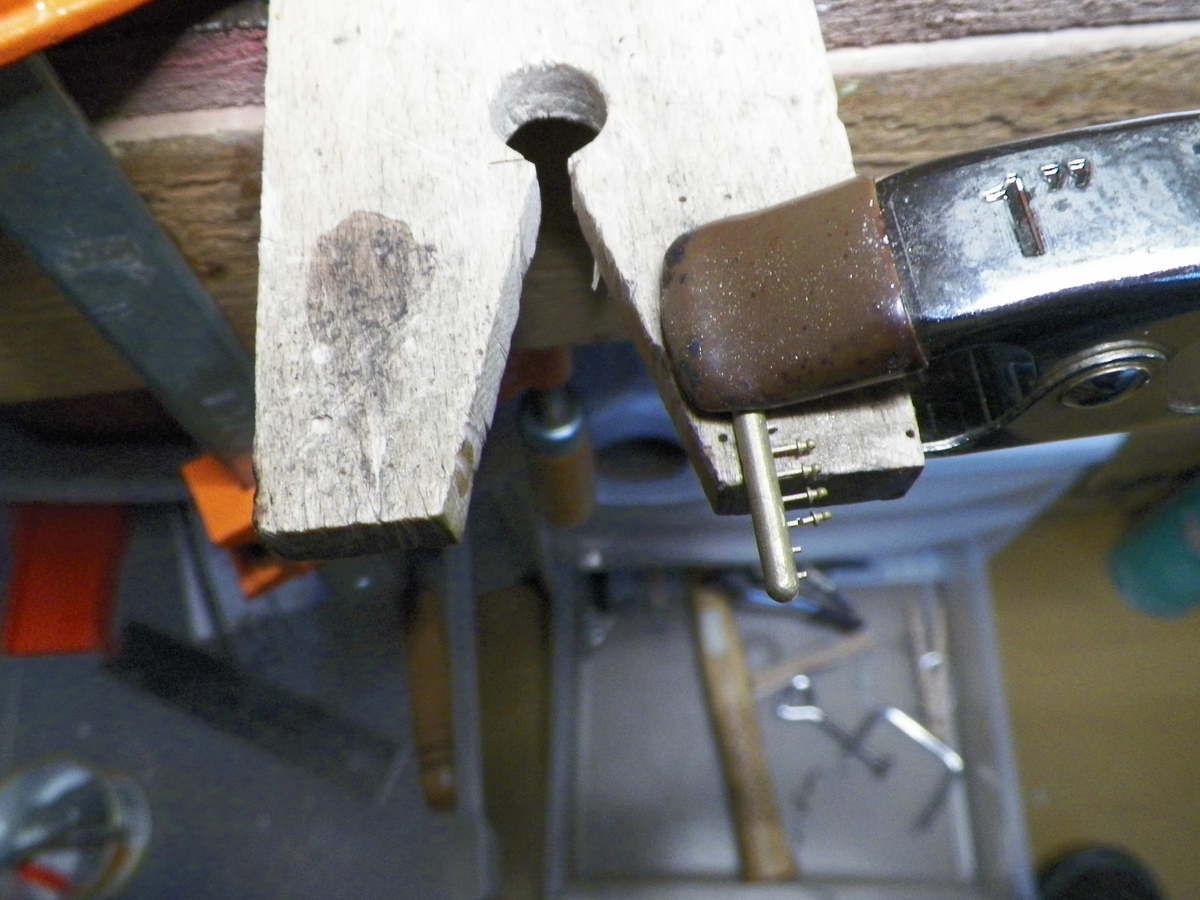
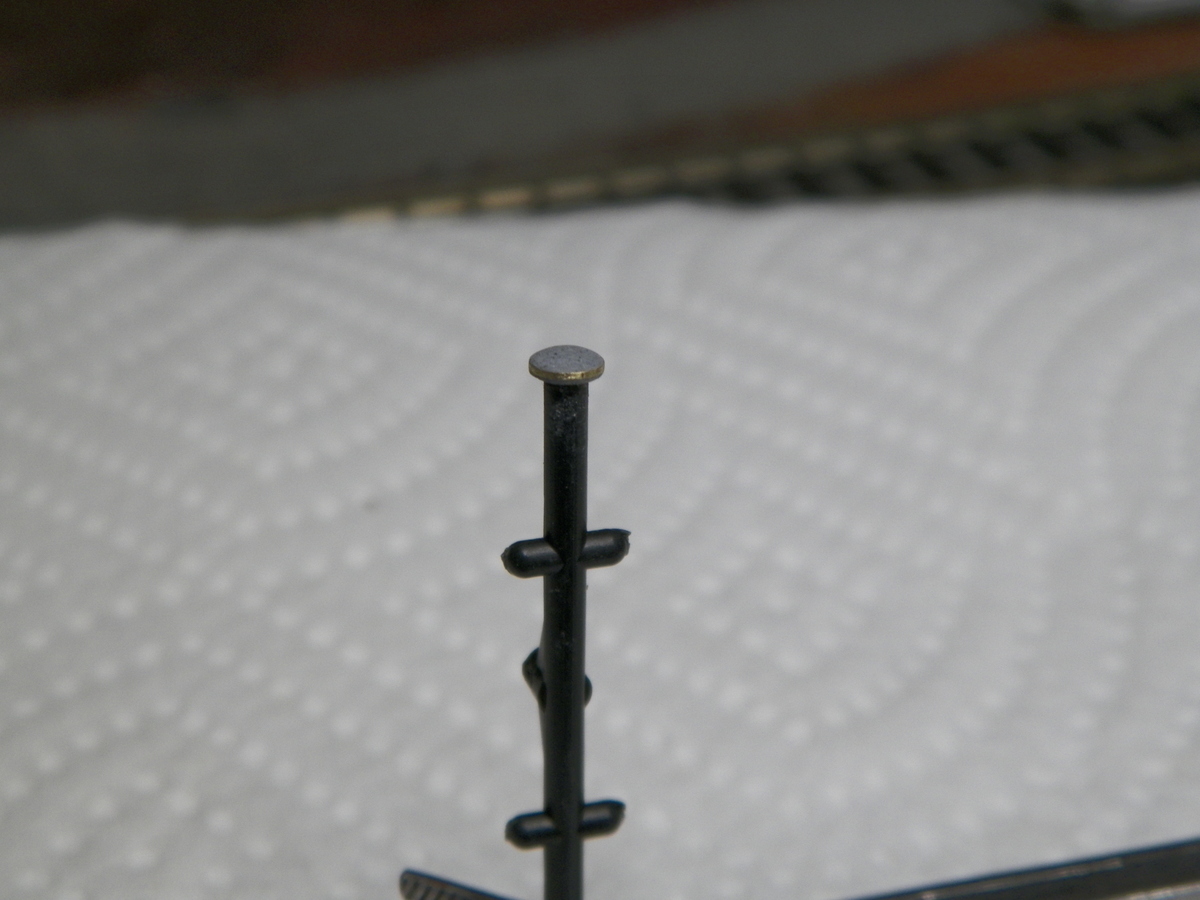
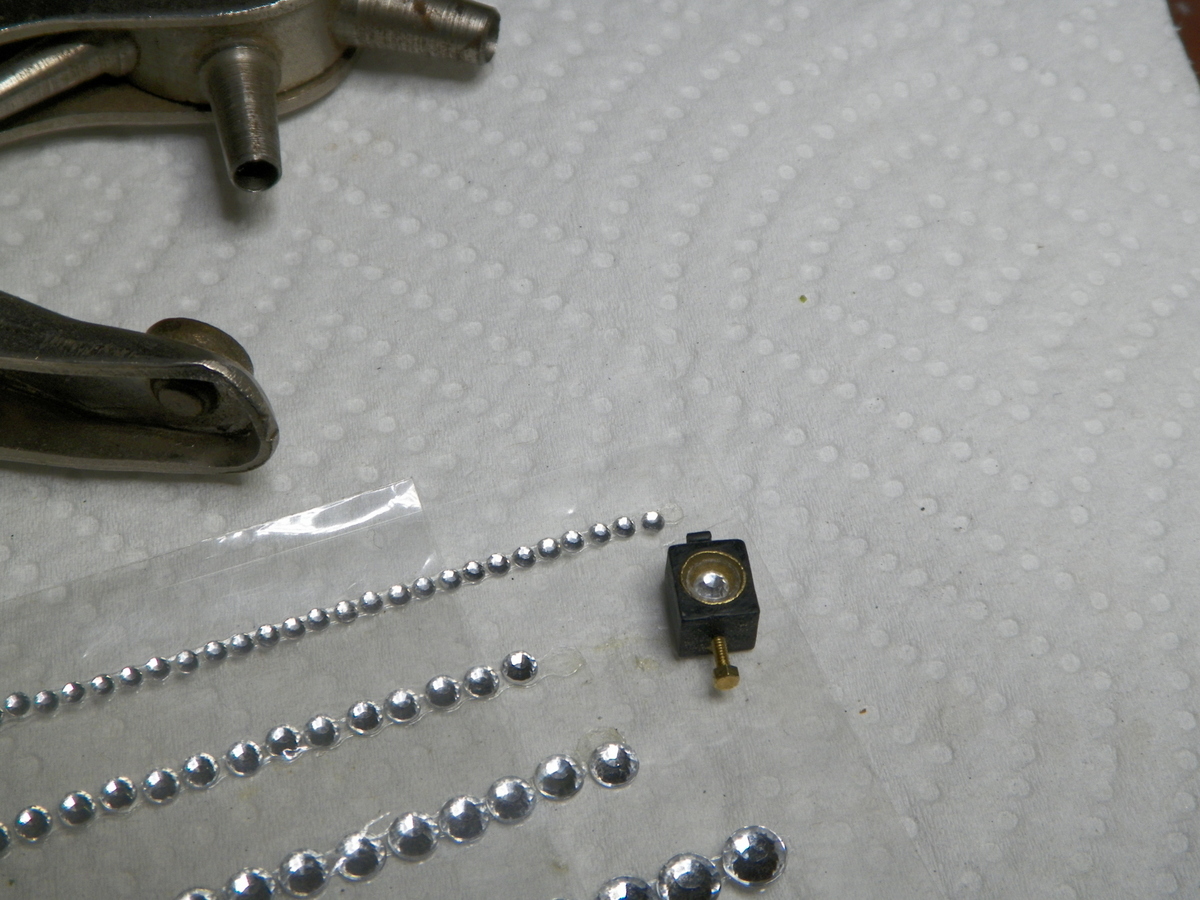
Jumped into the cold water and took my chances putting the tiny little stanchions in for the tender grab irons. Interesting how the photos tell you what you need to tighten up that you might completely over look. I used a jeweler's saw to cut the stanchions off the sprue; this so I wouldn't have to try and file the tiny mounting pin back into shape after side cutters pinched it out of shape. There's a tiny drop of Crazy glue on the bottom end of the .020 grab bar; wasn't sure how to hold it in place without making a mess.

I cut them "most" of the way through and then bent them off; this so they wouldn't drop to the floor where I guess the vacuum might find them someday.
|
|
Country: USA ~
Posts: 2087 ~
Member Since: March 16 2013 ~
Last Visit: July 05 2018
|
Alert Moderator
|
|
|
|
Posted - November 14 2015 : 7:34:14 PM
|
Those grab irons really look good. They're not just convincing, but also kind of dressy as one would expect on such a dandy little pride-of-the-fleet engine.
A little gold paint on the wire railing would make it look like brass to match the stanchions.
Carpe Manana!
|
|
Country: USA ~
Posts: 2418 ~
Member Since: September 17 2013 ~
Last Visit: July 12 2026
|
Alert Moderator
|
|
|
|
Posted - November 17 2015 : 1:43:29 PM
|
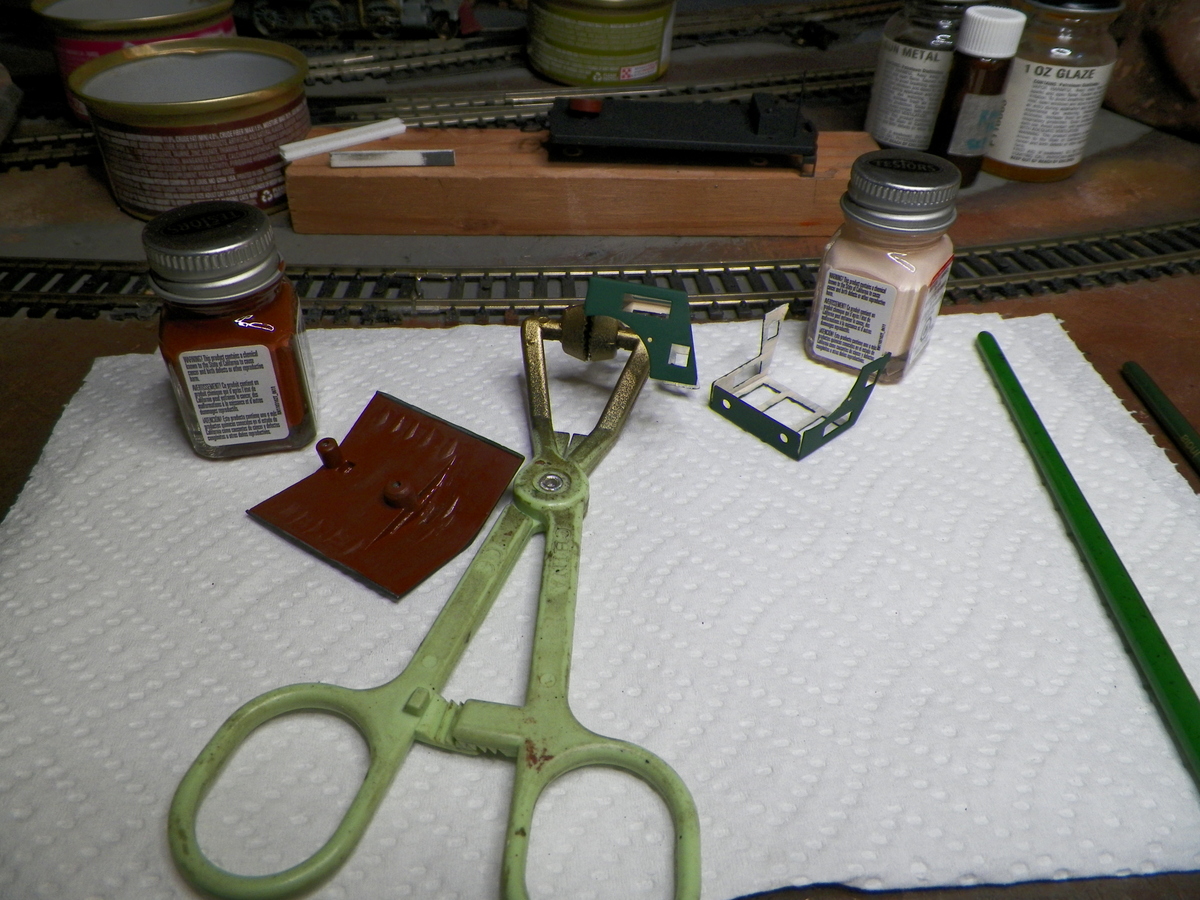
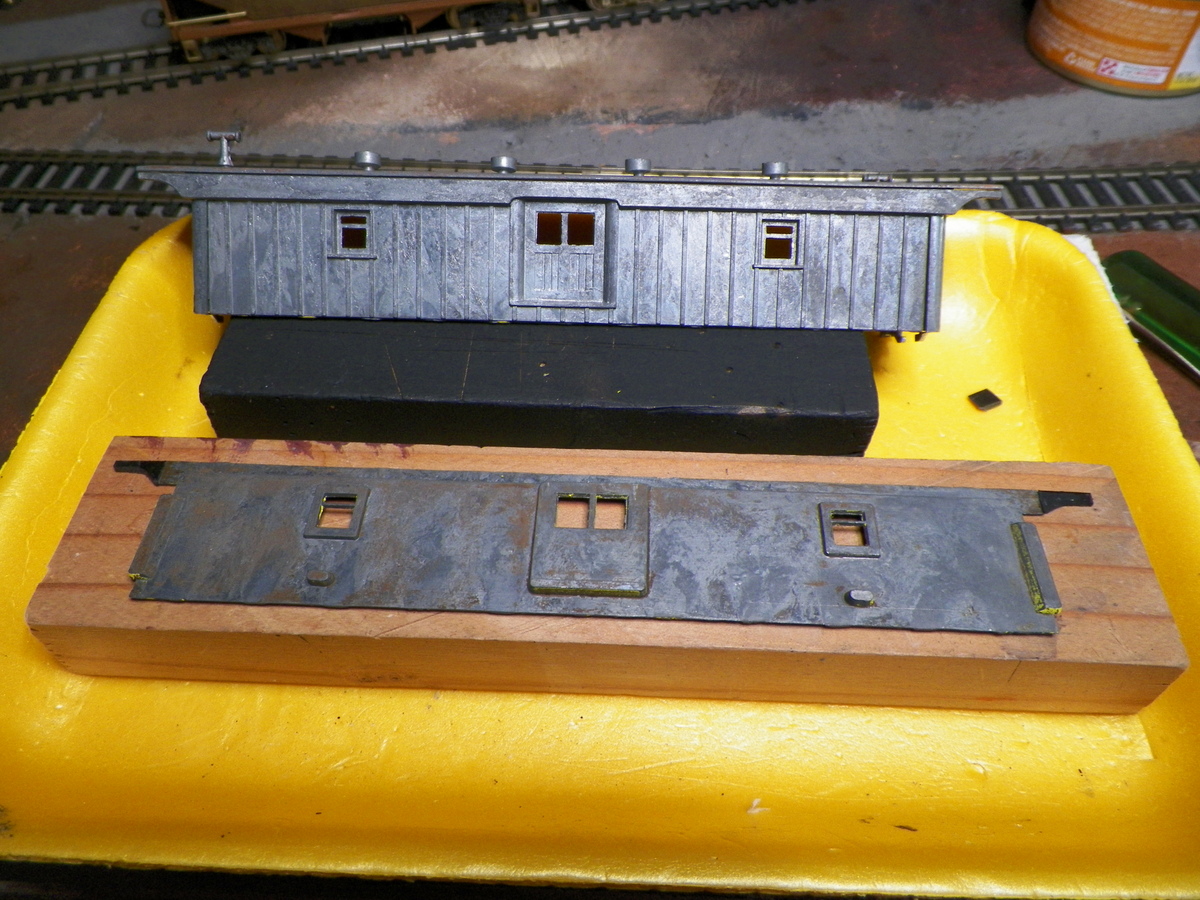
Been doin' a few things; workin' on firewood, a smoke box plate, and repainting. I decided to also repaint the cab. After a few coats of cream on the interior, I realized I really didn't clean the inside of the cab up well and I thought if I was going to spend that much time on this thing, I didn't want folks to "lift up the rug" to find the real quality of my work.
The smoke box plate is a 1-72 brass washer filled with JB Weld and then scuffed into shape. Some red paint on the front and then clean-up to allow a brass ring to show around the edge (not done yet).
And the little guy is showin' us how you can just day dream about gettin' the wood split and it gets done . . .
The first time I painted rods on another locomotive, I wasn't optimistic about the paint staying on, what with oil and movement, but given the paint cures good, it seems to stay on just fine.
|
|
Country: USA ~
Posts: 2087 ~
Member Since: March 16 2013 ~
Last Visit: July 05 2018
|
Alert Moderator
|
|
|
|
Posted - November 17 2015 : 5:38:50 PM
|
And another digression has come upon the scene. I'd gotten this set of Hi Ballers old time coaches and combine. The combine was the first to get after since it had a broken ledger board on one side. So, Ken, this repair was done with imported parts from the UK . . . the black plastic that you taped the Belle rods to seemed just the right thickness and so far it seems to have super glued to the cast part OK. This digression then is to get a little consist together for the Belle to pull . . .

|
|
Country: USA ~
Posts: 2087 ~
Member Since: March 16 2013 ~
Last Visit: July 05 2018
|
Alert Moderator
|
|
|
|
Posted - November 17 2015 : 7:21:00 PM
|
barry,glad the plasticard came in handy,hope it works out ok,and a nice job of the repair and shaping,ken
catfordken
if you cannot see the light at the end of the tunnel,try turning around
|
|
Country: United Kingdom ~
Posts: 8294 ~
Member Since: September 28 2006 ~
Last Visit: October 20 2021
|
Alert Moderator
|
|
|
|
Posted - November 23 2015 : 12:25:34 PM
|
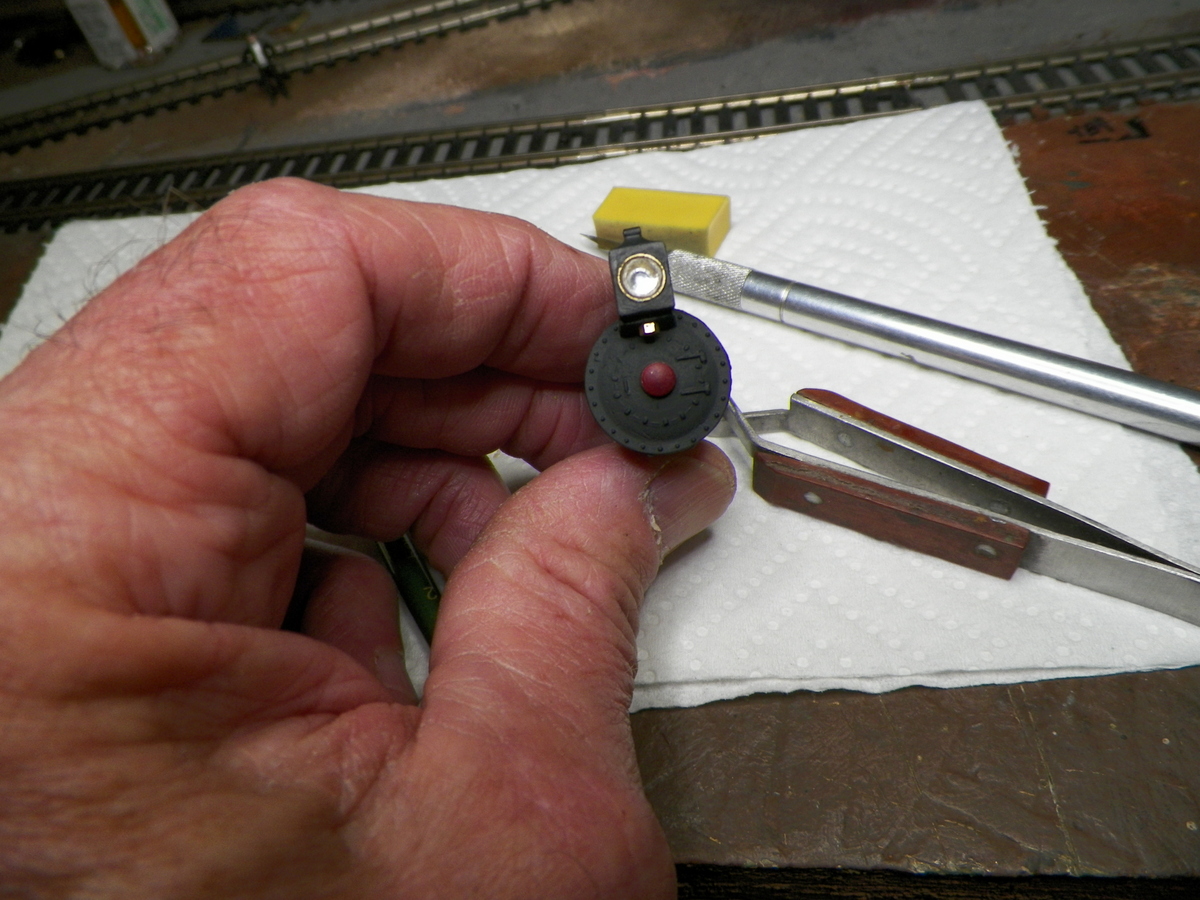
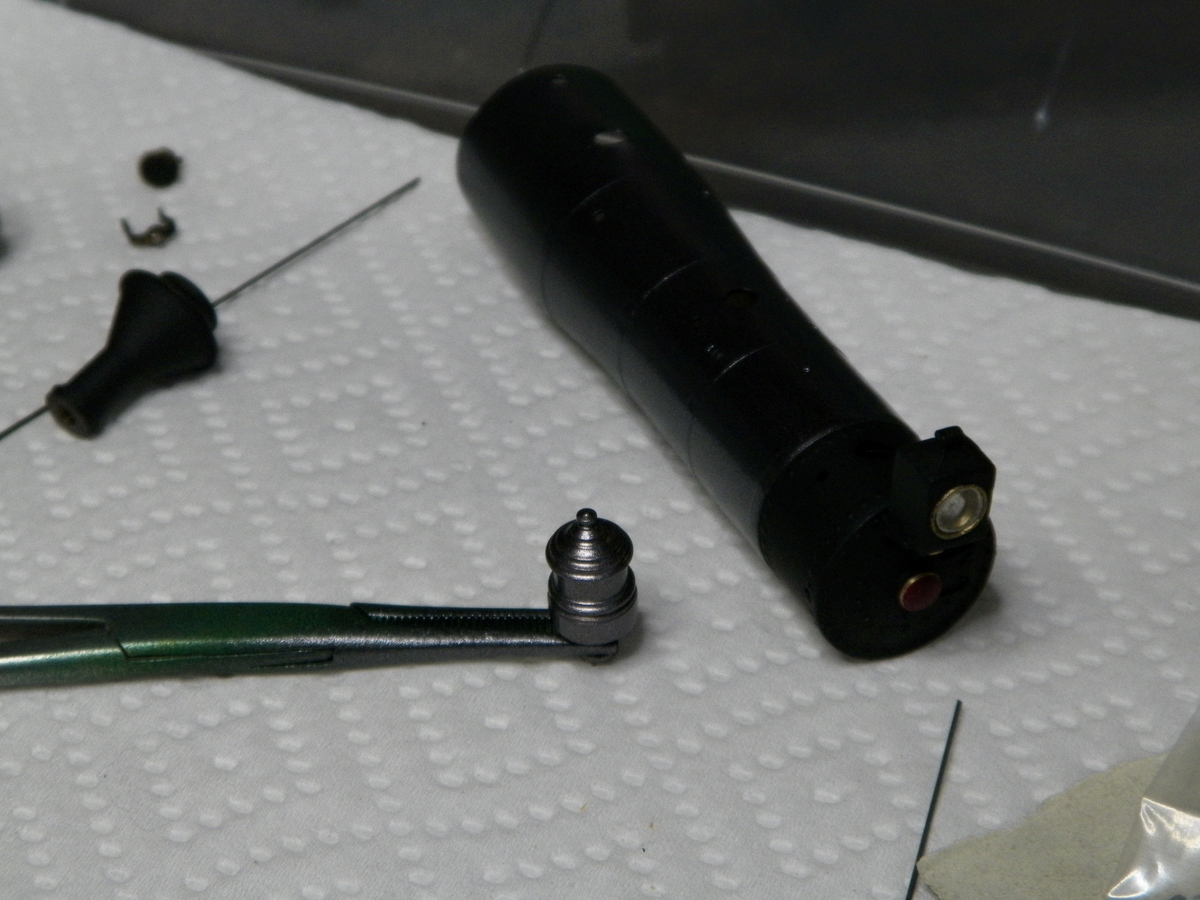
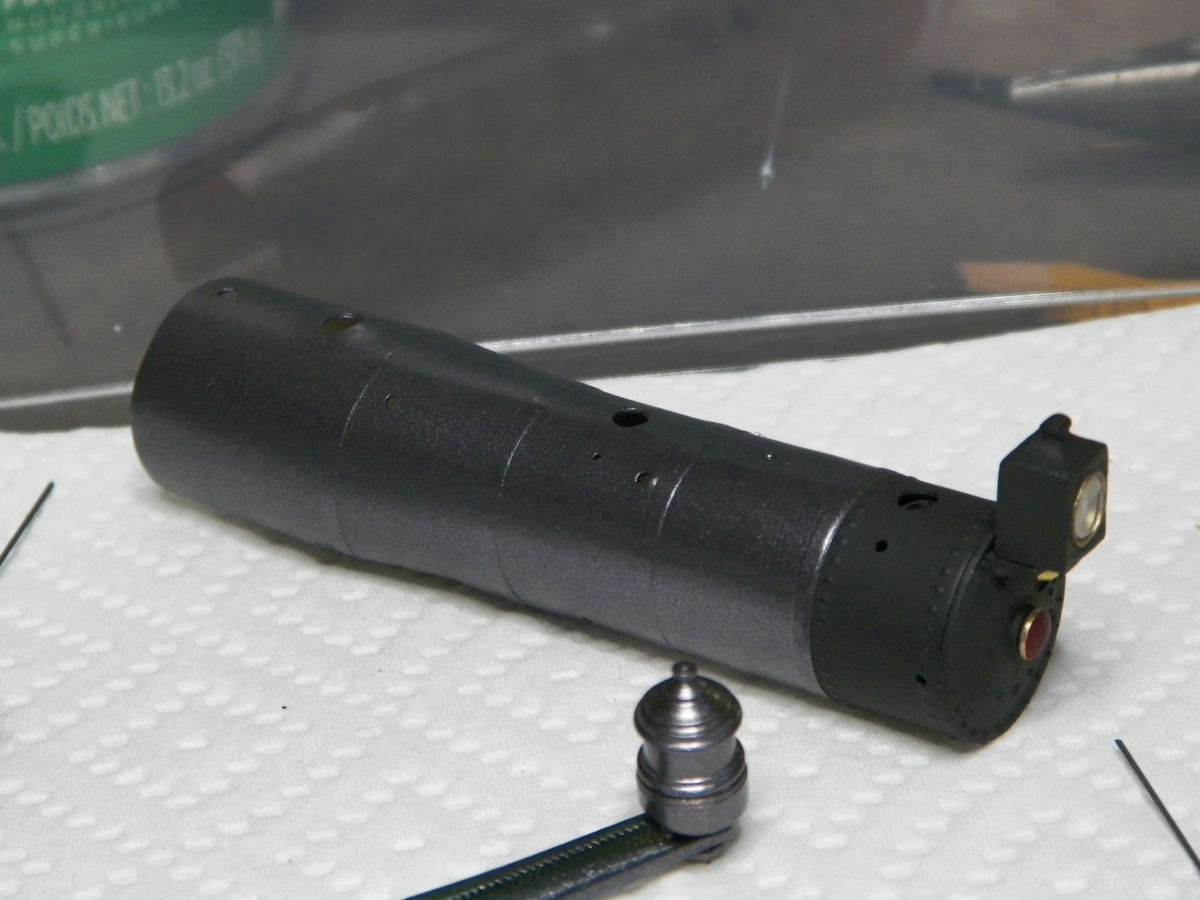
Building this model has been sort of like going to school; doing something and maybe it doesn't work quite so good and starting over. Fuss with this, fuss with that, what are you going to settle for? Let's see if I can drag this out to 3 months! Sheesh. I've gotten the smoke box together with the headlight and smoke box plate mounted. I ended up putting a cheap plastic crystal inside the headlight case and then a plastic lens that was cut with a leather punch (I didn't fancy myself being able to cut a nice circle by hand.) The headlight was sprayed with brass paint and then flat black painted around it . . . thinking that it would be easier for my skill to paint around the brass trim instead of trying to brush paint brass trim on top of flat black.
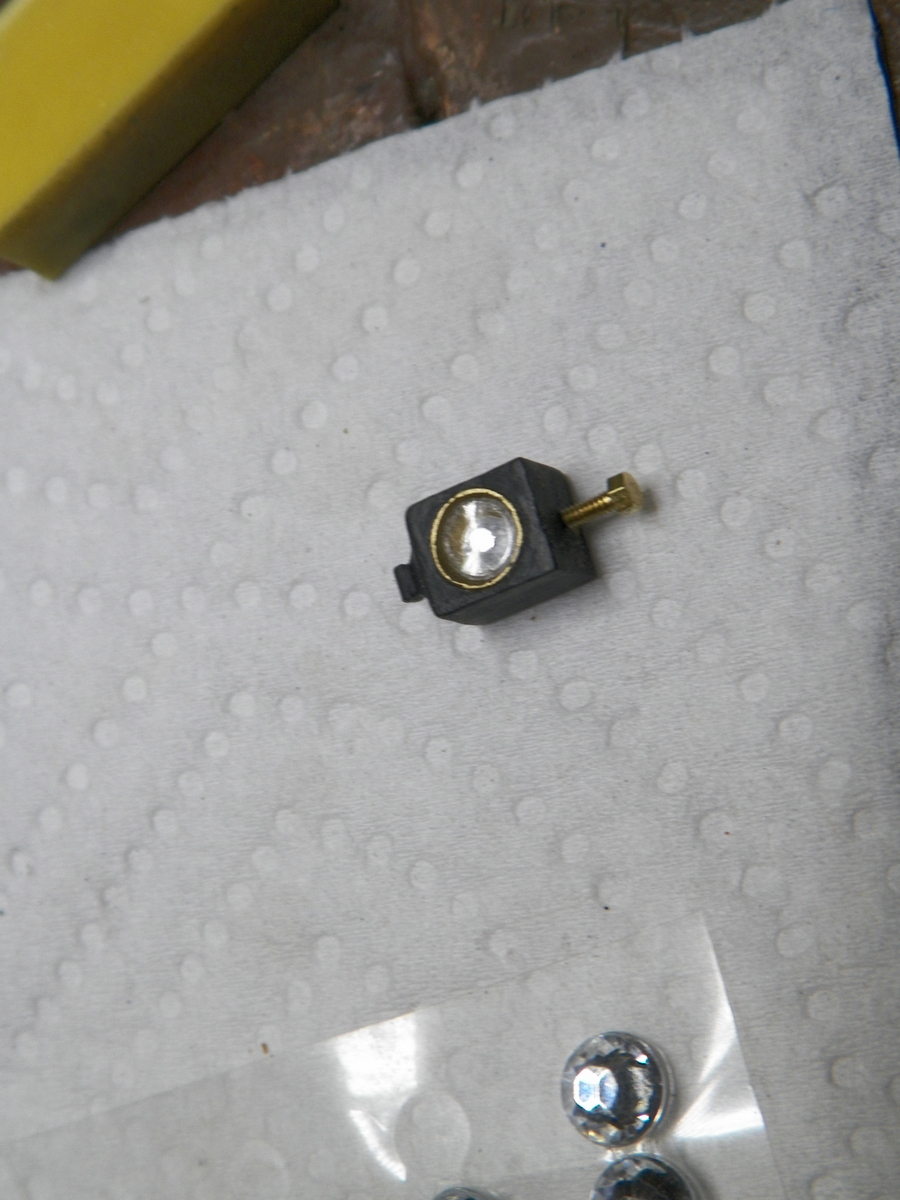
Probably will end up painting the hex nut flat black and maybe brightening up the red on the smoke box plate, which got dulled when I was sanding the back flat.
And I never got real satisfied with the Russian iron I put on the boiler, or the boiler bands. You know how you look at something you've done yourself and your eye goes directly to the defect(s). So . . . the boiler got stripped and the boiler bands redone with pin striping tape (1/16") that I found at the LHS. This pin striping tape is nicer than what I tried to cut by hand; it doesn't have the minutely wrinkled edges. It's suppose to "cure" for 48 hours. Then I'm going to try this gun metal spray I got (sample some on the flat plate next to the boiler). I did save a photo of the boiler before it got stripped of paint, but after the previous bands were removed; I thought it was kind of interesting the way the bands existed . . . given you applied paint thin enough, could be a technigue to try?
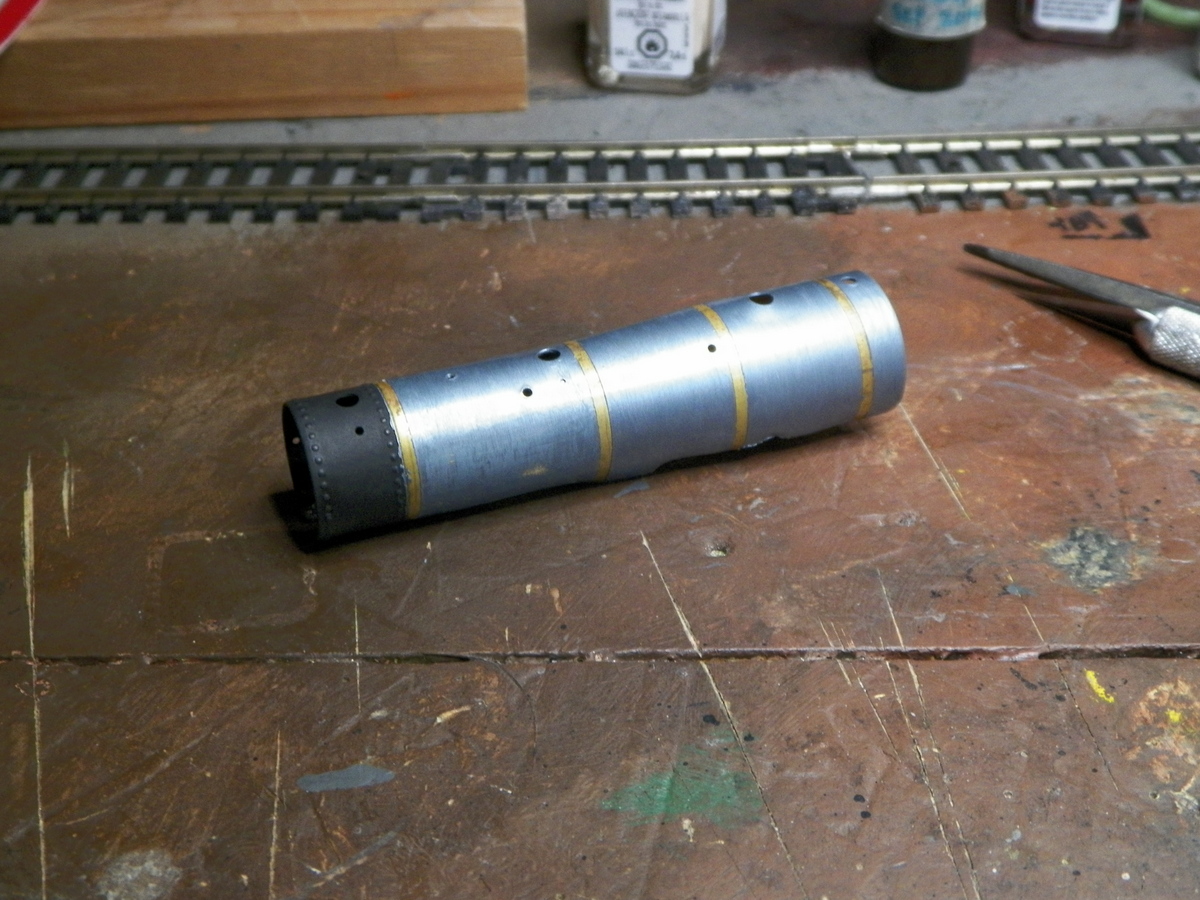
The boiler got sprayed with flat black (for the smoke box and to "prime" the boiler) before putting the pin striping tape bands on . . .
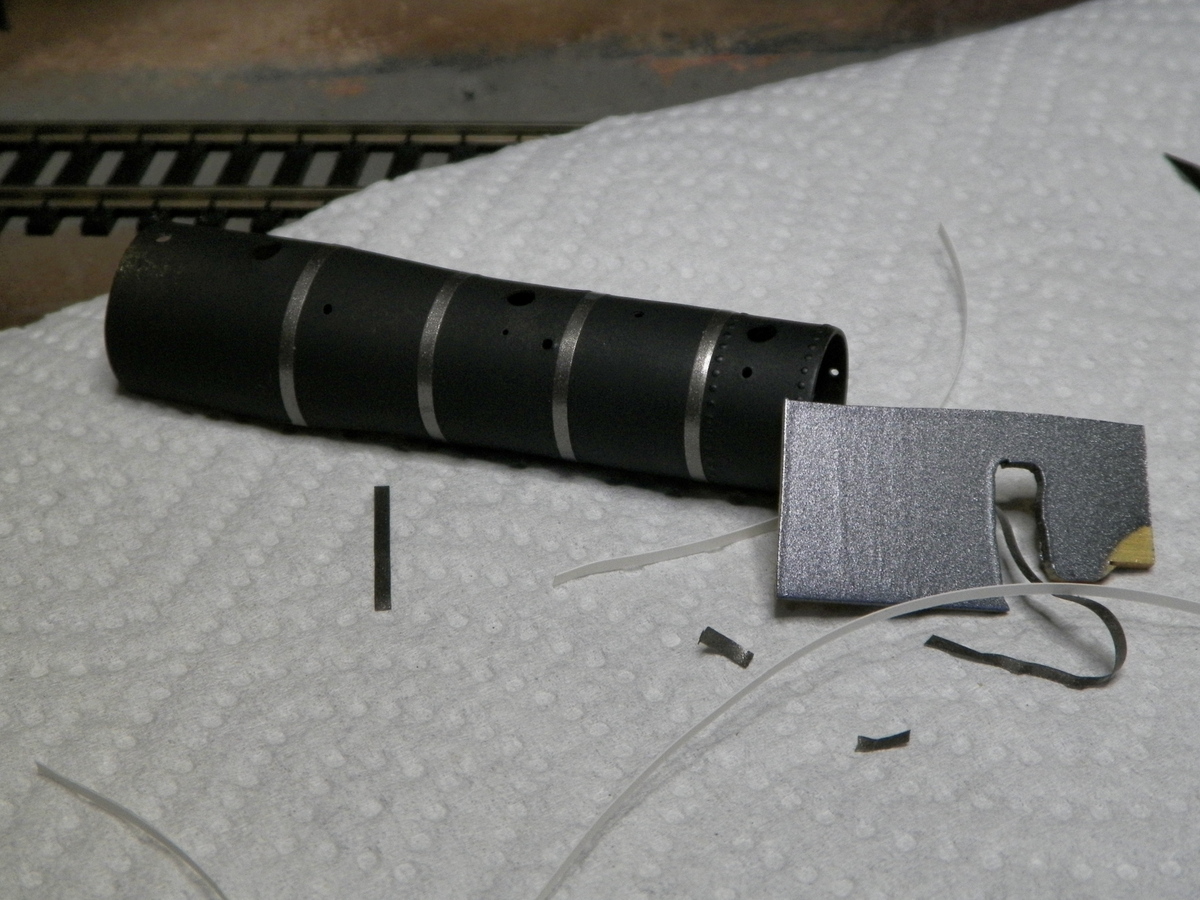
The gun metal that is sprayed on the flat plate is a test. Probably needs more paint, but I kind of dig the way that it can look black in one light setting and almost chrome in another light setting . . . a bit like the old photos seem to reveal the character of locomotives with Russian iron boilers. We'll see . . . there's always paint remover.
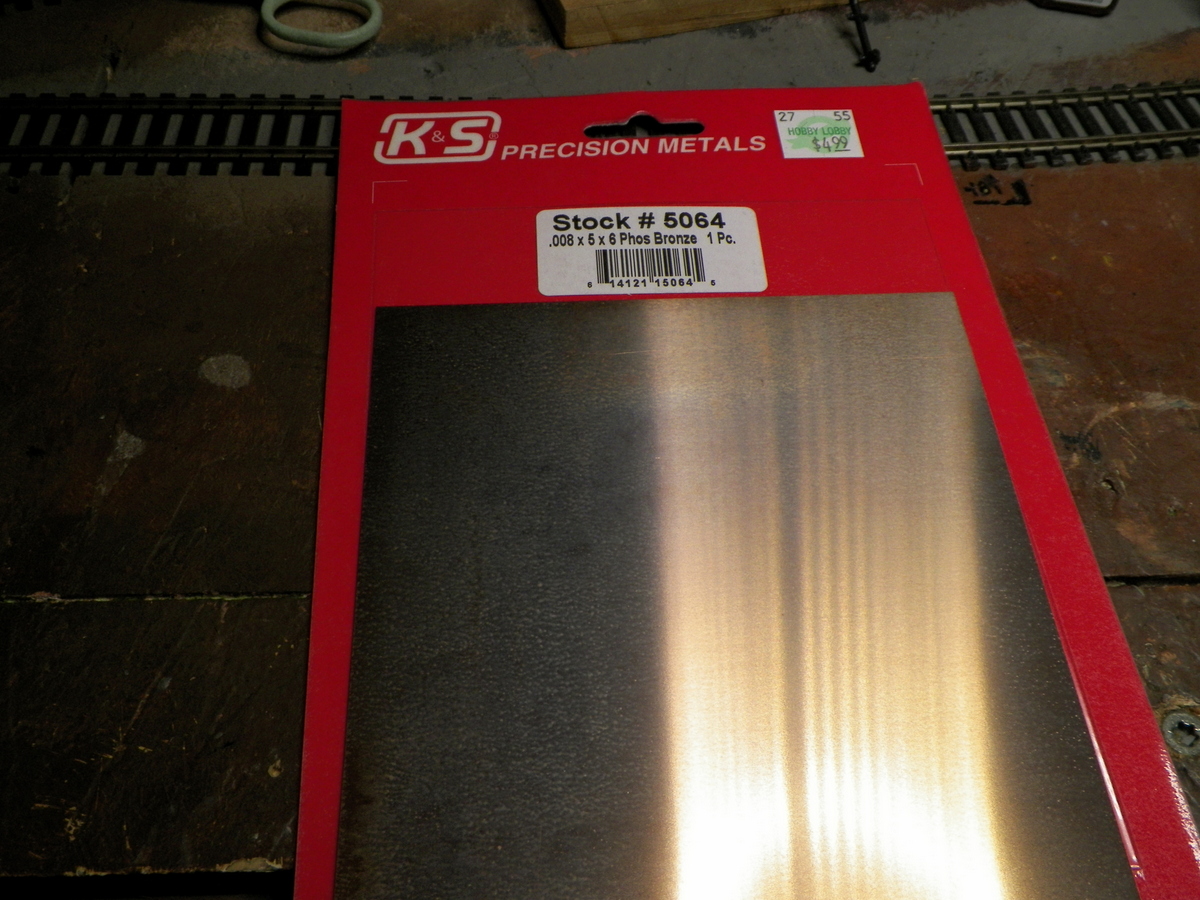
I also need one of those bronze strips that go on the tender above the trucks, with the spring arms that come out to contact the pin at the back of the locomotive. You can always "screw" a contact wire into the tender since there are already holes there, but I like the idea of being able to pick the locomotive up separately from the tender. I was thinking I would make this from copper, but when I was looking at the K & S display I found this bronze sheet that seems an OK thickness. The big issue will be to see if I can bend this tidily . . . it's like 5/16" wide with each little side that ends up leading to the "tabs" only 1/16" thick. We'll see how that works out.
|
|
Country: USA ~
Posts: 2087 ~
Member Since: March 16 2013 ~
Last Visit: July 05 2018
|
Alert Moderator
|
|
|
|
Posted - November 23 2015 : 4:47:11 PM
|
That's a sweet looking headlight. The way the jewel sits back in it behind the lens, looks about like a real light with a reflector back inside of it.
Regarding the phosphor bronze, if you're making some kind of spring arms, it's a way better metal than copper. Phosphor bronze is a spring metal, as such. Copper will bend and stay bent too easily to be a good spring. You made a good purchase.
Carpe Manana!
|
|
Country: USA ~
Posts: 2418 ~
Member Since: September 17 2013 ~
Last Visit: July 12 2026
|
Alert Moderator
|
|
|
|
Posted - November 23 2015 : 9:06:02 PM
|
Looking good. I agree with the jewel in the headlight. Really made it look good.
I like those Hi Ballers you found as well. Nice looking construct you're gonna have
when you're finished. Any idea on what road name you're gonna use??
|
|
Country: USA ~
Posts: 865 ~
Member Since: September 23 2014 ~
Last Visit: May 01 2023
|
Alert Moderator
|
|
|
|
Posted - November 24 2015 : 12:05:33 PM
|
IF I ever get my Tyco 4-6-0 going I will LED the headlight
Course I'd like to get the Leviathan in HO scale 
this project is looking good 
|
|
Country: USA ~
Posts: 15032 ~
Member Since: February 23 2009 ~
Last Visit: July 14 2026
|
Alert Moderator
|
|
|
|
Posted - November 24 2015 : 4:18:11 PM
|
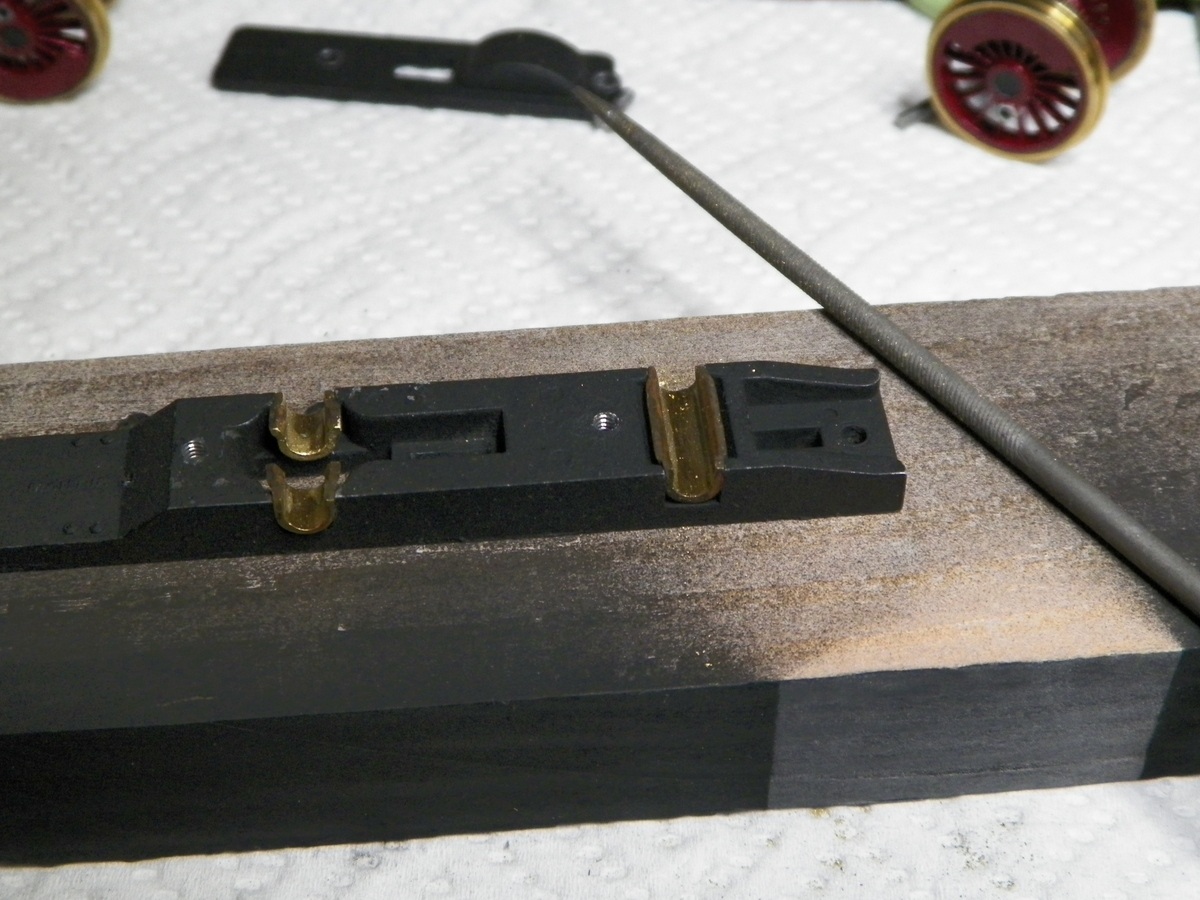
I looked at that phosphor bronze sheet I had long enough and it was time to see if I could pull it off. My thoughts were like the tinsnips are going to bend the heck out of anything if they can cut that fine. I had scored outline marks with an xcacto knife. It went easier than I anticipated . . .
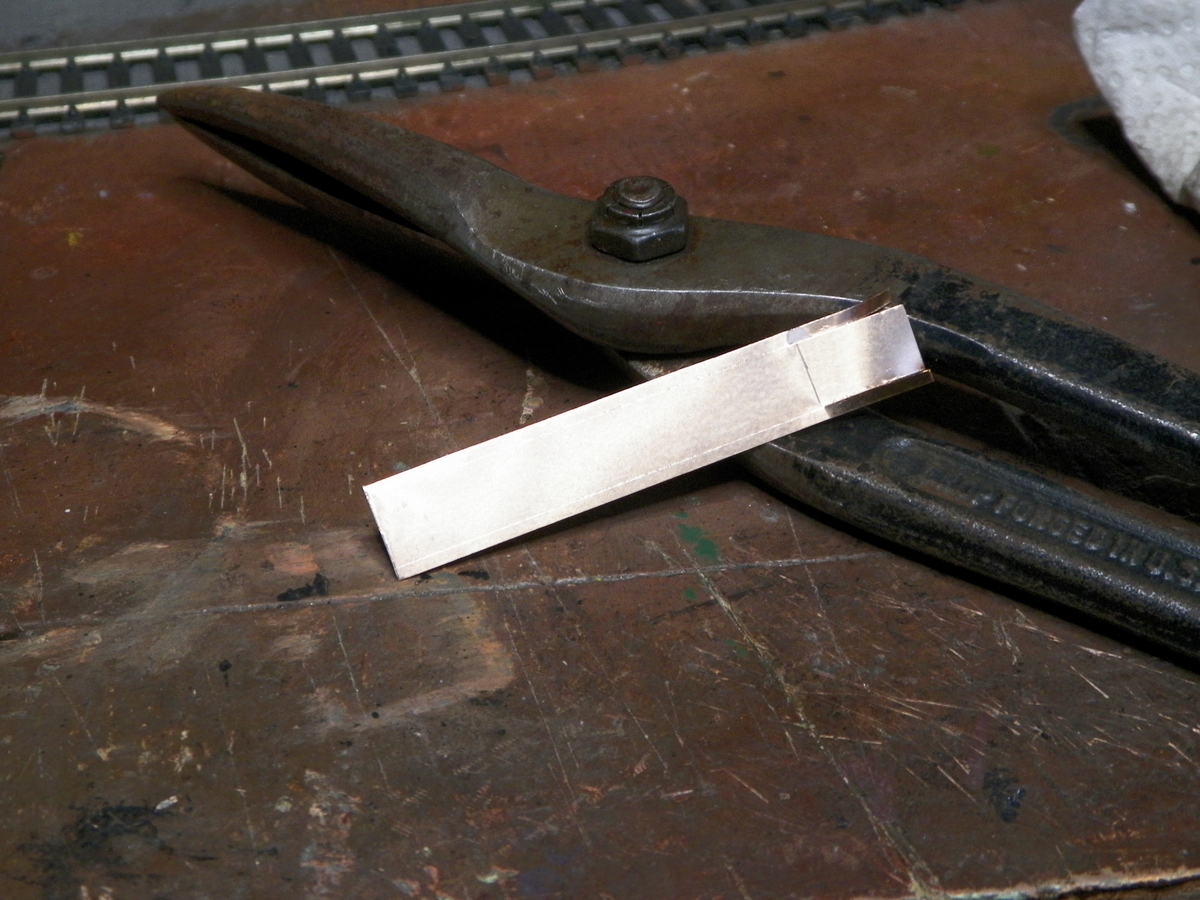
Then to drill the mounting holes . . .
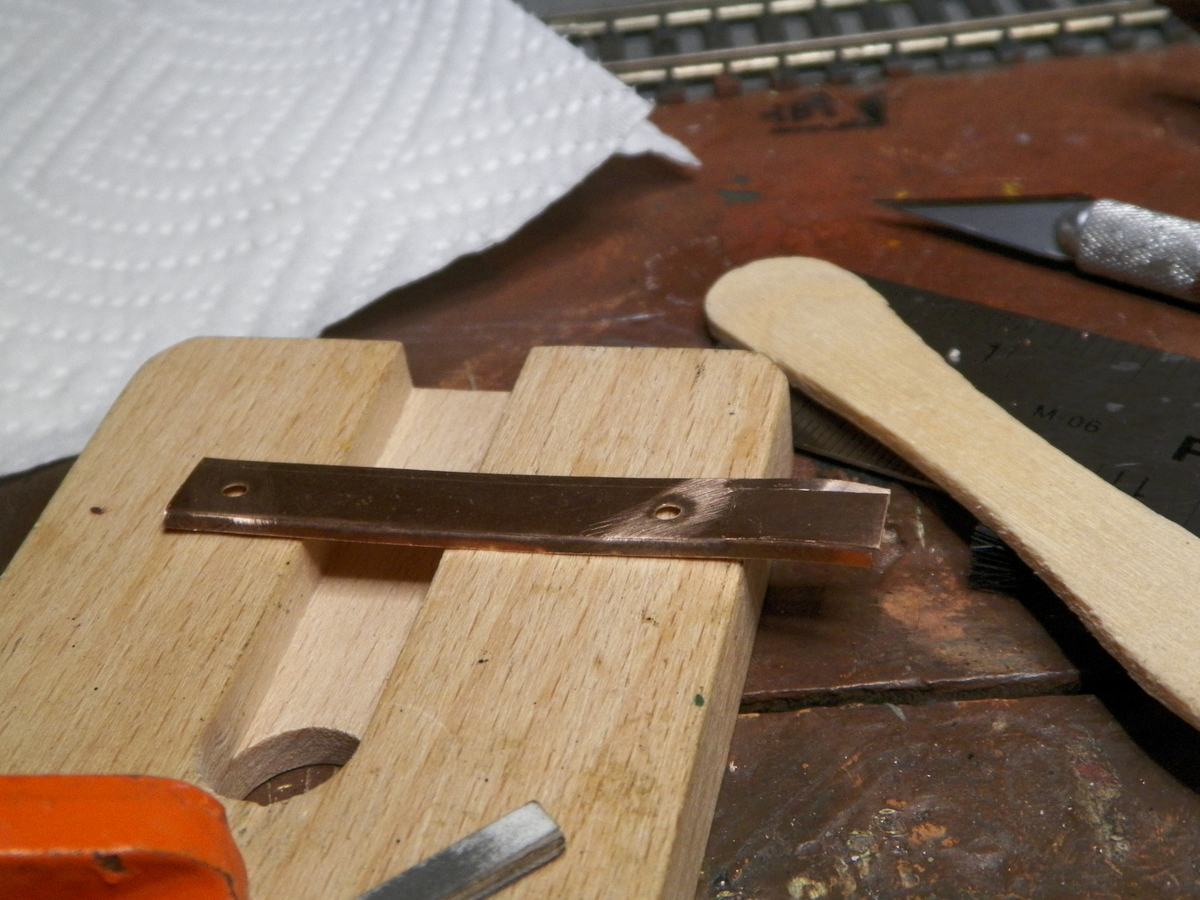
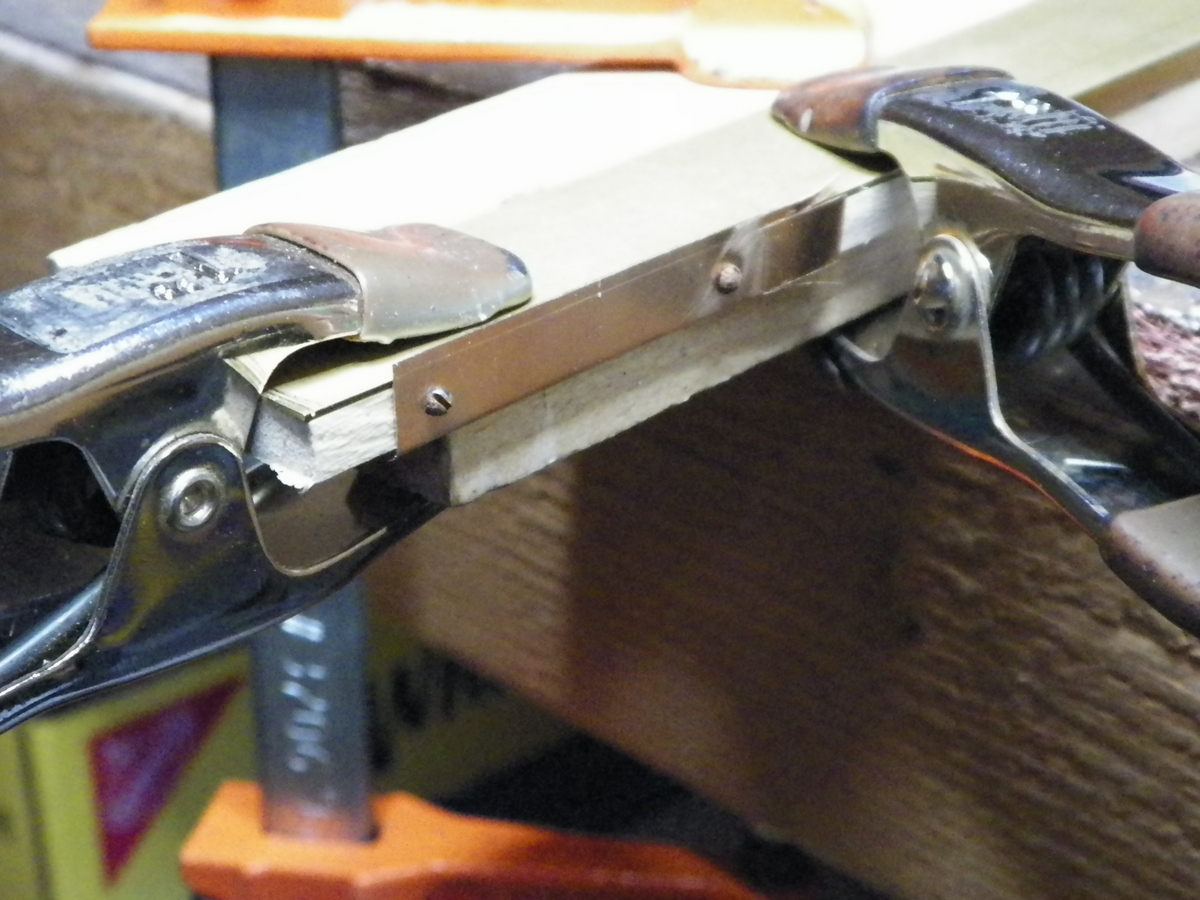
I never did get real clean bends. I secured the piece with screws through the mounting holes so it wouldn't "scoot away" as I was trying to bend it. Tried a few different things; tapping with a tack hammer, plyers pressing together a metal plate on either side . . . just not the same as using a metal brake. But it seems serviceable and the contact end is actually "springy" . . .
Everything looks bright and shiny. We'll see how good the contact actually is. I'm guessing the weak point will be in the trucks.
|
|
Country: USA ~
Posts: 2087 ~
Member Since: March 16 2013 ~
Last Visit: July 05 2018
|
Alert Moderator
|
|
|
|
Posted - November 24 2015 : 7:35:10 PM
|
Nicely done!
The worst contact that I've seen with Mantua tender trucks is when the Zamac frame sits directly on the steel truck bolster. If I put a piece of brass in between, it seems to work much better. You have the bronze, so that should work the same. I also like to put a little automatic transmission fluid or gear grease on the axle ends to keep the bearing surfaces from getting pitted or corroded.
By the way, I like that repair job where the side frame is bolted to the truck bolster.
Carpe Manana!
|
|
Country: USA ~
Posts: 2418 ~
Member Since: September 17 2013 ~
Last Visit: July 12 2026
|
Alert Moderator
|
|
|
|
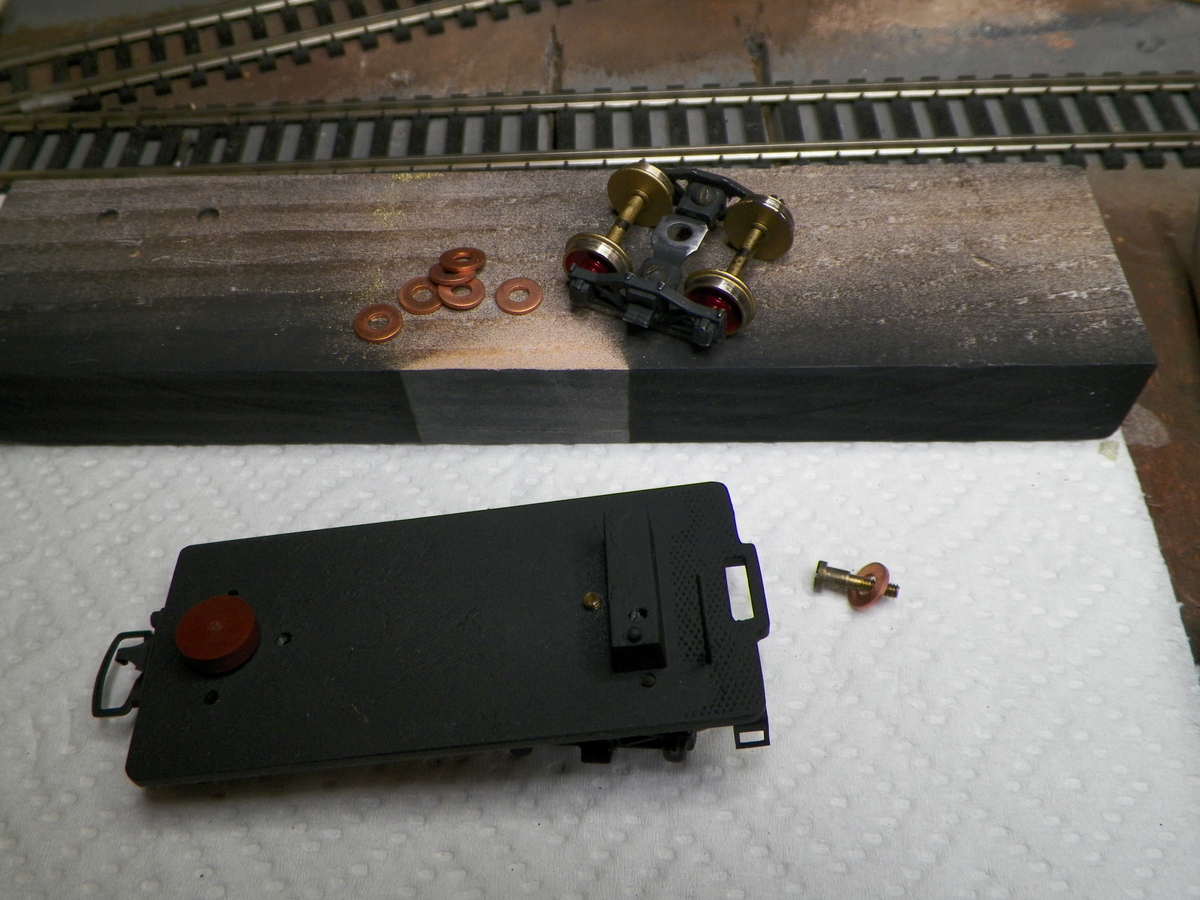
Posted - December 04 2015 : 8:11:17 PM
|
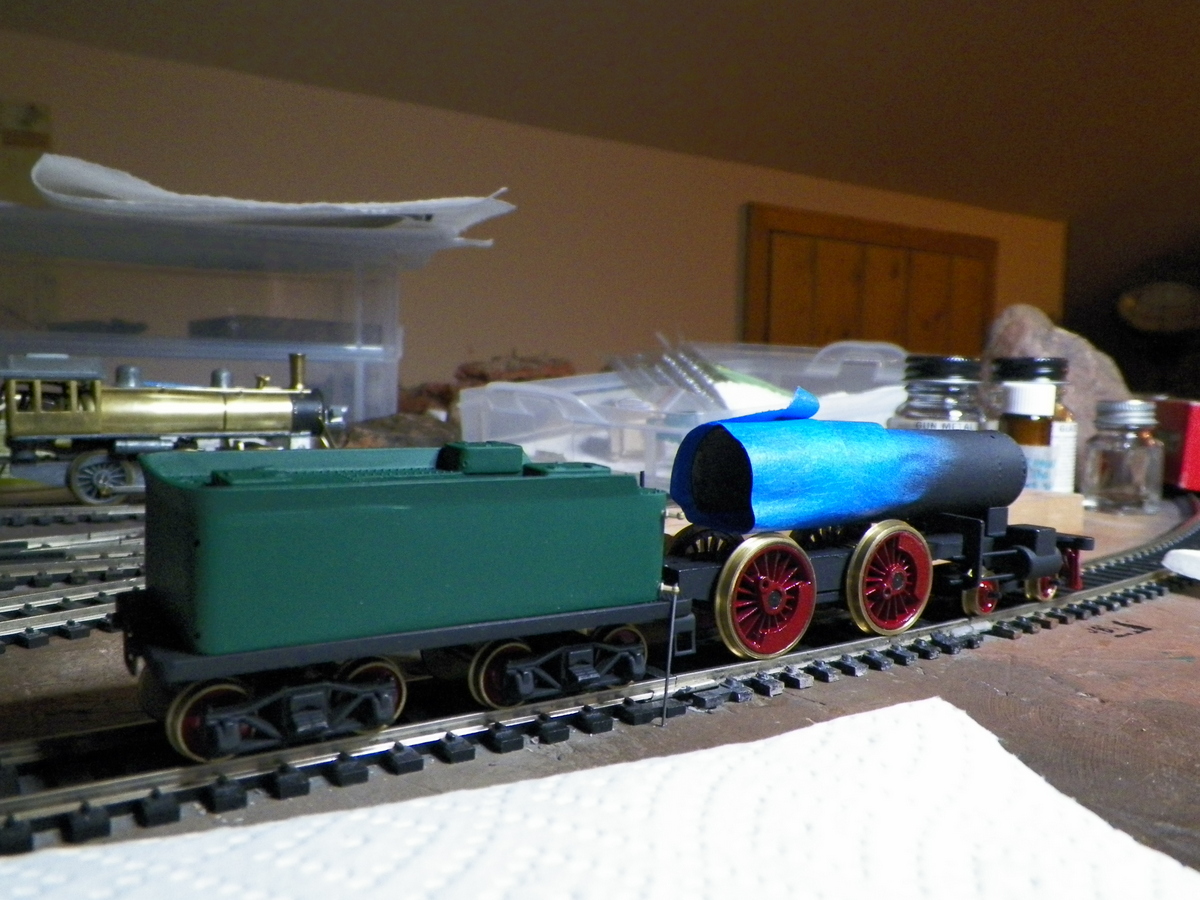
Whoa! That was an interesting break in service. Anyway, I've continued fussing with this thing. Had the framed mechanism pulling a tender and car (maybe a video of the finished set in a week or so?) and maybe it works a bit better under load, but it sort of puts me in mind of getting behind the wheel of a peppy car for the first time . . . where you haven't yet figured out the sweet spot in the clutch, or just how much gas to give it. And then, with those big drivers . . . it's like, you start rollin' and you're rollin' good. Here's a few recent photos. We'll see how the boiler looks on the locomotive, but I do find it "interesting" if nothing else. It literally does look black from some perspectives and lighting, and chrome with others . . .
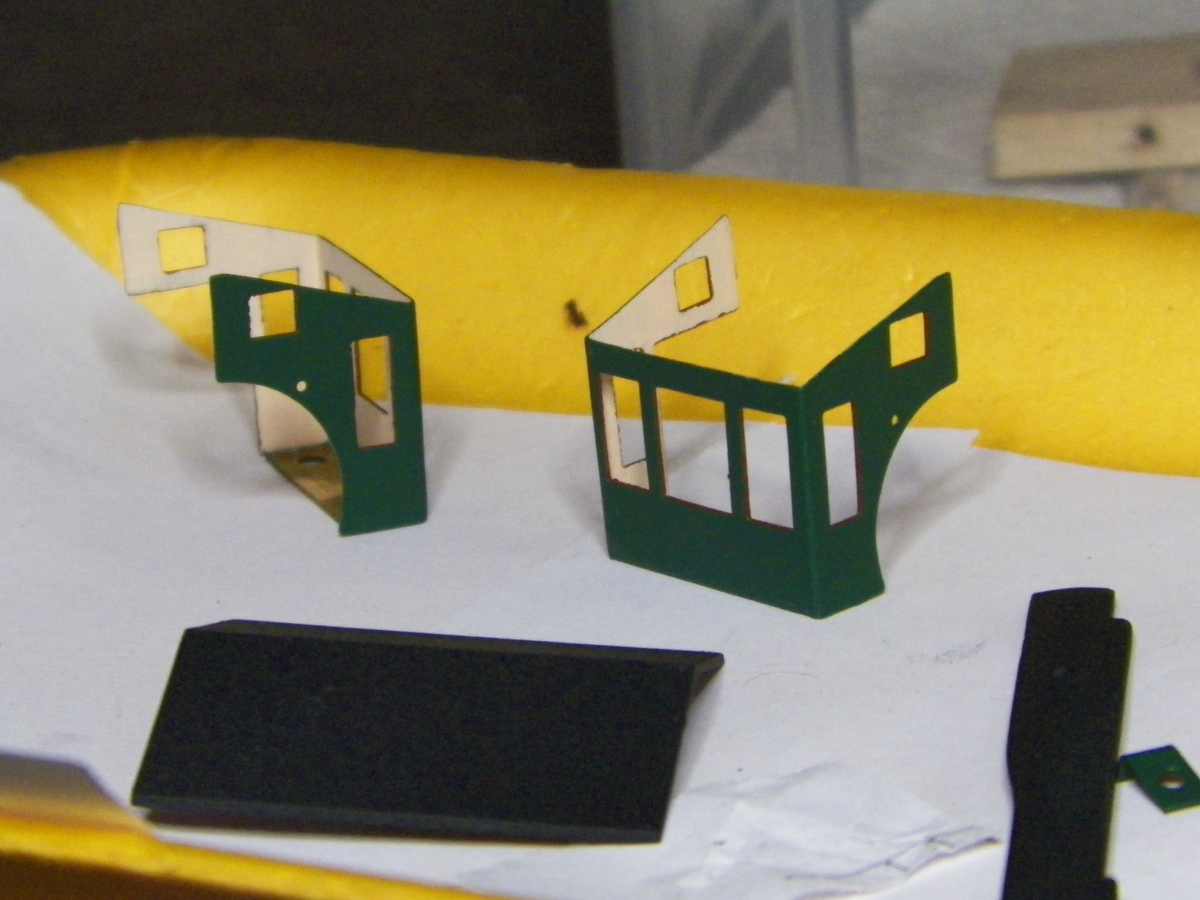
And I've been working on the Hi Ballers baggage car . . .
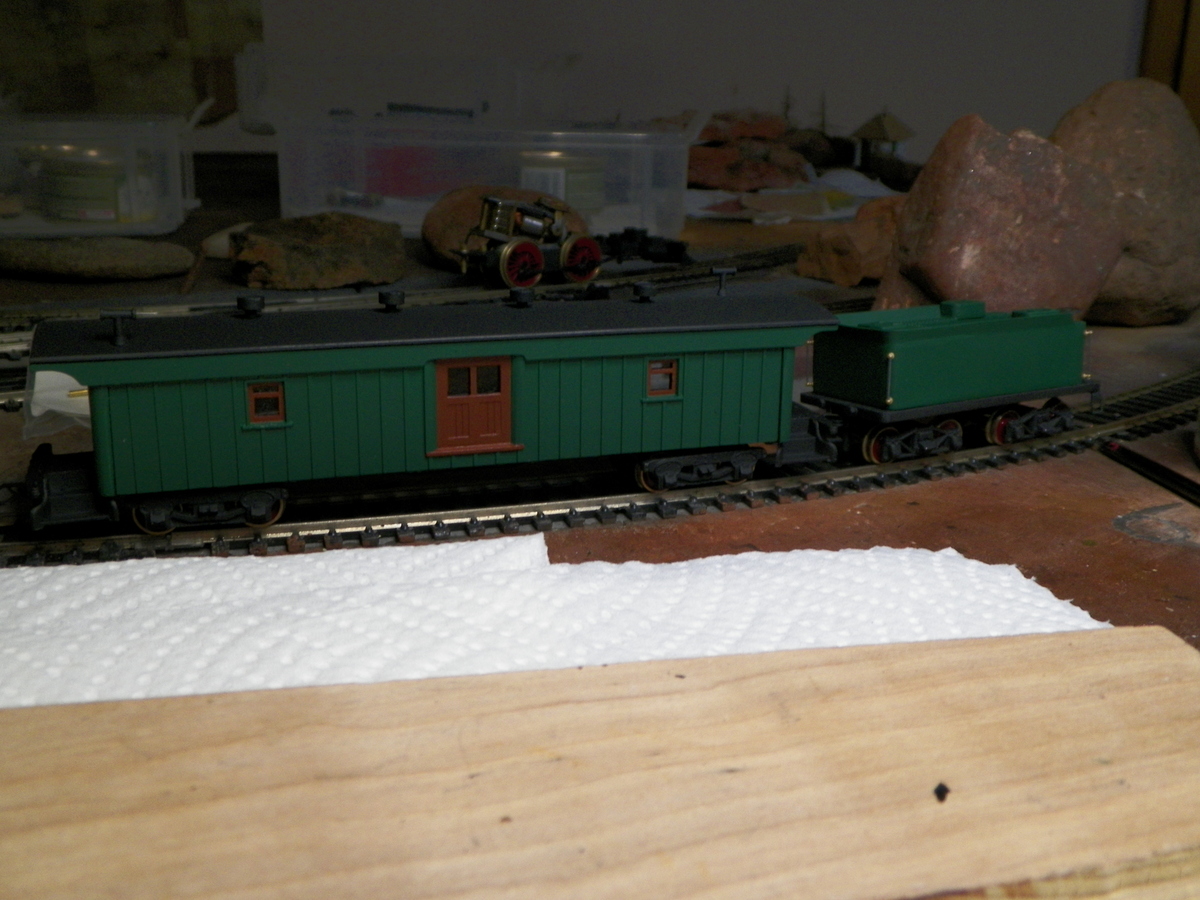
I got this burr in my saddle to paint trim around the windows of the cab, knowing good and well I'd probably make a mess requiring touch up. We'll see how the touch up goes. The painted cab had been dull coated prior to me attempting the trim, so I have a few options in mind for clean up; "erasing" the rust color from areas it wasn't suppose to be; painting green over it (though this particular brand of paint only made the spray, so what I have to brush is stuff I "sprayed" into a bottle, and that has quite different characteristics regarding application and drying time); maybe "scrape" the messy parts off with a fresh knife blade. ? ? ? If that goes well then I'll glaze the windows and put it together . . . if not . . . brake fluid bath and try it again, maybe without the window trim . . .
|
|
Country: USA ~
Posts: 2087 ~
Member Since: March 16 2013 ~
Last Visit: July 05 2018
|
Alert Moderator
|
|