|
|
 Posted - February 28 2017 : 8:36:27 PM Posted - February 28 2017 : 8:36:27 PM


|
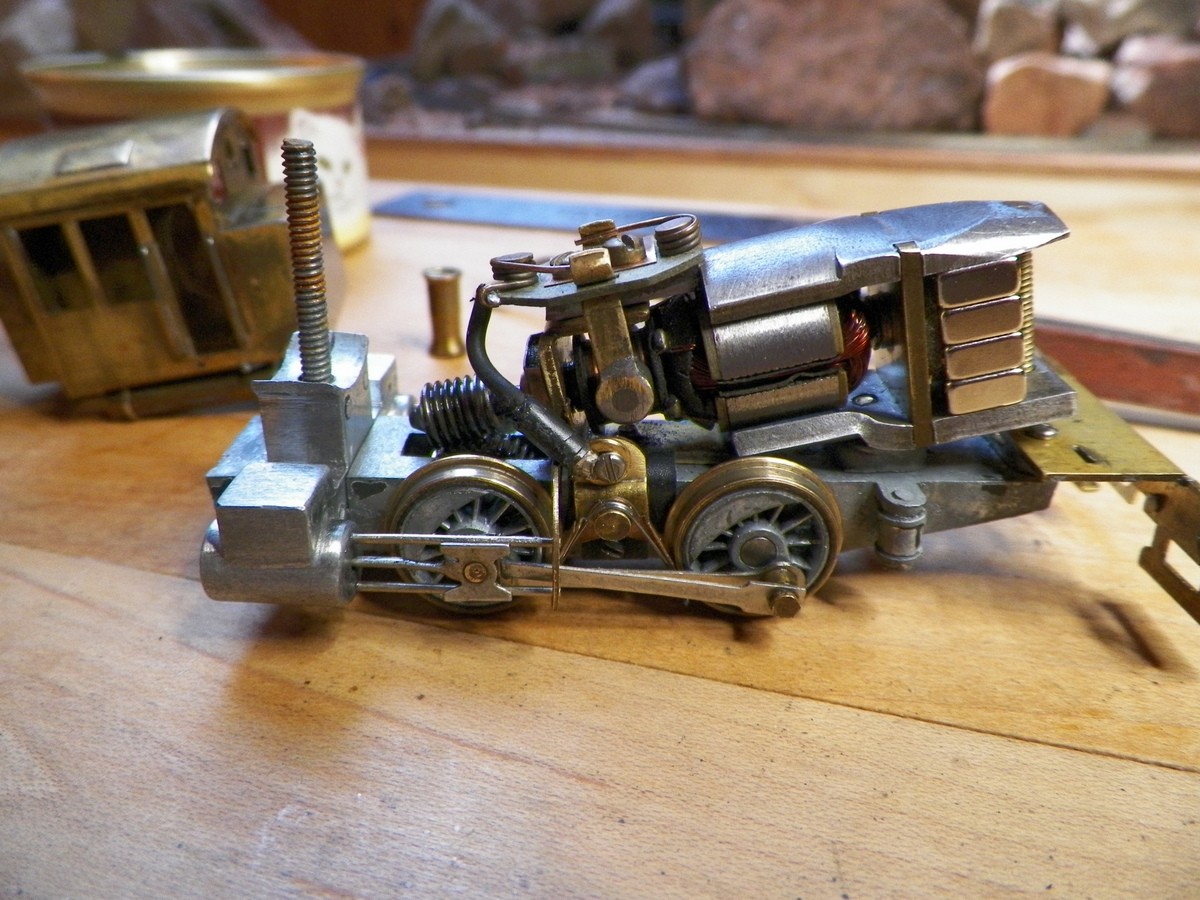
Just acquired this Mantua Little Bee. The photos will show that it is going to require a fair amount of rehab; particularly the electrical pickup which is "worn" away on one arm. I have been wanting one of these, though, to enhance my small collection of Mantua Metal Products early smaller locomotives (Mogul, Belle, Mighty Mite).
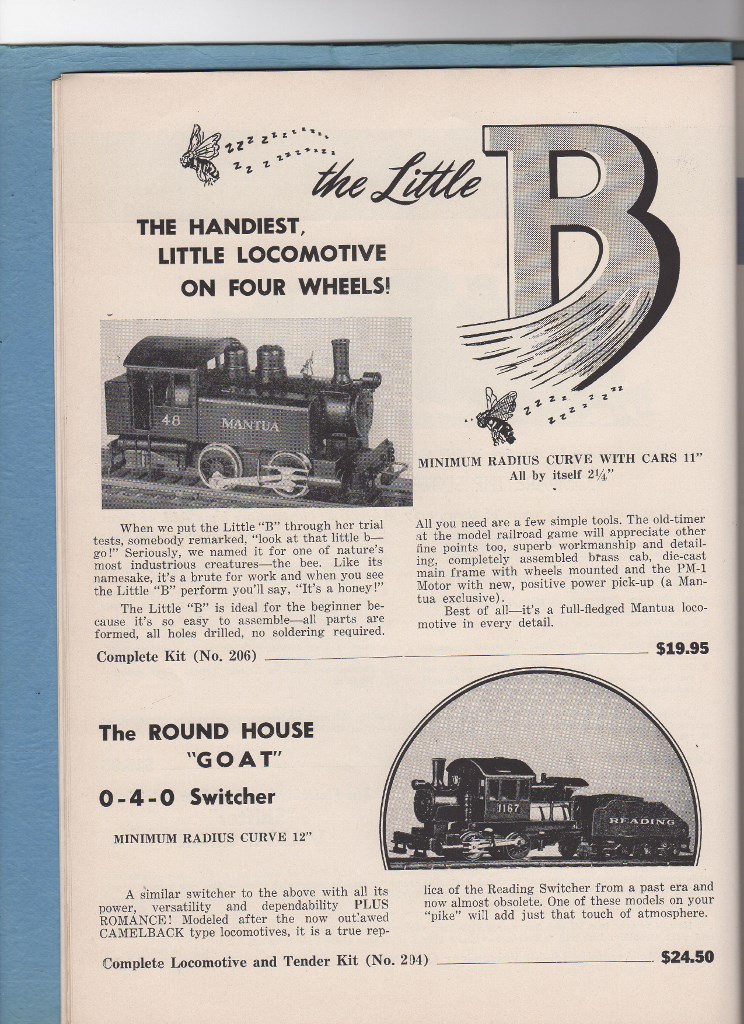
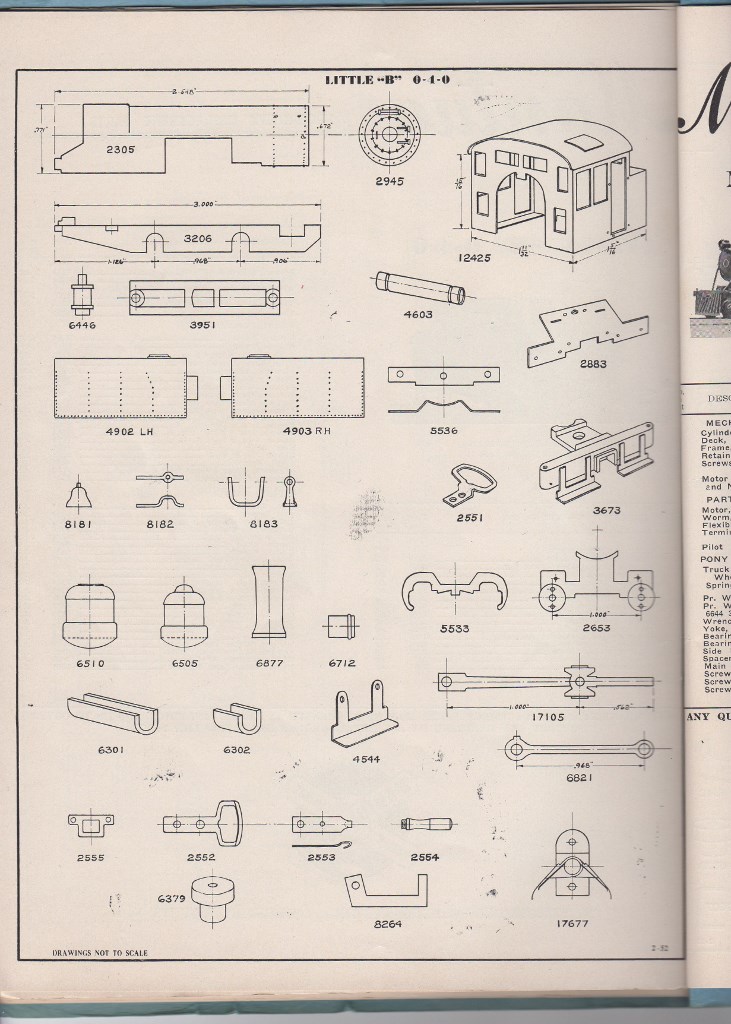
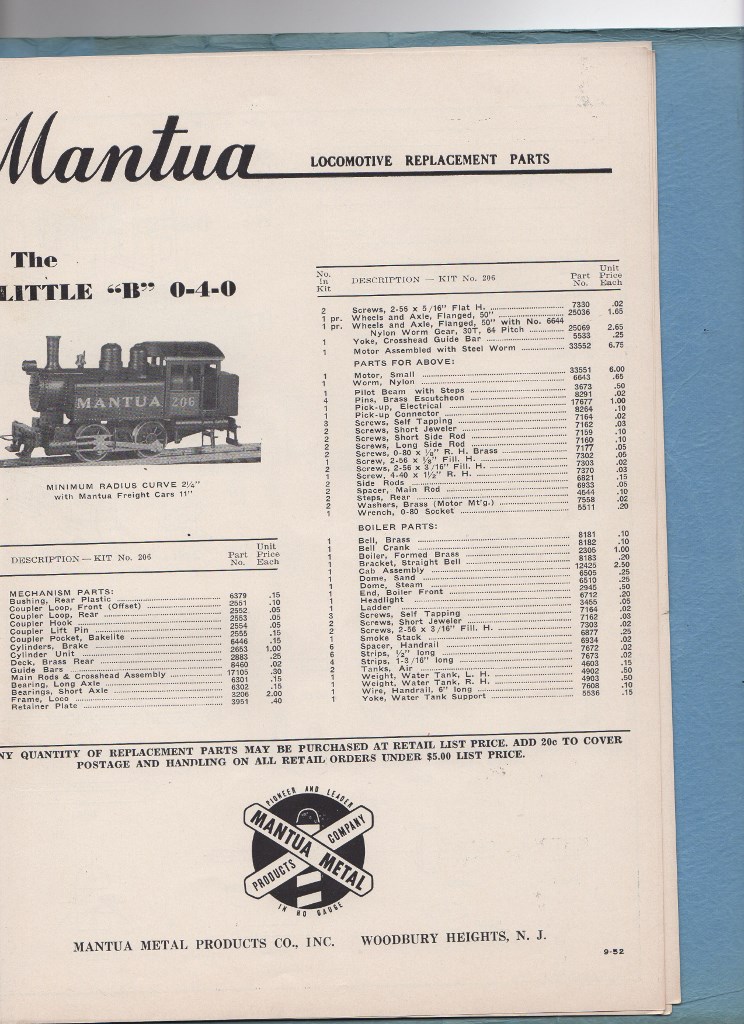
I'm looking for assembly instructions for this, if anyone happens to have a copy they could email? I did find the parts list and parts drawings on www.hoseeker.net , which will be a big help if I can't find the assembly instructions.
|
Country:  USA ~
Posts: 2087 ~
Member Since: March 16 2013 ~
Last Visit: July 05 2018 USA ~
Posts: 2087 ~
Member Since: March 16 2013 ~
Last Visit: July 05 2018
|
 Alert Moderator
|
|
|
|
Posted - March 03 2017 : 12:49:13 AM
|
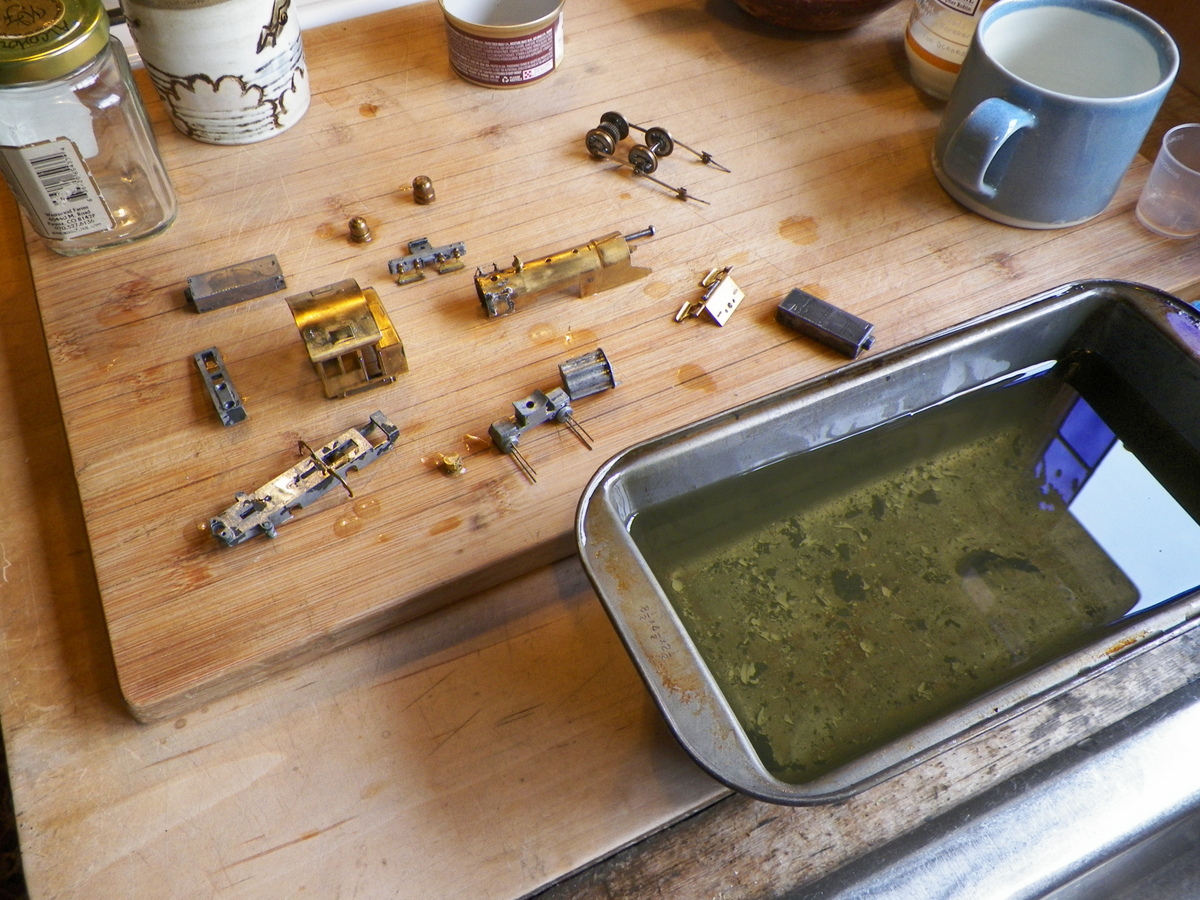
Some of that old paint is pretty stubborn. These photos are after about 36 hours in brake fluid. Lacquer thinner might work better, but I don't care for the residue it leaves. So . . . back in the brake fluid after these photos; taking pictures to help me remember how to put the thing together again.
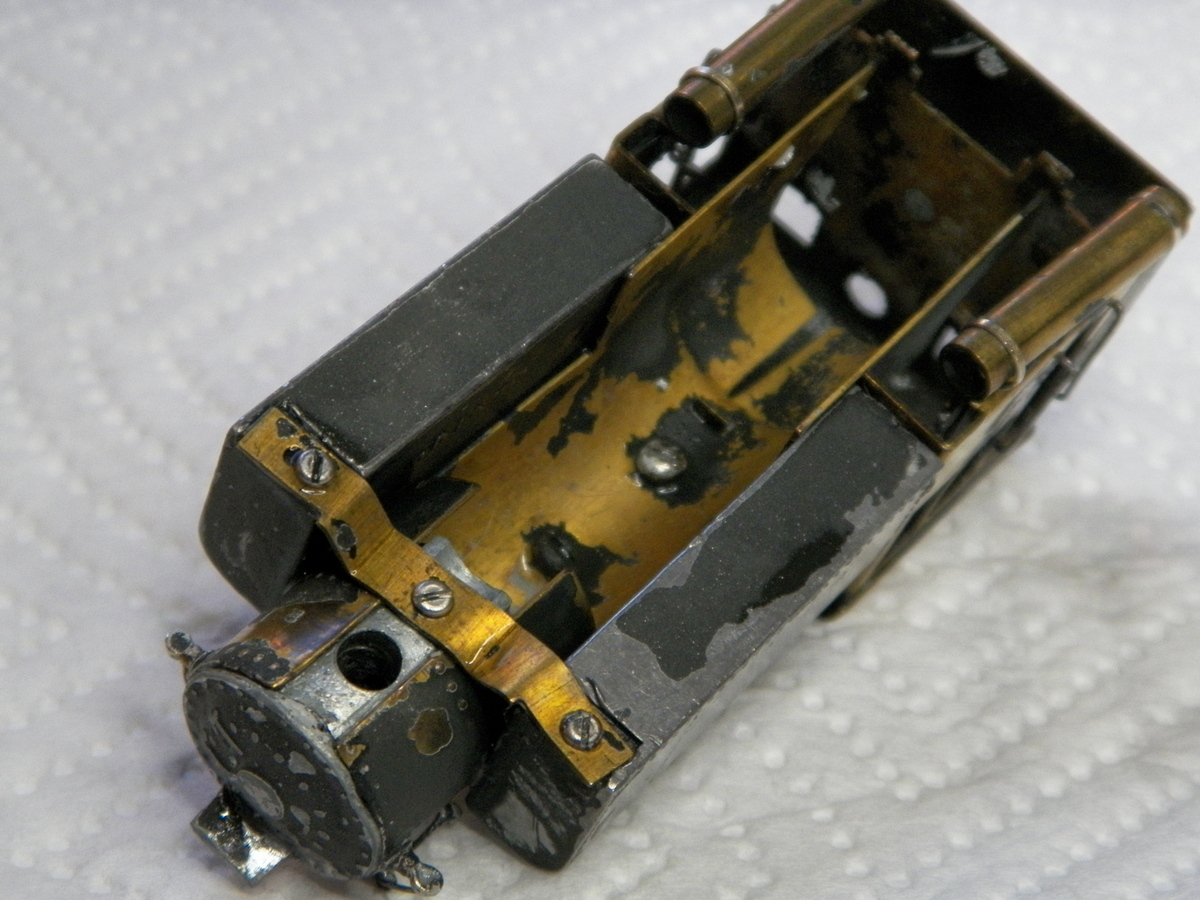
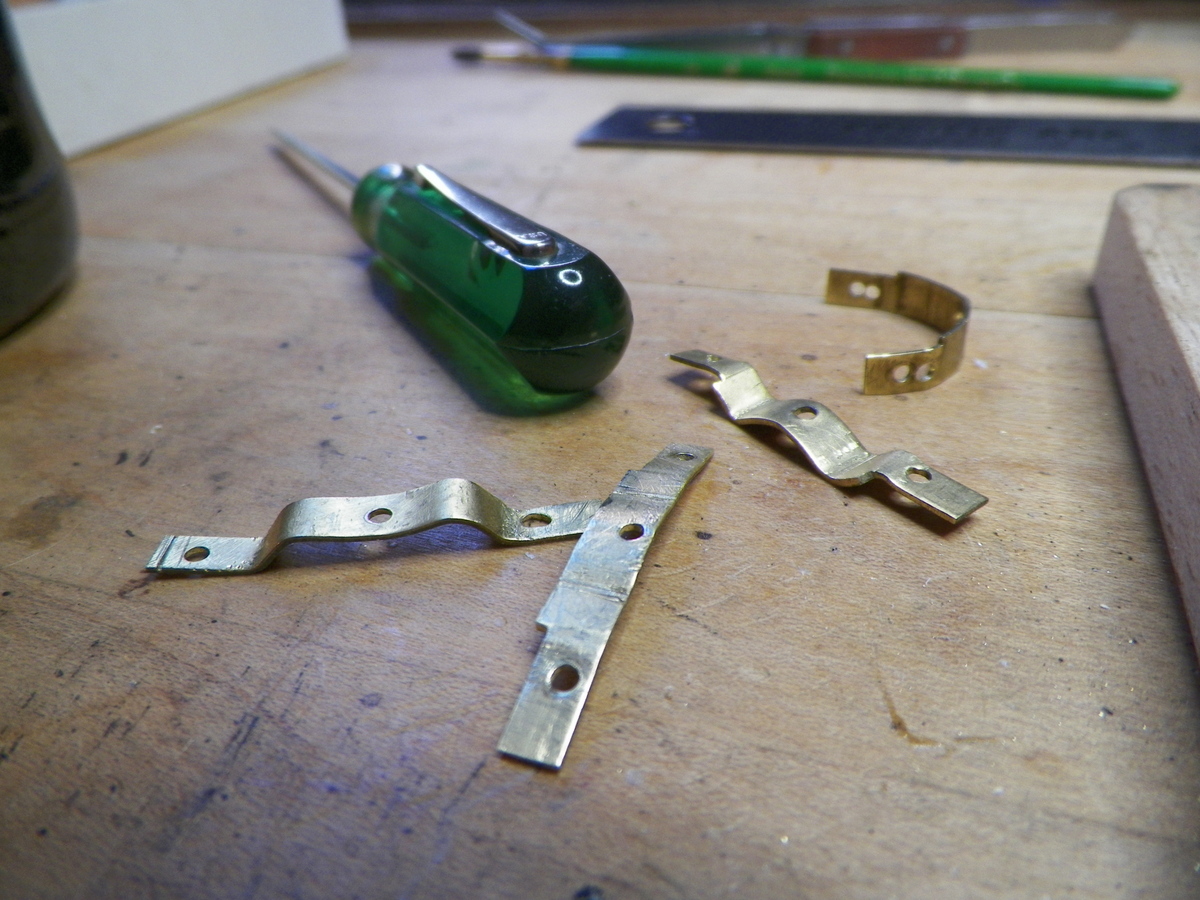
I like how the air tanks are strapped on. As the paint comes off, I can see an array of places where the metal needs straightened. There were some non-standard features on this from the previous modeler; an alternate bell and headlight among them. The way the model was, makes me think that it had been rehabbed in the past.
|
|
Country: USA ~
Posts: 2087 ~
Member Since: March 16 2013 ~
Last Visit: July 05 2018
|
Alert Moderator

|
|
|
|
Posted - March 03 2017 : 05:54:07 AM
|
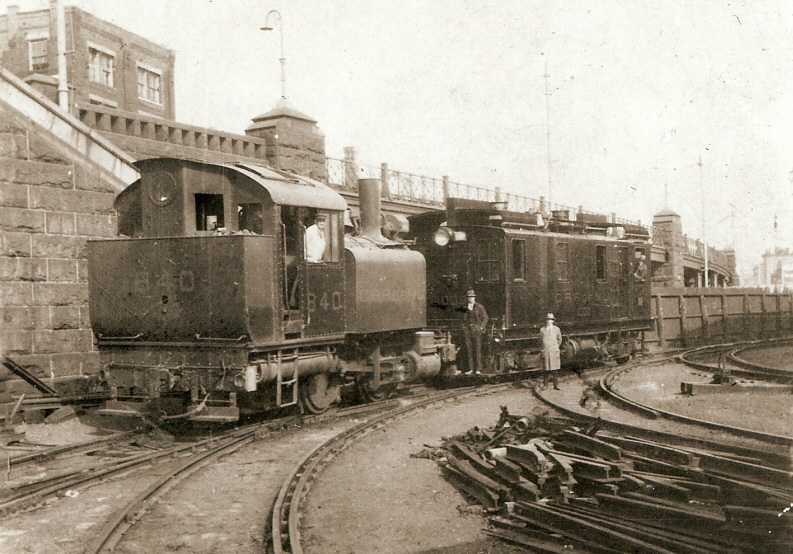
Barry, it was very common for people to get any of the old Mantua Brass and cast kit locos and redetailed them to a specific railroad. Your Little Bee was a dead ringer for the little yard goat used by the CNJ to handle the Communipaw round house turntable area. Relocating dead engines, moving them across the turntable, in and out of different roundhouse stalls. It was numbered 840.
toptrain
" It's a Heck of a Day " !!!
Edited by - toptrain on March 27 2017 6:59:33 PM
|
|
Country: USA ~
Posts: 7539 ~
Member Since: August 07 2008 ~
Last Visit: June 22 2026
|
Alert Moderator
|
|
|
|
Posted - March 03 2017 : 10:59:12 AM
|
| Nice photo Frank, thanks. I've been wondering, did these little engines have a supply of coal in that back area, or were they oil fired?
|
|
Country: USA ~
Posts: 2087 ~
Member Since: March 16 2013 ~
Last Visit: July 05 2018
|
Alert Moderator
|
|
|
|
Posted - March 03 2017 : 2:30:35 PM
|
Barry,
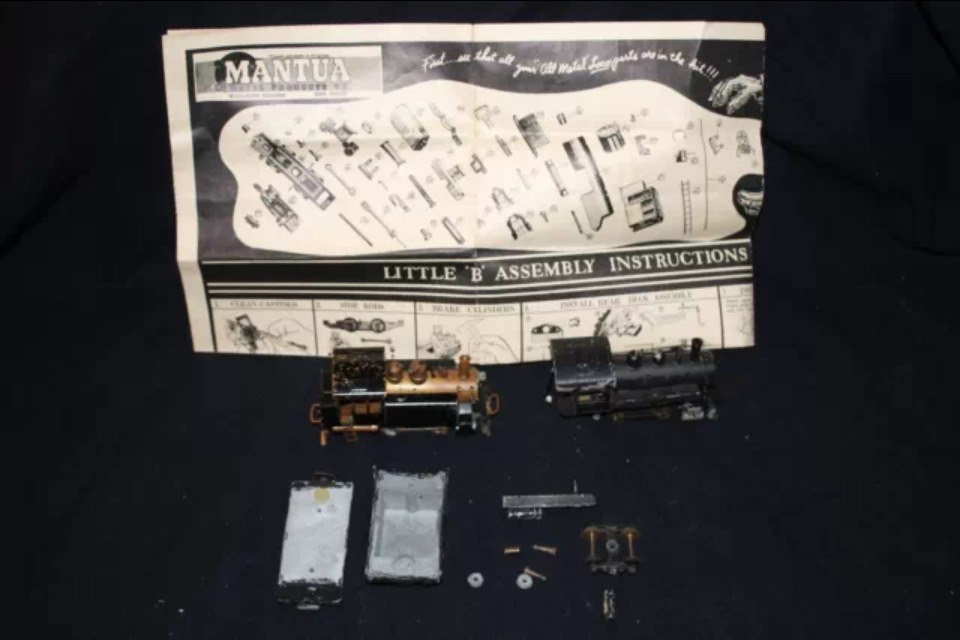
I do have at least one set of instructions in my collection as can be seen in this picture I have posted on flickr:
https://www.flickr.com/photos/9977705@N05/15860476530/
Sean
"If everything seems under control, you're not going fast enough!" - Mario Andretti!
|
|
Country: USA ~
Posts: 1729 ~
Member Since: June 15 2011 ~
Last Visit: June 26 2021
|
Alert Moderator
|
|
|
|
Posted - March 03 2017 : 7:50:29 PM
|
quote:Nice photo Frank, thanks. I've been wondering, did these little engines have a supply of coal in that back area, or were they oil fired?
Originally posted by Barry - March 03 2017 : 10:59:12 AM
|
Barry they were coal fired. You can see the raised coal loading shute behind the cab windows.
Sean; Someday i get one of them someday. Maybe this Sunday at the Clark NJ show, at Mother Seaton High School. I have a table there. My Historical club ( The Jersey Central Historical Society), runs the show so i'll be there from opening to closing. I think in the caffitera.
I have the Sales info , parts break down sheet, and the parts nomenclature sheet. I have no building instructions.
frank
toptrain
" It's a Heck of a Day " !!!
Edited by - toptrain on March 03 2017 8:14:57 PM
|
|
Country: USA ~
Posts: 7539 ~
Member Since: August 07 2008 ~
Last Visit: June 22 2026
|
Alert Moderator
|
|
|
|
Posted - March 03 2017 : 8:24:07 PM
|
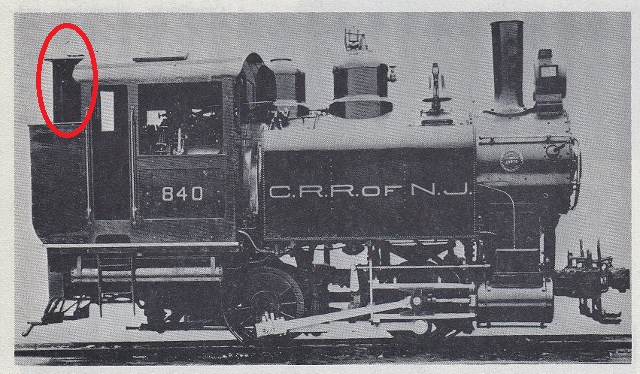
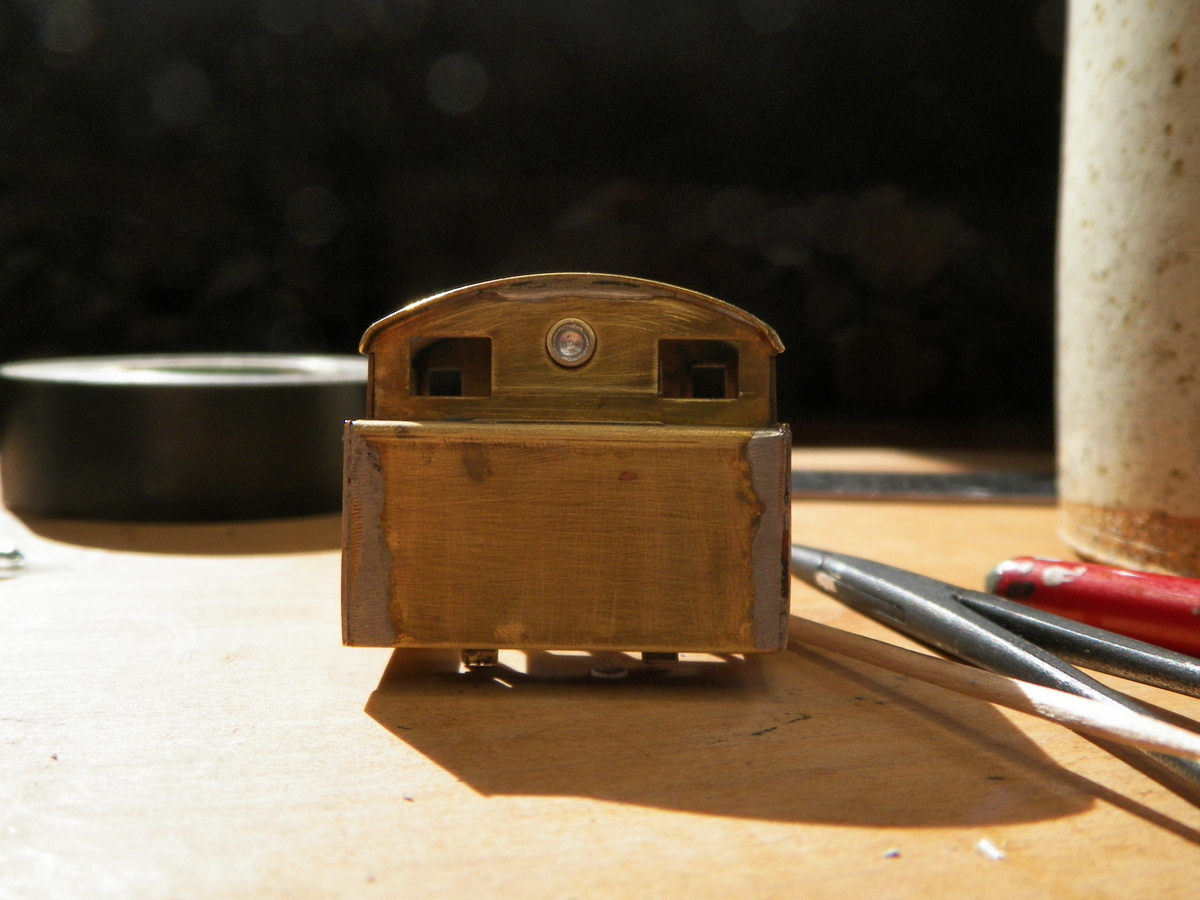
Sean, I saw that set of instructions on your Flicker site . . . if I could "unfold" the photo that would be great. How about posting a photo of them on here? Frank, that's a good story about the coal chute. Just to make sure we're talking about the same thing, is it what I have circled in red here.
Edited by - toptrain on March 27 2017 7:04:55 PM
|
|
Country: USA ~
Posts: 2087 ~
Member Since: March 16 2013 ~
Last Visit: July 05 2018
|
Alert Moderator
|
|
|
|
Posted - March 04 2017 : 08:15:35 AM
|
Barry, You got it, that is it.
* 840 replaced a larger 0-6-0t that was much older and worn out. If I find a photo I'll place it here.
frank
toptrain
" It's a Heck of a Day " !!!
|
|
Country: USA ~
Posts: 7539 ~
Member Since: August 07 2008 ~
Last Visit: June 22 2026
|
Alert Moderator
|
|
|
|
Posted - March 06 2017 : 3:51:23 PM
|
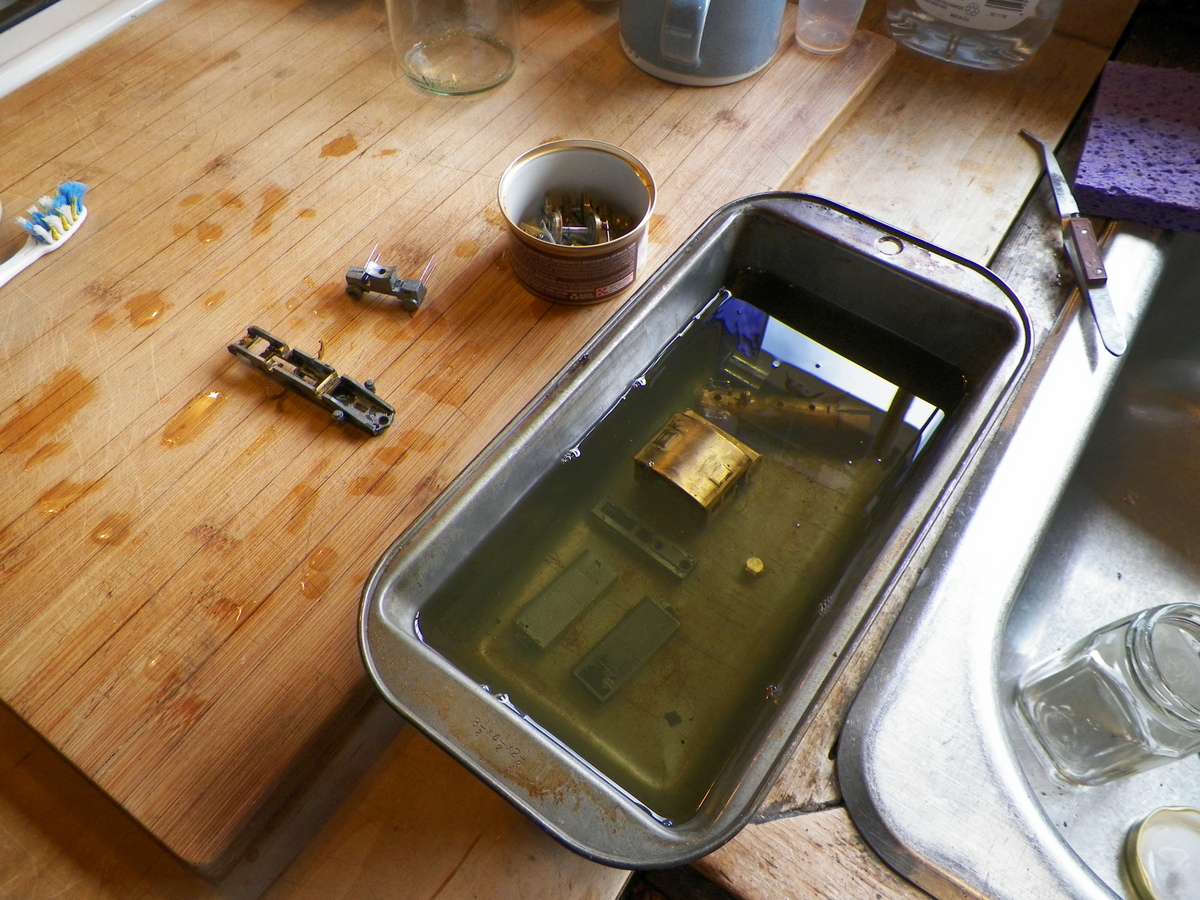
A few more days in the brake fluid helped considerably. A few pieces needed to go back in yet, though.
|
|
Country: USA ~
Posts: 2087 ~
Member Since: March 16 2013 ~
Last Visit: July 05 2018
|
Alert Moderator
|
|
|
|
Posted - March 15 2017 : 9:20:12 PM
|
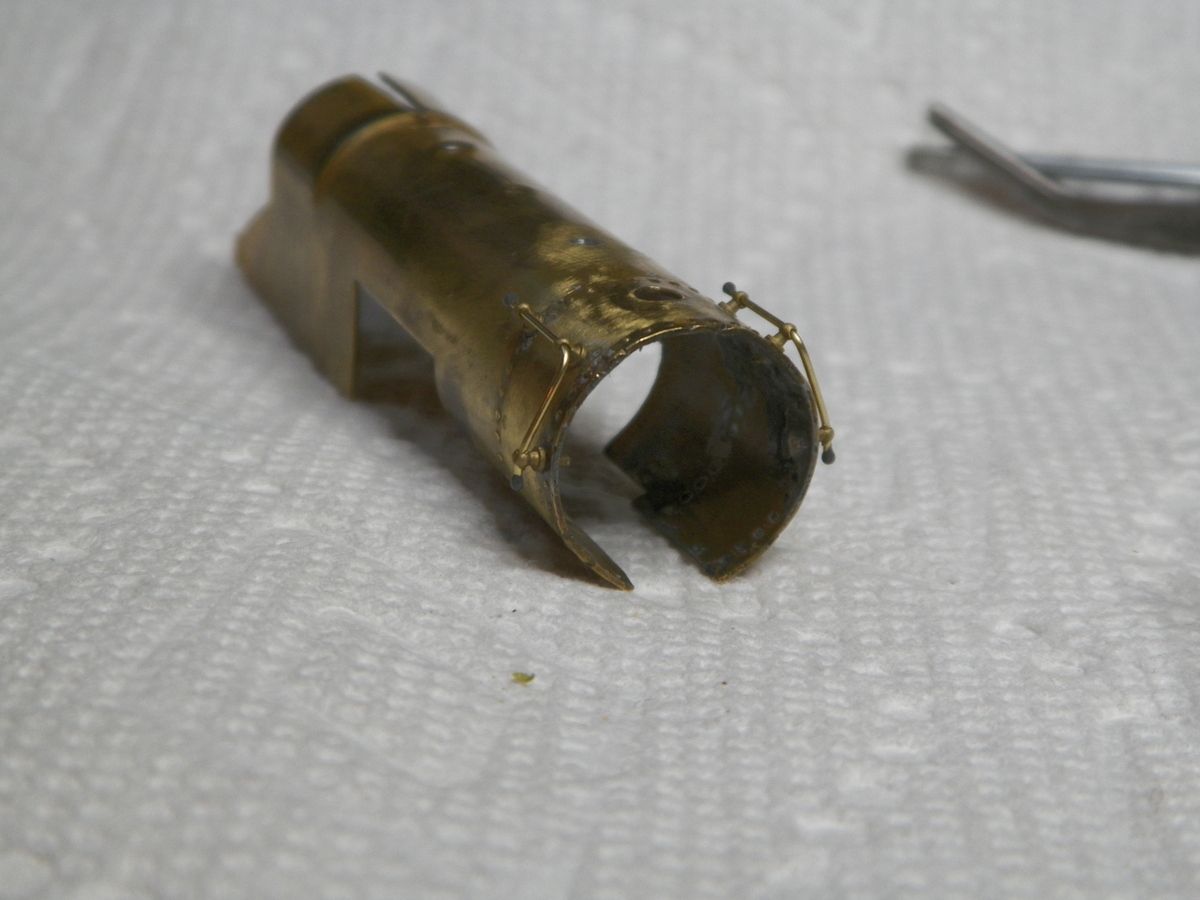
Got about as much paint off with the brake fluid as is gonna be. De-soldered the bell and hand rails and banged out the "out of round" smoke box. The old solder really didn't want to flow off and there is still a mess to clean up. In view of this, I'm not going to try and remove the bent handrails by the cab; I'll just straighten them in place as best I can.
Soldered an extension on the damaged pick up arm (strip of phosphor bronze). It's still long, but I'm waiting to trim it when I get to fitting it. I may need to solder a piece on the other arm which had suffered a bend that may weaken it and make it prone to break ? I'd still like to round up some instructions that show how the motor contact end is suppose to fit (just slide under the brush spring ? ? ?

Got the motor cleaned up and it seems to run well; didn't think to photo.
|
|
Country: USA ~
Posts: 2087 ~
Member Since: March 16 2013 ~
Last Visit: July 05 2018
|
Alert Moderator
|
|
|
|
Posted - March 16 2017 : 04:53:29 AM
|
This is a neat project, glad to see it progressing well! Hopefully the engine will soon be trundling around your layout
Feedback-hungry attention w****
|
|
Country: USA ~
Posts: 750 ~
Member Since: December 05 2015 ~
Last Visit: January 24 2024
|
Alert Moderator
|
|
|
|
Posted - March 16 2017 : 2:05:43 PM
|
quote:Sean, I saw that set of instructions on your Flicker site . . . if I could "unfold" the photo that would be great. How about posting a photo of them on here? Frank, that's a good story about the coal chute. Just to make sure we're talking about the same thing, is it what I have circled in red here?
Originally posted by Barry - March 03 2017 : 8:24:07 PM
|
Barry,
I looked once for the instructions, but I could not find them! They were not inside the box like I thought. In fact, I could not find any of my Busy Bs. I will look again and keep you posted. Looking good on the locomotive and I see you ran with my idea of soldering on extensions to the driver brush power pick-ups. Looking good!
Sean
"If everything seems under control, you're not going fast enough!" - Mario Andretti!
|
|
Country: USA ~
Posts: 1729 ~
Member Since: June 15 2011 ~
Last Visit: June 26 2021
|
Alert Moderator
|
|
|
|
Posted - March 17 2017 : 8:08:44 PM
|
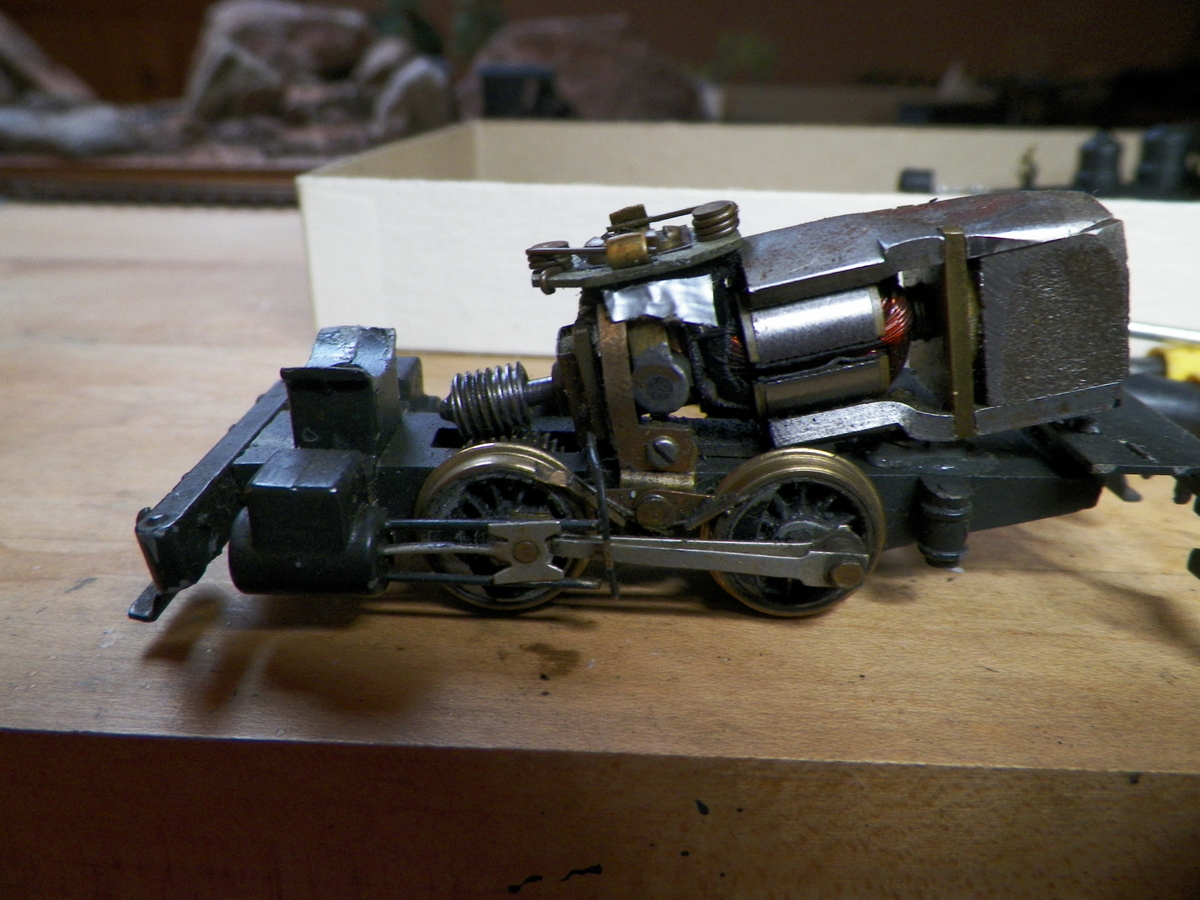
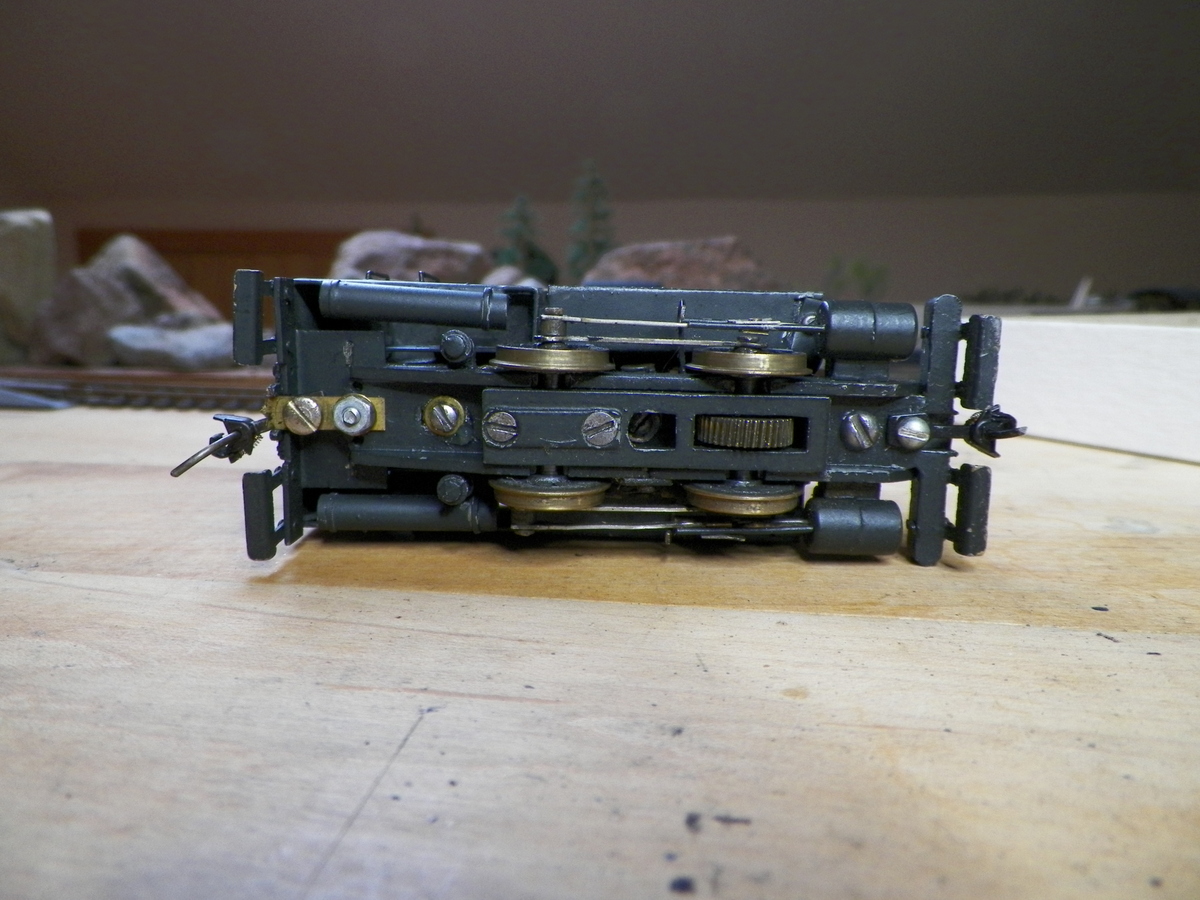
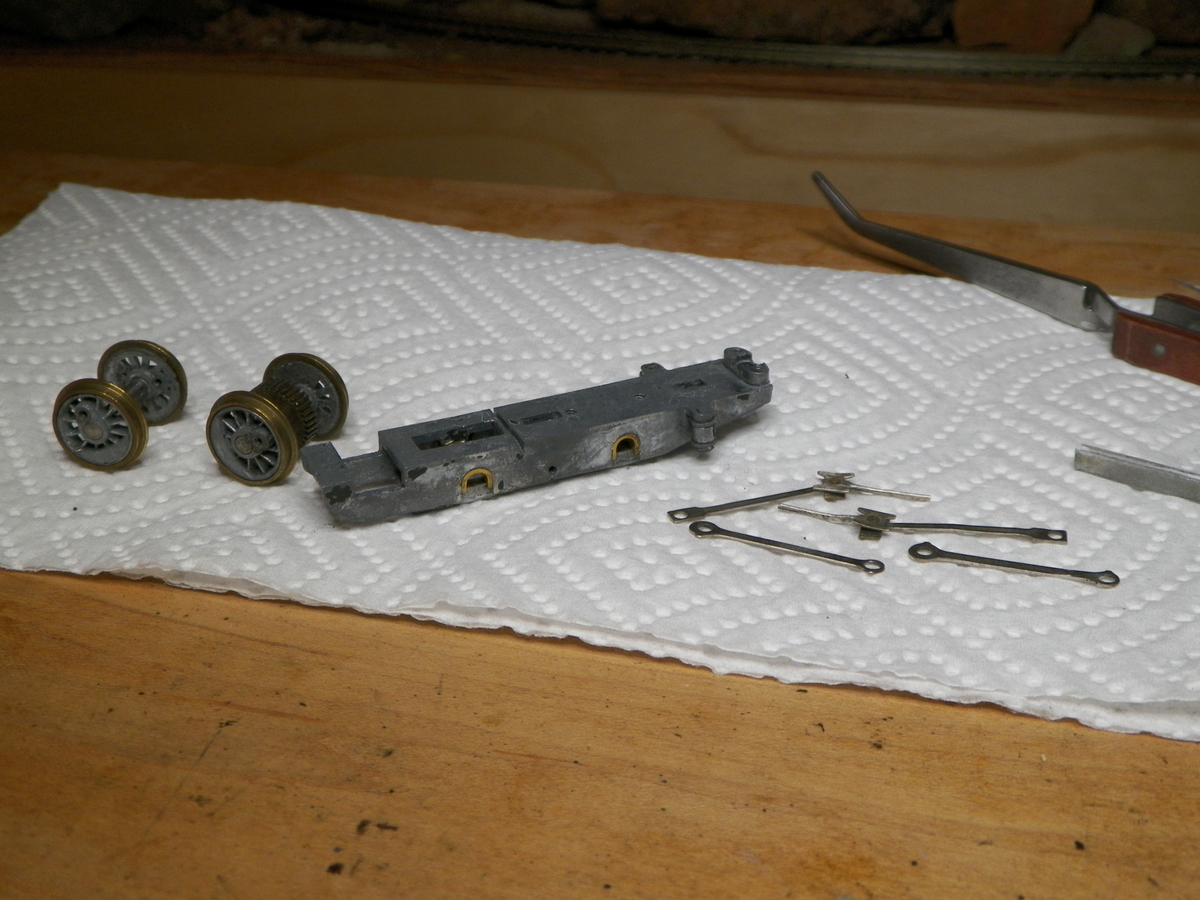
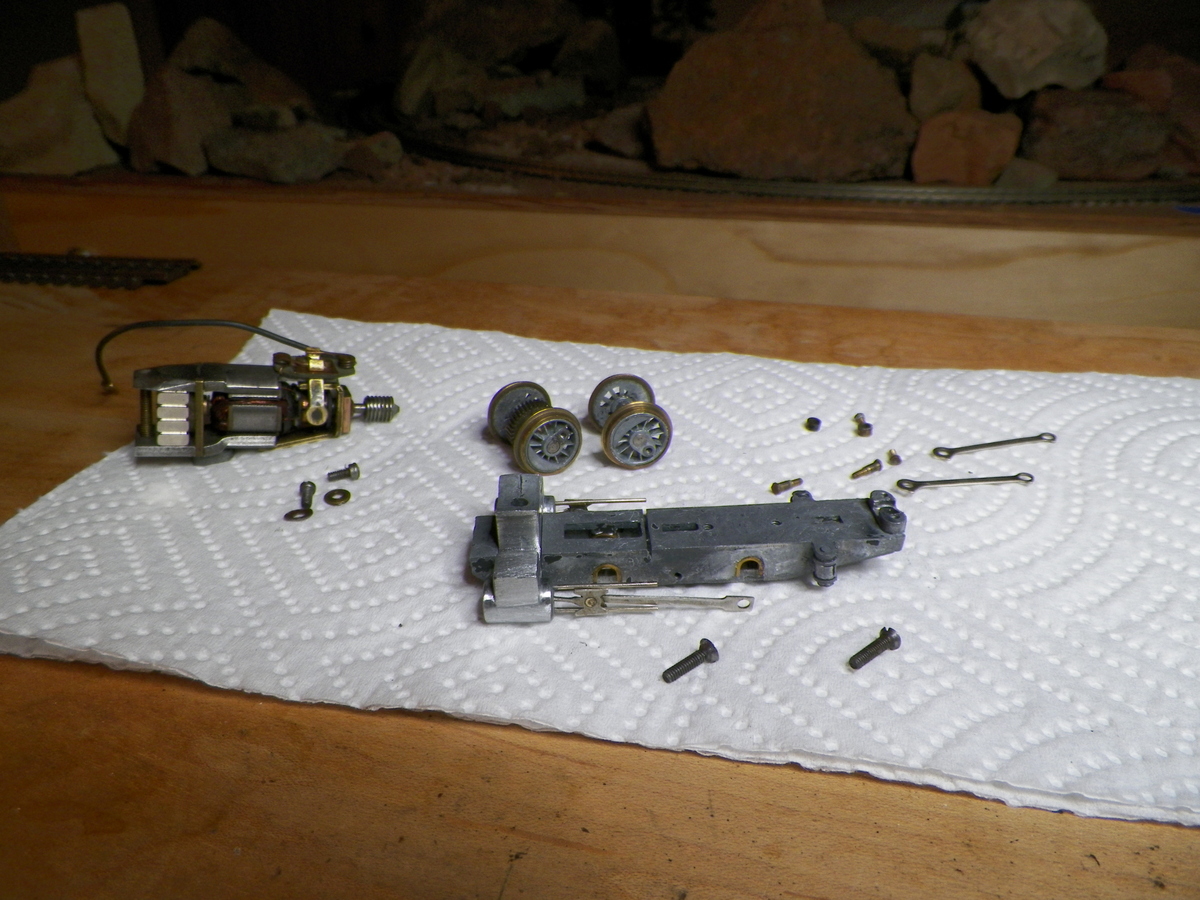
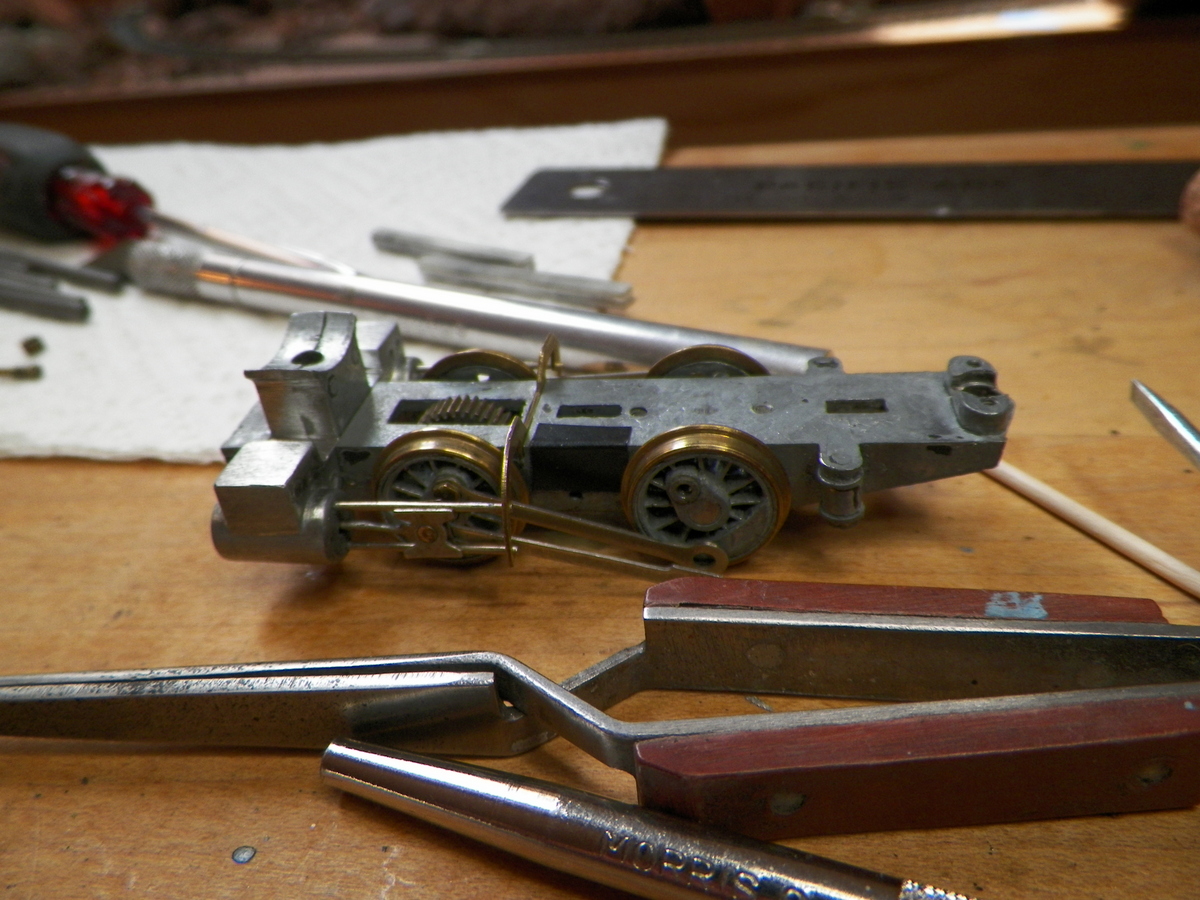
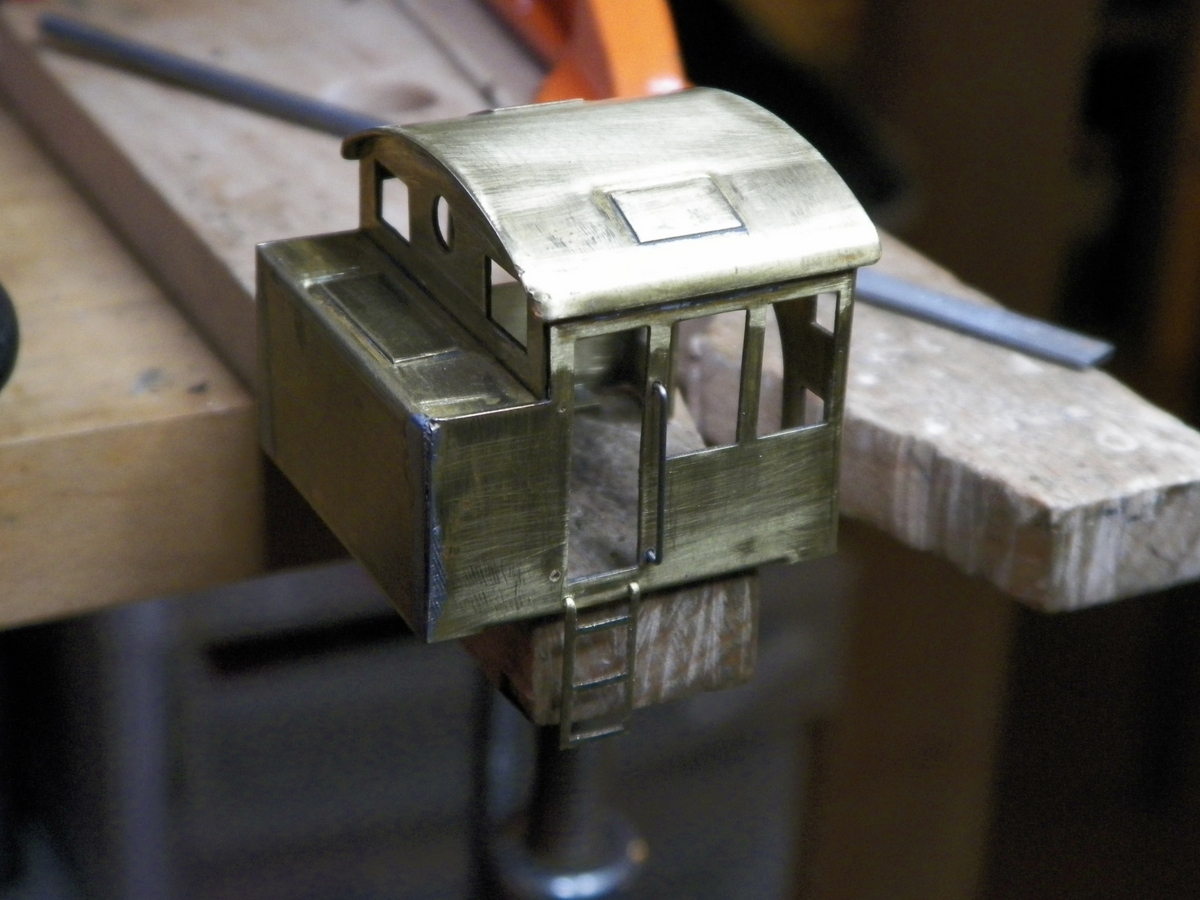
Working on the drive train now; going to try and be smart this time and make sure everything is running smoothly before I paint. Removing flash and straightening. It seems this little locomotive is tough enough to have survived a fair amount of abuse.

|
|
Country: USA ~
Posts: 2087 ~
Member Since: March 16 2013 ~
Last Visit: July 05 2018
|
Alert Moderator
|
|
|
|
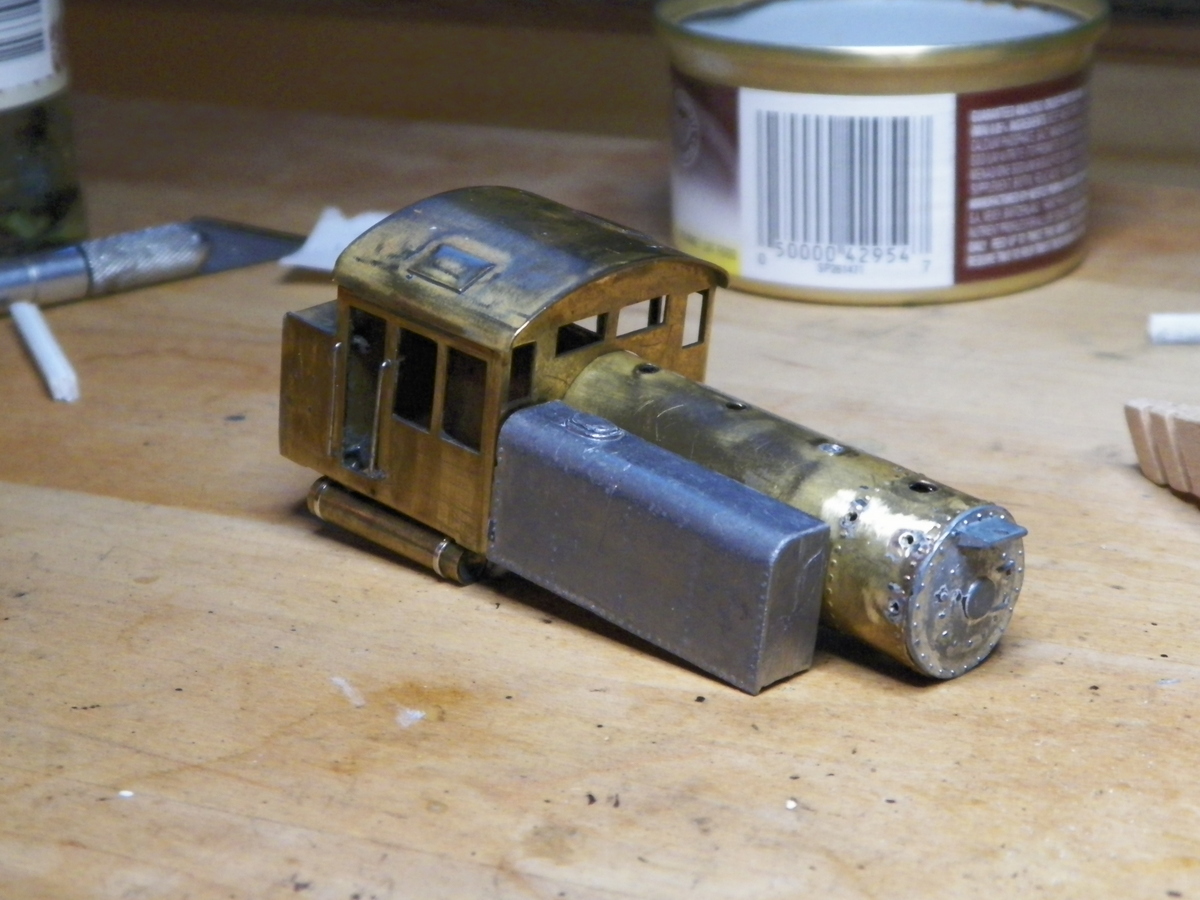
Posted - March 18 2017 : 10:58:33 PM
|
|
|
Country: USA ~
Posts: 2087 ~
Member Since: March 16 2013 ~
Last Visit: July 05 2018
|
Alert Moderator
|
|
|
|
Posted - March 18 2017 : 11:29:21 PM
|
NICE!!
Sean
"If everything seems under control, you're not going fast enough!" - Mario Andretti!
|
|
Country: USA ~
Posts: 1729 ~
Member Since: June 15 2011 ~
Last Visit: June 26 2021
|
Alert Moderator
|
|
|
|
Posted - March 19 2017 : 8:04:34 PM
|
I wonder why the original owner didn't remove all the flash from the casting.  Nice work by the way, I can't wait to see the refurbished model! Nice work by the way, I can't wait to see the refurbished model!
Proudly keeping Tyco Pluggers out of landfills since 2016
Edited by - Srenchin on March 19 2017 8:06:44 PM
|
|
Country: USA ~
Posts: 821 ~
Member Since: December 26 2009 ~
Last Visit: July 08 2026
|
Alert Moderator
|
|
|
|
Posted - March 19 2017 : 9:37:25 PM
|
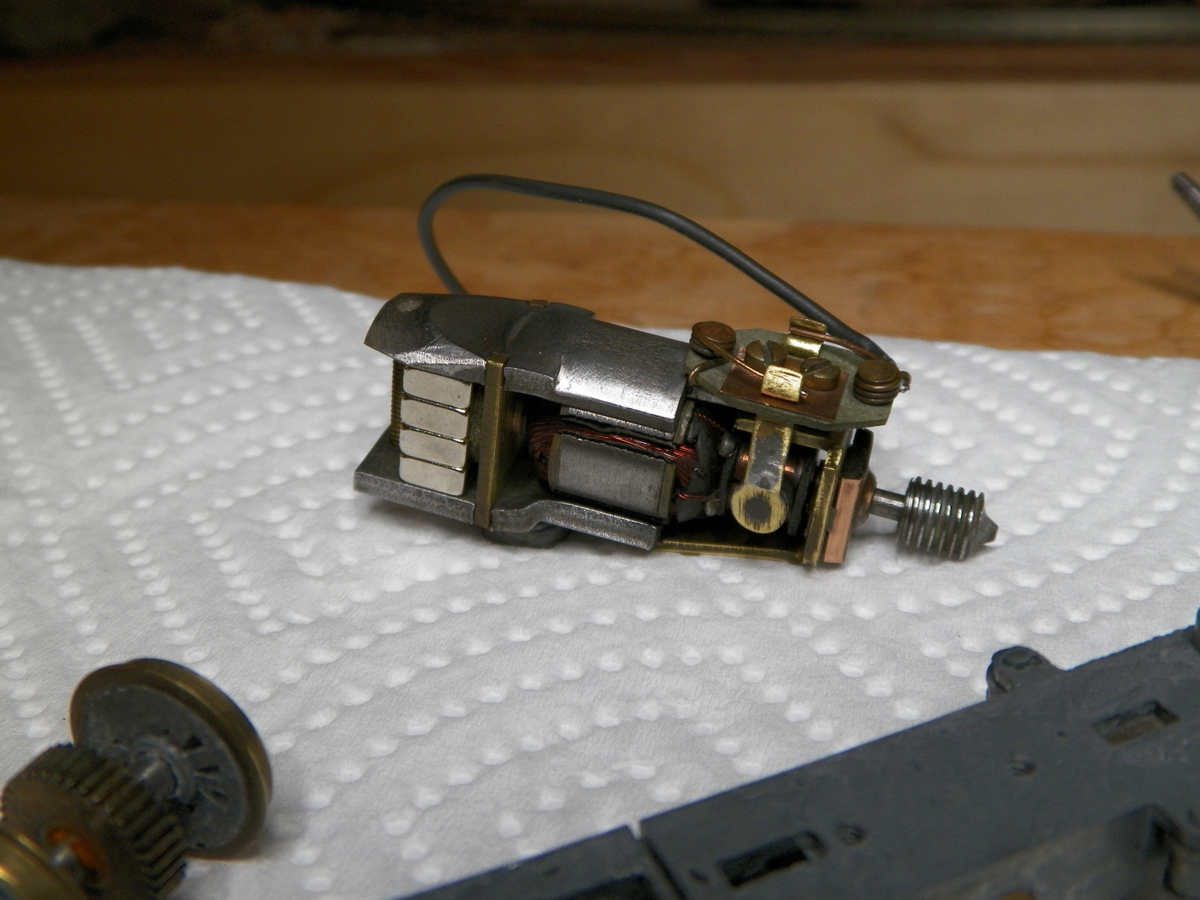
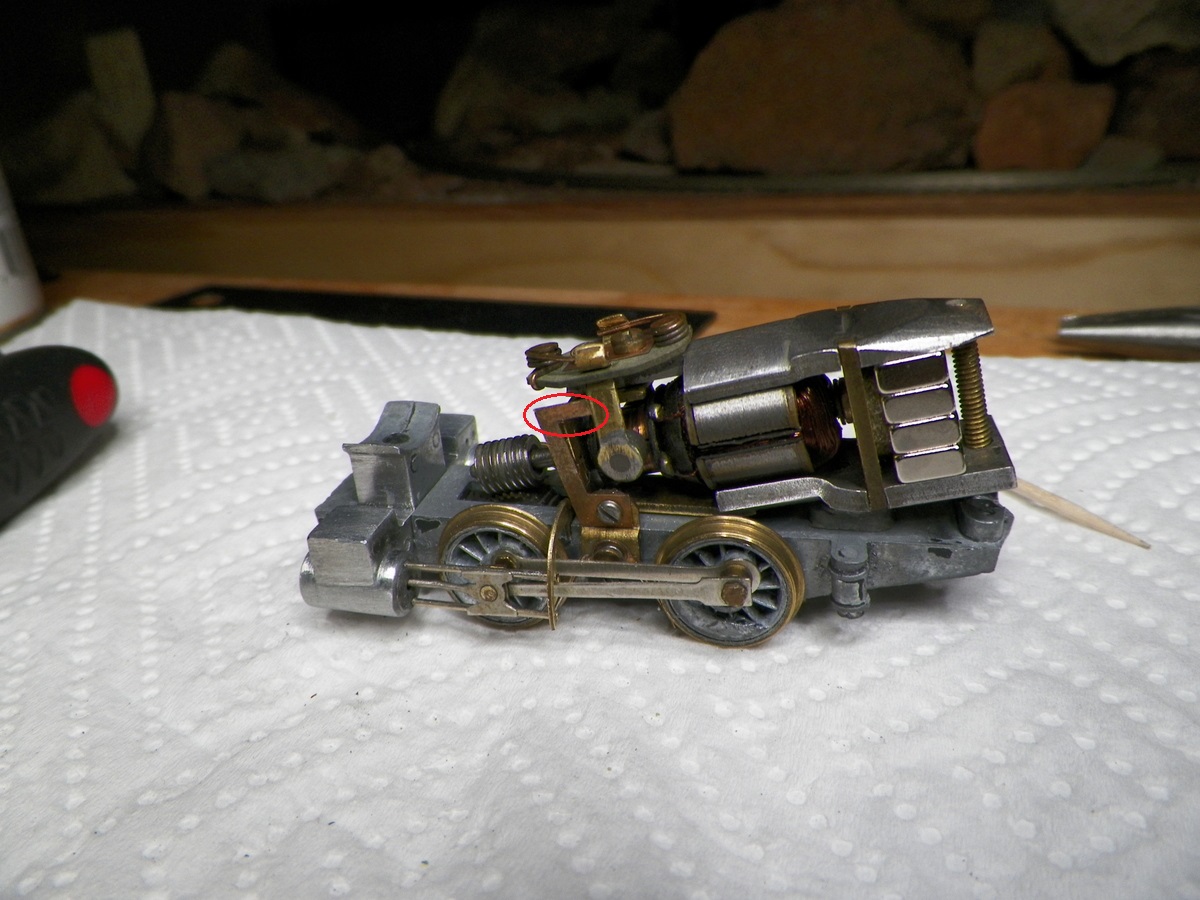
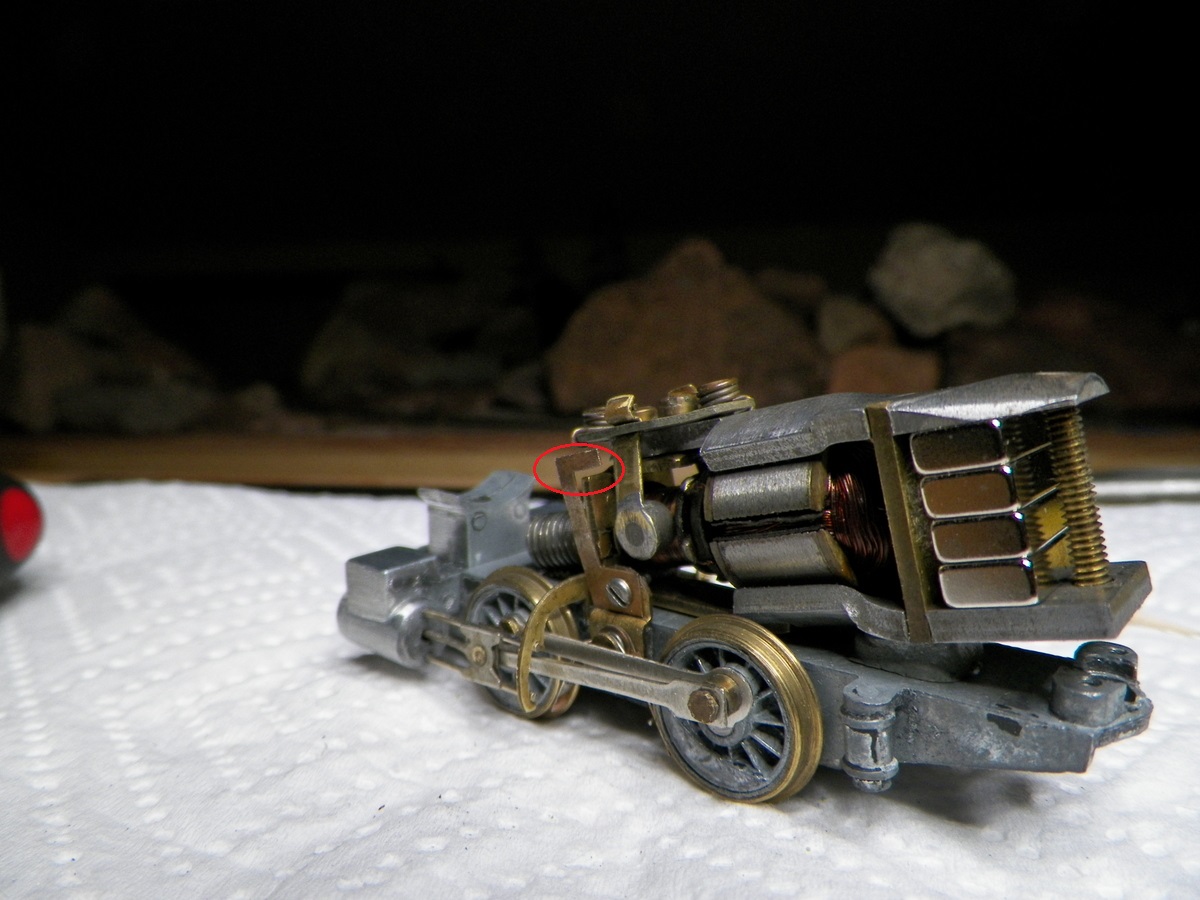
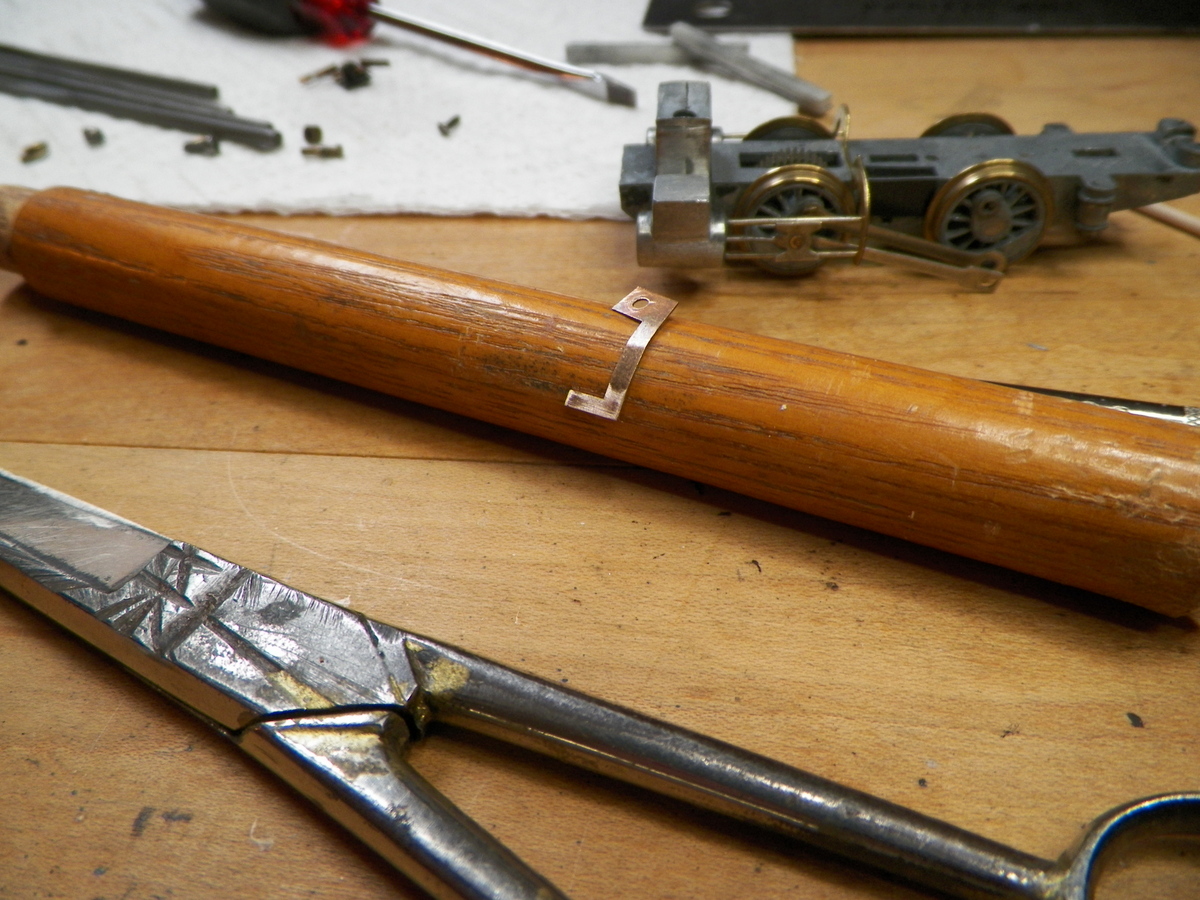
Thanks for the comments. I'd like to figure out how the motor "contact" (the upside down L) is intended to interact with the motor. Anyone have experience with this? I'm guessing, by the way it fits, that it is intended to ride under the brush arm. When I placed it there, though, it also contacted the motor frame . . . and I wasn't sure that was a good idea? The contact portion of the contact is circled in red.
|
|
Country: USA ~
Posts: 2087 ~
Member Since: March 16 2013 ~
Last Visit: July 05 2018
|
Alert Moderator
|
|
|
|
Posted - March 22 2017 : 7:35:39 PM
|
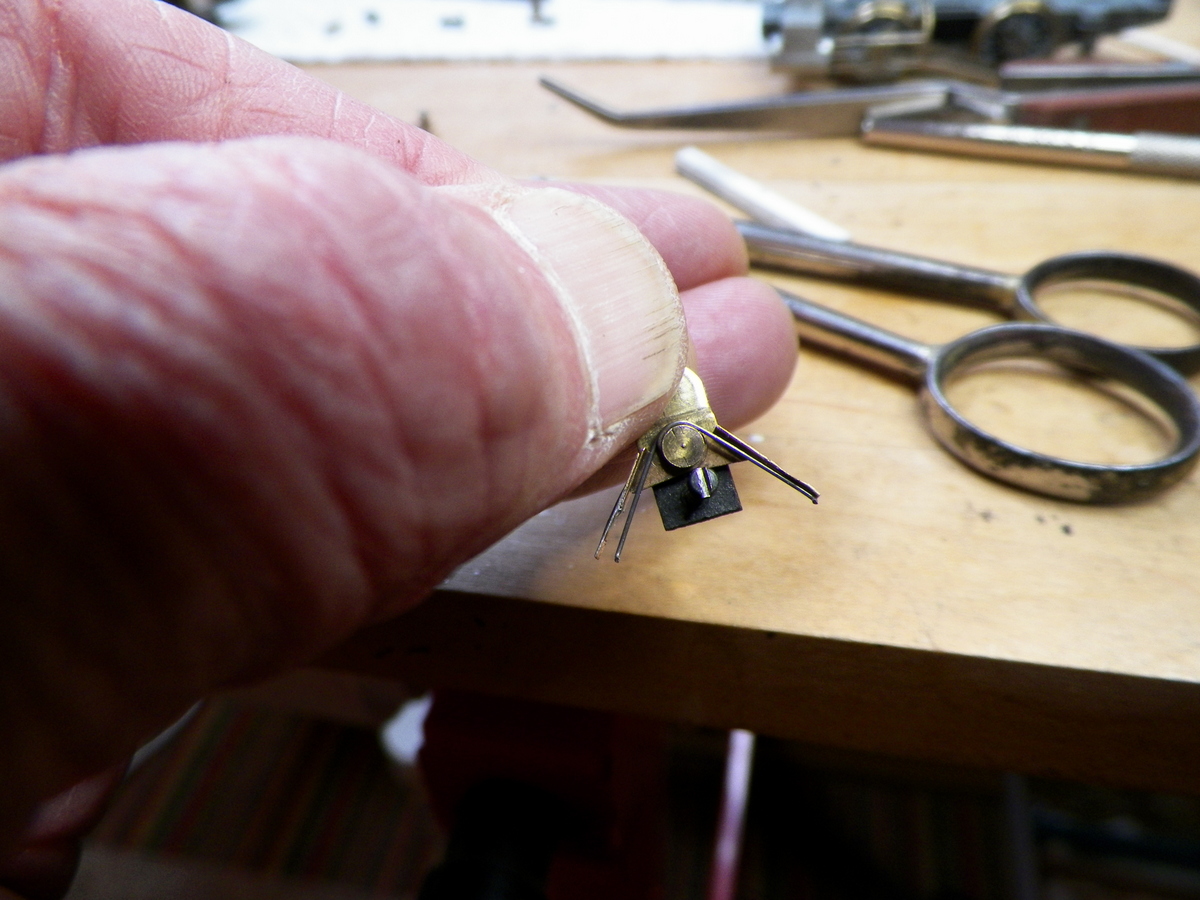
I decided that contact was meant to ride beneath the brush arm, and after much tinkering I have gotten this little locomotive to motor around the track. Seems like the tolerances on this engine are pretty close. I ended up having to make a torsion spring (on the same wheel contact arm that was sheared or worn off, that arm of the torsion spring was also very short, and during one trial kept popping out. I include info on making a torsion spring (I scaled the process down and just used vice grips to grip the wire since it was so light (0.015 music wire) and where you might actually be able to buy them (though $25 for minimum order). I also insulated the frame where I thought the contact might be touching (the wheel contact arms are riveted to a non-conductive material and the internal side of the rivet was exposed, so a piece of electrical tape. I bent the motor contact arm around a 9/16" diameter piece of wood and lucked out that made contact with the brush arm without holding the brush away from the armature. Close tolerances in a few ways. I think what finally helped things run smoothly was to loosen the motor to frame screws a wee bit. Now . . . it will be interesting to see if I can achieve this perfect storm after disassembling everything, cleaning the oil and grease off and painting.

and to make a torsion spring . . .
https://www.rctankcombat.com/articles/torsion-springs/
|
|
Country: USA ~
Posts: 2087 ~
Member Since: March 16 2013 ~
Last Visit: July 05 2018
|
Alert Moderator
|
|
|
|
Posted - March 24 2017 : 5:12:39 PM
|
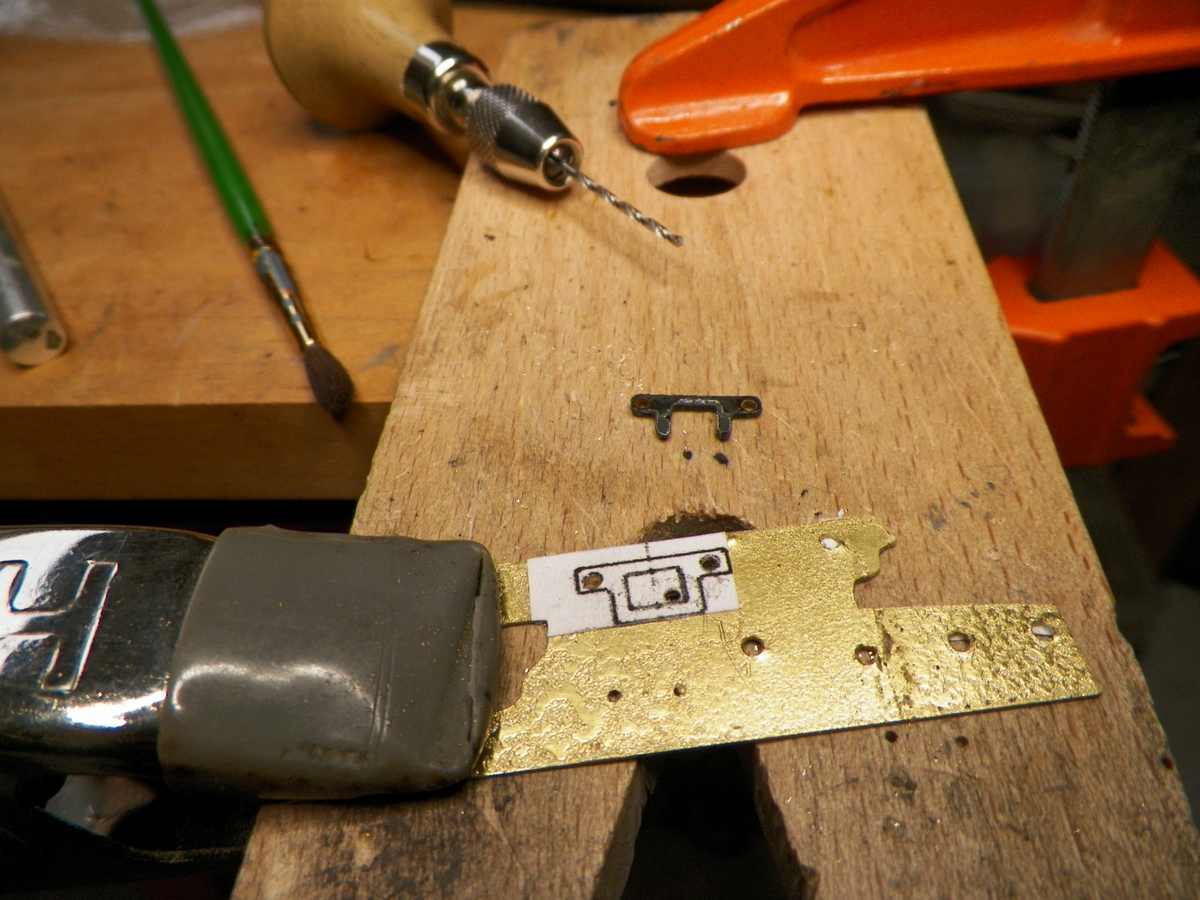
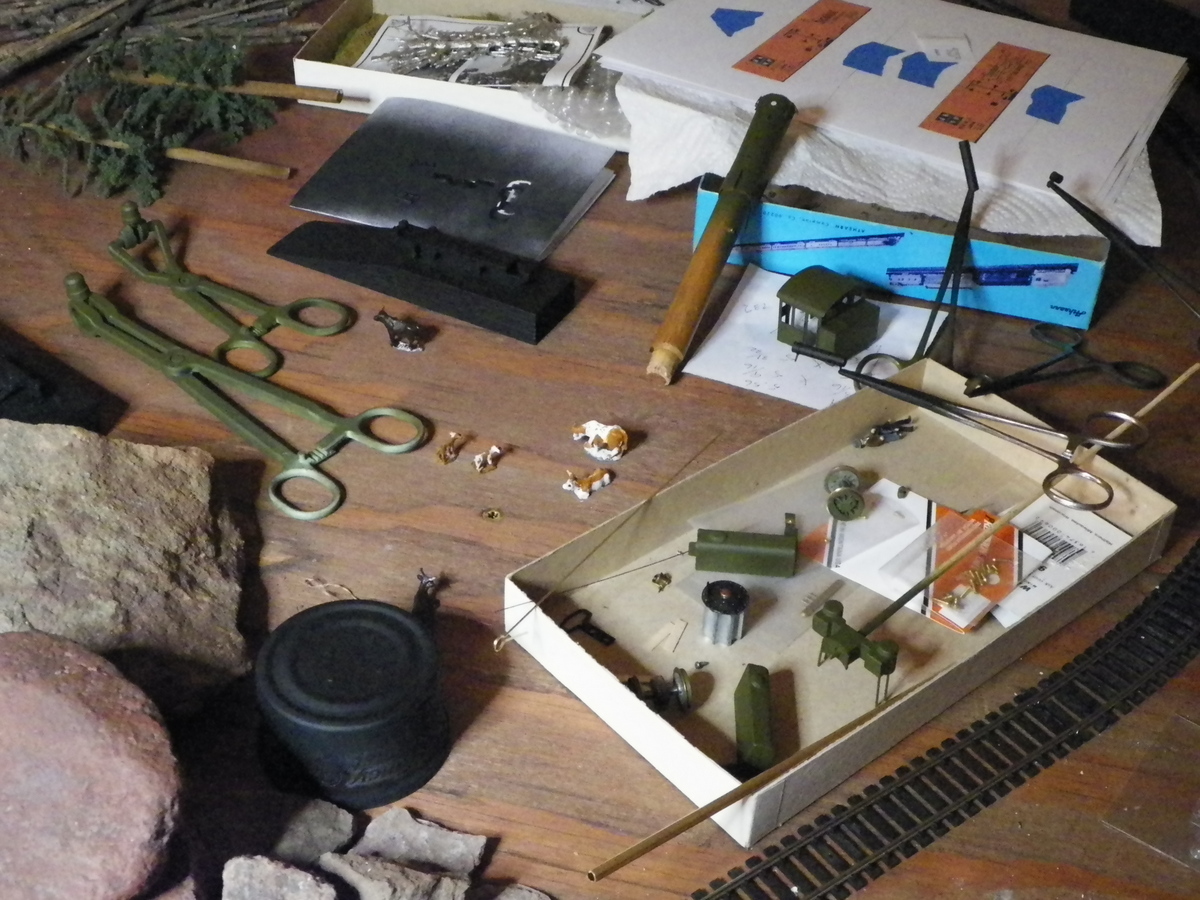
I've been running that motor and frame around the track; trying to decide if the performance is consistent, or if maybe I need to go ahead and try a "wire" connection between the wheel wiper frame and the brush contact wire (instead of the contact arm riding under the brush and possibly varying the contact quality from moment to moment). I suppose I at least need to try it and stop wondering about it. In the meantime, I'm practicing diversion and working on some of the decorative accoutrements, such as this coupler pocket. The original bakelite pocket had been broken. I've cut these out before and it's not too bad of a job. I have learned that if I don't get the screw hole placement right, then I may as well not proceed. So this one below is now ready for some jeweler's saw work . . .
|
|
Country: USA ~
Posts: 2087 ~
Member Since: March 16 2013 ~
Last Visit: July 05 2018
|
Alert Moderator
|
|
|
|
Posted - March 24 2017 : 5:19:11 PM
|
| The "pattern" was cut from a drawing of Little B parts that can be found at www.hoseeker.net . While the parts drawings are sometimes not to scale (and are specified so on some sheets), it turns out that this particular part is drawn to scale. I glued it to the brass with spray on adhesive which is why the brass surface looks quite irregular. And man that spray adhesive can be a sticky mess, which is why I'm putting up with this so far (I let the adhesive dry for 24 hours before attempting the drilling). As long as the pattern stays in place through the cuts; the other piece of controlling the cut (in this case) is to operate the saw in a manner that not only provides the desired path, but also, in a manner that doesn't tear up the pattern.
|
|
Country: USA ~
Posts: 2087 ~
Member Since: March 16 2013 ~
Last Visit: July 05 2018
|
Alert Moderator
|
|
|
|
Posted - March 26 2017 : 3:22:39 PM
|
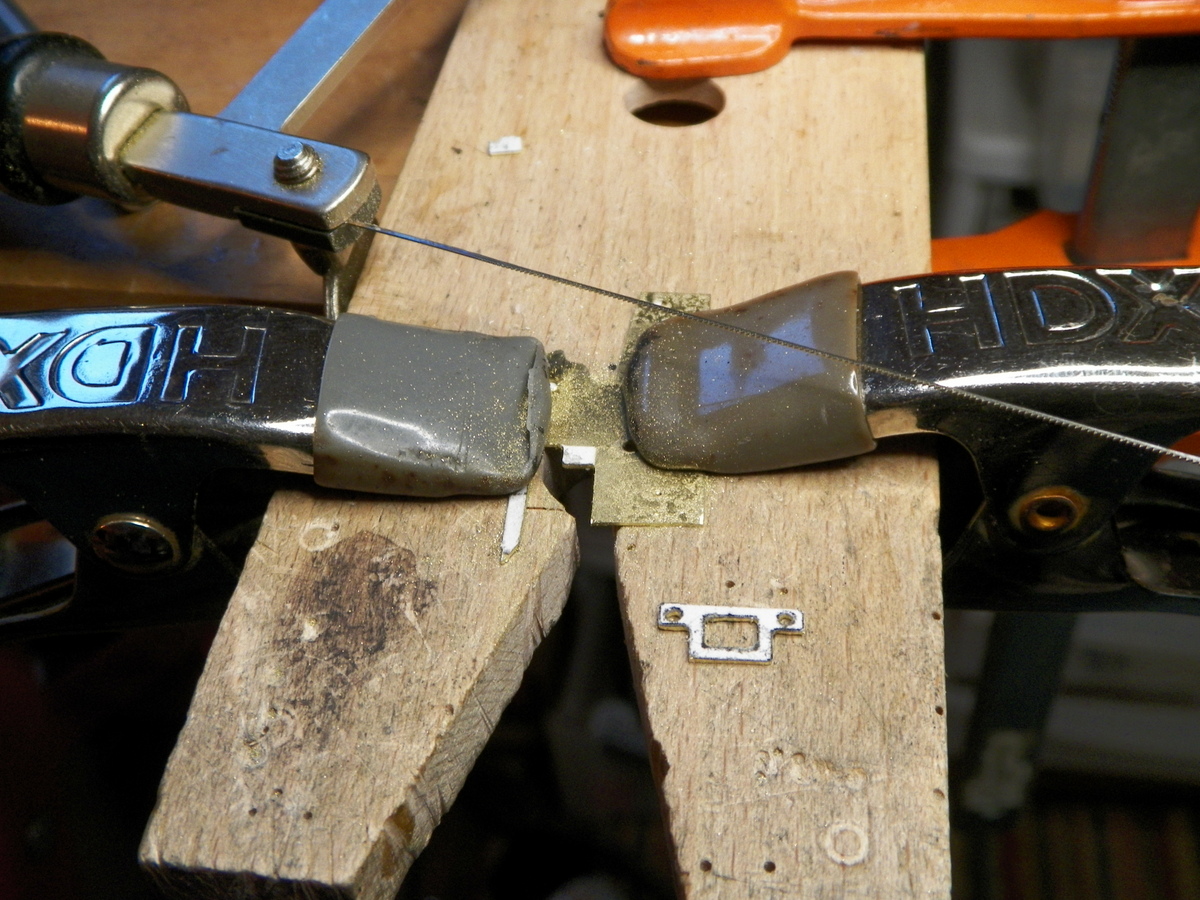
Despite "staying within the lines" while drilling, I still had to do a little hole expansion with the file to fit the frame. Sure couldn't have done it without a pattern though.
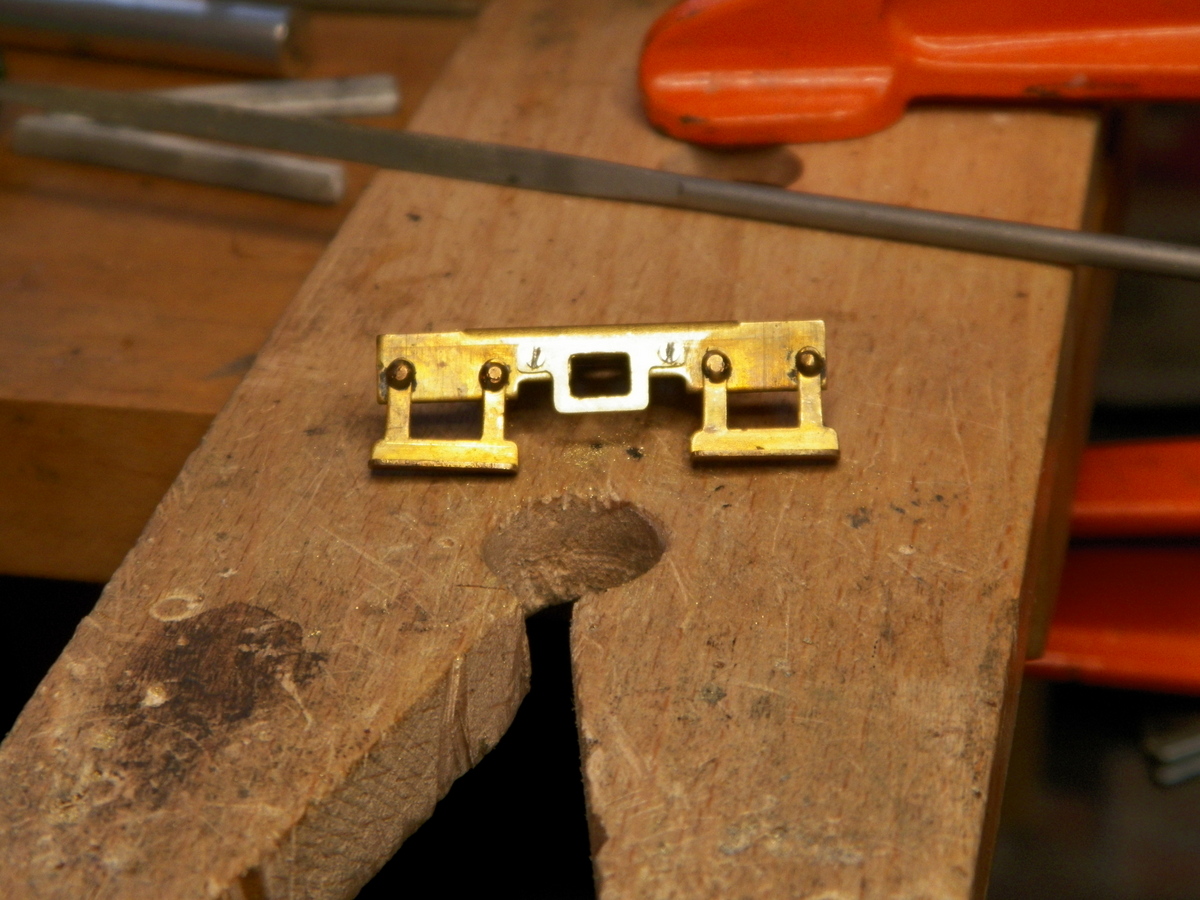
And then to straighten the boiler and tank support . . . (trying to get it to match the drawing in the factory parts list) . . .
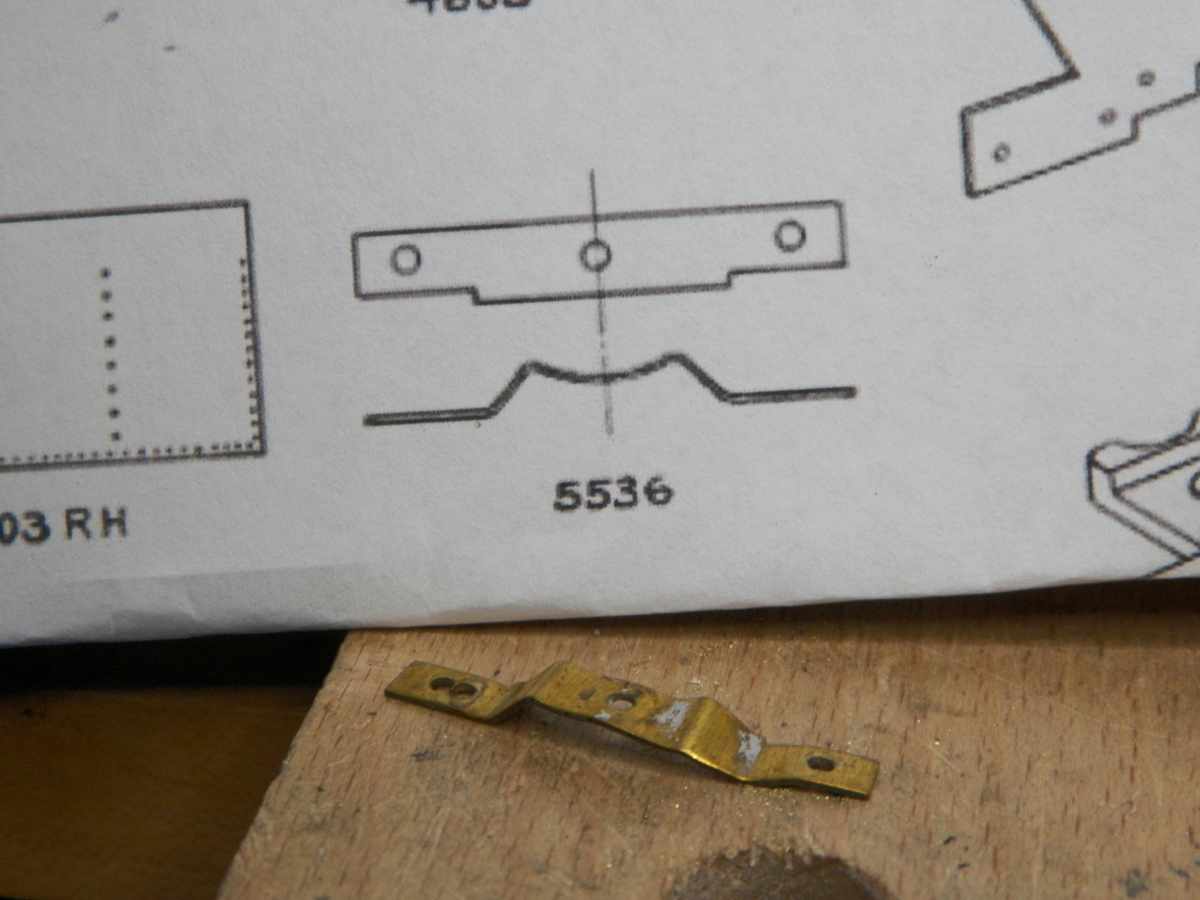
I used the middle hole in the bracket to secure the piece to a dowel and then used a small diameter blunt end metal to tap the piece back into round . . .
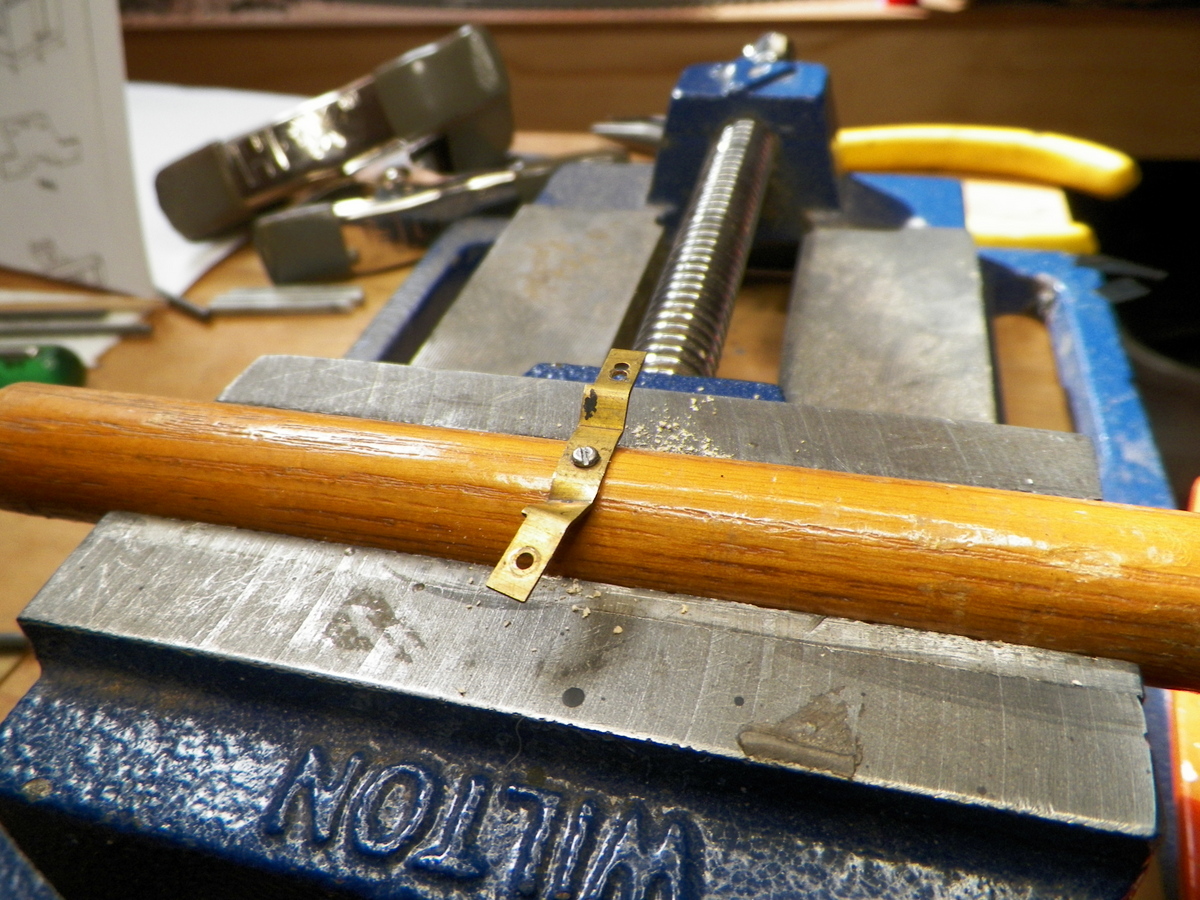
Getting the middle of this back to "round" helped straighten the "wings" on the piece, but some plyer work was still needed. That was a bit tenuous, wondering whether I was going to bend it one to many times and break it. Although, it is a piece that could be manufactured at home.
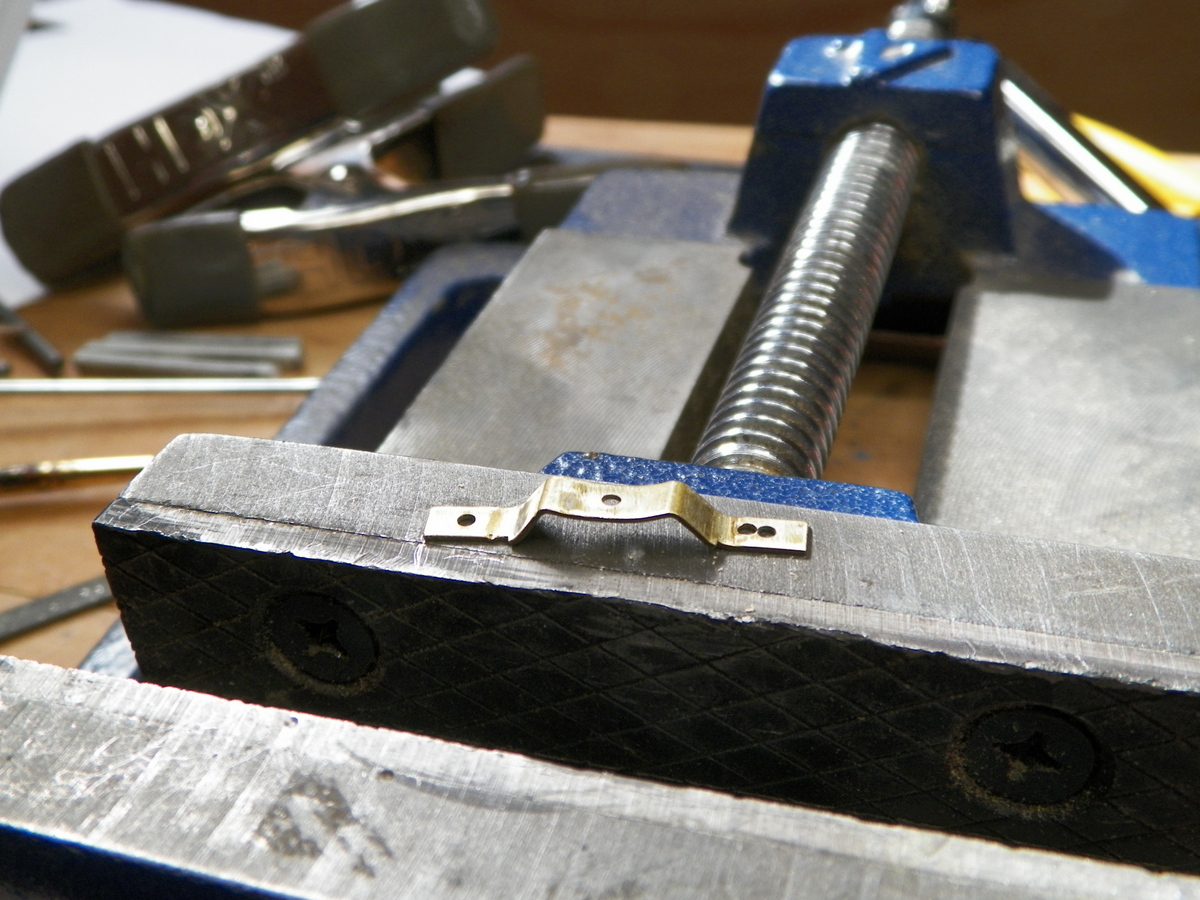
Be interesting to know if the original modeler(s) put the extra hole in this and why.
|
|
Country: USA ~
Posts: 2087 ~
Member Since: March 16 2013 ~
Last Visit: July 05 2018
|
Alert Moderator
|
|
|
|
Posted - March 26 2017 : 5:29:11 PM
|
Bit the bullet and revised the motor contact from the under the brush arm unit to a wire that doesn't interfere with the brush arm. I think the performance may be more reliable. It will be easier to get at the armature to clean. This little wire needs revising though to something that isn't as clunky around the attaching screw . . . it wants to hold the side tank a bit askew.
Ran it around the track like this a couple of times and it seemed to perform pretty decent. Trying to assure myself that parts are coming on and off and fitting and not messing with performance.
|
|
Country: USA ~
Posts: 2087 ~
Member Since: March 16 2013 ~
Last Visit: July 05 2018
|
Alert Moderator
|
|
|
|
Posted - March 27 2017 : 2:20:19 PM
|
| Hey Frank, do you happen to know the builder of 840? And maybe the year?
|
|
Country: USA ~
Posts: 2087 ~
Member Since: March 16 2013 ~
Last Visit: July 05 2018
|
Alert Moderator
|
|
|
|
Posted - March 28 2017 : 09:09:12 AM

|
found this interesting barry scroll down for front and back views,built by baldwin 1907 ken
http://members.trainweb.com/bedt/indloco/crrnjbxt.html#Locomotive Photos
catfordken
if you cannot see the light at the end of the tunnel,try turning around
Edited by - catfordken on March 28 2017 09:10:38 AM
|
Country:  United Kingdom ~
Posts: 8294 ~
Member Since: September 28 2006 ~
Last Visit: October 20 2021 United Kingdom ~
Posts: 8294 ~
Member Since: September 28 2006 ~
Last Visit: October 20 2021
|
Alert Moderator
|
|
|
|
Posted - March 28 2017 : 11:13:41 AM
|
| Thanks Ken. Those are good views. Photos of 840 could lead one to believe that Mantua used an early 1900's Baldwin as the prototype.
|
|
Country: USA ~
Posts: 2087 ~
Member Since: March 16 2013 ~
Last Visit: July 05 2018
|
Alert Moderator
|
|
|
|
Posted - March 28 2017 : 1:18:21 PM
|
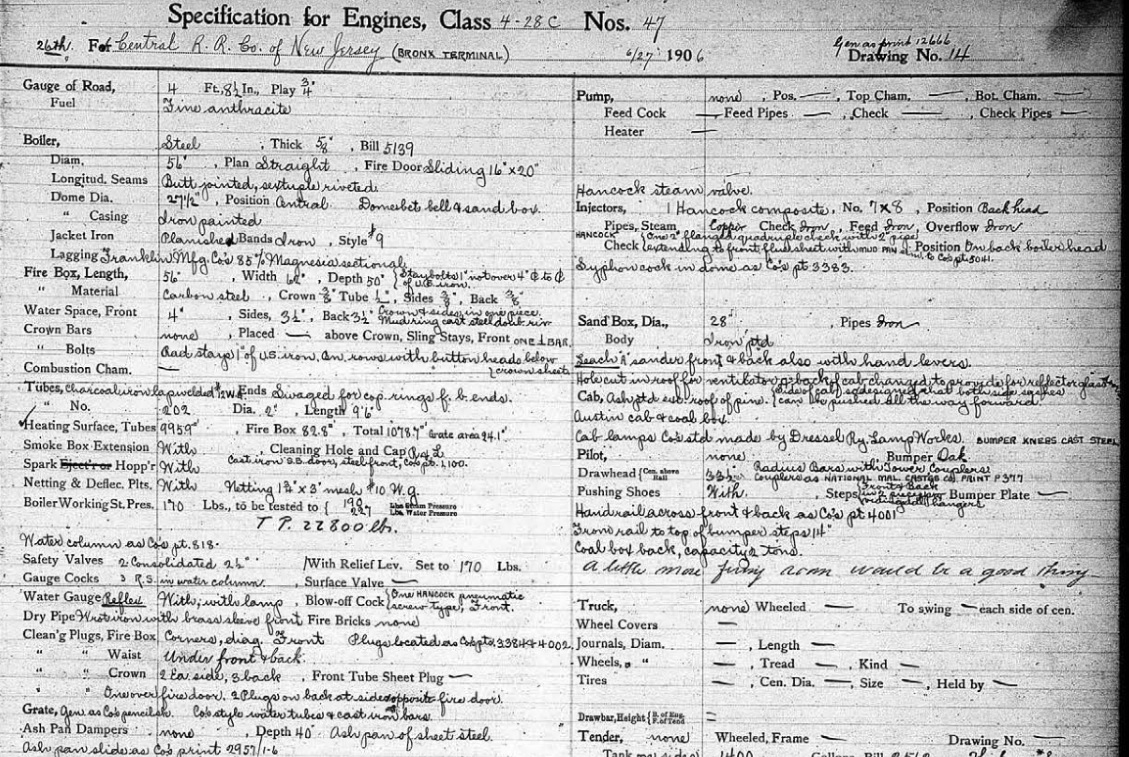
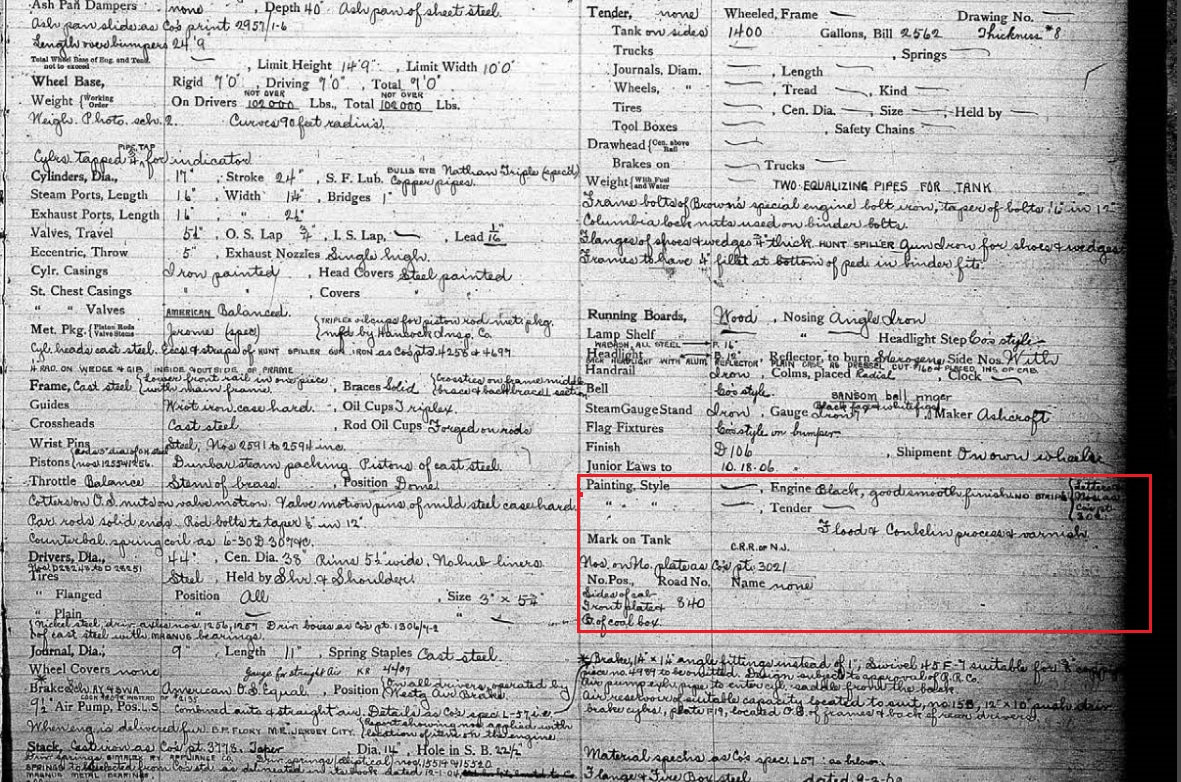
Now, knowing that Baldwin was the builder, and the year, I was able to go to Southern Methodist University's digital archives of Baldwin data and find this link to Volume 29 which has the builder's specs for 840 . . .
http://digitalcollections.smu.edu/all/extra/degolyer/rwy/BaldwinManuscripts/mss0061_02_29_opt.pdf
Below is a screen print of most of page 247 (volume 29) which shows Central Railroad of New Jersey as the purchaser and down lower that 840 would be painted "black good smooth finish"
|
|
Country: USA ~
Posts: 2087 ~
Member Since: March 16 2013 ~
Last Visit: July 05 2018
|
Alert Moderator
|
|
|
|
Posted - April 30 2017 : 12:50:42 PM
|
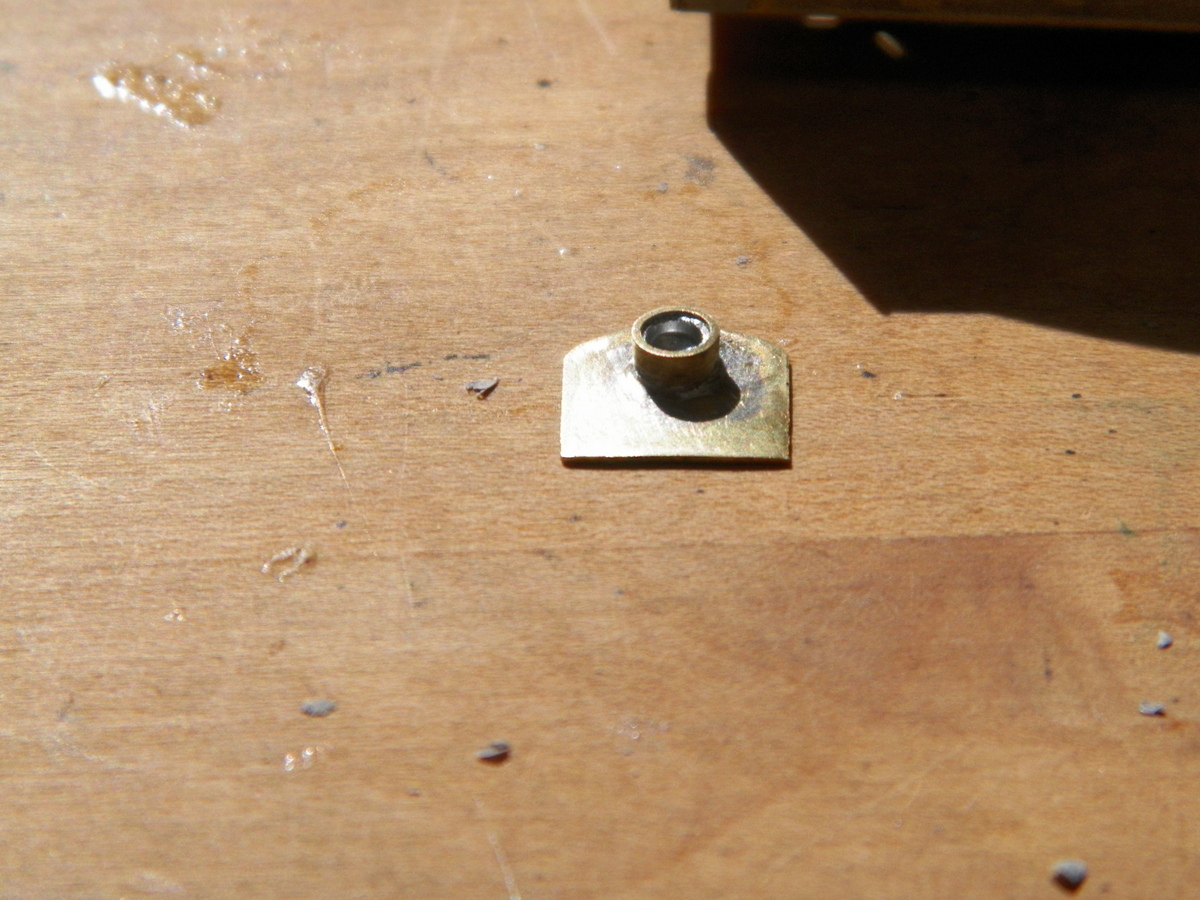
I have been continuing quite slow progress on the Little B; mostly hung up on trying to get the side tanks to hang straight and square. Made several of the little support brackets before achieving the present bend and hole arrangement, which I will live with it unless I buggar it up before the build is complete.
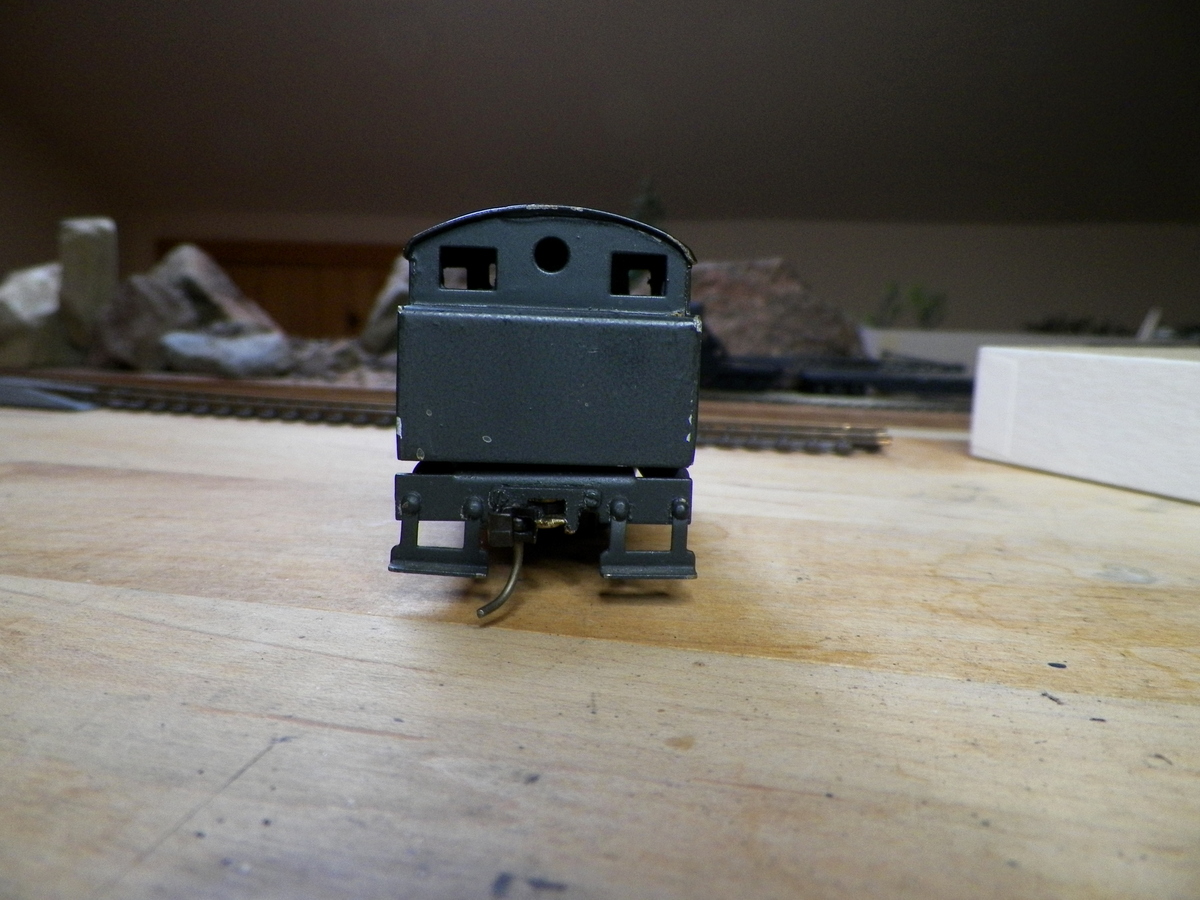
I did decide to remove the cab handrails and all the stuff that was messily soldered to the cab, so that took some time. And I made a plastic bushing as per the original design to attach the rear coupler. I want to make a rear light to fill that round hole at the rear of the cab. Looking at prototypes, it seems most had a rear light. Even 840 seems to have one placed on the rear of the coal shoot . . .
Found this photo of a scratchbuilt HO model of 840. If you Google CRRofNJ 840, you will see a photo of this model and it will lead you to the modelers web page. Rather amazing work.
Edited by - Barry on April 30 2017 12:58:01 PM
|
|
Country: USA ~
Posts: 2087 ~
Member Since: March 16 2013 ~
Last Visit: July 05 2018
|
Alert Moderator
|
|
|
|
Posted - April 30 2017 : 5:40:06 PM
|
I agree!
what other railroads used this loco?
|
|
Country: USA ~
Posts: 15032 ~
Member Since: February 23 2009 ~
Last Visit: July 14 2026
|
Alert Moderator
|
|
|
|
Posted - April 30 2017 : 6:05:07 PM
|
I love this thread Barry! Fantastic work!
Sean
"If everything seems under control, you're not going fast enough!" - Mario Andretti!
|
|
Country: USA ~
Posts: 1729 ~
Member Since: June 15 2011 ~
Last Visit: June 26 2021
|
Alert Moderator
|
|
|
|
Posted - May 02 2017 : 7:39:48 PM
|
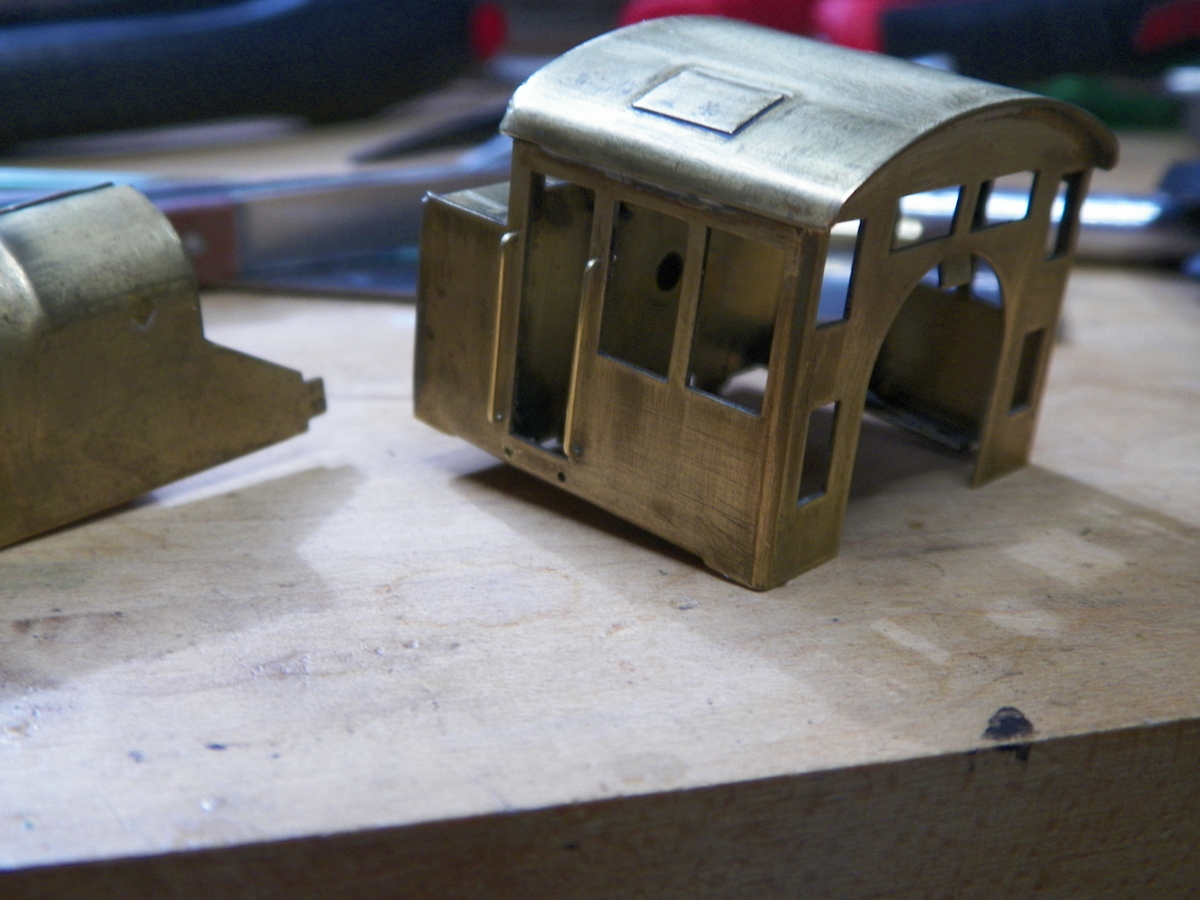
Working on the accoutrements to the cab; handrails, ladders. I decided [heresy] to drill another hole for mounting the ladder. "Factory" has it, that one arm of the ladder should go beneath the cab.
|
|
Country: USA ~
Posts: 2087 ~
Member Since: March 16 2013 ~
Last Visit: July 05 2018
|
Alert Moderator
|
|
|
|
Posted - May 06 2017 : 6:23:28 PM
|
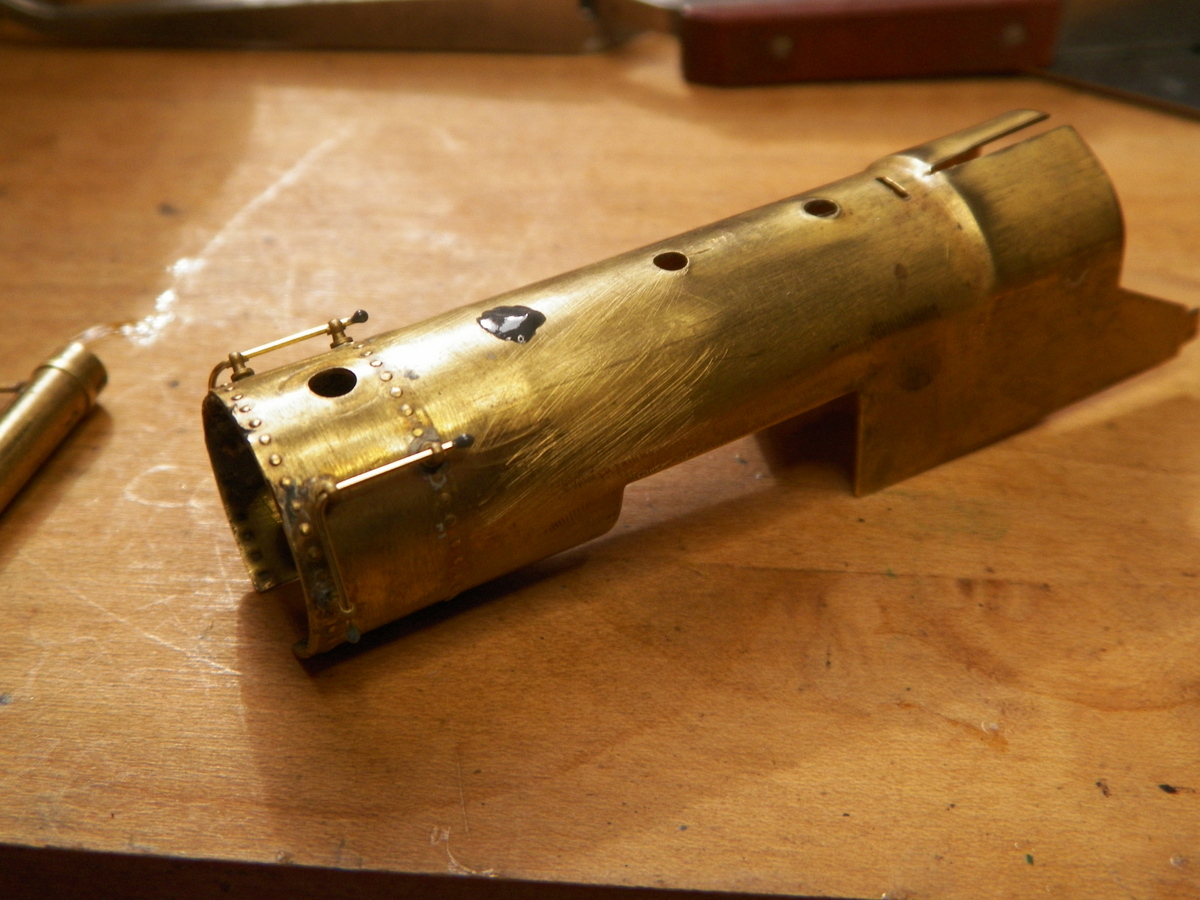
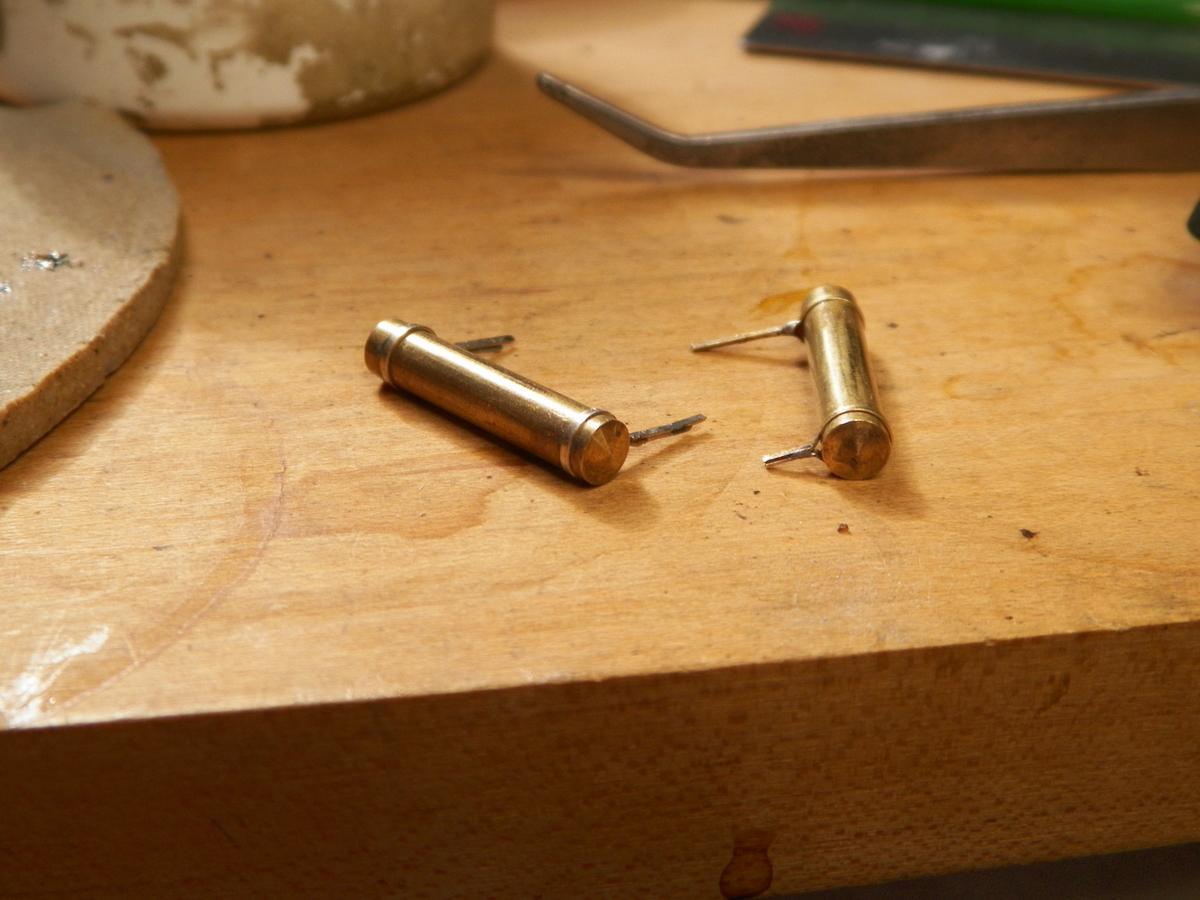
Weather has been terrific here the past few days and it's been great to be outside doing things. I did steal away for a spell and put the handrails on the smokebox. I chose an easy way out and used cast stanchions; partly because aside from needing to develop a skill at doing the factory recommended technique of folding tiny flat brass around the hand rail, I didn't want to have all those "ends" protruding inside the boiler.
|
|
Country: USA ~
Posts: 2087 ~
Member Since: March 16 2013 ~
Last Visit: July 05 2018
|
Alert Moderator
|
|
|
|
Posted - May 06 2017 : 6:48:19 PM
|
I went back to the top of the thread to see the original stanchions and those new ones look a whole lot more realistic. Good choice. This is going to be one sweet little engine.
Carpe Manana!
|
|
Country: USA ~
Posts: 2418 ~
Member Since: September 17 2013 ~
Last Visit: July 12 2026
|
Alert Moderator
|
|
|
|
Posted - May 07 2017 : 8:33:24 PM
|
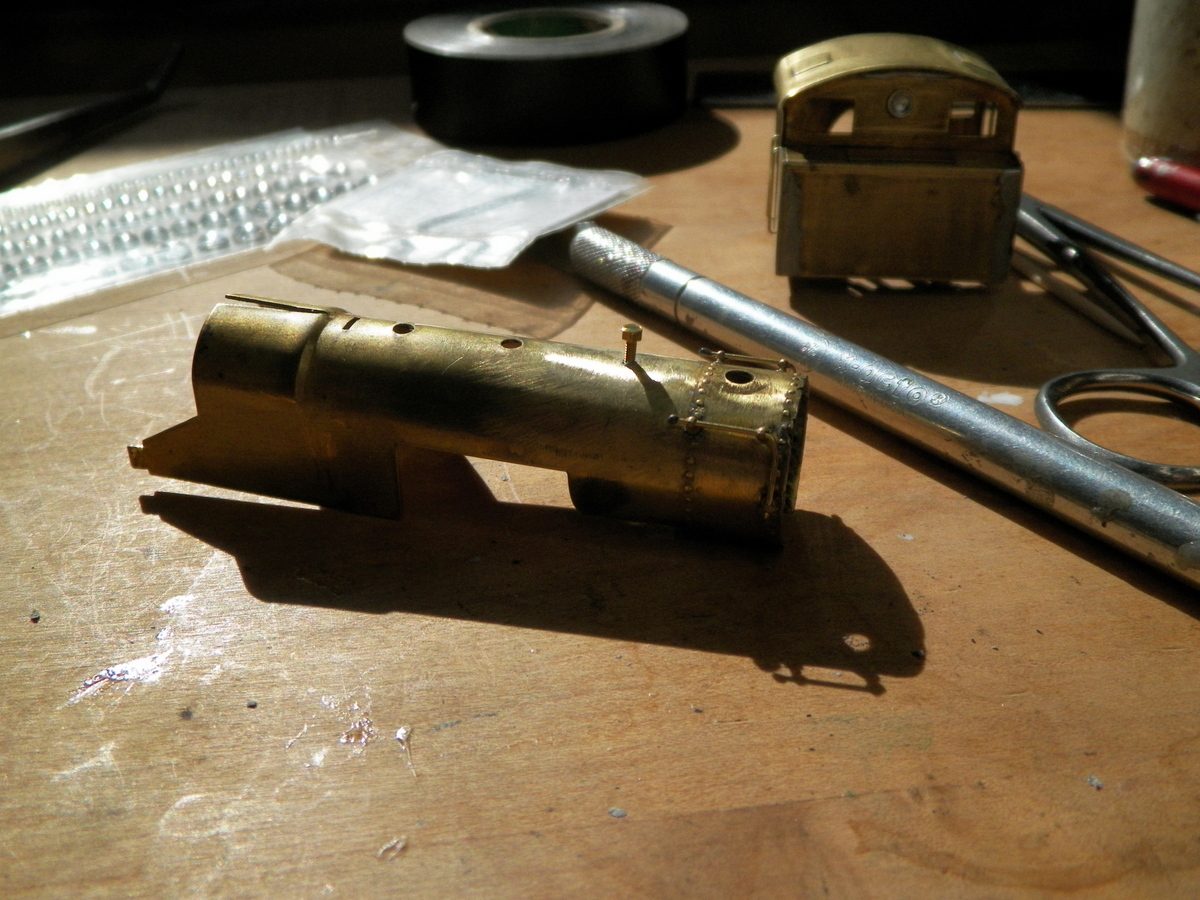
Yeah Don, this locomotive arrived with some interesting adaptations and modifications. One of which was using an "aftermarket" bell which apparently required a larger mounting hole. I want to put a Mantua original type bell back on, so I've filled the hole with JB Weld to be tapped for a #90 screw. We'll see how that works out.
Wrapping the flat wire around the air tanks seemed clumsy to me (inexperienced) and I ended up clamping it and soldering it . . . to be filed down and shortened to fit through the holes in the bottom of the cab so as to not leave much excess inside the cab. To be attached with super glue is my plan at this point. There isn't much room to work around a soldering iron inside the cab.
I ended up using brass for the cab handrails; a little more forgiving than the steel music wire. These are superglued in place.
|
|
Country: USA ~
Posts: 2087 ~
Member Since: March 16 2013 ~
Last Visit: July 05 2018
|
Alert Moderator
|
|
|
|
Posted - May 11 2017 : 7:01:31 PM
|
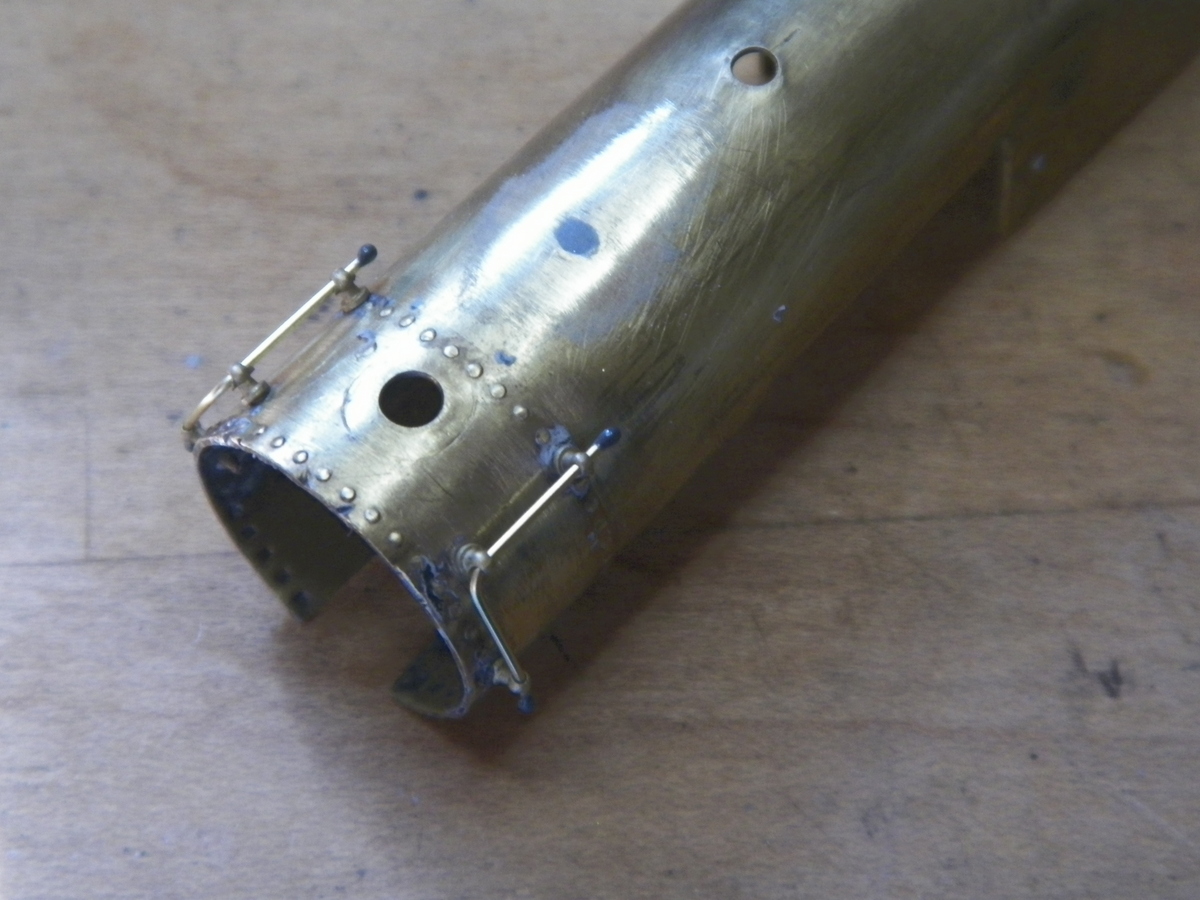
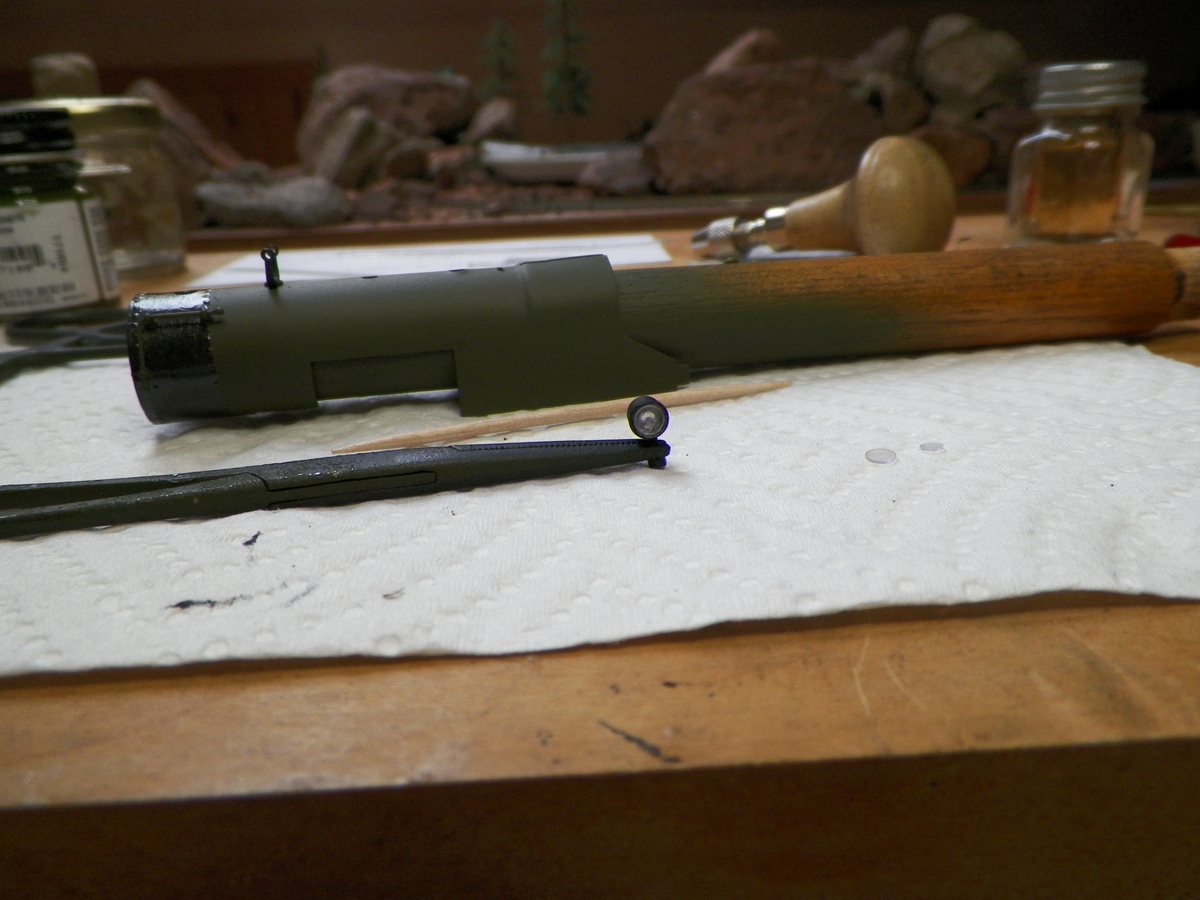
Filing off the JB Weld in prep for drill and #90 tap . . .
and working on the rear light. The 5/32" tubing wasn't a tight enough fit in the existing hole so I mounted a piece of it on a backing plate which has also made it easier to work on. The light fixture was then filled with JB Weld and then drilled out to accept a small jewel (not in place at this time), then [the interior of the light housing] painted silver. It will ultimately be covered with a thin piece of clear for a lens.
|
|
Country: USA ~
Posts: 2087 ~
Member Since: March 16 2013 ~
Last Visit: July 05 2018
|
Alert Moderator
|
|
|
|
Posted - May 13 2017 : 11:07:56 PM
|
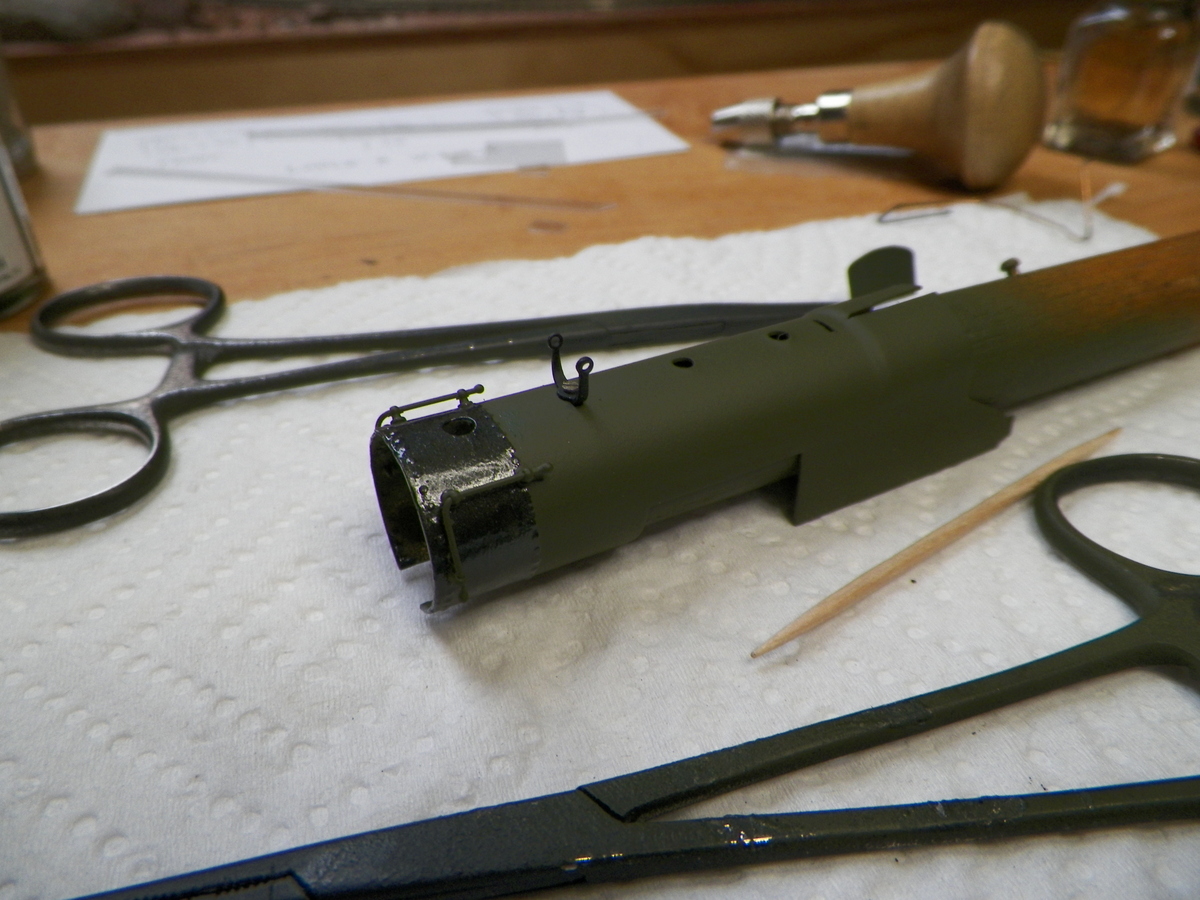
The lights didn't work out as nicely as I planned; may take me a few tries before I get the lens piece in without a bunch of glue smears. But . . . the weather was good for outdoor spray painting today so I jumped into that cold water. Seems to have come out serviceable. I went back and forth a while on the color (wishin' I had some Floquil Brunswick Green) between black and dark green. I didn't feel good about pulling off a good looking semi-gloss finish, but I was going to go flat black. Then the devil made me do it and I bought this can of Model Masters Dark Green. I like it better when it's not in bright light. "We'll see."
|
|
Country: USA ~
Posts: 2087 ~
Member Since: March 16 2013 ~
Last Visit: July 05 2018
|
Alert Moderator
|
|
|
|
Posted - May 20 2017 : 7:39:36 PM
|
Mostly been waiting for paint to cure. Seems like the paint is a bit more durable if I can sit on it a week. Want to apply some dull coat over the smoke box graphite (Testors), but now weather has turned cold here again for a few days. Did come up with some lights that I feel I can live with and got the bell mount screwed in fine to the tapped JB Weld.
This last photo shows what will be the cab rear light. Both of these lights were made by painting the interior silver, gluing in a small jewel and then putting a clear plastic lens on. The lens was cut out with a leather punch. It seems that just a tiny bit of crazy glue will get sucked up into the crack where the plastic lens meets the light housing. When I kept messing up on this, was when I was trying to dab a tiny amount of crazy glue around the edge of the housing and then set the lens down. That just seemed to make a mess. These aren't perfect by any means, but from a few feet away.
|
|
Country: USA ~
Posts: 2087 ~
Member Since: March 16 2013 ~
Last Visit: July 05 2018
|
Alert Moderator
|
|
|
|
Posted - May 24 2017 : 3:27:56 PM
|
Good Lord willin' and the creek don't rise, might be putting this thing together this weekend.
|
|
Country: USA ~
Posts: 2087 ~
Member Since: March 16 2013 ~
Last Visit: July 05 2018
|
Alert Moderator
|
|
|
|
Posted - May 24 2017 : 6:38:29 PM
|
Couple of thoughts but first have to say this is a grand project. Lens might successfully be glued in with clear acrylic floor coating. Used to be named Future maker names it something else now.
On the paint, a gloss coat might deepen the tone. For example; on one of my freelance roads the body color is a mix of PollyScale Brunswick green substantially lightened with CNW green and a bit of I forget what else. After application the flat paint is a forest green/olive hue somewhat lighter than Brunswick.
Gloss coat it with that floor acrylic and it goes back to almost but not quite black.
I haven't overcoated it with flat or satin since I'm liking the shop-fresh look. Testors Acryl flat or semigloss works over the acrylic. Lacquers are not reccomended.
“There are a thousand things that can happen when you go light a rocket engine, and only one of them is good.” — Tom Mueller, SpaceX, 2012
|
|
Country: USA ~
Posts: 94 ~
Member Since: May 23 2017 ~
Last Visit: May 26 2020
|
Alert Moderator
|
|
|
|
Posted - May 25 2017 : 3:32:53 PM
|
| Southwest Forests . . . that's quite a handle. Hey, those are some interesting tips you passed on. I may end up checking out some of that Future type floor product. As far as this project, I did notice that dull coat on top of the boiler dark green did seem to make the color "richer" if you will. I don't believe I'll try the clear gloss Future on this model because I've already glued the windows in place in the cab and if I take them out to clear coat, then I have to scrape out any glue "humps" and it will lead to a bigger mess than I care to repair at this time. I sort of realized today, that it's a good idea for me to check out "yesterday's work" before proceeding; there are more than a couple times I've had to back track. I've thought for a spell now that having two models is probably the best so one can serve as the prototype and alert you to most of the challenges you will need to overcome. Yeah, I'd really appreciate a bottle of Floquil Brunswick Green now. When my local hobby shop said Floquil was going to be done, I didn't know enough to stock up on some things.
|
|
Country: USA ~
Posts: 2087 ~
Member Since: March 16 2013 ~
Last Visit: July 05 2018
|
Alert Moderator
|
|
|
|
Posted - May 25 2017 : 6:58:44 PM
|
Thanks! And there's a bit more to say to fill out the thoughts.
Actually, on the clear acrylic, for years now the aircraft modelers have been dipping canopy parts in it for increased clarity and reflectance.
It isn't called Future any more, was recently changed to another name and I'm not sure exactly what, would have to go look it up.
The liquid flows well and for several decades I've been brushing it on flat windows on trains.
Tamiya's clear gloss acrylic model paint does similar on clear styrene parts. I used it for a time in 1980s before learning of the Future thing.
I think, think, the acrylic has even been used to 'glue' on thin, like .005, clear sheet for window glazing.
With glazing already in, just brush acrylic on that side, even over the glazing, then lay model with that side up and level and glazing will come out fine.
And likewise, think but will have to look, some aircraft modelers have said that after using it for a gloss coat they have placed decals over small puddles of wet acrylic.
The model rocket crowd also uses the acrylic for a smooth gloss coat.
It can be airbrushed, I'd have to look up the details.
“There are a thousand things that can happen when you go light a rocket engine, and only one of them is good.” — Tom Mueller, SpaceX, 2012
|
|
Country: USA ~
Posts: 94 ~
Member Since: May 23 2017 ~
Last Visit: May 26 2020
|
Alert Moderator
|
|
|
|
Posted - May 29 2017 : 3:34:46 PM
|
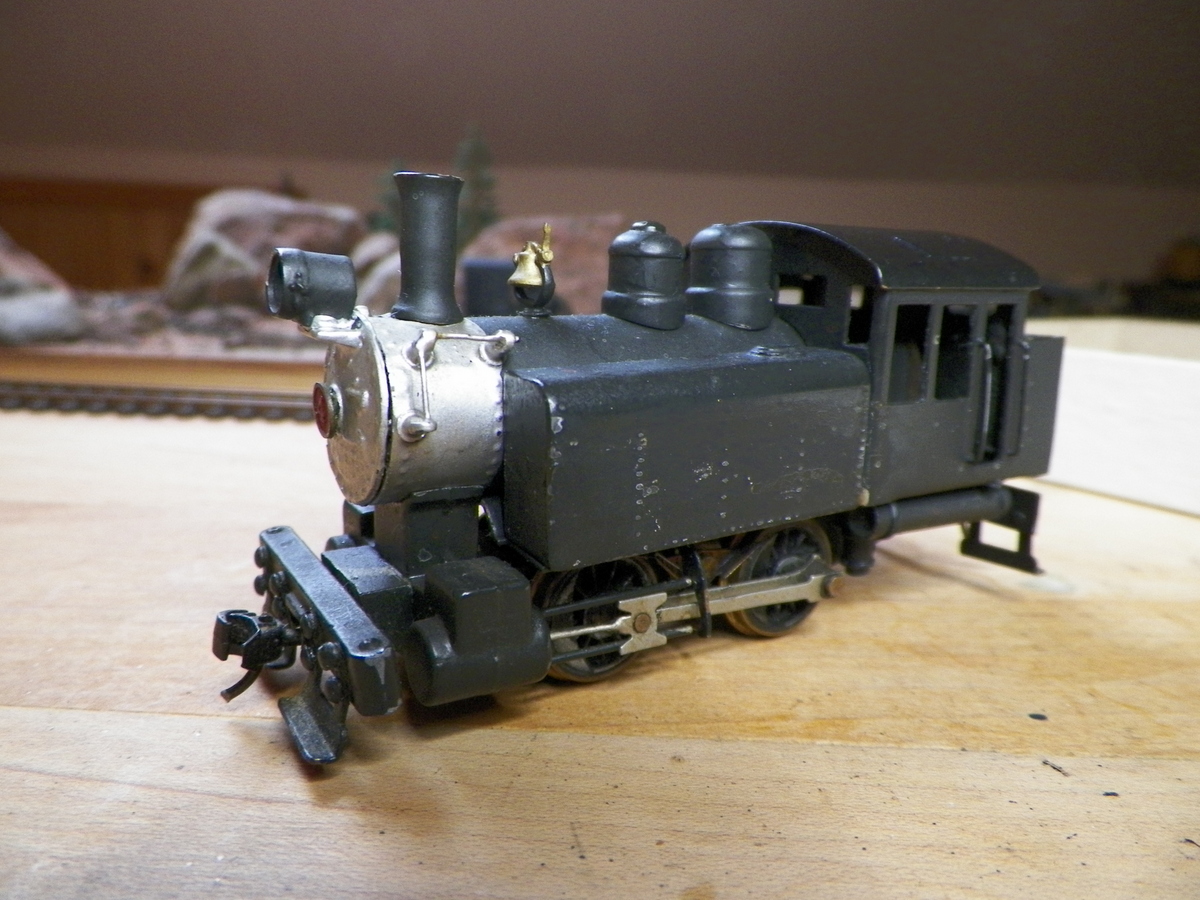
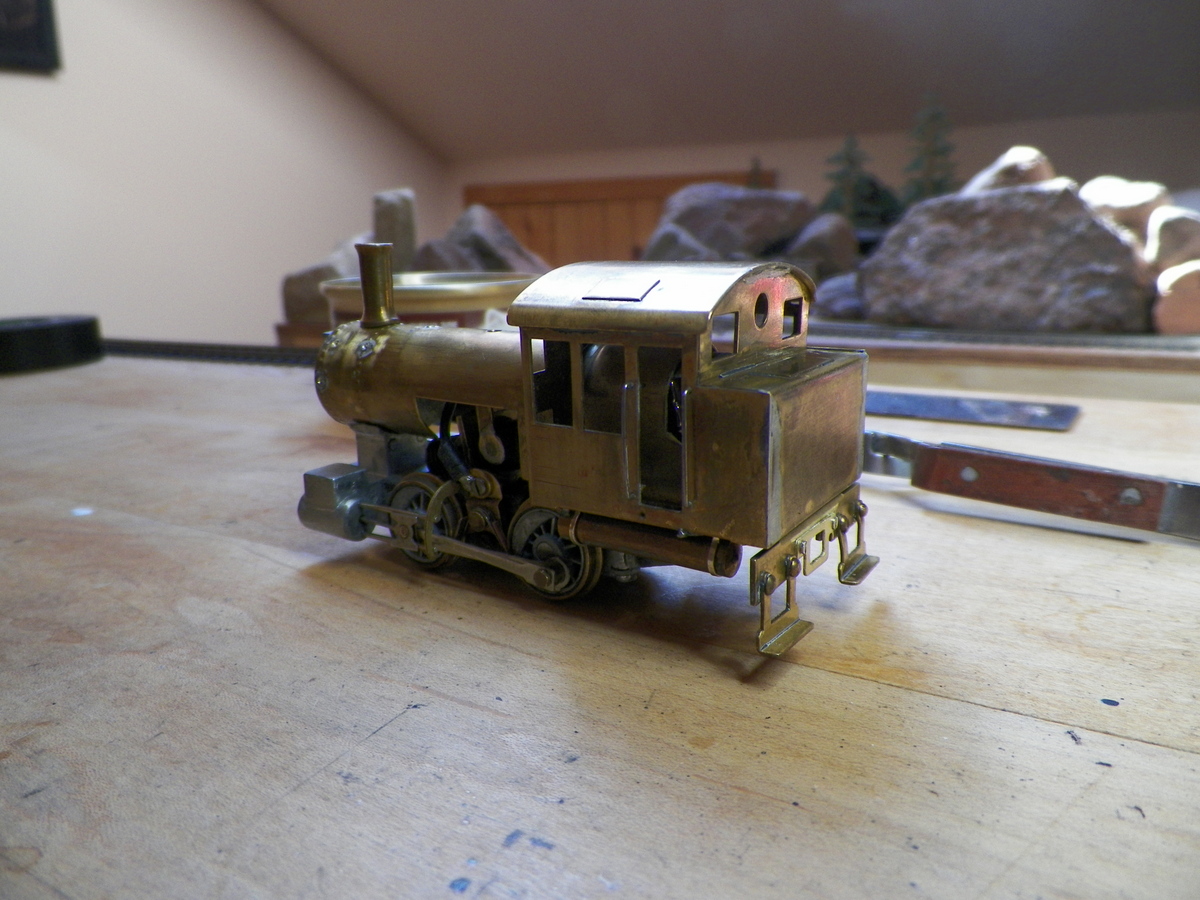
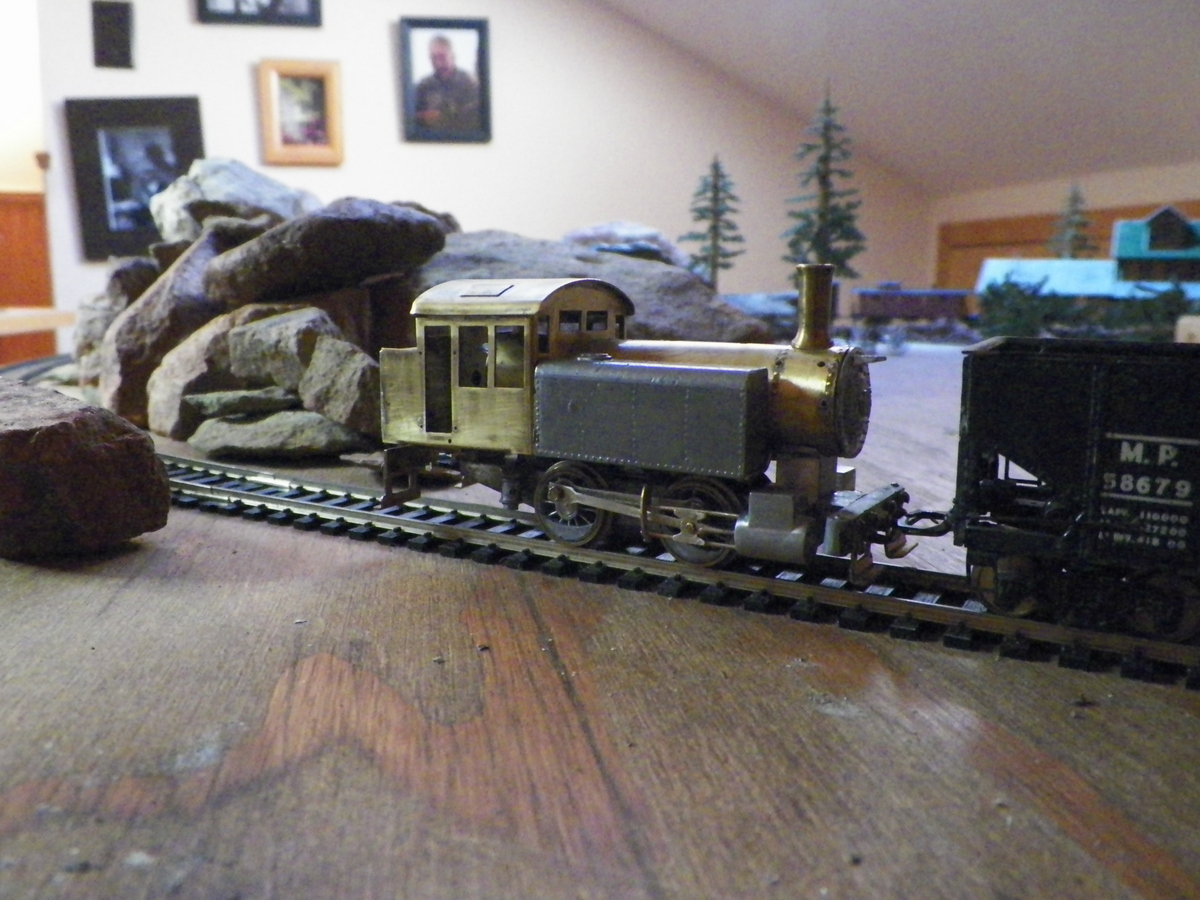
Well, got that little locomotive assembled this morning; had done a trial run of the "mechanism" yesterday. Amazingly avoided scratching up the boiler while attaching the cab.
|
|
Country: USA ~
Posts: 2087 ~
Member Since: March 16 2013 ~
Last Visit: July 05 2018
|
Alert Moderator
|
|
|
|
Posted - May 30 2017 : 12:03:02 AM
|
Nice vid, Barry. Having read the back story, this little gem is
just that much more interesting. Amazing how you brought
this thing back from "junk" status.
|
|
Country: USA ~
Posts: 11686 ~
Member Since: December 09 2013 ~
Last Visit: May 26 2026
|
Alert Moderator
|
|
|
|
Posted - May 30 2017 : 7:43:43 PM
|
|
|
|
Country: USA ~
Posts: 2087 ~
Member Since: March 16 2013 ~
Last Visit: July 05 2018
|
Alert Moderator
|
|