|
|
 Posted - December 17 2012 : 03:38:48 AM Posted - December 17 2012 : 03:38:48 AM


|
Well I said I was going to work on nothing but stuff for my layout this winter. Right up to the point where the opportunity came along to build a few unique xmas gifts for my friend from things I had laying around. There were 4 projects total, each one has been making my life as difficult as possible lol.
Some quick background. He owns his own business that sells lawn mowing equipment. I ALWAYS wanted to make a one off boxcar of his business name on the side. I thought that would be pretty cool. His other love in life other than trains is Porsches. He owns a few older ones that are 911's that go between autocross on the weekends and carrying him to work on nicer days. Strolling through a Walmart one night I spotted this.
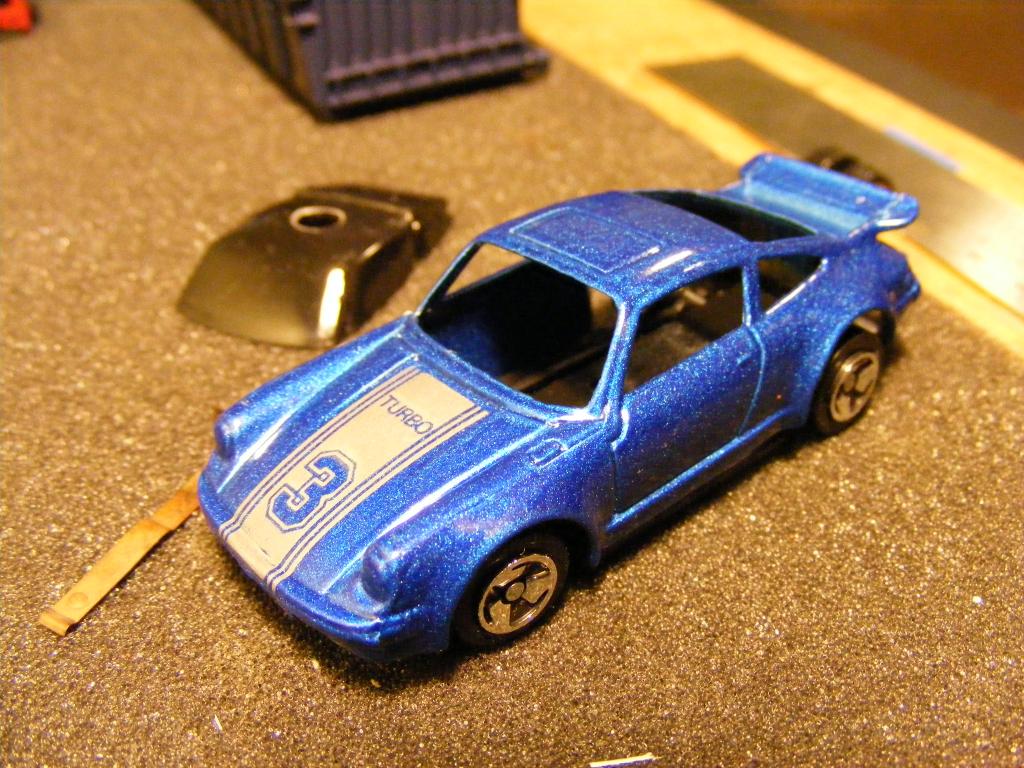
I think it was like 74 cents or something. I have NEVER repainted a hot wheels car before. But the idea intrigued me. I fashioned up a paint scheme based off a older 911 race car that he knew real well. Then in a small twist stuck his personal racing number on it. This was what I came up with.
If I ever do another car again, it will be too soon. First paint job the paint crazed on it due to bad primer and the car had to stripped down again. 2nd time was a charm. However painting the hood was a pain since I figured it would look best spray painted. The paint leaked a bit around the masking tape so I had to do some touch up with acrylics. I had to do MORE touch ups when I dropped the thing once  Then painting the bumpers blue came out very rough around the edges. I swapped the wheels from another car. However the chassis is narrower than the body that fits over it so it looks weird since the wheels sit so far in. Alas, at least its finished. Then painting the bumpers blue came out very rough around the edges. I swapped the wheels from another car. However the chassis is narrower than the body that fits over it so it looks weird since the wheels sit so far in. Alas, at least its finished.
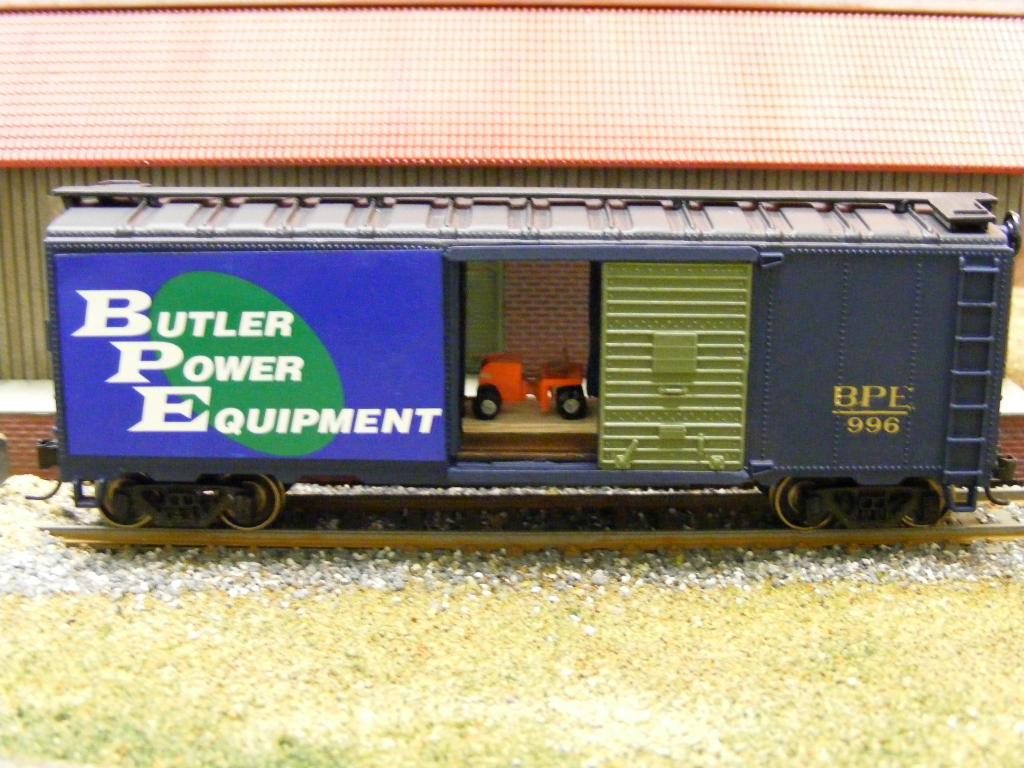
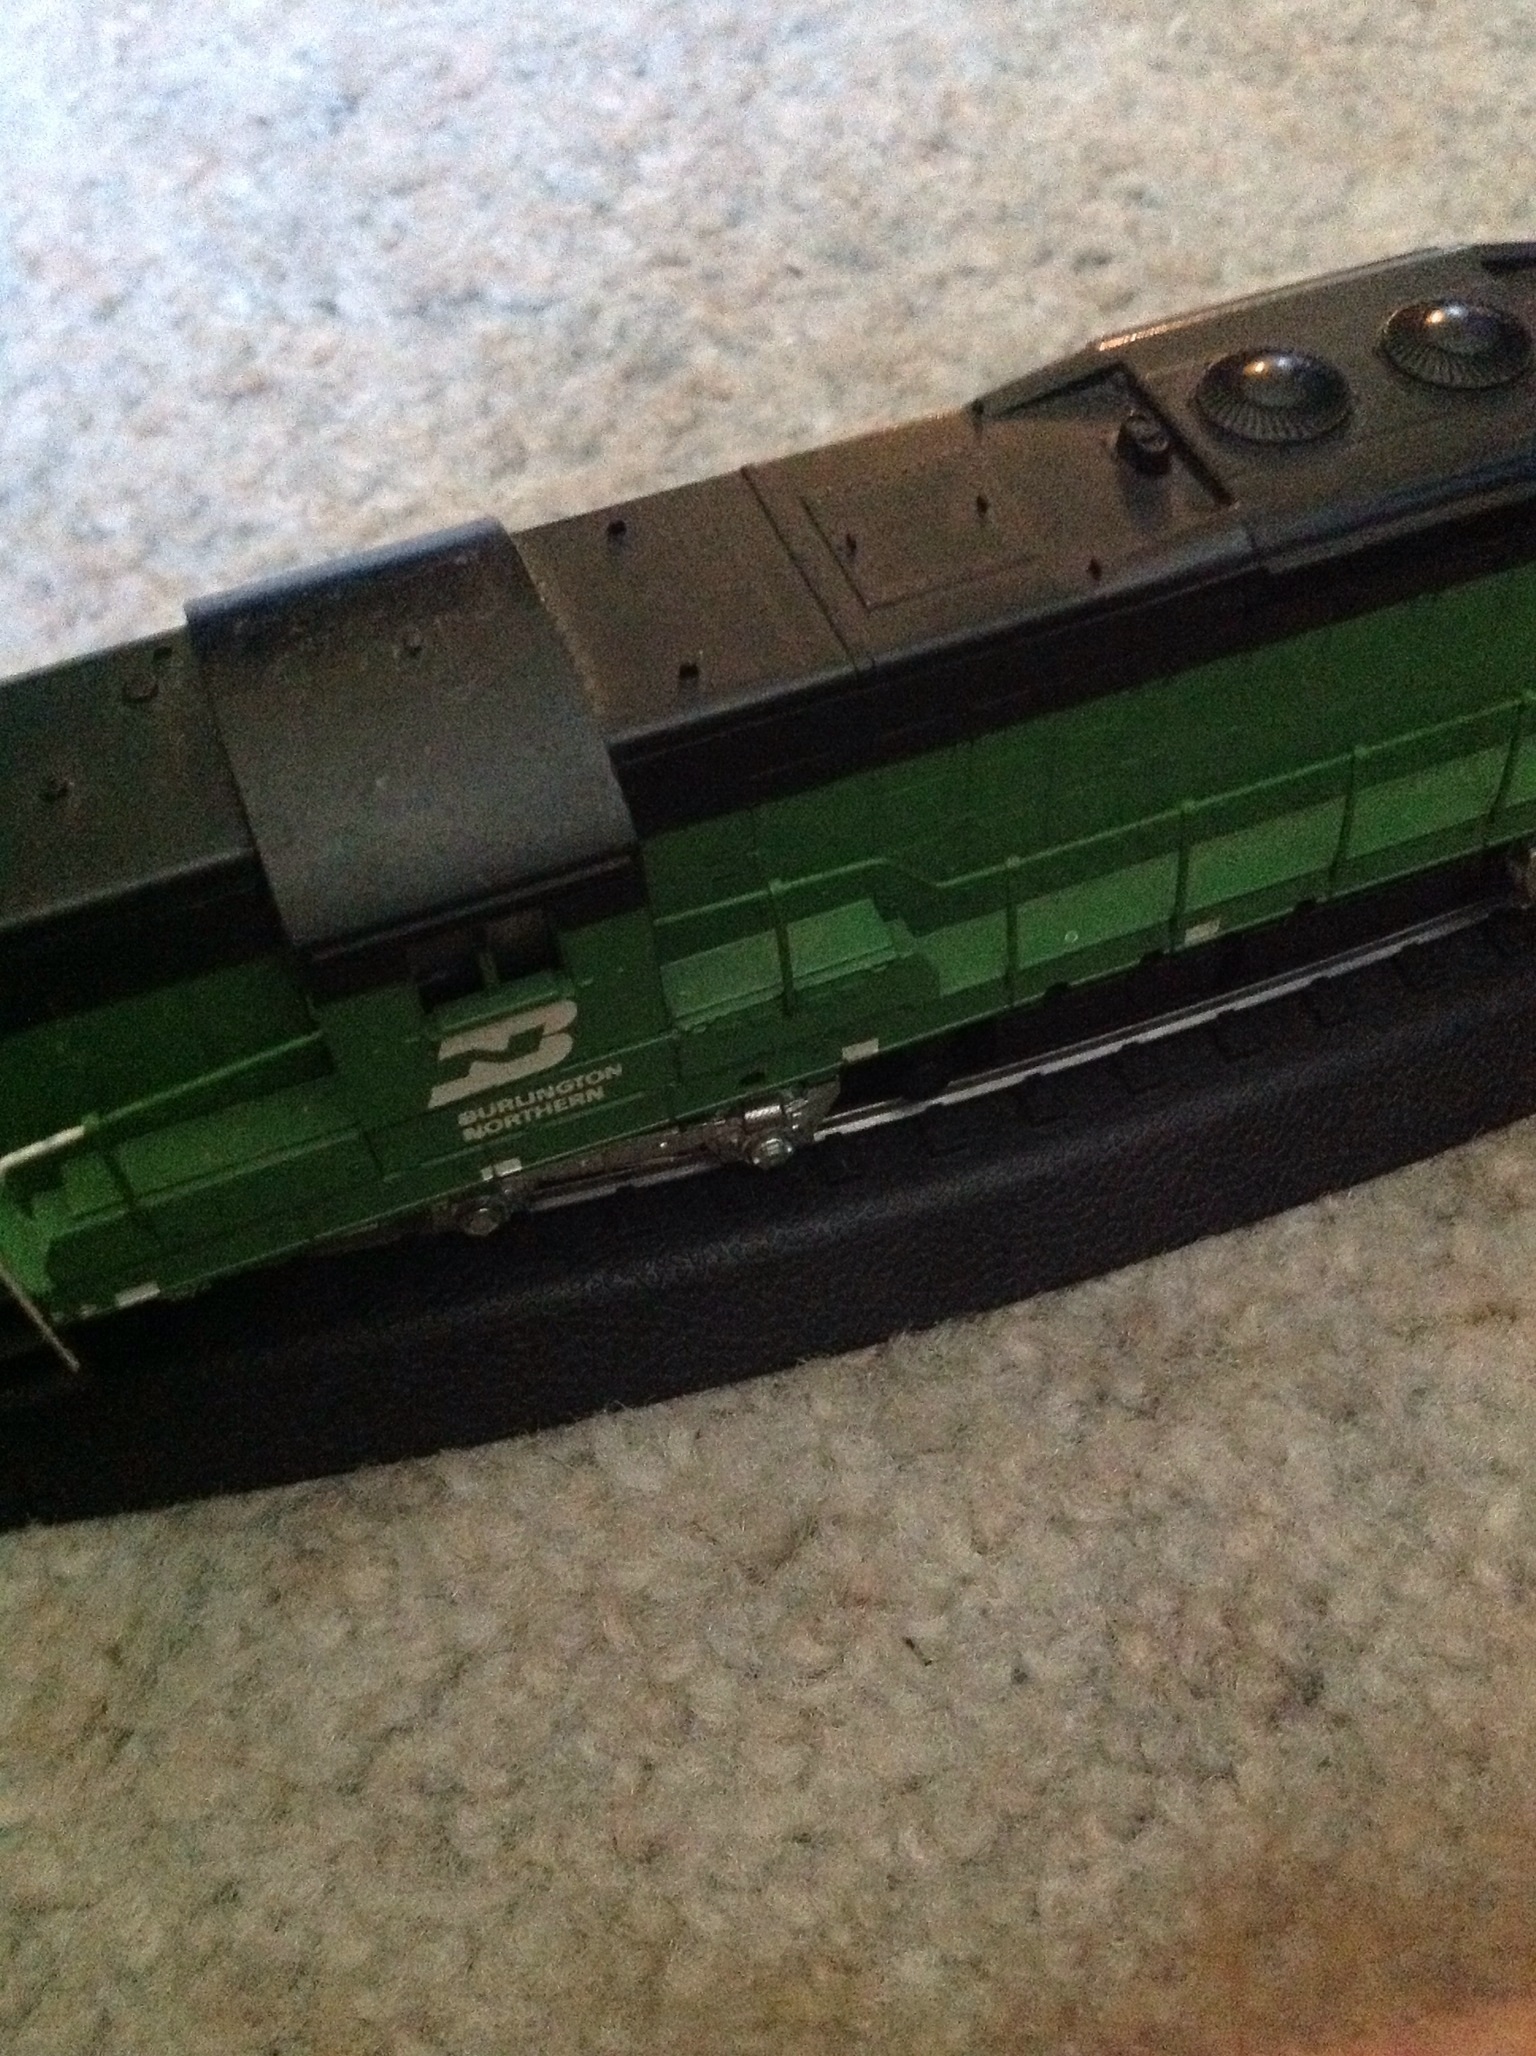
Next model was a AHM boxcar I had laying around. Remember what I said about a lawn mower business? First I built this little guy out of scrap.
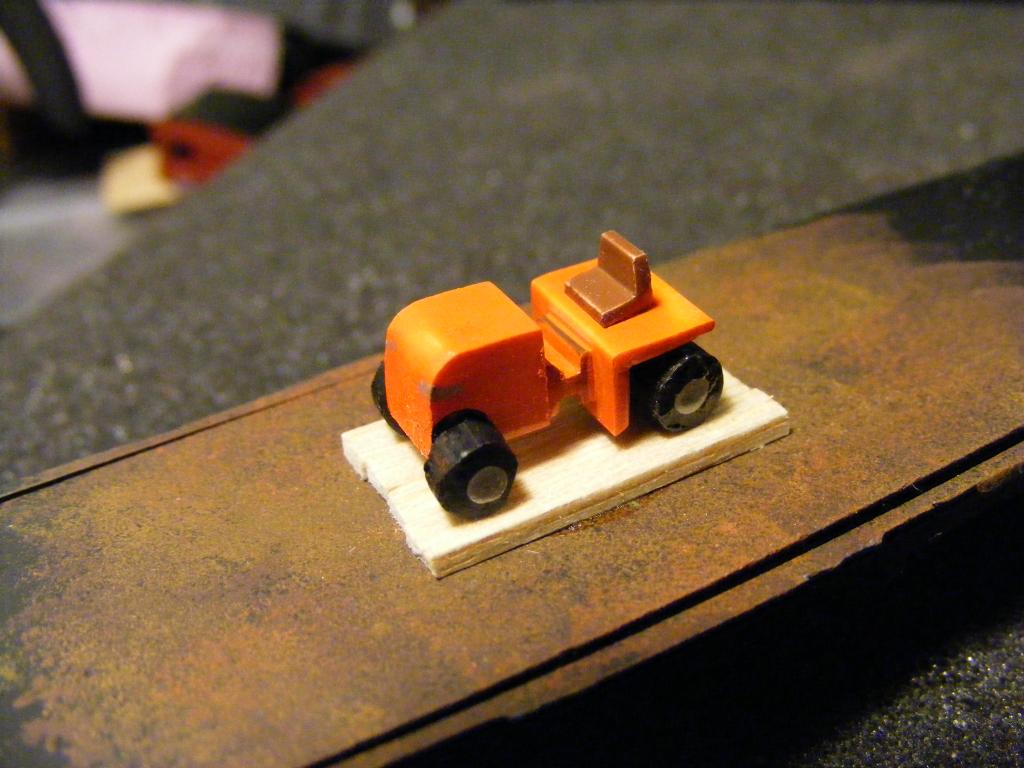
Not to shabby I thought? I mean you can at least tell its a lawn tractor lol. Next up the boxcar received a repaint. I cut the logo out of his business cards and glued them into the space on the side of the boxcar after cutting the molded ladder rungs off. Added metal wheels and kadee knock off couplers. The reporting marks are again more dry transfer decals that I've been playing with. This was the end result.
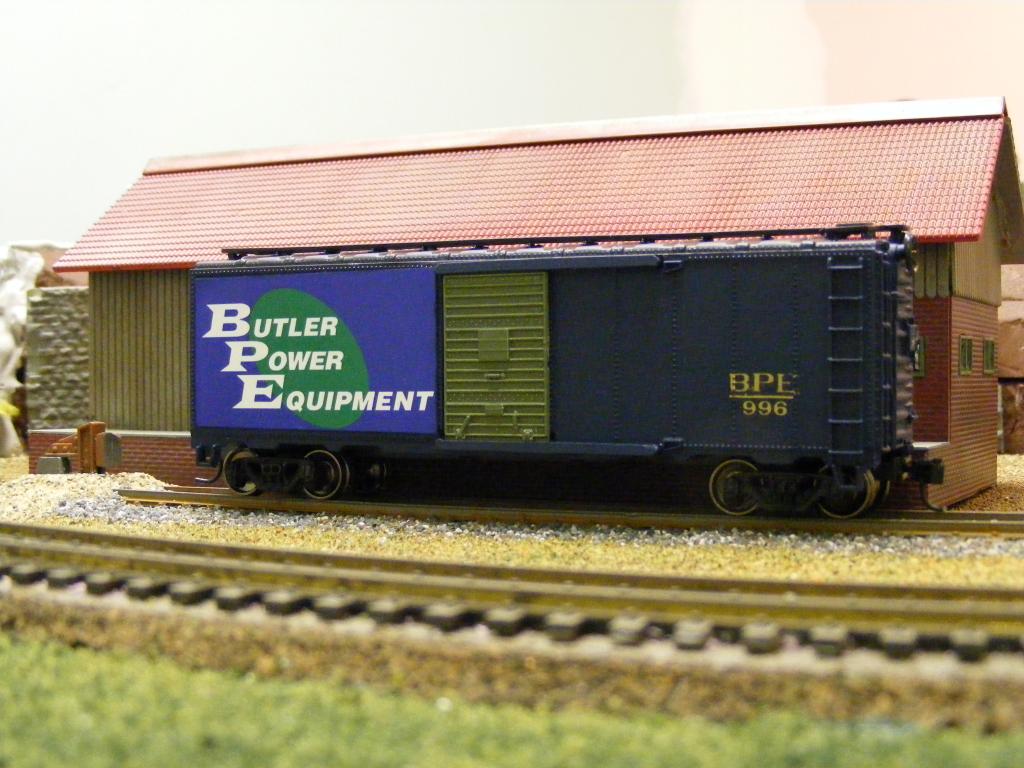
Nifty little car, nice & clean. Where is the mower you asked?
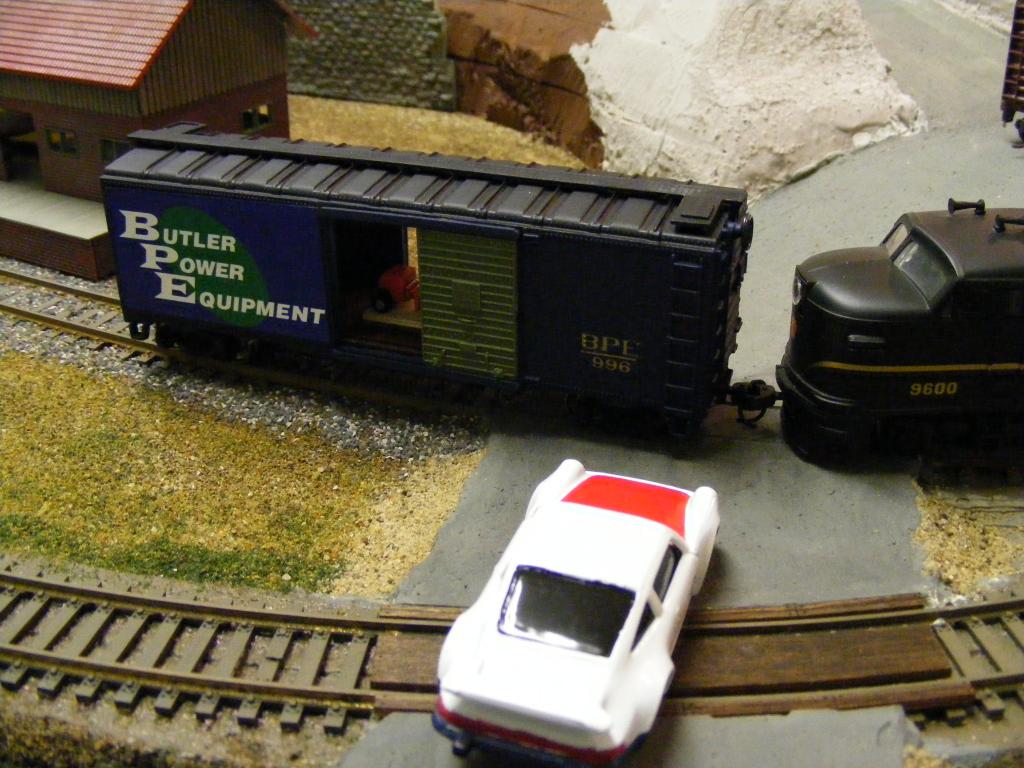
The camera is throwing the colors off it the main boxcar logo isn't quite that blue. But this one I'm actually happy with. A little delivery photo, and PRR FA-1 helps shove the BPE boxcar down the unloading track while the Porsche checks out the load inside.
So those are the next two. Here are the teaser for them till I get them done.
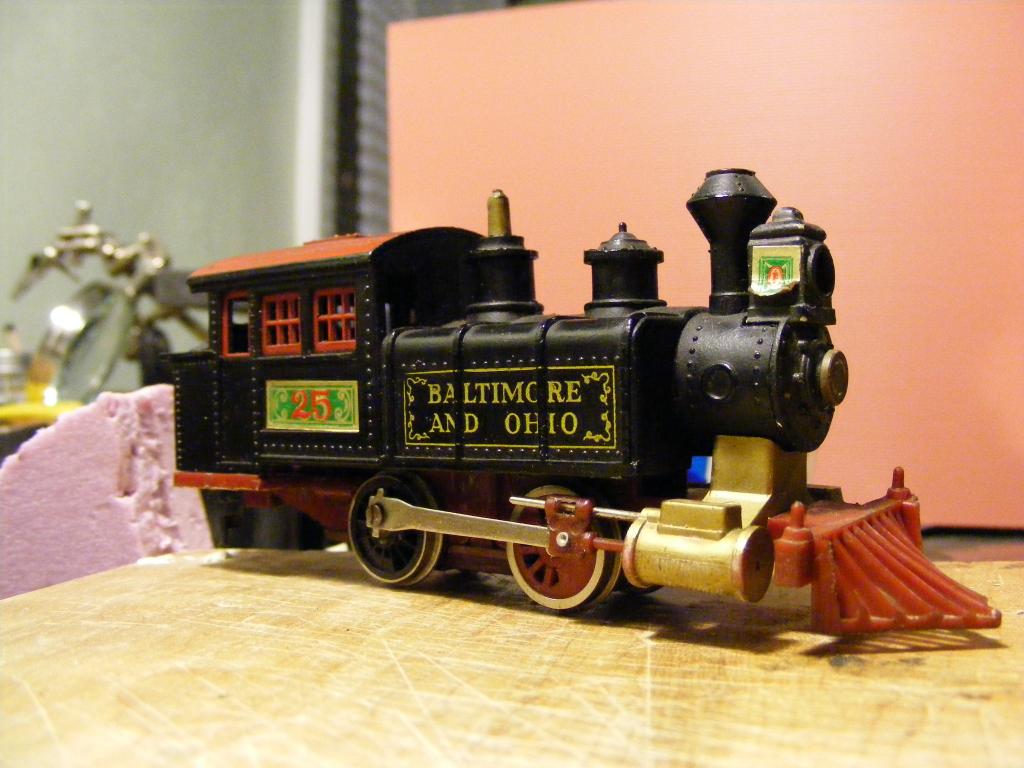
Two fun facts. The Teakettle was gutted. I took it off his own layout he has no clue I'm rebuilding it. But if it even moves a foot after I'm done I'll be massively impressed. Its really rough to say the least I picked a BAD candidate to rebuild. Main gear has messed up teeth, one of the electrical contacts was MIA. The motor I picked may or may not work for HO duty lol. This is assuming I can mount it in there ok, But as far as LOOKS its should be a massive improvement of the usual circus that is a Life-Like Teakettle!
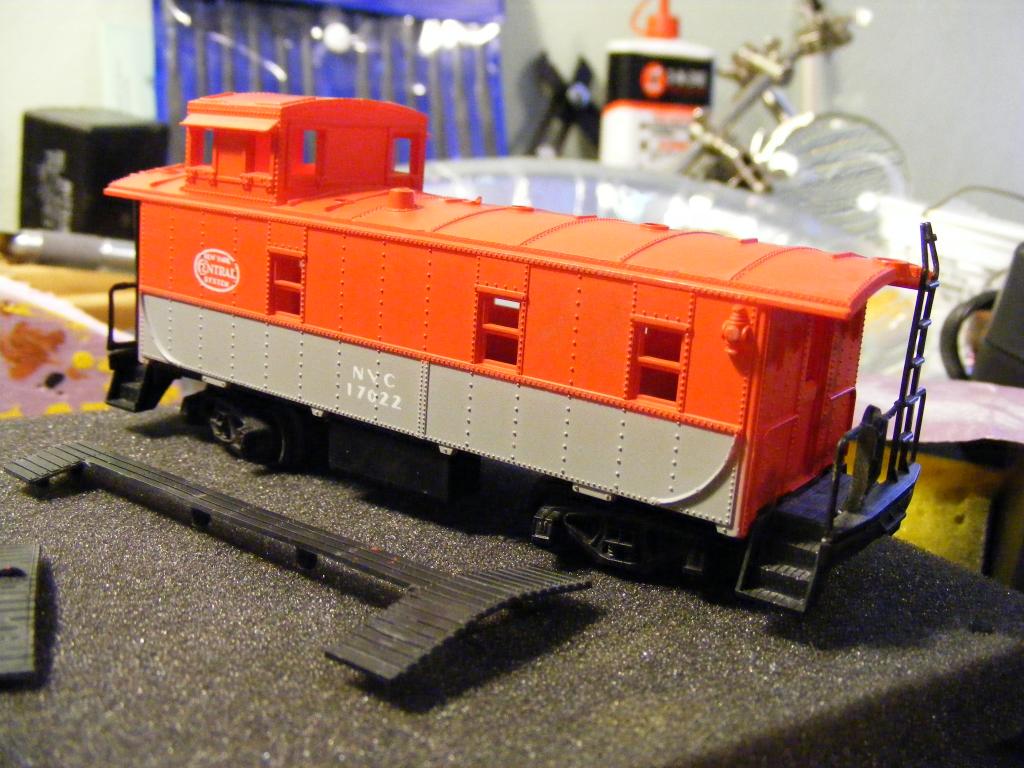
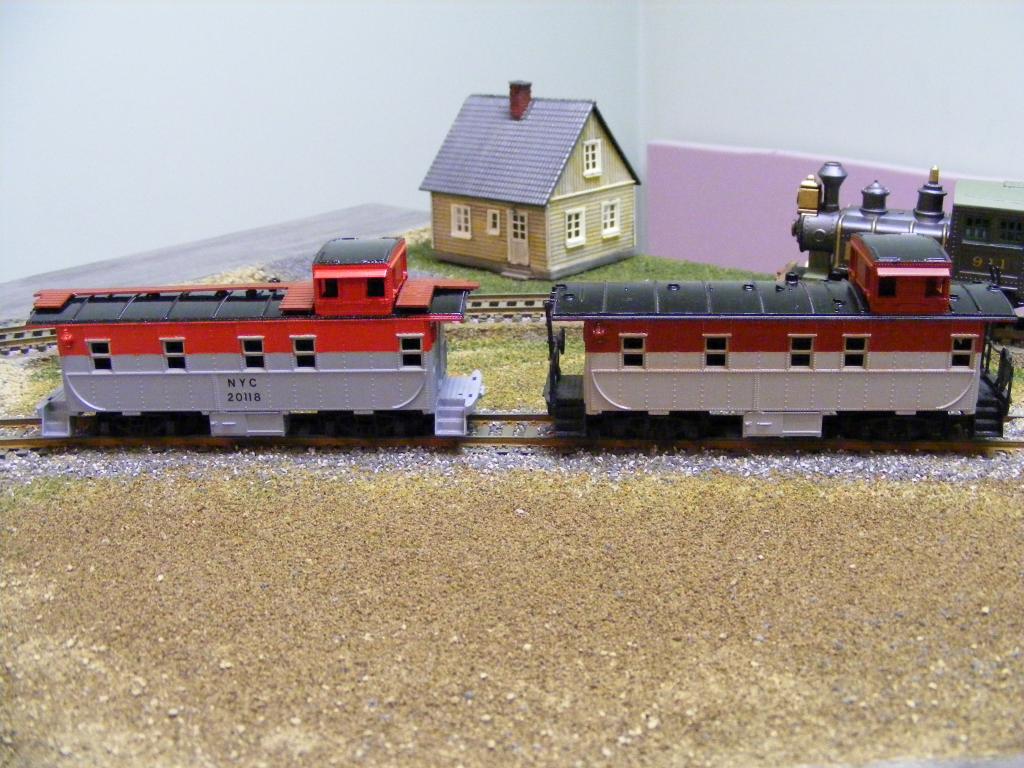
The caboose I originally wanted to make it much closer/better NYC pacemaker scheme (my friend likes NYC). But was another victim of bad primer messing everything up. THANKFULLY, I had another one just like it that was in ATSF livery. So the ATSF one is getting repainted to NYC Pacemaker scheme and the original one I wanted to "just upgrade the look" is a little dead in the water right now  So updates on the next two in a few days. Wish me luck its getting close lol. So updates on the next two in a few days. Wish me luck its getting close lol.
|
Country:  USA ~
Posts: 531 ~
Member Since: January 29 2009 ~
Last Visit: July 10 2020 USA ~
Posts: 531 ~
Member Since: January 29 2009 ~
Last Visit: July 10 2020
|
 Alert Moderator
|
|
|
|
Posted - December 17 2012 : 11:18:46 AM
|
Awesomesauce! Some real creative thinking there, and I love the mower: looks great! I need to keep this kind of stuff in mind if I ever have the time to expand or create scenes - to kitbash my own details. Really great work as always, Chris.
Also like the decals you made - the alignment and kerning on the text looks straight and professional, which is not easy with dry transfers (nor appreciated by those who haven't tried). Superb!
As for the diecast - that's how I originally got my start with painting, and it is a tricky canvas indeed! The small size really makes you focus on what details are important, and as you discovered, casting details can work both for and against you. Thick / multiple coats of paint hide key details, while others are hard to mask. You can have something that looks great to the eye, but terrible when magnified in a photo. But yours looks pretty good! Don't wash yourself of the concept just yet.
For diecasts I have found Pine-Sol is an incredibly effective stripper for most of them, to take everything off to bare metal. I'm sure that's not 100% for all vendors and kinds, but at least 95% of mine have been greatly simplified. Another thing you can do is wear a dust mask, then zip over the car with a wire brush in a Dremel... two minutes and done. Clean the casting with alcohol, prime with standard auto primer, and you shouldn't have any other paint issues beyond masking and detailing.
I've done a few over the years, some of my favorites (in both "terrible" and "decent" final quality) are posted here: http://goingincirclez.com/Lucidity/Automodels
Can't wait to see the final two projects! But do yourself a favor and toss that bad primer... been there, done that...
|
|
Country: USA ~
Posts: 2798 ~
Member Since: September 17 2010 ~
Last Visit: July 22 2015
|
Alert Moderator

|
|
|
|
Posted - December 17 2012 : 4:13:58 PM
|
I bought a little 2 engine lot of ebay back in September. The main engine I wanted in it was a 50s all metal MDc-Roundhouser 0-6-0 slopebaker for rebuild but there also was a life like teakettle exactly like yours which was in amazing cosmetic shape and he said it didn't run. I went in thinking it'd have dirty wheels and contact issues, boy was I wrong!! Tore apart her guts and ALL the gears were STRIPPED!! That nailed the lid on me rebuilding it at present time. The motor is lubed and works flawlessly! I don't know, I do hope to someday rebuild it but I have way to many engines to work on! My point is stripped gears was the most common issue the teakettes had!

I buy, repair, and collect
http://scvr.weebly.com/
http://seyboldlocomotiveworks.weebly.com/
http://www.youtube.com/user/TheDeputation?feature=watch
Hyde.
|
|
Country: USA ~
Posts: 1352 ~
Member Since: January 15 2012 ~
Last Visit: July 25 2021
|
Alert Moderator
|
|
|
|
Posted - December 17 2012 : 4:15:31 PM
|
Also, is that a Mantua driver on yours?? 
I buy, repair, and collect
http://scvr.weebly.com/
http://seyboldlocomotiveworks.weebly.com/
http://www.youtube.com/user/TheDeputation?feature=watch
Hyde.
|
|
Country: USA ~
Posts: 1352 ~
Member Since: January 15 2012 ~
Last Visit: July 25 2021
|
Alert Moderator
|
|
|
|
Posted - December 18 2012 : 01:04:28 AM
|
Really creative stuff, Chris. I love the mower. The Porshe looks great and I think your friend's going to be really happy.
Judging by the counterweight, I'm pegging the replacement drivers as a front set from a Mehano A-3. 
The Tyco Depot
|
|
Country: USA ~
Posts: 3927 ~
Member Since: June 20 2007 ~
Last Visit: November 19 2015
|
Alert Moderator
|
|
|
|
Posted - December 18 2012 : 09:12:14 AM
|
I'm glad the mower is a hit haha. If it wasn't for display inside the boxcar I could up the detail a little further. Sand the edges off the hood till they are rounded. Add in a piece of flat styrene under the mower to represent the mower deck and another very small piece for a steering wheel. Tony my Dad use to be in graphic design, before computers, so the words "alignment and kerning" are not lost on me ;) I can eye ball that stuff pretty easy. Actually in the pics your seeing the bad side. The decals just transfered a bit rough the other side looks much better. First time using dry transfers, what a trip they stick to everything lol.
My friend has been having a rough week so I sent the Porsche home last night, he was pleased . It will join the 10+ Porsche's we have on the rental layout already haha. In retrospect I was thinking, there is NO need for the wheels to move. I could have cut the axles and moved the wheels outward. The car would have sat lower and the wheels would have filled the wheel wells much better. Hmm...might have to try again next time. Tony your stuff is a inspiration as always thanks! I never even thought about using a sharpie. Sad part was I tried stripping the shell in straight pine sol. It took the primer off but would NOT take the factory blue paint off. Nor would soaking in alchohol. Dremel with the wire wheel did that so its funny I ended up going down the same path you advised. We should make a seperate thread for re-doing cars on here I bet we would see a few.
For the record everyone, stay away from Valspar Primer I had some cheapo primer before that I used on tons of stuff with no complaints. The Valspar is probably a result of laquer paint on enamel or vice versa. Either way something it in doesn't agree with most all my model paints. Also I am not a fan of tamiya spray paint, in white at least anyways. I did everything from heating the can so it would spray better to shaking it for 2 mins. I would spray it on the model and it would just run down to the lower areas almost like it was watery. For the caboose I'm using Testors on everything just to be safe.
The teakettle....what a POS haha. Hyde are you refering to the drive wheels being two different colors? No clue what happened there, was like that when I got it. Both wheels are black now to hide that fact. No clue if it will run when I'm done. The motor I aquired from a kids battery operated hand drill so I doubt it would last real long at full power on a layout. That's ok though the whole thing is so shoddy I think this thing is going to be a yard display engine. I consider Teakettles a challenge though. From the shoddy driveline to their obnoxious looks. They were built for kit bashing lol. I didn't do anything major looks wise its more of a repaint. But still it does wonders for the looks.
Tonight I'll start firing on all cyclinders again and getting some painting done on caboose #2 as well and mounting the motor in the loco. Stay tuned!
Edited by - ChrisC on December 18 2012 09:17:54 AM
|
|
Country: USA ~
Posts: 531 ~
Member Since: January 29 2009 ~
Last Visit: July 10 2020
|
Alert Moderator
|
|
|
|
Posted - December 18 2012 : 2:24:31 PM
|
As far as stripper is concerned, anything goes with metal parts. I just dunk 'em in lacquer thinner. It's pretty much instant and the best degreaser, too.
Chris, the replacement drivers came from one of these. http://www.ho-scaletrains.net/ahmhoscalelocomotives/id87.html
I've done a lot of work on them, so I recognized them right away. A set of those would look better then the LL originals.
The Tyco Depot
|
|
Country: USA ~
Posts: 3927 ~
Member Since: June 20 2007 ~
Last Visit: November 19 2015
|
Alert Moderator
|
|
|
|
Posted - December 18 2012 : 6:30:46 PM
|
Those Tea kettles bring back the horrifying memory of rebuilding mine.
I found replacement gears from other locomotives and old toys but didn't like how it ran so I made a whole new gear system to drive one axle and made a set of new rods to drive the other.


Ray
|
|
Country: USA ~
Posts: 1285 ~
Member Since: December 14 2005 ~
Last Visit: May 16 2019
|
Alert Moderator
|
|
|
|
Posted - December 18 2012 : 9:31:26 PM
|
Super cool projects. I think your friend will appreciate them more than the finest Out of the box train stuff.
By the way, I painted a 1/144 scale Lockheed Constellation 5 times before I got the finish right.
First coat, I accidentally sprayed acrylic on top of a base of enamel silver. Wrinkled the topcoat. That was dumb; I knew better. Had bleed through, under the tape, on the second try, etc., etc.
Unspoken expectations are premeditated failures.
|
|
Country: USA ~
Posts: 825 ~
Member Since: December 22 2008 ~
Last Visit: March 16 2015
|
Alert Moderator
|
|
|
|
Posted - December 18 2012 : 9:51:09 PM
|
Ray, please tell us more on the new gear set up! I have seen the Silvine/New One version of the infamous Teakettle 0-4-0T. A friend of mine has the newest version and its a ok runner. Wondering if that boiler could be retro-fitted to a better 0-4-0 chassis?
" Heck with counting 'em rivets, TRAINS ARE FOR FUN! Not called the Mad Scientist for nothing either!"
|
|
Country: USA ~
Posts: 3145 ~
Member Since: May 07 2007 ~
Last Visit: April 04 2024
|
Alert Moderator
|
|
|
|
Posted - December 18 2012 : 10:45:41 PM
|
quote:Ray, please tell us more on the new gear set up! I have seen the Silvine/New One version of the infamous Teakettle 0-4-0T. A friend of mine has the newest version and its a ok runner. Wondering if that boiler could be retro-fitted to a better 0-4-0 chassis?
Originally posted by Redneck Justin - December 18 2012 : 9:51:09 PM
|
I think putting the boiler on another frame would be easier than what I went through.
I put a larger gear on the front axle and drilled new holes in the metal plates for a different idler gear. I also replaced the open frame motor with a can motor.
If the newer version doesn't run bad it might be worth finding new gears for.
Ray
|
|
Country: USA ~
Posts: 1285 ~
Member Since: December 14 2005 ~
Last Visit: May 16 2019
|
Alert Moderator
|
|
|
|
Posted - December 19 2012 : 12:19:26 AM
|
Nice work on the gifts Chris.
Ray
|
|
Country: USA ~
Posts: 1285 ~
Member Since: December 14 2005 ~
Last Visit: May 16 2019
|
Alert Moderator
|
|
|
|
Posted - December 19 2012 : 10:22:08 AM
|
yeah Love the boxcar myself 
|
|
Country: USA ~
Posts: 14694 ~
Member Since: February 23 2009 ~
Last Visit: May 07 2024
|
Alert Moderator
|
|
|
|
Posted - December 20 2012 : 01:04:01 AM
|
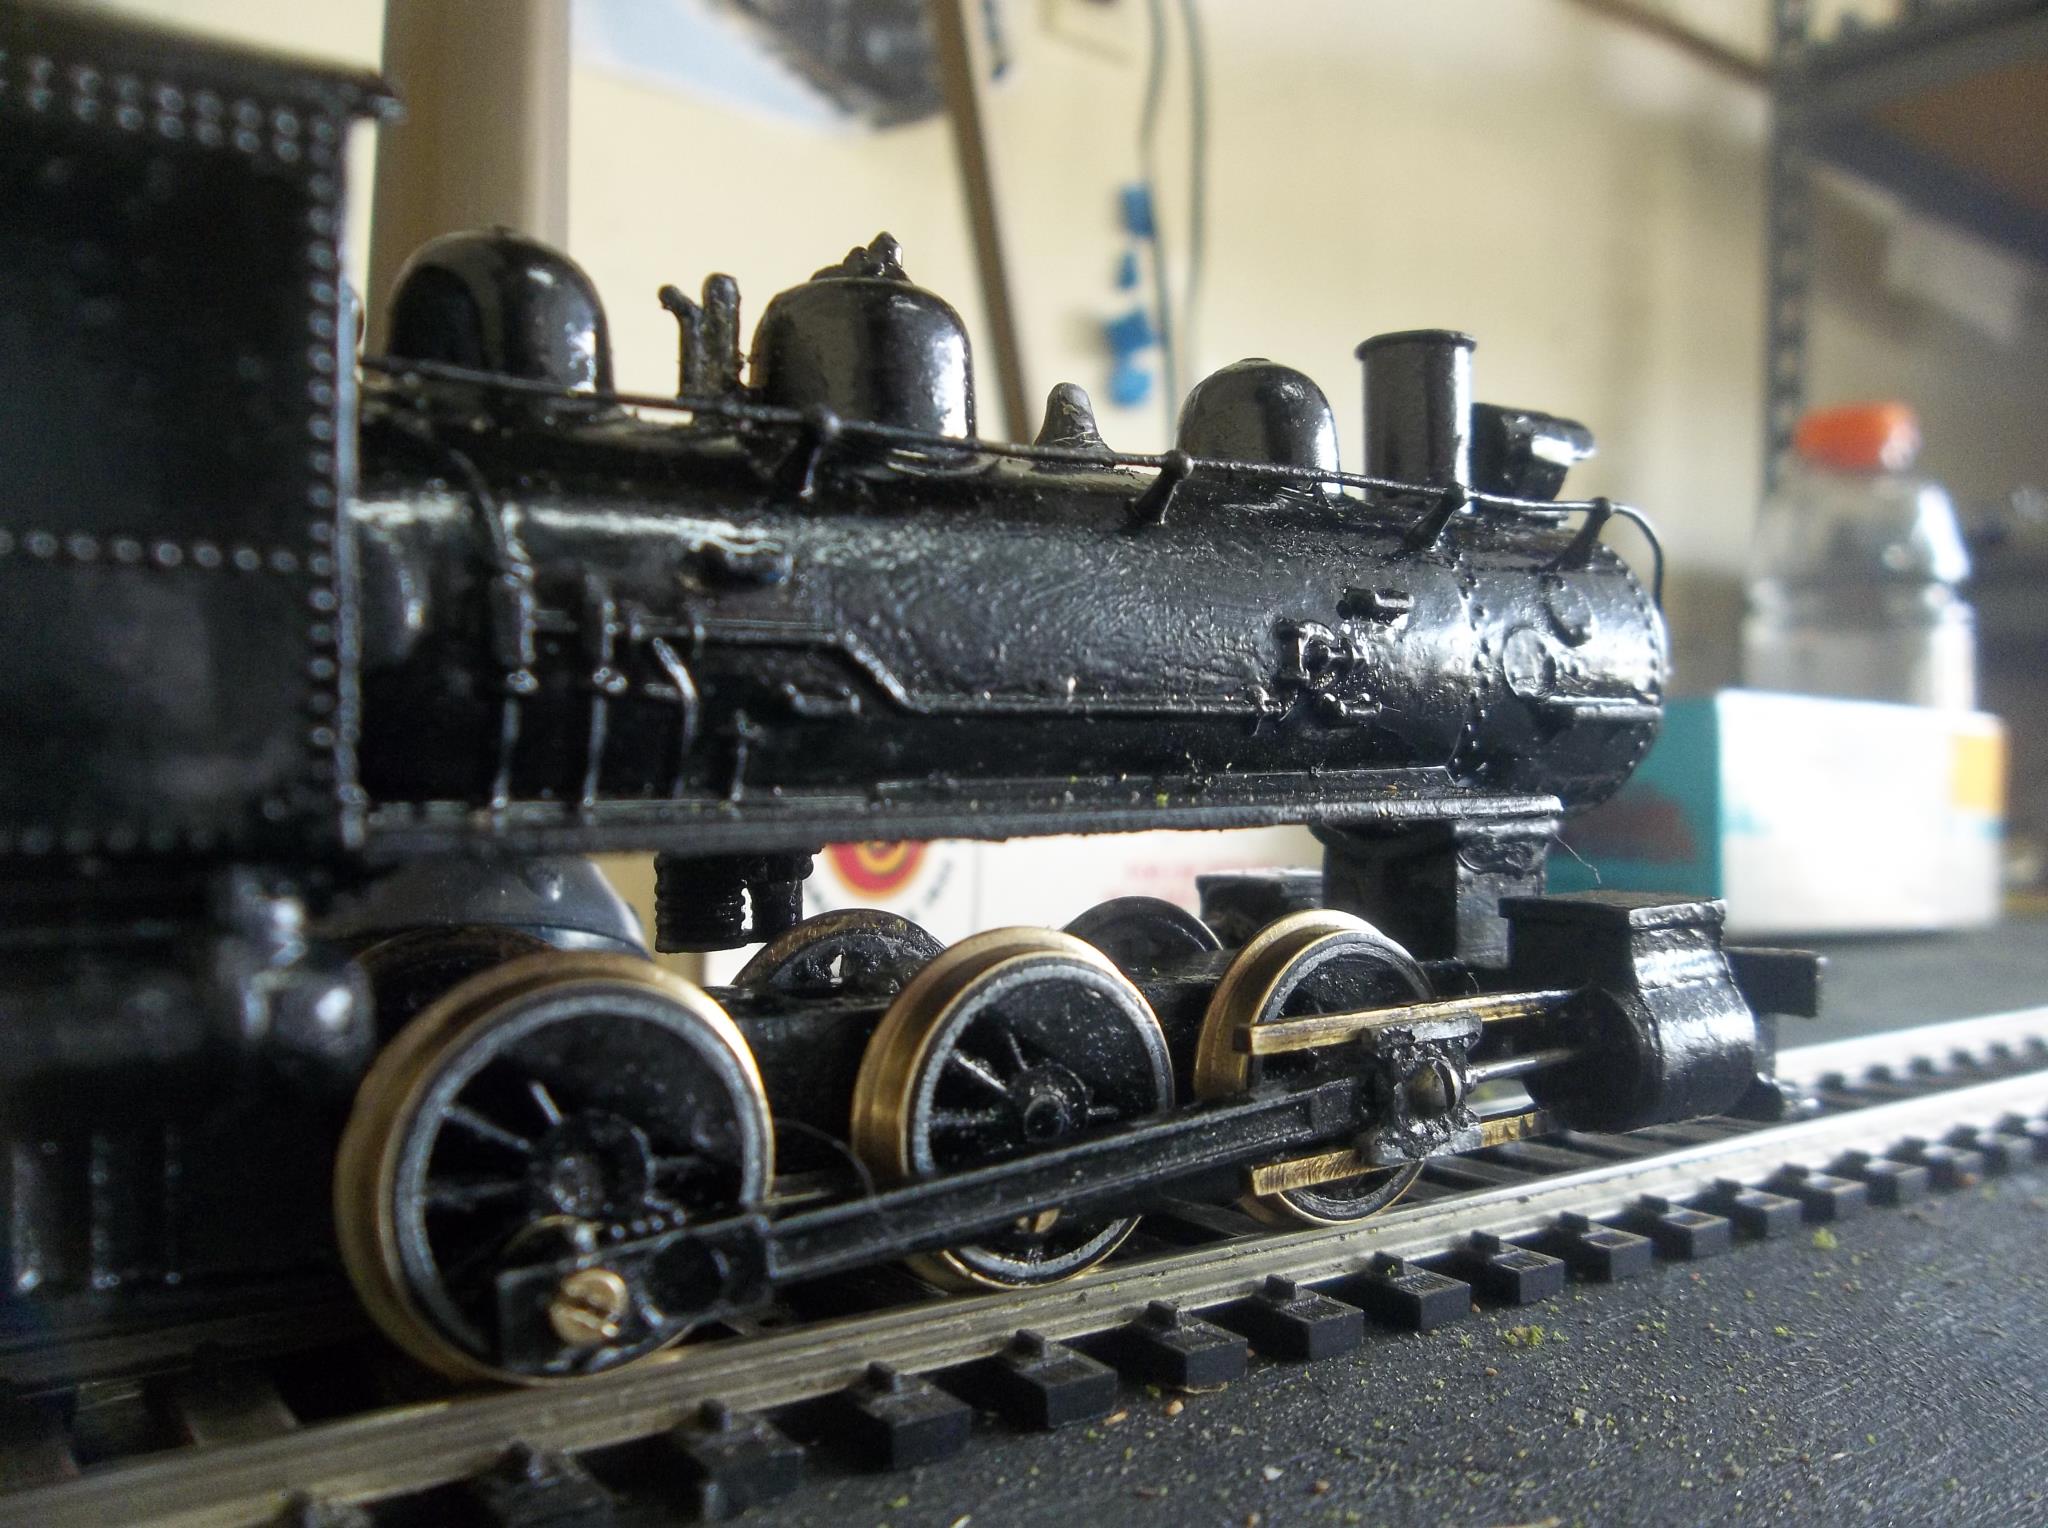
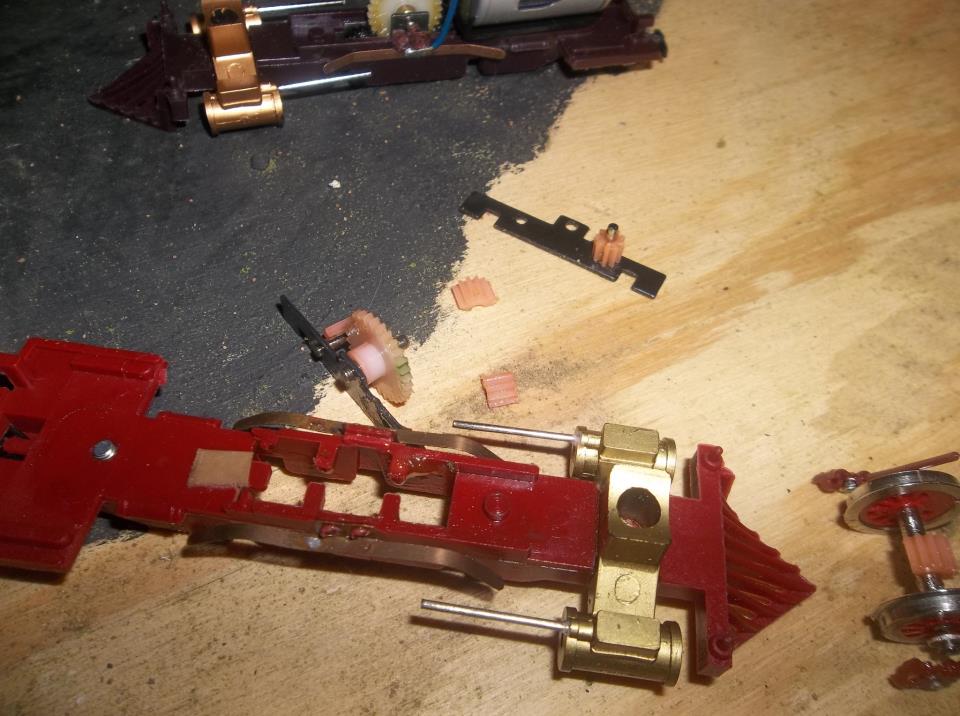
Well I'll be a son of a......tonight for the first time in many years. The Teakettle hobbled (literally) across my test track on the work bench.
The tape on the front is just to hold the pistons on since that little piece you see at the bottom of the photo decided to break off. I knew something else would have to get in the way I'm betting on a fairly short lifespan with this motor. So the best I could managed was to just glue it down to the chassis. Oddly enough I got the gears shimmed about right. If the main gear didn't have the screwed up tooth it would probably make a attempt to run better. On the rear of the motor I glued on a piece of styrene to hold the motor down. The electrical contact you see on the picture was the one that was missing. I replaced it with a shoe from a slot car and it seems to be working. I'm amazed it moved at all. When Ray calls something horrifying that's a signal to abandon ship lol. Its going to need a whole new front pilot section. But other than that its basically down to cosmetic stuff and it will be ready to....ummm....hop down the rails.....briefly.
The new caboose is proceeding great so far. The Testors colors are much closer to NYC Pacemaker colors. All 3 of the main colors on the caboose are done, tomorrow I should be ready for decals (which are pretty simple on the prototype just a NYC and a number). Still need to figure out how to mount the new trucks to the chassis.
Here is a picture of the first caboose. You can see the crazed grey paint on it. And notice where some of the red bled through on the rivet line running down the length of the body. Looking back I could have went ahead and used it. But caboose 2 is going to blow it out of the water from a quality standpoint. I'll strip this one later down the road maybe and turn it into something else.
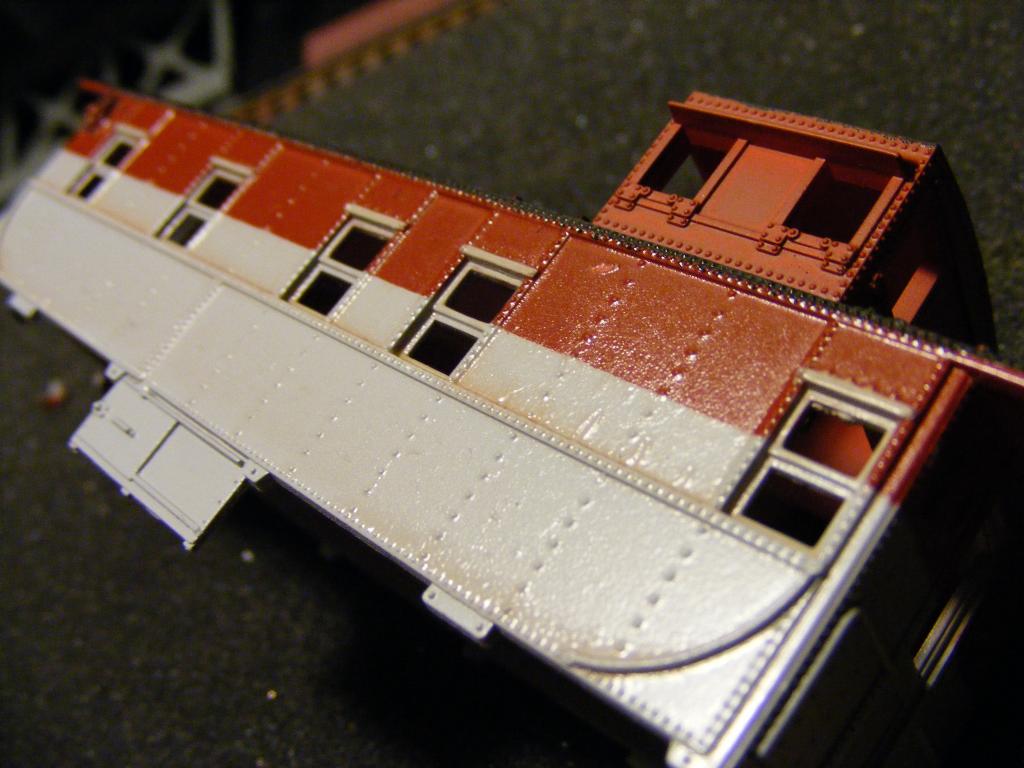
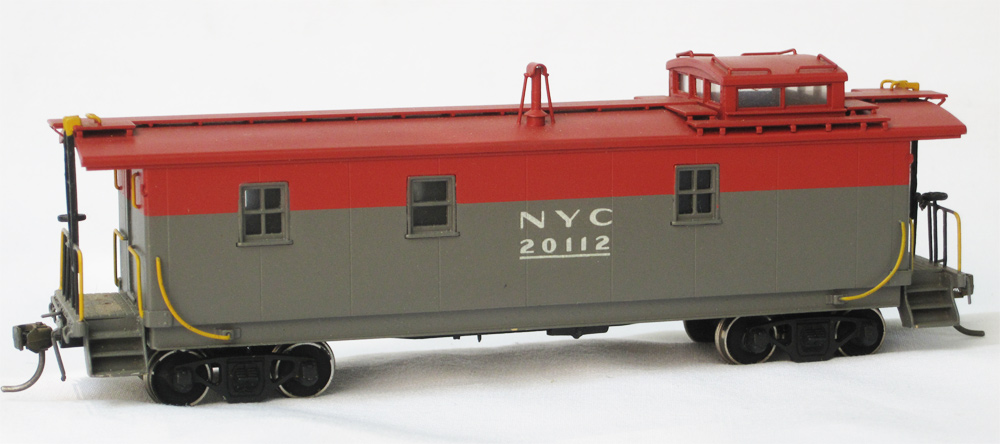
Mine won't look anything as good as this one, but its kind of my target as car as colors. Notice grey is darker and the red is brighter than the one I posted.
|
|
Country: USA ~
Posts: 531 ~
Member Since: January 29 2009 ~
Last Visit: July 10 2020
|
Alert Moderator
|
|
|
Jim
Little Six

Status:
offline
| |
Posted - December 20 2012 : 8:32:24 PM
|
| Looking AWESOME!!! What caboose is in the second pic that says NYC 20112?? who makes that one, looks different then any thing I have seen....
|
|
Country: USA ~
Posts: 145 ~
Member Since: September 26 2012 ~
Last Visit: December 23 2013
|
Alert Moderator
|
|
|
|
Posted - December 22 2012 : 01:25:11 AM
|
And here she is
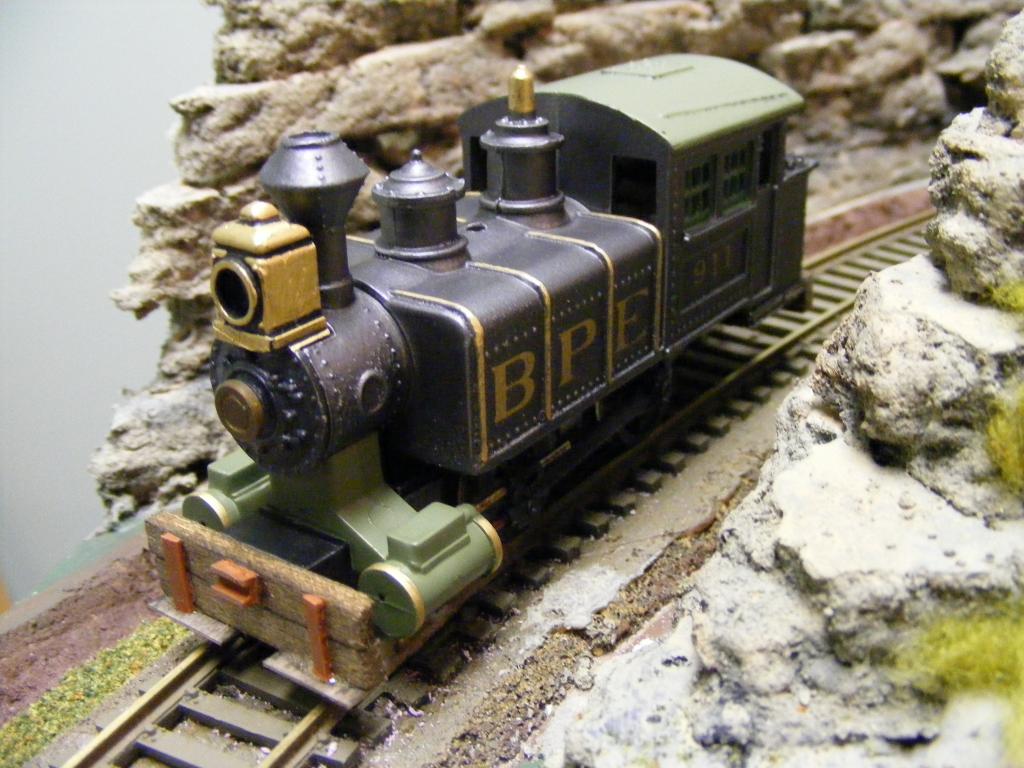

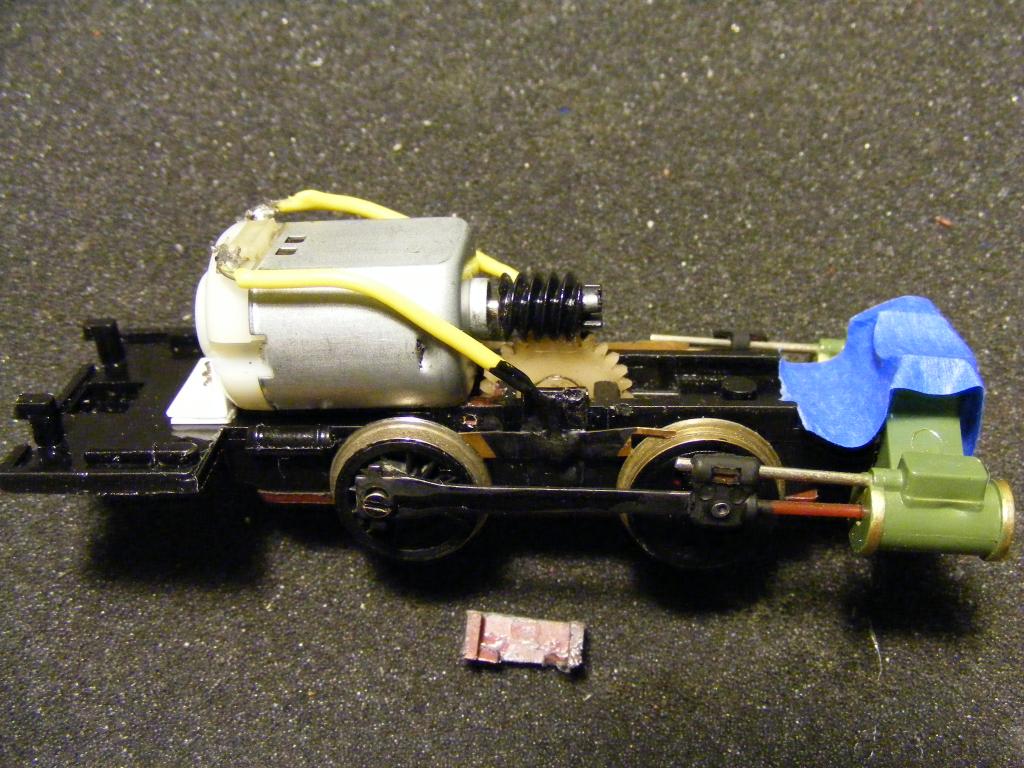
Just a few random notes. Oiled the gears a little more. Seems to be a little happier, but I really think it needs some extra weight. That would do wonders for planting the drivers on the rails. I still think its only going to be worth a few laps before the motor burns up haha. And with that bad main gear I don't know if it will be worth repairing again, but we'll see! Originally I wanted the front cow catcher off there. But the chassis cracked off just ahead of the piston assembly. The new pilot was totally scratch built and is actually connected to the piston assembly rather than the main chassis. The way the whole thing goes together this works out just fine. Decals are more dry transfers. Again the engine is sub-lettered after the business listed on the boxcar. The loco number (911) was a nod to the Porsche I posted earlier. The headlight is still non functional but has a lens now. My gold paint pen couldn't reach down into the cracks of the headlight assembly but it looks ok. The same paint pen also painted the ribs on the side of the loco. Around the back I did something different for the first time. What looks like a coal load is actually the contents of a Brita water filter. It sort of resembles coal aside from the little resin balls also in the filter. But as a passing effect it looks MUCH better than the molded plastic coal on the rear. The wood bumpers on the rear were just for some added effect since I had them sitting on the bench. I might upgrade the engine to a kadee shortly we'll see how it test out when I can run it more. Also painted the entire frame, wheels, and rods black which is another first for me.
The caboose is about 90% done. I am not a fan of the generic letter decals I had to use they look nothing like the font NYC used. But I'll make due overall its coming out ok.
Jim - Most every model I've seen of the Pacemaker caboose is brass. In real life NYC only built a handful which were based off a larger class of cabooses they had (if memory serves right). The copulas I'm told sat lower due to clearance issues on the lines the Pacemaker fast freights ran on. The caboose I'm making into a Pacemaker is Roco based. It shares some design features with the original Pacemaker's, but doesn't quite fit the bill. This is just a fun little side project so I'm just getting it relatively close to the real thing.
|
|
Country: USA ~
Posts: 531 ~
Member Since: January 29 2009 ~
Last Visit: July 10 2020
|
Alert Moderator
|
|
|
|
Posted - December 22 2012 : 11:14:50 AM
|
Nice job with the Tea kettle Chris.
I like the pilot.
How many teeth are on (should be on) the gears you need? Maybe one of us has them.
If I remember corectly, some of the gears from one of the earlier Life/Like diesels (Uni-Drive) would fit in the Tea Kettle.
Ray
|
|
Country: USA ~
Posts: 1285 ~
Member Since: December 14 2005 ~
Last Visit: May 16 2019
|
Alert Moderator
|
|
|
|
Posted - December 22 2012 : 10:17:50 PM
|
I’ve found that a really nice way to produce Hot wheels or a model paint job is using House Of Kolor automotive custom paints. Many modelers now use this method for extreme results and a finish far more glossy & durable than using the thin spray cans paints. House Of Kolor paints are available in 2 oz bottles for small projects. I clear coat with a PPG choice of clear. Of course, this method is a bit pricey…
A quick glass beading on a Hot wheels car or metal body is a chemically clean strip and a perfect surface waiting for primer. I use PPG DP-48 , white primer/ sealer that can be painted after a short dry time.
There is a myth, that primer changes the color outcome of the job. Good paint is NOT transparent unless it’s a “candy color”. During my 34 years of painting, I’ve found that prime coat color is irrelevant to the finished product color.. The myth may hold truth if you’re using spray bomb “over thinned” paint.
I also notice “bad primer” being mentioned. I beLIEve the results was from using an incompatible paint / primer combo. In the automotive painting field, I seen many bad results being blamed on “bad paint”, when the truth is bad paint won’t reduce and drain thru a strainer, let alone spray out of a gun.
Atuobody Tech school taught us that ANY bad result, was from a mistake made by the body man or painter. I have found this to be very true over the years…
|
|
Country: USA ~
Posts: 6279 ~
Member Since: February 18 2009 ~
Last Visit: March 04 2022
|
Alert Moderator
|
|
|
|
Posted - December 23 2012 : 12:51:59 AM
|
That's a 100% improvement in the look of that old teapot.  I like the wood beam pilots. I like the wood beam pilots.
The worm on the motor looks like it's twin lead, which means it has two threads and will turn the idler gear twice as fast as a standard single lead worm. If you find replacements for the cracked gears, a single lead worm will slow it down and make it less toy-like.
The Tyco Depot
|
|
Country: USA ~
Posts: 3927 ~
Member Since: June 20 2007 ~
Last Visit: November 19 2015
|
Alert Moderator
|
|
|
|
Posted - December 23 2012 : 03:51:17 AM
|
Well the camera died right after I got one picture off. But here is a teaser. On the right is the original Pacemaker caboose I screwed up. On the left is the mostly completed 2nd version.
The color difference is pretty obvious. While I believe version 2 is much closer, the actual Pacemakers are still a few shades between both cabooses. But hey like I said this wasn't a perfect realization of the NYC's original theme so I'm ok with that Notice I didn't add any of the details to the 2nd caboose (roof walks look a bit wavy because they are just laying on there). Reason is because I might keep the caboose around and change the decals out for real NYC decals. NYC used a very specific font for their stuff, I just think as far as looks it would really help out. So I'm going to wait before I dullcoat it to see if the new owner thinks its worth making the change. Once we decide it will get new trucks, window glazing, and couplers. Not sure what I'm going to do with version 1 yet?
Thanks for the complements on the Teakettle! I didn't intend to build a new pilot till the old one basically fell apart. All the pieces of styrene and most the balsa wood was just sitting on the bench haha. Though I'm pretty happy with it I definitely think I'll do something similar again with a little more effort. I'll check the gears Ray and see how many teeth it is.
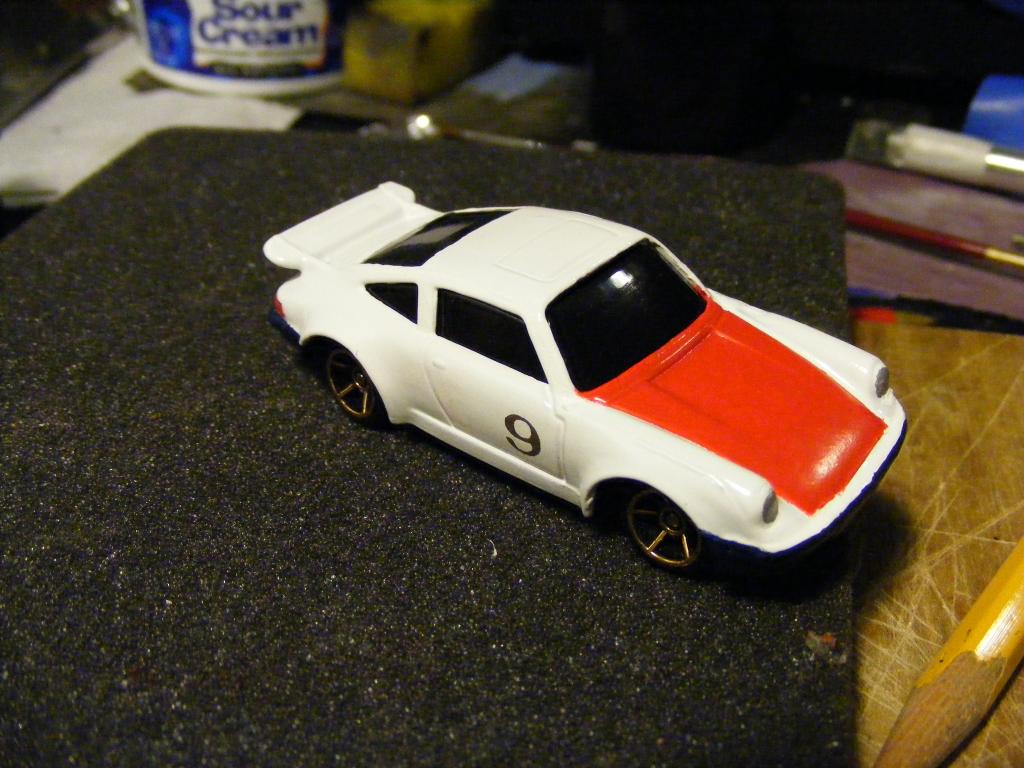
Walt - Yea no doubt about the primer being incompatible. I've painted & done body work on cars before and had the same thing happen. I'm getting a good feel now for what paints do work together. AND just yesterday, I bought the same blue 911 model again haha. Going to do a 2nd one just for fun and see how it turns out. I know a little more about what I need to do now so it should be as bad. That will be a separate post when the time comes.
|
|
Country: USA ~
Posts: 531 ~
Member Since: January 29 2009 ~
Last Visit: July 10 2020
|
Alert Moderator
|
|
|
|
Posted - December 23 2012 : 08:23:05 AM
|
Actually,CrisC The one on the right looks pretty good I like the colors
I gotta find me one of the Teakettle locos 
Who actually made that loco Did it really exist?
|
|
Country: USA ~
Posts: 14694 ~
Member Since: February 23 2009 ~
Last Visit: May 07 2024
|
Alert Moderator
|
|
|
|
Posted - December 26 2012 : 09:19:56 AM
|
Annnnnnnd the bittersweet ending
So I dropped the Porsche off early like I said. I found out a few days ago that my friend's Dad unknowningly mistook the car I painted for a car that was bought off the shelf. Its now been repainted a shade of orange Oh well, that whole thing was a bit of a experiment. His Dad did apologize so its fine. Like I said before I already bought another to paint differently so I'm ok with it.
The Teakettle did exactly what I expected it to do. It actually ran like a bat out of hell for awhile. Then promptly stripped its main gear Least we think that's what it did. However there is talk of getting it back on the rails again down the road its been well recived at its new home. The fact it was able to run for a decent while at all was impressive for the effort put forth. The redesign came out pretty well so I'd like to see it move again too.
The boxcar has performed well in revenue service so that's good. The caboose will wait till we get it some proper NYC decals.
Buss - Not sure if the Teakettle had a prototype. But I know in recent times it was always Life-Like that produced them.
|
|
Country: USA ~
Posts: 531 ~
Member Since: January 29 2009 ~
Last Visit: July 10 2020
|
Alert Moderator
|
|
|
|
Posted - December 28 2012 : 03:42:14 AM
|
Last post on this I swear. At least till the NYC caboose ever finds decals 
So these weren't the only gifts I got my friend. Everything here was basically free to make since they were all built from existing models we had laying around. However I myself and another friend pulled our money to buy this for my friend who the existing gifts went too. He did a lot for us with some car related stuff in 2012 and wanted nothing in return for what he did. So to us this was justified.
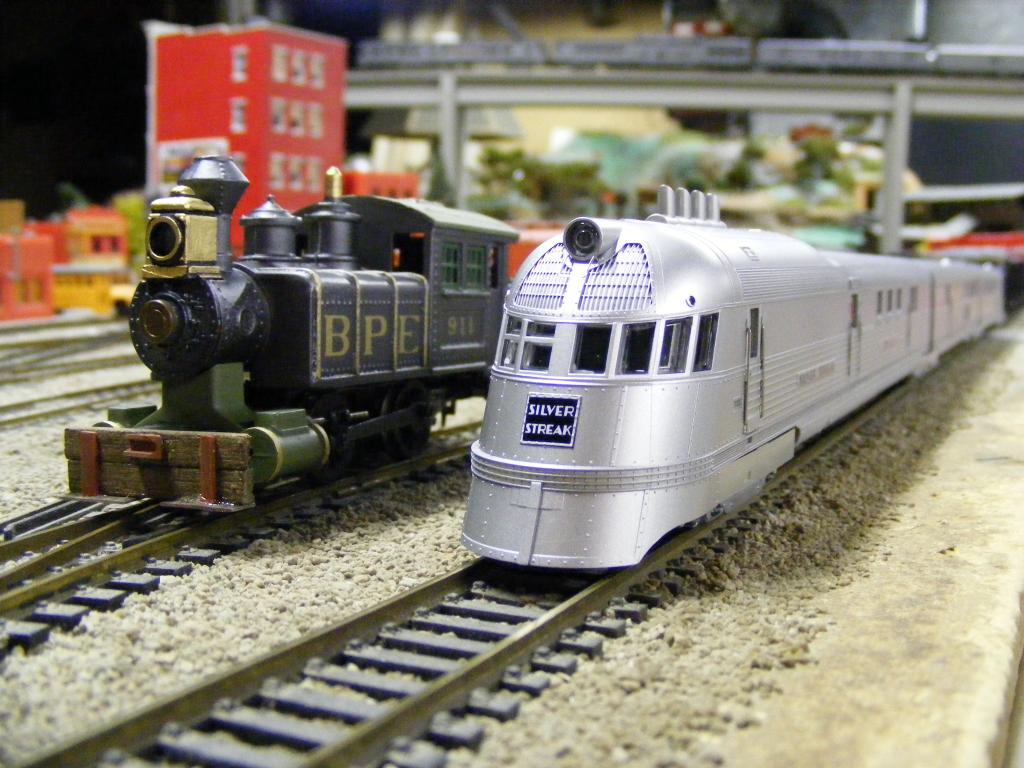
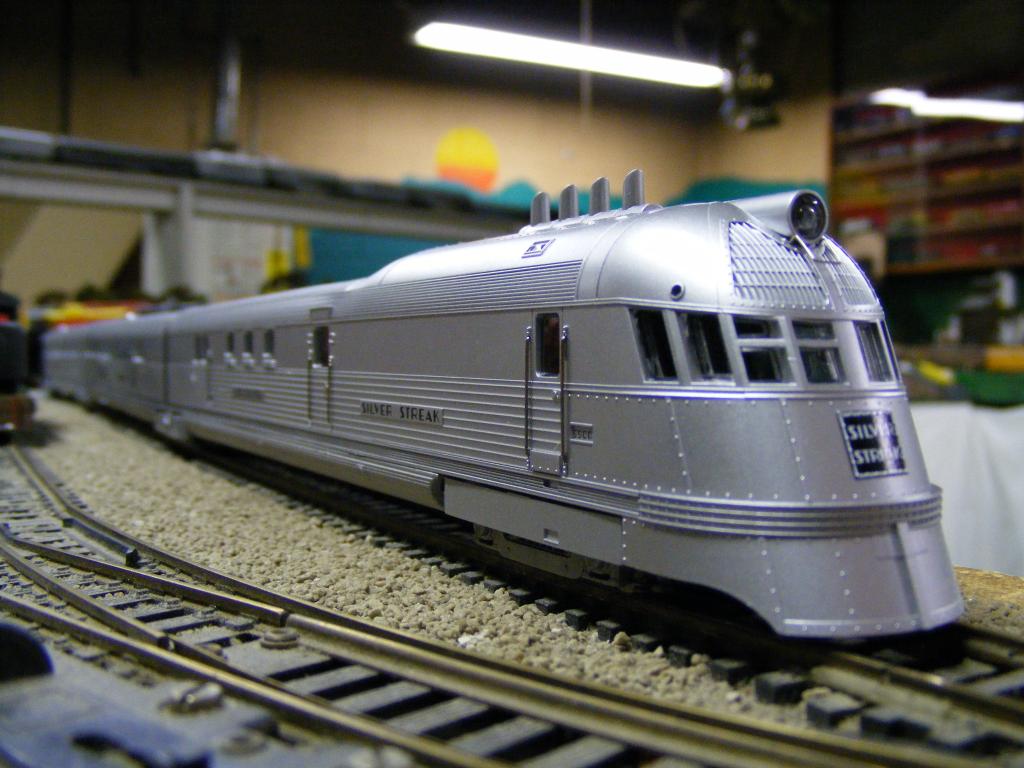
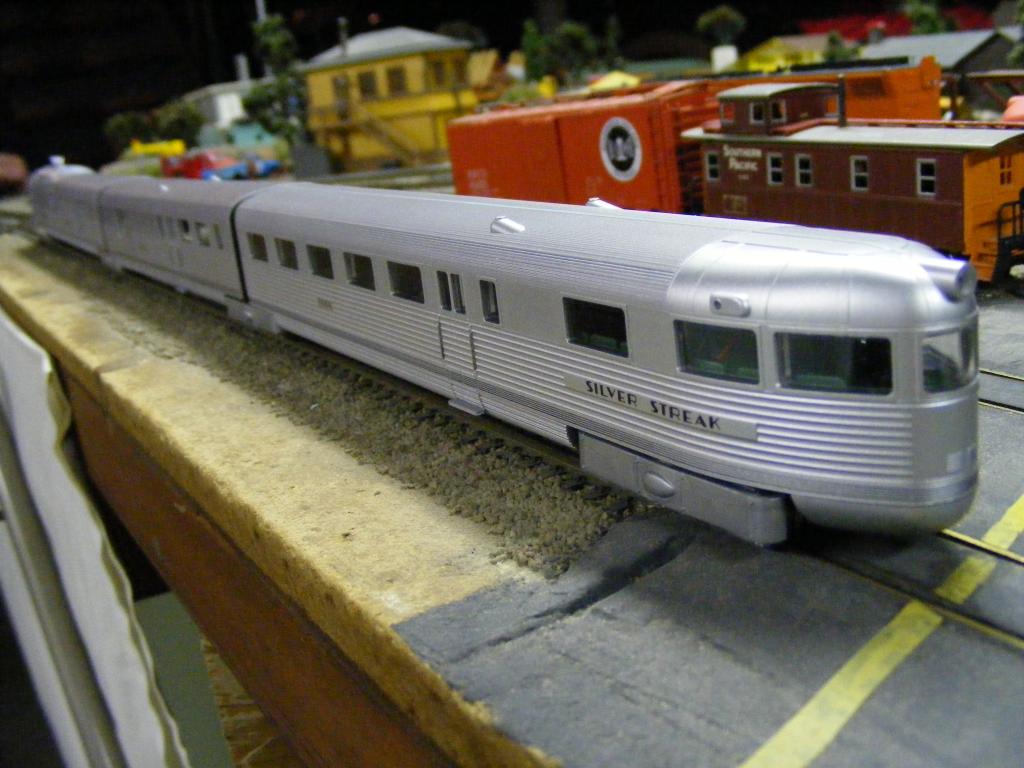

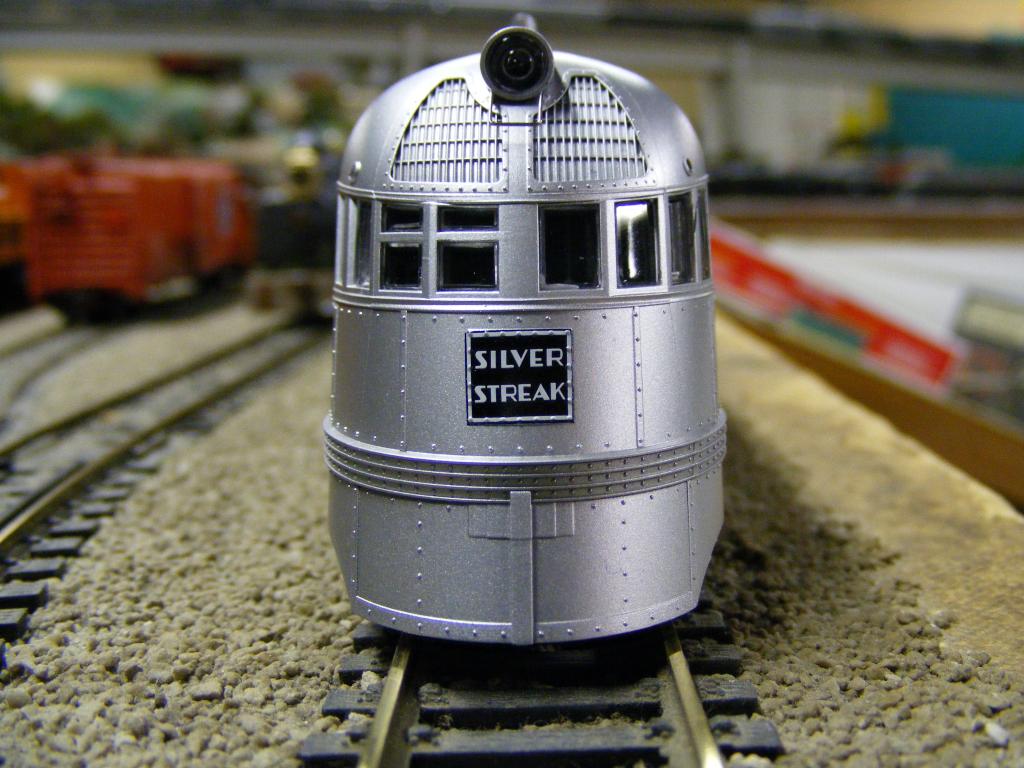
The Con-Cor Burlington Zephyr - Silver Streak Edition. Local hobby shop actually had this and at a decent price so we went in on it together as a gift. Blew my friend out of the water when he unwrapped it. Its a very photogenic engine, however some of the LED's already quit working so it looks like its going for a short trip back to Con-Cor. Also the rental layout's track work is so bad that only the head end unit can get around. If it tows its cars they rub & derail. So until we build a bigger badder layout we'll just have to stare at it. Thankfully its easy on the eyes!
Edited by - ChrisC on December 28 2012 03:50:42 AM
|
|
Country: USA ~
Posts: 531 ~
Member Since: January 29 2009 ~
Last Visit: July 10 2020
|
Alert Moderator
|
|
|
|
Posted - December 28 2012 : 08:37:01 AM
|
Oh I am JEALOUS of your friend now! *wants*
That is the movie version train It should be avalible on DVD
Course I want to do the CP Rail version of SS with Gene Wilder & Richard Pryor
|
|
Country: USA ~
Posts: 14694 ~
Member Since: February 23 2009 ~
Last Visit: May 07 2024
|
Alert Moderator
|
|
|
|
 Posted - August 11 2023 : 10:37:35 PM Posted - August 11 2023 : 10:37:35 PM
|
Very nice.
|
|
Country: USA ~
Posts: 5940 ~
Member Since: February 12 2014 ~
Last Visit: May 08 2024
|
Alert Moderator
|
|