|
|
 Posted - March 16 2011 : 10:45:00 PM Posted - March 16 2011 : 10:45:00 PM


|
So I had this I bought from a show over a year ago for 10 bucks. Still not sure why, body was totally chewed up and one of the motor bushes wasn't even right so it would smoke and die after two laps.
Figured someday I would maybe attempt to rebuild it into something so I parked it. That was until my friend's Dad built these little guys.

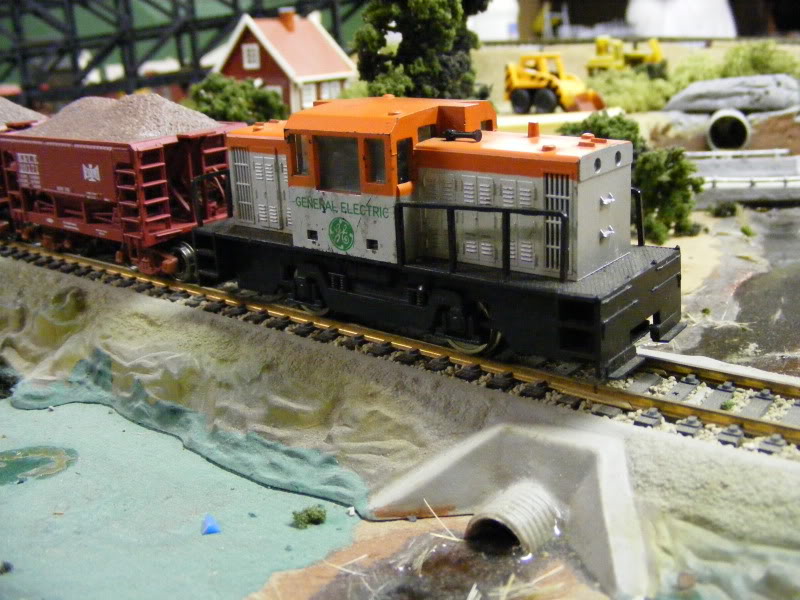
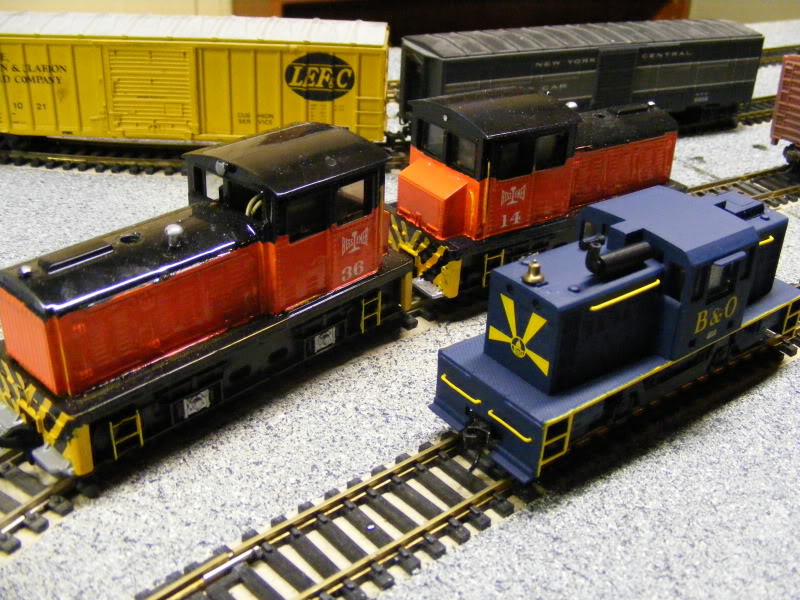
He built both of them within a few weeks. I decided I wanted something to strut around also. Oddly enough within the year of buying my switcher a few things happened. I came across another body that wasn't all busted up for a dollar. Found a motor in a junked IHC steamer we had that was a direct swap for the switcher's and it ran beautifully. And picked up a set of B&O GP30 decals I figured I could use on something. So with all those parts around I set to work rebuilding my switcher. New body was soaked in Pine Sol and stripped. I wanted to scratch build alot of stuff for this one. So using left over sprues from some kits I had I build a external muffler. I also shaved the small pilot steps off and replaced them with angled styrene. Also added sun visors over the side windows
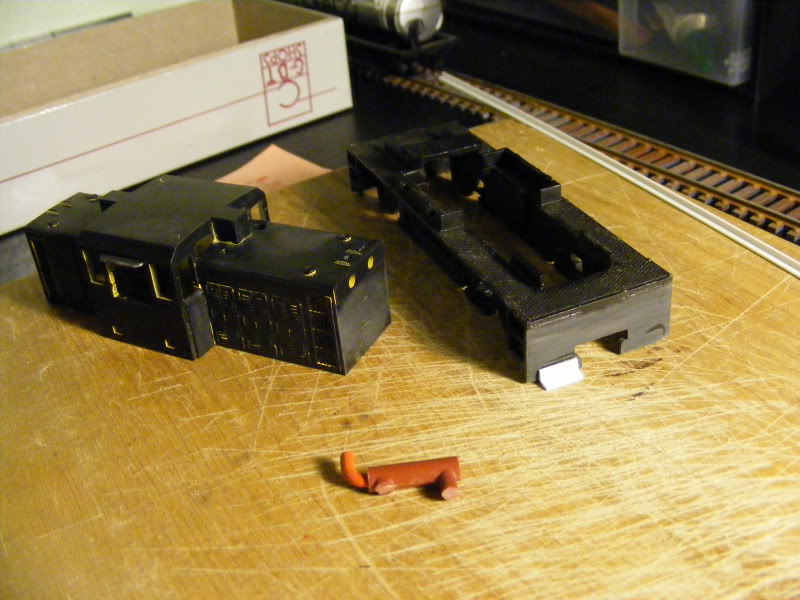
Next shot you can see I added the new front steps on and drilled holes for the front grab irons (which I really cheaped out and used staples for haha). Body was primered. At a local hobby shop I picked up a detail part that was suppose to be a AC unit for a cab locomotive. You can see it resting on the chassis as a raised radiator section. The lower body was very plain looking so I wanted to make something to add there. The 4 blocks of cut styrene ended up as utility boxes which came out pretty well (2nd picture).
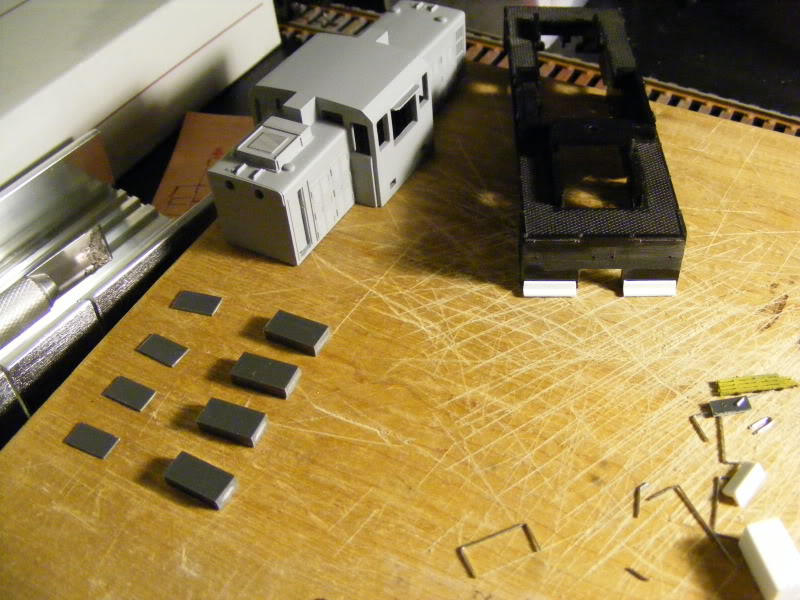
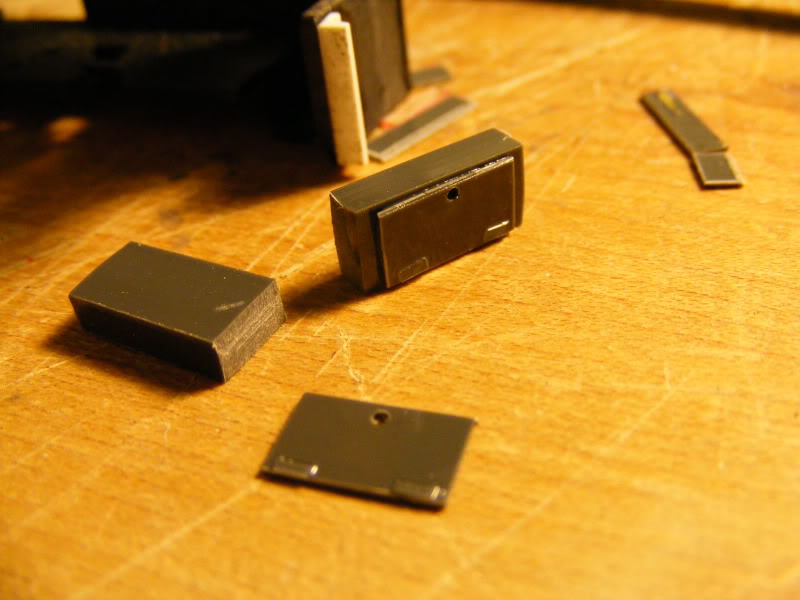
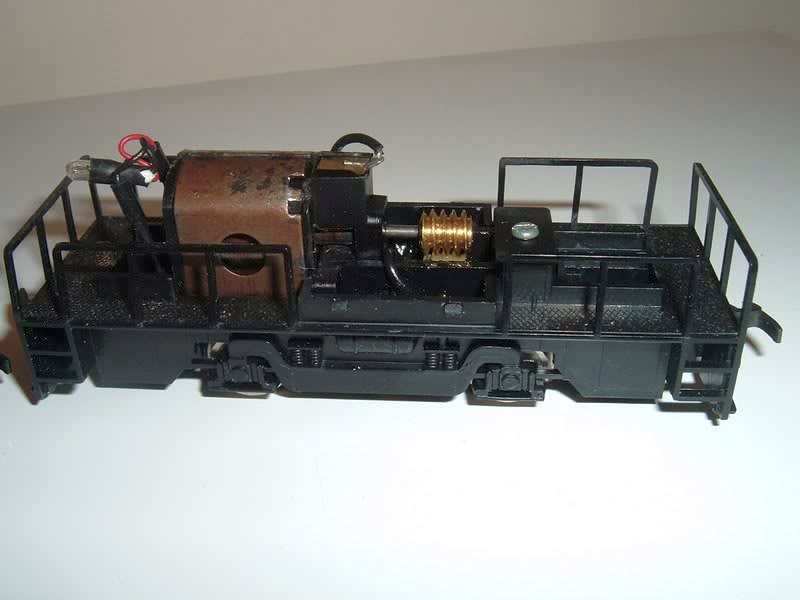
Next two shots show the whole body in its final color while testing fitting a few pieces like the handrails, muffer, and a bell off a old Tyco steamer! I swapped the wheels & gears over to the new lower body and swapped in the replacement motor. I shimmed the motor forward a little since it was sitting loose against the gears. Also shimmed the gears themselves so they wouldn't bounce around as much while running. The new drivetrain is SOOO much quieter than before. Almost can motor like its so quiet. 3rd picture down is just a comparison between the two bodies.


Finally I tossed the whole mess together. Here is how she came out 
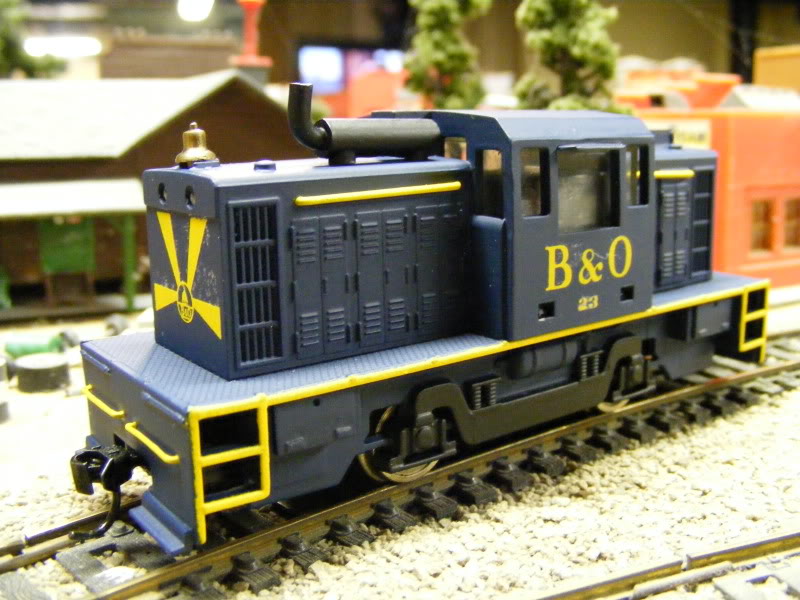
If you look on the rear corner you can see where I cut out one of the vents and added in a brake wheel assembly.

Close up of the underside. Utility boxes came out nice I though. Painted the truck detail flat black to set it apart a little.

Couplers sit a bit to low I need to get some offset ones. However I have boxcars with the same problem so it didn't mind hauling one of those around for the time being!
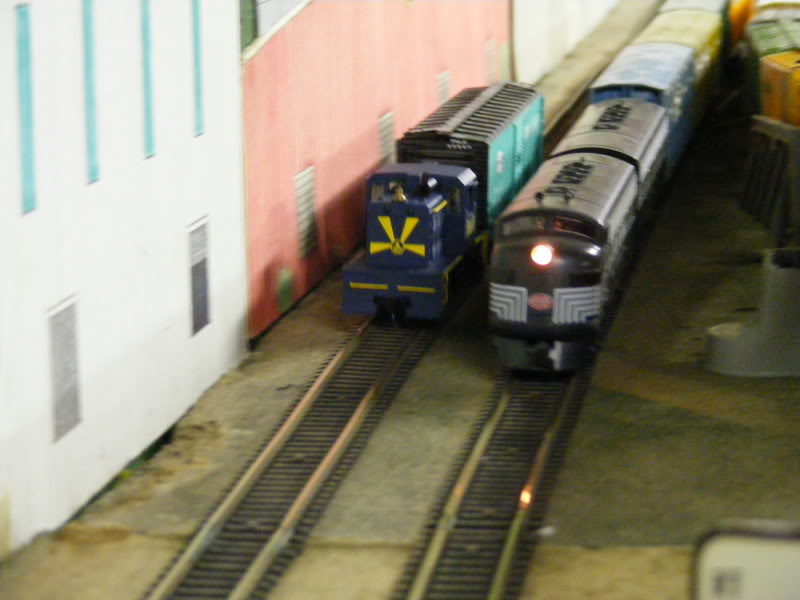
Finally a shot next to the switchers that started it all!
|
Country:  USA ~
Posts: 531 ~
Member Since: January 29 2009 ~
Last Visit: July 10 2020 USA ~
Posts: 531 ~
Member Since: January 29 2009 ~
Last Visit: July 10 2020
|
 Alert Moderator
|
|
|
|
 Posted - March 17 2011 : 04:04:46 AM Posted - March 17 2011 : 04:04:46 AM
|
Hi ChrisC,
Very nice work! clean and crisp.
Mike
|
|
Country: USA ~
Posts: 790 ~
Member Since: April 30 2006 ~
Last Visit: July 21 2015
|
Alert Moderator

|
|
|
|
Posted - March 17 2011 : 06:38:33 AM


|
Very good overhaul of a beater. I like the choice of road name, it looks very convincing. I have several of those GE units myself, I don't know if mine run or not, it's been so long since I tried them. Thanks for sharing the kitbash photos, looks awesome.
Jerry
" When life throws you bananas...it's easy to slip up"
|
|
Country: USA ~
Posts: 3974 ~
Member Since: January 04 2009 ~
Last Visit: January 11 2019
|
Alert Moderator
|
|
|
|
Posted - March 17 2011 : 10:15:03 AM
|
Thats Nice work Chris!
-Gareth
"A is A"
-Aristotle
Law of Identification
|
Country:  Canada ~
Posts: 4200 ~
Member Since: January 08 2006 ~
Last Visit: November 09 2021 Canada ~
Posts: 4200 ~
Member Since: January 08 2006 ~
Last Visit: November 09 2021
|
Alert Moderator
|
|
|
|
Posted - March 17 2011 : 11:38:05 AM
|
| hi chrisc ,very nice custom cab,love that livery suits it down to the ground ken
|
Country:  United Kingdom ~
Posts: 8294 ~
Member Since: September 28 2006 ~
Last Visit: October 20 2021 United Kingdom ~
Posts: 8294 ~
Member Since: September 28 2006 ~
Last Visit: October 20 2021
|
Alert Moderator
|
|
|
|
Posted - March 17 2011 : 10:19:47 PM
|
Glad you guys like it! Yea I thought the B&O theme checked out rather well on it also. I studied a few prototype pictures just to get a feel for it. Closest thing B&O had in real life was a 44 toner. But it didn't have the sunburst logos on it. That's kinda my favorite part lol.
Thought about weathering it, but I just can't bear to do that to it haha.
|
|
Country: USA ~
Posts: 531 ~
Member Since: January 29 2009 ~
Last Visit: July 10 2020
|
Alert Moderator
|
|
|
|
Posted - March 19 2011 : 01:13:12 AM

|
| It looks great Chris. Nice paint job and attention to detail.
|
|
Country: Canada ~
Posts: 3448 ~
Member Since: September 22 2006 ~
Last Visit: April 03 2026
|
Alert Moderator
|
|
|
|
Posted - March 19 2011 : 8:05:53 PM
|
Cheezy:
You still got a layout and are you driving yet!?
I was thinking of lending you my Genesis VIA P42 and my Rapido FP-9A in `59 CN paint when it arrives to make a couple of Yooutube vids for me!?
-Gareth
"A is A"
-Aristotle
Law of Identification
|
|
Country: Canada ~
Posts: 4200 ~
Member Since: January 08 2006 ~
Last Visit: November 09 2021
|
Alert Moderator
|
|
|
|
Posted - March 19 2011 : 9:28:46 PM
|
quote:Cheezy:
You still got a layout and are you driving yet!?
I was thinking of lending you my Genesis VIA P42 and my Rapido FP-9A in `59 CN paint when it arrives to make a couple of Yooutube vids for me!?
-Gareth |
I got my G2 about a year ago. I can get my G any time now...I just need to get down to the test centre 
The layout is still up. If both those engines run on DC I could do it.
|
|
Country: Canada ~
Posts: 3448 ~
Member Since: September 22 2006 ~
Last Visit: April 03 2026
|
Alert Moderator
|
|
|
|
Posted - March 19 2011 : 10:26:11 PM
|
hey kiddo:
I'll attach a pic of the P42 thogh he models are much more of a Teal Green like the originals and their's lots of pics on line of the Rapido FP-9A's!

"A is A"
-Aristotle
Law of Identification
|
|
Country: Canada ~
Posts: 4200 ~
Member Since: January 08 2006 ~
Last Visit: November 09 2021
|
Alert Moderator
|
|
|
|
Posted - March 19 2011 : 10:34:09 PM
|
 awesome sauce! Nice job awesome sauce! Nice job  Should have you redo my Tyco switchers Should have you redo my Tyco switchers 
|
|
Country: USA ~
Posts: 15032 ~
Member Since: February 23 2009 ~
Last Visit: July 15 2026
|
Alert Moderator
|
|
|
|
Posted - March 19 2011 : 11:01:24 PM
|
Factory Custom Paint, Bussy, for my LHS Train Specialty shop. bought my first new HO locomotive from them, (don't be silly I'm not admiting to that in public!) I remember a kid named Moses running around in Short Pant's!
-Gareth
"A is A"
-Aristotle
Law of Identification
|
|
Country: Canada ~
Posts: 4200 ~
Member Since: January 08 2006 ~
Last Visit: November 09 2021
|
Alert Moderator
|
|
|
|
Posted - April 10 2011 : 9:26:07 PM
|
A very handsome job Chris. Nice crisp detail work.
Alco Fan
|
|
Country: USA ~
Posts: 2496 ~
Member Since: August 03 2006 ~
Last Visit: September 17 2024
|
Alert Moderator
|
|
|
|
Posted - July 29 2011 : 1:24:11 PM
|
That Switcher Looks Great!
|
|
Country: USA ~
Posts: 1102 ~
Member Since: July 28 2011 ~
Last Visit: July 01 2015
|
Alert Moderator
|
|
|
|
Posted - September 14 2011 : 08:36:05 AM
|
Chris ; your ahm center cab came out really nice. The B&O sunburst gives the model alot. Really like the photos. They make a direct point keeping the text and photo together on the screen to view. Most people now want to put a link in. It is not the same. The addition of the mufflered stack, and brass bell is good. The hand rails over the louvered doors is a nice touch. I miss the access steps you removed. I know it was for the sun burst. The steps would have made it less sharp and clear.
Thanks again for the photos. It is good to see a plane jane turned into a center of attraction.
FRANK
toptrain
" It's a Heck of a Day " !!!
|
|
Country: USA ~
Posts: 7539 ~
Member Since: August 07 2008 ~
Last Visit: June 22 2026
|
Alert Moderator
|
|
|
|
Posted - September 14 2011 : 12:08:47 PM
|
| That's a pretty amazing transformation! The add-on parts are creative and really give it some much-needed character. I have one of these in a junk box somewhere but I might have to upgrade it to the "someday project" stash. Good work on the utility boxes... I noticed the hinges too, I assume you just used thin sheet for those? Looks factory-quality when painted. Superb work!
|
|
Country: USA ~
Posts: 2798 ~
Member Since: September 17 2010 ~
Last Visit: July 22 2015
|
Alert Moderator
|
|
|
|
Posted - September 14 2011 : 4:45:55 PM
|
Really nice job Chris. Looks great! You can also cut the speed of that puppy in half by using a single lead Atlas worm, instead of the double lead original.
The Tyco Depot
|
|
Country: USA ~
Posts: 3927 ~
Member Since: June 20 2007 ~
Last Visit: November 19 2015
|
Alert Moderator
|
|
|
|
Posted - October 22 2011 : 6:42:32 PM
|
How did you paint it? Air brush or spraypaint?
|
|
Country: USA ~
Posts: 1102 ~
Member Since: July 28 2011 ~
Last Visit: July 01 2015
|
Alert Moderator
|
|
|
|
Posted - December 31 2011 : 01:53:20 AM
|
Ugh, leave for a bit and I miss all kinds of questions.
CNVIATyco - Was colored with small spray can from the hobby store. Only problem is the blue doesn't dry glossy and it gave the decals issues. Lesson learned, next time using the blue I'll have to spray the model with a gloss to get them to stick easier. Yellow paint was just some Tamiya acrylic I picked up for cheap and applied by dabbing the parts with a cosmetic sponge. Sometimes a brush, but the sponges go on thinner and more evenly. You just have to maybe do it 2-3 times but the end look is worth it. Handrails were done the same way, stuck them in foam and dabbed them with the sponge.
Toptrain & Alco Fan - Thanks for the kind words 
Tony - Your stuff still blows me out of the water compared to what I do haha. Yea the box hinges I lucked out. I just happen to have two thicknesses of styrene. Had I done it again I would have made the handles stick out rather than just drilling a hole. But it works and it makes the underside a little more attractive. It was really a exercise for me to build stuff from basically nothing.
NickelPlate759 - I've heard about the Atlas worm upgrade, I just don't have one handy. But if I come across one its going in the switcher. Only other thing I debated was added handrails on each end of the loco. The front & back would technically never have no hand rails at all. But I'm ok with it. I did get one good upgrade I found the correct height couplers for it. So now I can hook it up to most any rolling stock on the layout. It still doesn't pull a ton, but its still very quiet & smooth. I'm very happy I put some time into the motor & gears on this thing. It really embarrasses any other small engine from its era since it runs so smooth.
|
|
Country: USA ~
Posts: 531 ~
Member Since: January 29 2009 ~
Last Visit: July 10 2020
|
Alert Moderator
|
|
|
|
Posted - December 31 2011 : 9:54:21 PM
|
To ChrisC:
Many thanks for your inspirational post about your center cab rebuild. I am Siouxlake (Ron), the guy who picked one up last Sept at a local train flea market, discovered your article, and did what you did in a slightly
different way. I used Nickel Plate (Nelson)'s idea of the Atlas worm and it turned a jerky jerky runner into a Lincoln Continental, so to speak. As a DC operator, I can run it slow enough to mimic DCC (well, real close) finessed-speeds. I managed front and rear LED lighting(bi-directional), but it was a real close fit.
Most of my postings with images have been on the Loose sub-forum, although a few early ones were also on this AHM sub-forum.
I am now always on the lookout for another one, as they are easy to work with and fun to upgrade.
Again, my sincere thanks and best wishes for a happy New Year!
Siouxlake/ Ron
|
|
Country: USA ~
Posts: 510 ~
Member Since: September 21 2011 ~
Last Visit: December 21 2014
|
Alert Moderator
|
|
|
|
Posted - January 01 2012 : 02:29:56 AM
|
Chris,
Here they are if you want to stock up.
http://www.ebay.com/itm/BRASS-WORM-GEARS-4-ATLAS-KATO-HO-Scale-/350519813375
The Tyco Depot
|
|
Country: USA ~
Posts: 3927 ~
Member Since: June 20 2007 ~
Last Visit: November 19 2015
|
Alert Moderator
|
|
|
|
Posted - January 02 2012 : 03:25:38 AM
|
Thanks Nickelplate! I've been looking at shows up haven't run across any. Some lower gearing would really help things.
siouxlake/Ron - I went and read all 3 articles........FLIPPING AWESOME!!! I was so happy I inspired a clone you don't even know lol. In case anyone missed them its worth the read.
http://www.tycoforums.com/tyco/forum/topic.asp?TOPIC_ID=10778
http://www.tycoforums.com/tyco/forum/topic.asp?TOPIC_ID=10803
http://www.tycoforums.com/tyco/forum/topic.asp?TOPIC_ID=10866
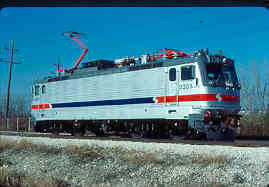
I liked a lot of the stuff you did, even if it was the same lol. Personally I like your tool boxes better than mine the texture adds a lot to them. Even the little stuff like staples for the front grabs, the visors on the window, and even the muffler detail came out great. BTW it doesn't show well in the photos, but I did the grabs & steps on both ends of the switcher. Only thing I didn't do was lights, which I'm glad to see you stick with and improve on. Mine was already falling off when I took it apart. Which brings me to my 2nd thing I wanted to do but didn't. I wanted to change the light assembly on the switcher. The two holes on each end from the factory sorta looked a bit off to me. I wanted something like SP did on their SW1500's, where the lead light on the nose was offset to one side.
http://www.railpictures.net/viewphoto.php?id=313474&nseq=11
Local shortline has a old SP unit and they kept the lights that way. I had trouble trying to figure out how I was going to cut up the hood to make that work. I decided it wasn't a huge deal and pressed forward on it.
All that stuff aside. I really like the color scheme you choose. Looks right at home on that body. If you do another definitely catalog it
|
|
Country: USA ~
Posts: 531 ~
Member Since: January 29 2009 ~
Last Visit: July 10 2020
|
Alert Moderator
|
|
|
|
Posted - January 02 2012 : 03:55:21 AM
|
ChrisC: those dual horizontal light holes made it necessary to have an LED set back from the top corner of the hood, in order to generate light thru both "lenses" at the same time. I plan to leave it without front and rear railings, as I think it has reached it's prime and don't want to ruin the work I already did. I just bid on an OEM one in ATSF colors on EBay, but it is in pristine condition. If I get it, I will fix the gearing issue with another Atlas/Kato brass worm, light it up in the rear with an LED, but otherwise leave it as a compare-and-contrast original. On my engine yard, freight yard small layout, it's a perfect fit.
Genius inspires others, pal. My thanks again.
Siouxlake/Ron
|
|
Country: USA ~
Posts: 510 ~
Member Since: September 21 2011 ~
Last Visit: December 21 2014
|
Alert Moderator
|
|
|
|
Posted - October 11 2013 : 02:29:11 AM
|
Great modeling here guy's. This Centercab industrial diesel looks like a good unit as it is but i presume it'snot actually a General Electric product. Plymouth prototype maybe?
Love your dad's B&LE loco's especially the 2 industrial's coupled together. Your B&O "Sunburst" scheme suits this loco too.
I got a 3 of them Bachmann 3 axle oversize cab switchers (actually 2 & a bit).
1 of them i added a different exhaust that looks like the unit has been repowered with a different engin, added a 3 chime horn to cab roof & a non operating Details West rotary beacon.
Many Thanks to all you inovative modelers here
Many Thanks. Regards. Pete H.
|
Country:  Australia ~
Posts: 3 ~
Member Since: October 09 2013 ~
Last Visit: October 14 2013 Australia ~
Posts: 3 ~
Member Since: October 09 2013 ~
Last Visit: October 14 2013
|
Alert Moderator
|
|
|
|
Posted - October 11 2013 : 02:59:08 AM
|
OK now you got my attention, that little B&O looks GREAT!!!!!!!!!!I love the sunburst scheme its almost as if, you read my mind!
NICE road number Too!
~John
Many have tried to, and failed, ya just can't repair stupid...
Do NOT try to Idiot-Proof anything!!!! God, will simply create a better......IDIOT!
|
|
Country: USA ~
Posts: 2911 ~
Member Since: March 26 2012 ~
Last Visit: January 14 2014
|
Alert Moderator
|
|
|
|
Posted - December 08 2020 : 10:27:51 PM
|
quote:
Small but useful.
|
|
Country: USA ~
Posts: 7779 ~
Member Since: February 12 2014 ~
Last Visit: July 18 2026
|
Alert Moderator
|
|