|
|
 Posted - November 30 2011 : 11:10:23 AM Posted - November 30 2011 : 11:10:23 AM


|
I think I Finally fixed the upload issue, but we will see....
The original pilot steps were cut and sanded off, then I used a template to locate and drill the holes for the pilot grabs. The steps were replaced with angled styrene, and the corners were slightly radiused (rounded), as well as the top lip of the step vertical portiion where it meets the face of the pilot. The grabs were painted separately with GN Orange (Polly Scale acrylic), sealed with dull cote, then carefully pressed into the holes. The rear of each staple (grab) was clipped shorter first to avoid seeing that project behind the pilot (and therefore be visible thru the side ladders of the lower deck).
The couplers were Kadee 37 offset style (offset higher), as a test with standard Kadee 5's revealed a very low mate with rolling stock couplers. Even so, there is a slight 1/16th inch differential, but not enough to necessitate further work (unless layout use creates any further vertical play).
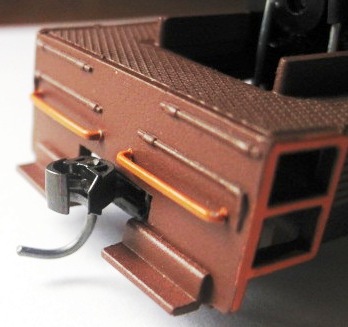
Here is an image of the assembled power chassis and lower deck:
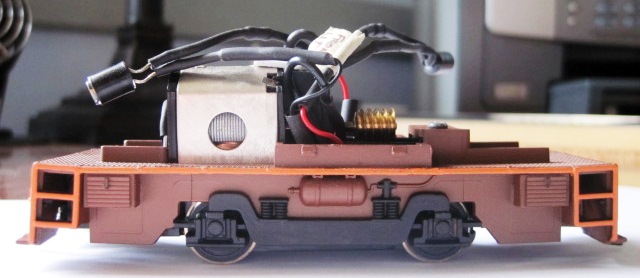
Here is an image of the shell paint work in progress:
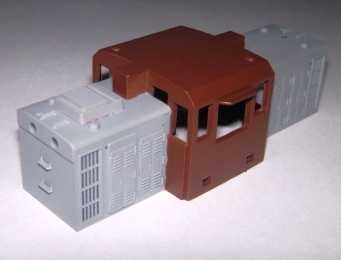
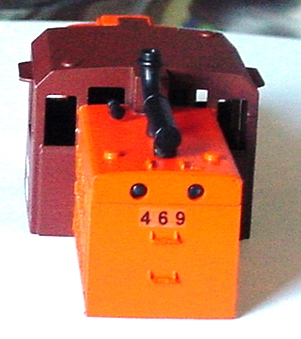
Hood and Shell Details:
In ChrisC's article, he mentioned pulling an air conditioning hatch cover detail part from his supply of spare parts that he attached to the rear top of the hood. I was not so lucky, but i had a small square of styrene that appeared to be the same size. I glued another piece of scribed styrene on top, to represent louvers, and cut a bit small that the dimensions of the square. As the hood was slightly rounded, a bit of sanding was required on the bottom of the piece to allow it to sit flush along the arc of the hood.
ChrisC also used pieces of parts tree plastic to create a muffler and exhaust. I replicated this with similar pieces, but when I researched GE and Plymouth small industrial diesels, I realized that the mounting of the vertical stack faced the rear from the front of the hood, so smoke would blow over the back of the cab (although this would be a problem running in reverse. i drilled a small hole in the center of the hood and placed a small pin of plastic in one of the "feet" of this device to secure it to the hood.
Final Painting...
I used Tamiya masking tape at the edges where the cab met the front and rear hood to define where the different colors joined, then used less expensive masking tape to cover the larger portions of the hood shell. This was painted with the Rustoleum red primer, as mentioned previously.
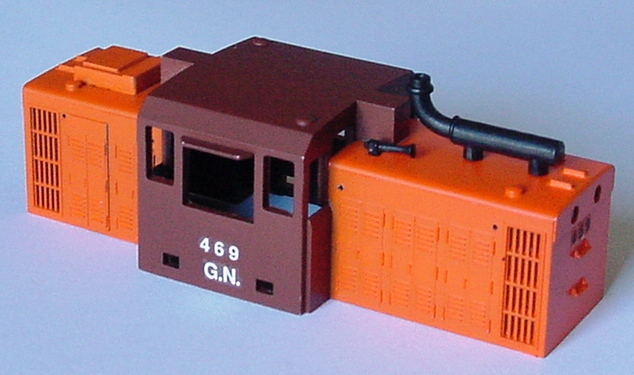
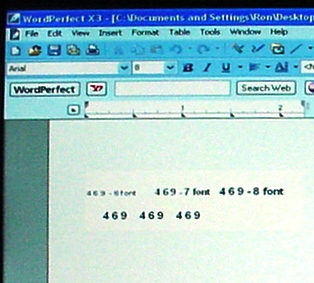
This final shell image shows the remainder of the shell paint work, this time Badger Modelflex BNSF Orange (to use directly with my airbrush and aviod diluting chores), and the lettering, rescued from a Great Northern MicroScale sheet I had. The white lettering works well against the red paint and on the end, having no black decals, I created a duplicate of the gothic font and size in WordPerfect (a fine Canadian product I have used since the early 90s) and printed the same engine numbers out on satin-finish self adhesive ACCO labels, cut them to fit and applied them to the ends of the hood. I then sprayed over them with dull cote to lock the ink and keep them clean. I realize this is a less than perfect method, but from 3 feet away, its hard to tell. I had to match the size of the MicroScale ones and tried several sizes for safety.
Here is an image of my "font development" for the numbers:
Oh yes, I forgot to mention the hood grab rails. They were made from .020 piano wire- perhaps a bit to large scale wise, but they look good. They are needed, as there is no deck railing on this engine. After drilling appropriate holes in the right locations, I made a paper template and bent the ends to fit. I then painted them with the Rustoleum red primer and dull cote before inserting and gluing from the inside of the shell with CA.
I am getting ready to fit the shell onto the assempled deck and power chassis, but need to trim some more from the two weights to endureclearance for the wiring and a good fit.
Be back with one more entry when the whole thing is assembled.
Siouxlake/Ron
|
Country:  USA ~
Posts: 510 ~
Member Since: September 21 2011 ~
Last Visit: December 21 2014 USA ~
Posts: 510 ~
Member Since: September 21 2011 ~
Last Visit: December 21 2014
|
 Alert Moderator
|
|
|
|
Posted - November 30 2011 : 11:57:51 AM
|
Some additional images of the painted shell- with railings!:
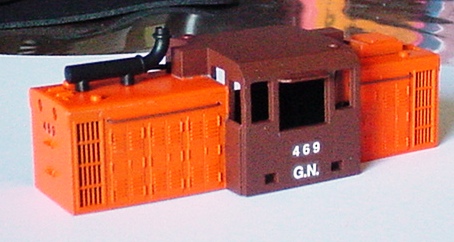
Sunshades were also added to the side cab windows, cut from thin styrene stock.
Siouxlake/Ron
|
|
Country: USA ~
Posts: 510 ~
Member Since: September 21 2011 ~
Last Visit: December 21 2014
|
Alert Moderator

|
|
|
|
Posted - November 30 2011 : 12:03:43 PM
|
And, you may wonder why the letters G.N. are on the cab...well, my railroad, the Minnesota, Sioux Lake & Western, is a wholly-owned subsidiary of the Great Northern. This particular engine was rebuilt at the Sioux Lake, MN field shop and is owned by GN, "leased" to the MSL&W for yard goat use at Sioux Lake. The colors of the MSL&W are that Rustoleum red primer and BNSF Orange, to reflect some of the vivid fall colors often seen across Minnesota in the fall. I have a separate logo for my railroad, but the limited space available on this engine made it difficult to use that, as it would have lost a lot of detail in downsizing to fit.
Siouxlake/Ron
|
|
Country: USA ~
Posts: 510 ~
Member Since: September 21 2011 ~
Last Visit: December 21 2014
|
Alert Moderator
|
|
|
|
 Posted - November 30 2011 : 8:18:03 PM Posted - November 30 2011 : 8:18:03 PM
|
Hi siouxlake,
That is some nice work! Great color combo. Can't wait to see it all together.
Can you show us your logo?
Thanks for sharing.
Mike
|
|
Country: USA ~
Posts: 790 ~
Member Since: April 30 2006 ~
Last Visit: July 21 2015
|
Alert Moderator
|
|
|
|
Posted - November 30 2011 : 8:57:22 PM
|
This is the logo I designed for my railroad- it is a "stylized" haystack or arrangement of wheat stalks, representative of the agricultural location of the railroad (west central Minnesota and eastern North Dakota), but I originally was planning on GN Orange with Maroon. Now that I have settled on "Rustoleum red primer", I guess that will be modified.

Siouxlake/Ron
|
|
Country: USA ~
Posts: 510 ~
Member Since: September 21 2011 ~
Last Visit: December 21 2014
|
Alert Moderator
|
|
|
|
Posted - November 30 2011 : 9:44:26 PM
|
Awesome work. That's a lot more than I did to the one I have in LOTW.
I did finally clean the motor and wheels, and replaced the couplers. I know from experience that all the Mehano diesels need the higher couplers. Even then they often need adjustment so they don't drag and hang up on turnouts.
Also, isn't it tricky to get back together? I had quite a time figuring out how to get the shell back on and get the weights and couplers in place. Everything's fine now, though...it runs like a champ.
|
|
Country: USA ~
Posts: 1166 ~
Member Since: October 18 2009 ~
Last Visit: December 23 2018
|
Alert Moderator
|
|
|
|
Posted - November 30 2011 : 10:22:20 PM
|
Nice paint job and logo. If you were to use the logo, how would you transfer it? Do you use decals?
-Thomas
|
|
Country: USA ~
Posts: 1091 ~
Member Since: July 07 2011 ~
Last Visit: June 17 2026
|
Alert Moderator
|
|
|
|
Posted - November 30 2011 : 10:29:26 PM
|
Getting it back together- that's a good point!
I am finding that I was perhaps a bit over-zealous in my use of shrink tubing, as I have some clearance issues that were not apparent previously. I have done some trimming of the lead weights, but the bulk I created with my wiring will have to be re-worked this weekend. That is the problem with these small diesels (and perhaps, as I get into them, the very small steamers- 040's, docksides, etc.).
The clearances are relatively tight and there is no room for substantive change from the original assembly. I will redo the LEDs and shorten the wires, as the extra length I allowed for seems to bind the shell at the top and on the sides; ditto for the relaxed length I allowed for the primary wiring from the motor to the pickup strips on each side. I saved the original white wires (not to reuse, though) and they were pretty short- now I understand why!
So- shortening the power wires and avoiding the use of shrink tubing (except around the LEDs as a light block) should restore the fit of the shell and the lower deck.
As I said in my first posting (I think), this is my first rebuild, coming off a long 2 year run of structure modeling. The learning curve is still operating at a steep angle, apparently, from my need for fixing the wiring. I realize that other diesel models have more empty space, so perhaps the best route is to carefully plan first, then hit the workbench!
As soon as I get the wiring redone, I will button it up and show the finished product.
Siouxlake/Ron
|
|
Country: USA ~
Posts: 510 ~
Member Since: September 21 2011 ~
Last Visit: December 21 2014
|
Alert Moderator
|
|
|
|
Posted - November 30 2011 : 11:37:09 PM
|
I'm enjoying watching this come together Ron. It's a shame you have to rework all that nice wiring, but I've been there. Seems like I'm always calculating wire lengths too long or too short. Clearance is and issue in smaller locos, and small steamers (excluding tank locos) are usually worse than this with the tight fit between the boiler weight and the shell.
B77, I've found it easier to re-seat the shell if I file the tips of the 4 tabs that hold it on down a bit. Otherwise getting the shell on or off can be a real headache without snapping the handrails.
The Tyco Depot
Edited by - NickelPlate759 on December 01 2011 12:05:44 AM
|
|
Country: USA ~
Posts: 3927 ~
Member Since: June 20 2007 ~
Last Visit: November 19 2015
|
Alert Moderator
|
|
|
|
Posted - December 01 2011 : 12:09:57 AM
|
get a old caboose & paint it like the loco & you'll have a matching caboose 
I suggest you use a extra Tyco caboose with that Sioux Lake logo Which I do like btw 
|
|
Country: USA ~
Posts: 15028 ~
Member Since: February 23 2009 ~
Last Visit: June 18 2026
|
Alert Moderator
|
|
|
|
Posted - December 01 2011 : 12:11:10 AM
|
Nelson,
do you mean round them off or shorten them or what?
"A is A"
-Aristotle
Law of Identification
|
Country:  Canada ~
Posts: 4200 ~
Member Since: January 08 2006 ~
Last Visit: November 09 2021 Canada ~
Posts: 4200 ~
Member Since: January 08 2006 ~
Last Visit: November 09 2021
|
Alert Moderator
|
|
|
|
Posted - December 01 2011 : 12:26:41 AM
|
Yep, just round off the points a little so you don't have to spread the shell as much.
The Tyco Depot
|
|
Country: USA ~
Posts: 3927 ~
Member Since: June 20 2007 ~
Last Visit: November 19 2015
|
Alert Moderator
|
|
|
|
Posted - December 01 2011 : 07:09:11 AM
|
Microbusss- that caboose idea is a very good one. I picked up a custom lettered club model
kit from Bowser (the Pennsy one with the steel cupola) at a swap meet last year that is a horrific shade of blue. Now, thanks to your suggestion, I know just what to do with it- it will become the tail end for my railroad in my colors!
Nelson- the rewiring isn't a big deal, and it will give me more practice anyway. I should have copied the lengths of the original wires more closely, as Mehano was mass-producing this model and needed to make things work the first time, so they were right.
I haven't lost more than 1/2 oz of weight, but I would rather not keep subtracting from that, hence, the rewiring without all that shrink tubing.
As far as my logo and decal creation, I will probably get some decal paper I can use in my printer and work with that. If I had the money, I could have it custom reproduced, but....
Siouxlake/Ron
|
|
Country: USA ~
Posts: 510 ~
Member Since: September 21 2011 ~
Last Visit: December 21 2014
|
Alert Moderator
|
|