|
|
 Posted - June 14 2020 : 11:44:58 PM Posted - June 14 2020 : 11:44:58 PM


|
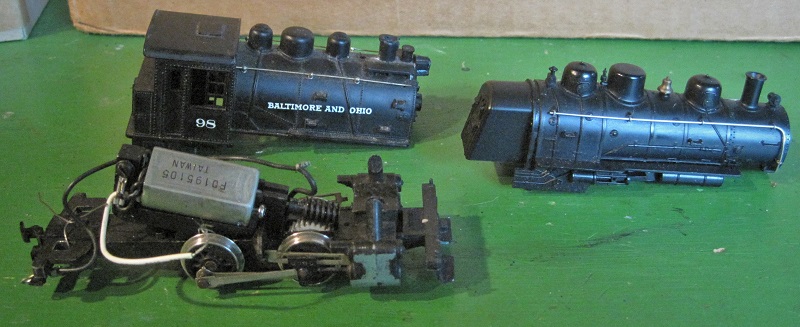
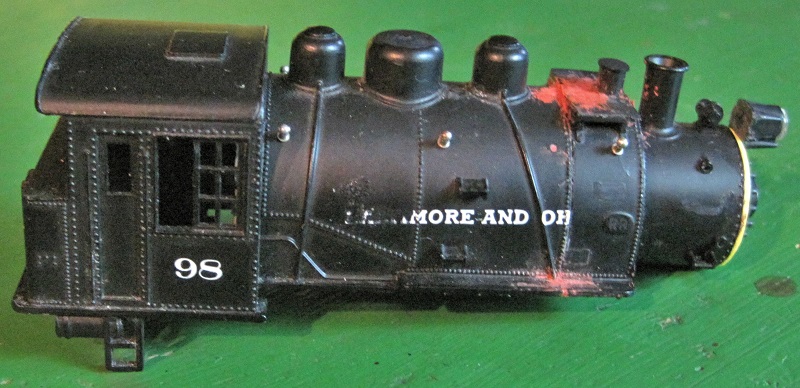
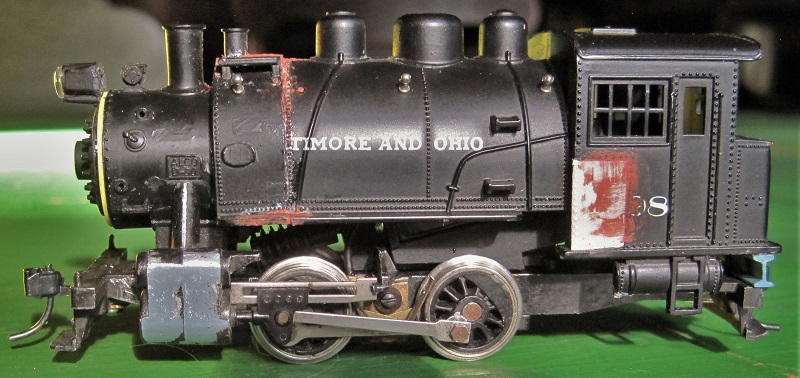
Left over from a past project, I had a working Chassis from a Mantua/Tyco Booster 0-4-0T switch engine. It seemed a shame for it to languish, but it was without a body shell. Fortunately, the junk box also contained an old shell from a Rivarossi Dock Side saddle tanker and a shell from a plastic-boiler Mantua/Tyco shifter.
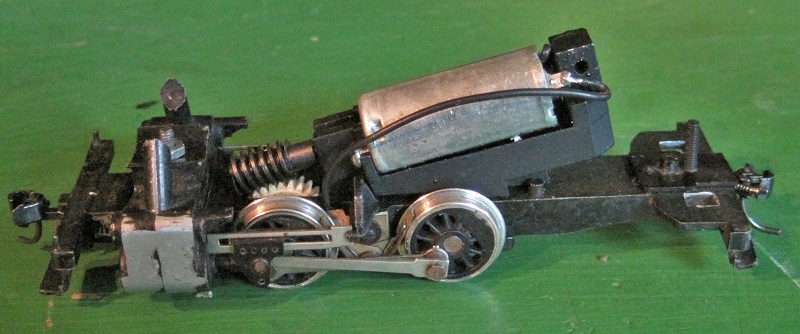
I think that odd motor was something Mantua was using in the 1980s or 1990s. It came in a Prairie, but I wanted to modify that in a way that works better with the old open-frame motor, so I swapped that out of the old Booster chassis, leaving the Booster with this motor.
It seemed like I could cobble together a saddle tanker body from the old dockside shell and the shifter shell.
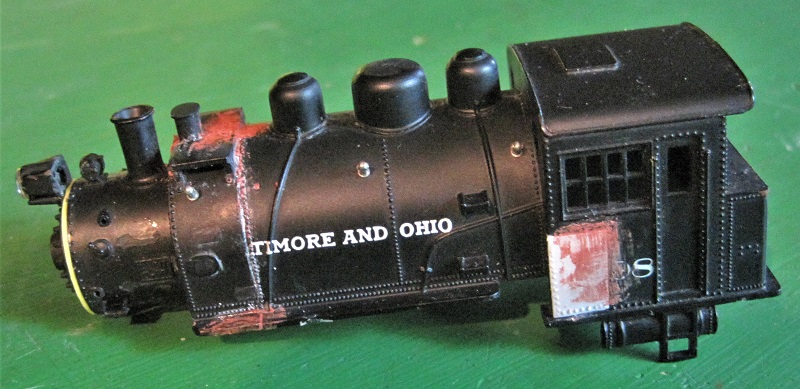
The Dockside body was too short for the chassis, by itself, but with the smoke box from the Shifter, it would be long enough. In fact it would be too long, so I cut out a section of the Dockside body under the smoke stack and got something the right length. The Shifter smoke box would fasten properly to the cylinder saddle on the Booster chassis, too. Cutting a square, precise section from that curved shape was a bit more than I could do, so a bit of putty was needed to fill some gaps. With hobby shops closed in my part of the world, there was no model building putty to be had, but "Spot and Glazing Putty" from a car parts store works well.
The Dockside had its air compressor mounted in an odd looking niche in the wall of the cab. The Rivarossi rendition of it was a little low-relief molded in sculpture that I didn't want in this case. I carved that off and glued on a patch. The rivet line on the patch is embossed from behind with a pointed tool.
The Shifter body did not have a smoke box front, but I did have the smoke box front from the Rivarrosi Dockside with its headlight attached. That didn't fit the smoke box, but I added a disk of plastic cut from a plastic "No Trespassing" sign. The bolt heads that attach the front to the smoke box are embossed from behind, like the rivet line on the cab patch.
The basic shell is now together, though the means of fastening down the back, and much of the cosmetic detailing have yet to be done.
The Hook and Horn front coupler has been replaced with a drop-shank Kadee whisker coupler. To do so, I had to carve out the coupler pocket with a jeweler's saw and a cold chisel ground from the tang of a broken file. Then, part of a coupler box provides the right size pivot and the bottom of the box.
The rear coupler has been replaced with a Kadee center-shank whisker coupler in a coupler box screwed to the original coupler mounting plate.
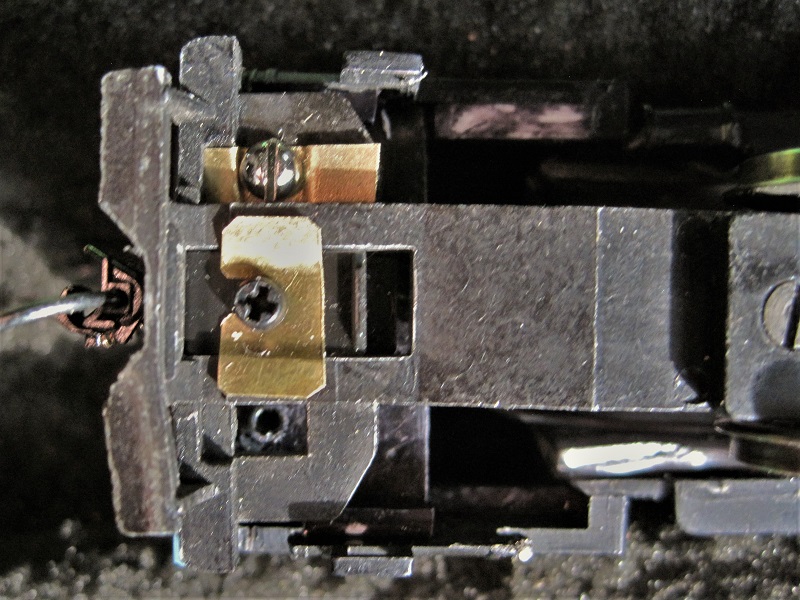
The original body had hooks under it that engaged the edges of square holes under the cab. The back of the body held down the mounting plate for the rear coupler. My shell was of a different design, so I made a little brass clip to go under the coupler's screw head and hold down the coupler mount from below.
The rear of the body is held down as follows:
1) A lead block is glued in the cab. This is drilled and tapped for screws from below. You can see the threaded hole through one of the square mounting holes in the frame.
2) Brass clips fit into the square holes that the old shell's hooks engaged.
3) Screws through the brass clips reach into the holes in the lead weight. You can see the screw and clip in one of the mounting holes.
At this point, the shell is mounted. The height is determined by the cylinder saddle and smoke box. The rest of the body sits high and doesn't reach down to the chassis. The blue I beam forms a support for the cab and fuel oil bunker. The air reverse and the compressed air tank under the walkway fill in an ugly gap below the saddle tank. They come from below the walkway of the old shifter shell.
Over on the Fireman's side, you can see the ugly gap below the saddle tank. This will later be filled with the details below the left walkway of the shifter's shell.
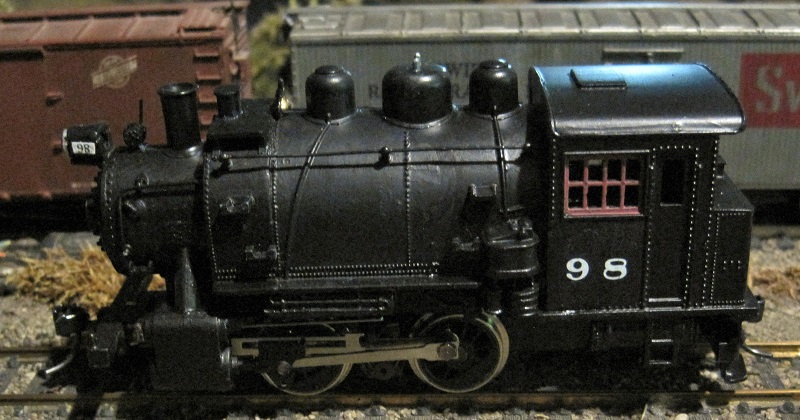
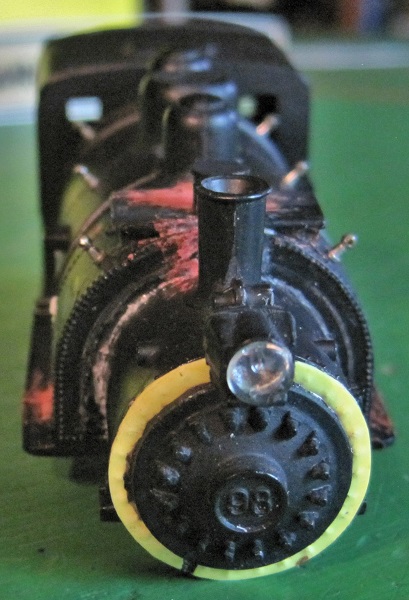
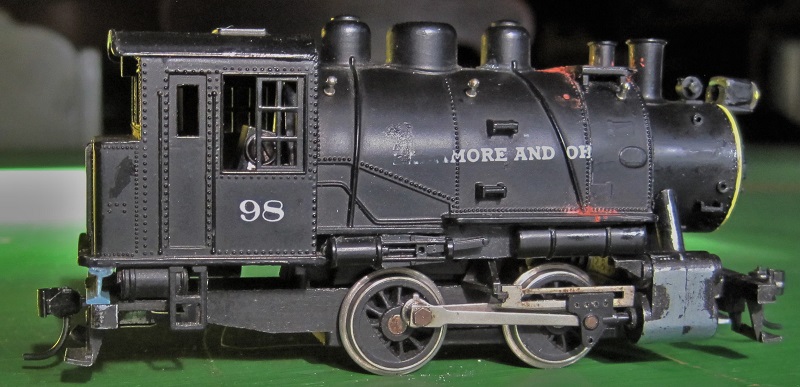
Here's the more or less finished product. At this point, I haven't chosen a road name or weathered anything, but otherwise, it's built. An air compressor has been added, just ahead of the cab. This was from the old Shifter shell. The details below the walkway come from the Shifter, too. A few steps have been added to the side of the tank to access the water filler hatch and the rear sand dome. A piece of wire fills in for the linkage from a Stephenson valve gear to the valve on the cylinder saddle. The bell is an old MDC bell. It was the smallest bell I had, which was needed because it's in a small space. The molded on headlight dynamo lacked an exhaust pipe, but a .020" hole drilled in it, and a wire shoved in makes a reasonable representation. Finally, a little paint covers a whole lot of ugly.
From this side, we can see some pop valves and a whistle added to the steam dome. These are made from odds and ends of plastic from my box of sprues.
The Rivarossi Dockside did not portray a hatch to fill the oil bunker, but it wasn't hard to cobble one up from scraps of plastic. The backup light was just a hollow hole, but some silver paint made for a reflector, and then the hole was filled with some Elmer's Glue-All and capped with a clear plastic disk. When the glue dried clear, it didn't look too bad.
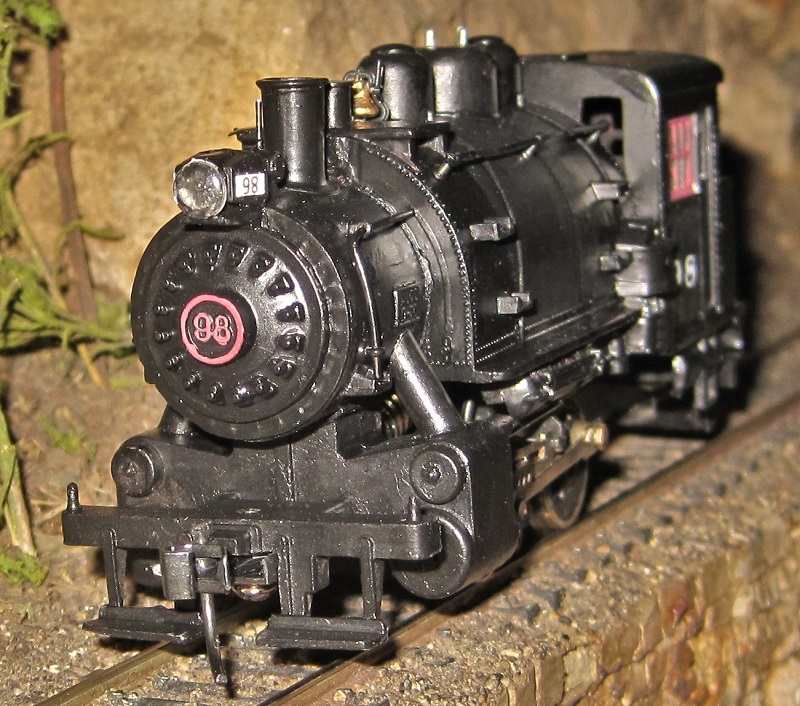
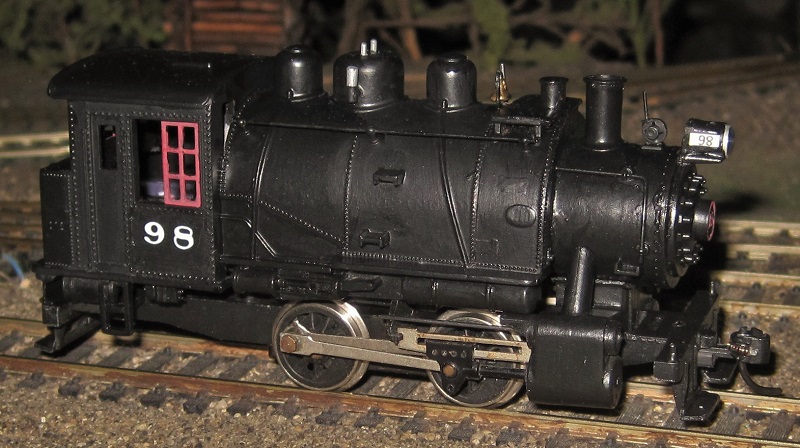
A view of the front.
The engine runs pretty well, but the little can motor draws very little current and is jumpy on a rheostat throttle. That can be controlled, however, by wiring in an automobile tail light across the "track" terminals of the power pack. This bulb should have a switch, so you can turn it off when you use locomotives with old-fashioned high-amperage open frame motors.
At a time when there are no swap meets, one can still get fodder for a project from the junk boxes.
Carpe Manana!
Edited by - scsshaggy on June 14 2020 11:46:41 PM
|
Country:  USA ~
Posts: 2417 ~
Member Since: September 17 2013 ~
Last Visit: June 27 2026 USA ~
Posts: 2417 ~
Member Since: September 17 2013 ~
Last Visit: June 27 2026
|
 Alert Moderator
|
|
|
|
Posted - June 15 2020 : 01:05:40 AM
|
| Ingenious.
|
|
Country: USA ~
Posts: 11686 ~
Member Since: December 09 2013 ~
Last Visit: May 26 2026
|
Alert Moderator

|
|
|
|
Posted - June 15 2020 : 10:24:45 AM
|
This is so cool! I have like, 3 dockside shells I could do this with. Thank you for this!
Ferb, I know what we're gonna do today!
|
|
Country: USA ~
Posts: 1549 ~
Member Since: October 10 2019 ~
Last Visit: January 04 2024
|
Alert Moderator
|
|
|
|
Posted - June 15 2020 : 9:09:05 PM
|
Amazing work!
"Let your light so shine before men, that they may see your good works, and glorify your Father which is in Heaven." - Matthew 5:16
Youtube Channel: www.youtube.com/rpmodelrailroads
Instagram: https://www.instagram.com/rp_model_railroads/
|
|
Country: USA ~
Posts: 4669 ~
Member Since: August 11 2017 ~
Last Visit: July 20 2023
|
Alert Moderator
|
|
|
Bamos
Big Six


Status:
offline
| |
Posted - June 15 2020 : 10:10:09 PM
|
Excellent kitbash
Bill
|
|
Country: USA ~
Posts: 203 ~
Member Since: December 24 2017 ~
Last Visit: March 20 2026
|
Alert Moderator
|
|
|
|
Posted - June 16 2020 : 1:46:19 PM
|
That's a charming little locomotive, great kitbashing work!!!! I have a few questions about this project though... I have a few questions about this project though...
First, how did you cut the dockside shell straight, did you use a miter box or something? Also what tool did you use to make the cut? (Razor saw, dremel tool, band saw?)
Second, could you use a resistor mounted inside the locomotive to reduce the amount of voltage going to the motor for smoother starts?
Last, are you going to add any additional details? The model looks nice now, but a few extra details would boost the wow factor. Such details could include things like rerailing frogs, chains, a tool chest on the pilot, fire hose, push pole, pin lifers on both ends, elk antlers on the headlight, engineer and fireman figures, glass in the windows, and of course weathering (dust on the wheels, calcium deposits around the whistle and relief valves, rust along the lowerer edges of the tank, soot on the top of the smoke box)!
I would love to see you run with this little guy, it deserves the extra TLC!
Proudly keeping Tyco Pluggers out of landfills since 2016
Edited by - Srenchin on June 16 2020 1:54:12 PM
|
|
Country: USA ~
Posts: 821 ~
Member Since: December 26 2009 ~
Last Visit: June 26 2026
|
Alert Moderator
|
|
|
|
Posted - June 16 2020 : 4:38:28 PM
|
First of all, thanks, all, for the kind words.
Now to answer some questions:
Q: First, how did you cut the dockside shell straight, did you use a miter box or something? Also what tool did you use to make the cut? (Razor saw, dremel tool, band saw?)
A: I only cut it just so straight, hence the putty. Black paint covers a lot of ugly, but a closer scrutiny would show an uneven seam. I just measured out a line as best I could and cut with a jeweler's saw and then cleaned things up as best I could with a file.
Q: Second, could you use a resistor mounted inside the locomotive to reduce the amount of voltage going to the motor for smoother starts?
A: I really don't know what the value of the resistor would need to be. The nice thing about the tail light bulbs back in the control panel is that a light bulb sort of adjusts itself to the needed resistance. A dark, cold light bulb is practically a dead short, then as it heats up and lights, the resistance increases with temperature. I also don't know what kind of heat the resistor mounted inside the locomotive would produce. I just skip all that uncertainty, by doing what I do. By the way, a resistor if used would not be to cut voltage to the motor, but to create a balance between the rheostat and the load. Rheostats control motors by balancing the voltage between the two of them. The newer, low draw motors have more resistance than the old open frame motors around which the rheostat throttles were designed. A resistor in parallel with the motor would have a lower total resistance than the motor alone and be a better balance with the rheostat.
Q: Last, are you going to add any additional details? The model looks nice now, but a few extra details would boost the wow factor. Such details could include things like rerailing frogs, chains, a tool chest on the pilot, fire hose, push pole, pin lifers on both ends, elk antlers on the headlight, engineer and fireman figures, glass in the windows, and of course weathering (dust on the wheels, calcium deposits around the whistle and relief valves, rust along the lowerer edges of the tank, soot on the top of the smoke box!)
A: The weathering you mention will probably happen, sometime, when I decide exactly how the engine will be used. I usually do add pin lifters, and may yet do so, here. Frogs, chains, etc. would depend on how it's to be used. If it stays in the yard, it would never be too far from those tools that it has to tote them around all the time. If I want it to look like a logging engine, those usually carry all the tools.
Carpe Manana!
|
|
Country: USA ~
Posts: 2417 ~
Member Since: September 17 2013 ~
Last Visit: June 27 2026
|
Alert Moderator
|
|
|
|
Posted - June 25 2020 : 12:58:39 PM
|
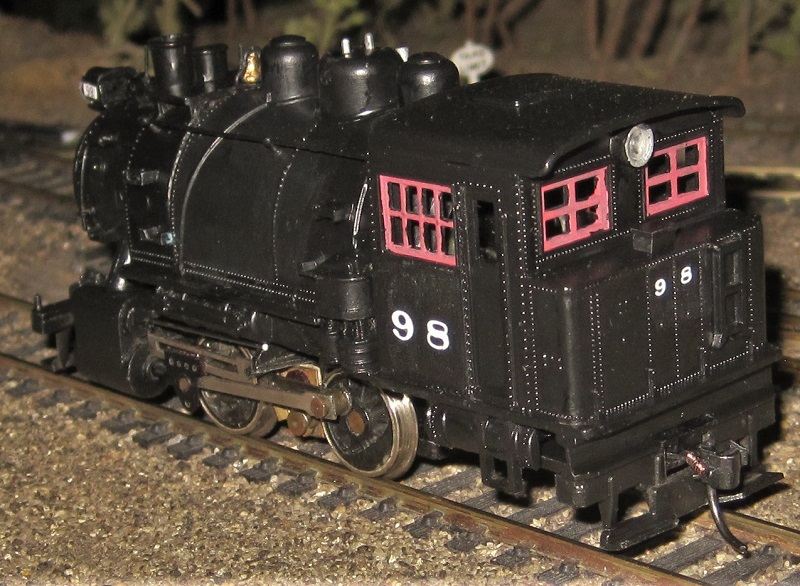
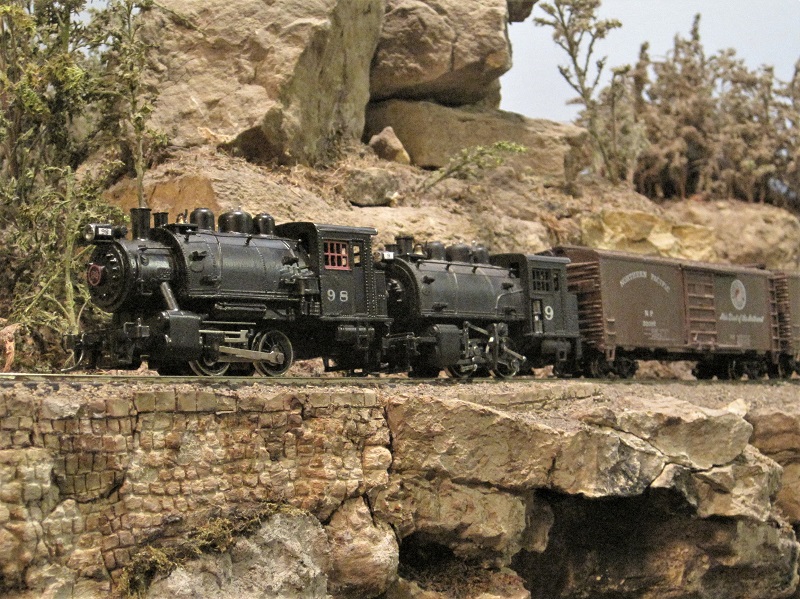
The new 0-4-0T has found a job on the Mussentuchit Transfer. It pulls together well with a Rivarossi Dockside I already had, and between them, if one stalls on an insulated switch frog, the other nudges it back into motion. Also, the two low-draw motors in parallel play nicer with a rheostat throttle than one alone.
I already had a Mantua Shifter doing this job, but variety being the spice of life, it and the two tank engines can take turns.
I still haven't added a road name, but I did go back and add in an uncoupling lever on the front. I couldn't really make one fit on the back without fouling up some other things. A bit of light weathering has been added, too.
Carpe Manana!
|
|
Country: USA ~
Posts: 2417 ~
Member Since: September 17 2013 ~
Last Visit: June 27 2026
|
Alert Moderator
|
|
|
|
 Posted - June 25 2020 : 1:16:57 PM Posted - June 25 2020 : 1:16:57 PM
|
| Very nice!
|
|
Country: USA ~
Posts: 1549 ~
Member Since: October 10 2019 ~
Last Visit: January 04 2024
|
Alert Moderator
|
|
|
|
Posted - June 25 2020 : 8:00:40 PM
|
Love that photo!! You have an incredible layout, to say the least, and your customizing work is top-notch.
"Let your light so shine before men, that they may see your good works, and glorify your Father which is in Heaven." - Matthew 5:16
Youtube Channel: www.youtube.com/rpmodelrailroads
Instagram: https://www.instagram.com/rp_model_railroads/
|
|
Country: USA ~
Posts: 4669 ~
Member Since: August 11 2017 ~
Last Visit: July 20 2023
|
Alert Moderator
|
|
|
|
Posted - June 25 2020 : 8:56:19 PM
|
quote:Love that photo!! You have an incredible layout, to say the least, and your customizing work is top-notch.
Originally posted by RP model railroads - June 25 2020 : 8:00:40 PM
|
Couldn't of put it better myself!
|
|
Country: USA ~
Posts: 1549 ~
Member Since: October 10 2019 ~
Last Visit: January 04 2024
|
Alert Moderator
|
|
|
|
Posted - June 25 2020 : 10:13:18 PM
|
Thanks, guys, for the kind words.
Carpe Manana!
|
|
Country: USA ~
Posts: 2417 ~
Member Since: September 17 2013 ~
Last Visit: June 27 2026
|
Alert Moderator
|
|
|
|
Posted - July 02 2020 : 1:35:11 PM
|
That sure is a nice kitbash, great work!
Proudly keeping Tyco Pluggers out of landfills since 2016
|
|
Country: USA ~
Posts: 821 ~
Member Since: December 26 2009 ~
Last Visit: June 26 2026
|
Alert Moderator
|
|
|
|
Posted - July 04 2020 : 12:11:06 PM
|
| Incredible work! That is an excellent kitbash, plus it's plausible as either a home-built loco or a rebuild. Love it!
|
|
Country: USA ~
Posts: 37 ~
Member Since: January 02 2016 ~
Last Visit: June 03 2025
|
Alert Moderator
|
|