|
|
 Posted - October 07 2017 : 9:40:14 PM Posted - October 07 2017 : 9:40:14 PM


|
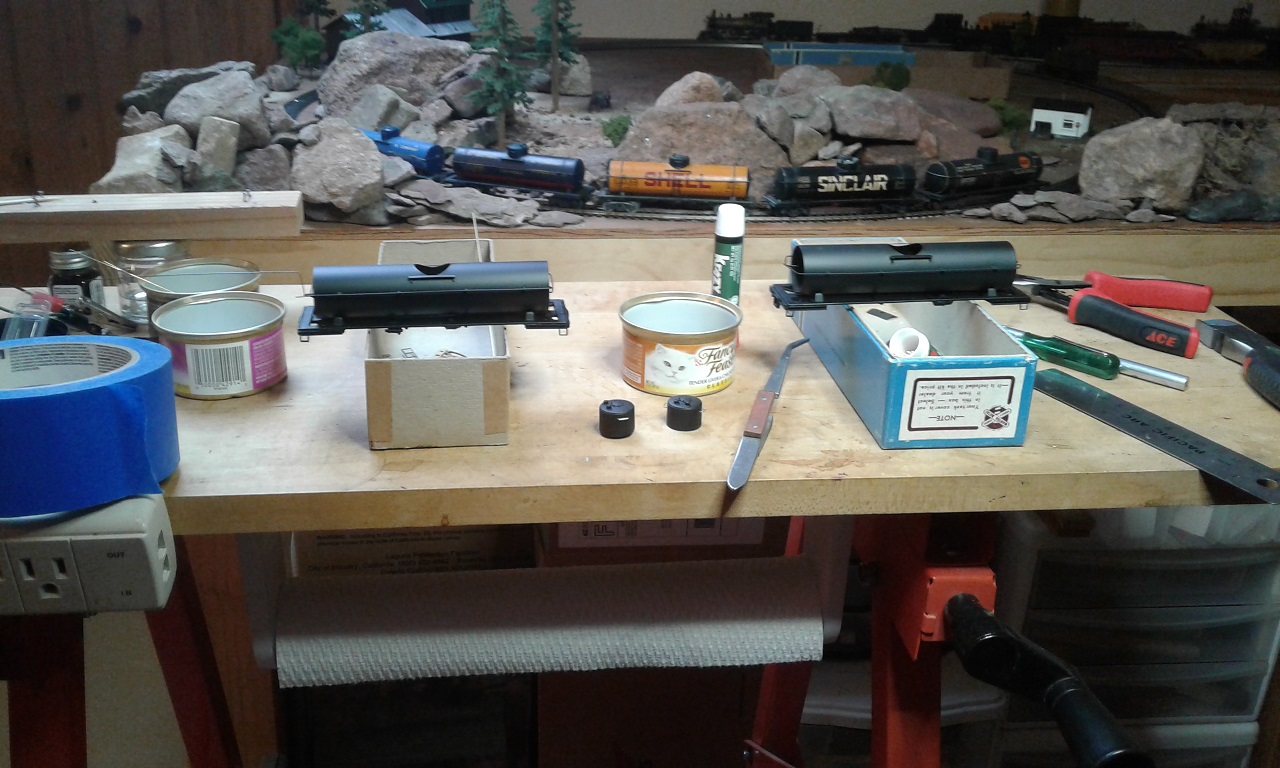
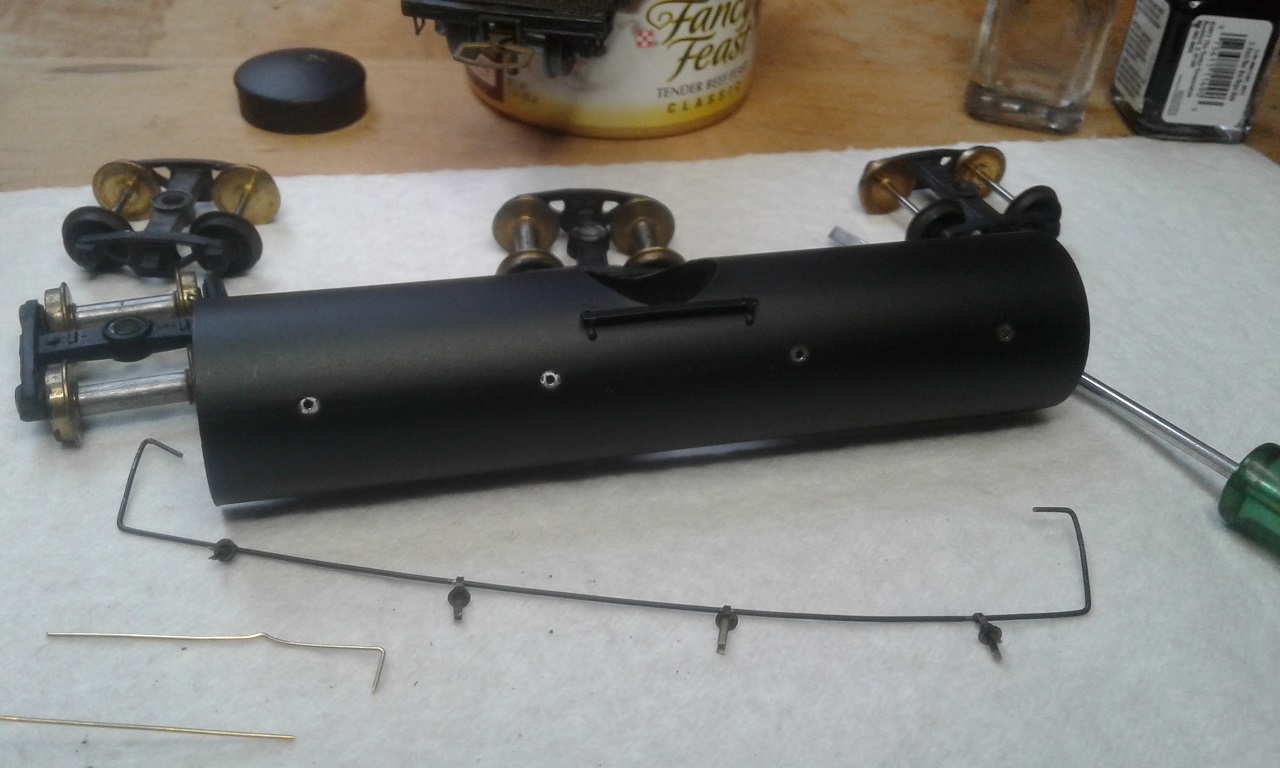
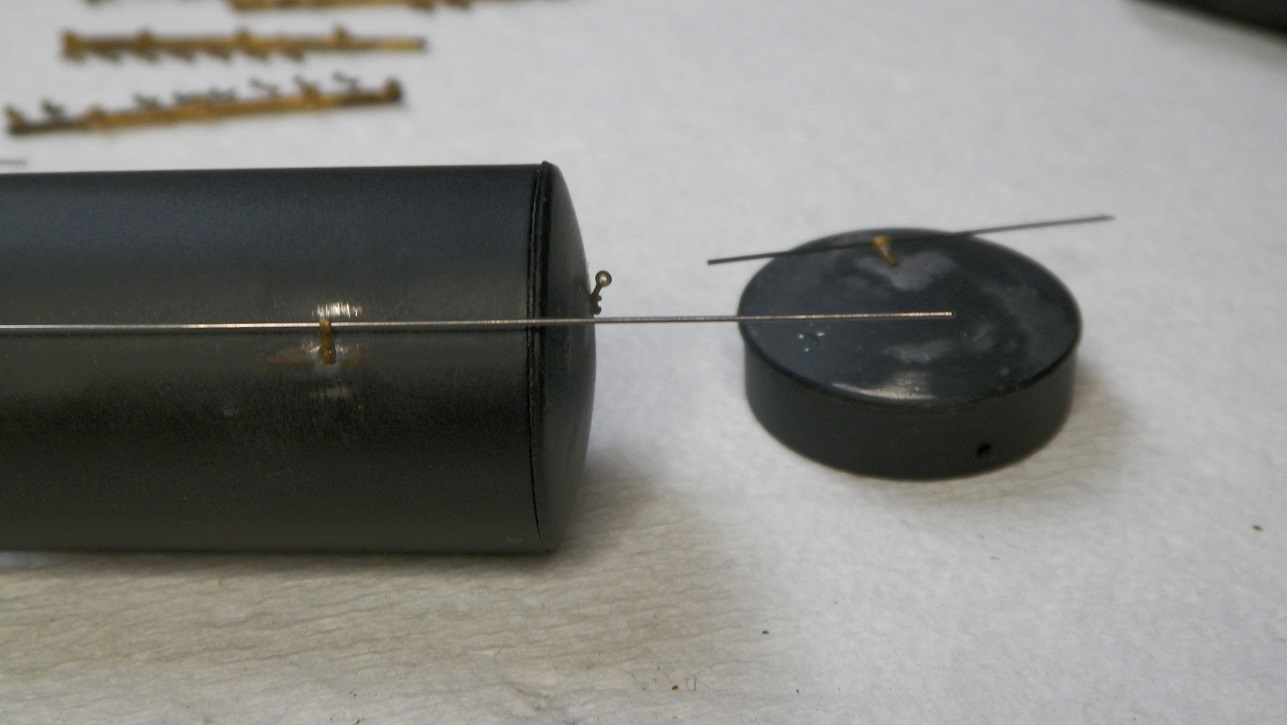
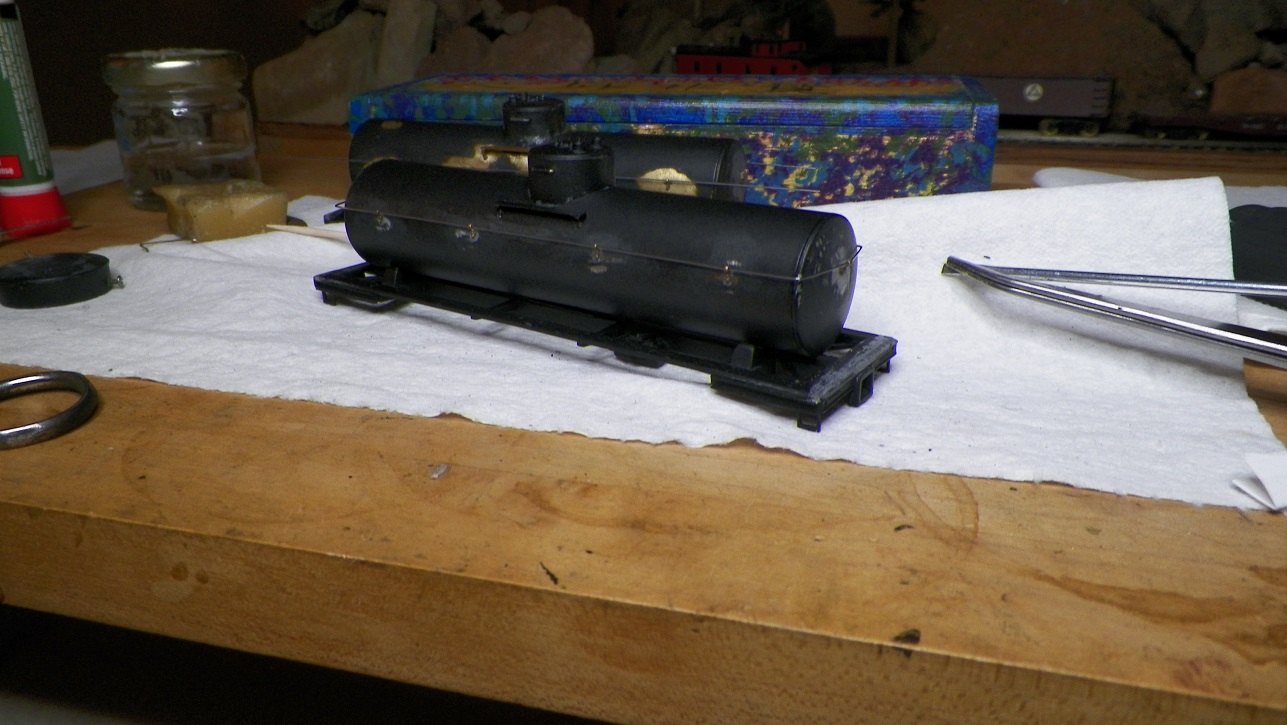
For some time I've had the thought of re-doing a Mantua Metal Products tank car in basic flat black. One reason being that I had a couple cars that were in need of a tune up, and another being that a no name flat black tank car conjures up something along the lines of an old black and white photo of a steam train. I set out the other Mantua tank cars for inspiration, and to check some assembly things. At one time, I thought my goal would be to just re-do each of the Mantua cars I acquired, but I've grown to appreciate the work done by the modelers a half-century ago, and actually, the general simple design of these cars. We'll see how this flat black business goes. So far just got the frames and a few pieces painted. Need to thread those little bent pieces of brass strip that serve as stanchions and do that handrail install before I paint the tanks; thinking I'd have a tendency to scratch the tanks all up putting the handrails on after.
|
Country:  USA ~
Posts: 2087 ~
Member Since: March 16 2013 ~
Last Visit: July 05 2018 USA ~
Posts: 2087 ~
Member Since: March 16 2013 ~
Last Visit: July 05 2018
|
 Alert Moderator
|
|
|
|
Posted - October 08 2017 : 12:06:52 AM
|
Barry,
I've never painted a train before and defer to you and anyone else on this forum with painting expertise, but what if you paint the tanker, let the paint dry, put blue painters tape on and then insert the handrails? Wouldn't this help prevent scratches?
Looking forward to seeing the end result.
|
|
Country: USA ~
Posts: 553 ~
Member Since: February 18 2013 ~
Last Visit: January 01 2026
|
Alert Moderator

|
|
|
|
Posted - October 08 2017 : 10:39:20 AM
|
| That's a good thought Brian.
|
|
Country: USA ~
Posts: 2087 ~
Member Since: March 16 2013 ~
Last Visit: July 05 2018
|
Alert Moderator
|
|
|
|
Posted - October 08 2017 : 2:57:01 PM
|
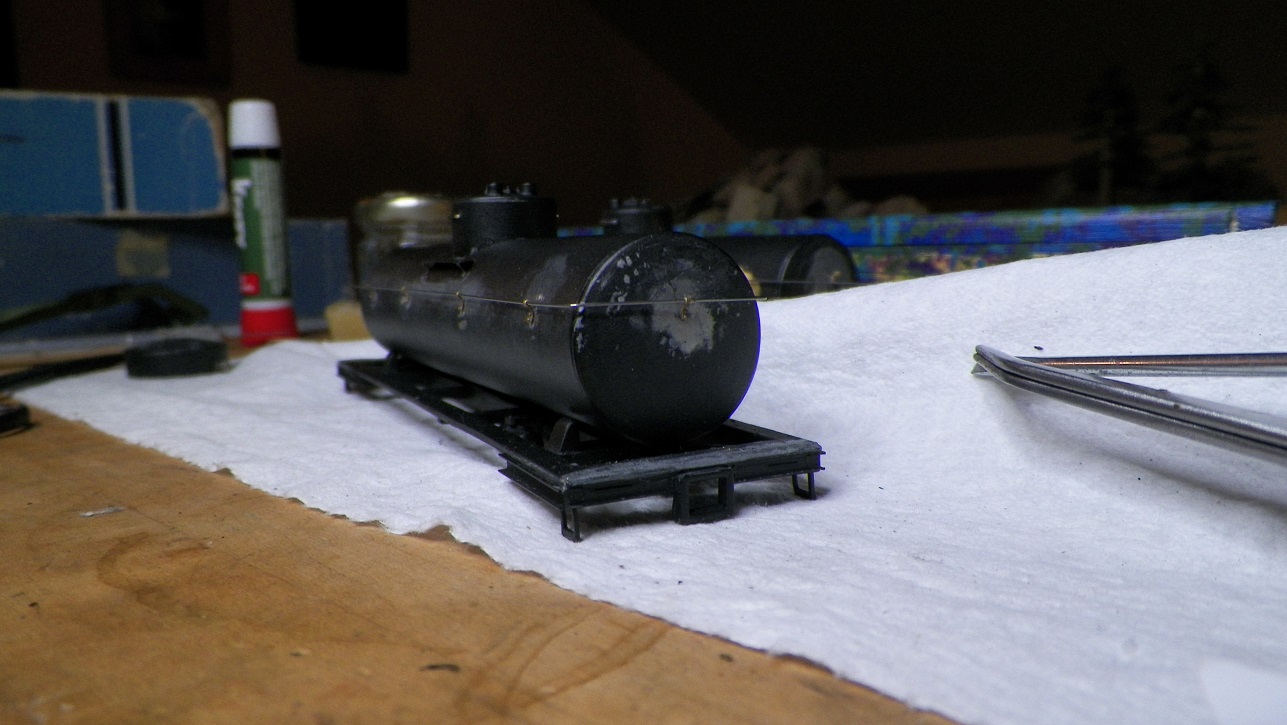
Moving along a bit . . .
|
|
Country: USA ~
Posts: 2087 ~
Member Since: March 16 2013 ~
Last Visit: July 05 2018
|
Alert Moderator
|
|
|
|
Posted - October 08 2017 : 5:18:46 PM
|
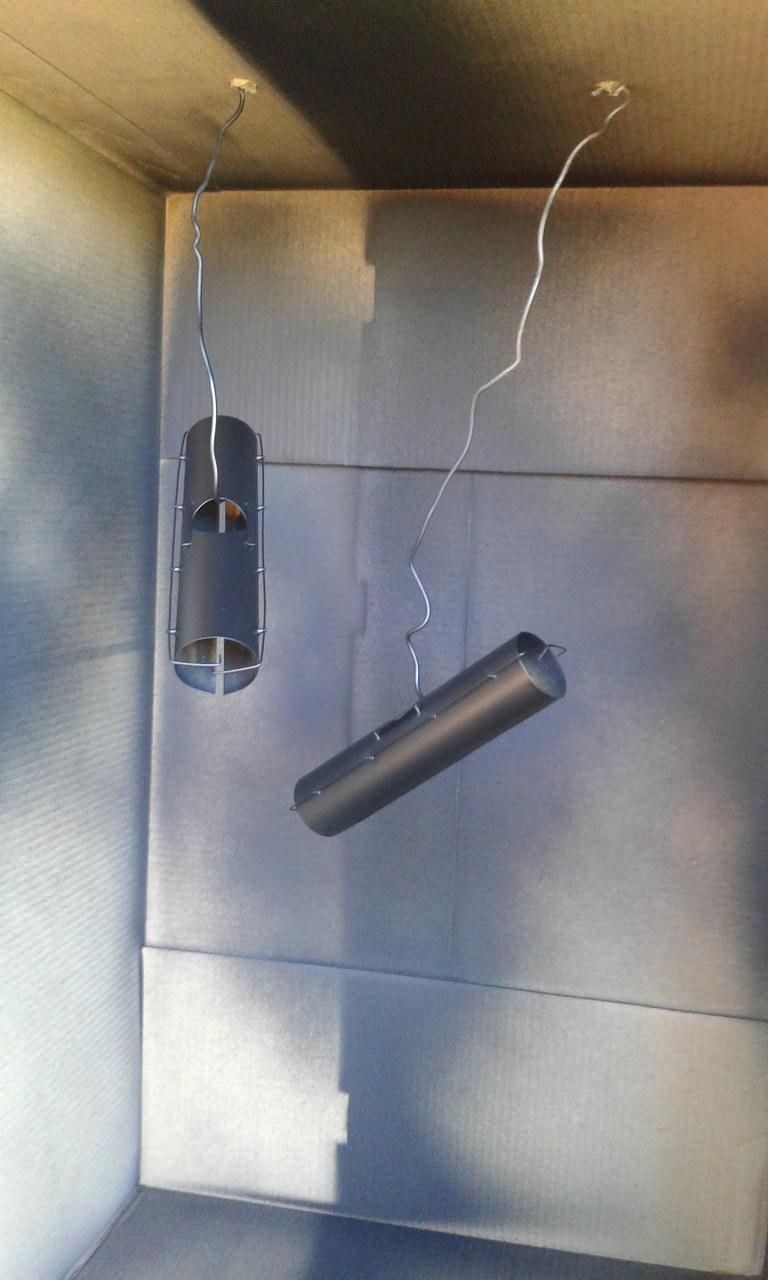
Sunshine . . . out to spray. In this rush, I see a flaw or two I'm going to need to get after. We're maybe gonna have snow tomorrow, so that was the rush.
|
|
Country: USA ~
Posts: 2087 ~
Member Since: March 16 2013 ~
Last Visit: July 05 2018
|
Alert Moderator
|
|
|
|
Posted - October 09 2017 : 1:17:26 PM
|
Snow today! So . . . I'm minimizing the amount of brushwork which means waiting for another sunny day to do much more. Use to be, I could get those Floquil paints to give a fine finish with a brush, but I haven't yet (after going on a couple of years now) found an acceptable way to thin Testors paint; some colors in particular, maybe especially the "flats". Then, trying to paint grab irons or handrails or ladders leads to little globs here and there. Not always, but often enough not to want to take the chance. Maybe someone reading this will offer me their tips for thinning Testors paints and maybe that even varies by color? Chemistry!
|
|
Country: USA ~
Posts: 2087 ~
Member Since: March 16 2013 ~
Last Visit: July 05 2018
|
Alert Moderator
|
|
|
|
Posted - October 12 2017 : 7:55:39 PM
|
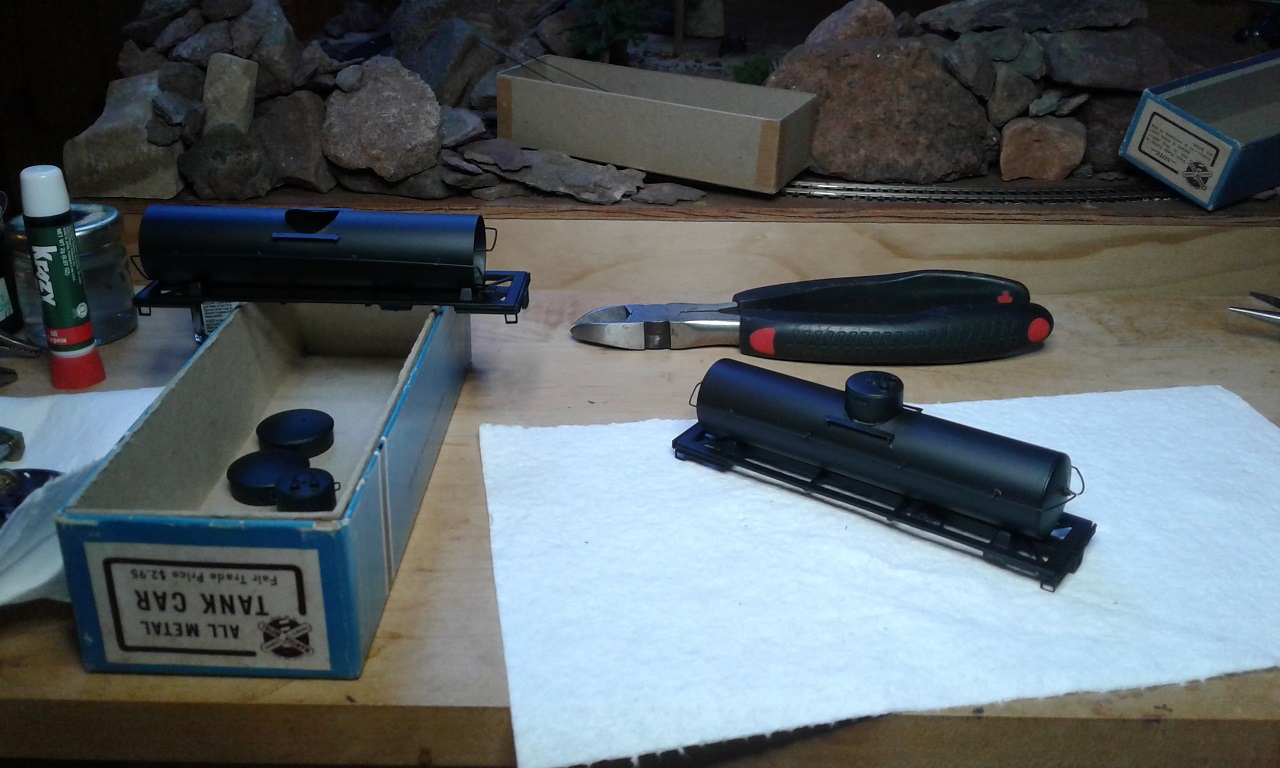
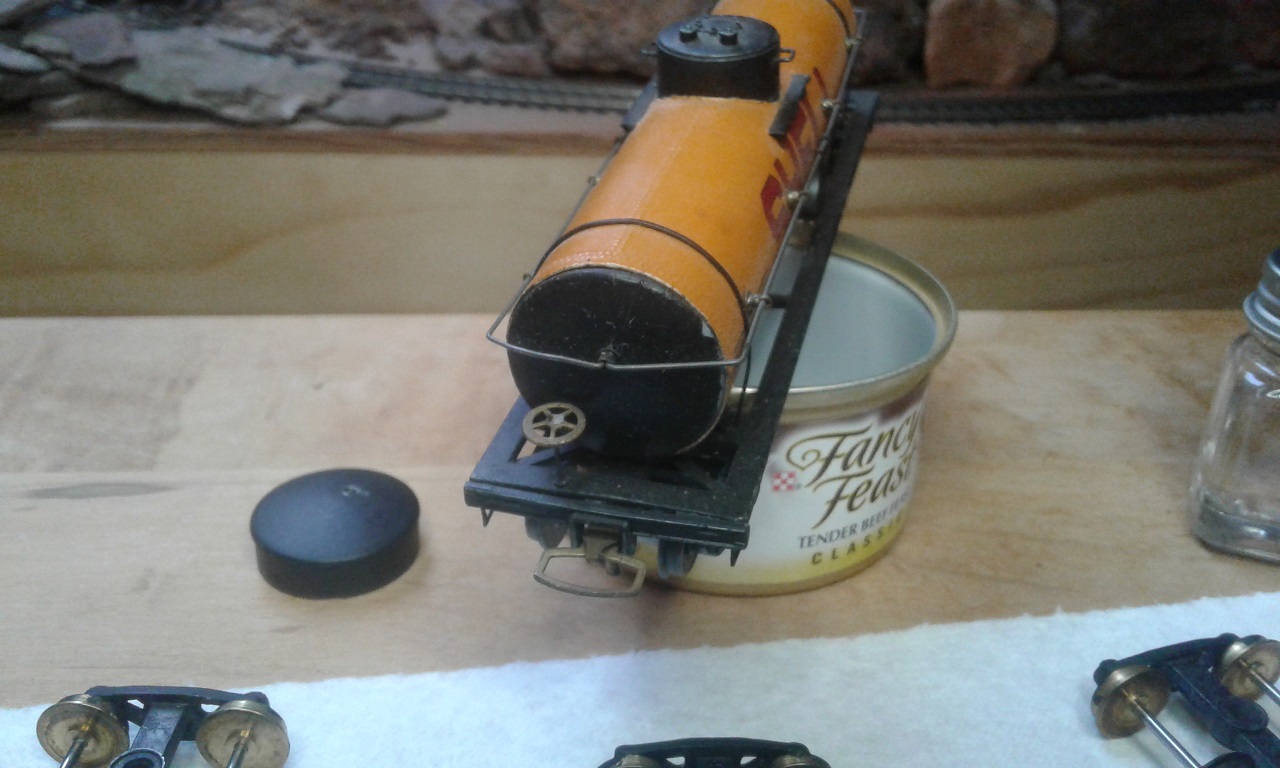
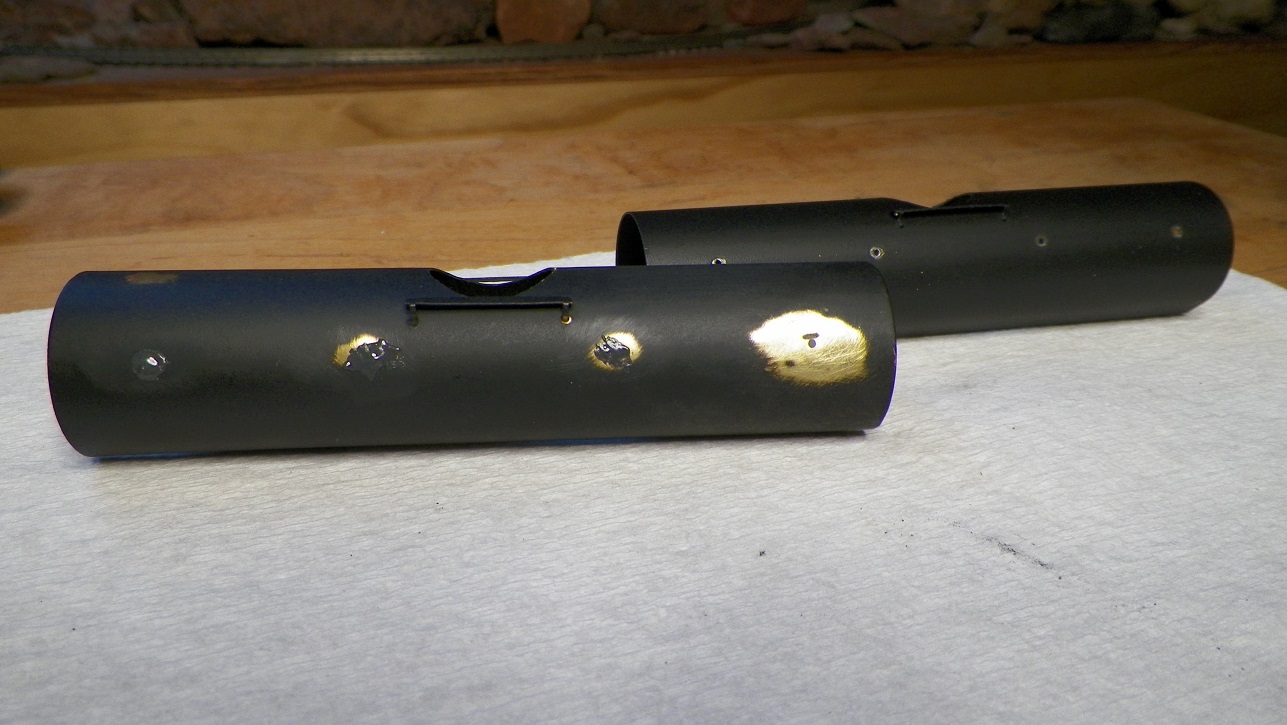
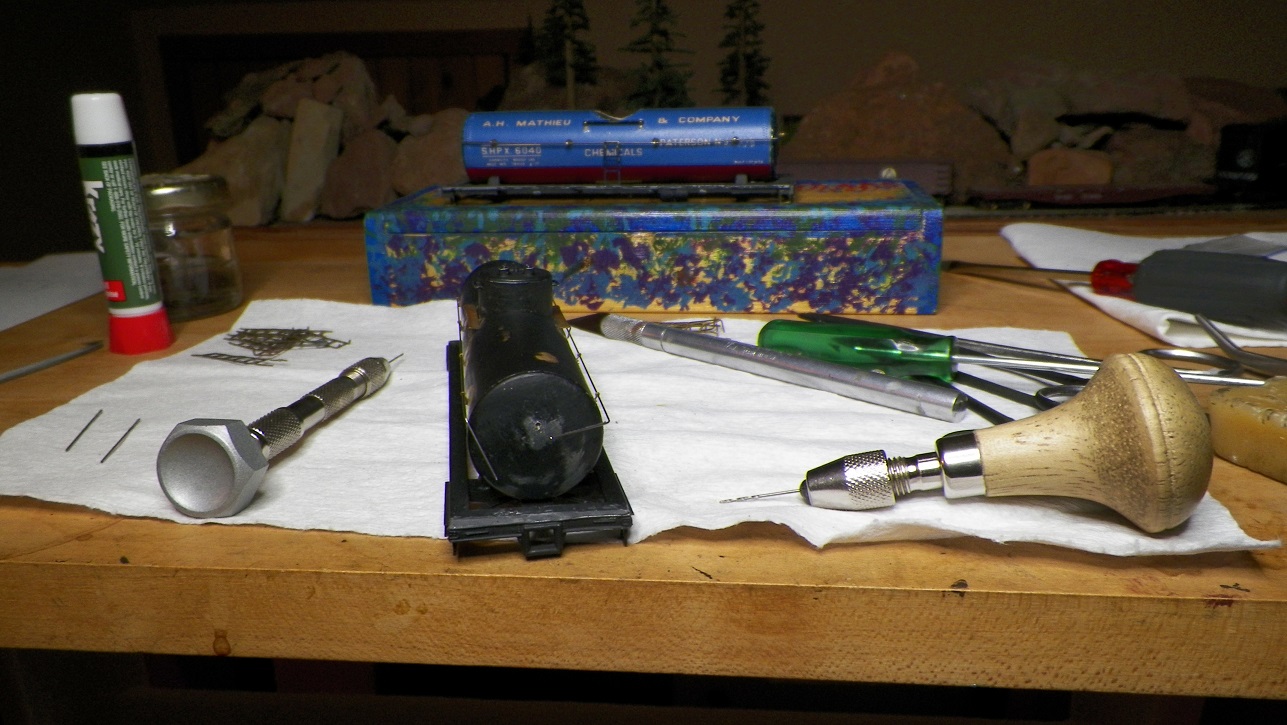
Started assembly on the most beat up one. For me, this tank car is the most tedious car I've done in a while. Thought the home made hand rail was in a decent position, but it wasn't and it's pretty much locked in place. Also, knocked a couple stanchions loose messing with the hand rails. I'm going to try and bend and trim the hand rails in place and save what's there (versus breaking off the tiny brass strip that's used for the stanchions; don't really have enough left to do all eight. I am happy, thought, that I think a flat black tank car will work for what I'm trying to image. We'll see when it's all together.
|
|
Country: USA ~
Posts: 2087 ~
Member Since: March 16 2013 ~
Last Visit: July 05 2018
|
Alert Moderator
|
|
|
|
Posted - October 12 2017 : 8:23:11 PM
|
| Another great project, Barry!
|
|
Country: USA ~
Posts: 11686 ~
Member Since: December 09 2013 ~
Last Visit: May 26 2026
|
Alert Moderator
|
|
|
|
Posted - October 12 2017 : 9:56:44 PM
|
Those are nice looking tank cars. They have nice, crisp detail and a well-scaled look about them.
Carpe Manana!
|
|
Country: USA ~
Posts: 2418 ~
Member Since: September 17 2013 ~
Last Visit: July 12 2026
|
Alert Moderator
|
|
|
|
Posted - October 13 2017 : 12:23:25 AM
|
*sticks GRAMPS on the sides* 
ok those were 3 foot gauge tank cars for the Rio Grande
but maybe do the opposite
Like GRAMS on the side 
|
|
Country: USA ~
Posts: 15032 ~
Member Since: February 23 2009 ~
Last Visit: July 14 2026
|
Alert Moderator
|
|
|
|
Posted - October 13 2017 : 07:33:55 AM
|
Lookin' good, Barry! Keep up the great work. 
"Let your light so shine before men, that they may see your good works, and glorify your Father which is in Heaven." - Matthew 5:16
Youtube Channel: www.youtube.com/rpmodelrailroads
Instagram: https://www.instagram.com/rp_model_railroads/
|
|
Country: USA ~
Posts: 4669 ~
Member Since: August 11 2017 ~
Last Visit: July 20 2023
|
Alert Moderator
|
|
|
|
Posted - October 14 2017 : 03:14:48 AM
|
| These cars are really coming along nicely. I'm learning a lot following these threads on the various projects, the lessons learned and suggestions from other members. Keep up the great work Barry, Srenchin and other members.
|
|
Country: USA ~
Posts: 553 ~
Member Since: February 18 2013 ~
Last Visit: January 01 2026
|
Alert Moderator
|
|
|
|
Posted - October 14 2017 : 2:51:59 PM
|
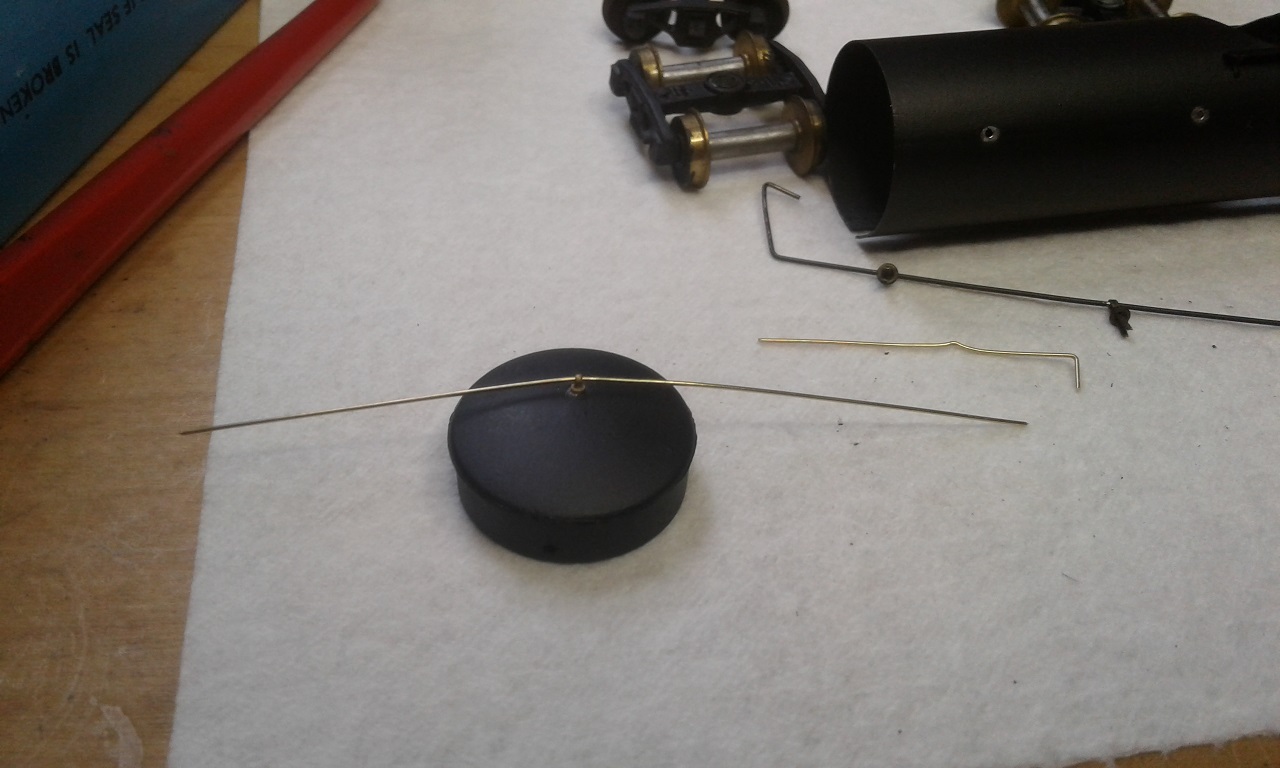
Practice. That's what this is. I've discovered at least a couple of mistakes I've made upon assembling this first car. One is that I should not have painted it until the tank ends were in place and the hand rails were all the way around. The second is that I probably should have fashioned the hand rails I needed to make out of steel wire instead of brass. I think those little hand made stanchions cut into the brass wire making it impossible to adjust. So the tank assembly on the towel (with the sanded spots) is the one with the brass wire that's been manipulated probably about to the point of "too much". The tank assembly resting on the kit box has the factory steel hand rail wires which where fairly easy to adjust position of even after being painted.

|
|
Country: USA ~
Posts: 2087 ~
Member Since: March 16 2013 ~
Last Visit: July 05 2018
|
Alert Moderator
|
|
|
|
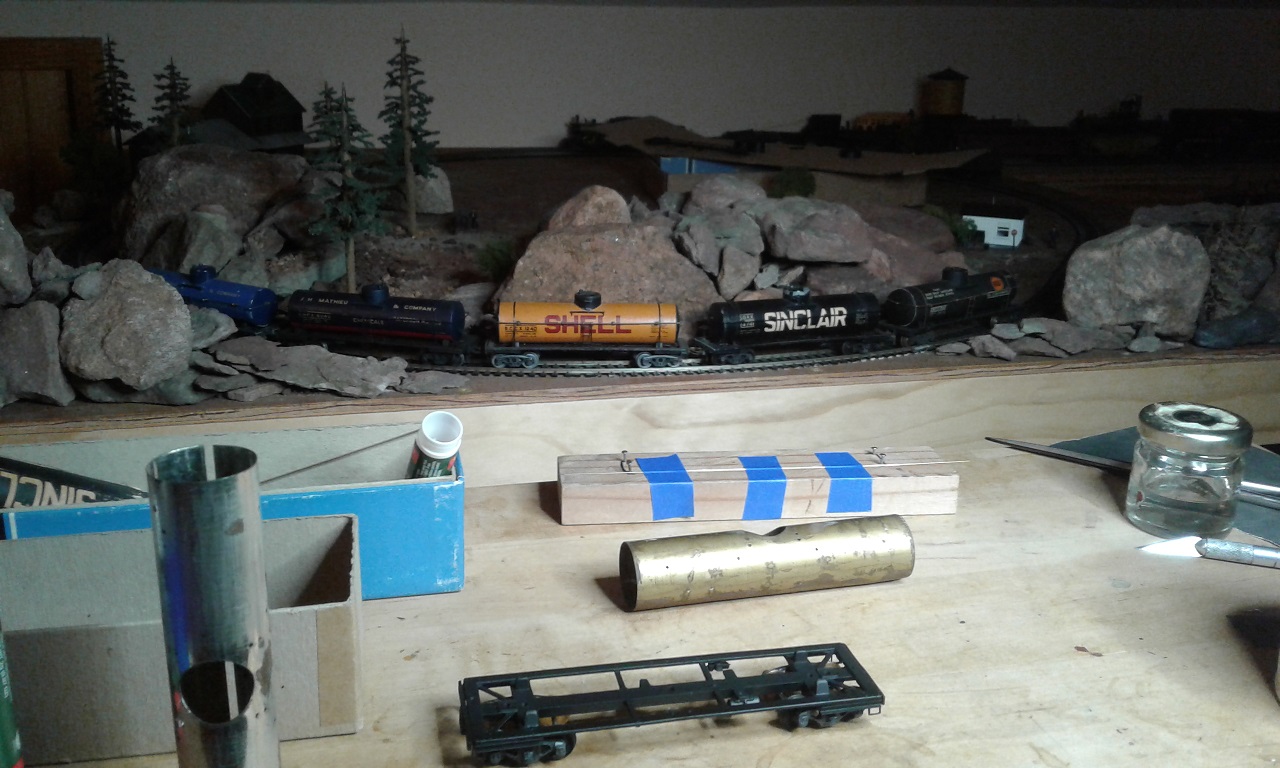
Posted - October 16 2017 : 1:47:11 PM
|
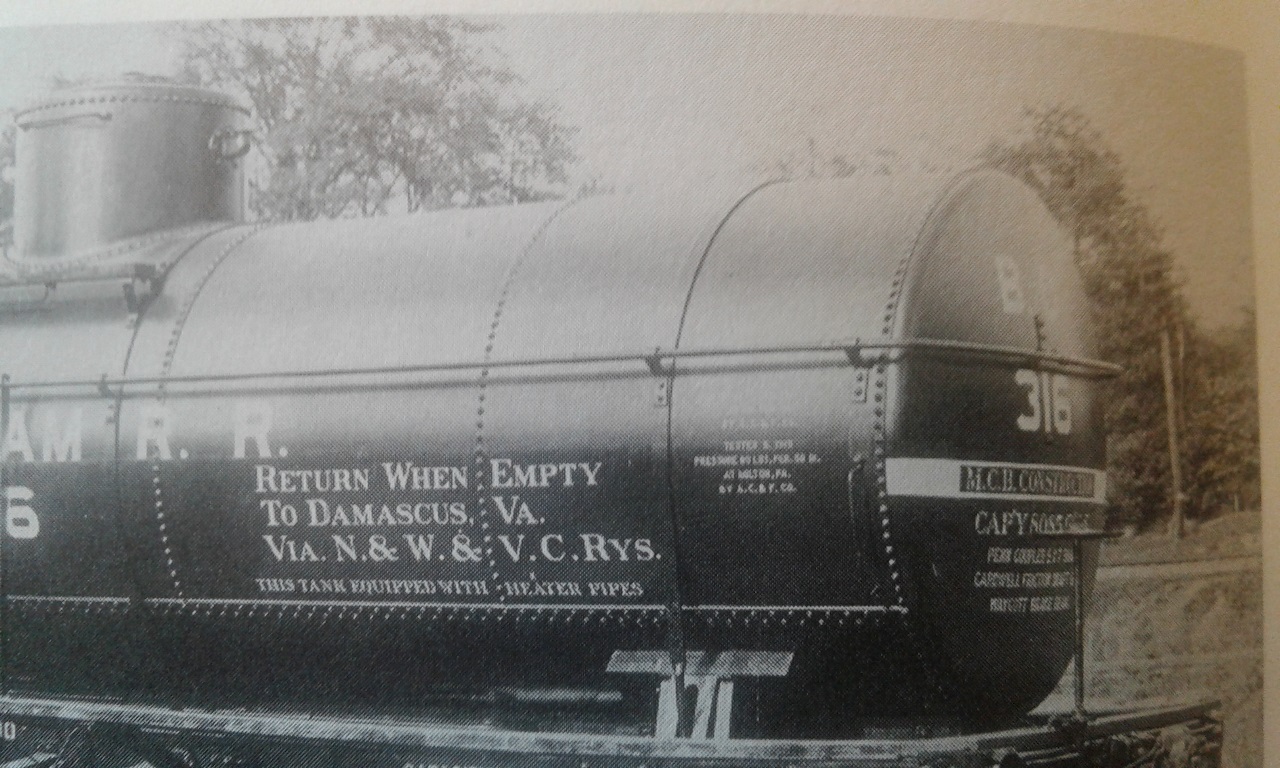
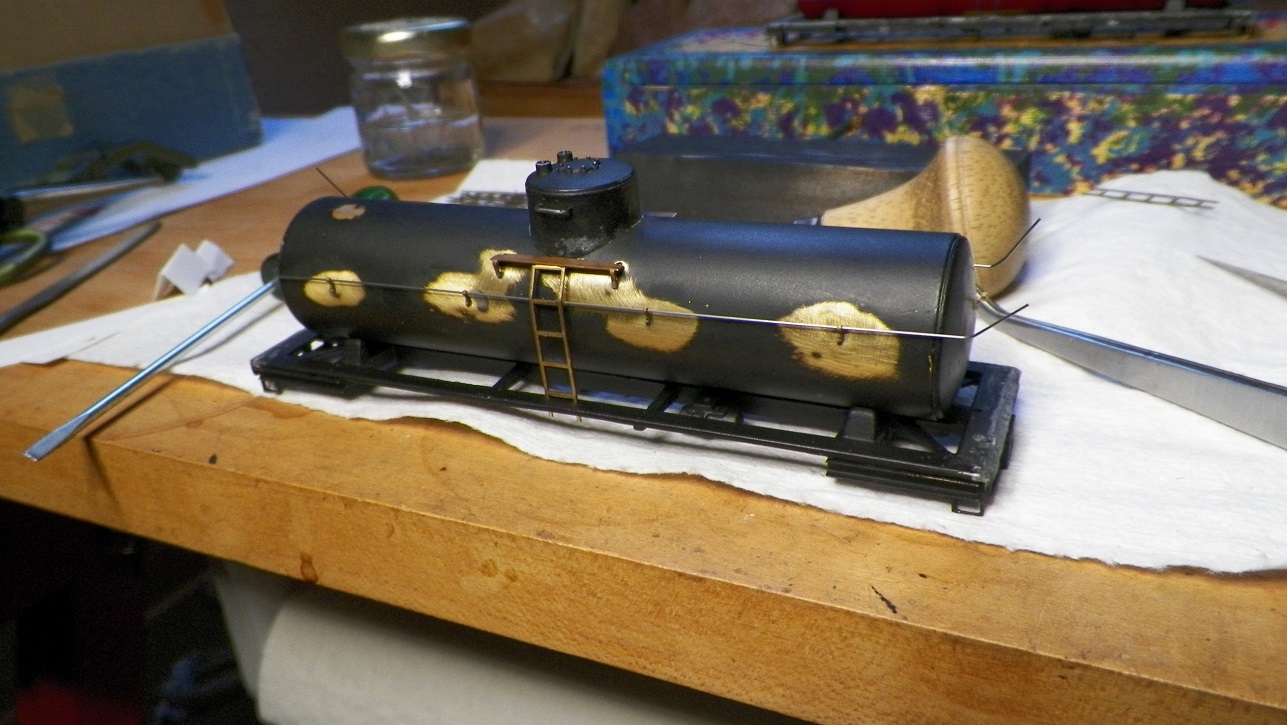
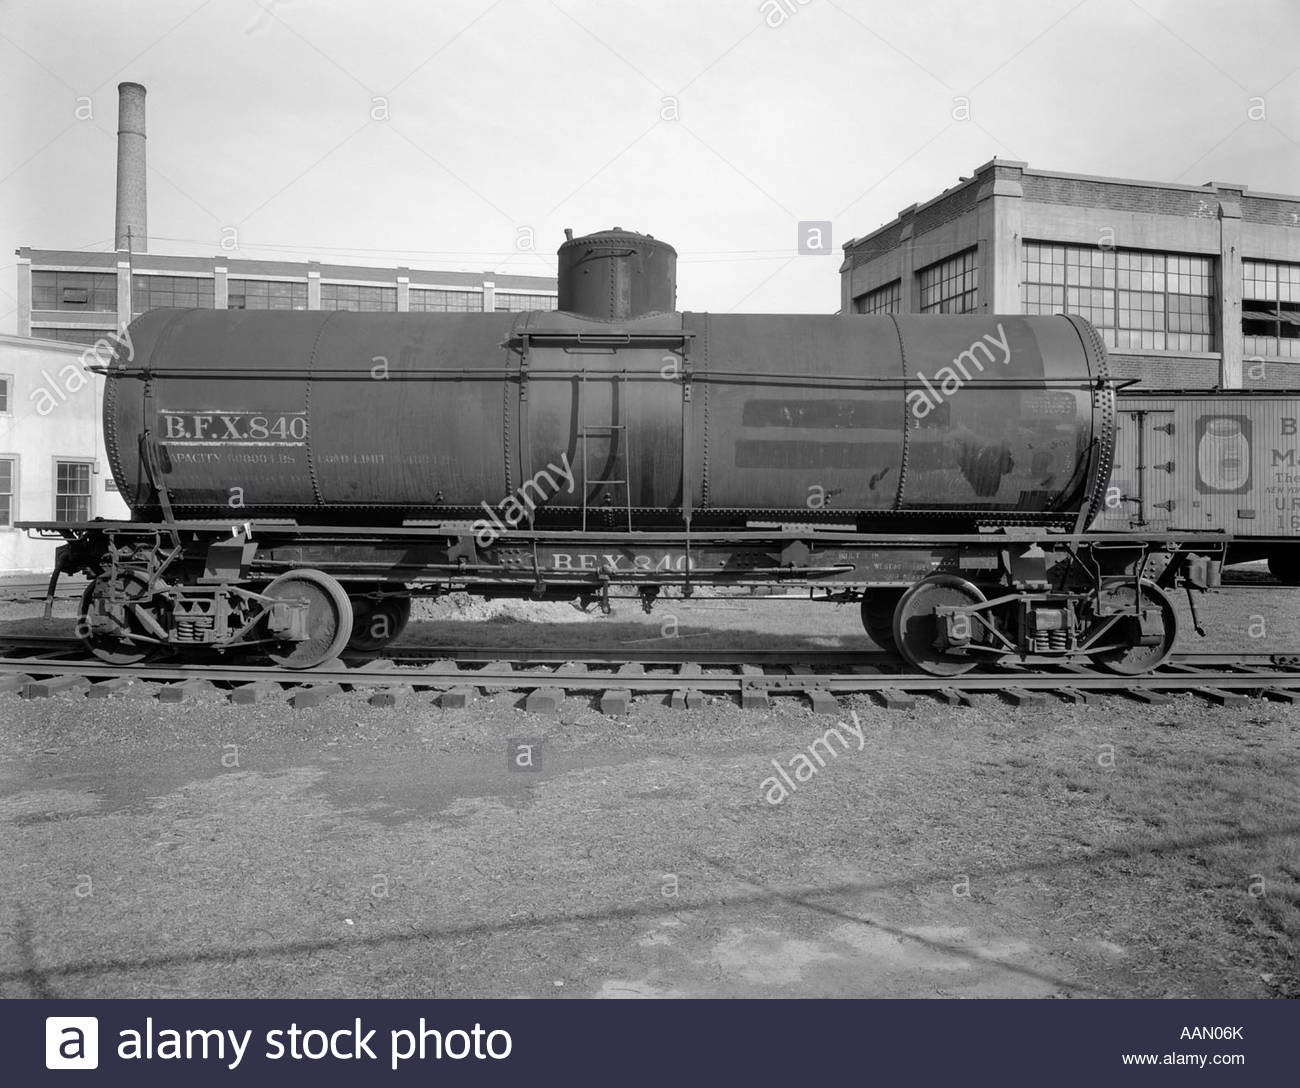
This first photo shows the work done by a modeler of maybe 50 years ago. I'm looking at the way the hand rails are brought together in the middle of the end. I consider this example pretty darn tidy compared to the mess I was making.
Being dissatisfied with my ability to get things at least that tidy, I pulled everything apart. After looking at a bunch of prototype tank cars (just got a neat book from the library about ACF with many photos of tank cars they produced over the years), and also looking at an array of model tank cars, I do believe the Mantua Metal Products model can be improved on without destroying the integrity of the model should some purest in the future want to return it to it's factory design (more likely it will end up in someone's trash can when the kids are going through my stuff post-mortem). I didn't see any recent plastic models that didn't look garish. When I looked at the brass models, they all seemed to use molded stanchions.
My next step then is to try molded stanchions and connect the handrails in one of the stanchions along the side of the tank, rather than the end. The straight out stanchions are not prototype, but I believe they will look tidier and fit the hand rails a little more closely to the tank and a little more scale.
The last photo is from the book American Car & Foundry Company by Kaminski. If anyone knows where brackets like those in the ACF photo can be found, I would love to know. I briefly thought of trying to make something like that, but getting 10 of those tiny things to be uniform and not be a mess . . .
Probably wont be doing much more until the stanchions arrive.
|
|
Country: USA ~
Posts: 2087 ~
Member Since: March 16 2013 ~
Last Visit: July 05 2018
|
Alert Moderator
|
|
|
|
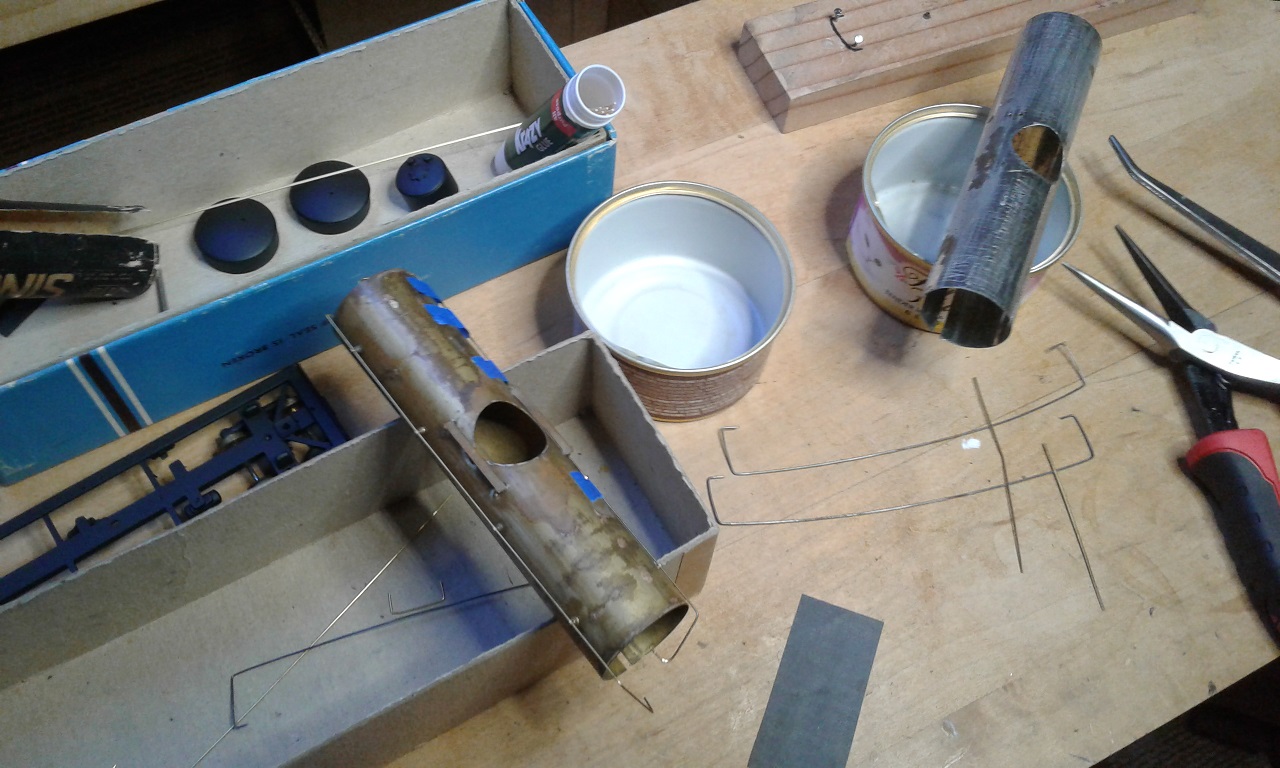
Posted - October 30 2017 : 1:39:33 PM
|
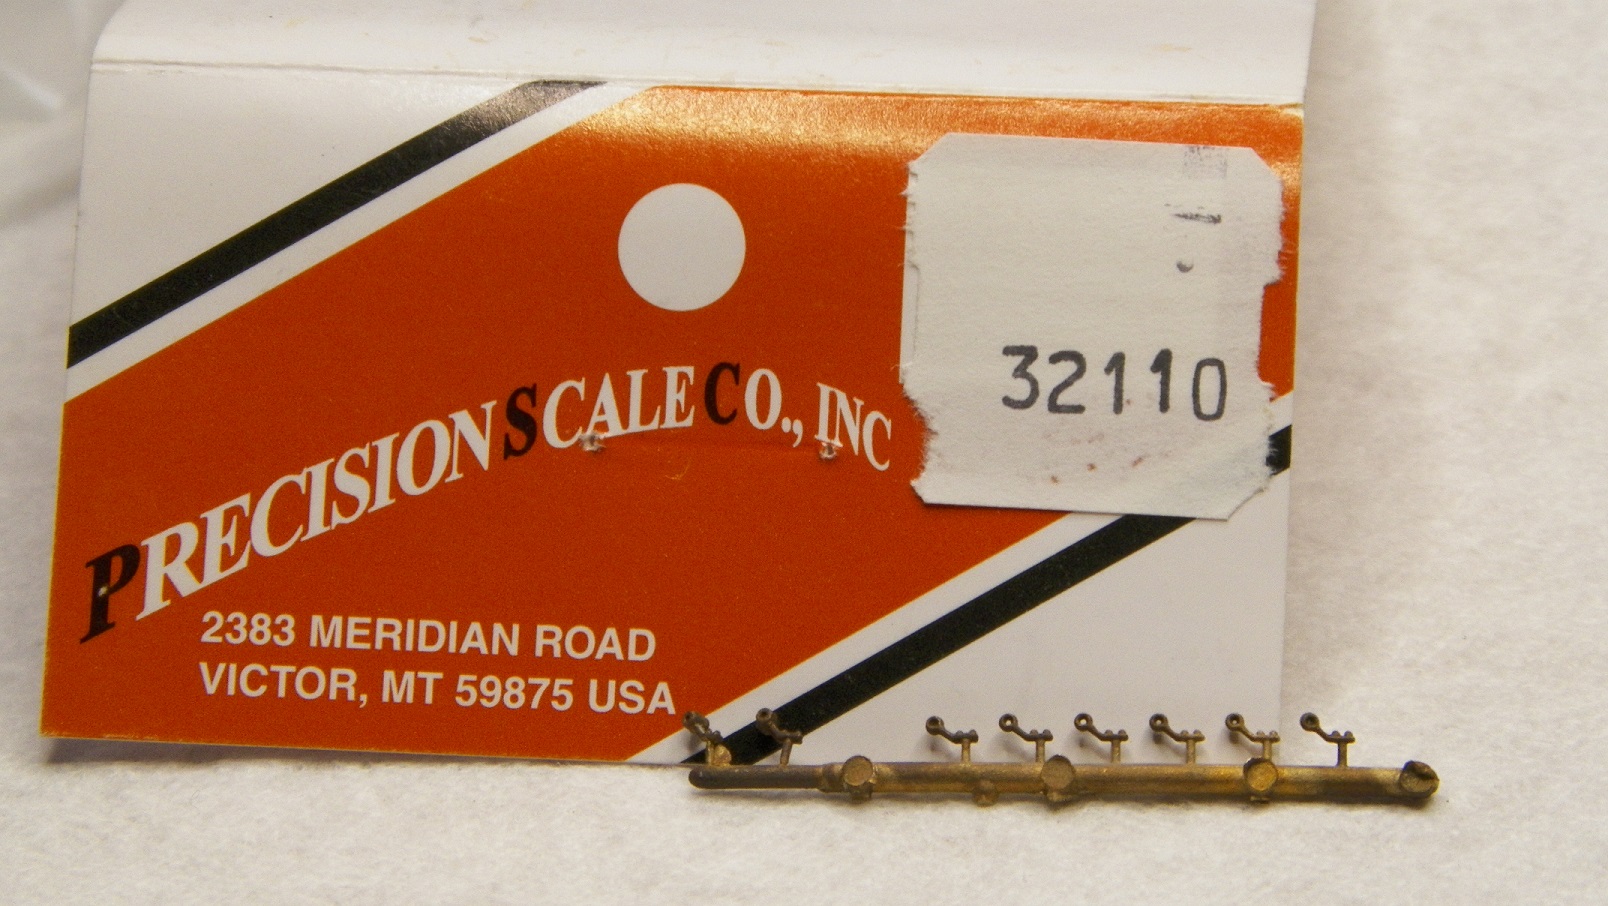
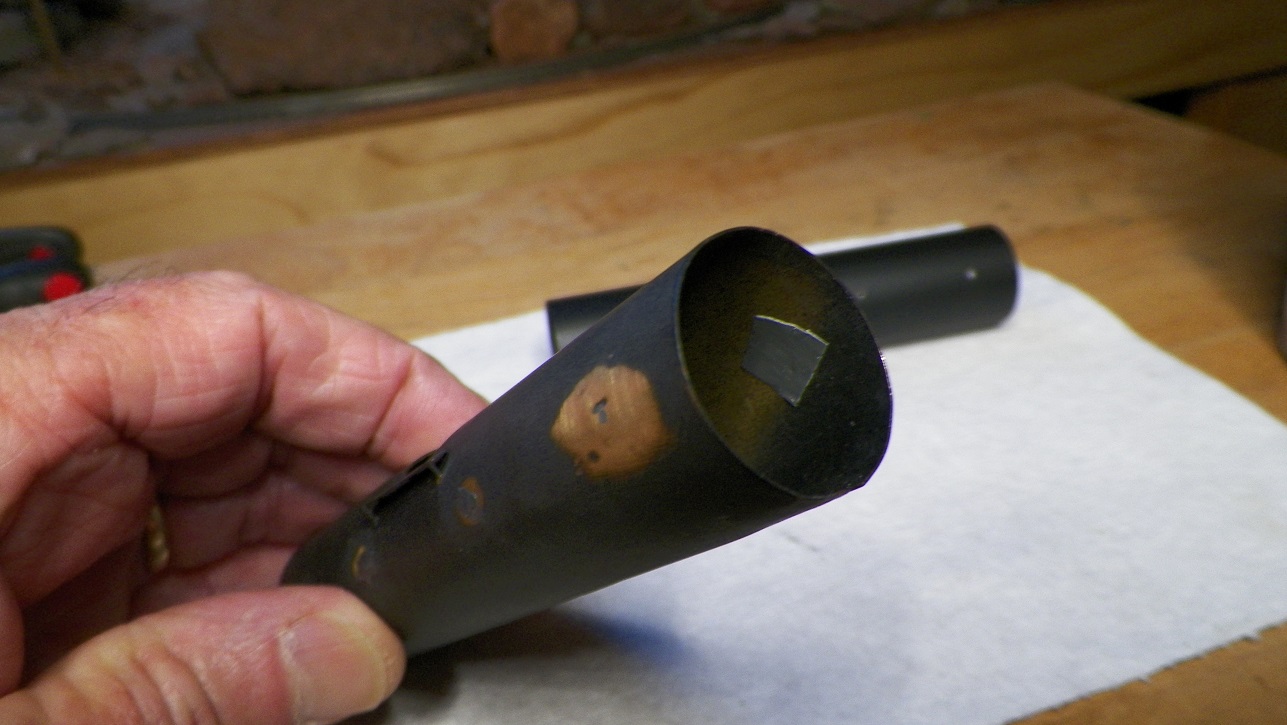
Received some Precision Scale tank car handrail brackets today. They are TINY! Not sure what to think of them yet. I white-glued one in place to check the scale. That's maybe not so bad, but trying to pass a wire . . . the smallest I have this morning is .015 and that's a bit too big. Seems like any tinier wire is going to be bent all over the place between stanchions? Maybe drill the orifice out a bit larger? I do have regular stanchions, but pretty much all the vintage photos I see show brackets like these. So a couple of photos for entertainment . . .
|
|
Country: USA ~
Posts: 2087 ~
Member Since: March 16 2013 ~
Last Visit: July 05 2018
|
Alert Moderator
|
|
|
|
Posted - October 30 2017 : 1:42:23 PM
|
| And now I see I glued it on upside down compared to the vintage photo above. Good I took a photo I guess; keep me on the straight and narrow.
|
|
Country: USA ~
Posts: 2087 ~
Member Since: March 16 2013 ~
Last Visit: July 05 2018
|
Alert Moderator
|
|
|
|
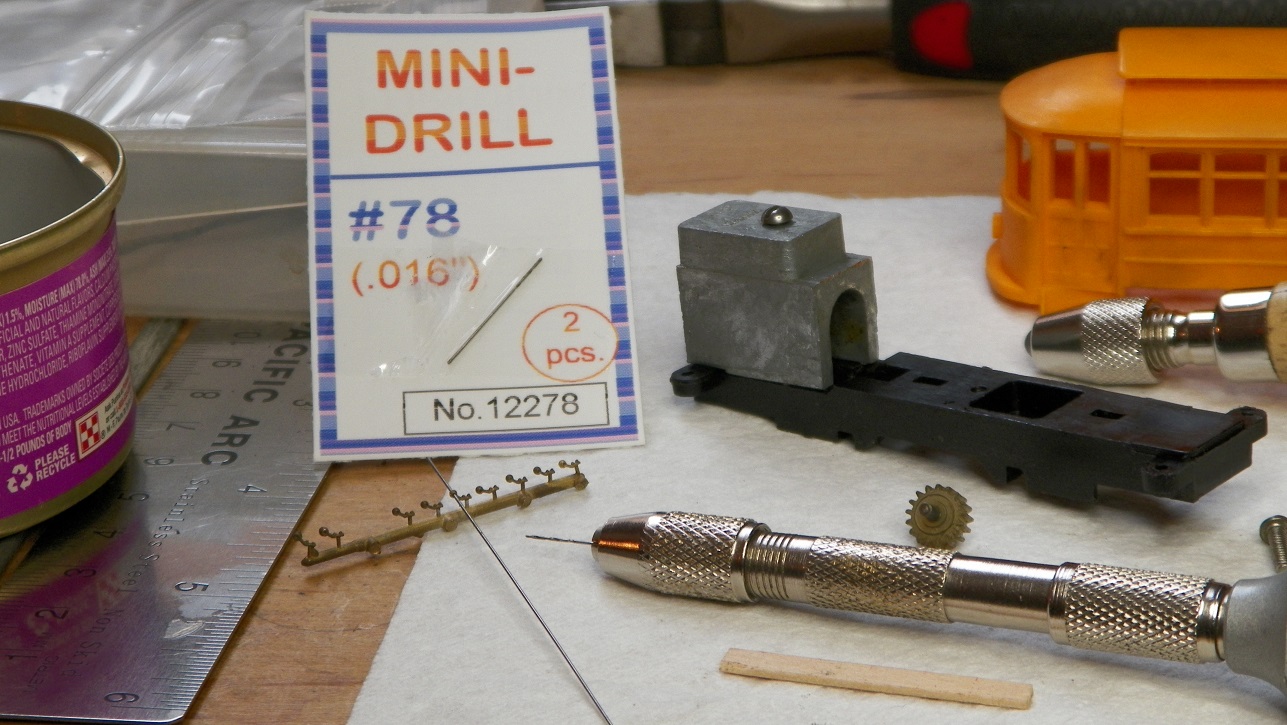
Posted - October 31 2017 : 6:00:30 PM
|
A trip to Hobby Town this morning yielded a #78 wire drill . . . the last one. And, it turned out to be just the right size to bore out the orifices of the handrail brackets to be able to accept a 0.015 wire. That is pretty tiny, but in HO scale (if my calculations are correct) it is still about an inch in diameter. "We'll see", hey?
|
|
Country: USA ~
Posts: 2087 ~
Member Since: March 16 2013 ~
Last Visit: July 05 2018
|
Alert Moderator
|
|
|
|
Posted - October 31 2017 : 11:47:19 PM
|
Looks like you're going all out and doing it up right. These are going to be pretty sweet models.
Carpe Manana!
|
|
Country: USA ~
Posts: 2418 ~
Member Since: September 17 2013 ~
Last Visit: July 12 2026
|
Alert Moderator
|
|
|
|
Posted - November 01 2017 : 08:41:05 AM
|
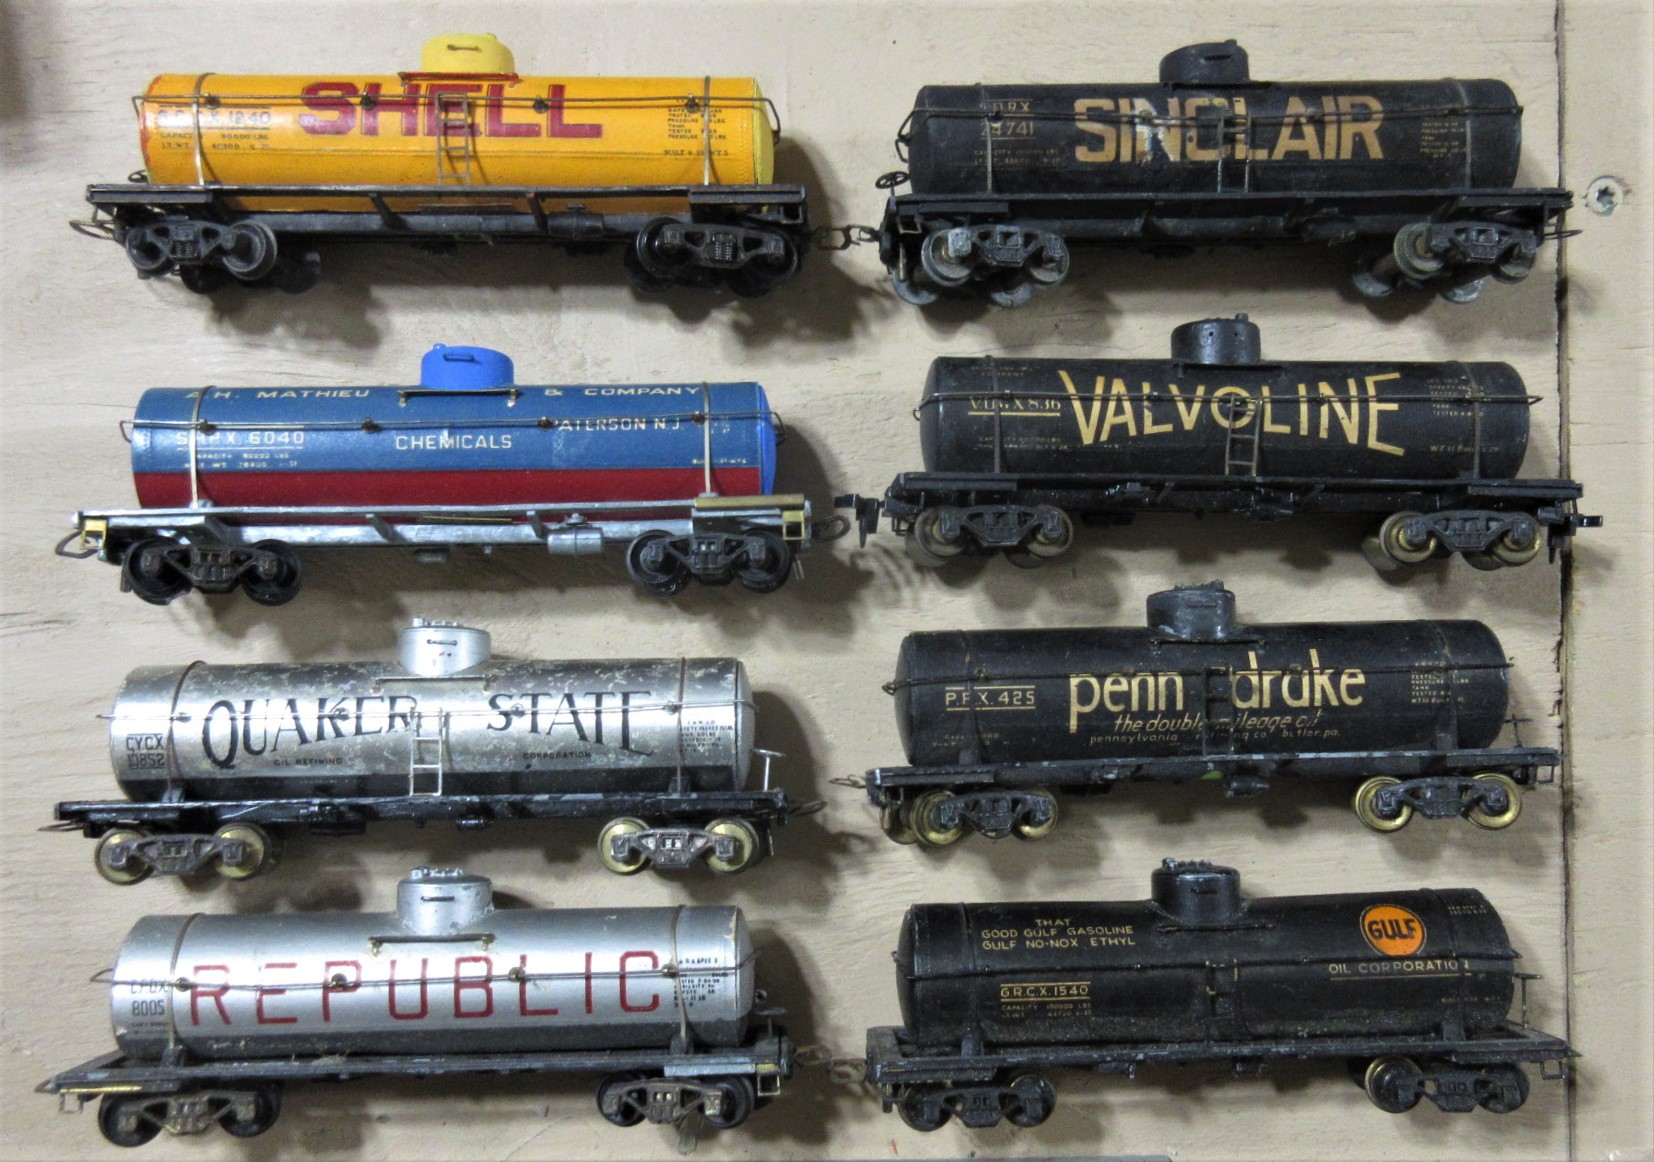
* These are very interesting tank cars to me also. In 1941 there were 8 different ones. In 1942 there were 12 tank cars. A 1947 catalog shows 12 again just one was different. The standard oil tank was replaced with UTLX. So there are 13 different tank cars made. I don't have Texaco, Standard Oil, Deep-Roc, General American, UTLX. These catalogs are to be found in HOseeker. A great place for locating HO information.
* The list of Road names is;
1- Gulf, 2- Texaco, 3- Standard Oil, 4- Deep Rock, 5- Republic Oil, 6- Valvoline, 7- Sinclair, 8- Mathien, 9- General American, 10- Shell, 11- Penn-Drake, 12- Quaker State, 13- U.T.L.X.
frank
toptrain
" It's a Heck of a Day " !!!
Edited by - toptrain on November 01 2017 2:54:35 PM
|
|
Country: USA ~
Posts: 7539 ~
Member Since: August 07 2008 ~
Last Visit: June 22 2026
|
Alert Moderator
|
|
|
|
Posted - November 01 2017 : 10:41:57 AM
|
| Thanks for compiling those road names Frank. I do use www.hoseeker.net as a reference. And it is still a very much alive site. I contributed instructions for the Busy Bee not long ago which they hadn't had.
|
|
Country: USA ~
Posts: 2087 ~
Member Since: March 16 2013 ~
Last Visit: July 05 2018
|
Alert Moderator
|
|
|
|
Posted - November 01 2017 : 2:20:08 PM
|
** Barry, I enjoyed posting it. I have posted a photo here of the 8 of them I have. It would be nice if someone said they had spares of ones I don't have. I don't have Texaco, Standard Oil, Deep-Roc, General American, UTLX.
frank
toptrain
" It's a Heck of a Day " !!!
Edited by - toptrain on November 01 2017 3:04:07 PM
|
|
Country: USA ~
Posts: 7539 ~
Member Since: August 07 2008 ~
Last Visit: June 22 2026
|
Alert Moderator
|
|
|
|
Posted - November 05 2017 : 12:08:55 PM
|
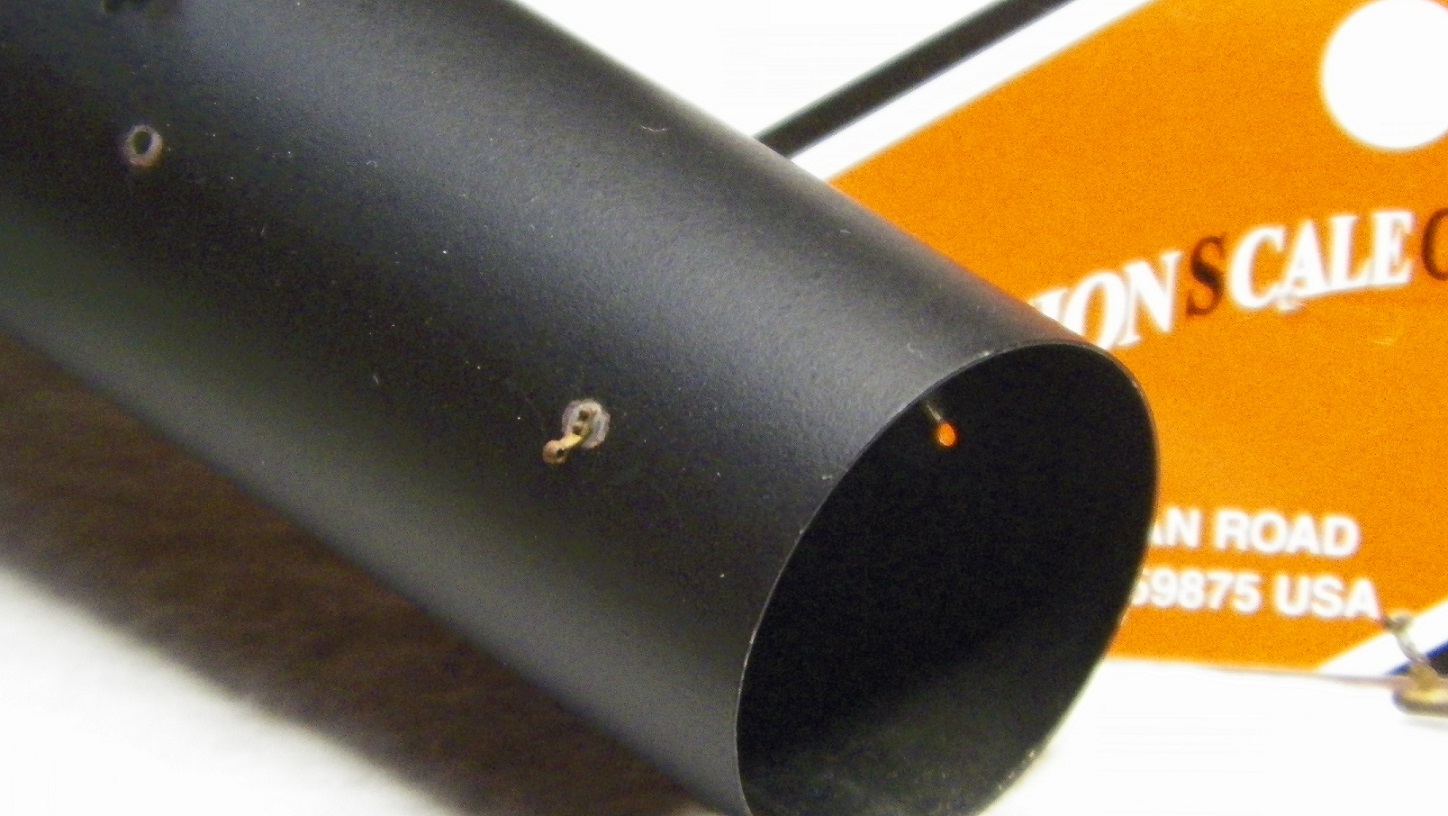
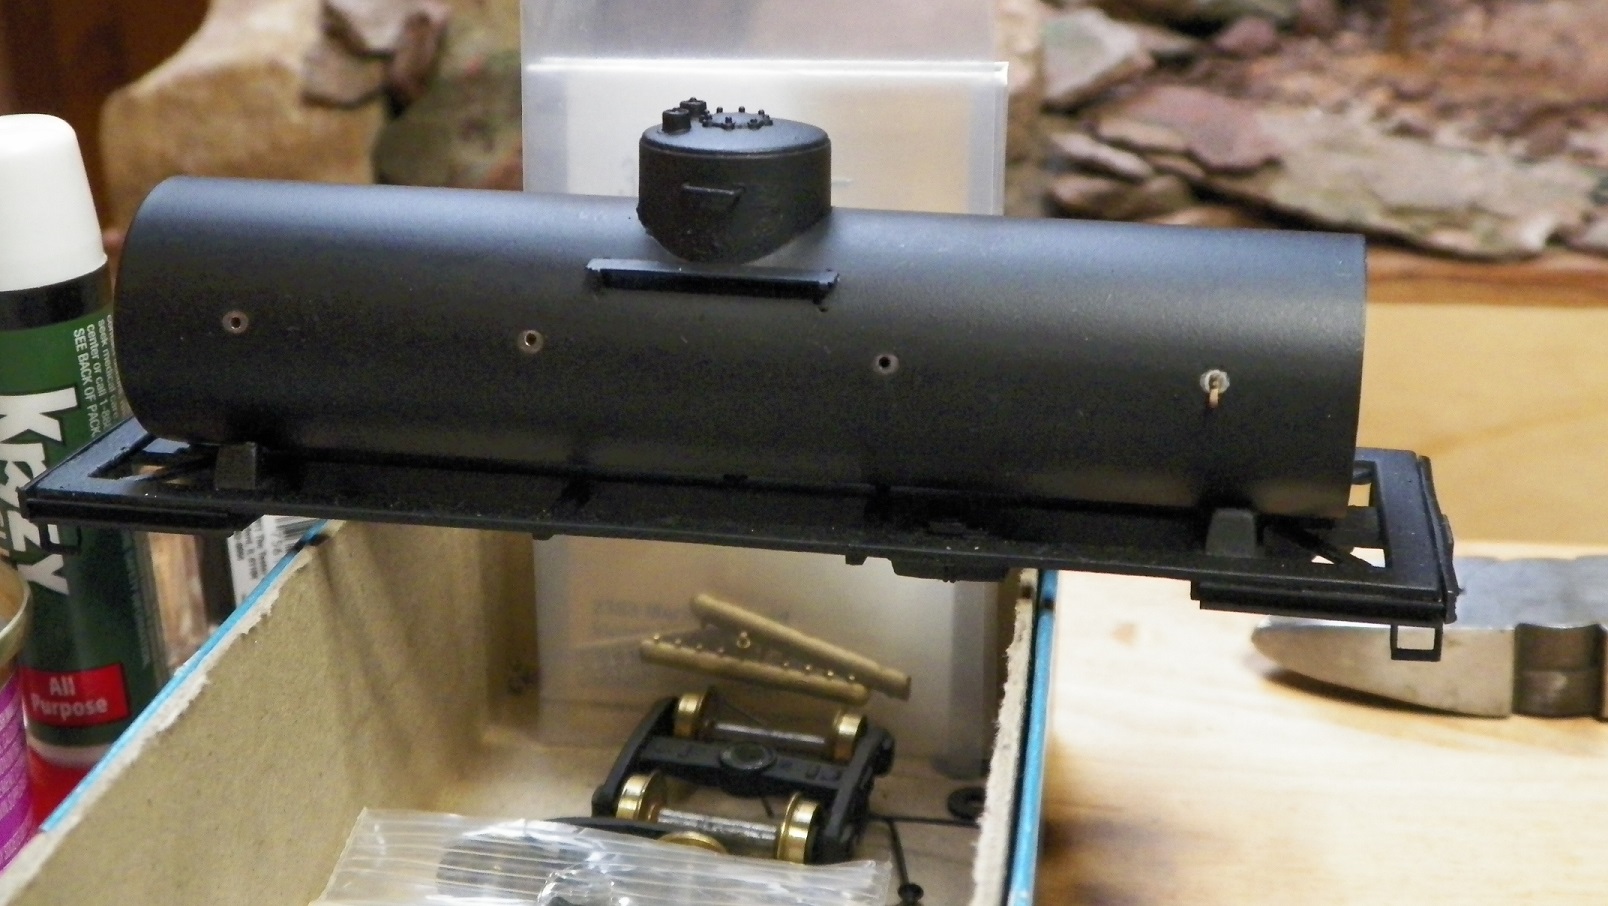
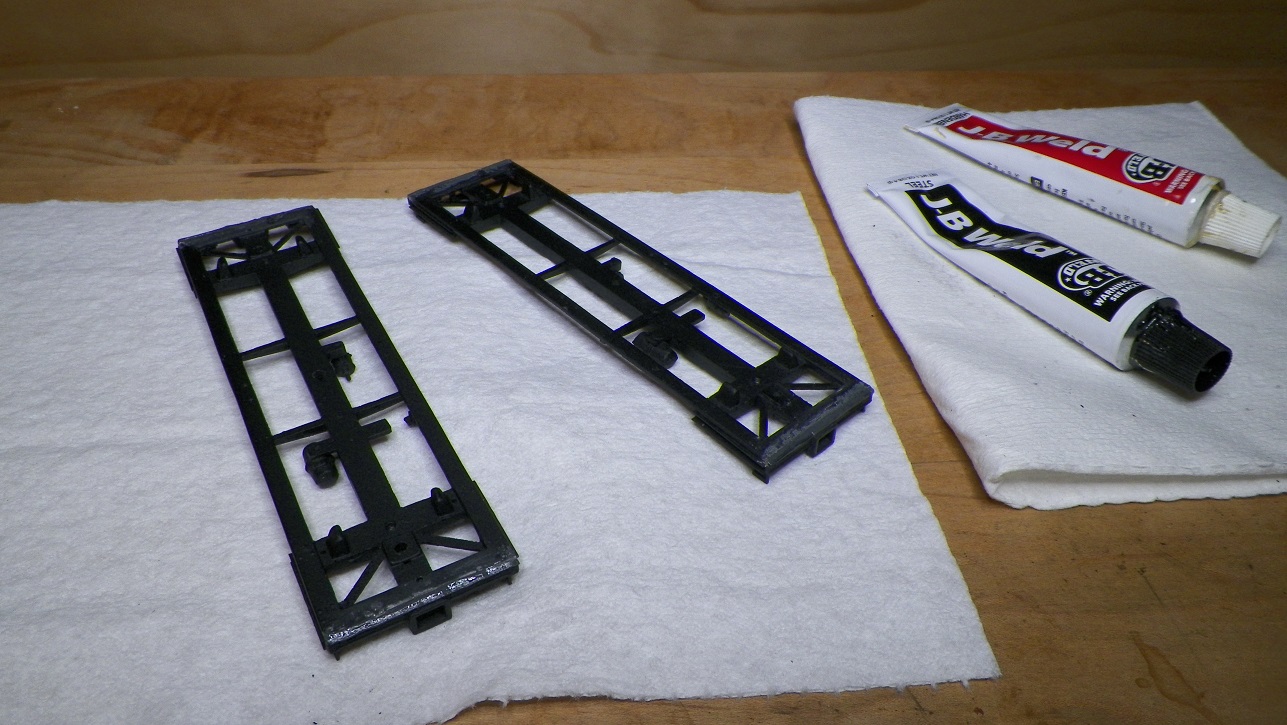
Well this project is moving right along, hey? Waiting for some drill bits to arrive to complete boring out the handrail brackets. The handrail brackets included some that were a bit thicker or wider so the drilling with these little "needles" makes you wonder at times if they're really removing any metal. Got the narrower ones done that will run along the sides, but the thicker ones at the end is where I'm planning to hide the "ends" of the handrails. So I have a pack of 10 #78 bits coming; hoping that a bunch of fresh bits will get through those end brackets in a couple of hours. Ha! In the meantime, I decided to go ahead and fill and re-drill the bracket mount holes. The factory holes were about twice as large as need be. With extremely careful placement, I might have been able to make certain the hole wasn't exposed, but that seemed pretty sketchy. So, a little duct tape backing and JB Weld as a filler . . .
|
|
Country: USA ~
Posts: 2087 ~
Member Since: March 16 2013 ~
Last Visit: July 05 2018
|
Alert Moderator
|
|
|
|
Posted - November 05 2017 : 1:43:48 PM
|
Lookin' good, Barry! Keep up the great work. :)
"Let your light so shine before men, that they may see your good works, and glorify your Father which is in Heaven." - Matthew 5:16
Youtube Channel: www.youtube.com/rpmodelrailroads
Instagram: https://www.instagram.com/rp_model_railroads/
|
|
Country: USA ~
Posts: 4669 ~
Member Since: August 11 2017 ~
Last Visit: July 20 2023
|
Alert Moderator
|
|
|
|
Posted - November 08 2017 : 6:24:48 PM
|
Got those little drill bits and was able to get through all the brackets and filled holes. Seems a fine line between perseverance, technique and magic. The real trick is coming . . . and that is to try and get two pieces of wire to meet up nice and tidy inside one of the thicker brackets that will be on the end. That is the plan. We'll see . . . [forgot I had to fill the bracket mounting holes in the end pieces as well, and the other tank car shell]

|
|
Country: USA ~
Posts: 2087 ~
Member Since: March 16 2013 ~
Last Visit: July 05 2018
|
Alert Moderator
|
|
|
|
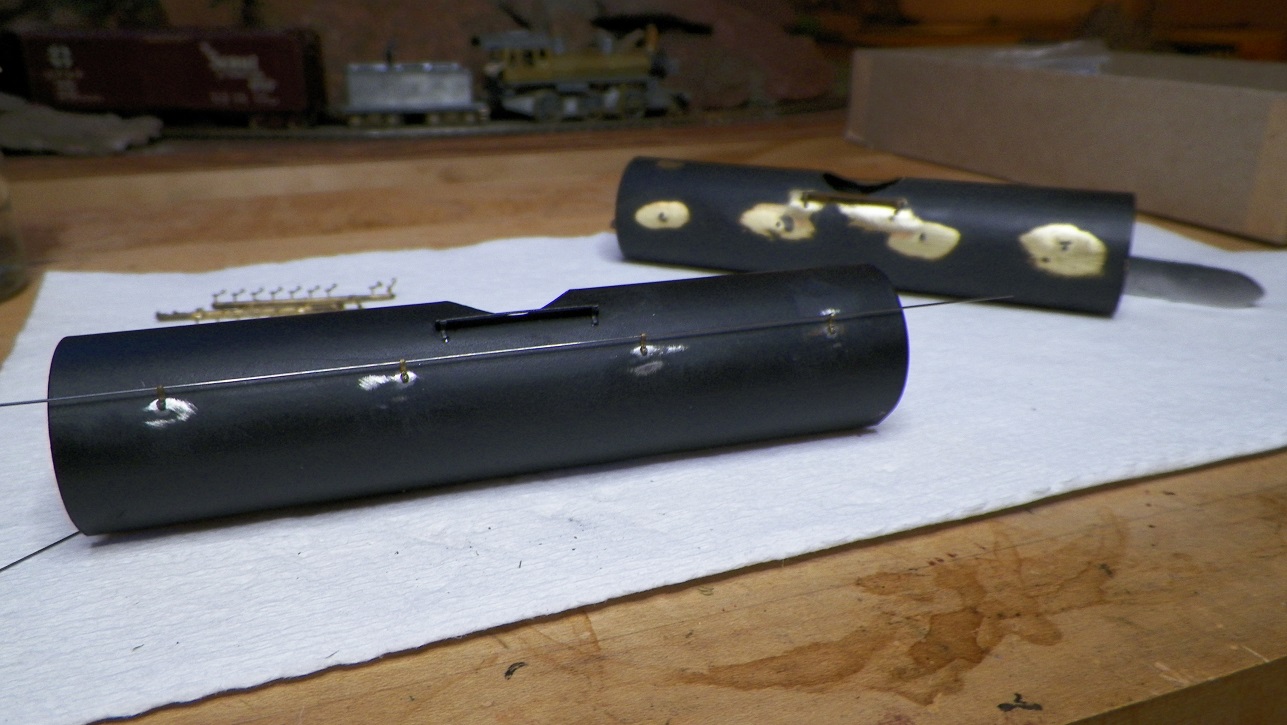
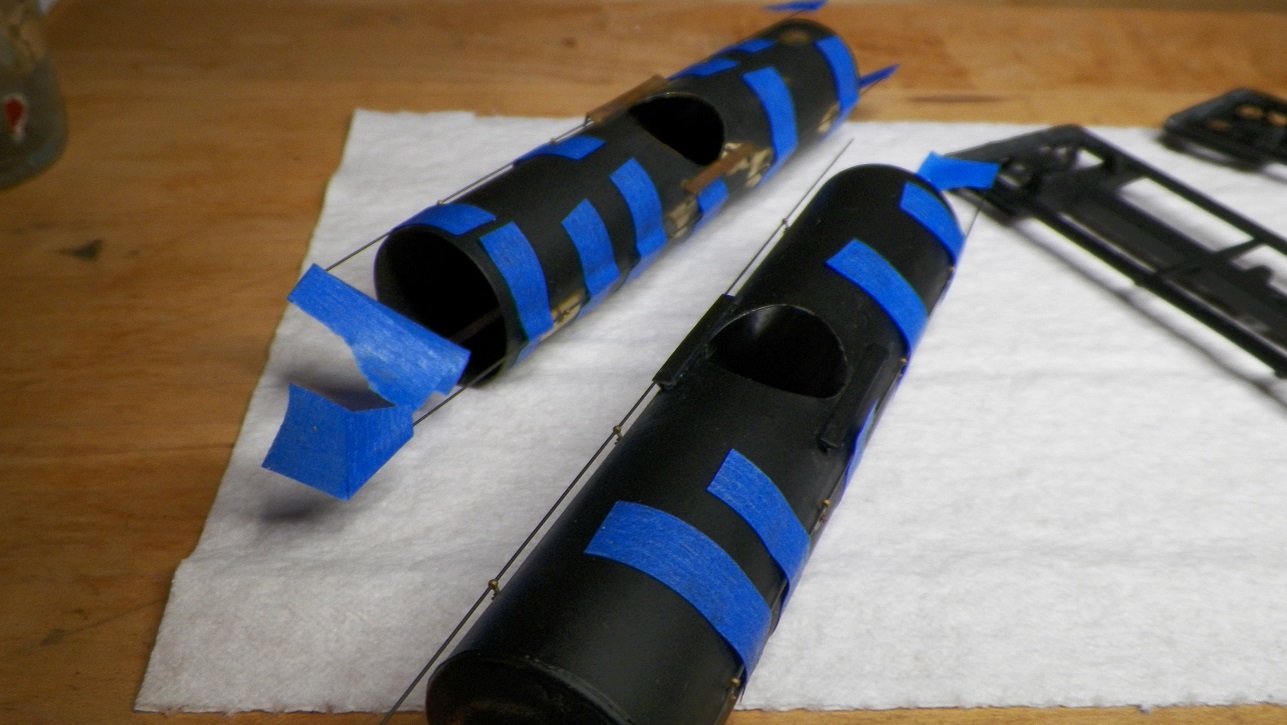
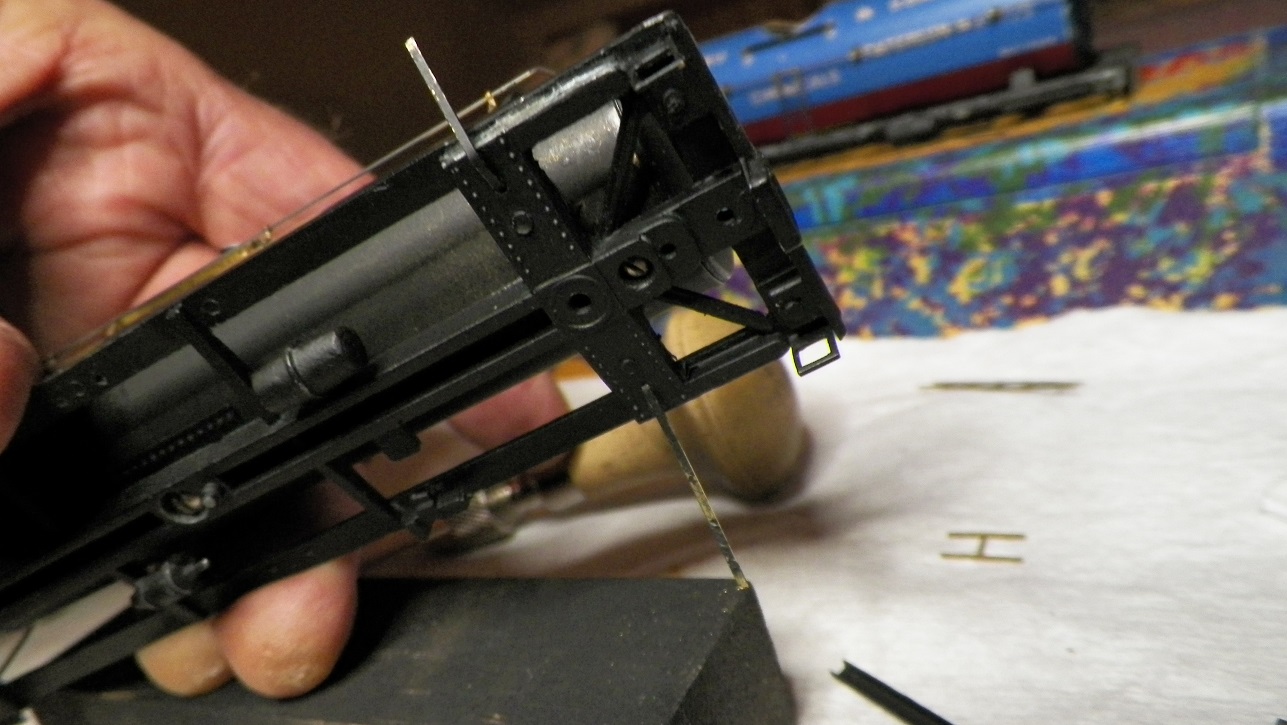
Posted - November 20 2017 : 8:08:26 PM
|
Finally jumped into the cold water and tried my hand at placing and supergluing some brackets in place. Lost two brackets in the carpet; need to settle it down a bit. And did some rehab on the tank platform on the other car.
|
|
Country: USA ~
Posts: 2087 ~
Member Since: March 16 2013 ~
Last Visit: July 05 2018
|
Alert Moderator
|
|
|
|
Posted - November 21 2017 : 12:56:30 PM
|
Here in lies the challenge. Doesn't look like that much when magnified. "We'll see."
|
|
Country: USA ~
Posts: 2087 ~
Member Since: March 16 2013 ~
Last Visit: July 05 2018
|
Alert Moderator
|
|
|
|
Posted - November 21 2017 : 2:17:57 PM
|
I wonder if the ends of the wires could be spliced more sturdily in the bracket if they were filed diagonally so the angled ends overlapped a bit in the bracket. It would be a fussy job to get the filed surfaces face to face and just the right distance from the corner of the tank to meet in the middle, but maybe no harder than getting them to butt up end to end within the short hole through the bracket.
Carpe Manana!
|
|
Country: USA ~
Posts: 2418 ~
Member Since: September 17 2013 ~
Last Visit: July 12 2026
|
Alert Moderator
|
|
|
|
Posted - November 21 2017 : 8:04:01 PM
|
| That's a good thought Don, because, I'm thinking if I am lucky enough to get them each a limited tolerance length so they both fit in the end bracket, it will make the fit more tolerant if the ends are tapered. What I'm using is steel wire, though, and I'm not sure how much I can shape it. Another of my concerns is bending the wire correctly the first time, but I did buy a couple more packs of wire today!
|
|
Country: USA ~
Posts: 2087 ~
Member Since: March 16 2013 ~
Last Visit: July 05 2018
|
Alert Moderator
|
|
|
|
Posted - November 28 2017 : 5:31:25 PM
|
Haven't aborted yet . . .
Tinkering. Decided to resolve the gap that existed between the frame ends and sides and thinking now that the "bend" will be one of the last things to do before spraying ? ? ?
|
|
Country: USA ~
Posts: 2087 ~
Member Since: March 16 2013 ~
Last Visit: July 05 2018
|
Alert Moderator
|
|
|
|
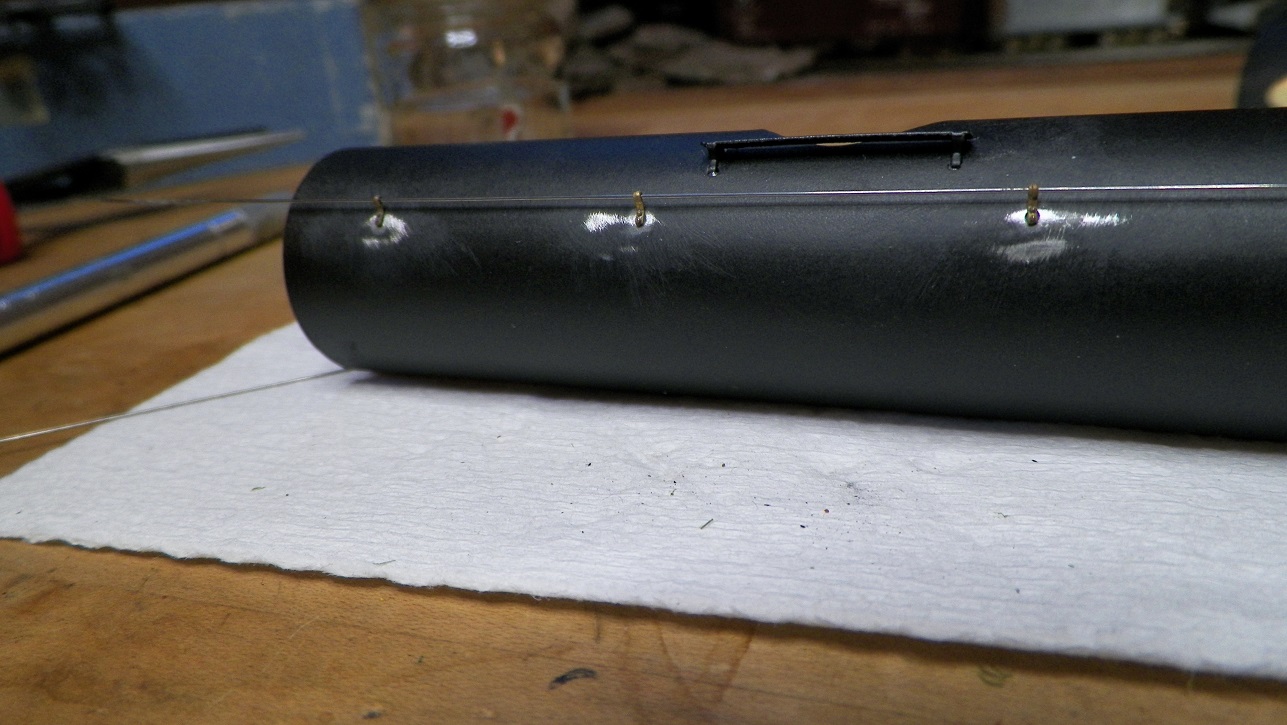
Posted - December 02 2017 : 11:25:57 PM
|
I seemed to be in just the right frame of mind this evening, a bit of a devil-may-care attitude, and got down to the business of wire bending. Things, though a bit nerve wracking, went better than I had anticipated. I did end up knocking a couple of the handrail brackets loose. The handrail will hold them in place some; I'm hoping some paint will help as well.
|
|
Country: USA ~
Posts: 2087 ~
Member Since: March 16 2013 ~
Last Visit: July 05 2018
|
Alert Moderator
|
|
|
|
Posted - December 02 2017 : 11:28:24 PM
|
Looking great, Barry!!! Keep up the great work. :)
"Let your light so shine before men, that they may see your good works, and glorify your Father which is in Heaven." - Matthew 5:16
Youtube Channel: www.youtube.com/rpmodelrailroads
Instagram: https://www.instagram.com/rp_model_railroads/
|
|
Country: USA ~
Posts: 4669 ~
Member Since: August 11 2017 ~
Last Visit: July 20 2023
|
Alert Moderator
|
|
|
|
Posted - December 03 2017 : 07:07:29 AM
|
The railings look great. 
Carpe Manana!
|
|
Country: USA ~
Posts: 2418 ~
Member Since: September 17 2013 ~
Last Visit: July 12 2026
|
Alert Moderator
|
|
|
|
Posted - December 04 2017 : 8:15:16 PM
|
Had an accident while doing the handrails on the second car; broke off one of the end brackets. So, I got to learn how to make a repair drilling out the previous bracket mounting plug . . .
I'm thinking of doing the ladders differently than suggested in the Mantua instructions, and having them go to the valve access platform, instead of stopping at the handrail . . .
There are prototypes both [all ways]. It would help the model to go all the way to the platform instead of only to the lighter weight handrail.

|
|
Country: USA ~
Posts: 2087 ~
Member Since: March 16 2013 ~
Last Visit: July 05 2018
|
Alert Moderator
|
|
|
|
Posted - December 04 2017 : 9:35:29 PM
|
Nice work, Barry.
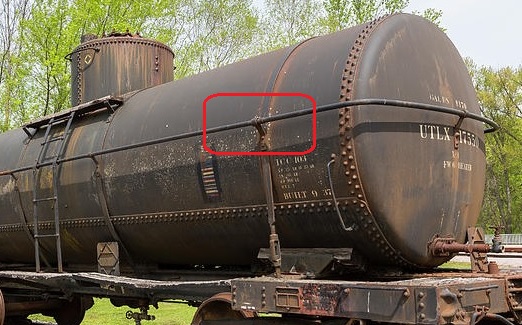
The last photo caused a light bulb to go off. You probably already thought about this, but ...
What if you found thicker brackets that you could drill out some of the material so that the ends of the handrail fit inside the bracket? The rails in the red circle below seem to do just that.
|
|
Country: USA ~
Posts: 553 ~
Member Since: February 18 2013 ~
Last Visit: January 01 2026
|
Alert Moderator
|
|
|
|
Posted - December 05 2017 : 11:47:41 AM
|
| See the Dec 2 post Brian.
|
|
Country: USA ~
Posts: 2087 ~
Member Since: March 16 2013 ~
Last Visit: July 05 2018
|
Alert Moderator
|
|
|
|
Posted - December 05 2017 : 10:47:35 PM
|
| The only reason I circled the bracket on the side was because it was more visible. Yes, I would agree that the ends of the rail should be joined at the end of the tanker. I reread the entire thread and see your Nov 5th post mentioned using a thicker bracket on the ends of the car, so you are one step ahead of me. Keep up the good work and I'm looking forward to seeing the final result.
|
|
Country: USA ~
Posts: 553 ~
Member Since: February 18 2013 ~
Last Visit: January 01 2026
|
Alert Moderator
|
|
|
|
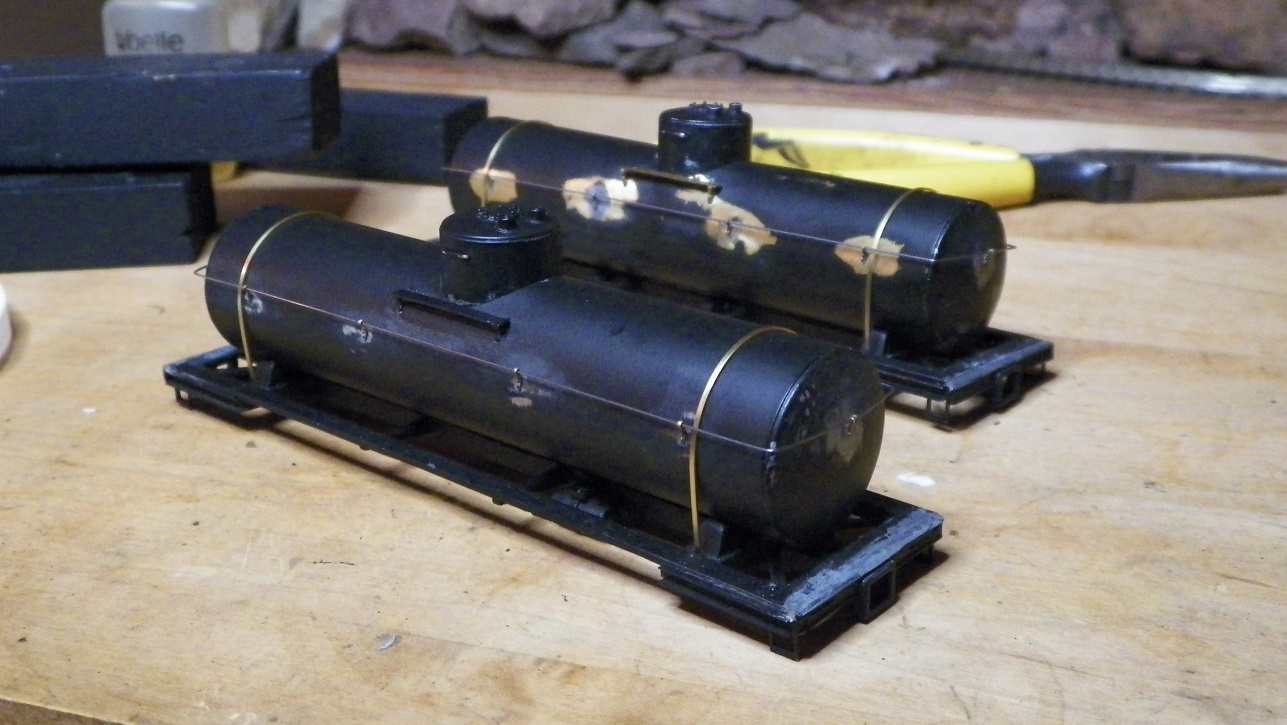
Posted - December 06 2017 : 7:53:40 PM
|
More tinkering. I suppose a reason I could use to post these, is in the event that anyone would be building one of these cars and maybe they could see some of the "opportunities" that are presented by certain confounds in assembly . . . or some such mumbo jumbo. Didn't fasten the ladders in place yet; want to paint them first. My plan is to spray this car and my experience [ability] doesn't see me being able to get at all the nooks and crannies. Trying out the tank straps and these are going to need some thought and work. There may be "brass strip" available comparable to what Mantua put in the kits, but all I found was about twice as 'thick' [K&S]. Twice as thick still isn't very thick (though probably out of scale), but it seems to need a bit more persuasion to lie flat against the curve of the tank. I used a broom handle the diameter of the tank to pre-bend the strip, but it was pretty "strong". So I will be thinking about any better way to fasten the strip to the bottom to hold the 'tension' in the strip better to allow the strip to be pulled tight . . . and stay tight.
|
|
Country: USA ~
Posts: 2087 ~
Member Since: March 16 2013 ~
Last Visit: July 05 2018
|
Alert Moderator
|
|
|
|
Posted - December 09 2017 : 6:31:48 PM
|
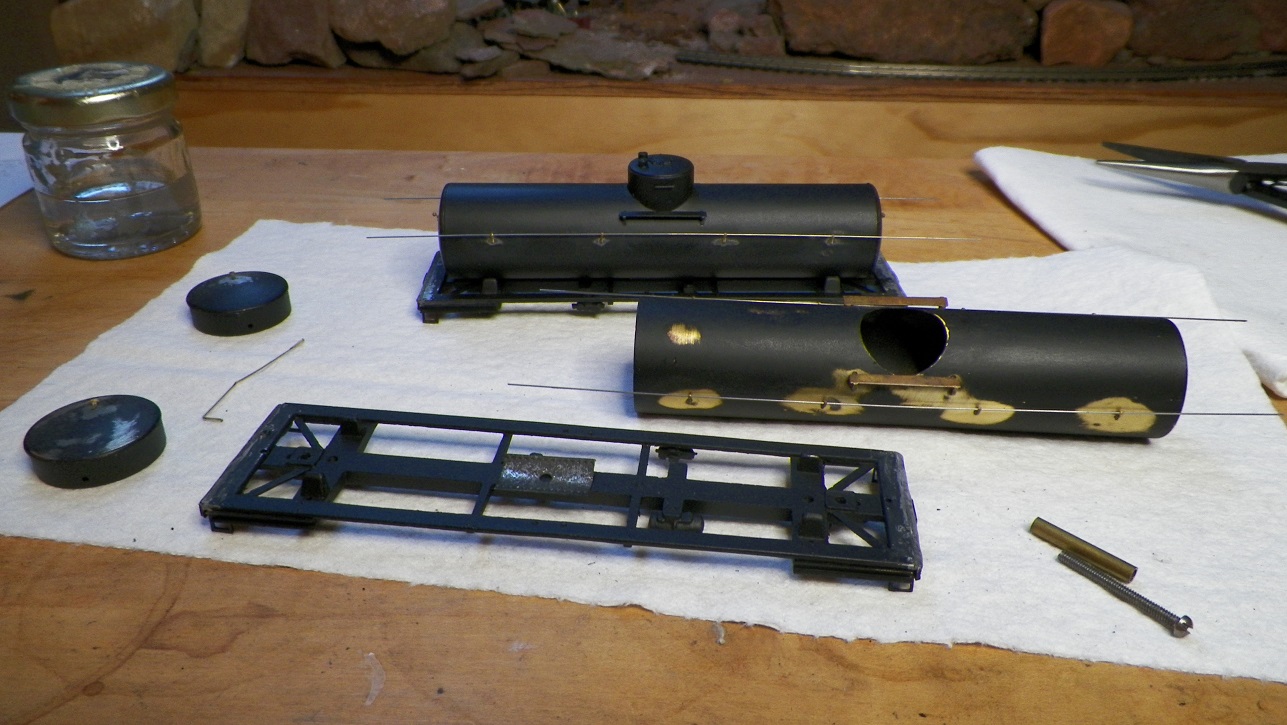
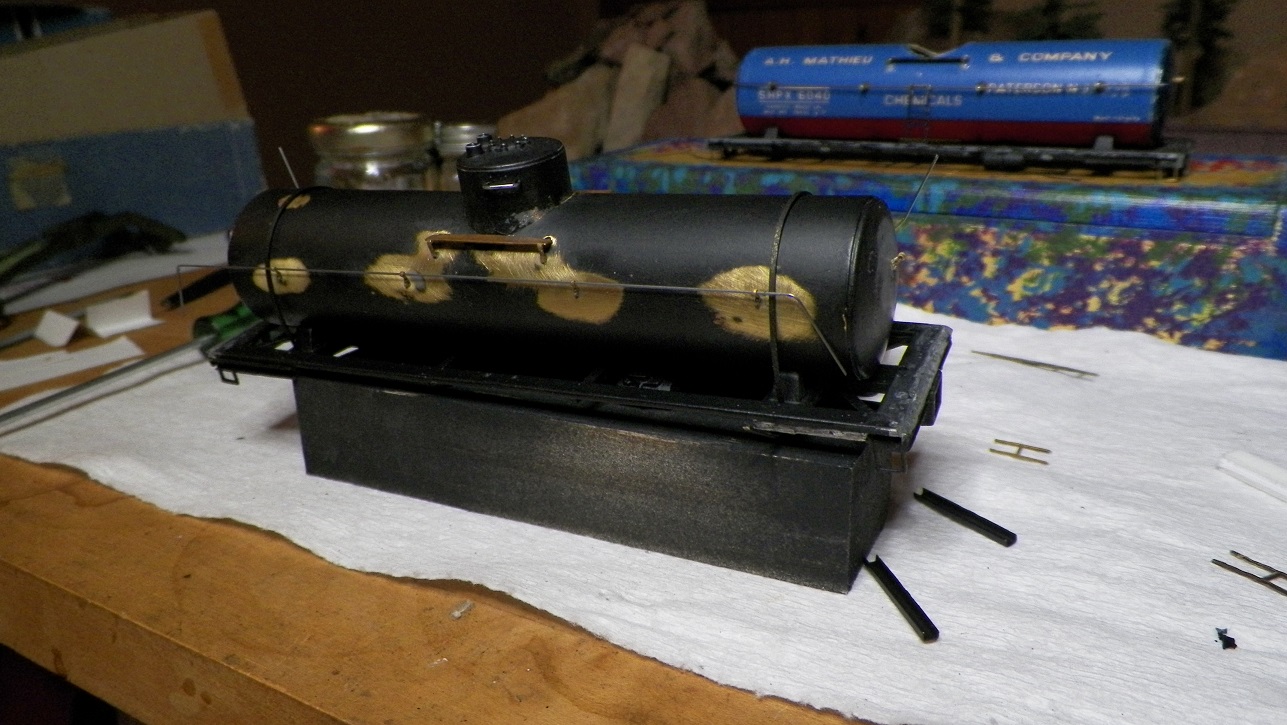
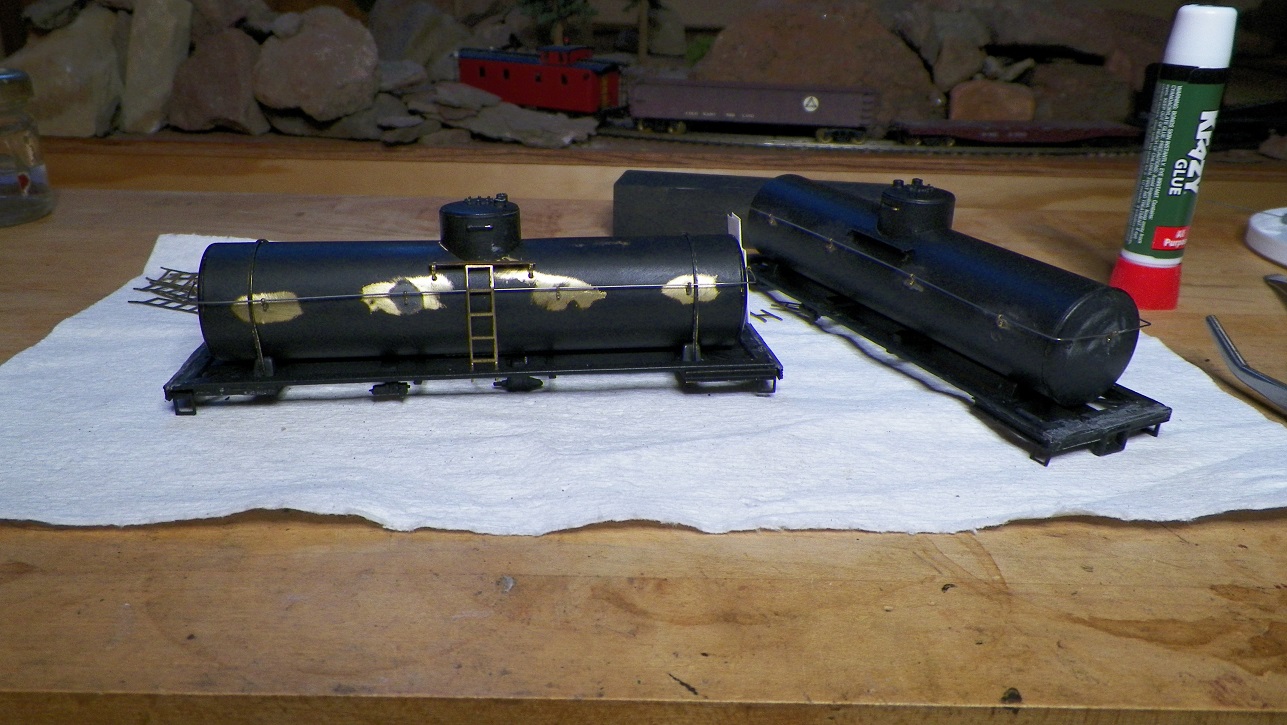
Tried a couple of different things to get the tank bands to snug up to the tank better; bending around a smaller diameter and "hammering" around a steel pipe. May have helped some. Still not happy with the way I can see daylight between the strap and the tank in a spot or two, so will just try to be more careful on the next car. I've been working on the most 'beat up' of the cars first, getting some of the trial and error out of the way. On the one hand, I have a set of Mantua tank car instructions, so there shouldn't be so much trial and error, but "always an excuse, hey?" Have most of the accoutrements on the prototype car except the brake wheel and maybe one of those little diamond shape hazard signs. Been pretty cool here to be able to paint outdoors.
|
|
Country: USA ~
Posts: 2087 ~
Member Since: March 16 2013 ~
Last Visit: July 05 2018
|
Alert Moderator
|
|
|
|
Posted - December 13 2017 : 5:32:08 PM
|
I learned that hammering the brass strip over a steel pipe for more than a few taps took the sass out of it. And when fitting the bands, once you make the bend to hold the strap in place, you're committed. Pull 'er tight, and leave 'er be and if it ain't tight enough, take it off and start over. I also learned that the tank bands should go on before the hand rails; too much manipulation of the car. Gettin' closer . . .
|
|
Country: USA ~
Posts: 2087 ~
Member Since: March 16 2013 ~
Last Visit: July 05 2018
|
Alert Moderator
|
|
|
|
Posted - December 13 2017 : 6:34:26 PM
|
Looking even better, Barry! Keep up the hard work.
"Let your light so shine before men, that they may see your good works, and glorify your Father which is in Heaven." - Matthew 5:16
Youtube Channel: www.youtube.com/rpmodelrailroads
Instagram: https://www.instagram.com/rp_model_railroads/
|
|
Country: USA ~
Posts: 4669 ~
Member Since: August 11 2017 ~
Last Visit: July 20 2023
|
Alert Moderator
|
|
|
|
Posted - December 19 2017 : 12:16:09 PM
|
Working on the warning placards . . .
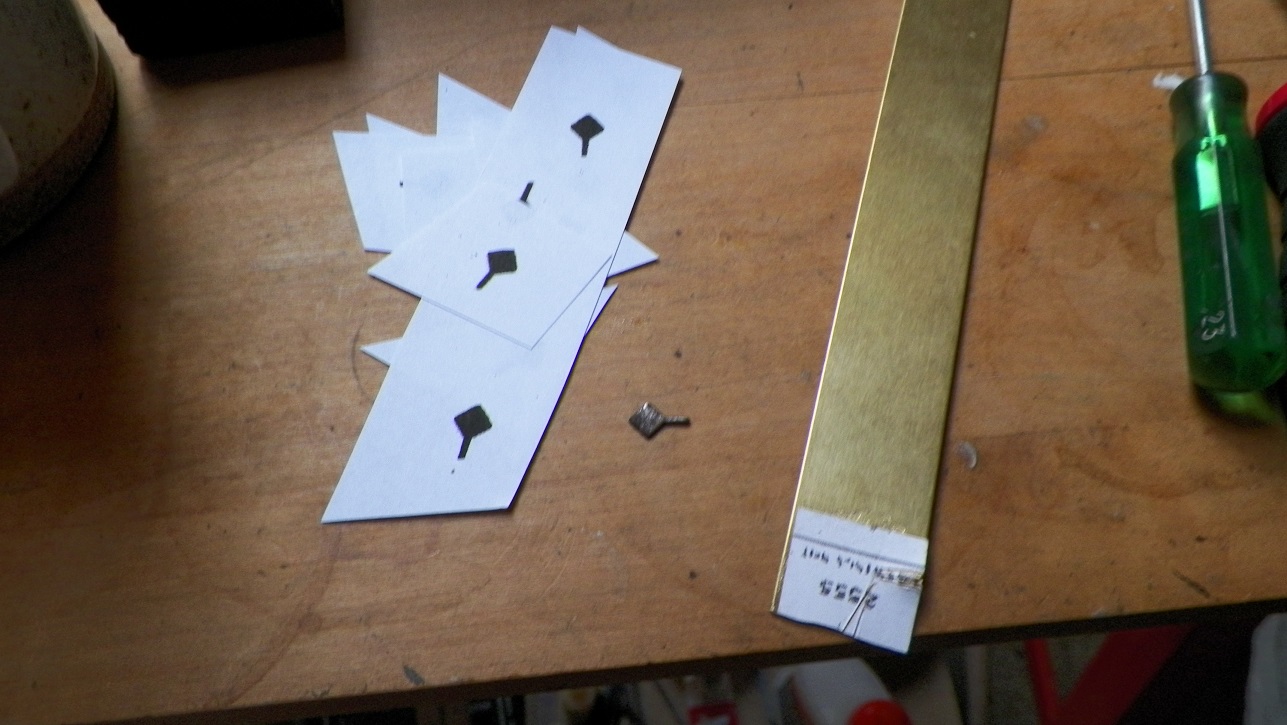
The completed placard in the above photo is one that I found in a kit, but I'm not certain that Mantua made these ? ? ? It is what I copied to use for a pattern.

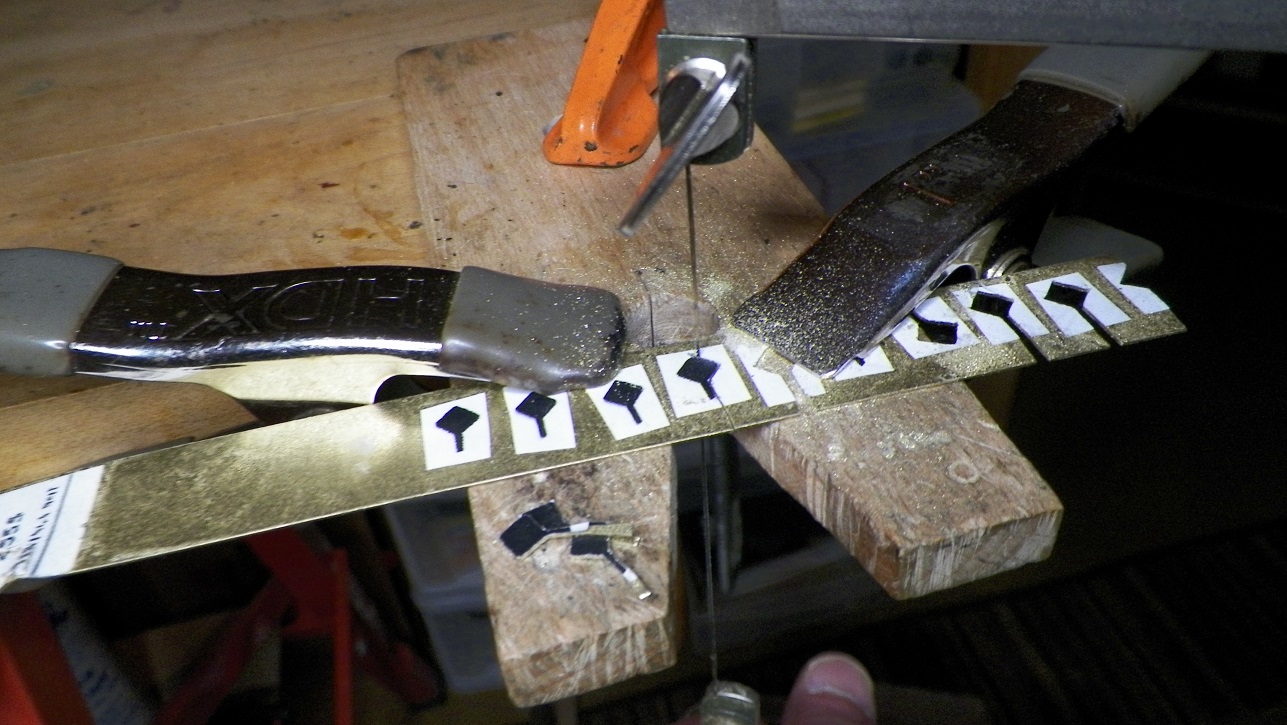
[spray adhesive to glue patterns to stock]
Edited by - Barry on December 19 2017 12:19:05 PM
|
|
Country: USA ~
Posts: 2087 ~
Member Since: March 16 2013 ~
Last Visit: July 05 2018
|
Alert Moderator
|
|
|
|
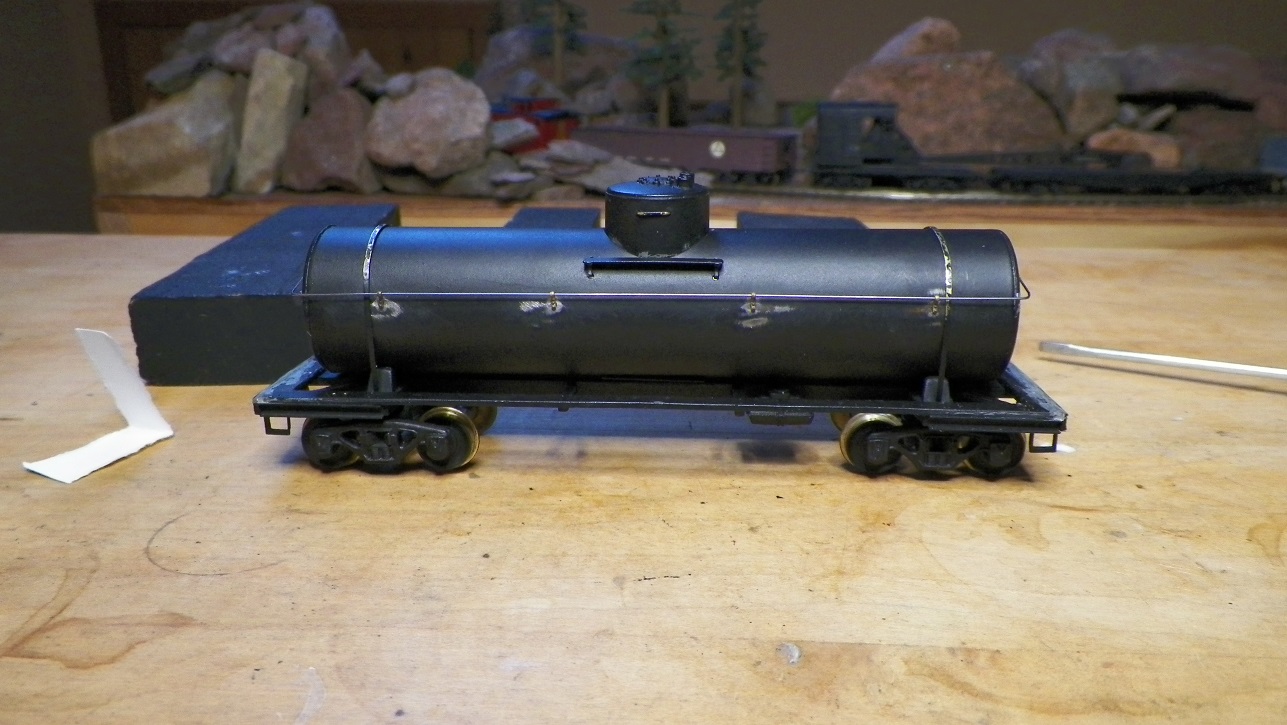
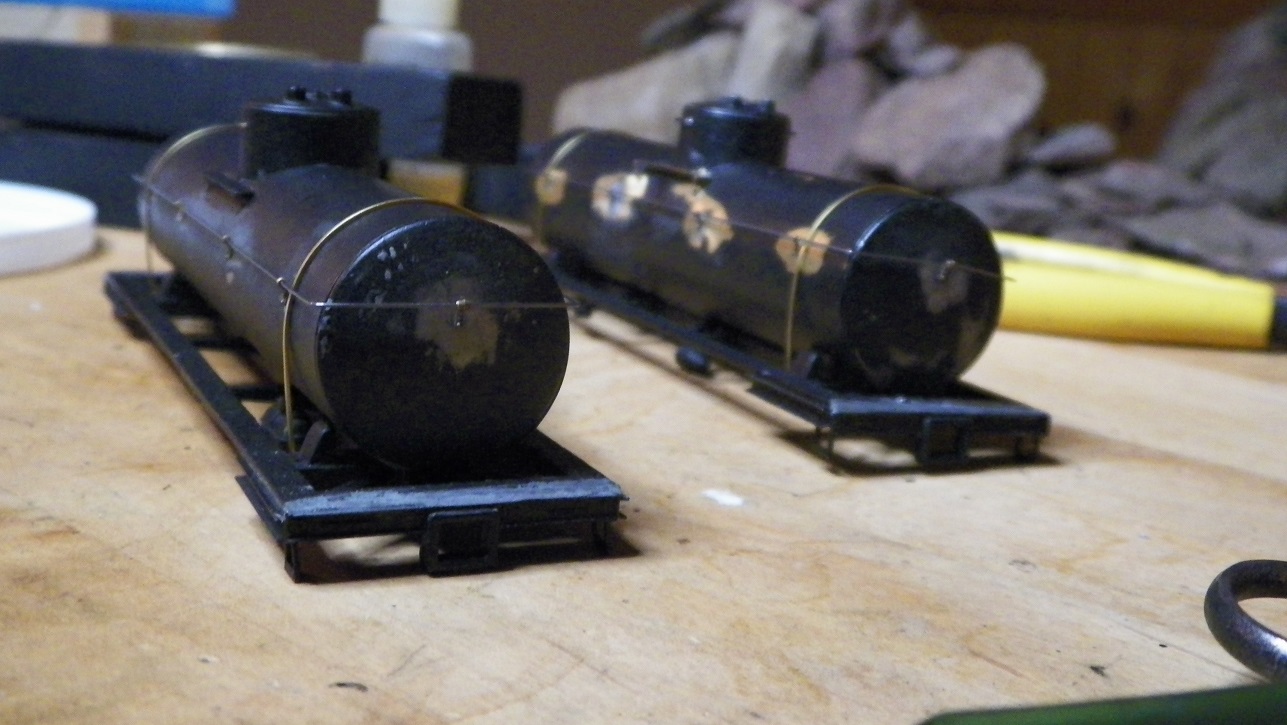
Posted - January 01 2018 : 9:02:30 PM
|
Happy New Year to you! Took the plunge the past couple days and got after some things I wasn't happy with. The tank straps, that I so nicely hammered the heck out of to get them to snug to the tank, really didn't look good. Full of hammer marks; surprise. This time I just bent the strap by hand to a smaller diameter round and tried like heck to snug them up before bending a tab. And getting the handrails to symmetrically follow the tank is, for me, a trick easier said than done. So, I redid the things that I didn't like looking at. The tank straps, I think I'm happy with. The handrails; "so, so". I'm going to have to look at them a few more days (too cold to paint here anyway) and see.
|
|
Country: USA ~
Posts: 2087 ~
Member Since: March 16 2013 ~
Last Visit: July 05 2018
|
Alert Moderator
|
|
|
|
Posted - January 02 2018 : 01:05:14 AM
|
| Very nice work!!
|
|
Country: USA ~
Posts: 6279 ~
Member Since: February 18 2009 ~
Last Visit: March 04 2022
|
Alert Moderator
|
|
|
|
Posted - January 03 2018 : 10:45:41 AM
|
| Thanks Walt. I'm looking forward to completing these and getting them on the rails.
|
|
Country: USA ~
Posts: 2087 ~
Member Since: March 16 2013 ~
Last Visit: July 05 2018
|
Alert Moderator
|
|
|
|
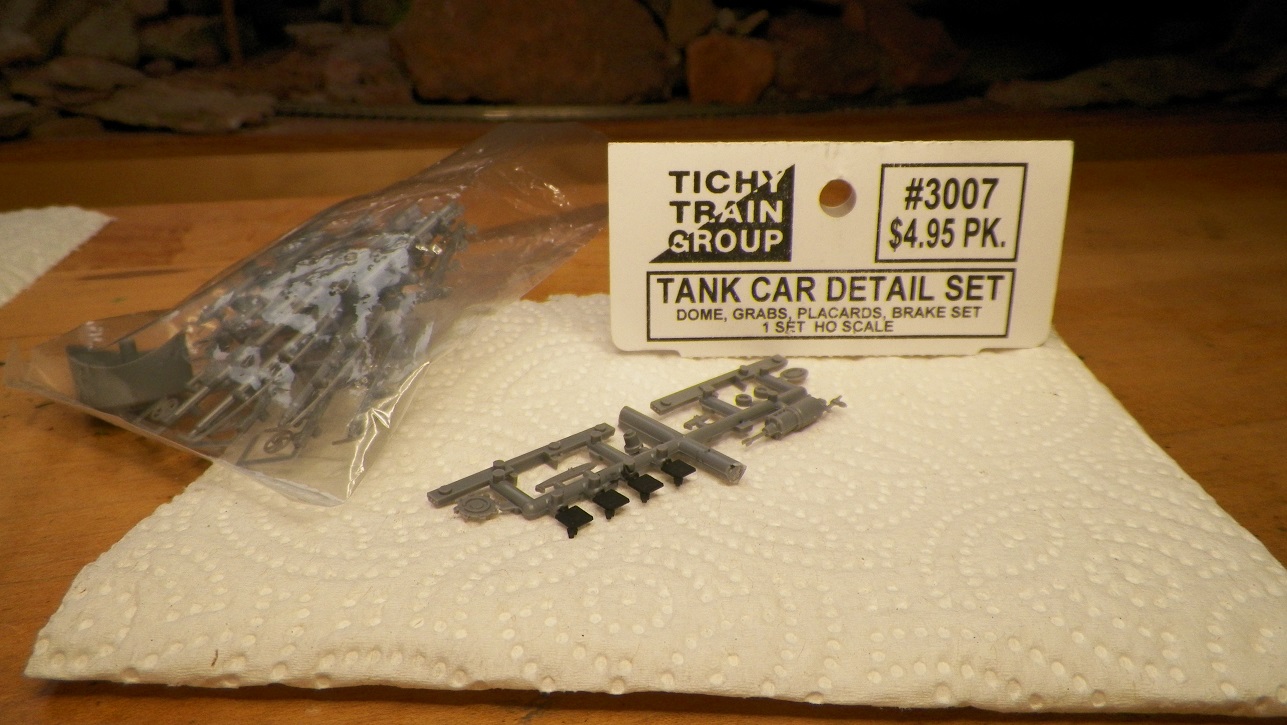
Posted - January 20 2018 : 7:39:53 PM
|
Hey, it's only been 3 months or so. Although, I did find an indoor spray booth I can use. I splurged and got a Tichy Train tank car detail set, for the purpose of getting the placards. I had cut a bunch out of a brass sheet, but it seemed to me that kind of detail needed to be perfectly shaped, and my efforts weren't making it. Any tank car freaks should be pleased with the stuff that comes in that kit. I don't even know all the names of the things.
|
|
Country: USA ~
Posts: 2087 ~
Member Since: March 16 2013 ~
Last Visit: July 05 2018
|
Alert Moderator
|
|
|
|
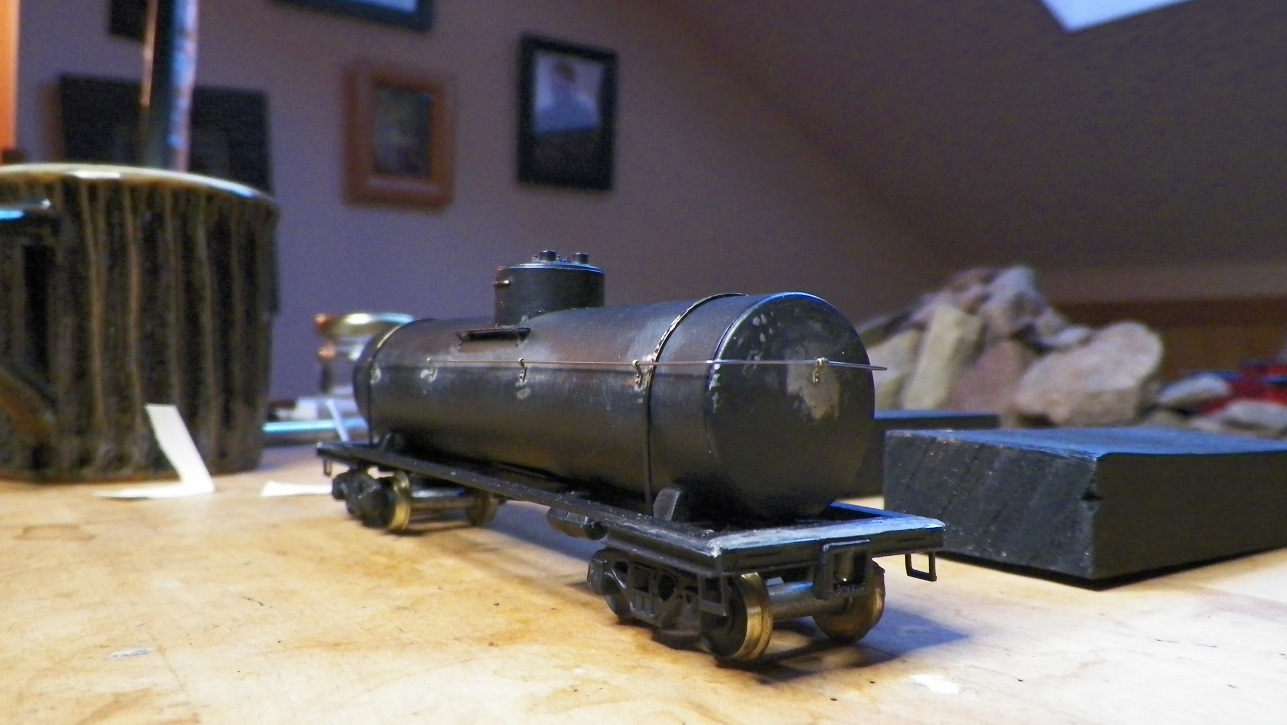
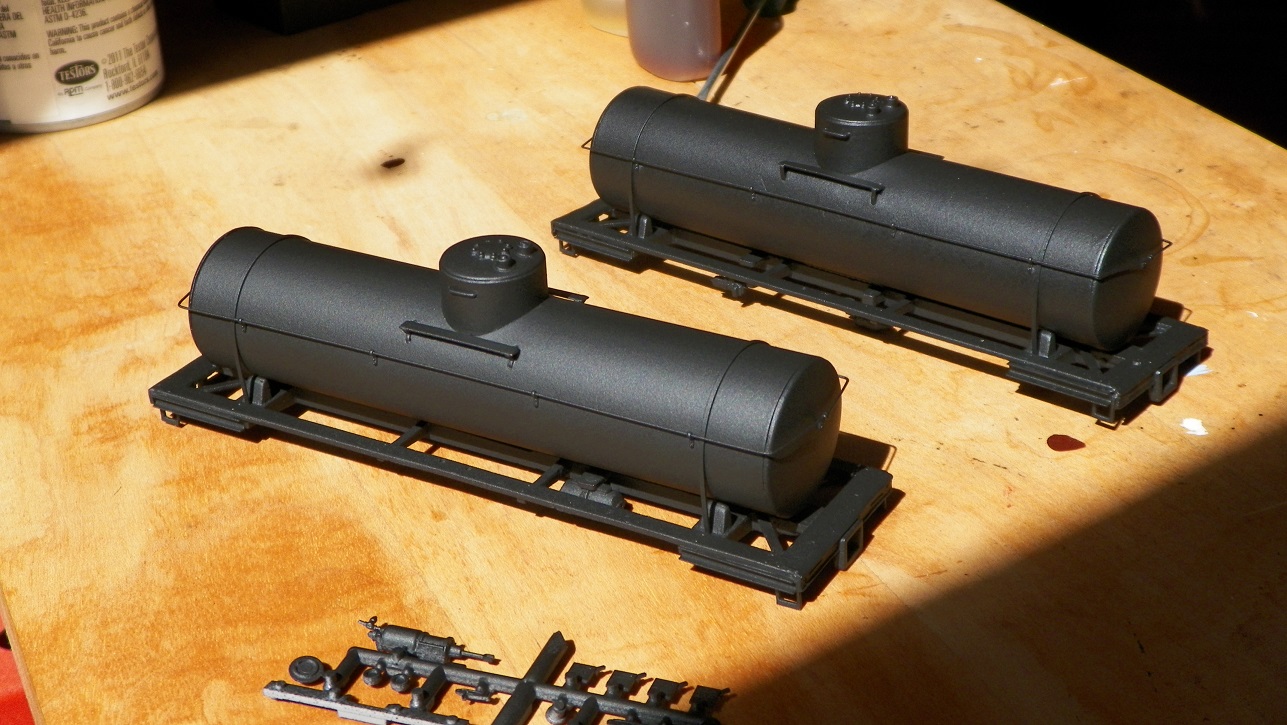
Posted - April 22 2018 : 5:49:08 PM
|
I was starting to believe I never would get back to this. Alas, the stars were aligned just right today and I went for it . . . so, now maybe let the paint cure a few days and we'll see about putting them together.
|
|
Country: USA ~
Posts: 2087 ~
Member Since: March 16 2013 ~
Last Visit: July 05 2018
|
Alert Moderator
|
|
|
|
Posted - April 22 2018 : 8:01:49 PM
|
Lookin' good.....
"Let your light so shine before men, that they may see your good works, and glorify your Father which is in Heaven." - Matthew 5:16
Youtube Channel: www.youtube.com/rpmodelrailroads
Instagram: https://www.instagram.com/rp_model_railroads/
|
|
Country: USA ~
Posts: 4669 ~
Member Since: August 11 2017 ~
Last Visit: July 20 2023
|
Alert Moderator
|
|
|
|
Posted - April 22 2018 : 8:11:57 PM
|
Nice crisp looking paint and detail.
Carpe Manana!
|
|
Country: USA ~
Posts: 2418 ~
Member Since: September 17 2013 ~
Last Visit: July 12 2026
|
Alert Moderator
|
|
|
|
Posted - April 22 2018 : 9:14:05 PM
|
If I hadn't seen the photos from mid December and January 1st, I would have said "no way." This is remarkable - beyond anything I could have done. Can't wait to see the tankers on your layout.
|
|
Country: USA ~
Posts: 553 ~
Member Since: February 18 2013 ~
Last Visit: January 01 2026
|
Alert Moderator
|
|
|
|
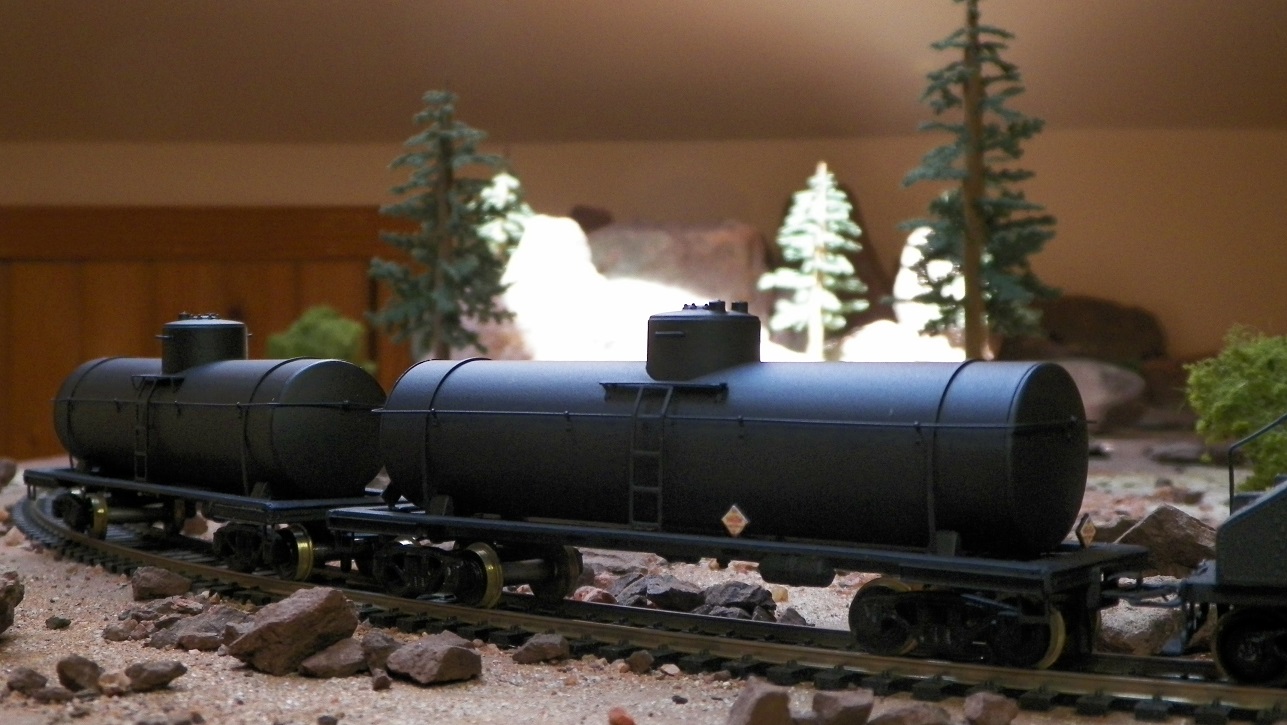
Posted - May 01 2018 : 2:26:24 PM
|
At last . . .
|
|
Country: USA ~
Posts: 2087 ~
Member Since: March 16 2013 ~
Last Visit: July 05 2018
|
Alert Moderator
|
|
|
|
Posted - May 01 2018 : 6:33:17 PM
|
Those vintage tankers look great!! Nice craftsmanship, and patience, on this project.
"Let your light so shine before men, that they may see your good works, and glorify your Father which is in Heaven." - Matthew 5:16
Youtube Channel: www.youtube.com/rpmodelrailroads
Instagram: https://www.instagram.com/rp_model_railroads/
|
|
Country: USA ~
Posts: 4669 ~
Member Since: August 11 2017 ~
Last Visit: July 20 2023
|
Alert Moderator
|
|