|
|
 Posted - March 31 2016 : 8:43:40 PM Posted - March 31 2016 : 8:43:40 PM


|
Having received his Majesty's approval of road bed, the Tyco Expander Layout has
progressed to this:

I burned a lot of gasoline finding the right roadbed. It comes pretty close to the Tyco
Manual's image, which looks a lot like a carpet pad. But when I looked at carpet padding,
it is like at least a half inch thick and cost way more than I wanted to shell out, for what
started out as a joke.
|
Country:  USA ~
Posts: 11686 ~
Member Since: December 09 2013 ~
Last Visit: May 26 2026 USA ~
Posts: 11686 ~
Member Since: December 09 2013 ~
Last Visit: May 26 2026
|
 Alert Moderator
|
|
|
|
Posted - April 01 2016 : 11:29:25 PM
|
I think it must have been available cheaper and thinner once.
Feedback-hungry attention w****
|
|
Country: USA ~
Posts: 750 ~
Member Since: December 05 2015 ~
Last Visit: January 24 2024
|
Alert Moderator

|
|
|
|
Posted - April 03 2016 : 1:02:36 PM
|
Interesting choice of roadbed. On my layout, I just nail the track right onto the plywood (covered with green ground foam grass material stuck onto the wood), and then in certain areas I applied ballast to the track, using Woodland Scenics gravel ballast, their glue/adhesive sprayer, and a Life-Like track cleaner "eraser" to wipe off the rails after the gluing process. It looks a bit messy at first, but then once I vacuum it, it's much improved, and looks pretty realistic.
Of course, according to the original 1975 Layout Expander System manual and the 1975 TYCO catalog, TYCO made a green printed foam mat with the Layout Expander System roadbed, roads and a lake printed right onto the mat. But it's EXTREMELY hard to find, there haven't been any known to exist so far, and I don't think it sold well back in the 70s; I am guessing anyone who was building the Layout Expander System back then would prefer to do their own landscaping (as it admittedly looks more realistic.) A.H.M., Life-Like and Woodland Scenics had plenty to choose from back then. (Aside from the mat, TYCO never really made landscaping stuff like its' competitors A.H.M., Bachmann and Life-Like did.)
|
|
Country: USA ~
Posts: 599 ~
Member Since: January 03 2013 ~
Last Visit: March 28 2026
|
Alert Moderator
|
|
|
|
Posted - April 03 2016 : 1:19:02 PM
|
A mystery solved. I could not figure out for the life of me
what the road bed in that manual ever was.
I once tried a vintage box of Life Like ballast, on another project. What a horror that turned out to be. I had to take a screw driver and chisel out bits of gravel that had attached themselves to the interior face of the rails.
I've also done the tie to plywood method. Satisfactory,
but I was shooting to recreate that weird look the
vintage layout had. It is the somewhat unrealistic look
of vintage Tyco I find so appealing. For the same
reason I cringe at Kadees on Tyco.
Edited by - Chops124 on April 03 2016 1:22:09 PM
|
|
Country: USA ~
Posts: 11686 ~
Member Since: December 09 2013 ~
Last Visit: May 26 2026
|
Alert Moderator
|
|
|
|
Posted - April 03 2016 : 8:15:12 PM
|
| Jeff, I believe it takes a special mindset to lay ballast. I've never had luck with it; likely because I tried to do too much. I think you really need to painstakingly make sure each little space between ties is done correctly. At least, in my ignorance, that's how I imagine accomplishing it.
|
|
Country: USA ~
Posts: 2087 ~
Member Since: March 16 2013 ~
Last Visit: July 05 2018
|
Alert Moderator
|
|
|
|
Posted - April 03 2016 : 10:45:43 PM
|
I just stumbled over a series of posts under "Tyco Accessories," where Wiley209, and others, undertook
creating various renditions of the TEL. I see I am not
the only Tycohead who got hooked on this slippery
slope. Certainly not the most inventive track plan ever
devised, but it has an undeniable gravity to anyone
who loves Tyco.
A few years back, in my pre-TF days, I tried doing this
with Bachmann EZ Track, but found that with respect to the inner loop I could not make it fit. In that thread
someone else made a start of it using EZ track.
On the current get up, I used vintage brass rail that
I picked up for pennies on the dollar as everyone is/was
in such a hurry to get rid of it. My experience that
when given a wipe down with Wahl's Hair Clipper
Oil it performs just as good as NS, and I like that
burnished brass look. I threw in a bridge here
and there simply because I like bridges.
For the inner loop I FINALLY won a
Tyco Straphanger Set, and will install
that inside the inner loop. To my surprise
the set is more of a cool novelty than
a serious entrée into the traction arena.
It comes with only two straight sections
and they are only about four inches in
length! To open up the oval a bit, I intend
to use the Tyco street car track as a template
and fashion my own straight sections with
styrene sheets and perhaps some balsa.
|
|
Country: USA ~
Posts: 11686 ~
Member Since: December 09 2013 ~
Last Visit: May 26 2026
|
Alert Moderator
|
|
|
|
Posted - April 04 2016 : 08:21:32 AM
|
The only difference between brass and NS is the nickel, and it's not as huge a difference as might be thought. And both of them stay clean and clean up better than steel rail does. Brass rail track and brass rail stock tend to be cheap or at least reasonable even when not marked down because nobody's issued any for over two decades so the price tags are old. (speaking of brass rail, I responded to your one PM I'm pretty sure)
Congrats on winning the Straphanger set and good luck on building the additional track. May your cuts go smooth and straight.
Feedback-hungry attention w****
|
|
Country: USA ~
Posts: 750 ~
Member Since: December 05 2015 ~
Last Visit: January 24 2024
|
Alert Moderator
|
|
|
|
Posted - April 04 2016 : 10:45:54 AM
|
quote:Jeff, I believe it takes a special mindset to lay ballast. I've never had luck with it; likely because I tried to do too much. I think you really need to painstakingly make sure each little space between ties is done correctly. At least, in my ignorance, that's how I imagine accomplishing it.
Originally posted by Barry - April 03 2016 : 8:15:12 PM
|
The quick shortcut to filling all those little spaces is to dump the ballast on and sweep it into place with a paint brush. I use a big soft artist's brush like kids might use with a watercolor set. That fills in all the spaces and sweeps the ballast off of the top of the ties and out of the flange ways.
Once the ballast is in place, I dribble on diluted carpenter's glue with a little alcohol or dish soap stirred in to keep it from beading up on top of the ballast. This step must be done carefully around switches to keep from gluing the points or throw bar in place or gumming up the rivets where the electricity gets into the points.
Carpenter's glue is resoluble so, if you need to tear up some track, you can dribble water onto the ballast and let it soak and soften a little while.
Carpe Manana!
|
|
Country: USA ~
Posts: 2417 ~
Member Since: September 17 2013 ~
Last Visit: July 02 2026
|
Alert Moderator
|
|
|
|
Posted - April 04 2016 : 12:49:52 PM

|
I've never had luck with dribbling the glue directly on the ballast. The loose ballast always gets misted with glue/water/soap first and then once dry I use the dribble method. Luckily my last two layouts haven't required ballasting. 
Chops, I'm looking forward to seeing your Straphanger set up. I've never seen more than ebay pictures.
|
Country:  Canada ~
Posts: 3448 ~
Member Since: September 22 2006 ~
Last Visit: April 03 2026 Canada ~
Posts: 3448 ~
Member Since: September 22 2006 ~
Last Visit: April 03 2026
|
Alert Moderator
|
|
|
|
Posted - April 04 2016 : 2:50:51 PM
|
"The Boys' Book of Model Railroading" recommends sodium silicate (AKA water glass, the term used in the book) as a ballast fixative.
Feedback-hungry attention w****
|
|
Country: USA ~
Posts: 750 ~
Member Since: December 05 2015 ~
Last Visit: January 24 2024
|
Alert Moderator
|
|
|
|
Posted - April 04 2016 : 4:38:03 PM
|
quote:"The Boys' Book of Model Railroading" recommends sodium silicate (AKA water glass, the term used in the book) as a ballast fixative.
Originally posted by ZeldaTheSwordsman - April 04 2016 : 2:50:51 PM
|
You really like that classic book, I recognized your ladder-soldering jig right away from it (in the Pacific thread). :)
Waterglass may work. I don't know. I think that it is the adhesive used even now to glue the layers of corrugated cardboard together. In the olden days there weren't many good, room-temperature, water-soluble, permanent adhesives, but I don't know where the waterglass idea came from. I suspect it may have originated in the Model Builder magazine, since many of Louis H Hertz's ideas came from thataway.
Another popular thing to do was to mix powdered casein glue with the loose ballast, then sprinkle it with water after putting it down.
Brass rail vs. steel vs. NS: I use all three and I agree that brass vs. NS is not dissimilar in my experience. As smart as Linn Westcott was, I think he dropped the ball on some things, and left us with the pervasive idea that "NS oxide" is somehow better than "brass oxides". I don't think this is right at all; in my experience, oxidized, dirty NS works as badly as oxidized, dirty brass. I think the NS is just harder, so dirt and dust may not stick to it as easily. In practice, though, once I remove the oxides from long-stored track of any material, whether brass or steel or NS, they all give about the same service. But the brass oxide myth does assure me a supply of cheap brass trackage, sooo...I shouldn't fight it hard. :)
I do suggest that any track should be polished and burnished before use. I use a modified "Gleem" method from the MR forums. First, sand the railhead with superfine 600 grit sandpaper. Some people will balk at sandpaper, but 600 grit is far finer than a Bright Boy (which is so coarse I never use one). Sanding removes the mill-finish roughness from rail, which is basically redrawn wire. Then scrub off any corrosion from the ends, where the rail-joiners go, with a stainless steel or brass wire brush. Then burnish the railhead with a stainless-steel washer. This leaves a mirror-smooth stripe on the railhead, where the wheels make contact. It is apparently so smooth that many dirt particles have nowhere to lodge themselves. Finish by wiping the rail with alcohol and a rag or towel, to remove any metal dust. (The full Gleem method uses an additional step, of polishing with Flitz metal polish, but I never bother with this step).
The result is a rail that stays clean for a very, very long time, with only wiping or polishing with a Masonite slider car needed to keep good contact.
|
|
Country: USA ~
Posts: 432 ~
Member Since: March 04 2008 ~
Last Visit: December 28 2018
|
Alert Moderator
|
|
|
|
Posted - April 04 2016 : 5:45:09 PM
|
Hey, that book's been a great inspiration and help. Sadly, i kept breaking the ladder when trying to clean up the excess solder, so I gave up on a wire one for the time being :(
In my opinion MR Magazine is very guilty of shilling on occasion (especially as time has gone by), and it seems like not even Westcott was 100% immune.
I'd be wary of using abrasive cleaning on steel rail track though. At least on the stuff I have, it seems like only the outer surface is actually conductive, like it's plating or something.. I could be wrong.
Feedback-hungry attention w****
|
|
Country: USA ~
Posts: 750 ~
Member Since: December 05 2015 ~
Last Visit: January 24 2024
|
Alert Moderator
|
|
|
|
Posted - April 04 2016 : 5:54:13 PM
|
quote: quote:Jeff, I believe it takes a special mindset to lay ballast. I've never had luck with it; likely because I tried to do too much. I think you really need to painstakingly make sure each little space between ties is done correctly. At least, in my ignorance, that's how I imagine accomplishing it.
Originally posted by Barry - April 03 2016 : 8:15:12 PM
|
The quick shortcut to filling all those little spaces is to dump the ballast on and sweep it into place with a paint brush. I use a big soft artist's brush like kids might use with a watercolor set. That fills in all the spaces and sweeps the ballast off of the top of the ties and out of the flange ways.
Once the ballast is in place, I dribble on diluted carpenter's glue with a little alcohol or dish soap stirred in to keep it from beading up on top of the ballast. This step must be done carefully around switches to keep from gluing the points or throw bar in place or gumming up the rivets where the electricity gets into the points.
Carpenter's glue is resoluble so, if you need to tear up some track, you can dribble water onto the ballast and let it soak and soften a little while.
Originally posted by scsshaggy - April 04 2016 : 10:45:54 AM
|
I intend, sigh, to apply ballast to my British OO layout as I am looking for a closer
proto-real appearance. Any opinions about these commercially available cylindrical
ballast spreaders? I've never tried one.
|
|
Country: USA ~
Posts: 11686 ~
Member Since: December 09 2013 ~
Last Visit: May 26 2026
|
Alert Moderator
|
|
|
|
Posted - April 04 2016 : 5:56:21 PM
|
| Sandpaper is absolutely useful for polishing old track, it's when people use a grit too course and use it for regular cleaning that it becomes a problem. When I was working on my Atomic Lake layout a few years back I had to resurrect a loop of steel track for the Tyco Turbo Trains. I ended up using automotive grade sandpaper (2000 grit) for the final polishing and the rails turned out great!
|
|
Country: Canada ~
Posts: 3448 ~
Member Since: September 22 2006 ~
Last Visit: April 03 2026
|
Alert Moderator
|
|
|
|
Posted - May 24 2016 : 11:56:14 PM
|
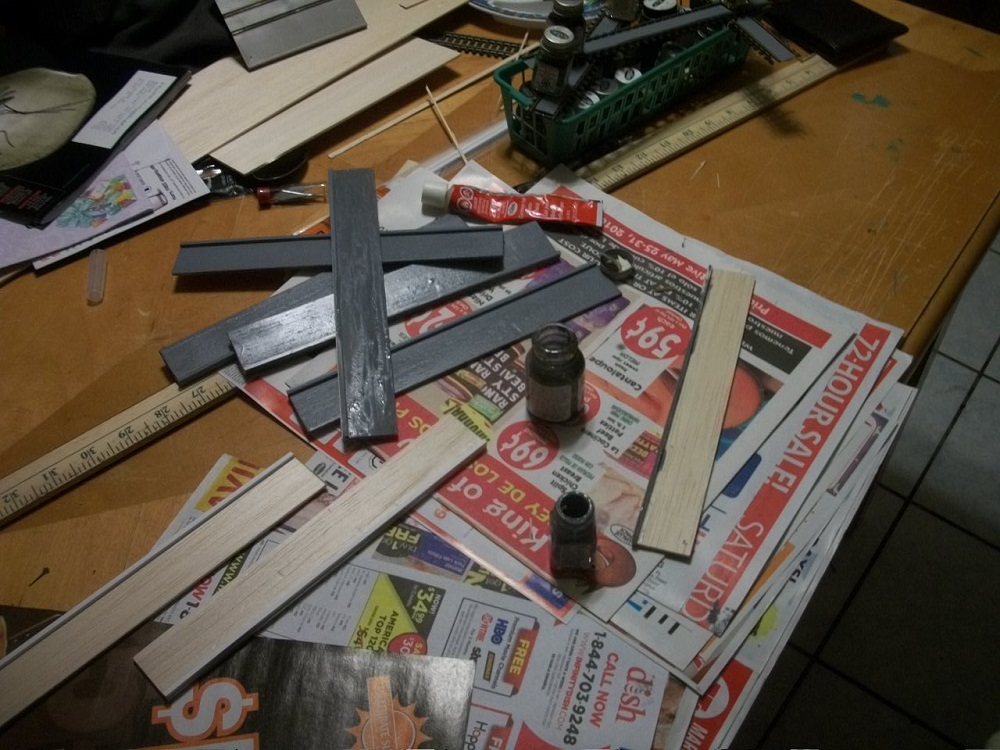
The Tyco Strap Hanger set is really cool, but the tiny oval of track is so small
as to make the set look like an egg beater in motion. Using balsa strips and
some brass track I am fashioning a longer straightaway.
|
|
Country: USA ~
Posts: 11686 ~
Member Since: December 09 2013 ~
Last Visit: May 26 2026
|
Alert Moderator
|
|
|
|
Posted - June 22 2016 : 11:50:18 PM
|
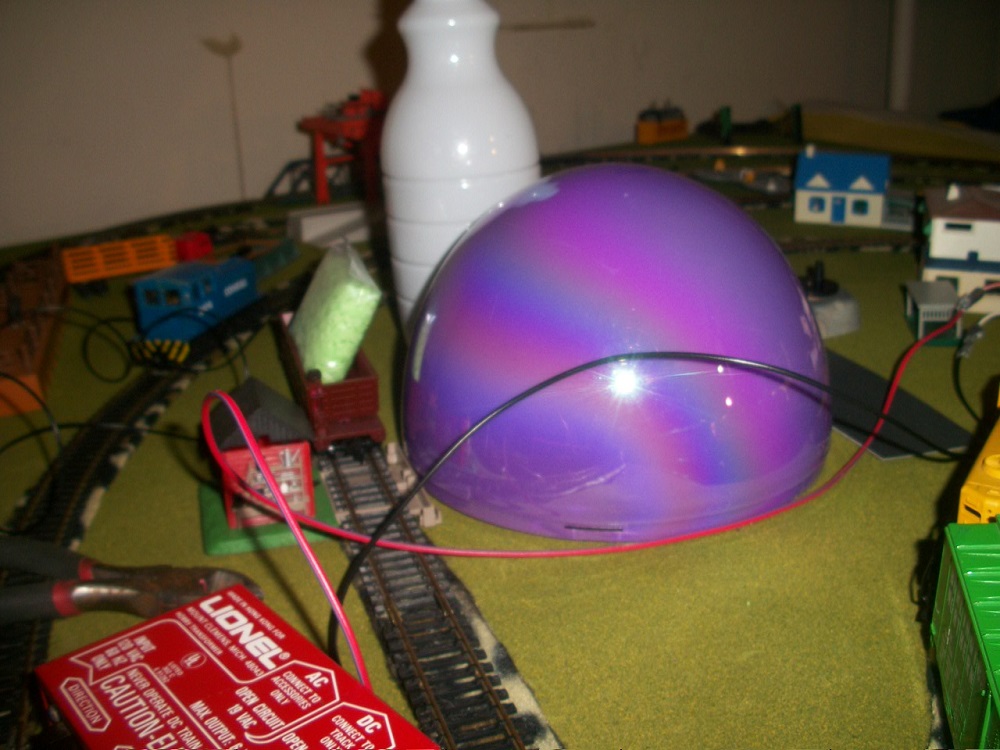 
Progress has been slow. Painted up the containment dome- the bottom half
of a Walmart Easter egg, and have fiddled a bit with the strap hanger set.
Really need to get off my duff and get some going here.
|
|
Country: USA ~
Posts: 11686 ~
Member Since: December 09 2013 ~
Last Visit: May 26 2026
|
Alert Moderator
|
|
|
|
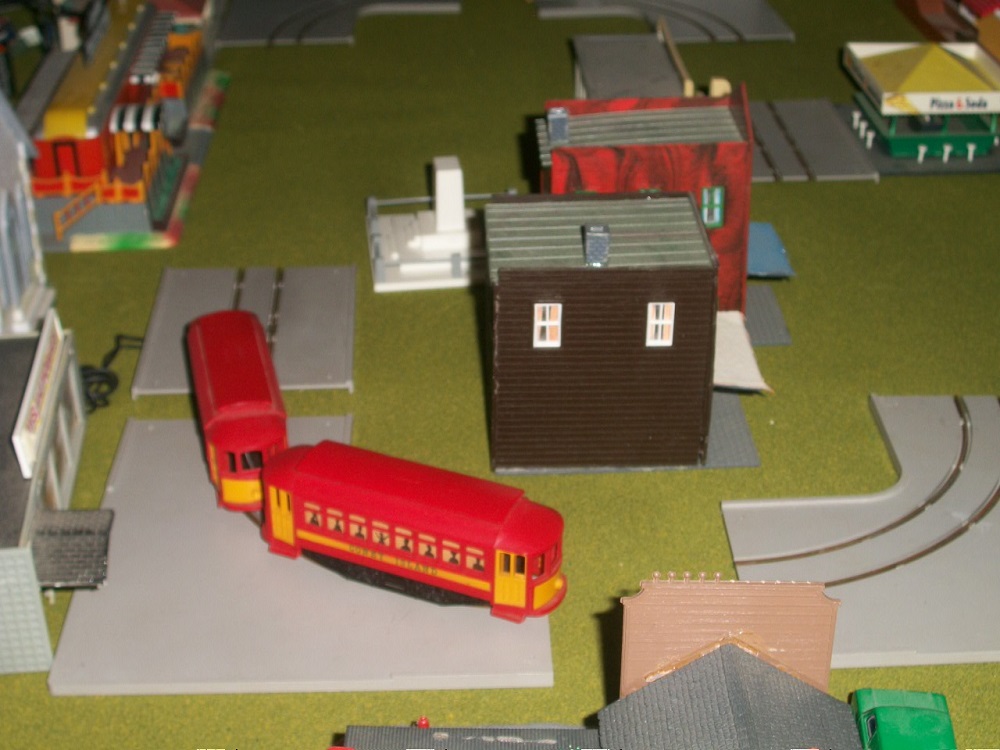
Posted - October 09 2016 : 11:07:01 PM
|
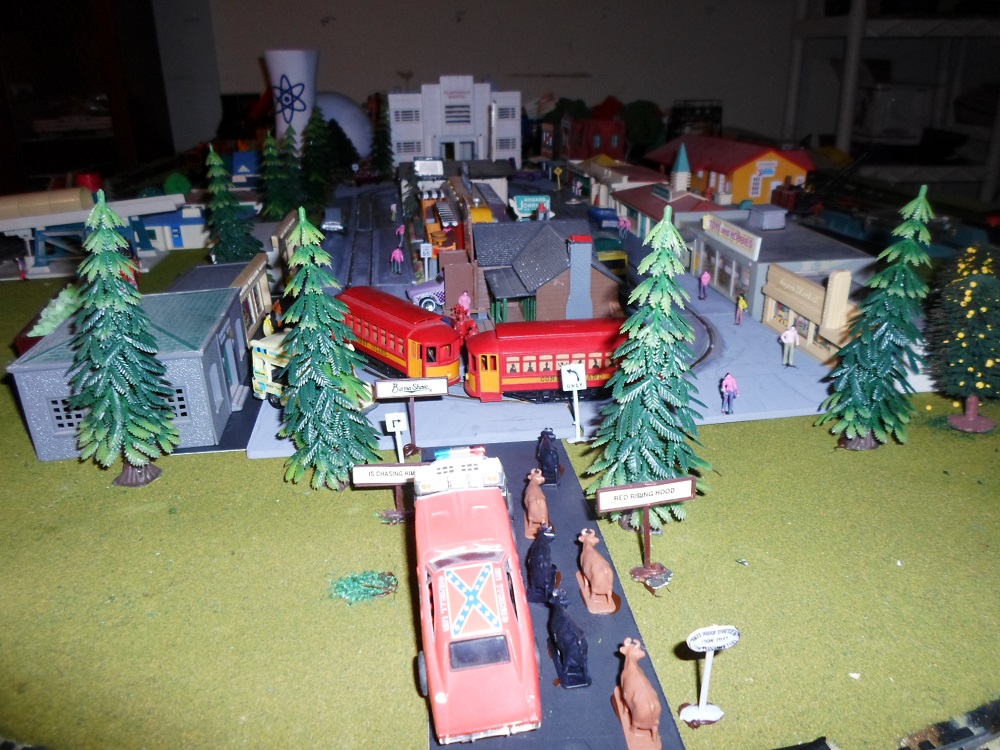
Populating the Tyco Expander Layout and adding some people.
|
|
Country: USA ~
Posts: 11686 ~
Member Since: December 09 2013 ~
Last Visit: May 26 2026
|
Alert Moderator
|
|


