|
|
 Posted - October 20 2014 : 7:24:00 PM Posted - October 20 2014 : 7:24:00 PM


|
I ordered these brass inserts so I can do away with the push in trucks and use screw in trucks.I don't know what size hole to drill. I tried a 9/64 but it is a tab to large. Any suggestions?
http://www.ebay.com/itm/280897951122?_trksid=p2055119.m1438.l2649&ssPageName=STRK%3AMEBIDX%3AIT
|
Country:  USA ~
Posts: 338 ~
Member Since: February 08 2013 ~
Last Visit: January 27 2019 USA ~
Posts: 338 ~
Member Since: February 08 2013 ~
Last Visit: January 27 2019
|
 Alert Moderator
|
|
|
|
Posted - October 20 2014 : 7:42:30 PM
|
tramp - here is AMC's thread using those inserts: http://tycoforums.com/tyco/forum/topic.asp?TOPIC_ID=15126
Glancing through it I haven't found that info you're looking for though, I'm sure it's in there somewhere or he'll respond.
http://tycodepot.com/
|
|
|
|
|
Posted - October 20 2014 : 8:26:17 PM


|
Luckily for me I didn't have to drill the holes larger. The flat car design allowed me to secure the threaded rivet in from the top with glue, as the holes in the flats were already oversized for this piece. The design of the flat car allows the rivet to stay centered, and I just glued it in. Not sure how other Tyco cars will do with this, as I haven't tried any others yet. I DID however, take a Lima flat car last night, with the Mercedes autos on it, and installed the rivets in it, had to press them in with a soldering iron as the hole in the top area wasn't quite wide enough. So I don't have to glue that one in. 
I would think most of the Tyco cars would have the same diameter opening, so no hole drilling would be required. What kind of car are you using these on? Boxcar? Hopper? I've only tried the Flats so far, and been real happy with the results. Take some pics of what you are trying to put them in, and post them here, and I'll see if I can make any suggestions.
Jerry
" When life throws you bananas...it's easy to slip up"
|
|
Country: USA ~
Posts: 3974 ~
Member Since: January 04 2009 ~
Last Visit: January 11 2019
|
Alert Moderator

|
|
|
|
Posted - October 20 2014 : 8:50:57 PM
|
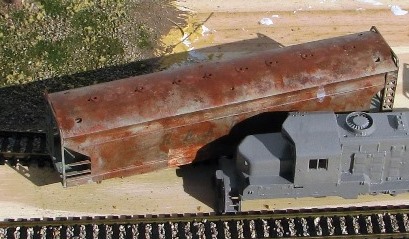
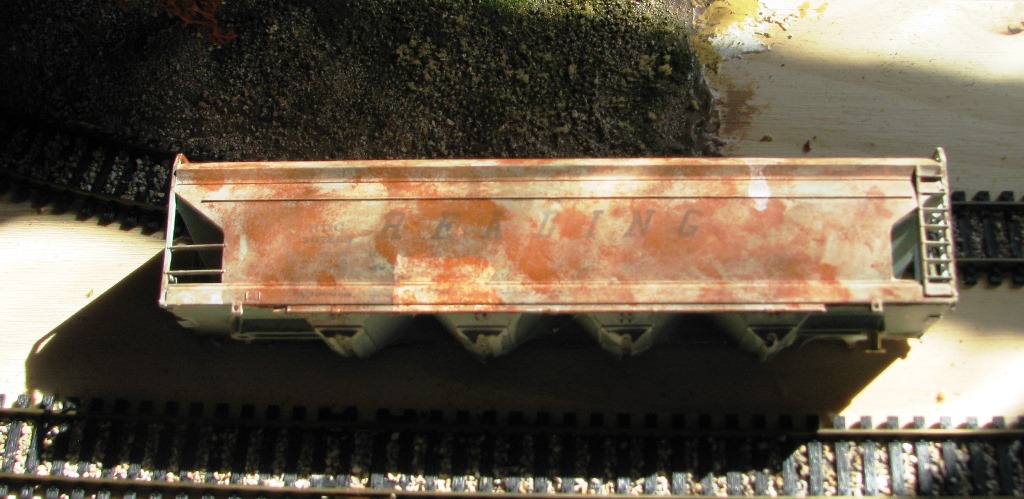
I was testing my skills on an old Junk box AHM hopper that I had. I am having to go from the bottom. A picture of the hopper is below. Tomorrow, I will post a picture of the bottom of this car. It had the push in pin to hold the trucks on. The brass insert is just a tab bit to large.
|
|
Country: USA ~
Posts: 338 ~
Member Since: February 08 2013 ~
Last Visit: January 27 2019
|
Alert Moderator
|
|
|
|
Posted - October 20 2014 : 9:13:13 PM
|
Off topic, but if you can bring that hopper back to life you'll have a heck of a nice weathering job. That thing looks real!
http://tycodepot.com/
|
|
|
|
|
Posted - October 20 2014 : 11:38:16 PM
|
I was thinking the same thing, Jerry!
Glenn
I was thinking of the immortal words of Socrates, who said, "... I drank what?"
|
|
Country: USA ~
Posts: 1709 ~
Member Since: December 13 2008 ~
Last Visit: May 10 2026
|
Alert Moderator
|
|
|
|
Posted - October 20 2014 : 11:49:11 PM
|
| And I was, too. Junk box no more.
|
|
Country: USA ~
Posts: 2087 ~
Member Since: March 16 2013 ~
Last Visit: July 05 2018
|
Alert Moderator
|
|
|
|
Posted - October 20 2014 : 11:50:55 PM
|
| Yeah, you might have to end up drilling or JB Welding a bit to get things secure? Got a photo of the bottom and the piece you need to place?
|
|
Country: USA ~
Posts: 2087 ~
Member Since: March 16 2013 ~
Last Visit: July 05 2018
|
Alert Moderator
|
|
|
|
Posted - October 21 2014 : 12:52:08 AM
|
The other option you can use is to push the threaded insert in with a soldering iron. I did that with the Lima flat, and you can wiggle it a bit if it's not straight with the iron <quickly! > and straighten it out. If you hold the heat too long, though, you can ruin the hole. Needs a quick,deft touch to use JUST enough heat to seat it, then get it perfectly flat and 90 degrees.
To use the drilling method, you may have to order specialty drill-bits, as most normal hardware places wont' carry the much-smaller incremental bits like /64s, etc. They're out there, but you probably won't find them at Home Depot or Lowes. Sears or Ace Hardware MIGHT carry them. A VERY good hobby shop should carry some. What you really need is a set of pin gauges, which are incremental pin sizes, and you can determine the size of the hole by that ( or find the smallest bit that fits in the hole, then the next size above which does NOT, and then figure out which drill bit size in between you need.) If you're not too worried about the Hopper, I'd just use the soldering iron method, it's quick and seals the rivet in the hole. Keep us informed!
Jerry
" When life throws you bananas...it's easy to slip up"
|
|
Country: USA ~
Posts: 3974 ~
Member Since: January 04 2009 ~
Last Visit: January 11 2019
|
Alert Moderator
|
|
|
|
Posted - October 21 2014 : 06:25:55 AM
|
I use the soldering iron method to sink 2-56 nuts into the existing holes. Same procedure, as Jerry described.
http://tycodepot.com/
|
|
|
|
|
Posted - October 21 2014 : 08:18:55 AM
|
quote:I use the soldering iron method to sink 2-56 nuts into the existing holes. Same procedure, as Jerry described.
Originally posted by JNXT 7707 - October 21 2014 : 06:25:55 AM
|
Now, a word of caution. I'm putting the studs in from the TOP side, not the track side, of the chassis. Not sure how JNXT is installing his nuts, but the flat surface of the round hole is critical for the smooth pivoting of the truck. Anything interfering with that will cause you grief later. So you don't really want to be installing them from underneath, or you risk damaging the surface of the mounting hole. In case you were trying to put them in from the bottom. Not a good idea. I've used similar threaded inserts in box cars as well, so I know the technique works, it all depends on the design of the car body.
Jerry
" When life throws you bananas...it's easy to slip up"
|
|
Country: USA ~
Posts: 3974 ~
Member Since: January 04 2009 ~
Last Visit: January 11 2019
|
Alert Moderator
|
|
|
|
Posted - October 21 2014 : 12:58:18 PM
|
quote:| Not sure how JNXT is installing his nuts.... |

On the nut install I am going from the BOTTOM, not the top. Different from Jerry's rivet install!
http://tycodepot.com/
|
|
|
|
|
Posted - October 21 2014 : 3:13:04 PM
|
A #30 drill bit is .1285. It should be a better fit as the brass inserts are .127 OD. They might have to be glued in due to the .0015 difference.
Another possibility is to drill an 1/8" hole and ream it slightly to get a press in fit.
Ray
|
|
Country: USA ~
Posts: 1285 ~
Member Since: December 14 2005 ~
Last Visit: May 16 2019
|
Alert Moderator
|
|
|
|
Posted - October 21 2014 : 4:47:41 PM
|
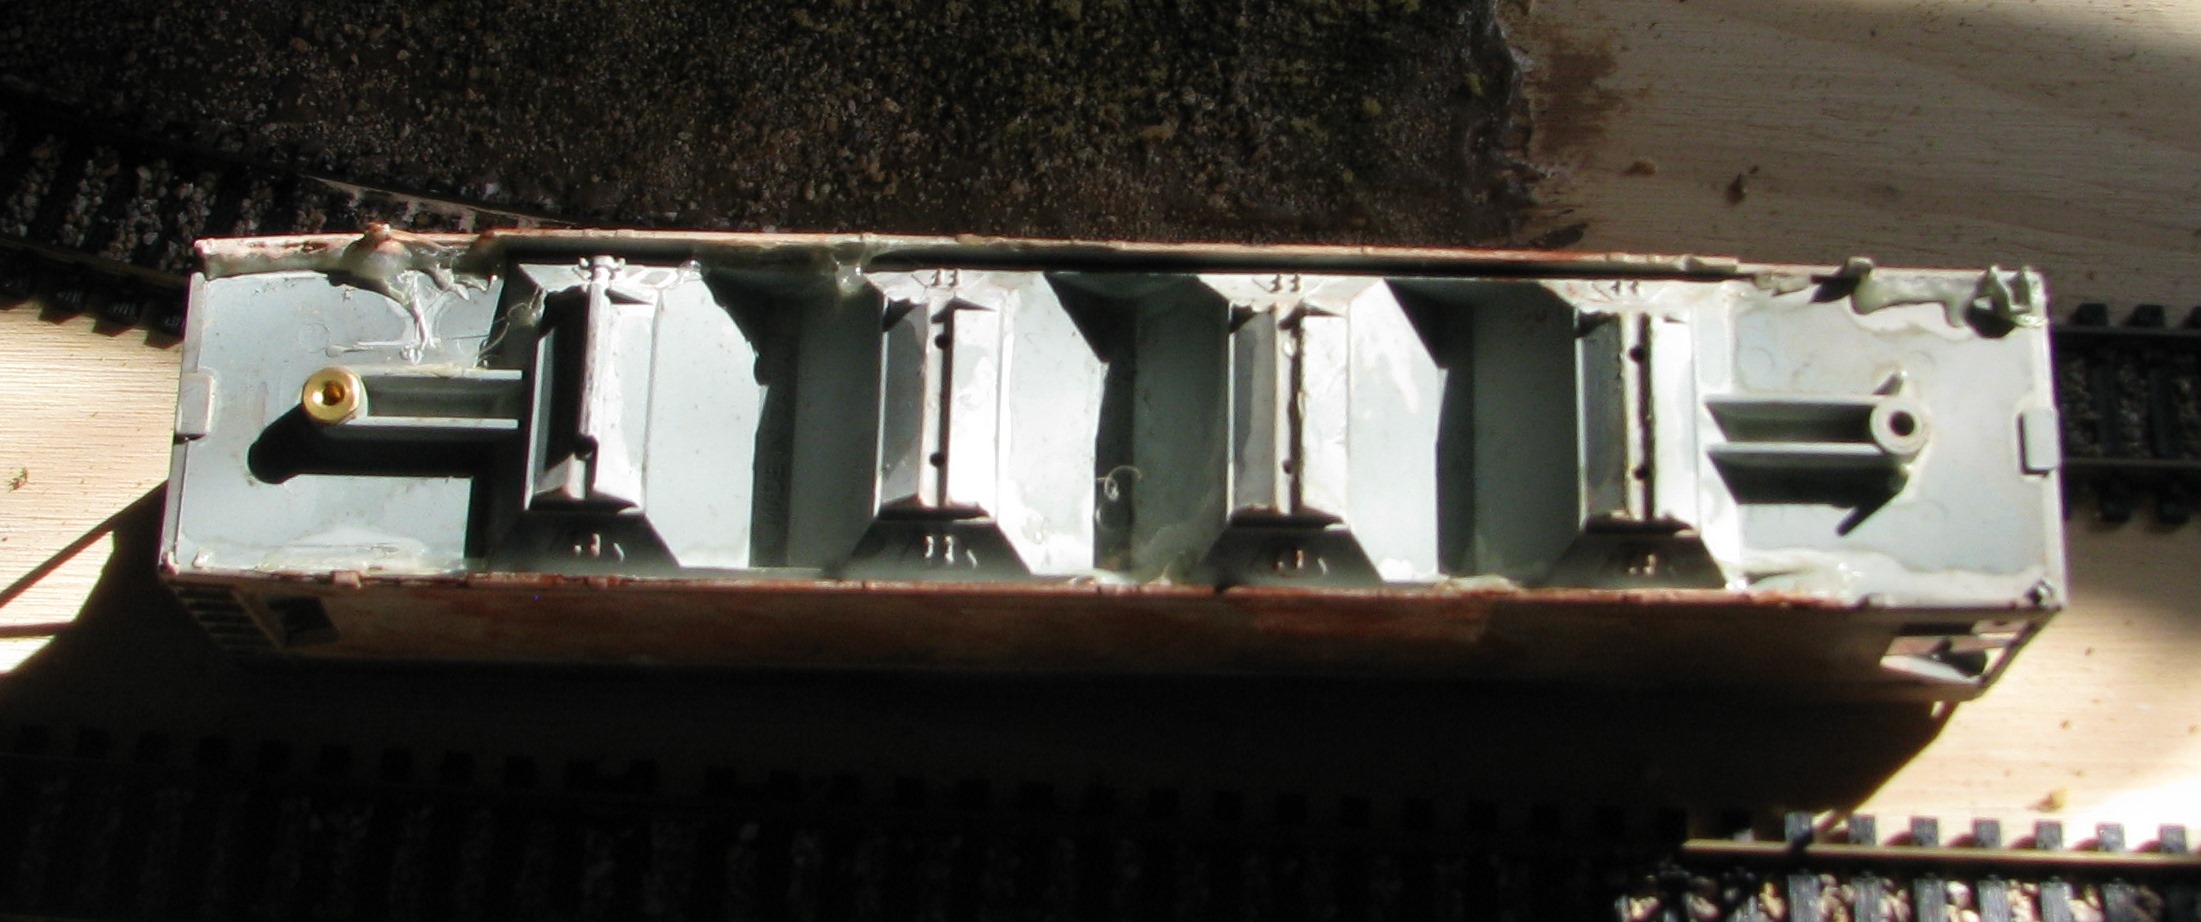
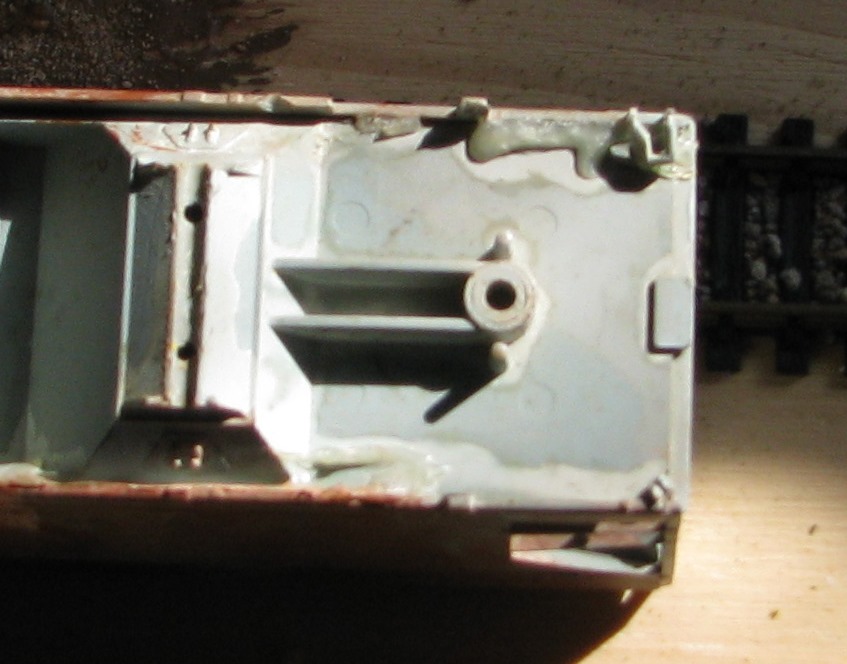
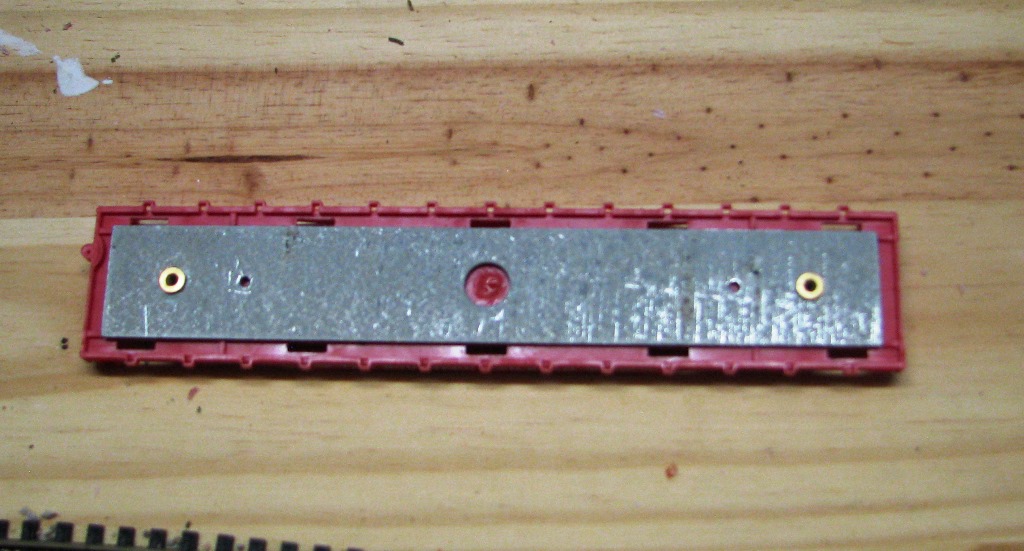
Here is a picture of the bottom of the hopper. A 9/64 drill bit was used for the insert but it is a tab larger and the insert can slide out. On the tyco cars with the push in trucks, the hole is slightly larger than the insert. How do you fix that?
Edited by - thetramp on October 21 2014 4:59:30 PM
|
|
Country: USA ~
Posts: 338 ~
Member Since: February 08 2013 ~
Last Visit: January 27 2019
|
Alert Moderator
|
|
|
|
Posted - October 21 2014 : 5:53:29 PM
|
tramp - see Jerry's post above. It appears from your photos that you are trying to install the inserts from the bottom. They go in from the top of the chassis.
As I understand it from Jerry's install thread, the brass rivets extend down and act as a centering post for the trucks.
http://tycodepot.com/
|
|
|
|
|
Posted - October 21 2014 : 7:28:25 PM
|
| I tried this just a few moments ago. I used a 1/8 bit to open the hole some. It was a little small so I used my soldering iron and touched the hole from the bottom of the car to pen it up some. The insert than went in slightly than I used the iron again on the insert. The insert went right in, it is tight and straight. I also put 1 insert from the top and is the same - tight and straight however how can this be done from the top when the top won't come off the bottom? Now how to put the inserts in a hole that is slightly larger. I will look around for an old non fixable car and try Jerry's suggestion of using a 2-56 nut.
|
|
Country: USA ~
Posts: 338 ~
Member Since: February 08 2013 ~
Last Visit: January 27 2019
|
Alert Moderator
|
|
|
|
Posted - October 21 2014 : 9:15:12 PM
|
quote:I tried this just a few moments ago. I used a 1/8 bit to open the hole some. It was a little small so I used my soldering iron and touched the hole from the bottom of the car to pen it up some. The insert than went in slightly than I used the iron again on the insert. The insert went right in, it is tight and straight. I also put 1 insert from the top and is the same - tight and straight however how can this be done from the top when the top won't come off the bottom? Now how to put the inserts in a hole that is slightly larger. I will look around for an old non fixable car and try Jerry's suggestion of using a 2-56 nut.
Originally posted by thetramp - October 21 2014 : 7:28:25 PM
|
tramp I will give you the disclaimer - my 2-56 nut suggestion is amazingly simple but does require a very cautious, light hand with the soldering iron. Your goal is to sink the nut into the hole as straight as you possibly can, until the top of the nut is exactly even with the original hole rim. Go a little at a time and don't let the soldering iron get the nut too hot. If in doubt, stop and let it cool. Once in, check to see that it's flat - if not, you can carefully adjust. Once situated to my liking, I put a drop of CA adhesive around it, just to make sure it's a solid connection.
http://tycodepot.com/
|
|
|
|
|
Posted - October 21 2014 : 9:39:53 PM
|
Well, thetramp, I see your problem.... you are trying this on an enclosed hopper car. You've chosen one of the MOST difficult cars to do this to. The hopper does come apart, as it is not molded in that big a shape, but getting it apart will require some effort, I'm sure. Most flats or boxcars have a chassis that comes off of the main body, so it's much easier to deal with. Just for yuks, I just took apart a Tyco Boraxo enclosed hopper I had laying on top of my PC, and there is no room to get the stud into the hole from top side easily. Not sure which brand you are trying this on, but I bet it's similar in design. There are other 2-56 threaded inserts which have no flange lip, and you can heat insert them, or glue them in, from the bottom. Since I've only wanted to convert flats and boxcars right now, I've had no need to get that type and try it. And the flanged type work great on those I've tried. I think you may need the non-flanged type of insert to do what you want. Sorry that my method is not much help to you for the type of car you want to convert/upgrade 
Jerry
" When life throws you bananas...it's easy to slip up"
|
|
Country: USA ~
Posts: 3974 ~
Member Since: January 04 2009 ~
Last Visit: January 11 2019
|
Alert Moderator
|
|
|
|
Posted - October 21 2014 : 11:04:56 PM
|
| That hopper I am using is a junk hopper and I use it to try my hand at things such as weathering, trying my hand at inserts and what else comes along. I picked up some coupler boxes and will try my hand at gluing them to the body. Will probably use the inserts on flats and box cars. I have one old hopper I use for weathering and graffiti and when I mess up, I simply repaint and try again. I appreciate all the info Jnxt and amc has to offer. It certainly helps.
|
|
Country: USA ~
Posts: 338 ~
Member Since: February 08 2013 ~
Last Visit: January 27 2019
|
Alert Moderator
|
|
|
|
Posted - October 22 2014 : 8:47:44 PM
|
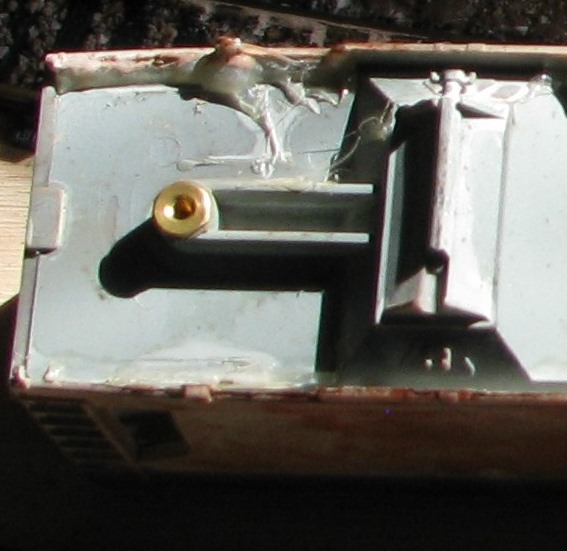
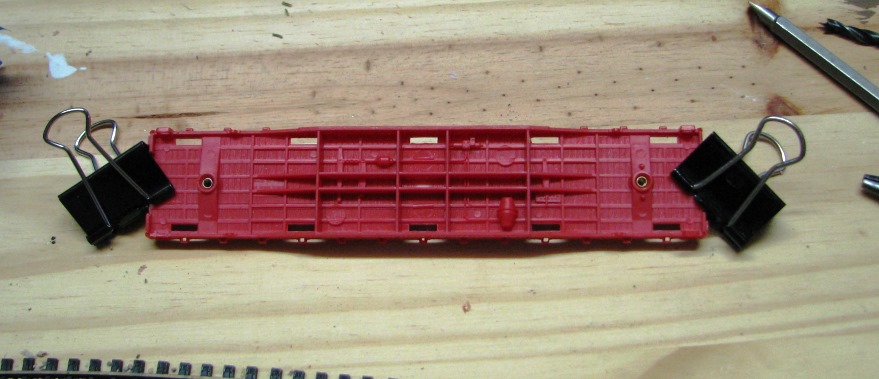
Working on installing the brass inserts. The car is a tyco bulkhead flat car with a pulpwood load. I took the car apart and took the weight off. Then I drilled out the hole in the weight to match the size of the insert then glued the insert to the weight. In the process of gluing the weight to the car. As you can see from the underside, the insert does not come all the way to the top of the truck hole. Not sure how that will work when screwing the truck in. Then I will install a coupler box and hopefully everything will work correctly
.

|
|
Country: USA ~
Posts: 338 ~
Member Since: February 08 2013 ~
Last Visit: January 27 2019
|
Alert Moderator
|
|
|
|
 Posted - October 23 2014 : 12:01:19 AM Posted - October 23 2014 : 12:01:19 AM
|
quote:Working on installing the brass inserts. As you can see from the underside, the insert does not come all the way to the top of the truck hole. Not sure how that will work when screwing the truck in.
Originally posted by thetramp - October 22 2014 : 8:47:44 PM
|
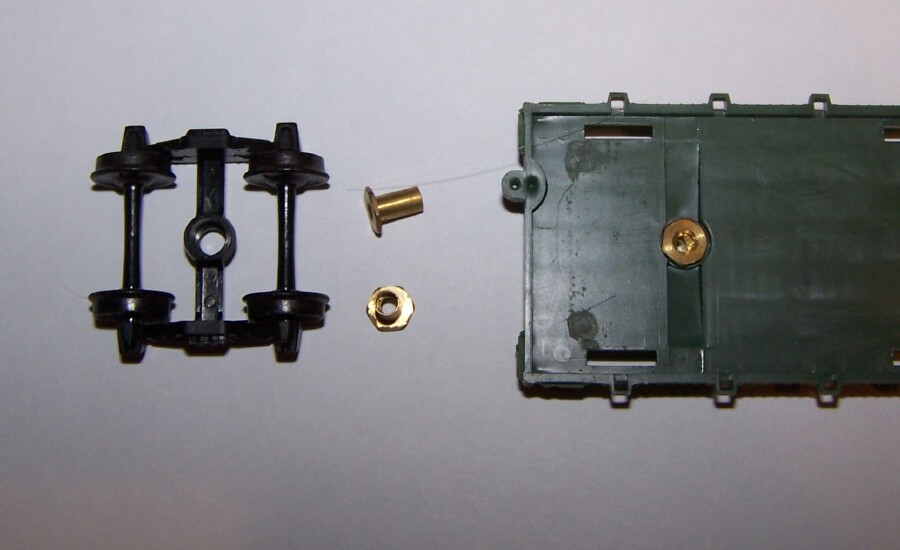
Dude, you are making that WAY harder than it has to be!!!!  Why are you trying to put it on TOP of the weight????!!!! You simply drop it in the hole UNDER the weight , directly into the plastic flat body, put glue on both ramped sides, and put the weight BACK on top of it. Simple! It will protrude through the hole underneath to center the truck on it, and I used a small spring on the inside as well, the screw holds it in, and it gives it some play. <headsmack!> Why are you trying to put it on TOP of the weight????!!!! You simply drop it in the hole UNDER the weight , directly into the plastic flat body, put glue on both ramped sides, and put the weight BACK on top of it. Simple! It will protrude through the hole underneath to center the truck on it, and I used a small spring on the inside as well, the screw holds it in, and it gives it some play. <headsmack!>  That is the easy flat to do this to, the flange should fit down in the hole flush. At least if it's a Tyco it will. OMG, guy.... That is the easy flat to do this to, the flange should fit down in the hole flush. At least if it's a Tyco it will. OMG, guy....
Jerry
" When life throws you bananas...it's easy to slip up"
|
|
Country: USA ~
Posts: 3974 ~
Member Since: January 04 2009 ~
Last Visit: January 11 2019
|
Alert Moderator
|
|
|
|
Posted - October 23 2014 : 12:04:55 AM
|
quote: quote:Working on installing the brass inserts. As you can see from the underside, the insert does not come all the way to the top of the truck hole. Not sure how that will work when screwing the truck in.
Originally posted by thetramp - October 22 2014 : 8:47:44 PM
|
Dude, you are making that WAY harder than it has to be!!!! Why are you trying to put it on TOP of the weight????!!!! You simply drop it in the hole UNDER the weight , directly into the plastic flat body, put glue on both ramped sides, and put the weight BACK on top of it. Simple! It will protrude through the hole underneath to center the truck on it, and I used a small spring on the inside as well, the screw holds it in, and it gives it some play. <headsmack!> That is the easy flat to do this to, the flange should fit down in the hole flush. At least if it's a Tyco it will. OMG, guy....
Jerry
Originally posted by AMC_Gremlin_GT - October 23 2014 : 12:01:19 AM
|
" When life throws you bananas...it's easy to slip up"
|
|
Country: USA ~
Posts: 3974 ~
Member Since: January 04 2009 ~
Last Visit: January 11 2019
|
Alert Moderator
|
|
|
|
Posted - October 23 2014 : 08:57:30 AM
|
And, if you're going to install Kadee body-mount couplers, NOW is the time to do it. Do NOT reinstall the weight, you get your coupler body, a drill bit, center it, drill it for a screw or glue it ( I did both on some, I prefer to have a nice mechanical <screw> holding it, not trusting glue long term ). I also had short self-tapping 2-56 screws, so I could do a partial drill, then let the screw self-tap the rest, and hold it solid, and it was flush with the top of the plastic where the weight goes, so it didn't protrude and need cutting off. I was lucky to have those screws, you may just want to use glue. But I want something that can take a drop to the floor and still hold up. Glue probably wouldn't do that.
Jerry
" When life throws you bananas...it's easy to slip up"
|
|
Country: USA ~
Posts: 3974 ~
Member Since: January 04 2009 ~
Last Visit: January 11 2019
|
Alert Moderator
|
|
|
|
Posted - October 23 2014 : 12:07:26 PM
|
This is also a good place to use the nylon screws that come with the 20/30 series Kadee couplers. Once installed you can cut them flush with a knife or dremel.
http://tycodepot.com/
|
|
|