|
|
 Posted - February 02 2014 : 11:13:10 AM Posted - February 02 2014 : 11:13:10 AM


|
Well, the 2nd Athearn Crane project metastasized (probably a bad word choice there) into a crane AND BOOM CAR project, because I wanted a visually matched set of both, not a painted crane and an anonymous following boom car. I decided to light the small caboose cabin, so I made pickup wipers (metal axle wrap-arounds, actually) for the boom car and wired them using 28 AWG computer ribbon wire from an old PC (which I harvested before tossing).
When doing soldering for this, it is important to use alligator (or my preference, smooth jaw) clips to act as heat sinks to wick away as much heat as possible from the soldering point. Even then, one must be quick and precise. I tinned each end of the wrap-around brass strip first, then clipped it to the center portion and just gave each tinned end a moment's solder heat to enable the ends to secure flat to the center area, then did a similar quick touch with a tinned stranded wire to fix the wire for routing to the caboose cabin. The wheels are Intermountain 33" metal ones- insulated on one side.
There was a bit of trimming required to the underside of the under frame to allow each truck - with the wire attached- to swivel easily by having the wire pass under the trimmed crossbar. That keeps the wire from rubbing against the wheel and the cross frame keeps the wire out of the way without using any CA glue or such. I then used liquid plastic electric tape to protect the exposed wire (and enable durability of the electrical connection with the movement of the truck).
I then masked the existing new paint and decals (note- dullcoat the decal work before
you do any masking. (don't ask how I found this out  ), and sprayed a Model Master FS 30219 Dark Tan enamel on the top deck, followed by some Model Master Flat Black enamel dry brushing to give a weathered effect. I looked at a number of research photos of real boom cars and found that the work surfaces were either painted as the rest of the car in a same color, but weathered, or - as in my version- resurfaced with wood which then became weathered with use. I followed with dull coat after weathering was completed. ), and sprayed a Model Master FS 30219 Dark Tan enamel on the top deck, followed by some Model Master Flat Black enamel dry brushing to give a weathered effect. I looked at a number of research photos of real boom cars and found that the work surfaces were either painted as the rest of the car in a same color, but weathered, or - as in my version- resurfaced with wood which then became weathered with use. I followed with dull coat after weathering was completed.
That rectangular lump is a "re-purposed" lead fishing weight (Walmart) for proper NMRA weighting (to be hidden in the caboose cabin). I attached that with GOOP! (Craft Arte) clear craft adhesive before any primer painting was started.
Here are 2 images of the work:

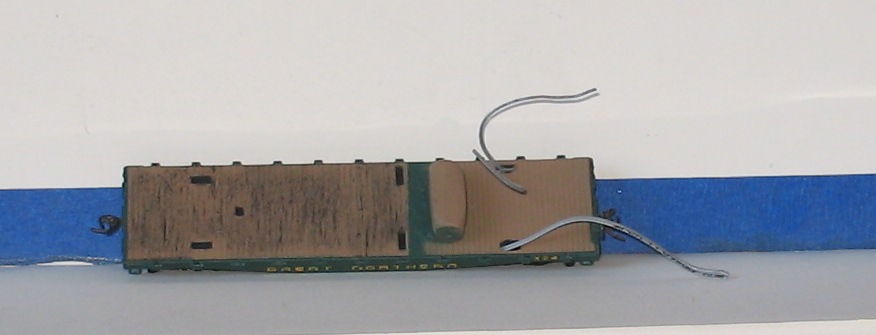
You will note there are two wires on each truck- I tried to create a simple constant lighting circuit with just a bridge rectifier and one LED (and 470 ohm resistor) but that blew the LED on my test track when I clipped it on and powered the track, so I reverted to a more elementary two-LED circuit, with one LED to be wired P-N and the other wired in reverse N-P (again, each LED with a 470 ohm resistor) so that the caboose cabin lights in either direction. This works for my old Athearn BB engine LED modifications (not yet DCC) for forward/reverse operation, so I will keep working on my electronics skills on another project.
Hopefully, the constant lighting circuit I have built fro the crane will be better- but I need to connect the other LEDs to that first and test it.
Be back soon, with more updates (painting and decaling the crane cabin, completing the boom car).
Siouxlake Ron
|
Country:  USA ~
Posts: 510 ~
Member Since: September 21 2011 ~
Last Visit: December 21 2014 USA ~
Posts: 510 ~
Member Since: September 21 2011 ~
Last Visit: December 21 2014
|
 Alert Moderator
|
|
|
|
Posted - February 02 2014 : 11:25:55 AM

|
| ron that is looking good so far,enjoy these tutorials ken
|
Country:  United Kingdom ~
Posts: 8294 ~
Member Since: September 28 2006 ~
Last Visit: October 20 2021 United Kingdom ~
Posts: 8294 ~
Member Since: September 28 2006 ~
Last Visit: October 20 2021
|
Alert Moderator

|
|
|
|
Posted - February 02 2014 : 10:28:20 PM
|
quote:Well, the 2nd Athearn Crane project metastasized (probably a bad word choice there)
Originally posted by siouxlake - February 02 2014 : 11:13:10 AM
|
I think you mean metamorphosed as in, "the caterpillar metamorphosed into a butterfly."
Metastasized means the cancer spread.
I prefer to compare your model work to a beautiful butterfly as opposed to a cancer. 
Carpe Manana!
|
|
Country: USA ~
Posts: 2418 ~
Member Since: September 17 2013 ~
Last Visit: July 17 2026
|
Alert Moderator
|
|
|
|
|
|

