|
|
 Posted - November 28 2013 : 10:31:52 AM Posted - November 28 2013 : 10:31:52 AM


|
...my current Christmas train engines, TYCO Ten and Twelve Wheelers. Hope to have at least one painted in Ravens colors and running by Christmas. The other will be in more Christmas like paint.
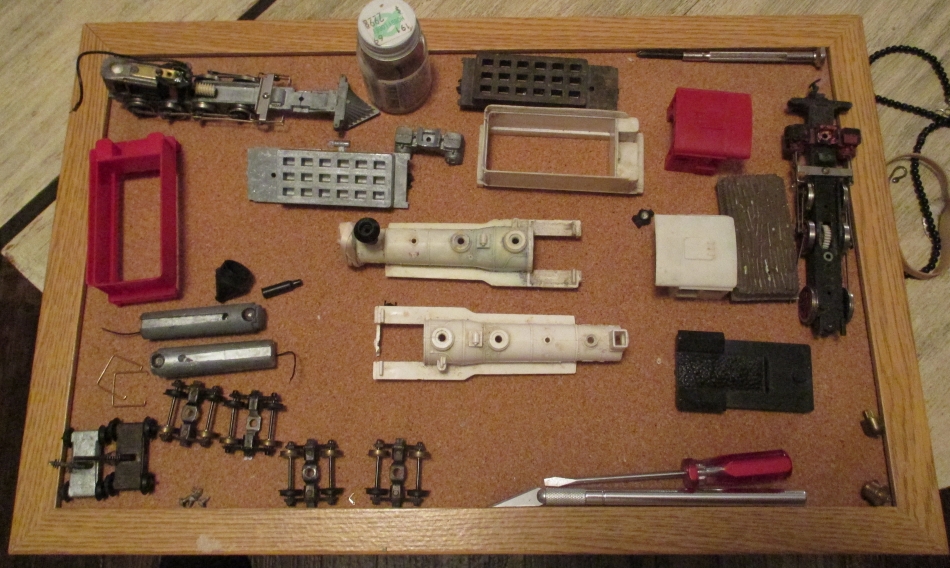
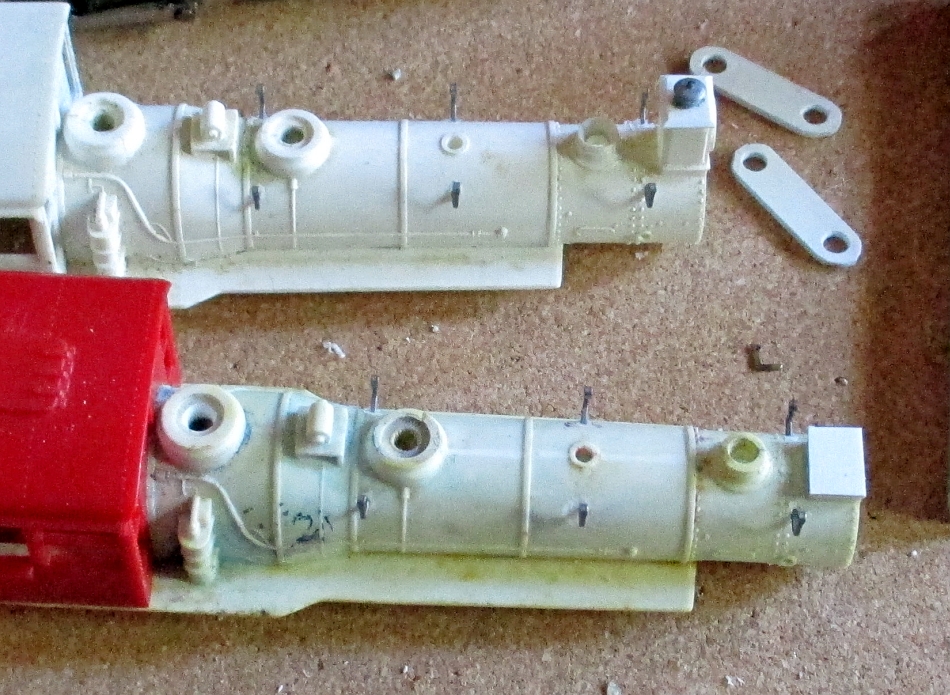
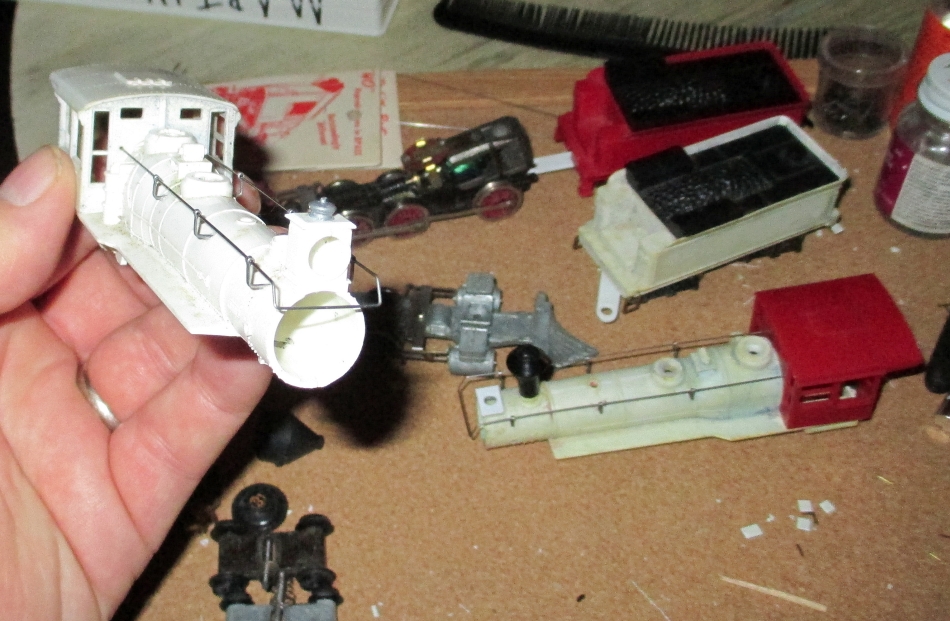
Progress to this point...first I had to scratch a new top for one oil lamp with bits of styrene and part of an HO milk can...
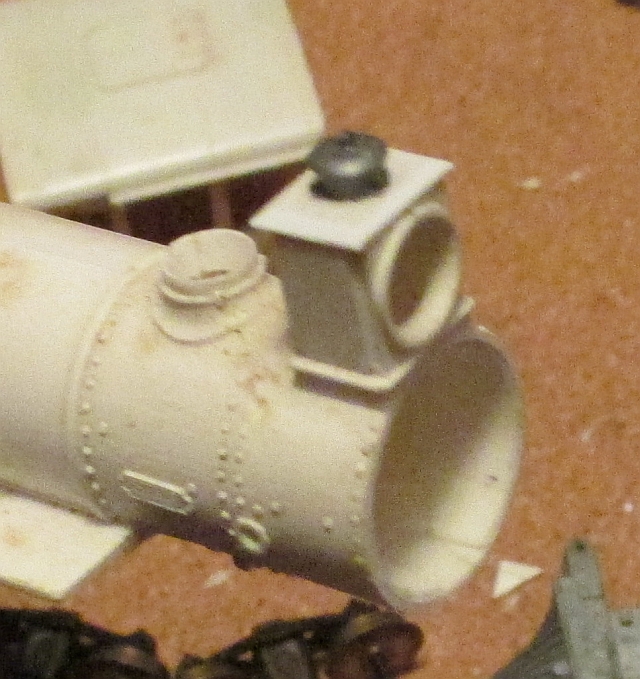
...then I had to remove a busted up one on the other and place deck for the new one...
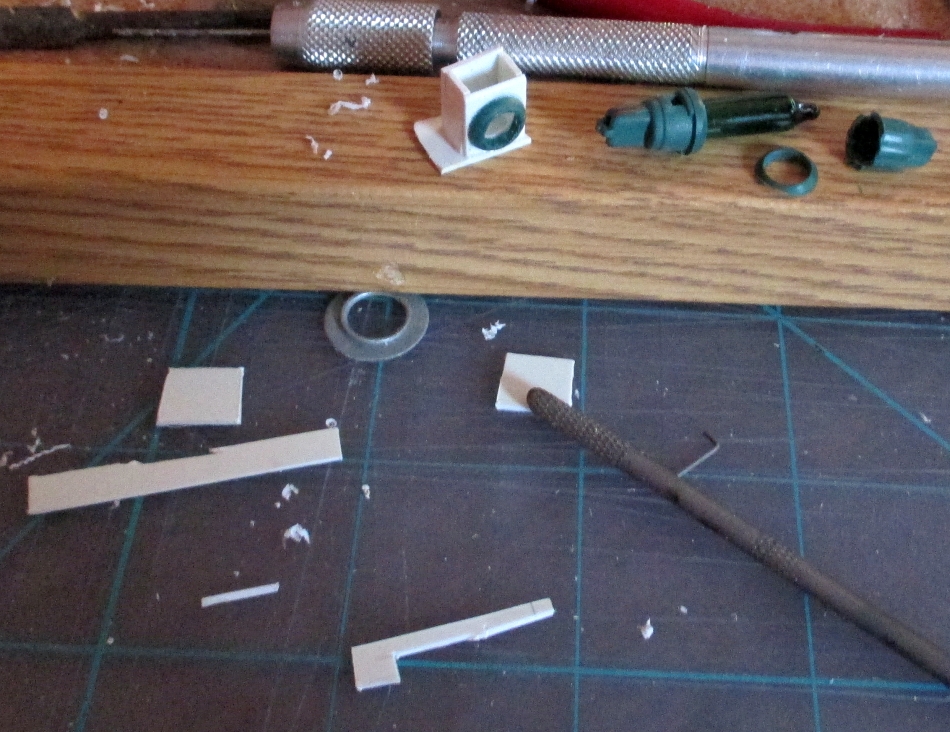
...both had lost their rear shell clips long ago, so new ones were made...
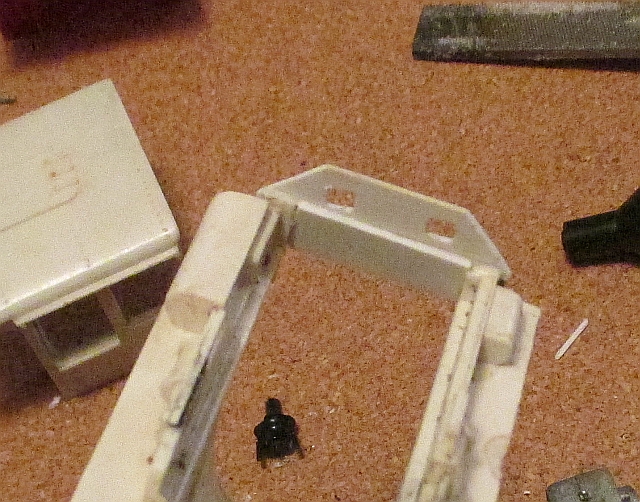
...a missing motor and screws were found in my motor and parts bins...
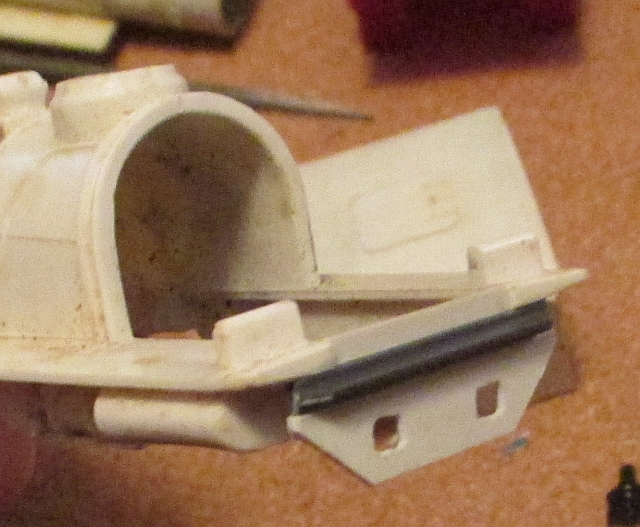
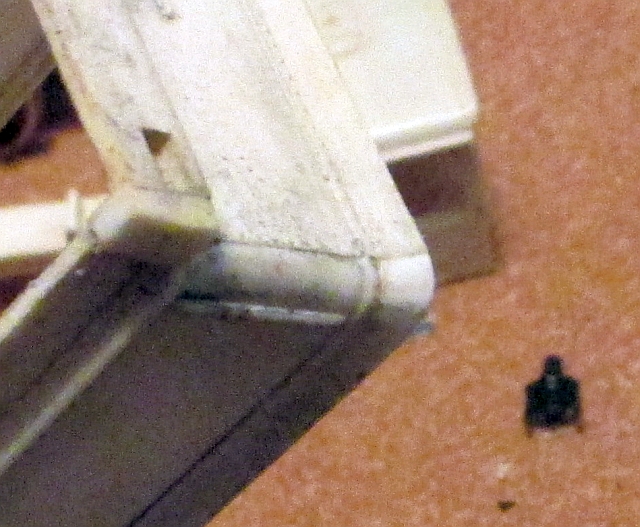
...there was a damaged corner on one tender shell that needed a styrene patch grafted in...
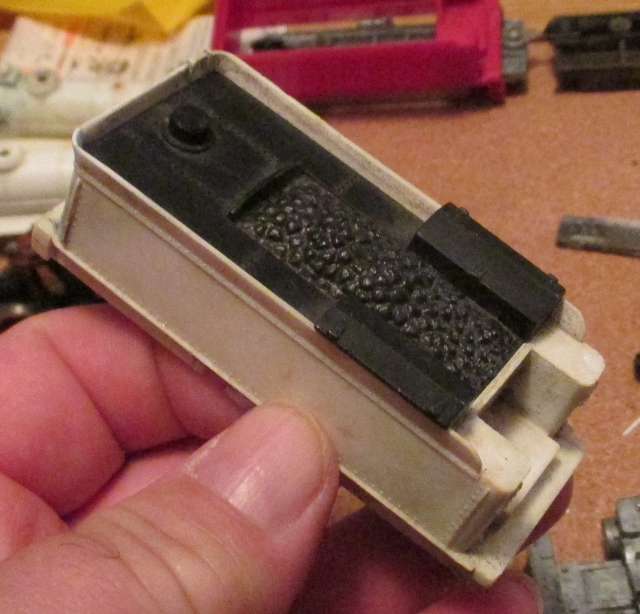
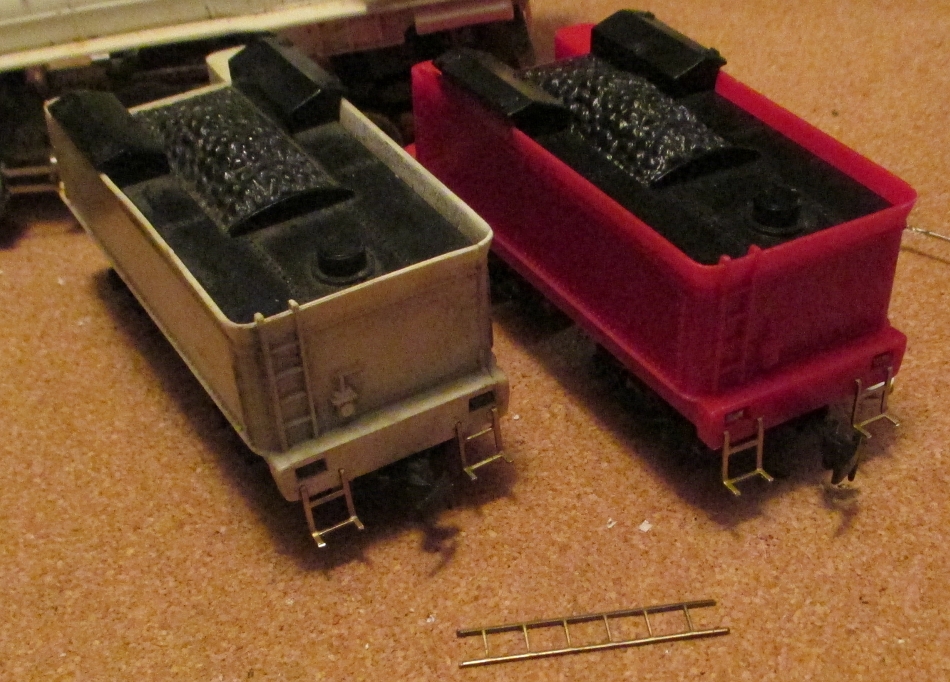
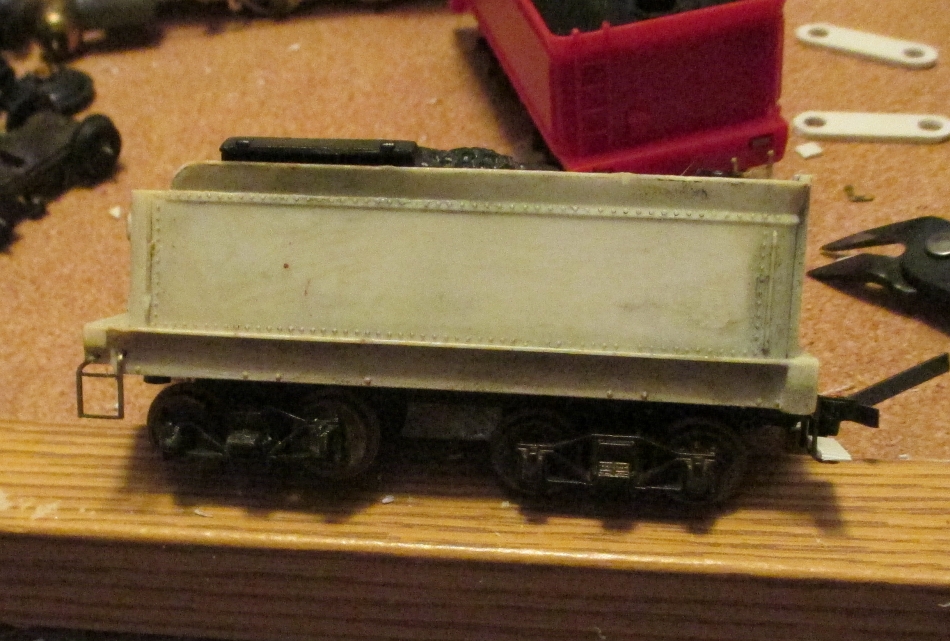
...the rather pathetic wood load was swapped out for another coal deck, to give them a "sisterhood" with shared details, and to get rid of that pathetic wood load...

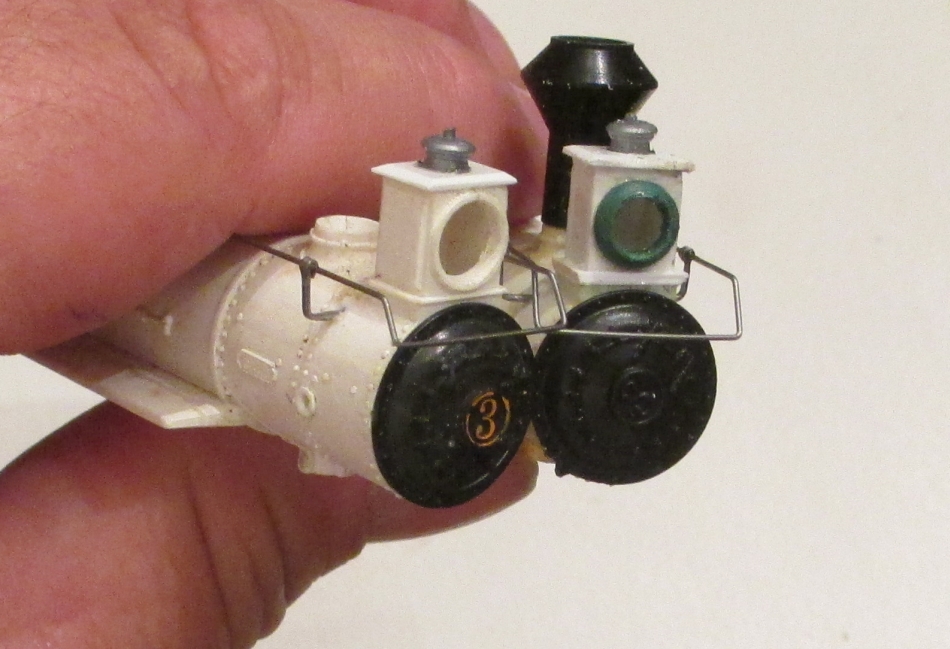
...finally, two missing domes and boiler fronts were found on Ebay for far less than they normally go for--just not my style to spend more than I need to on the hobby.
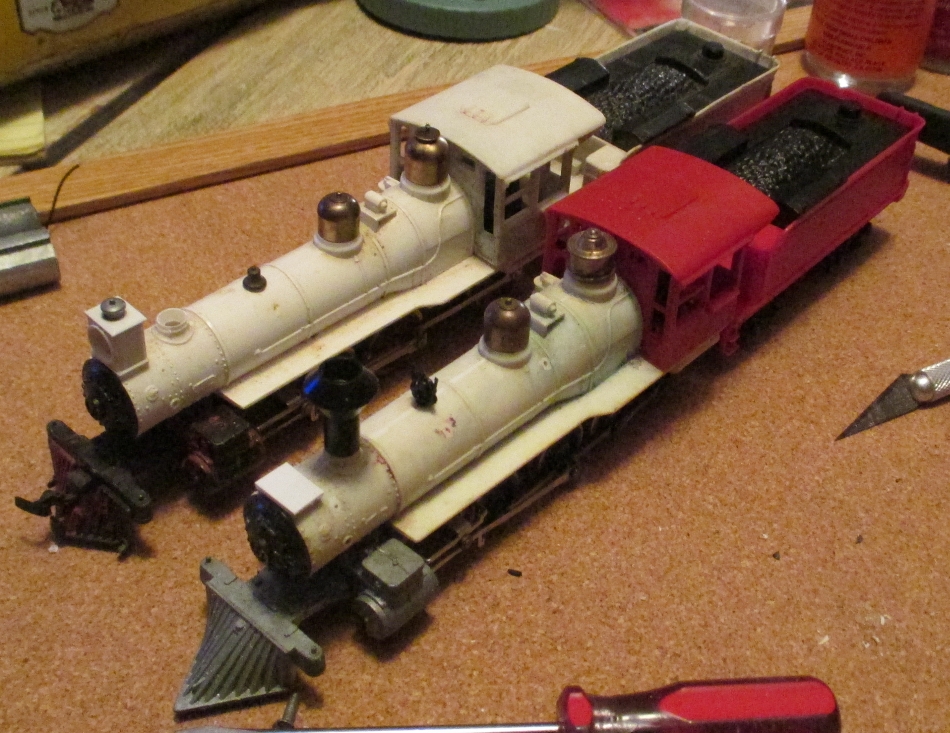
May not be finished by Christmas, but they will be running by then...you will note the mismatched domes on the one on the right. While not common, it was not unusual to mix domes on the real ones and for the same reason--it's what was on hand at the time when she was last shopped.
|
|
|
|
|
Posted - November 28 2013 : 11:08:13 AM
|
Umm...shaygetz, if you paint it in Ravens colors, it's not likely to run very well  
http://tycodepot.com/
|
|
|
|
|
Posted - November 29 2013 : 09:37:18 AM
|
Do you have any pix (or general instructions) of how you dismantled one of these engines? I'd like to do a similar repaint project. But can't for the life of me figure out how to get one of these engines apart without destroying it.
ArtSkull.com: Graphic Design & Illustration
|
Country:  USA ~
Posts: 69 ~
Member Since: December 11 2012 ~
Last Visit: January 19 2020 USA ~
Posts: 69 ~
Member Since: December 11 2012 ~
Last Visit: January 19 2020
|
 Alert Moderator

|
|
|
|
Posted - November 29 2013 : 09:46:44 AM

|
hi artskull,these may help ken
http://www.hoseeker.net/assemblyexplosiontyco/tyco460tenwheeler1890pg2.jpg
http://www.hoseeker.net/assemblyexplosiontyco/tyco460tenwheeler18901965pg4.jpg
|
Country:  United Kingdom ~
Posts: 8294 ~
Member Since: September 28 2006 ~
Last Visit: October 20 2021 United Kingdom ~
Posts: 8294 ~
Member Since: September 28 2006 ~
Last Visit: October 20 2021
|
Alert Moderator
|
|
|
|
Posted - November 29 2013 : 10:45:39 AM
|
quote:Umm...shaygetz, if you paint it in Ravens colors, it's not likely to run very well
Originally posted by JNXT 7707 - November 28 2013 : 11:08:13 AM
|
After the team was gutted to pay for Flacco, I was predicting a 5-11 season. Now that they're 6-6, I'll be hearing it from my family...

quote:Do you have any pix (or general instructions) of how you dismantled one of these engines? I'd like to do a similar repaint project. But can't for the life of me figure out how to get one of these engines apart without destroying it.
Originally posted by artskull - November 29 2013 : 09:37:18 AM
|
They come apart fairly easy...remove the pilot truck screw and the truck, then lift the shell from that point, tipping it back and off the stubs on the frame holding it on. The domes, bell stack and cabs are a press fit---take care as the domes can be pretty tight. They are turned brass, I plan to polish mine up at final assembly. The tender shell takes a bit more care...insert the point of a small screwdriver between the shell and the frame on the end by the coupler and gently pry it apart and lift it away towards the front of the tender---it just clips on. Hope that helps...
|
|
|
|
|
Posted - November 29 2013 : 11:57:35 AM
|
good advice & the only thing my 4-6-0 needs is a motor
Btw? where does the headlight connect & how does bulb come out? 
|
|
Country: USA ~
Posts: 15028 ~
Member Since: February 23 2009 ~
Last Visit: June 15 2026
|
Alert Moderator
|
|
|
|
Posted - November 29 2013 : 12:31:30 PM
|
| hi bob sorry forgot to mention your project,as usual look forward to seeing a great pair,ken
|
|
Country: United Kingdom ~
Posts: 8294 ~
Member Since: September 28 2006 ~
Last Visit: October 20 2021
|
Alert Moderator
|
|
|
|
Posted - November 29 2013 : 3:02:34 PM
|
Thanks guys...Ben, the headlamp uses the boiler weight as a grounding point, with the boiler screw completing the circuit, there is one wire that goes back to the motor and attaches were the tender lead goes. Hope that helps...
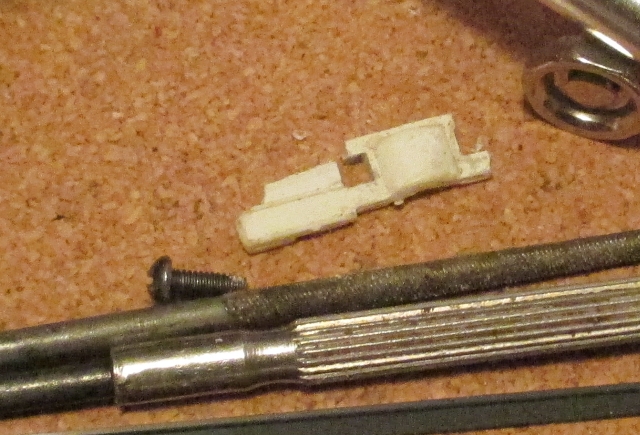
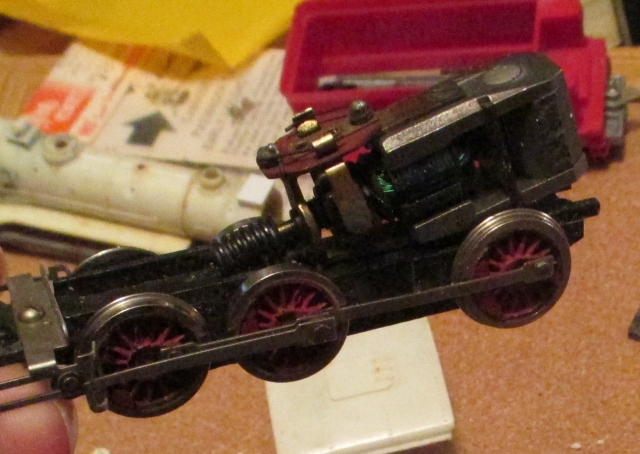
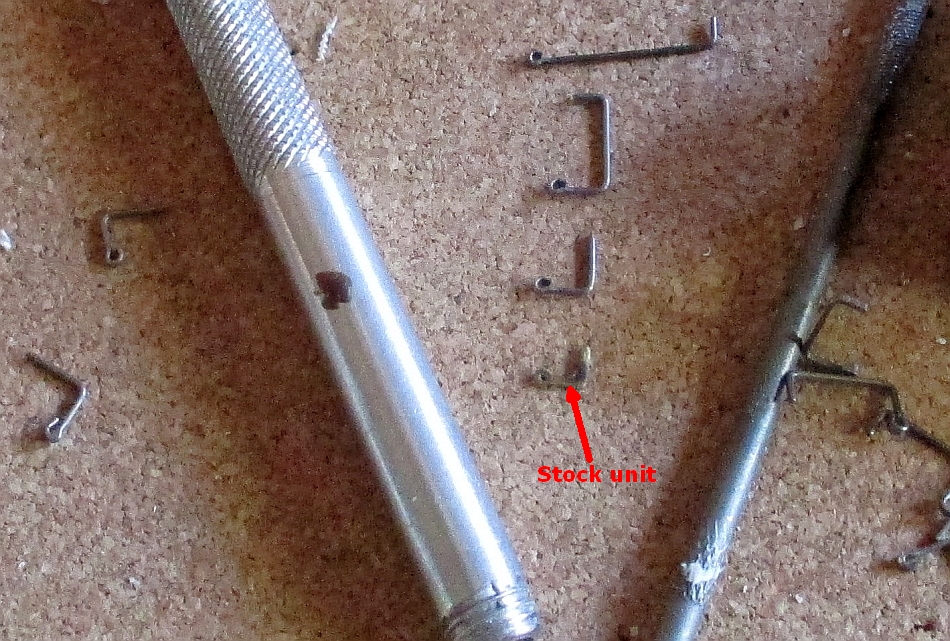
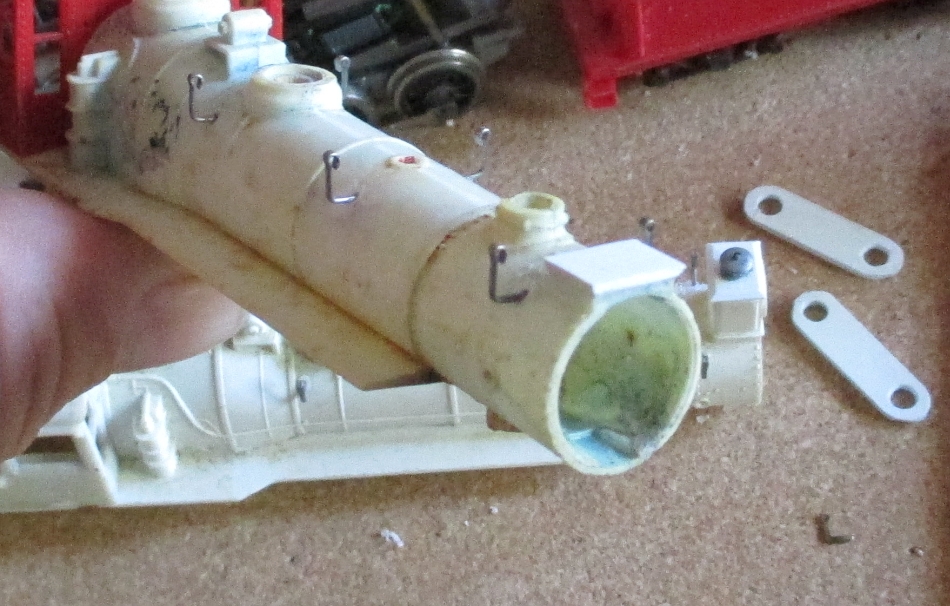
Hand rail stanchions next...since 10 of the 12 originals were missing, I made new ones from bent and clipped Athearn diesel parts (always knew diesels were good for something :p;) )
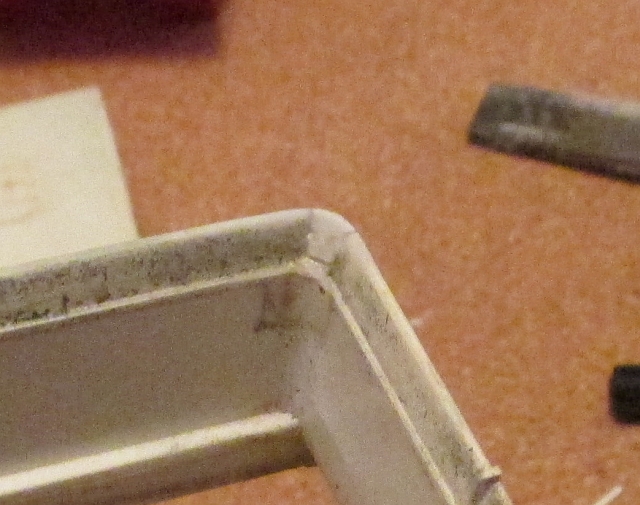
I also had to make some drawbars for the tenders, did those with layers of styrene cut to shape...
|
|
|
|
|
Posted - November 29 2013 : 4:49:46 PM
|
| ok thanks cause I want to replace the bulb with a soft white LED
|
|
Country: USA ~
Posts: 15028 ~
Member Since: February 23 2009 ~
Last Visit: June 15 2026
|
Alert Moderator
|
|
|
|
Posted - November 29 2013 : 7:05:35 PM
|
| Nice work Shayman and nice to see the photos. I liked the way you made the hand rail stanchions. I'm looking forward to seeing the photos of your painted locomotive. I've got a few of these locomotives and I still enjoy takin' 'em down once in awhile for a rebuild.
|
|
Country: USA ~
Posts: 2087 ~
Member Since: March 16 2013 ~
Last Visit: July 05 2018
|
Alert Moderator
|
|
|
|
Posted - November 29 2013 : 7:44:58 PM
|
Thanks, Barry...kinda off the cuff way to do them that worked pretty well. My only warning would be that they are slightly smaller than the TYCO stanchions, so they are not a press fit.
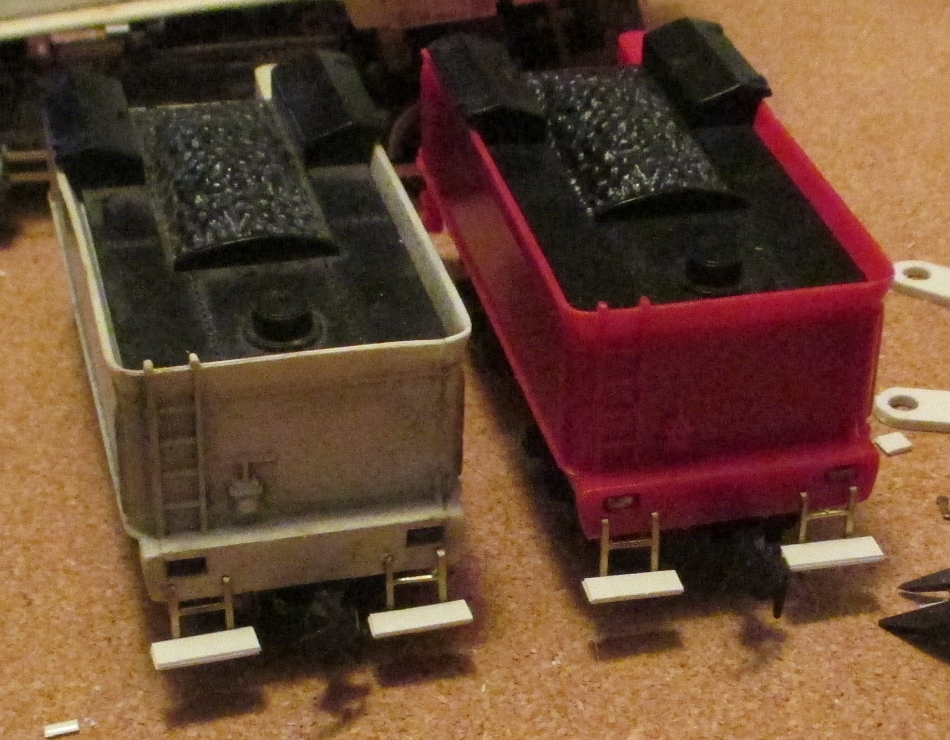
Steps were next, using my favorite material...brass ladder stock...tough, durable, able to take knocks...
|
|
|
|
|
Posted - November 29 2013 : 8:13:13 PM
|
| hi bob that step ladder solution,solved a problem for me cheers ken
|
|
Country: United Kingdom ~
Posts: 8294 ~
Member Since: September 28 2006 ~
Last Visit: October 20 2021
|
Alert Moderator
|
|
|
|
Posted - November 29 2013 : 9:24:17 PM
|
quote:hi bob that step ladder solution,solved a problem for me cheers ken
Originally posted by catfordken - November 29 2013 : 8:13:13 PM
|

|
|
|
|
|
Posted - November 29 2013 : 9:59:31 PM

|
| They're looking great! Can't wait to see them finished.
|
Country:  Canada ~
Posts: 3448 ~
Member Since: September 22 2006 ~
Last Visit: April 03 2026 Canada ~
Posts: 3448 ~
Member Since: September 22 2006 ~
Last Visit: April 03 2026
|
Alert Moderator
|
|
|
|
Posted - December 01 2013 : 4:06:06 PM
|
Thanks guys...handrails finished, bent from .020" steel wire...I secure them with crazy glue for its capillary action, makes them rock solid once it sets.
Edited by - shaygetz on December 01 2013 4:07:12 PM
|
|
|
|
|
Posted - December 01 2013 : 4:11:41 PM
|
| Seeing the comb lying behind that loco gave me an idea for using the teeth for a telltale.
|
|
Country: USA ~
Posts: 2087 ~
Member Since: March 16 2013 ~
Last Visit: July 05 2018
|
Alert Moderator
|
|
|
|
Posted - December 01 2013 : 4:15:37 PM
|
| hi bob,looking great love those handrails ken
|
|
Country: United Kingdom ~
Posts: 8294 ~
Member Since: September 28 2006 ~
Last Visit: October 20 2021
|
Alert Moderator
|
|
|
|
Posted - December 01 2013 : 5:46:41 PM
|
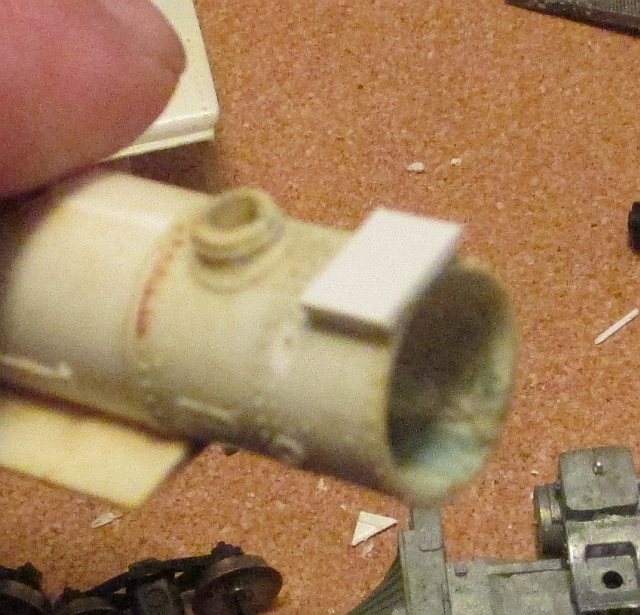
Thanks...since some parts may be lost in the postal system, I set about to make a headlight myself. The rim is cut from a Christmas light socket, the rest is styrene sheet. Just waiting for the glue to set so that I can trim it to fit...
|
|
|
|
|
Posted - December 01 2013 : 6:40:28 PM
|
New headlight awaits final shaping and touch-up...
|
|
|
|
|
Posted - December 01 2013 : 9:46:23 PM
|
Thanks for the photos and links. Literally "seeing" how other members go trough a project is a huge help and inspiration. (Regardless of their NFL affiliations. LOL!)
ArtSkull.com: Graphic Design & Illustration
|
|
Country: USA ~
Posts: 69 ~
Member Since: December 11 2012 ~
Last Visit: January 19 2020
|
Alert Moderator
|
|
|
|
Posted - December 02 2013 : 11:28:27 PM
|
| Nice headlight. I'm enjoying watching this project. Keep it comin'.
|
|
Country: USA ~
Posts: 2087 ~
Member Since: March 16 2013 ~
Last Visit: July 05 2018
|
Alert Moderator
|
|
|
|
Posted - December 10 2013 : 9:22:53 PM
|
Thanks for sharing this project. The kind of resourcefulness shown here (homemade headlight housing, improvised handrails, new tender steps, etc.) is very useful to those of us, here, who repair and use old stuff with unavailable parts.
Carpe Manana!
|
|
Country: USA ~
Posts: 2417 ~
Member Since: September 17 2013 ~
Last Visit: June 16 2026
|
Alert Moderator
|
|
|
|
Posted - December 12 2013 : 9:37:39 PM
|
| Thanks for the kind words guys...had to set them aside for the last two weeks because of work obligations...hope to be back on them soon.
|
|
|
|
|
Posted - December 12 2013 : 9:45:03 PM
|
| I repeat "How does the bulb come out?"
|
|
Country: USA ~
Posts: 15028 ~
Member Since: February 23 2009 ~
Last Visit: June 15 2026
|
Alert Moderator
|
|
|
|
Posted - December 12 2013 : 10:35:21 PM
|
quote:I repeat "How does the bulb come out?"
Originally posted by microbusss - December 12 2013 : 9:45:03 PM
|
Based on a parts diagram that I have, it looks like the smoke box front is a press fit that should pop out of the end. Then, a boiler weight should slide forward out the front revealing a light bulb down in a hole in it under the headlight. You should be able to pop that upward out of the hole trailing the wire behind it.
The picture shows a threaded base on the bulb, so I assume that it is the arrangement where the wire is soldered to a socket and the bulb screws out from the socket.
Good luck! I hope the previous owner didn't glue any of those parts in place.
Carpe Manana!
|
|
Country: USA ~
Posts: 2417 ~
Member Since: September 17 2013 ~
Last Visit: June 16 2026
|
Alert Moderator
|
|
|
|
 Posted - December 14 2013 : 01:11:33 AM Posted - December 14 2013 : 01:11:33 AM
|
I've been watching this with interest. Awesome work, SG, and thanks for the fix with the ladder stock.
The Tyco Depot
|
|
Country: USA ~
Posts: 3927 ~
Member Since: June 20 2007 ~
Last Visit: November 19 2015
|
Alert Moderator
|
|
|
|
Posted - December 14 2013 : 01:47:00 AM
|
Shay.....NICE! I myself picked up a powered frame to one of these to supply me, with another slide valve cylinder set for my current mallet projects.............
Nice restore even with the mixed domes, looks AWESOME and prototypical!
~John
Many have tried to, and failed, ya just can't repair stupid...
Do NOT try to Idiot-Proof anything!!!! God, will simply create a better......IDIOT!
|
|
Country: USA ~
Posts: 2911 ~
Member Since: March 26 2012 ~
Last Visit: January 14 2014
|
Alert Moderator
|
|


