|
|
 Posted - November 05 2013 : 1:57:49 PM Posted - November 05 2013 : 1:57:49 PM


|
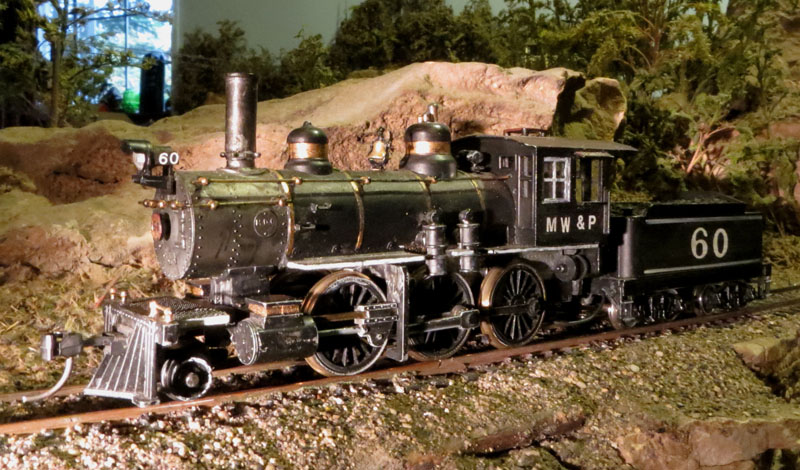
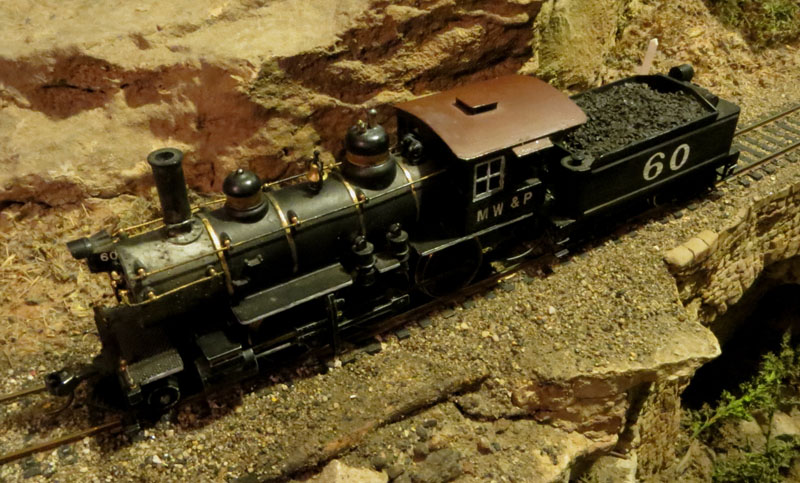
Here are a few changes to an MDC old time mogul. It was built with the modern smokestack and headlight. A brass bell was substituted for the always-broken plastic one that came with the kit. The shell was painted to make the boiler bands and a few other parts look like polished brass. Otherwise, the shell is pretty stock.
The bottom reveals some changes, though.
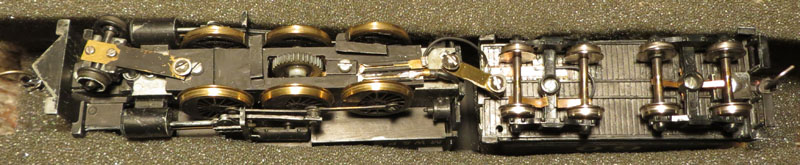
The rear driver pair was originally back farther from axle 2, but the long wheelbase and very light rear axle weighting made it derail on sharp or imperfect curves. Back in the day when MDC had parts support, I ordered another pair of short connecting rods like the ones between axles 1 and 2. With these, I measured the distance from the groove for axle 2 to where I would now want axle 3. With a razor saw and file, I cut a groove and installed a Mantua axle bearing. In the picture, you'll see the old axle 3 groove and the new bearing. This closer-coupled spacing is better balanced and rides better.
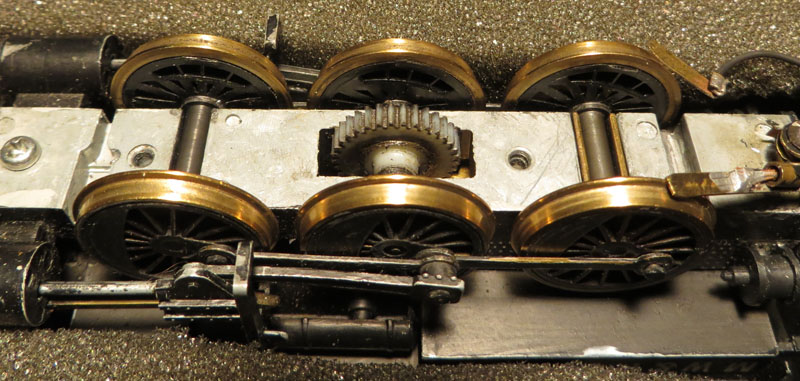
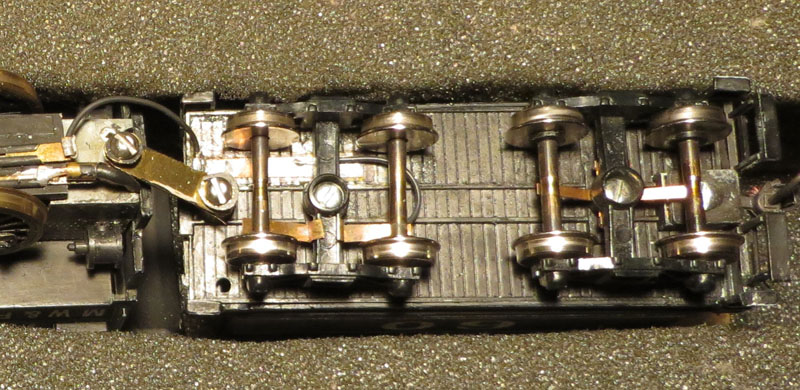
The best electrical pickup is on the drivers, so why leave half of them insulated? I replaced the axle cover plate with a piece of blank printed circuit board. Where the screws attach it, grooves were cut in the copper to insulate the board from the frame. A piece of brass was soldered on the front, then drilled and tapped for the pony truck screw. Brass pickup wipers for the insulated-side drivers are soldered to phosphor bronze strips which are soldered to the PC board. Phosphor bronze is nice and springy. Toward the back of the cover are two track connectors soldered on. One is a socket for a brass contact soldered to the wire from the motor. The other is a socket for a wire from the tender.
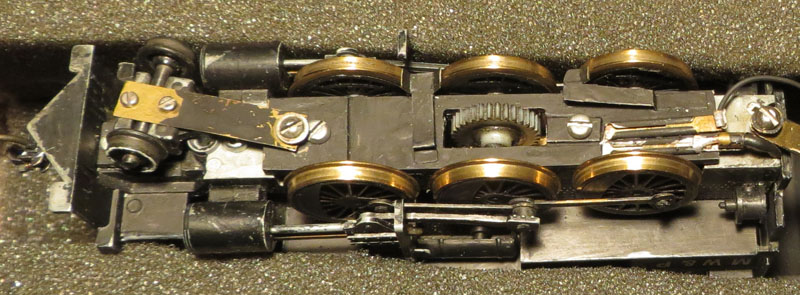
The tender is modified to pick up power from both rails. One truck is turned around to ground the tender frame to the right rail and the drawbar is modified to conduct electricity to the engine frame. The other truck picks up from the left rail and the wiper is made to not contact the frame. A very flexible wire (available from NWSL) goes from that to a strip of brass glued to, but insulated from, the tender frame. Another wire leads from that brass strip to the axle cover on the locomotive, which as previously noted, is grounded to the left rail, also.
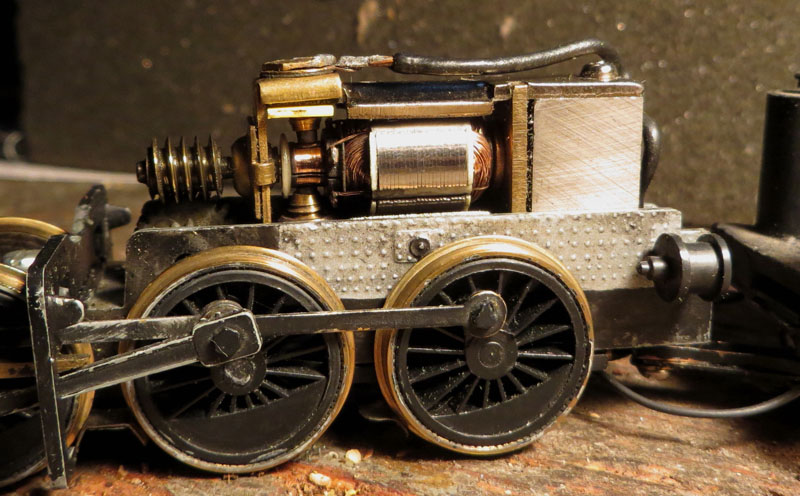
The motor has been repaired (not customized as such). The plastic bushing that insulates the top brush from the frame melted once. It has been replaced by an insulated washer on top, a plastic tube through the hole, and a square of plastic from a no trespassing sign that serves as a nut. That's the yellow part just above the commutator. The original graphite brushes wore out, and I don't know where to get more, but they're just a little smaller than the lead in a wooden pencil. I turned down the lead from a broken pencil to the correct diameter and found the correct length by trial and error. Then, being careful not to lose the springs, I replaced the brushes.
The engine runs pretty well, tracks well and pulls better than you'd expect for its weight.
Carpe Manana!
|
Country:  USA ~
Posts: 2417 ~
Member Since: September 17 2013 ~
Last Visit: June 17 2026 USA ~
Posts: 2417 ~
Member Since: September 17 2013 ~
Last Visit: June 17 2026
|
 Alert Moderator
|
|
|
|
Posted - November 05 2013 : 2:52:08 PM

|
| hi scsshaggy,nice bit of work,plus a great looking loco ken
|
Country:  United Kingdom ~
Posts: 8294 ~
Member Since: September 28 2006 ~
Last Visit: October 20 2021 United Kingdom ~
Posts: 8294 ~
Member Since: September 28 2006 ~
Last Visit: October 20 2021
|
Alert Moderator

|
|
|
|
Posted - November 05 2013 : 6:15:25 PM
|
Very creative with the brush replacement! What hardness of pencil lead did you use? Because it seems to me pencil lead would wear pretty quickly. Of course, you could use harder grades of lead at the expense of conductivity.
Glenn
I was thinking of the immortal words of Socrates, who said, "... I drank what?"
Edited by - gmoney on November 05 2013 6:28:20 PM
|
|
Country: USA ~
Posts: 1709 ~
Member Since: December 13 2008 ~
Last Visit: May 10 2026
|
Alert Moderator
|
|
|
|
Posted - November 05 2013 : 6:52:06 PM
|
quote:Very creative with the brush replacement! What hardness of pencil lead did you use? Because it seems to me pencil lead would wear pretty quickly. Of course, you could use harder grades of lead at the expense of conductivity.
Originally posted by gmoney - November 05 2013 : 6:15:25 PM
|
I used #2 because that's what was handy. I'll probably have to replace it fairly often, but I don't really rack up the mileage on this model, anyway.
Carpe Manana!
|
|
Country: USA ~
Posts: 2417 ~
Member Since: September 17 2013 ~
Last Visit: June 17 2026
|
Alert Moderator
|
|
|
|
Posted - November 05 2013 : 11:49:30 PM
|
| That is a great presentation; nice model and good captioned photos to clearly show what you did. That is cool. Man, I got lost, though, reading about the wiring changes. I'm gonna have to save this as a study reference!
|
|
Country: USA ~
Posts: 2087 ~
Member Since: March 16 2013 ~
Last Visit: July 05 2018
|
Alert Moderator
|
|
|
|
Posted - November 06 2013 : 01:40:19 AM
|
Cool stuff, Shaggy. I can't believe you were able to change the axle spacing with a razor saw. Nice job with the pickups, too, and making them ride on the flanges... less wear on the treads.
That NWSL super-flex wire can be a lifesaver. Those brushes must be tiny if their smaller diameter than standard pencil lead. I might try that for Bachmann can motors, since they don't sell replacement brushes, just entire motors, naturally.  The only issue is that their commutators are much smaller and the gaps far narrower than your MDC motor and foul easily, so pencil graphite might fill in the gaps and cause shorts. The only issue is that their commutators are much smaller and the gaps far narrower than your MDC motor and foul easily, so pencil graphite might fill in the gaps and cause shorts.
The Tyco Depot
Edited by - NickelPlate759 on November 06 2013 01:41:10 AM
|
|
Country: USA ~
Posts: 3927 ~
Member Since: June 20 2007 ~
Last Visit: November 19 2015
|
Alert Moderator
|
|
|
|
Posted - November 06 2013 : 08:53:13 AM
|
quote:Those brushes must be tiny if their smaller diameter than standard pencil lead. I might try that for Bachmann can motors, since they don't sell replacement brushes, just entire motors, naturally. The only issue is that their commutators are much smaller and the gaps far narrower than your MDC motor and foul easily, so pencil graphite might fill in the gaps and cause shorts.
Originally posted by NickelPlate759 - November 06 2013 : 01:40:19 AM
|
I can't guarantee that I won't have trouble with the pencil leads eventually, but since the motor already didn't work without them, I was not really gambling anything. I expect the same can be said for your Bachmann motors.
Carpe Manana!
|
|
Country: USA ~
Posts: 2417 ~
Member Since: September 17 2013 ~
Last Visit: June 17 2026
|
Alert Moderator
|
|
|
|
Posted - November 06 2013 : 8:17:40 PM
|
The MDC motor seems to have wider commutator gaps, plus being an open frame it has one huge advantage over a can motor: accessibility. If it does build up now and then it will be easy to service.
The Tyco Depot
|
|
Country: USA ~
Posts: 3927 ~
Member Since: June 20 2007 ~
Last Visit: November 19 2015
|
Alert Moderator
|
|