|
|
 Posted - August 14 2013 : 01:48:44 AM Posted - August 14 2013 : 01:48:44 AM


|
Well guys,
I got those "updated" pictures! I thought you all would appreciate that insted of allowing the suspense to keep building, kind of like we do as modelers, right? Anyway, here is that same unit, painted, and with A LOT more details added to it.....
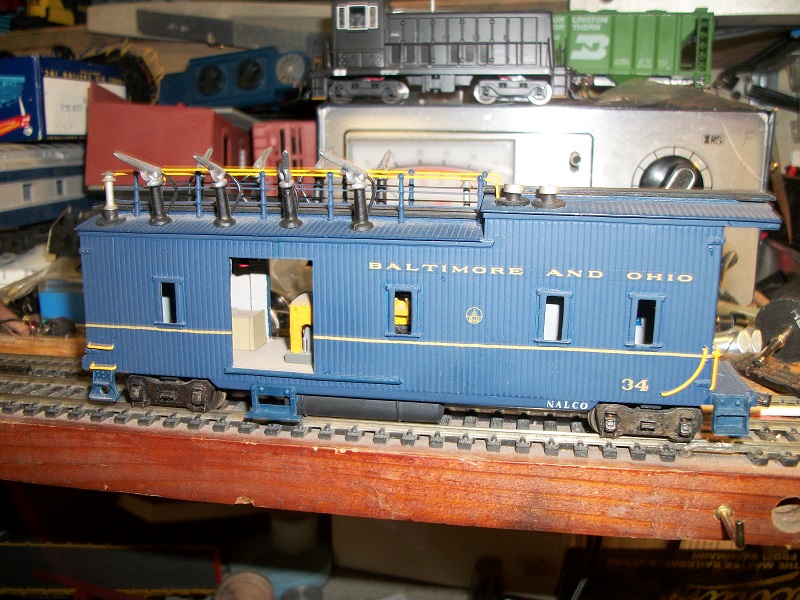
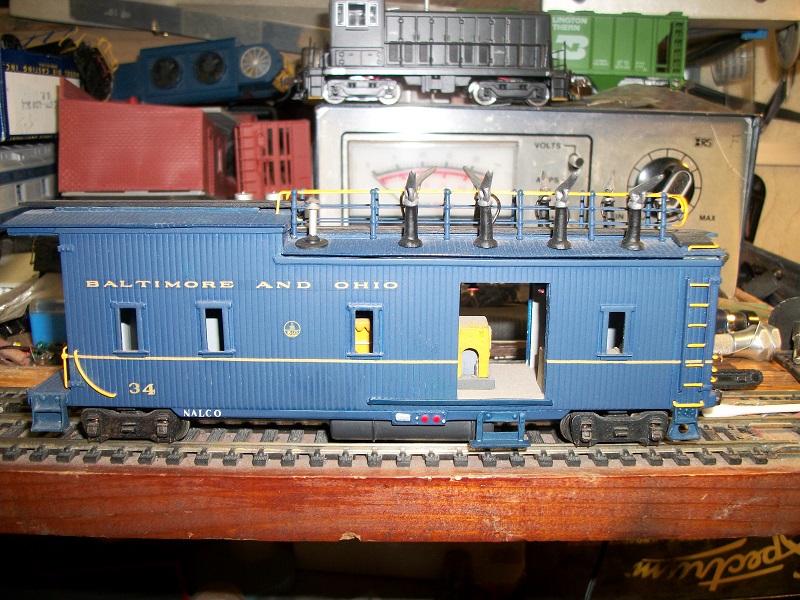
A few good shots of the outside of the overall unit.
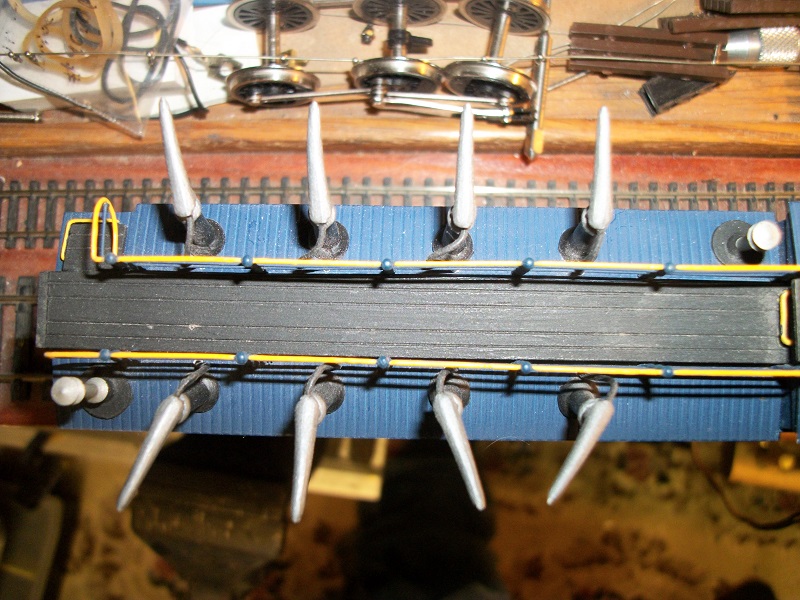
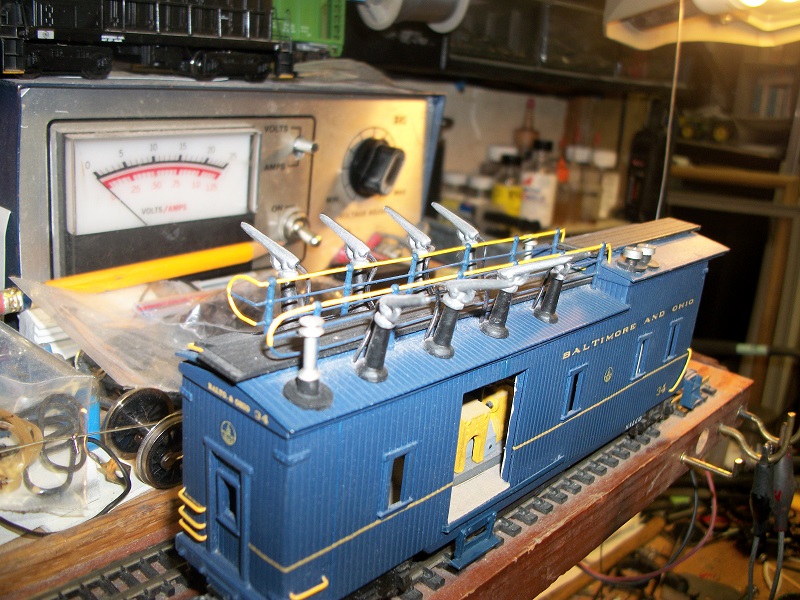
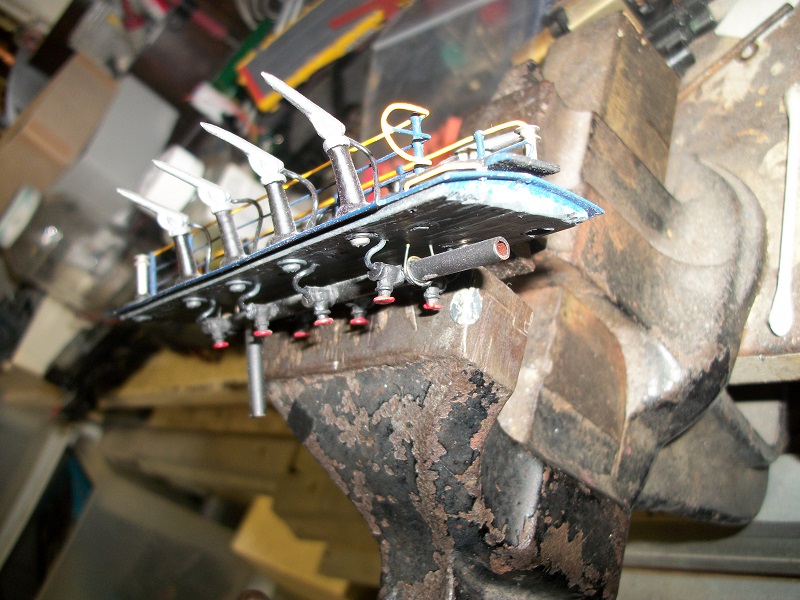
NOW, for some close up of the sprayer heads, with the hose all hooked up....NOW guys, keep in mind, the heads are NOT "lined" up for looks, they are ALL positionable, as they are NOT press fitted, and then a restriction made to keep them from falling off, they are all bolted, and one the inside, the bolts had the "heads" cut off, and a washer placed, with a nut to hold it one, and then the nut, was soldered to the bolt! They move pretty freely, by hand, BUT do not "vibrate move" durring run time.....They hold the position that they were last set at. Then, under the roof, is a whole other story....Which you'll see.
Here are close ups of the outside roof detail....
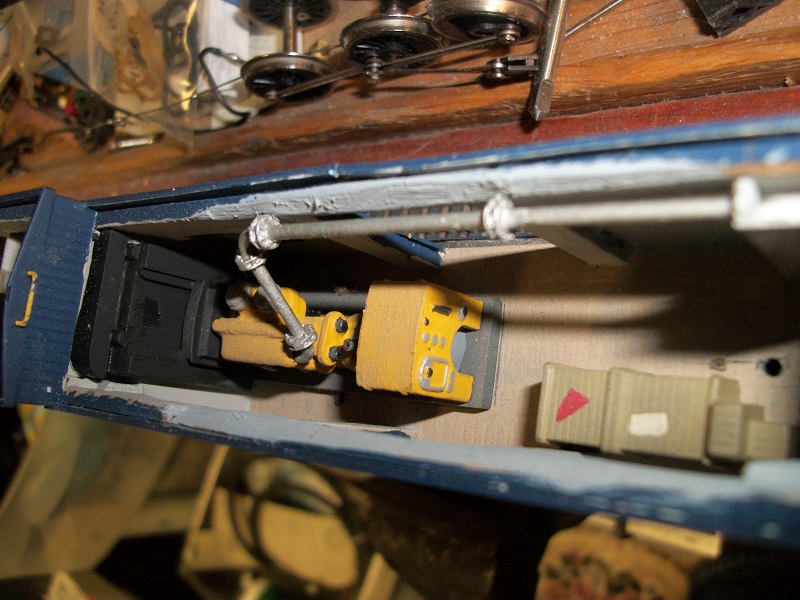
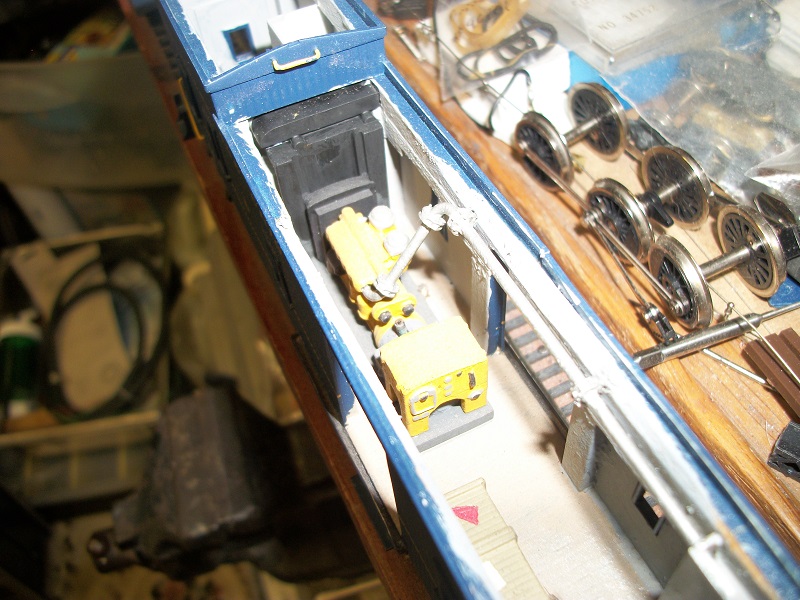
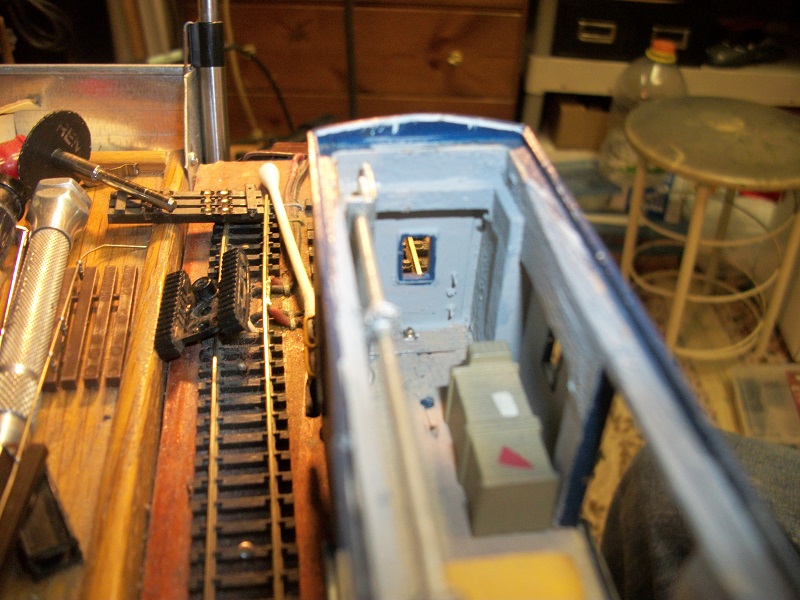
NOW, for the inside of the works....
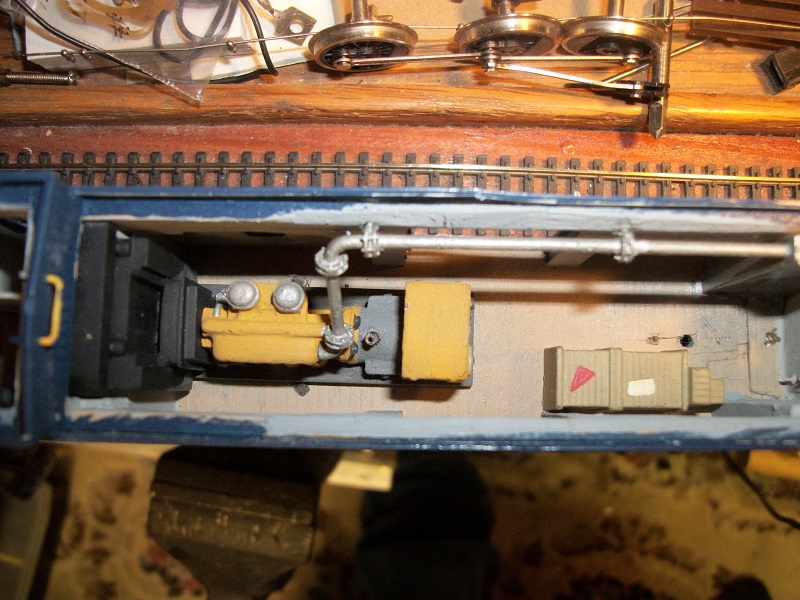
Pump motor and controls, along with the seen piping for the Cat diesel inside....The motor and controls were not to the unit, its something I had in place of the actual part thats shown in the instructions, nor is it the exact part, but was close enough for an inside detail, and it looks good, and the diesel, just so happens to be a 4 cylinder, as the one they had mentioned in the instructions, the only differance? The actual part was to be a Detroit Diesel, and I had this detail part, thats a Cat....This actual part, could have been made a Detroit, BUT, I'm a Cat fanatic, (Caterpillar, not the animal, even tho I like the 2 cats we have as pets)....But the detail part I used is an old Walthers die cast metal detail! With a little care, some added pipe, and detail paint work, makes them look GREAT! I can't even remember where I got this detail it was gotten really close the same way as the Nalco Weed Sprayer so......You guys will not believe the stuff I find!!!! As time passes, you'll see what I'm talkin about!
So, then you have the "crew" quarters....
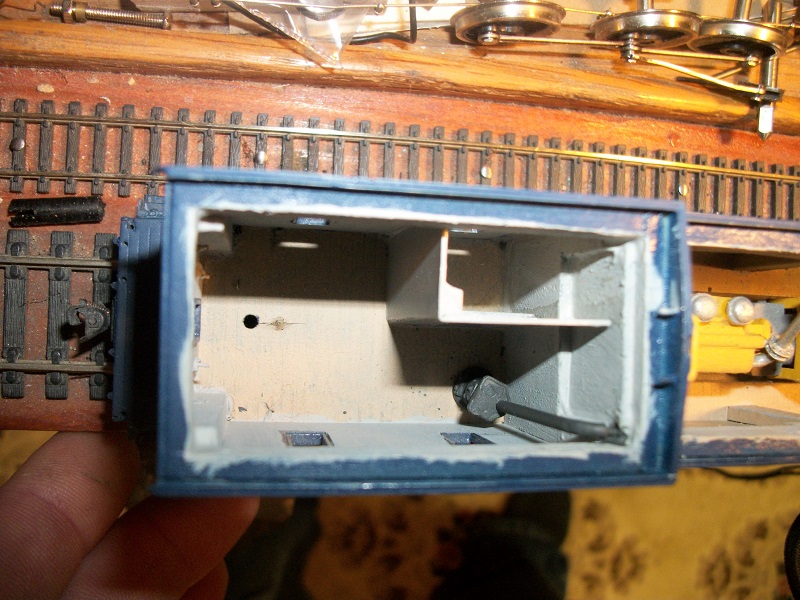
I got more to add, needless to say, but you see the pot belly stove, and stove pipe....Notice the pipe goes throug hthe wall between sections of the car.....Then you cann see the "restroom" thats why the tanks on the underside of the car seen in the overall pictures, ones a "gray" tank, and the other is a water supply tank......
Then, I have to add in a little "caboose" type set up on the model in this area, I just have not gotten around to it. As I said, please remember, I have more to add! (My wife does all the little people painting and she is working on a "lot" of little people, some of them, for this unit and the other car that goes with it, as the other part is the Western Union caboose thats going to be used with this short weed control train.....
A crate of parts or supplies for the next job, ahead!
Now, the part that has alot of interest.....
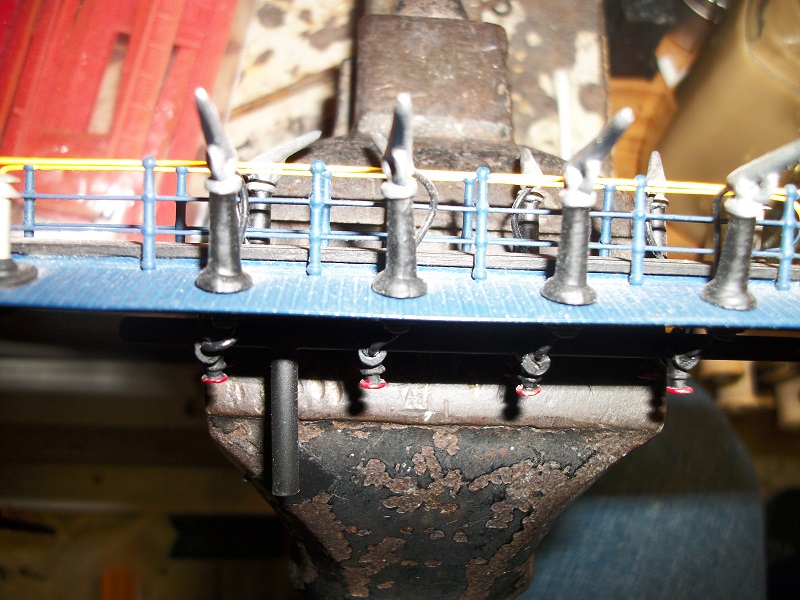
Notice the hose comming through the roof to the sprayer nozzels.....These nozzels were also in a wax envelope in the bottom of that box! Sadly, tho, out of the whole pack, only 2 or 3 were in good shape, the rest were broken....WELL, me being me, had a friend, that was doing some casting (spin casting) and I had him spin cast these as detail parts....He done well, costed me 25 cents each at lunch time as he was a modeler too and he worked for a casting company that was local to him.....Back when I lived in Pennsylvania, but I had them done over the phone and mailing the part to him....Sadly, before I resorted to the casting process, I looked EVERY WHERE to find details close to these, and I came up short, there isn't any part I have found close, so thats when I had one good one, casted, and now, I'm going to make my own mold as well, as I have a few of them now, BUT, my friend isn't working that job any longer the company went out of business.....SO, it served me well for the time it served me, I got stuff, you can't buy anywhere, but my shop! For that very reason.
Anyway, here are some more....
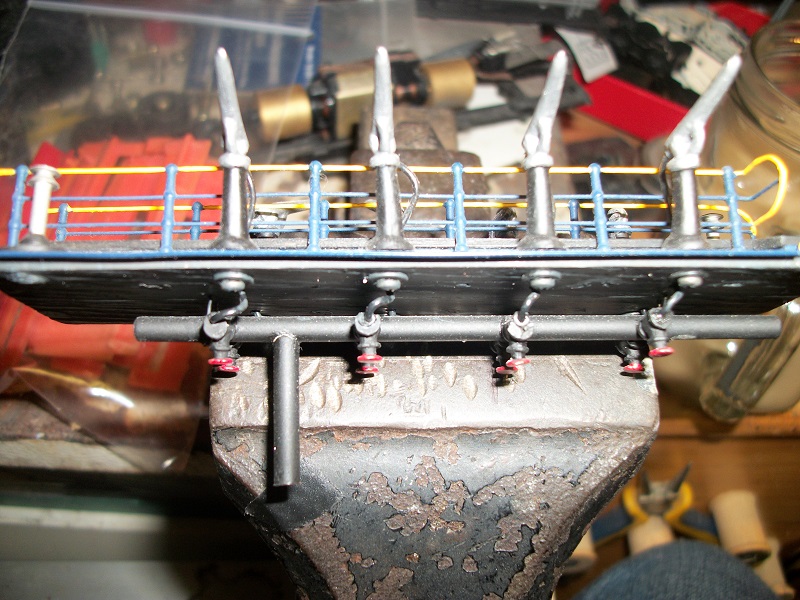
This is that Manifold I spoke about, its all made out of copper pipe, that I cut and fitted, soldered and assembled to what you see here, as well as that "hose" is wire as you all know, WELL that wire, is also soldered to this Manifold! THEN the part that gets interest is the valved....EACH, sprayer head on the roof can have the supply of weed control turned off by the turn of that red knob under the roof line! THESE also are also soldered to the manifold! That pipe "tail" that comes down fits in a pipe in the pump off the end of the motor inside that section of the car too....... It all fits together like a puzzle, actually!
The next picture, is a 3/4 view.....Shows the depth of the manifold, that is overhead inside the pump section of the car....
Also, something I had forgot about, the car isn't painted in the dual B&O pin stripe scheme, its the lower stripe that was the paint scheme that came after that one and was on a lot of B&O passenger cars!
ENJOY!
~John
Many have tried to, and failed, ya just can't repair stupid... 
Do NOT try to Idiot-Proof anything!!!! God, will simply create a better......IDIOT!
|
Country:  USA ~
Posts: 2911 ~
Member Since: March 26 2012 ~
Last Visit: January 14 2014 USA ~
Posts: 2911 ~
Member Since: March 26 2012 ~
Last Visit: January 14 2014
|
 Alert Moderator
|
|
|
|
Posted - August 15 2013 : 09:36:17 AM
|
| John, that is simply amazing. What kind of a magnifying lamp do you have set up or do you just have eagle eyes? You certainly did your home work on this one. Keep the pictures coming as the work continues, please.
|
|
Country: USA ~
Posts: 2087 ~
Member Since: March 16 2013 ~
Last Visit: July 05 2018
|
Alert Moderator

|
|
|
|
Posted - August 15 2013 : 10:44:07 AM
|
real cool work, John
*steals the BN grain hopper*
|
|
Country: USA ~
Posts: 15028 ~
Member Since: February 23 2009 ~
Last Visit: June 07 2026
|
Alert Moderator
|
|
|
|
Posted - August 15 2013 : 11:38:14 AM
|
| great work john,cannot wait to see more,making me envious ken
|
Country:  United Kingdom ~
Posts: 8294 ~
Member Since: September 28 2006 ~
Last Visit: October 20 2021 United Kingdom ~
Posts: 8294 ~
Member Since: September 28 2006 ~
Last Visit: October 20 2021
|
Alert Moderator
|
|
|
|
|
|


