|
|
 Posted - March 12 2013 : 2:01:39 PM Posted - March 12 2013 : 2:01:39 PM


|
Lately I've been doing some painting and decaling on simple cars, specifically a con-cor Impack set for TTX, and I've decided to advanced to a harder project. I'd like to paint and decal an engine for a historic local railroad that went bankrupt a while back, which ran literally through my backyard, the Houston Belt and Terminal. I have a decal set for their engines, but I am hesitant now because I don't want to ruin an engine shell. I'm not really looking for investing in an airbrush for this one project either. Any advice would be appreciated.
Here are a few pics off the internet of the HB&T's locos
http://www.railpixs.com/hbt/HBT30_UnionStation_HoustonTx_Dec75.jpg
http://www.railpixs.com/hbt/HBT_shops_Houston_April90a.jpg
http://www.railpixs.com/hbt/HBT23_MilbyStShops_Houston_March80.jpg
http://www.railpixs.com/hbt/HBT51_31_SouthYd_Houston_June76.jpg
i would be modeling the yellow and white paint scheme but the above pic reminded me of Tyco's 430s and 630s in the Spirit of 76 paint.
Any advice would be appreciated.
ChessieRR
|
Country:  USA ~
Posts: 332 ~
Member Since: February 24 2012 ~
Last Visit: January 26 2015 USA ~
Posts: 332 ~
Member Since: February 24 2012 ~
Last Visit: January 26 2015
|
 Alert Moderator
|
|
|
|
Posted - March 12 2013 : 2:07:06 PM
|
are those old pics? cause the one showing MP BN SF & The Rock Don't exist anymore 
neat locos I especially love the one switcher pulling the BN B unit 
Need to find a BN B unit like that 
Edited by - microbusss on March 12 2013 2:08:07 PM
|
|
Country: USA ~
Posts: 15028 ~
Member Since: February 23 2009 ~
Last Visit: June 07 2026
|
Alert Moderator

|
|
|
|
Posted - March 12 2013 : 3:25:23 PM
|
Need to find some one to make you the decals as I imagine no one makes HBT decals. Cool sign in pictures! In modern setting, It'd be CN, UP and BNSF.
" Heck with counting 'em rivets, TRAINS ARE FOR FUN! Not called the Mad Scientist for nothing either!"
|
|
Country: USA ~
Posts: 3147 ~
Member Since: May 07 2007 ~
Last Visit: June 01 2026
|
Alert Moderator
|
|
|
|
Posted - March 12 2013 : 4:49:24 PM
|
Doesn't look like a very complex scheme so it would be a great first custom paint project. Here's what I would note, and do:
- Light colors such as yellow and white are often the most troublesome to make opaque, yet thin.
- For this reason I would use a light gray or white primer, first. Since you don't have an airbush, spray can primer is fine. Airbrush paints are mixed finer and lay down thinner, but a proper rattlecan application can work. Just go easy with light passes, one or two coats at best, and allow lots of dry time between each.
- When the primer is dry, spray yellow the same way. Take it from me, brush-painting a light color is usually not a good idea. Don't use the 99 cent spray paint for this, get a $5 can of good stuff, which is more likely available in that dull yellow color anyway (check several stores as color palettes vary across brands).
- When the yellow is dry, you can probably brush-paint the white sill and pilots. You might (should) even mask these off before you paint the yellow.
- Seal with a light coat of gloss for uniformity, apply your decals, then seal again with gloss or flat to suit your preference.
|
|
Country: USA ~
Posts: 2798 ~
Member Since: September 17 2010 ~
Last Visit: July 22 2015
|
Alert Moderator
|
|
|
|
Posted - March 12 2013 : 10:14:42 PM
|
Thanks a lot for the advice! It is much appreciated.
Redneck Justin, I have found a decal set for HB&T, it is Herald King set L-630.
Microbusss, I am pretty sure those pics are from late 70s or early 80s. That sign is neat for sure, I regularly railfan the shops where it once stood, its owned by Morrison-Knudsen now, as they provide the Genset locos for the Port Terminal Railroad Association that runs in that area.
|
|
Country: USA ~
Posts: 332 ~
Member Since: February 24 2012 ~
Last Visit: January 26 2015
|
Alert Moderator
|
|
|
|
Posted - August 27 2013 : 11:18:52 PM
|
| Finally finished this project, got two engines done, an sw1000 and an sw9. I will put pictures up soon.
|
|
Country: USA ~
Posts: 332 ~
Member Since: February 24 2012 ~
Last Visit: January 26 2015
|
Alert Moderator
|
|
|
|
Posted - August 28 2013 : 12:59:34 AM
|
| Looking forward to seeing your photos. The prototypes looked pretty cool/heavy duty and that was a nice dirty faded yellow color; made 'em look like work-horses.
|
|
Country: USA ~
Posts: 2087 ~
Member Since: March 16 2013 ~
Last Visit: July 05 2018
|
Alert Moderator
|
|
|
|
Posted - August 28 2013 : 01:40:58 AM


|
Can't wait to see the pictures of the models Chessie! HEY wait a second, this is the first time I heard of Chessie being in Texas!
Kidding, kidding.....
Thing is, I know a real trick to using yellow on ANYTHING. use Testors flat white paint, lightly till the surface is covered, and ONLY sprayed light, and I do mean lightly.....mist coats.....
Then, 2 mist coats of yellow over the white once the white is dry.....AND only coat on the yellow till the white is covered, no more! As that's going to be A LOT of light coats and if you "overcoat" your detail will begin, to disappear!
I paint Chessie yellow much the same way!
~John
Many have tried to, and failed, ya just can't repair stupid...
Do NOT try to Idiot-Proof anything!!!! God, will simply create a better......IDIOT!
|
|
Country: USA ~
Posts: 2911 ~
Member Since: March 26 2012 ~
Last Visit: January 14 2014
|
Alert Moderator
|
|
|
|
Posted - August 31 2013 : 10:51:53 AM
|
FYI- I use a Badger #200 Air Brush... Not the best but parts are available for it. A compressor is a must for painting with an Air Brush.
I have found that the Scotch Blue painters tape works really well, better than Frog tape.
|
|
Country: USA ~
Posts: 668 ~
Member Since: April 28 2010 ~
Last Visit: February 14 2026
|
Alert Moderator
|
|
|
|
Posted - August 31 2013 : 4:44:55 PM
|
Once piece of advice i have received that I am now following very faithfully is to let at least 24 hrs go by between stages of a paint project, whether spray can or air brush is used. This allows the paint to cure a bit and behave better when further masking is required. I know we all like to see a finished product, but I have previously been impatient, then started all over because I felt the job was not done right. Besides, it isn't as if you have a production schedule to meet-its a hobby. Sometimes that waiting period gives you time to approach the next painting step a bit differently, something you may not have thought of if you rush things.
Ron
|
|
Country: USA ~
Posts: 510 ~
Member Since: September 21 2011 ~
Last Visit: December 21 2014
|
Alert Moderator
|
|
|
|
Posted - September 01 2013 : 07:50:04 AM
|
I realize you have finished your project but, for future reference:
I'll second the advice mentioned.
If you don't want to ruin a shell, get a couple of cheap diesel shells at a trains show to practice on.I get them for 1 or 2 dollars each.
Rattle can does work fine. I use Floquil spray cans. Their primer comes in handy.
Take your time. Your are going to be looking at these locos for a long time. What's another week in the process? My brother will sometimes wait as much as 2 weeks between paint coats.
Sometimes as much as 2 years but, that's because he is always got new projects going.
Unspoken expectations are premeditated failures.
|
|
Country: USA ~
Posts: 825 ~
Member Since: December 22 2008 ~
Last Visit: March 16 2015
|
Alert Moderator
|
|
|
|
Posted - September 02 2013 : 10:51:47 AM
|
Here are the photos as promised. Haven't got around to decaling the 2nd unit. I ended up using rattle can paint. Thanks for the advice everyone.
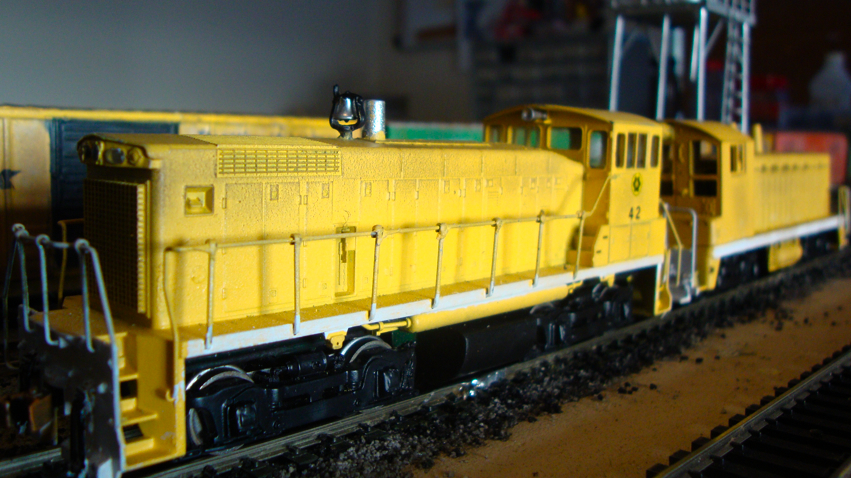
Both units together.
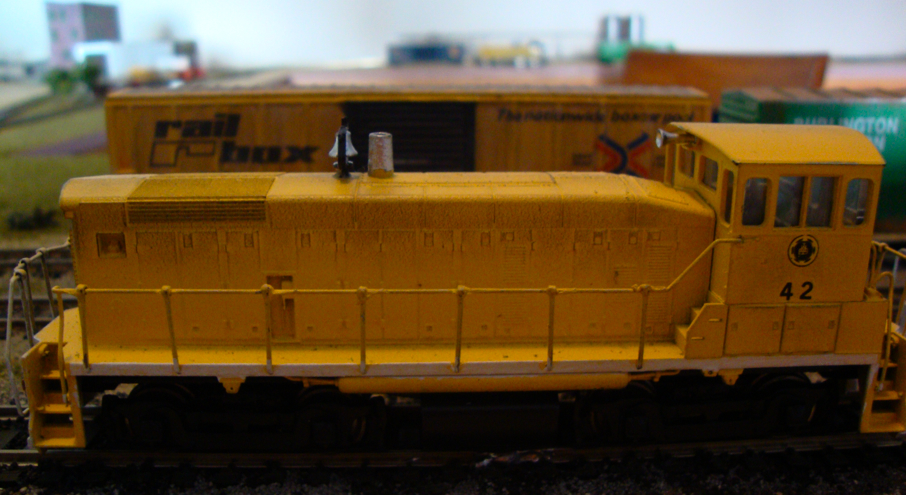
first unit, Athearn SW1000, #42
second unit, Athearn SW9, yet to be either #23 or 24
By the way, about the layout behind this, I built a 3rd layout, much bigger than the previous two I have built, and I will post pictures of that soon.
|
|
Country: USA ~
Posts: 332 ~
Member Since: February 24 2012 ~
Last Visit: January 26 2015
|
Alert Moderator
|
|
|
|
Posted - September 02 2013 : 10:04:50 PM
|
| That locomotive looks pretty fine. I would like to see more pictures of your layout; maybe a video of that locomotive in action?
|
|
Country: USA ~
Posts: 2087 ~
Member Since: March 16 2013 ~
Last Visit: July 05 2018
|
Alert Moderator
|
|
|
|
Posted - September 03 2013 : 01:58:24 AM
|
Chessie,
Those look pretty good, altho that second unit is an Athearn SW-7....They never made a SW-9!
The top one is a SW-1500....NICE work! What shade of rattle can yellow did you use?
~John
Many have tried to, and failed, ya just can't repair stupid...
Do NOT try to Idiot-Proof anything!!!! God, will simply create a better......IDIOT!
|
|
Country: USA ~
Posts: 2911 ~
Member Since: March 26 2012 ~
Last Visit: January 14 2014
|
Alert Moderator
|
|
|
|
Posted - September 06 2013 : 5:35:54 PM
|
EM1- Thanks! Yeah I forgot that athearn never made an SW9, close enough model for my layout though. Can't remember the exact shade of yellow, got the can around here somewhere.
Barry-Thanks! I will post layout pics soon.
|
|
Country: USA ~
Posts: 332 ~
Member Since: February 24 2012 ~
Last Visit: January 26 2015
|
Alert Moderator
|
|