|
|
 Posted - March 17 2013 : 5:58:53 PM Posted - March 17 2013 : 5:58:53 PM


|
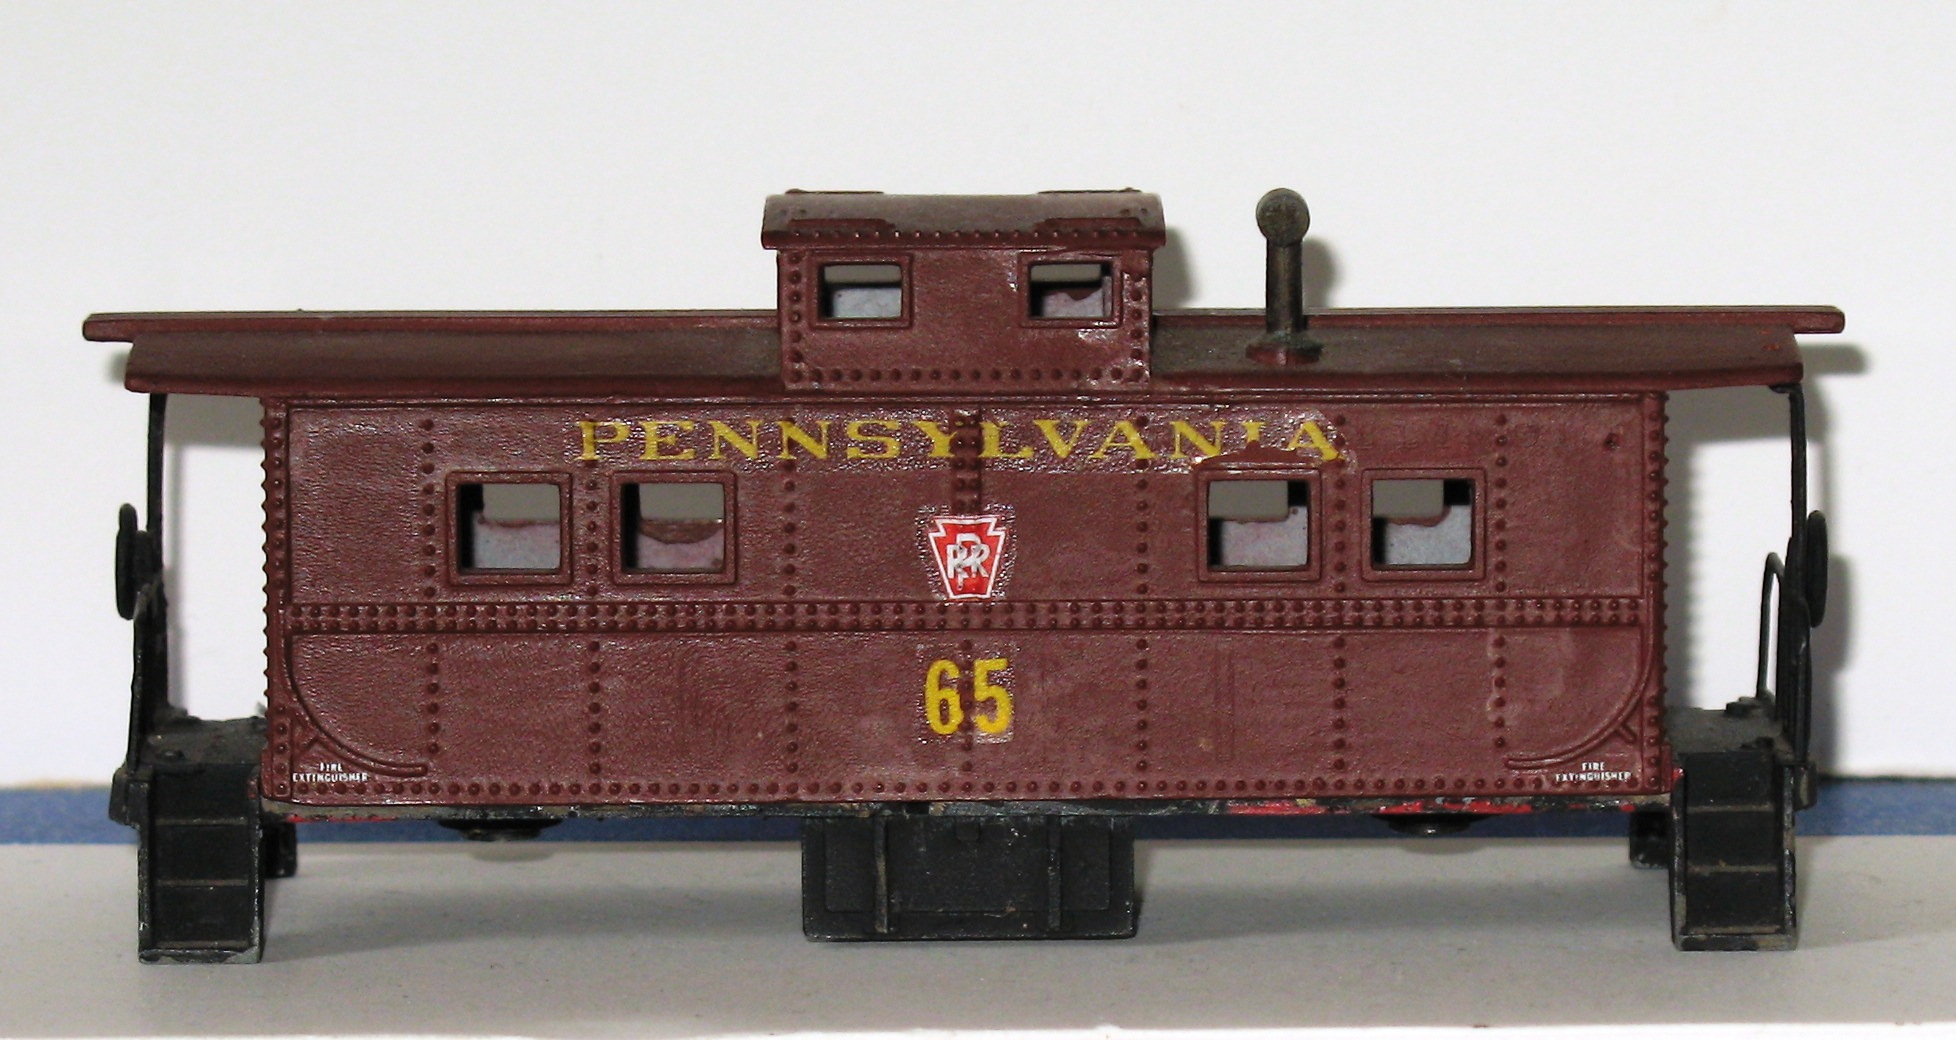
I recently asked- in the identification forum- about an old caboose shell I picke up last fall at one of my quarterly train swap shows. After establishing that it was not the "first car even made by Irv Athearn" or the Hope Diamond, I got to work on it:
First, as it was:
Then, stripped of paint (note it is not as clean as it could be, perhaps due to the age and nature of the plastic:

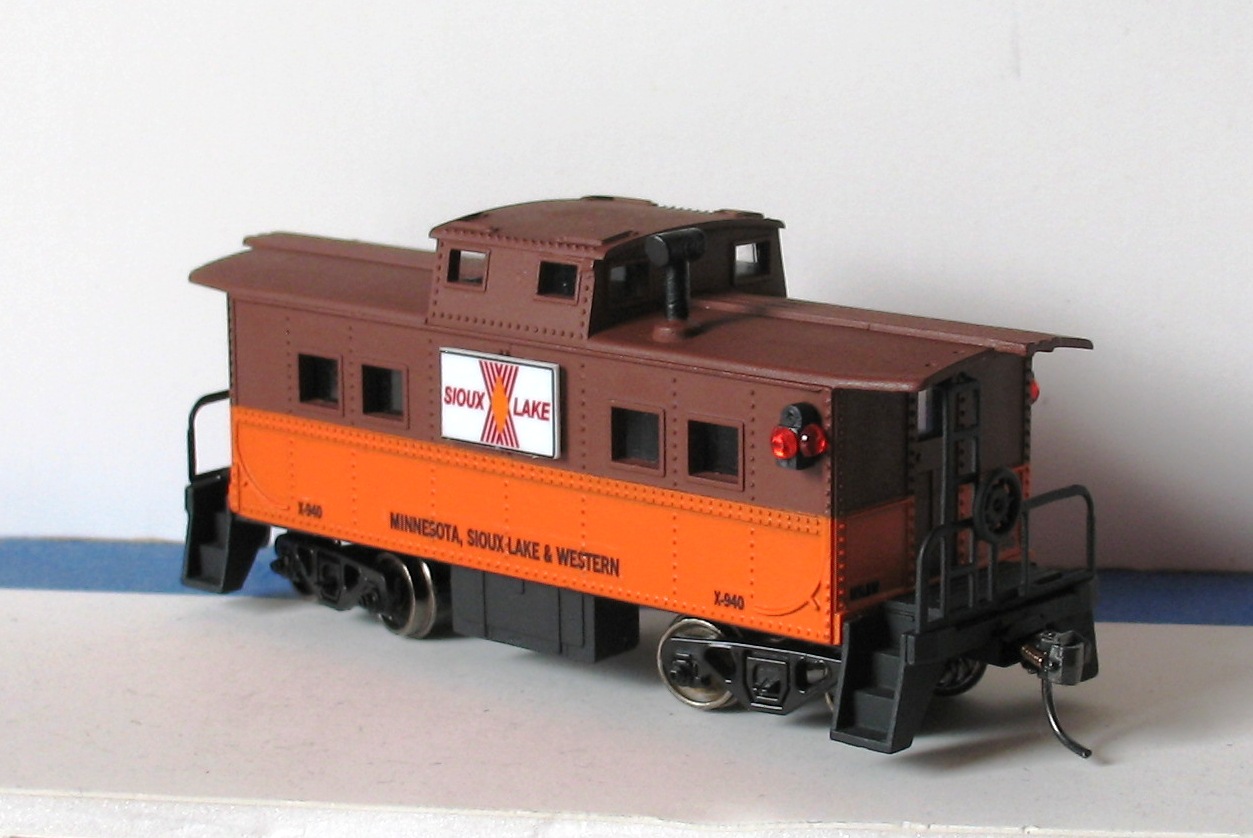
I then painted it primer gray inside and out. I decided on my Minnesota, Sioux lake and Western scheme for this, as it could not conceiveably ever have been a Great Northern caboose, cast off on its unsuspecting subsidiary short line (mine). The MSL&W bought this one at auction, from a factor in Chicago (it WAS an Chicago and Eastern Illinois car originally, after all!)
I painted the car and decaled it for my railroad, but before I finished, I noticed a pair of holes in the upper rear sides of the caboose- where the old style marker lights would go.
After looking at images of the real ones- and the real prices plus shipping for a pair of HO scale ones, I searched my plastics scrap box and came up with some small scale-approximate pieces which I could fiddle into shape. The costs of LED-lit ones were around $25.00, so I found some inexpensive decorative red rhinestones at Michaels Crafts (on the right side of the store- where the adhesive letters are) for $3.00 and I had my lights! There are three sizes of them on the card I bought, but the middle size seemed most appropriate:
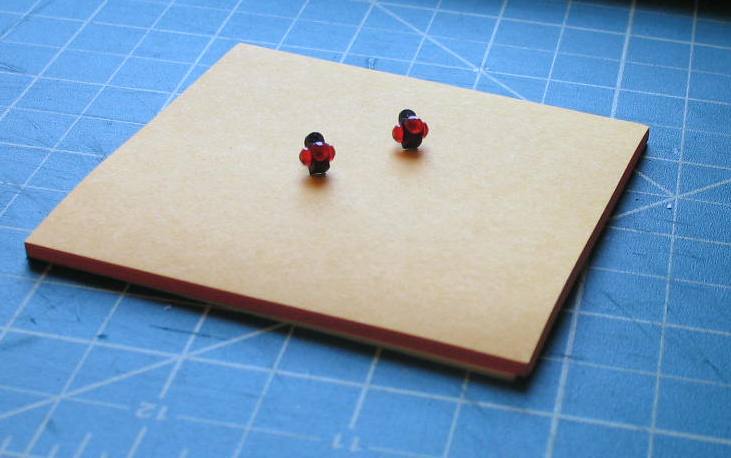
I CA glued the rhinestones to the plastic, after painting it flat black (the adhesive backing is not secure enough- use CA cement!) front, rear and side, and glued a small .025 wire in a drilled hole in the plastic to enable me to glue it to the holes on the model.
The metal chassis needed a wood flooring outside each end doorway, so I used 3" scribed plastic to simulate that, then shot the chassis in flat black. The shell covers the side sills of the chassis, so only the end porches are visible. The railings and ladder are metal stamped and welded to chassis frame, so I left then in flat black as well. Due to the all metal chassis, only a 1/2 ounce weight was needed to be added in the interior- reshaped (with my highly adept metallurgical skills- a plain old engineers hammer)- to form a day bed and pillow for the crewman.
The fact is that the decals I make cannot be done in white or with white backrounds (i use clear paper at present), so the railroad logo would not show well. This was offset by placing the logo decals on small rectangles of styrene, with two "riser" pieces on each end on the back to enable the piece to sit "over" the center vertical rivets. I glued the risers to the styrene signboard back, but used double-stick tape to attach to the car body. It will stay there for a loooong time, believe me!
The story on this- the signboard- (I know it makes it harder for the crew to see our the rear two side windows, especially at night) is that the last railroad who owned this car tried a "lighted" herald sign as a measure to improve the safety and advertise themselves all in one device, hence, a "lit herald". When my railroad bought the caboose, the president (me) thought the idea was unique and, instead of removing the sign and wiring, ordered that a MSL&W logo be placed on the sign and, as the French say "we surrender"- no, I mean, viola!, a unique addition to my railroad!
I then found some modern trucks, metal wheels from my supply and Kadee#5's to complete the build.
This is the final result:
Not bad for a week's spring break off of work, despite having to take my beautiful and talented daughter to the beach twice and seeing the new Wizard of Oz with her while Mom worked. (I liked it, despite the reviews)
Coming soon- a Santa Fe caboose reworked as a Great Northern!
Siouxlake Ron
Edited by - siouxlake on March 17 2013 6:02:29 PM
|
Country:  USA ~
Posts: 510 ~
Member Since: September 21 2011 ~
Last Visit: December 21 2014 USA ~
Posts: 510 ~
Member Since: September 21 2011 ~
Last Visit: December 21 2014
|
 Alert Moderator
|
|
|
|
Posted - March 17 2013 : 6:09:45 PM
|
real cool I LOVE it! Gonna light up the lights? Gonna light up the lights?
I STILL want a Sioux Lake boxcar from you hehe
May I say one thing about movie critics?
Forget them!! They'd not know a good movie if it bit them in their butt
Oz movie is #1 for the 2nd week
|
|
Country: USA ~
Posts: 15031 ~
Member Since: February 23 2009 ~
Last Visit: July 07 2026
|
Alert Moderator

|
|
|
|
Posted - March 17 2013 : 6:17:40 PM

|
| ron,what can i say but wow nice paint job,love it,ken
|
Country:  United Kingdom ~
Posts: 8294 ~
Member Since: September 28 2006 ~
Last Visit: October 20 2021 United Kingdom ~
Posts: 8294 ~
Member Since: September 28 2006 ~
Last Visit: October 20 2021
|
Alert Moderator
|
|
|
|
Posted - March 17 2013 : 7:06:56 PM

|
Ron,
That turned out WELL! I can't tell, did you add in window glass too?
The marker lights look AWESOME! What was the base detail for tem? I know of the Rhinestones....But did you use a detail part of a marker light or were those something you made?
GREAT work!
~John
Many have tried to, and failed, ya just can't repair stupid... 
Do NOT try to Idiot-Proof anything!!!! God, will simply create a better......IDIOT!
|
|
Country: USA ~
Posts: 2911 ~
Member Since: March 26 2012 ~
Last Visit: January 14 2014
|
Alert Moderator
|
|
|
|
Posted - March 18 2013 : 04:38:34 AM
|
John:
In looking at examples of marker lights, I came across a scratchbuilt set made by a fellow who writes "along the right of way" , a modeling blog. In his Jan 2012 edition, he shows his scratchbuilt set and describes them as being made with .1 styrene strip plastic, but gives no other details than a picture. He used little round discs of white styrene cut from a rod piece. I figured the red rhinestones improved his idea, particularly as I was not trying to actually light the markers. My use of a piece of wire rod was to enable me to attach the markers using those holes already in the model body.
I did glaze the windows with clear plastic sheet material from K and S.
Paint was Rustoleum red primer and Badger Modelflex BNSF orange ( my railroad's colors).
Hope you're getting better, buddy!
Ron
|
|
Country: USA ~
Posts: 510 ~
Member Since: September 21 2011 ~
Last Visit: December 21 2014
|
Alert Moderator
|
|
|
steve
Big Six

Status:
offline
| |
Posted - March 18 2013 : 09:11:40 AM
|
Really Nice Work!!!
|
|
Country: USA ~
Posts: 227 ~
Member Since: January 26 2010 ~
Last Visit: May 18 2016
|
Alert Moderator
|
|
|
|
Posted - March 18 2013 : 4:03:02 PM
|
Ron,
I thought I'd ask on the windows, its difficult to see....
You know that overhead projector sheets work GREAT for window glass! AND you get a lot of it too for doing loco's and any passenger cars, even cabooses as well!
As for getting better the hand is doing better I'm coming around! I got a few forum members decal work done and gaining by the day! Its not 100% but I have to "work" the fingers to get full motion back! And decaling is doing just that! And is stress free too!
Question tho, the rhinestones you used on the marker lights, where did you get them and if you know, whats the diameter on them?
~John
Many have tried to, and failed, ya just can't repair stupid...
Do NOT try to Idiot-Proof anything!!!! God, will simply create a better......IDIOT!
|
|
Country: USA ~
Posts: 2911 ~
Member Since: March 26 2012 ~
Last Visit: January 14 2014
|
Alert Moderator
|
|
|
|
Posted - March 18 2013 : 4:55:10 PM
|
Beautiful job once again, Ron. Nice makeshift markers!
The Tyco Depot
|
|
Country: USA ~
Posts: 3927 ~
Member Since: June 20 2007 ~
Last Visit: November 19 2015
|
Alert Moderator
|
|
|
|
Posted - March 18 2013 : 5:05:04 PM
|
John:
Just because it was you who asked, I imaged the package and measured the rhinestones:
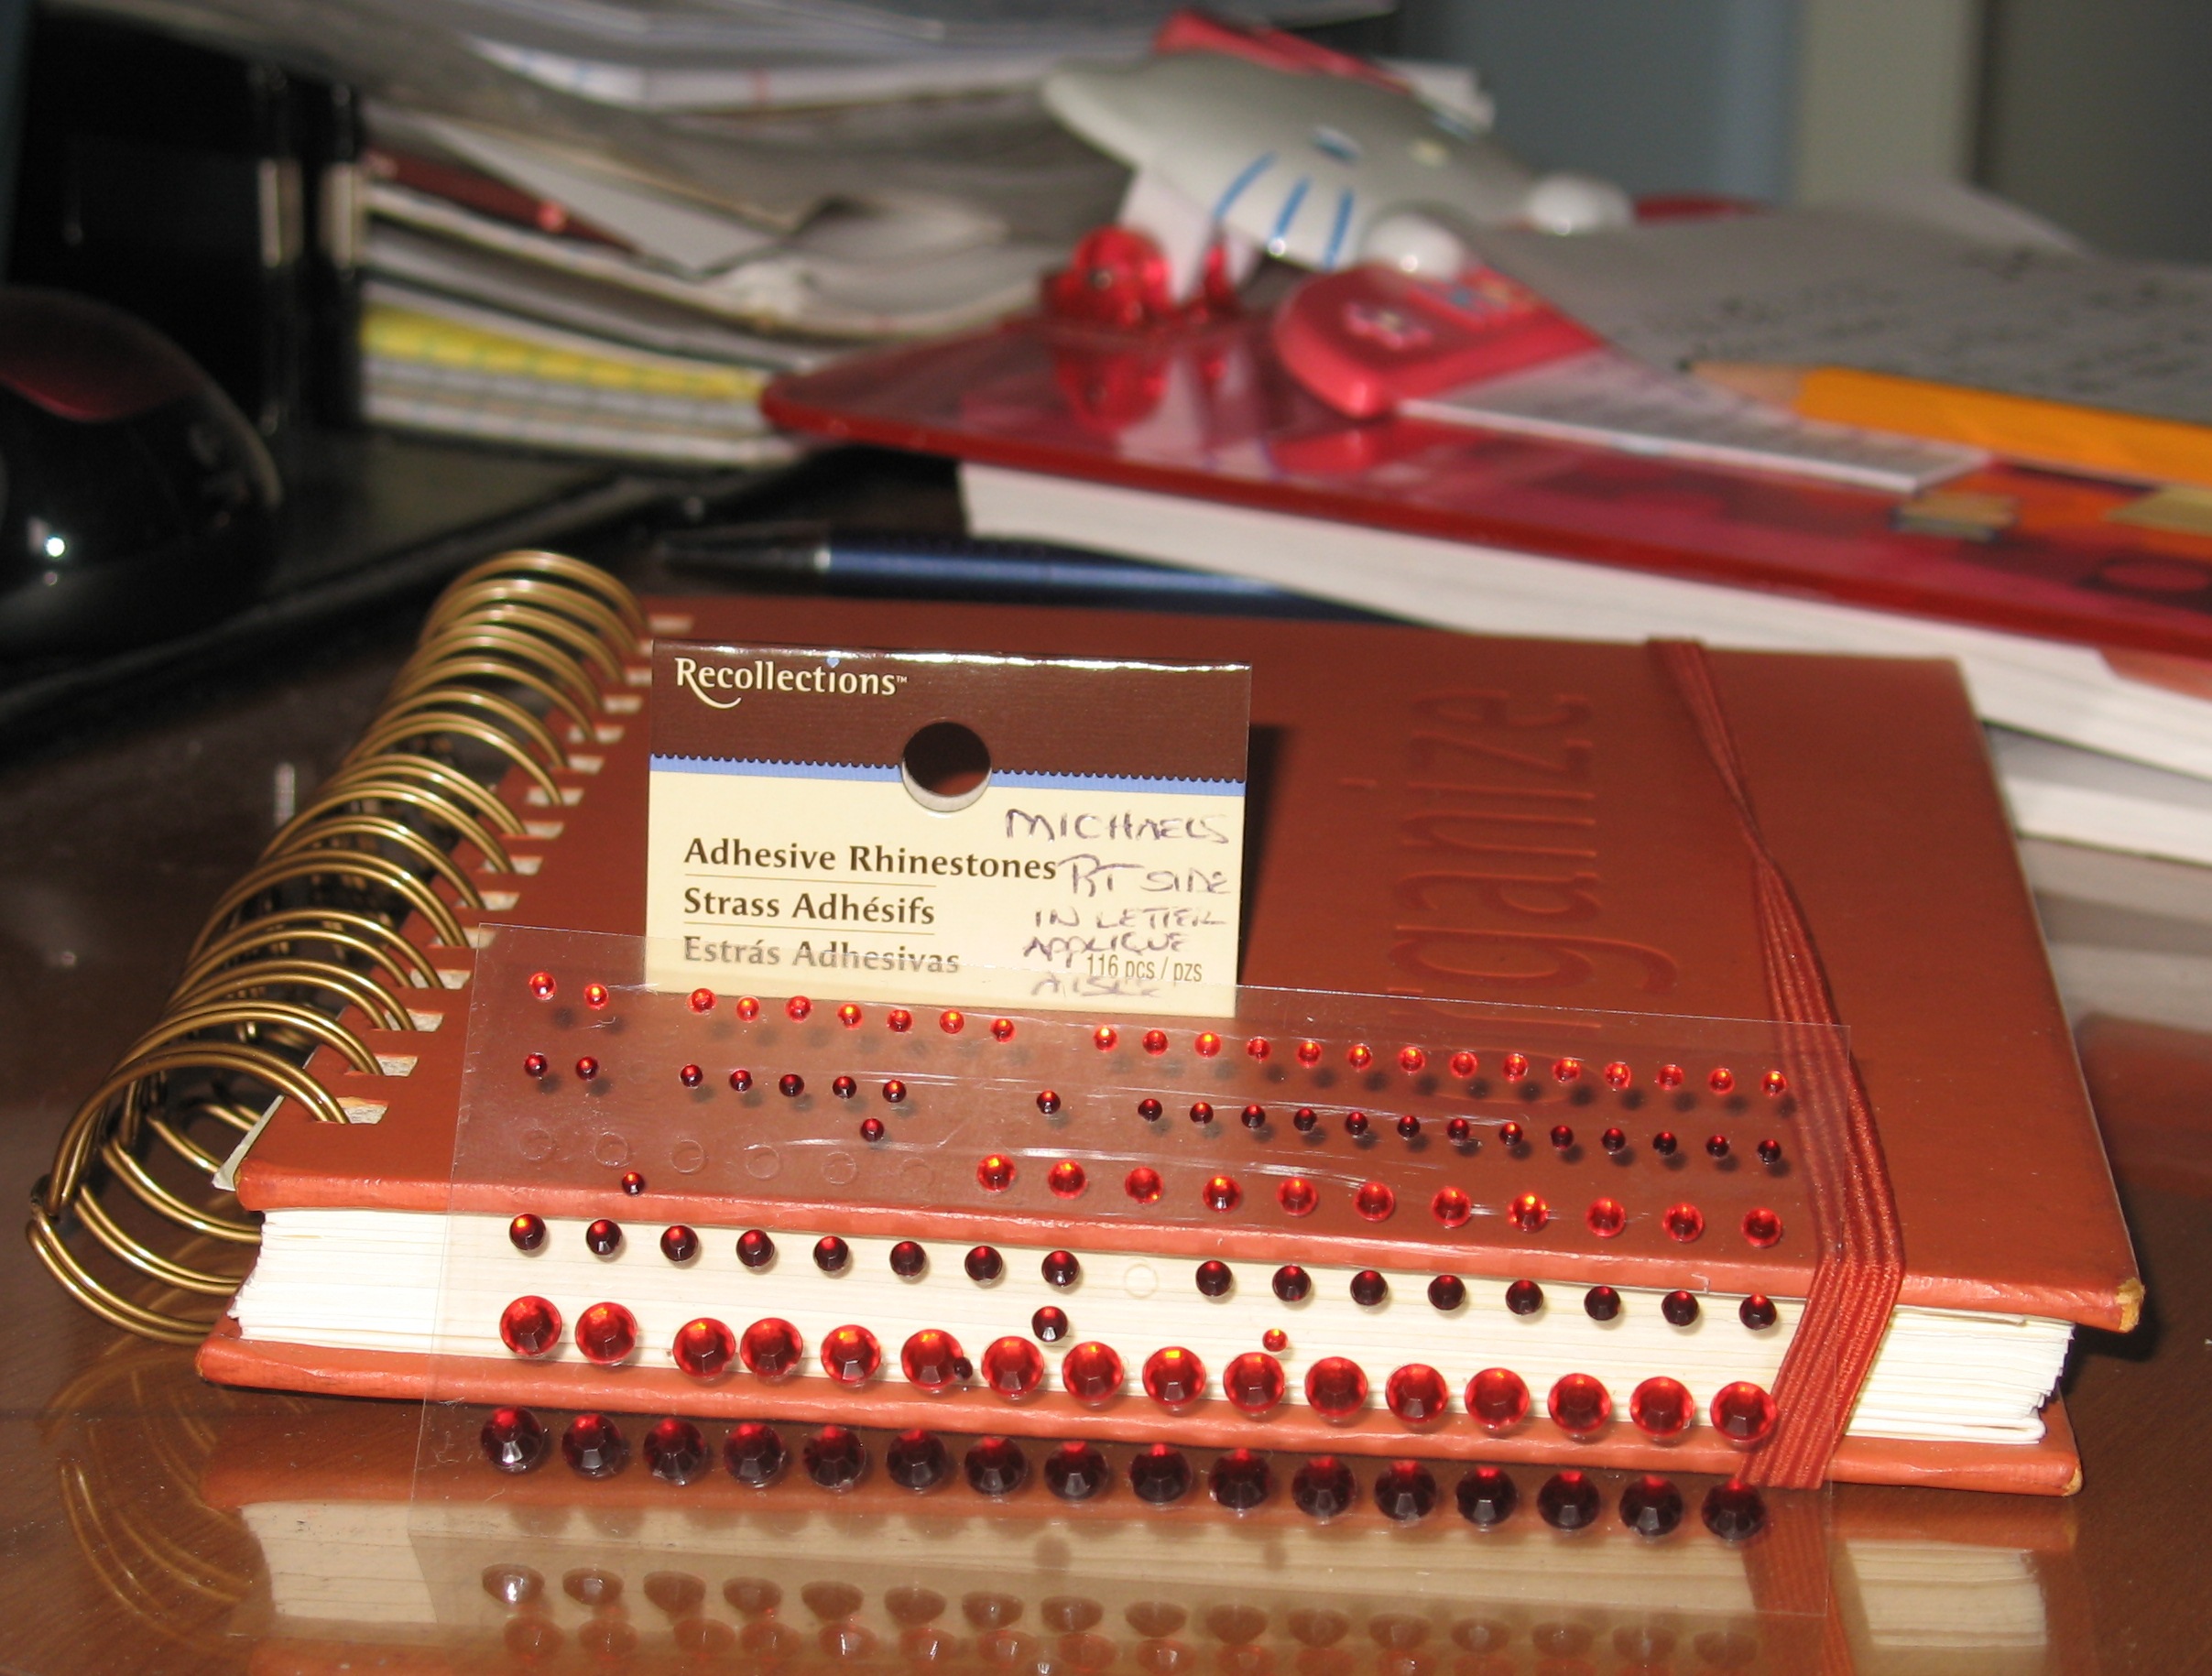
The sizes (3 of them) are: largest= 4.5mm dia.; medium (the ones I used)= 3mm dia; smallest= 2mm dia. These are approximate, based on measuring across the back with a small ruler.
The product barcode # is 00100 81447.
I found these on the right side of the store (assuming a standard retail floorplan) about 5 aisles back from the front cashiers in the aisle where stick on letters and "cute stick on emplems" were located- on opposite side of that aisle.
There are clear, green, red, blue rhinestones- I didn't really look after I found these too much. I chose the medium sized ones as they appeared to be closer to the scale marker light lens size than the small ones. The largest ones were way too big and would look "toyish" on the caboose, being almose the same size as a diesel front headlamp, it would appear.
you can see that there are two shades- lighter and darker. The lighter ones were used on my caboose, as my "test" of them with a small LED flashlight (Harbor freight- $3 for 2 of them) showed that the lighter red one "glowed better". Some scientific test, right?
As you can see, the trade name is "Recollection, but the reverse side of the label says that they are made for Michaels Crafts in China, so this may be a generic vendor's trade name for the product.
Remember- that adhesive on the back of these is worthless, so use CA to glue them in place.
One thought did occur- if you remove the rear silvered paper backing, you could conceiveably allow a small (3mm) or smaller (?) LED to shine thru the red plastic lens....
Hope that is enough info for you on the rhinestones.
As to using overhead projector film- that which I had tried from school was thinner and more brittle to work with than I liked, so I opted for the K&S Clear PETG Plastic sheets-at Hobbytown, as they are a bit thicker and more bendable without the bend becoming a whitish crease.
By the way, that is NOT my Hello Kitty clipboard in the background of the photo- it belongs to my lovely and talented daughter- who first spotted the rhinestones for Dad! (Yeah, just like HER toy poodle is not MY toy poodle )!
Later,
Ron
|
|
Country: USA ~
Posts: 510 ~
Member Since: September 21 2011 ~
Last Visit: December 21 2014
|
Alert Moderator
|
|
|
|
Posted - March 18 2013 : 6:10:08 PM
|
now you needs to put a LED bulb marker lights & light them up
|
|
Country: USA ~
Posts: 15031 ~
Member Since: February 23 2009 ~
Last Visit: July 07 2026
|
Alert Moderator
|
|
|
|
Posted - March 18 2013 : 6:50:32 PM
|
Ron,
Thanks for the extra input! I been using those rhinestones from Bowser at .032" for years and they are difficult to work with at that size.....AND expensive after awhile!
BUT to what you did looks GREAT!
~John
Many have tried to, and failed, ya just can't repair stupid...
Do NOT try to Idiot-Proof anything!!!! God, will simply create a better......IDIOT!
|
|
Country: USA ~
Posts: 2911 ~
Member Since: March 26 2012 ~
Last Visit: January 14 2014
|
Alert Moderator
|
|
|
|
Posted - March 25 2013 : 05:58:15 AM
|
SiouxLake,
What an incredible transformation! In the first photo the paint job and decal work from this car's previous owner looks incredibly rough! Your overhaul looks professional and the color scheme really makes it stand out. Your paint scheme is prototypical in style and fits in well with the 1950s-60s time period. Good plus with the roller bearing trucks, metal wheels, and markers.
Excellent!
Be creative, share and enjoy the hobby :-)
|
|
Country: USA ~
Posts: 32 ~
Member Since: July 23 2012 ~
Last Visit: December 20 2015
|
Alert Moderator
|
|


