|
|
 Posted - November 25 2012 : 11:42:21 AM Posted - November 25 2012 : 11:42:21 AM


|
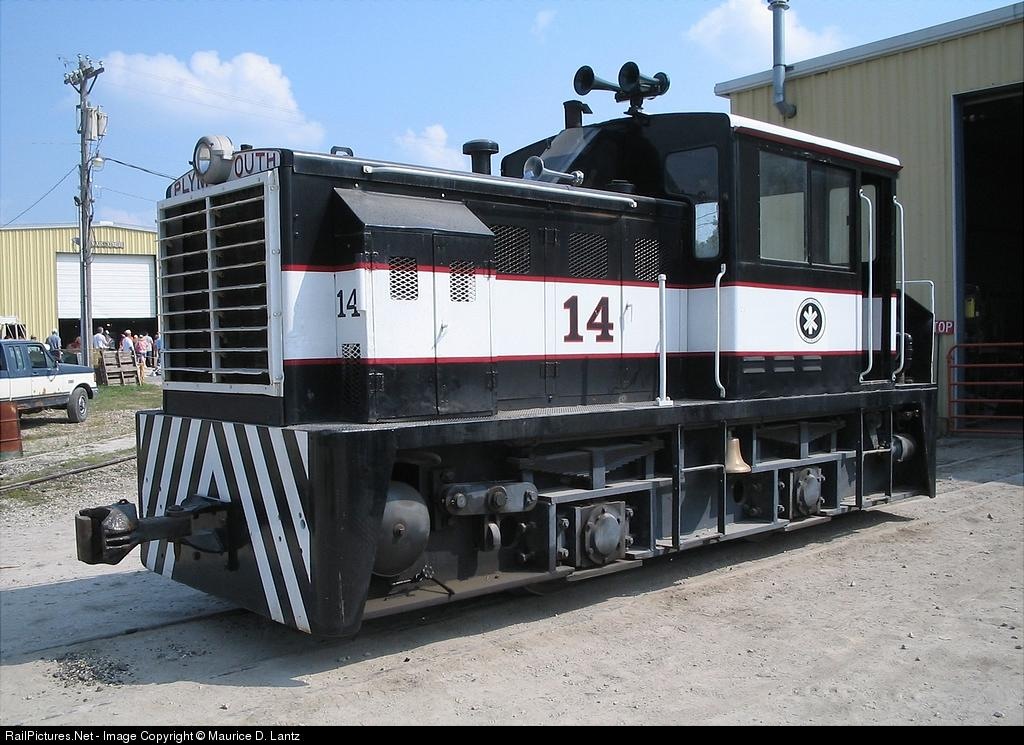
I had a pair of AHM Plymouth MDT's that I was planning to rehab and this month was the time to get started. I found inspiration from a photo of a real Plymouth MDT operated on an Iowa rail museum property.
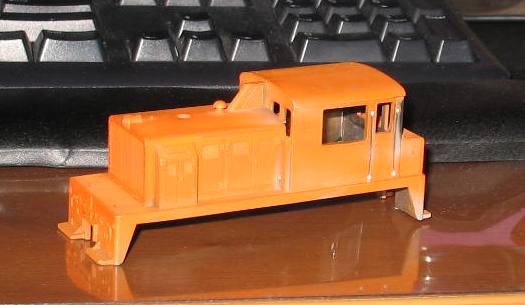
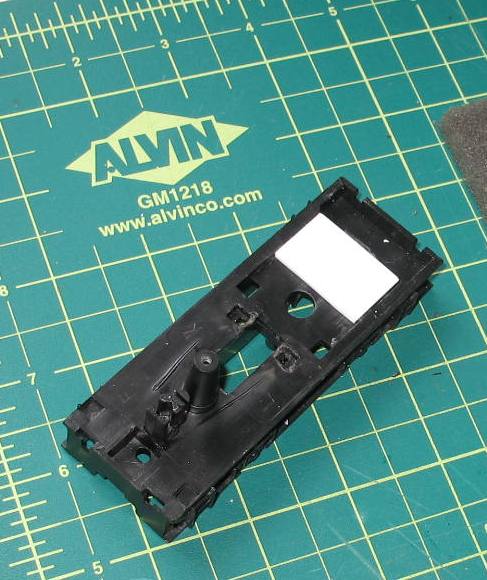
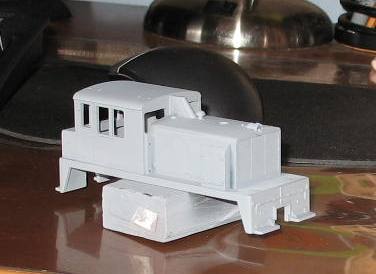
One of the shells I had was used to experiment with my Sioux Lake railroad orange, so I started with that one. I had a problem cleaning the Badger Modelflex paint off it using standard 91 alcohol, so I turned to my second weapon- Super Clean, which I get in 1 gallon containers at (you guessed it!) Wal Mart. A 24 hr soak did the trick. This is the shell as I started on it:
The Iowa diesel in the photo has (among other features) a divided side window, a rear light and additional grabs located in front below each front cab window. This version has no front porch, as the HO model does, so a bit of artistic license was used. I used these elements in my rebuild.
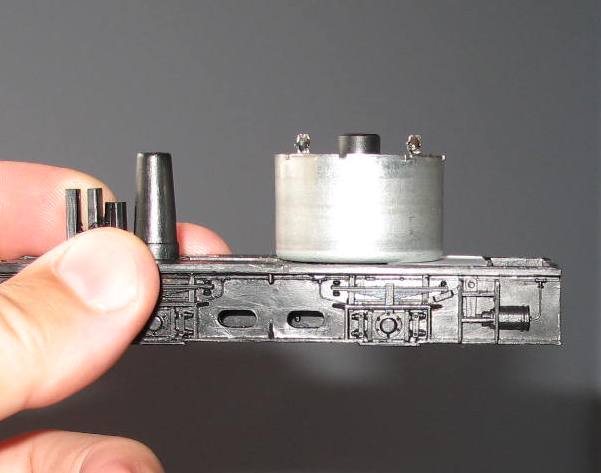
I had scavenged some round can motors from a VCR and found that one of them, a Mabuchi, would fit in the same space as the old motor, with only minor modifications to the chassis. I tried researching the specs for this motor online using the printed model number on the motor, but was not successful. Again, this came from a VCR built in the early 90s, so it may be no longer manufactured as such. I did find references to similar model images, suggesting that it is a 9VDC motor. Since I have no intention of racing around the layout at 12V, this works for me.
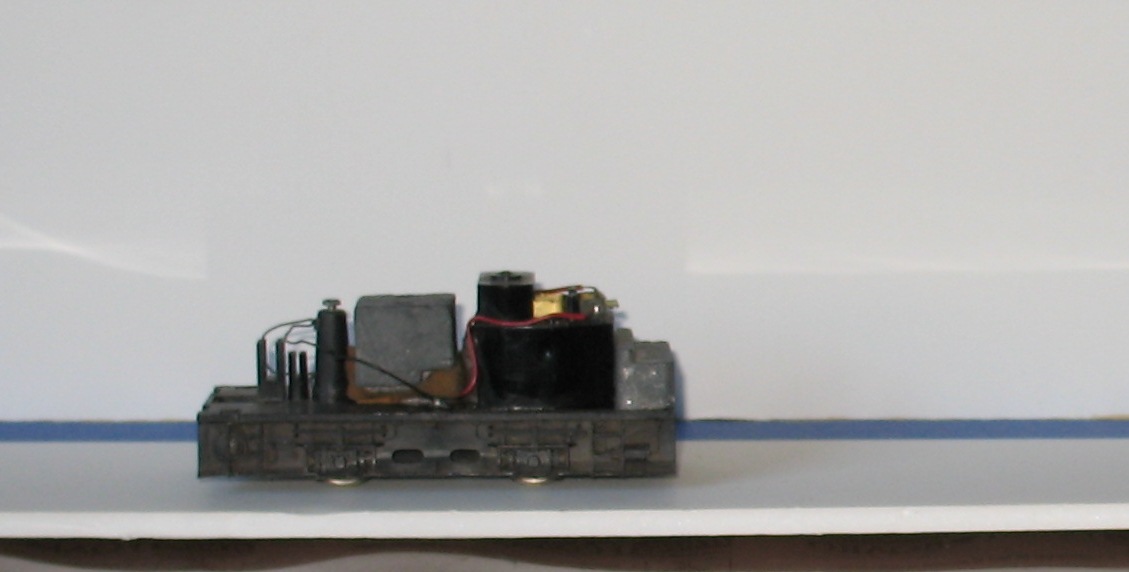
Here is the original chassis configuration:
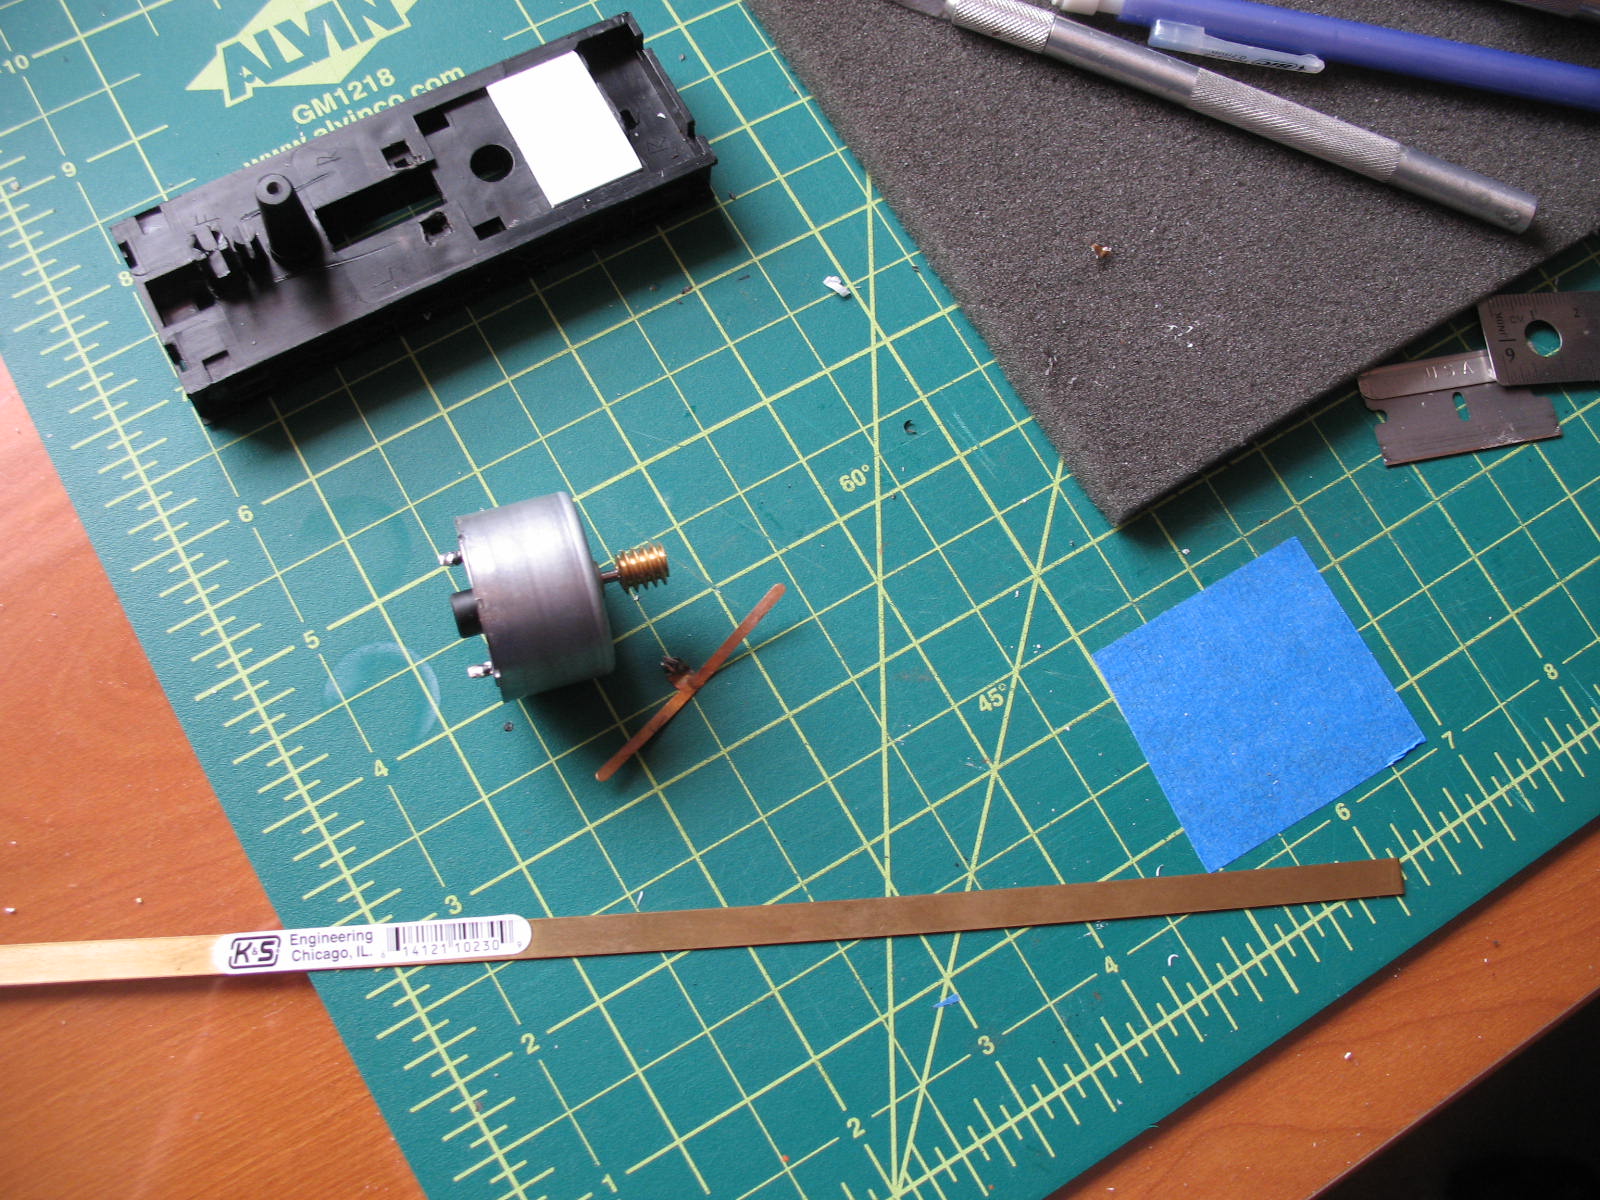
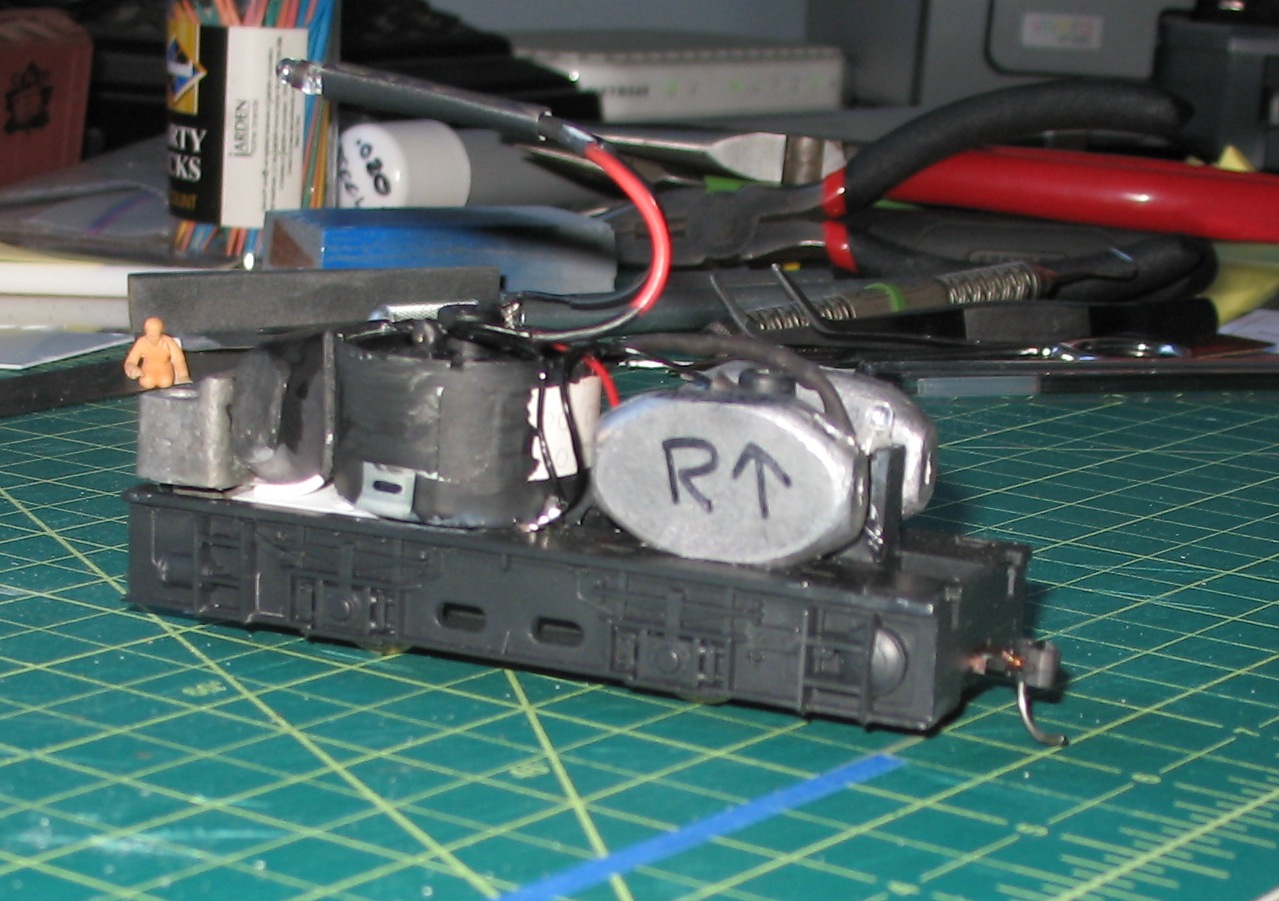
Here is the Mabuchi motor with a brass Atlas (?) worm gear that Nelson clued me into, which I bought several of online last spring.
I had to seat the motor, so a bit of styrene was fit into the original motor, as well as enlarging the gear hole (the gear runs vertically down to the geared wheel axle):
And how it seats on the chassis (I used Loctite gel CA glue to mount the motor to avoid height and fit issues with the worm meshing with the geared wheel):
The original wheel wipers barely cleared the chassis deck and made resoldering difficult, as well as being corroded from decades of use:
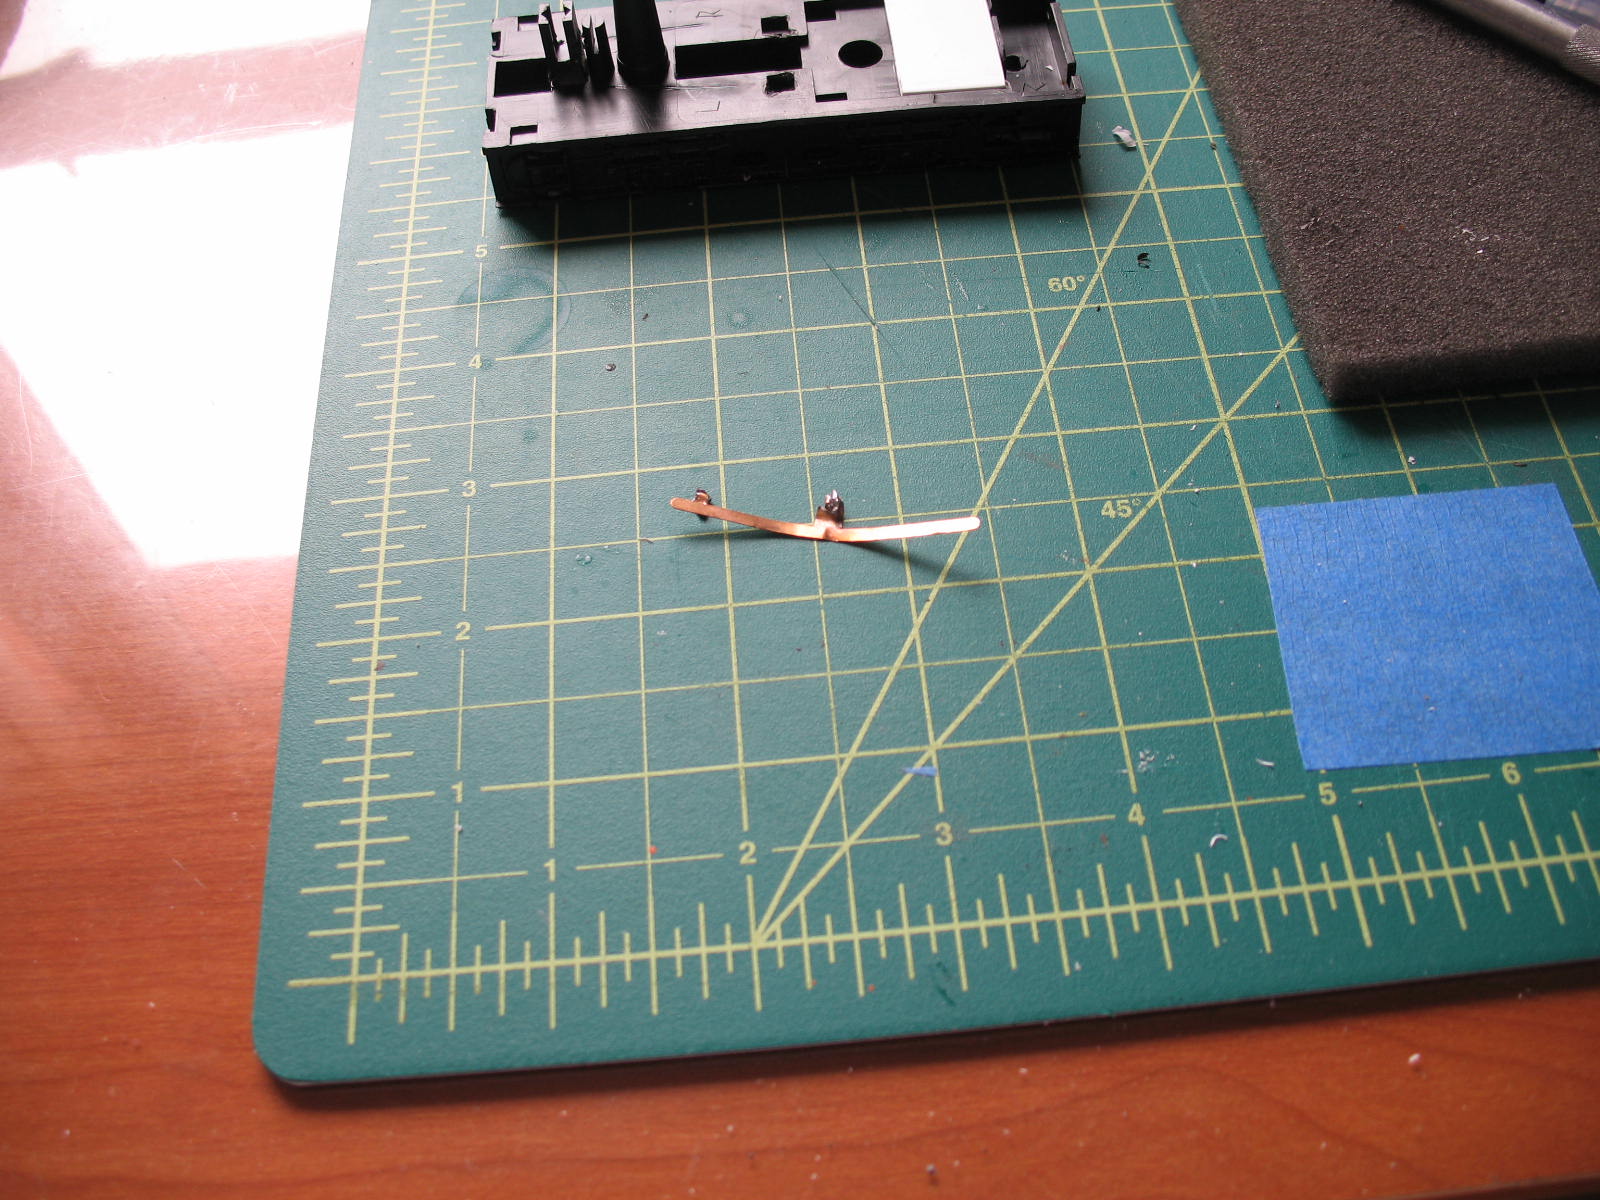
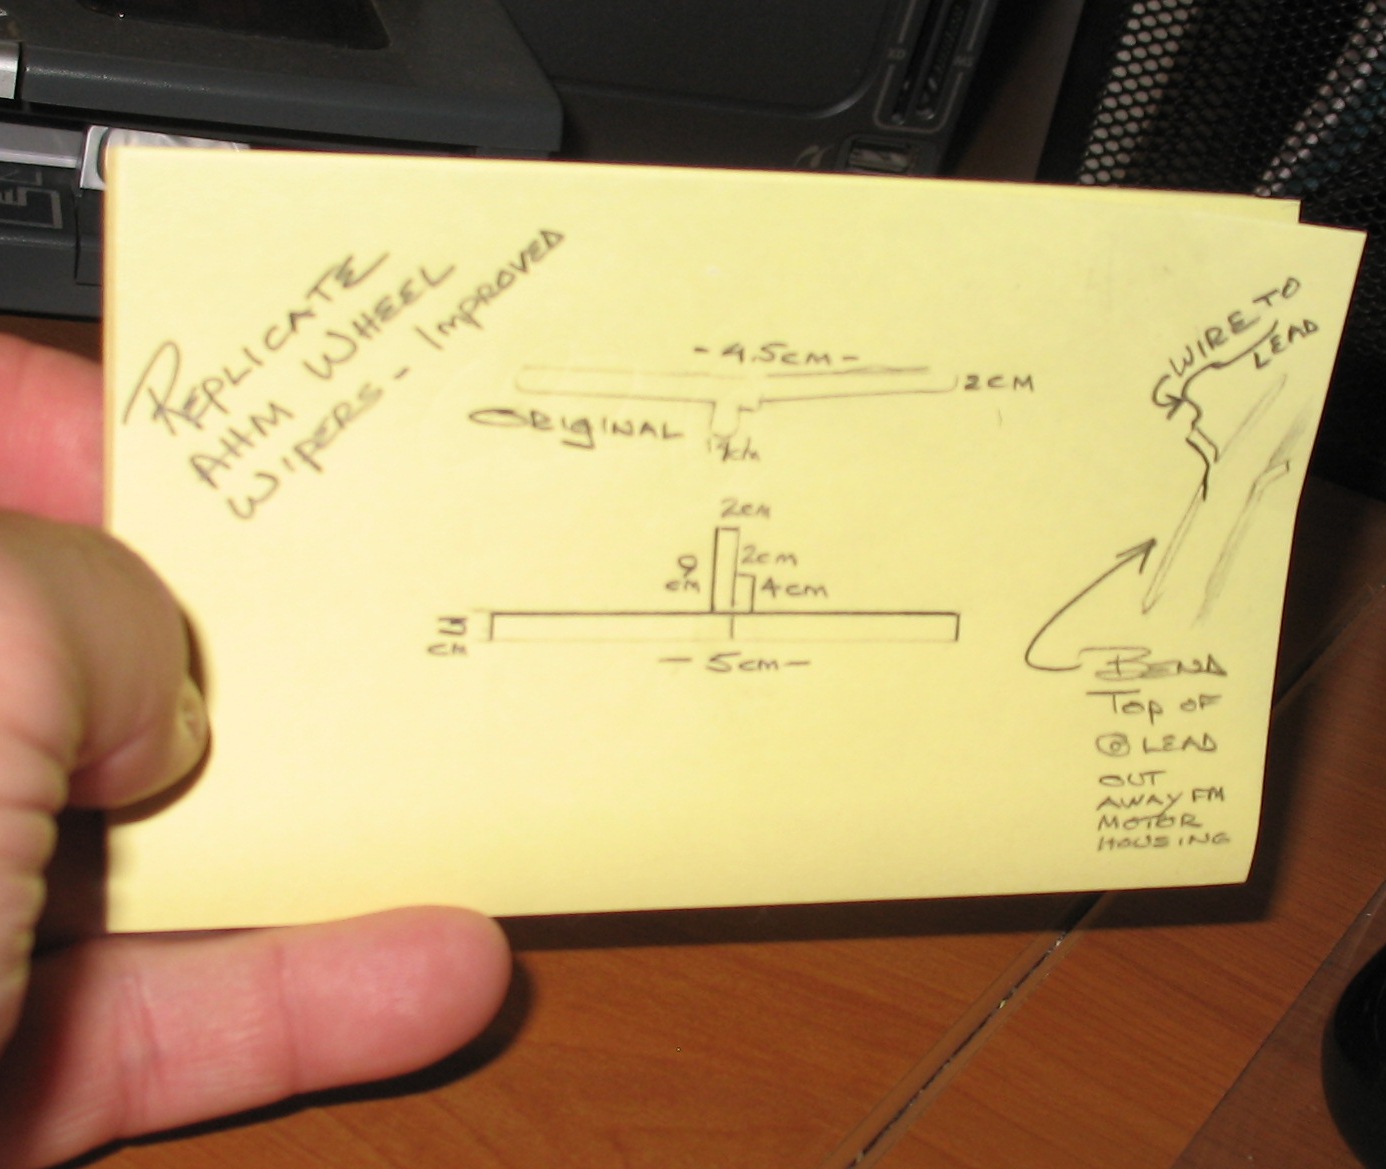
I bought a piece of brass sheet stock (yes, I could have used phosphor bronze, but that was unavailable locally and I didnt feel like spending more than the $3.00 that the brass sheet cost -plus it makes many more wipers in the future) and redesigned the wiper with a longer vertical "tang" so that I could connect wires to it more easily:
I replaced the front bulb with a round-top 3mm warm white LED, drilled a hole for the same LED in the rear of the hood back wall, and then connected things up. I replaced the front weight with some fishing weights, appropriately reshaped- this had the advantage of moving the balance center closer to the exact middle of the chassis, over the front wheel. The overall weight was not increased, for the reason that the lower speed of the motor might be compromised (my view) by any significant increase in overall weight). The wheels were cleaned with 1000 grit wet/dry and alcohol, then the gearing was oiled with ATF.
I placed a strip of electrical tape along the bottom front of the motor, to protect against shorts from the wheel wiper tangs and wires, painted the contacts with liquid electrical tape after soldering, and wired the rear LED to the motor tangs, to simplify wiring. The rear LED is a press fit into it's new hole, so removing the shell- if needed- will be easy. I painted the can motor black, to minimize it's visibility from outside. I also placed reflective foil (backed with doublestick tape) on the underside front of the shell near the front light tube ahead of the front LED, to increase the focus of the LED out thru the front lens. Both LEDs were separately wired with a 470 ohm resistor for each, off the positive lead.

The shell was cleaned, holes drilled for grabs, and the window side openings divided with styrene strip. I opened up and cleaned up the front cab window openings to match, as best I could, the Iowa MDT's appearance, as the AHM model has two front windows on each side of the center partition. I then primered the shell and masked it for final painting. I opted to tint and install new clear window "glass", as the original window part was pretty beat up and crazed- even with tinting, the damage would be visible. The original part covered the rear and sides of the cab, but not the front. I soon realized that a front window would be difficult to install, as the top opening edge was offset from the lower edges. The tinting would offer a sufficiently darkened interior to compensate. Kadee # 27 couplers, which have a lower arm with the coupler mounted higher, were recommeded by Kadee's website conversion chart and used (sure- I bought them at a discount at a swap meet previously, back when I was originally going to work on thi MDT!)
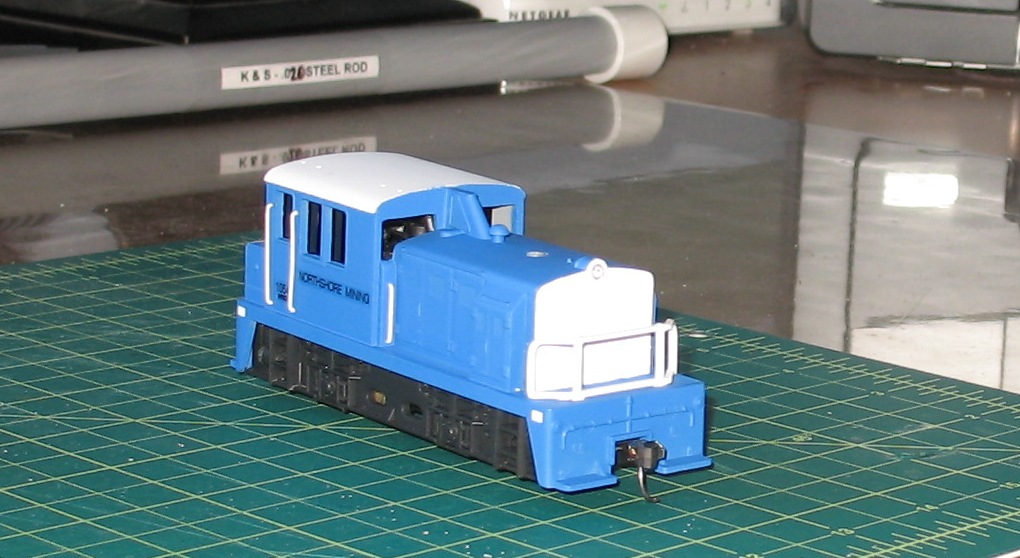
The real world inspiration for this model's paint comes from a taconite mining railroad in northern Minnesota. The rational for this being on my Sioux Lake railroad is that my engine repair facilities are always glad to accept contract work for engine repainting and rehab (a short line is always short of cash!):
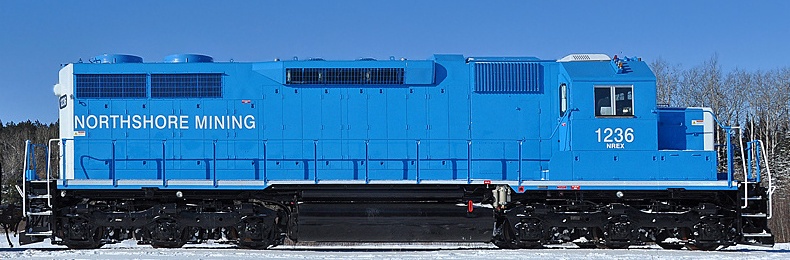
I could not replicate the white lettering, so I opted for the same font in black, located a bit differently, as the MDT has smooth surfaces on the cab. I was able to use standard blue for the rear lettering, which closely matched the Rustoleum "Sail Blue" that is, itself, a close color match (visually) for the Northshore Mining blue. I clued my paint scheme to the photo, but only placed lettering on the rear, as the front has a grill hatch pattern that would not lend itself to easy decaling. I used four small white safety rectangles on the chassis side fore and aft, as -even in a Minnesota winter- that blue would be easily seen. The white used was a Rustoleum flat white. The chassis sides were painted flat black and dullcoated.
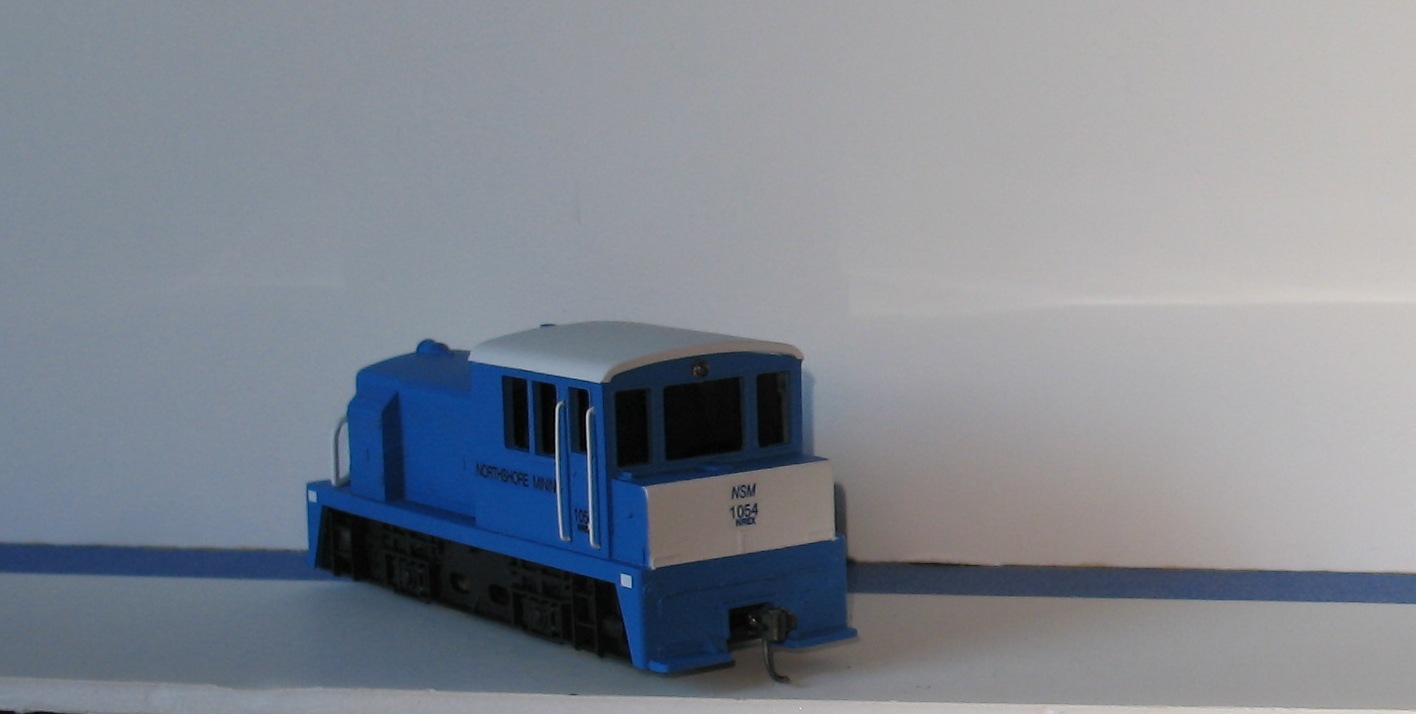
I finished the decal work, then Dull-Coated the entire shell, to tone down the gloss of the blue
I have some diesel horns coming for the cab roof, and will paint those the same blue (or black). The final result is seen in the following images:

But wait...there's more!
The OTHER MDT will be painted and lettered for the Minnesota, Sioux Lake & Western. Either in MOW livery (as my MOW project series was) or in the orange and red livery of my railroad.
I will just post a few images of the finished product, as this post explains the process.
Thanks for viewing.
Siouxlake/ Ron
|
Country:  USA ~
Posts: 510 ~
Member Since: September 21 2011 ~
Last Visit: December 21 2014 USA ~
Posts: 510 ~
Member Since: September 21 2011 ~
Last Visit: December 21 2014
|
 Alert Moderator
|
|
|
|
Posted - November 25 2012 : 7:57:06 PM
|
An excellent rebuild, nicely explained. Really good paint job.
I'll be interested in seeing the other one finished.
Will they be used together, double headed?
Alco Fan
|
|
Country: USA ~
Posts: 2496 ~
Member Since: August 03 2006 ~
Last Visit: September 17 2024
|
Alert Moderator

|
|
|
|
Posted - November 26 2012 : 7:38:14 PM
|
Ron, that looks fantastic.  I know those MDT's are oversized, but I'm still surprised you fit that motor in there. They are typically used to drive the tape spools, I believe, and are quite large. I know those MDT's are oversized, but I'm still surprised you fit that motor in there. They are typically used to drive the tape spools, I believe, and are quite large.
The reason the weight is concentrated toward the rear is because only the rear axle is driven, so evening it out will probably reduce traction. If it were 4 wheel drive centering the weight would be optimal. Adding more weight to the rear -- if there's room -- would only improve traction.
The Tyco Depot
|
|
Country: USA ~
Posts: 3927 ~
Member Since: June 20 2007 ~
Last Visit: November 19 2015
|
Alert Moderator
|
|
|
|
Posted - November 26 2012 : 8:28:10 PM
|
The motor I used required that I either mash up the OEM front weight, which I did with bad results, or rearrange the location of front weighting within the space available, so as to preserve the original weight
of the MDT. The OEM weight sat MOL directly amidships between the geared wheel and the front free wheel. My weighting may help keep the nose on the track, if anything, as that will ensure the security of the 4 wheel pickup off the tracks.
I made a set of videos of the original chassis moving on my test track and the repowered one. If I can get a clue as to how to upload them in a posting, you will be surprised by the comparison.
Siouxlake/ Ron
|
|
Country: USA ~
Posts: 510 ~
Member Since: September 21 2011 ~
Last Visit: December 21 2014
|
Alert Moderator
|
|
|
|
Posted - November 27 2012 : 12:58:05 PM
|
Yeah, I had to smoosh the large weight with a large socket wrench to make it fit around the Canon motor I used, which had smaller diameter. The open frame motor was offset and could sit much closer to it.
I just noticed the fishing weight behind your motor. That should help, but in my experiments with this and the center cab, added weight over the dead axle decreased traction. I actually get more traction out of a center cab if I remove the front weight entirely, but then it almost does a wheelie. 
It's too bad they didn't power both axles.
The Tyco Depot
|
|
Country: USA ~
Posts: 3927 ~
Member Since: June 20 2007 ~
Last Visit: November 19 2015
|
Alert Moderator
|
|
|
|
Posted - November 28 2012 : 07:25:56 AM
|
Wow that is impressive! I need to hire you to do some of my detailing!
Starting my Tyco and other favorites collection over again after 37 years.
My still in progress list of inventory and wantlist: tyconut.com
|
|
Country: USA ~
Posts: 396 ~
Member Since: November 02 2009 ~
Last Visit: March 14 2021
|
Alert Moderator
|
|
|
|
Posted - November 28 2012 : 09:23:20 AM
|
quote:| Yeah, I had to smoosh the large weight with a large socket wrench to make it fit around the Canon motor I used,... Originally posted by NickelPlate759 - November 27 2012 : 12:58:05 PM
|
You remind me of my biker neighbor years back. Knowing I had a large collection of tools, he came over one time to borrow a Cresent wrench. When I asked him what size, he said, "The biggest you got, I'm just gonna use it as a hammer anyway..."
Edited by - shaygetz on November 28 2012 09:23:59 AM
|
|
|
|
|
Posted - November 28 2012 : 10:31:08 AM
|
darned cool The colors look like either The Rock or EMD Oakway colors
I'd love to find one of these real Plymouth locos for sale 
Use it to rescue lost or abandoned equipment
|
|
Country: USA ~
Posts: 15031 ~
Member Since: February 23 2009 ~
Last Visit: July 10 2026
|
Alert Moderator
|
|
|
|
Posted - November 29 2012 : 5:00:13 PM
|
quote: quote:| Yeah, I had to smoosh the large weight with a large socket wrench to make it fit around the Canon motor I used,... Originally posted by NickelPlate759 - November 27 2012 : 12:58:05 PM
|
You remind me of my biker neighbor years back. Knowing I had a large collection of tools, he came over one time to borrow a Cresent wrench. When I asked him what size, he said, "The biggest you got, I'm just gonna use it as a hammer anyway..."
Originally posted by shaygetz - November 28 2012 : 09:23:20 AM
|
Well that's just tool abuse, whereas I needed something to make a cylindrical dent. It was a cheap socket, anyway. 
The Tyco Depot
|
|
Country: USA ~
Posts: 3927 ~
Member Since: June 20 2007 ~
Last Visit: November 19 2015
|
Alert Moderator
|
|
|
|
Posted - November 29 2012 : 7:37:36 PM
|
| Would the Super Clean work on TYco Acrylic paint? I have a scuffed up Tyco Plymouth Switcher I am trying to strip the paint off and it is not working too well.
|
|
Country: USA ~
Posts: 668 ~
Member Since: April 28 2010 ~
Last Visit: June 30 2026
|
Alert Moderator
|
|
|
|
Posted - November 29 2012 : 8:10:35 PM
|
The Badger modelflex i had used on the "paint test" MDT shell is acrylic, so at first guess, i would say yes. The thing is, is that I have used 91 alcohol very successfully on factory painted Model Power, old
Athearn BB models, and others.
I found the Super Clean useful where the alcohol was not effective- its an iffy thing.
I cannot tell you that there is a set of rules regarding what paint is more susceptible to which remover, but having the Super Clean around may be good insurance.
Ron
|
|
Country: USA ~
Posts: 510 ~
Member Since: September 21 2011 ~
Last Visit: December 21 2014
|
Alert Moderator
|
|
|
|
Posted - November 30 2012 : 1:18:25 PM
|
I tried stripping a Model Power Plymouth DDT shell in globbed on Chessie paint... I don't know what that stuff was, but nothing would get it all off, alcohol, Chameleon, it didn't matter, or how long I soaked it. I did a lot of scraping. I've since gotten Scale Coat Wash Away, so I don't know if that would have done the trick. I may have to give Super Clean a try on some cheap shells.
The Tyco Depot
|
|
Country: USA ~
Posts: 3927 ~
Member Since: June 20 2007 ~
Last Visit: November 19 2015
|
Alert Moderator
|
|
|
|
Posted - November 30 2012 : 11:10:53 PM
|
| Nelson- I tried that Wash Away paint remover on the Tyco USS Plymouth and I can only scratch some of the paint away after lettin git soak for a few days, that is why why I was looking for an better remover.
|
|
Country: USA ~
Posts: 668 ~
Member Since: April 28 2010 ~
Last Visit: June 30 2026
|
Alert Moderator
|
|
|
|
Posted - December 01 2012 : 12:18:25 AM


|
Ron,
That looks AWESOME! Nice work, yet again!
I too have one of these I picked up from a garage sale that needs something done with its paint. Who ever had it, had sprayed blue and orange paint around it and it has some serious over spray on it.....
But, It will get done in something, I'm just not sure what at this point!
~John
Many have tried to, and failed, ya just can't repair stupid...
Do NOT try to Idiot-Proof anything!!!! God, will simply create a better......IDIOT!
|
|
Country: USA ~
Posts: 2911 ~
Member Since: March 26 2012 ~
Last Visit: January 14 2014
|
Alert Moderator
|
|
|
|
Posted - December 01 2012 : 01:42:51 AM
|
AF - I haven't cracked open the bottle of Wash Away yet, so I have no idea how well it works. I've heard it's pretty effective, but that's just anecdotal. The bottle of Chameleon gel is nowhere near as strong as their liquid stuff I had & recycled for years.
It seems like the cheaper the loco, the tougher the paint. 
The Tyco Depot
|
|
Country: USA ~
Posts: 3927 ~
Member Since: June 20 2007 ~
Last Visit: November 19 2015
|
Alert Moderator
|
|
|
|
Posted - December 01 2012 : 01:44:21 AM
|
Nelson,
Yeah......the paint holds the cheaper ones together!
~John
Many have tried to, and failed, ya just can't repair stupid...
Do NOT try to Idiot-Proof anything!!!! God, will simply create a better......IDIOT!
|
|
Country: USA ~
Posts: 2911 ~
Member Since: March 26 2012 ~
Last Visit: January 14 2014
|
Alert Moderator
|
|
|
|
Posted - December 01 2012 : 10:49:14 PM
|
Great work on a cool project! How many cars can your little loco pull? Does the motor provide smooth slow speed operation and coasting action?
Proudly keeping Tyco Pluggers out of landfills since 2016
|
|
Country: USA ~
Posts: 821 ~
Member Since: December 26 2009 ~
Last Visit: July 08 2026
|
Alert Moderator
|
|
|
|
Posted - December 03 2012 : 1:47:19 PM
|
I tested (30 Nov) the completed first MDT and the remotored chassis of the second MDT with a boxcar and an unfortunately- overweighted calf unit (SW-7) that I worked on last spring.
Both MDTs (identical motors) pulled well (+12 oz) at 9VDC and at very low speed.
Unfortunately, my test track is powered by a TYCO transformer, so no momentum control switch is available, but- given the coarse nature of the TYCO control, it does quite well at slow speeds.
Ron
|
|
Country: USA ~
Posts: 510 ~
Member Since: September 21 2011 ~
Last Visit: December 21 2014
|
Alert Moderator
|
|
|
|
Posted - December 07 2012 : 02:15:20 AM
|
| Nice remotor job Ron! That thing has to pull like a beast with the new motor and all the extra weight. Looking forward to seeing the next one!
|
|
Country: USA ~
Posts: 531 ~
Member Since: January 29 2009 ~
Last Visit: July 10 2020
|
Alert Moderator
|
|


