|
|
 Posted - July 18 2012 : 7:26:49 PM Posted - July 18 2012 : 7:26:49 PM


|
I just completed the work caboose/ boom car for my Athearn 200ton Crane. No special efforts made on a standard Athearn BB kit other than Kadee #5s, some additional weight to bring it to NMRA spec and additional decaling on the toolbox lockers. I weathered the deck with India ink wash and gave the windows some "glass". I need to get more metal wheels (hopefully this weekend) and she's ready to roll. I saw some equipment enhancements in a photo of another boom car- a wooden barrel, some freight car wheels (no axles), etc that I might consider adding when the set is done.
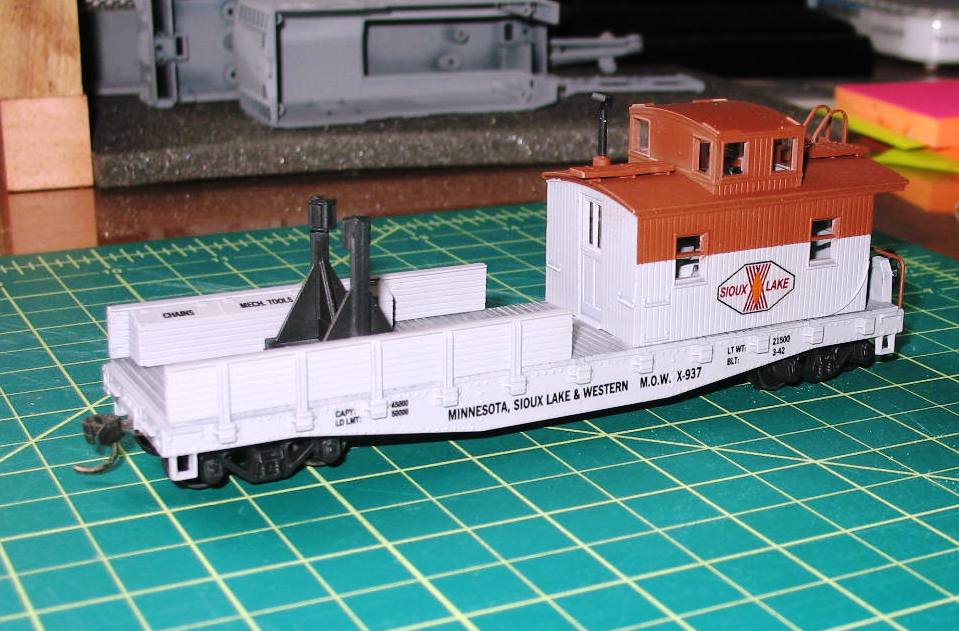
I am in the middle of the railroad crane project- paintshop work- so I will post when that is done and give you gys a family portrait of the MOW cars all together in a week or so. The cars are all numbered separately and I tried to be realistic about capacity, LT WT, and other data in the decal creation process.
Next up- final assembly and decaling of the RDC I had my friend Antonio FP45 (MR name) do in Alclad paint this past spring.
Raining like crazy every day this summer in Tampa- great railroading weather! (but then, I used to say the same thing about snowy days up north back when I was a kid!).
Siouxlake/ Ron
|
Country:  USA ~
Posts: 510 ~
Member Since: September 21 2011 ~
Last Visit: December 21 2014 USA ~
Posts: 510 ~
Member Since: September 21 2011 ~
Last Visit: December 21 2014
|
 Alert Moderator
|
|
|
|
Posted - July 18 2012 : 7:39:43 PM
|
Excellent painting/finishing/decalling Ron! I like the two-tone scheme.
-Thomas
|
|
Country: USA ~
Posts: 1091 ~
Member Since: July 07 2011 ~
Last Visit: July 01 2026
|
Alert Moderator

|
|
|
|
Posted - July 19 2012 : 06:07:52 AM


|
Ron,
VERY NICE! Where did you get the decals from to paint that up like that?
The two tone paint looks GREAT!
~John
Many have tried to, and failed, ya just can't repair stupid... 
Do NOT try to Idiot-Proof anything!!!! God, will simply create a better......IDIOT!
|
|
Country: USA ~
Posts: 2911 ~
Member Since: March 26 2012 ~
Last Visit: January 14 2014
|
Alert Moderator
|
|
|
|
Posted - July 19 2012 : 08:14:54 AM
|
The brand of decal paper I bought online is Bel and I purchased clear paper this first time out. The reason is that printing on white paper may substantially increase your color fidelity (due to inkjet ink quality and consistency), but you are then burdened with trimming around the shapes of letters or any graphics images your design has. And- how do you eliminate the white space between words, unless you make each one a separate decal? Thus, my choice was to buy the clear paper, so "Minnesota, Sioux Lake & Western" or with the car number added cones out as one complete line of text, with clear spacing between words. Easier to align and easier to apply.
As I use Autocad (which I teach and am very comfortable with), my fonts are not stair-stepped, as they print out far more smoothly than a jpeg image. But, having said that, at very small sizes, that may not be a critical issue for font clarity if you use the decal paper with MS Word or even MS Paint. On my first posted project- the AHM Center Cab diesel, I printed out a black number using MS Paint with Arial font at a size of 6 onto Acco matte adhesive labels (before I got the decal paper), the trimmed the number into a small rectangle and applied it on the end of the Center Cab hood. It looks very good, as the matte label finish made the edges of the "decal" disappear and the strong label adhesive made any other decal solution use unnecessary. I then sprayed the model with Testors Dullcote.
Hope this explanation helps.
Ron
|
|
Country: USA ~
Posts: 510 ~
Member Since: September 21 2011 ~
Last Visit: December 21 2014
|
Alert Moderator
|
|
|
|
Posted - July 19 2012 : 08:17:11 AM
|
Oops- I used Avery brand adhesive labels, not "Acco"!!!!!
Ron
|
|
Country: USA ~
Posts: 510 ~
Member Since: September 21 2011 ~
Last Visit: December 21 2014
|
Alert Moderator
|
|