|
|
 Posted - June 26 2011 : 6:45:51 PM Posted - June 26 2011 : 6:45:51 PM


|
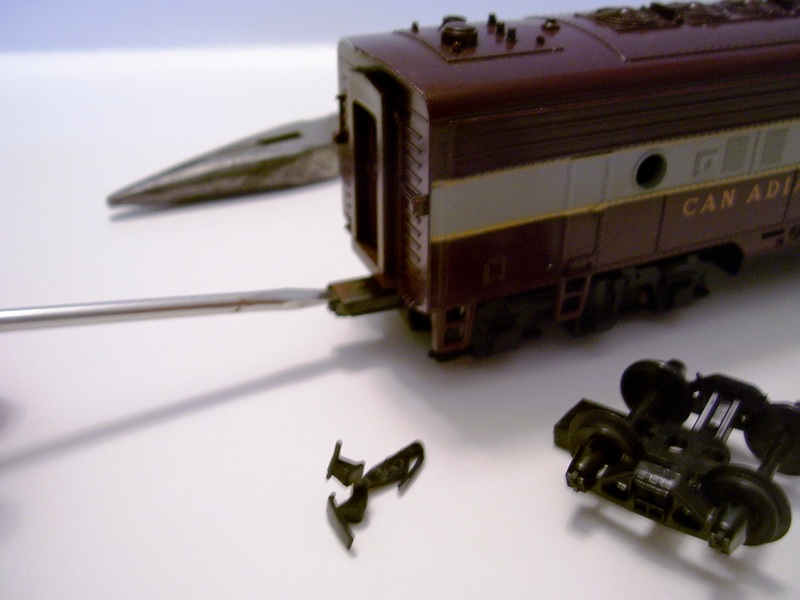
When I get an MU2 locomotive with missing couplers the fix is simple and works. If the coupler box looks to be in original condition, as most of the ones I've purchased are, this method will work.
I usually replace with horn hook couplers that sometimes I salvage from extra Tyco rolling stock I have around.
I use a small flat head screw driver that I slip above the broken coupler, and under the metal box, and gently pop out the rivet, which stays attached to the metal cover, and allows it's removal.
Then place the coupler over the still attached rivet, align it again with the rivet whole on the tongue then using needle nosed pliers gently squeeze until it snaps back in place.
Also squeeze the 2 tabs on the sides on the coupler end of the cover for extra measure of security.
I think Model Power has a knuckle coupler that fits Tycos if you roll that way.
This has worked for me and looks original.
Let me know if it helps restore your fave MU2 rides couplers.
Alco Fan
Edited by - Alco Fan on June 26 2011 7:57:55 PM
|
Country:  USA ~
Posts: 2496 ~
Member Since: August 03 2006 ~
Last Visit: September 17 2024 USA ~
Posts: 2496 ~
Member Since: August 03 2006 ~
Last Visit: September 17 2024
|
 Alert Moderator
|
|
|
|
Posted - June 27 2011 : 09:21:52 AM
|
With some pictures now, sorry for the quality.
Step 1: Insert screwdriver to pop rivet and metal box.
Step 2: Place new coupler over rivet, point metal box tabs at coupler, and align rivet with whole in tongue and press to hold temporarily.
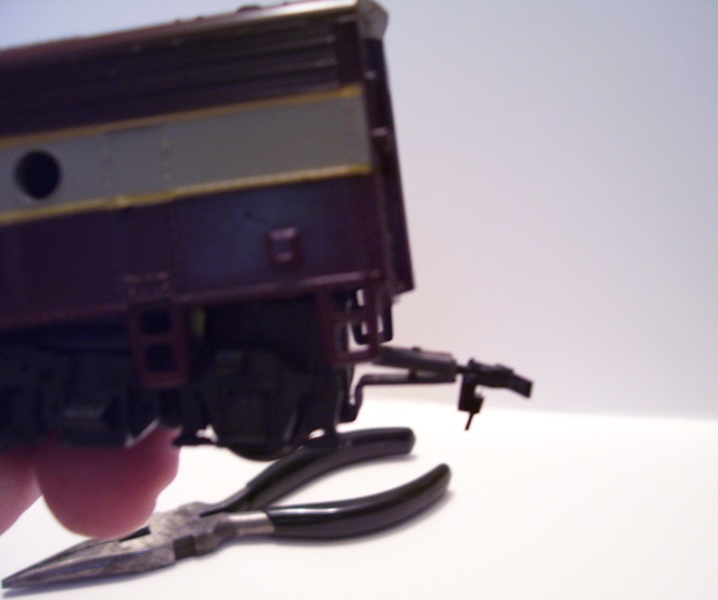
Step 3: Use pliers to secure rivet in whole with gentle pressure. Press tabs on side of coupler box.
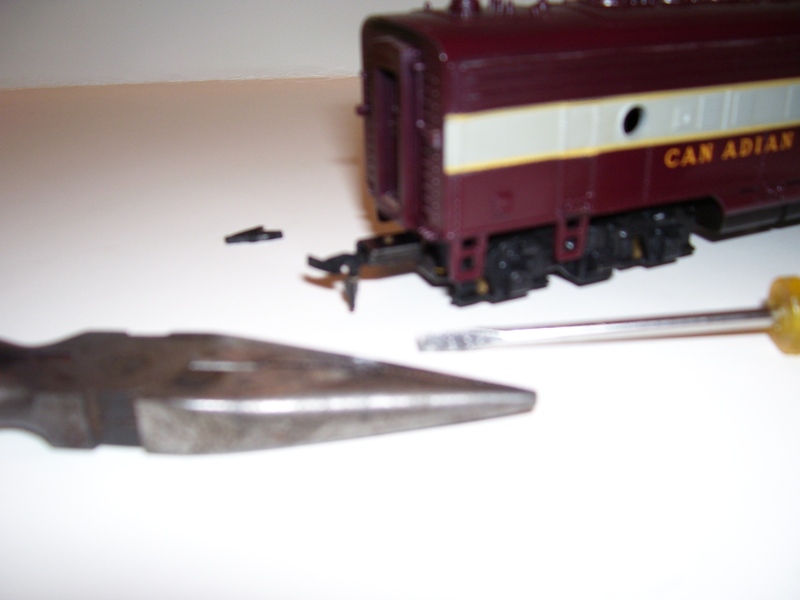
This process took several minutes.
Alco Fan
|
|
Country: USA ~
Posts: 2496 ~
Member Since: August 03 2006 ~
Last Visit: September 17 2024
|
Alert Moderator

|
|
|
|
Posted - June 27 2011 : 2:52:09 PM

|
Nice picture tutorial!  This is actually what I do as well when I need to fix couplers on older MU-2 engines and 60's era passenger cars. I wish more people knew how to do this. It gets tiresome finding so many vintage Tyco engines with the rivet drilled out and some massive plastic coupler box screwed on -_- This is actually what I do as well when I need to fix couplers on older MU-2 engines and 60's era passenger cars. I wish more people knew how to do this. It gets tiresome finding so many vintage Tyco engines with the rivet drilled out and some massive plastic coupler box screwed on -_-
|
Country:  Canada ~
Posts: 3448 ~
Member Since: September 22 2006 ~
Last Visit: April 03 2026 Canada ~
Posts: 3448 ~
Member Since: September 22 2006 ~
Last Visit: April 03 2026
|
Alert Moderator
|
|
|
|
Posted - June 27 2011 : 3:37:49 PM
|
I also use this method at will attest to its simplicity and effectiveness. Excellent write-up AF!
The only thing I have to add is, in cases where the base of the rivet whittles or fractures upon removal from the tongue and is therefore no longer a secure / "snap" fit back in place, you can take care of this by replacing it anyway as described above, and then adding a small drop of CA onto the exposed rivet to keep it secured. You can also add a drop of CA at the back of the coupler box where it lays on the tongue. At the very least this will keep parts from getting lost for display, but in most cases it does stand up to a typical load of several cars.
|
|
Country: USA ~
Posts: 2798 ~
Member Since: September 17 2010 ~
Last Visit: July 22 2015
|
Alert Moderator
|
|
|
|
Posted - June 28 2011 : 08:05:22 AM
|
Thanks fellas. I couldn't remember anyone talking about doing this. Early on I would glue a Kadee box and coupler on the tongue and that works but this is more original looking and it's dependable.
Alco Fan
|
|
Country: USA ~
Posts: 2496 ~
Member Since: August 03 2006 ~
Last Visit: September 17 2024
|
Alert Moderator
|
|
|
|
Posted - June 28 2011 : 11:26:05 AM
|
Alrite, wheres the That was easy button? LOL.Cool trick. Beats drilling it out and tapping it! Like your CP unit. I have one myself.
" Heck with counting 'em rivets, TRAINS ARE FOR FUN! Not called the Mad Scientist for nothing either!"
|
|
Country: USA ~
Posts: 3147 ~
Member Since: May 07 2007 ~
Last Visit: June 01 2026
|
Alert Moderator
|
|
|
|
Posted - August 28 2011 : 8:24:12 PM
|
I bought a very nice green PRR Mantua F unit with an MU2 motor and the front and rear coupler were missing along with the rear coupler box. I tried to use a box from another MU2 motor and found that the hole in the tongue was too far back to align the rivet. After measuring the tongue and comparing the measurements the F is 5/16
long and other Fs are 7/16 long. I think you could grind some of the box away then perform the procedure above.
I haven't solved this problem yet but the standard replacement coupler could be too long from the hole to the truck to clear and may need modified or find another short tongue MU2 motor and coupler for the swap.
I hope everyone in the path of Hurricane Irene is safe and sound! 8/28/11
Alco Fan
Edited by - Alco Fan on August 31 2011 5:20:29 PM
|
|
Country: USA ~
Posts: 2496 ~
Member Since: August 03 2006 ~
Last Visit: September 17 2024
|
Alert Moderator
|
|
|
|
Posted - August 30 2011 : 01:49:25 AM
|
| Hey AF. Was this Mantua unit one of the new ones or a 1960's Tyco model? The Tyco models from the early 60's had much smaller pockets. The couplers lacked the springy "tail" and used a small wire to give them their tension. These ones are a pain to repair/replace especially if you don't have the wire. I've made replacements out of the springy parts that go inside Kadee coupler boxes.
|
|
Country: Canada ~
Posts: 3448 ~
Member Since: September 22 2006 ~
Last Visit: April 03 2026
|
Alert Moderator
|
|
|
|
Posted - August 30 2011 : 05:50:08 AM
|
Cheez,
Thanks for the reply. The PRR F is from the '60s and has the aluminum truck bottom plates so it's very early '60s.
I have never seen that type of coupler but may switch over one from a cheap but complete non powered B unit or modify a coupler if possible.
Alco Fan
|
|
Country: USA ~
Posts: 2496 ~
Member Since: August 03 2006 ~
Last Visit: September 17 2024
|
Alert Moderator
|
|
|
|
Posted - August 30 2011 : 10:30:58 PM
|
That may be your best bet. The couplers are easy enough to modify...just take a standard horn hook and clip off the tail portion. As for the B-unit, if the coupler is intact don't open up the pocket. Once you take the cover off, that little spring is almost as good as gone 
|
|
Country: Canada ~
Posts: 3448 ~
Member Since: September 22 2006 ~
Last Visit: April 03 2026
|
Alert Moderator
|
|
|
|
Posted - January 12 2013 : 7:32:46 PM
|
quote:Nice picture tutorial! This is actually what I do as well when I need to fix couplers on older MU-2 engines and 60's era passenger cars. I wish more people knew how to do this. It gets tiresome finding so many vintage Tyco engines with the rivet drilled out and some massive plastic coupler box screwed on -_-
Originally posted by DaCheez - June 27 2011 : 2:52:09 PM
|
Thanks Spiderj and Cheez
I agree this method keeps it stock appearing and works most times permanently.
Alco Fan
|
|
Country: USA ~
Posts: 2496 ~
Member Since: August 03 2006 ~
Last Visit: September 17 2024
|
Alert Moderator
|
|
|
n/a
deleted
Status:
offline
| |
Posted - December 06 2013 : 07:52:11 AM
|
quote:I also use this method at will attest to its simplicity and effectiveness. Excellent write-up AF!
The only thing I have to add is, in cases where the base of the rivet whittles or fractures upon removal from the tongue and is therefore no longer a secure / "snap" fit back in place, you can take care of this by replacing it anyway as described above, and then adding a small drop of CA onto the exposed rivet to keep it secured. You can also add a drop of CA at the back of the coupler box where it lays on the tongue. At the very least this will keep parts from getting lost for display, but in most cases it does stand up to a typical load of several cars.
Originally posted by spiderj76 - June 27 2011 : 3:37:49 PM
|
You can also use a 00-90 or 0-80 machine screw and nut to replace the rivet. This way, you can disassemble the coupler for servicing or replacement in the future
"S"tring boB
|
|
Posts: 0 ~
Member Since: October 09 2013 ~
Last Visit: December 13 2013
|
Alert Moderator
|
|
|
|
Posted - December 06 2013 : 6:49:52 PM
|
Glad I found this thread - I had no idea how I was going to remove that tiny rivet 
I replaced 3 last night, and all of them snapped securely back into place.
http://tycodepot.com/
|
|
|