|
|
 Posted - April 21 2010 : 11:56:14 PM Posted - April 21 2010 : 11:56:14 PM


|
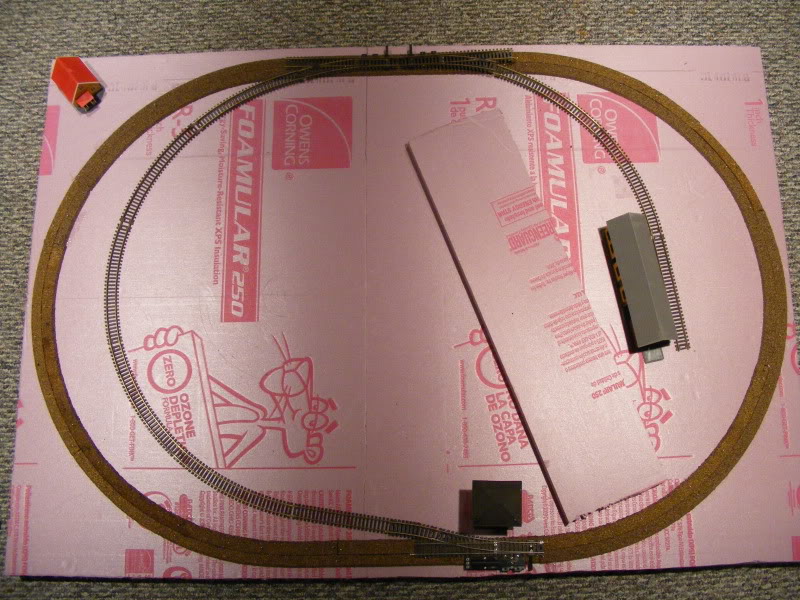
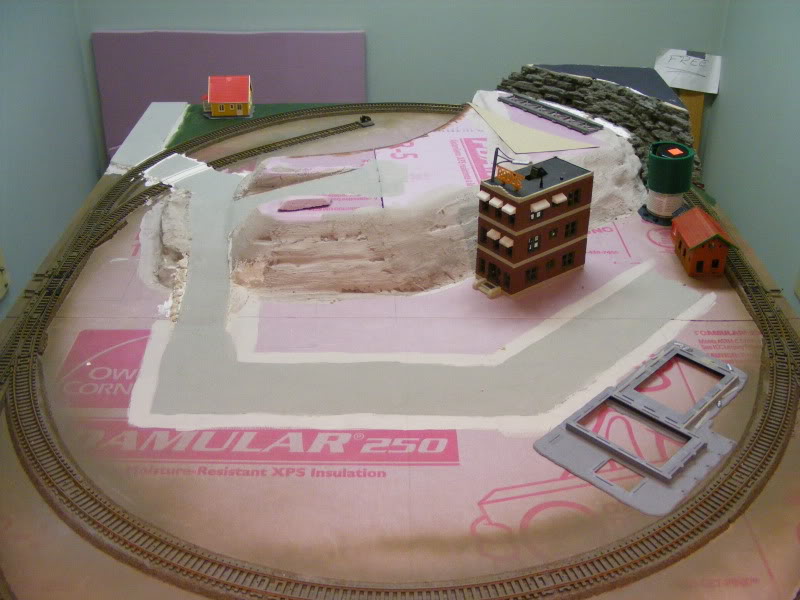
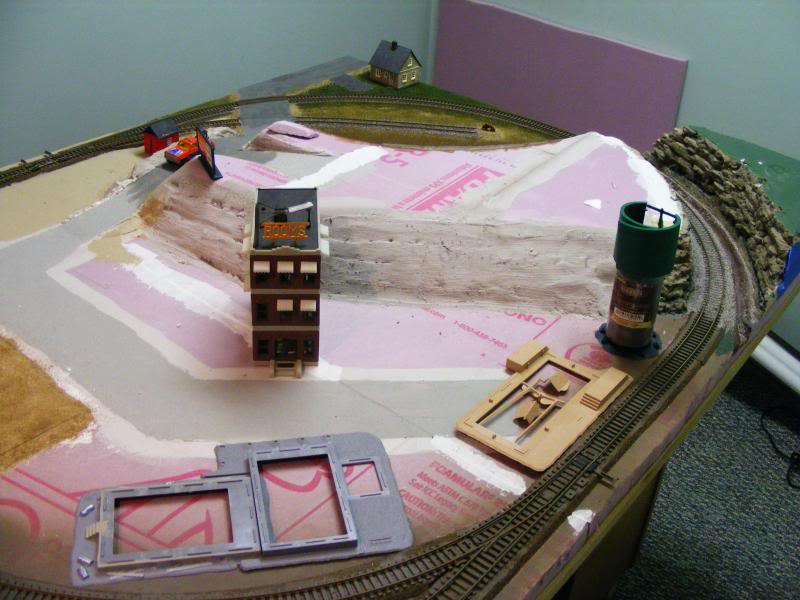
I've been posting this over on another forum, I finally get a chance to post it here as well! My brother calls me last week, tells me there is a train layout sitting out by the road nearby his house with the words "FREE" on it. Size was roughly 3x5, which is small by all standards. However I've been wanting to do a diorama to practice scenery & weathering on. Plus its free and can actually run trains in a loop so what the hey. I pick it up and drag it home.
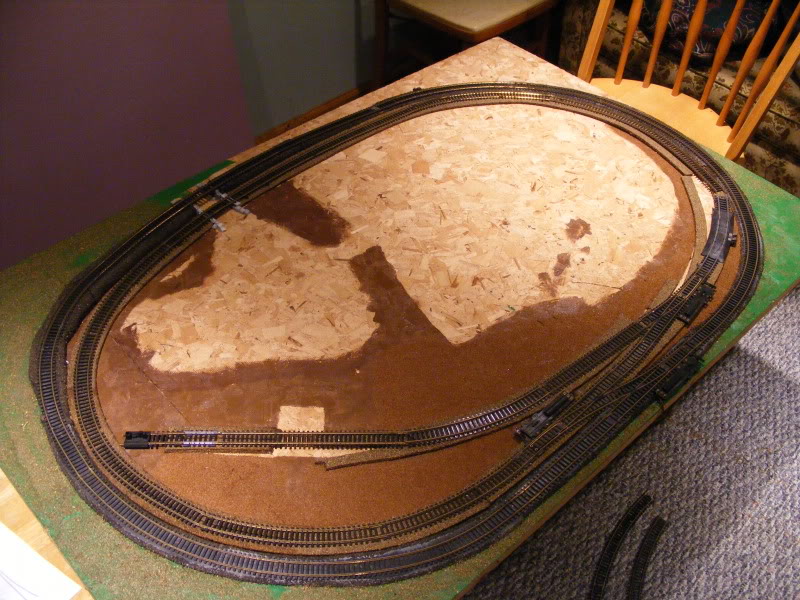
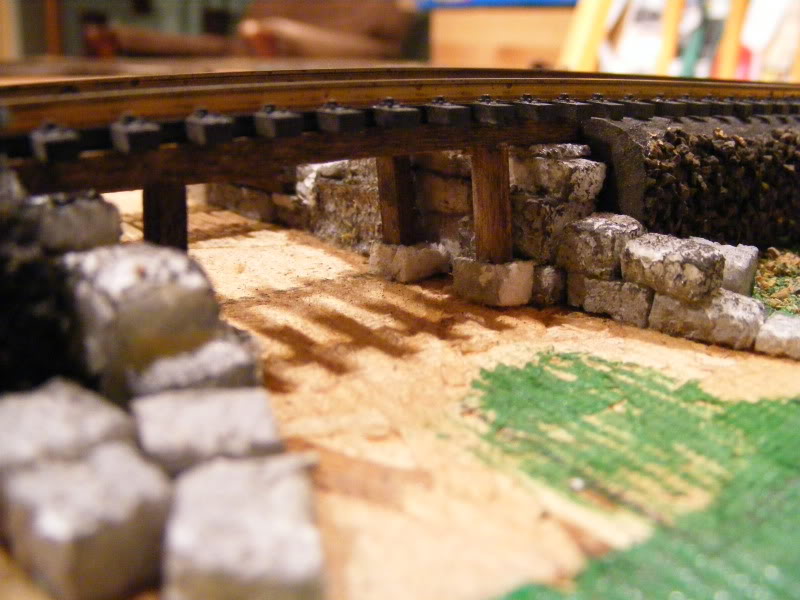
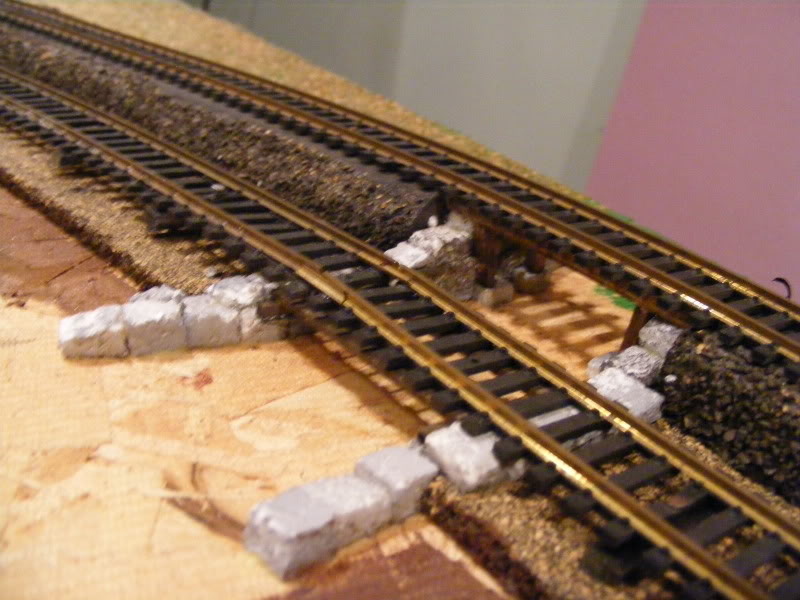
What the picture doesn't convey, is that the outside loops are TIGHTER than 18", I don't even want to guess what the inside one is lol. Had this neat little bridge thing in the corner, the stones were actually painted styrofoam cubes and they pulled off the look quiet well.
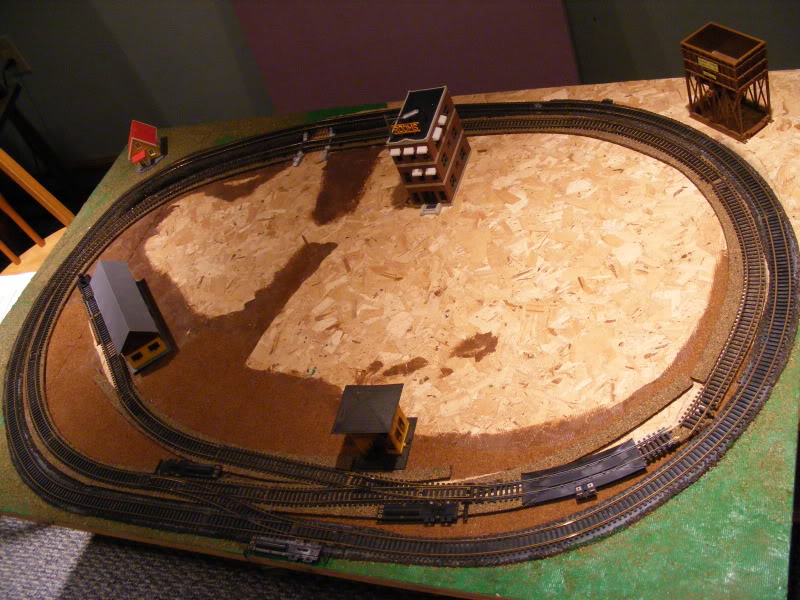
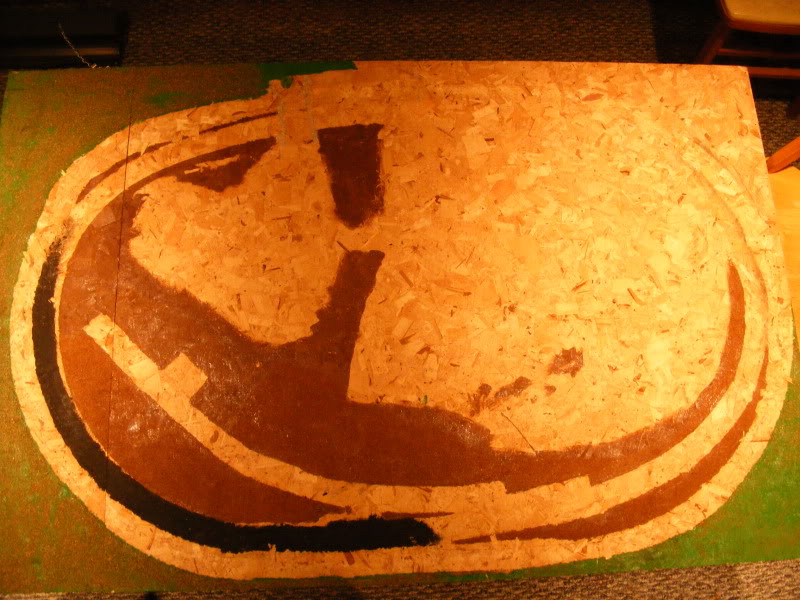
And a shot with some of my old buildings on it since I was just playing around. Notice while the inner loop had a cork roadbed. The outer loop has painted black wood for its roadbed.
Obviously, I think its time to abandon the original ROW.
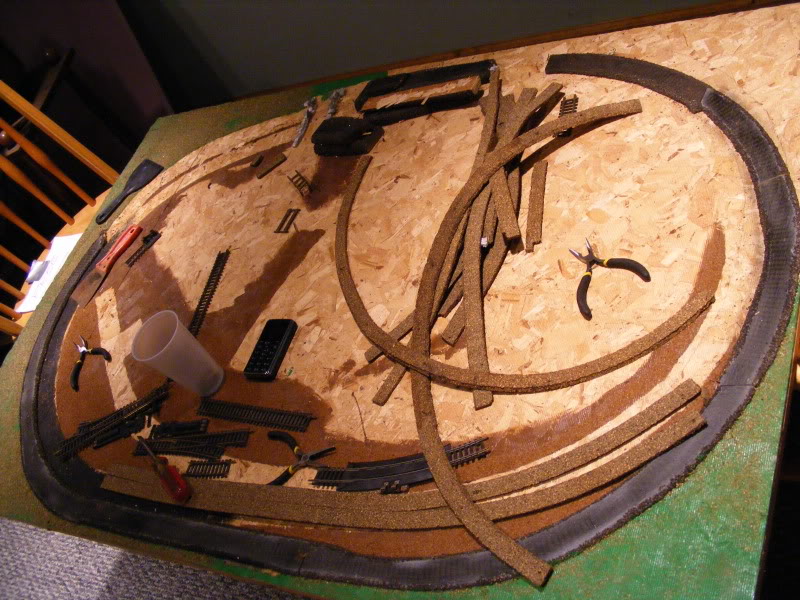
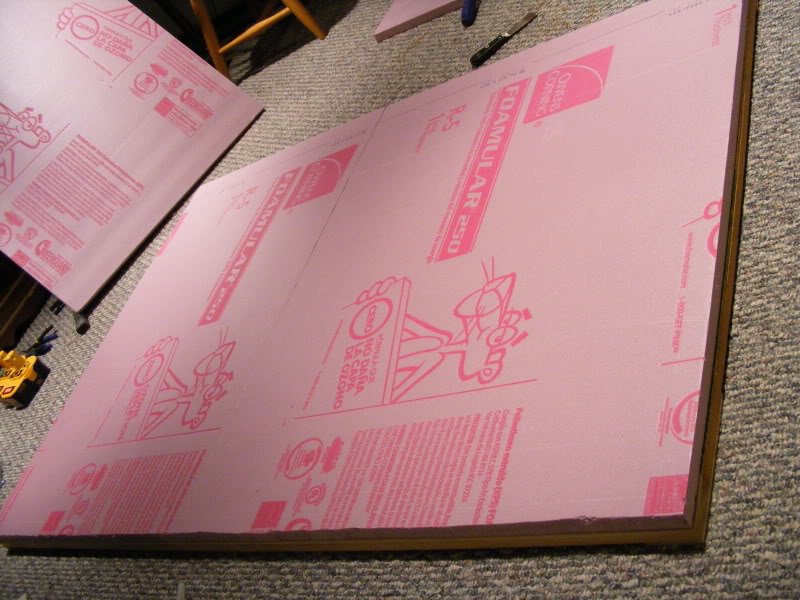
The wood roadbed was a pain to pull up. I'm saving most the brass track, I'm trying to do this project for cheap so I might reuse some of it and a little extra I had of my own. If its too much of a pain I'll just goto the local hobby store and get nickel silver stuff. All 3 switches go the same direction so that's not helping either. Next up is that pink foam you can see in the background of the photos. I have more of it. Guess where its going to end up?
I needed to make the whole thing just a tad wider to at least support 18" turns. So I carefully removed the nails and did my best to separate one of the supports on the one side which was held on with some glue.
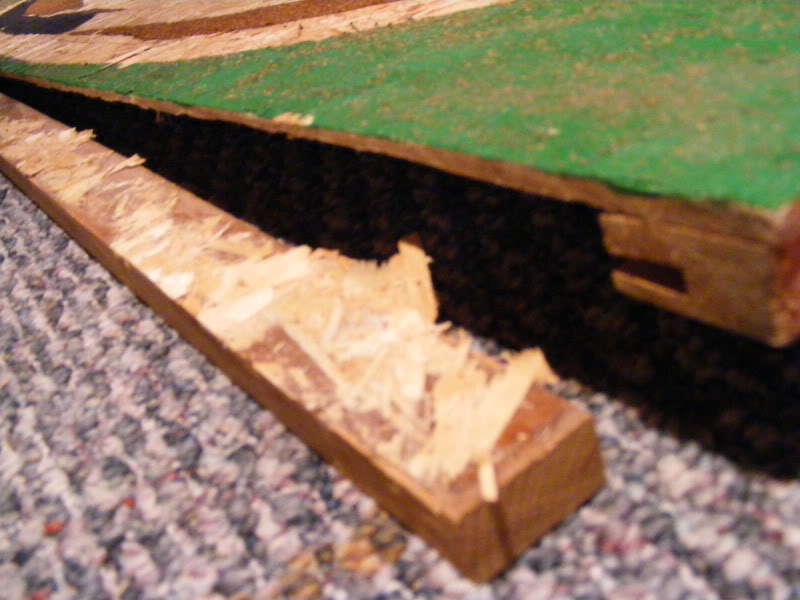
The new piece of wood was cut & notched to work around the existing braces on the underside. You can also see the spacer piece off to the left to make the whole thing level with the existing surface.
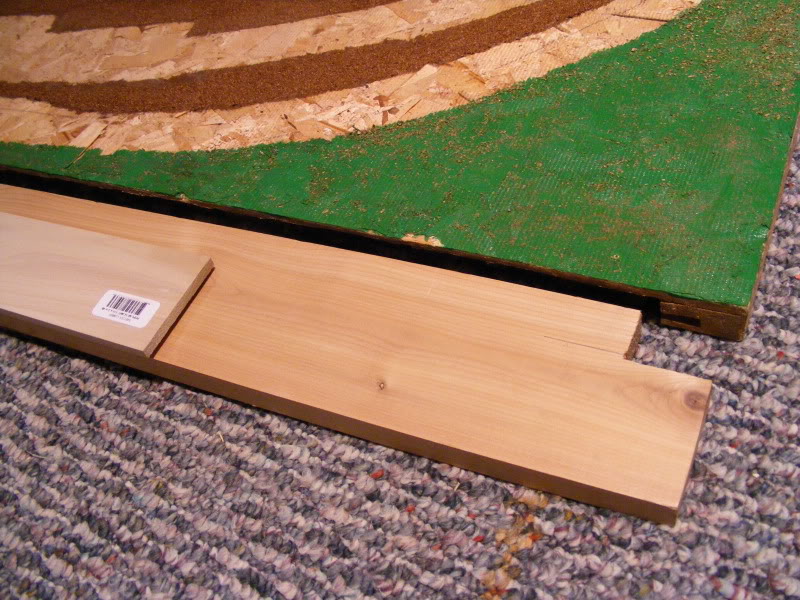
The new extension was both glued and nailed back into place. And I didn't get a pic but I glued the spacers on also. The leftover spacer material I think I'll use on the underside and corner braces to help reinforce the whole thing and make it a tad more solid.
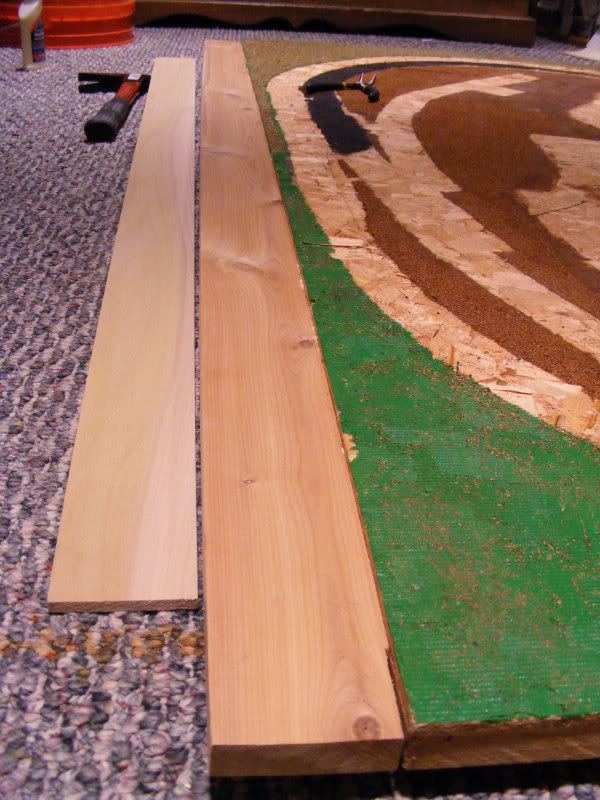
The cost of materials so far has been pretty well under control. The wood I bought for the extension was only a few bucks, it was the cheapest Home Depot had haha. Plus I'll use most all of it.
Next step, the foam base!
|
Country:  USA ~
Posts: 531 ~
Member Since: January 29 2009 ~
Last Visit: July 10 2020 USA ~
Posts: 531 ~
Member Since: January 29 2009 ~
Last Visit: July 10 2020
|
 Alert Moderator
|
|
|
|
Posted - April 22 2010 : 01:13:05 AM
|
yay & congrats on your bro Give him a BIG thanks for all of us on here 
Always grab FREE train stuff 
|
|
Country: USA ~
Posts: 15032 ~
Member Since: February 23 2009 ~
Last Visit: July 11 2026
|
Alert Moderator

|
|
|
|
Posted - April 22 2010 : 7:50:45 PM

|
I'm looking forward to seeing what you plan on doing with this thing. Dioramas and mini layouts are fun to make as you can add loads of detail and it won't take too long (compared to a full sized layout anyway ). I wonder what the previous owner was running on those tight curves ). I wonder what the previous owner was running on those tight curves
|
Country:  Canada ~
Posts: 3448 ~
Member Since: September 22 2006 ~
Last Visit: April 03 2026 Canada ~
Posts: 3448 ~
Member Since: September 22 2006 ~
Last Visit: April 03 2026
|
Alert Moderator
|
|
|
|
Posted - April 23 2010 : 01:22:42 AM
|
I think they got so far in and realized they were in over their head and quit. Alot of the inside loop wasn't even nailed down when I got it. Nor was it connected right if you look at the first pictures. At which point they probably stopped painting as well. The wood structures for the bridges came out intact, trying to think of a clever way to reuse them. Right now I'm planning on a small passing siding/service track. And probably one spur serving one of the buildings I have (which are all in need of care). Someday I wanted to do a much larger fullsize layout. But like I said I've been mentally planning a diorama for awhile so this works out decent since I can test trains on it also. It will be a great practice run for stuff I've never really done like scenery & roadbed/trackwork. How things turn out here will probably dictate how the larger layout goes together in the future.
Edited by - ChrisC on April 23 2010 01:24:24 AM
|
|
Country: USA ~
Posts: 531 ~
Member Since: January 29 2009 ~
Last Visit: July 10 2020
|
Alert Moderator
|
|
|
|
Posted - April 23 2010 : 02:14:49 AM
|
It looks like they realized that 3' was only wide enough if you squeezed the oval a little bit, lol. I guess they thought they were working with flex track. I'm sure more than one person has walked away from this hobby muttering in frustration.
Good luck, Chris. You're off to a good start.
The Tyco Depot
|
|
Country: USA ~
Posts: 3927 ~
Member Since: June 20 2007 ~
Last Visit: November 19 2015
|
Alert Moderator
|
|
|
|
Posted - April 25 2010 : 03:18:51 AM
|
Well I didn't do much today...but I did do this.
Made a run by the hobby shop yesterday. Bought some ballast and two sections of cork. I also bought a nickle silver switch and swapped it with a brass switch off Rental Layout, so everybody wins haha. Aside from the corners I reinforced the corners on the underside to make the whole heap a little stronger. Won't get a chance to touch it again till sometime next week, but the hard part is over now I can move onto track laying!
|
|
Country: USA ~
Posts: 531 ~
Member Since: January 29 2009 ~
Last Visit: July 10 2020
|
Alert Moderator
|
|
|
|
Posted - April 29 2010 : 01:06:03 AM
|
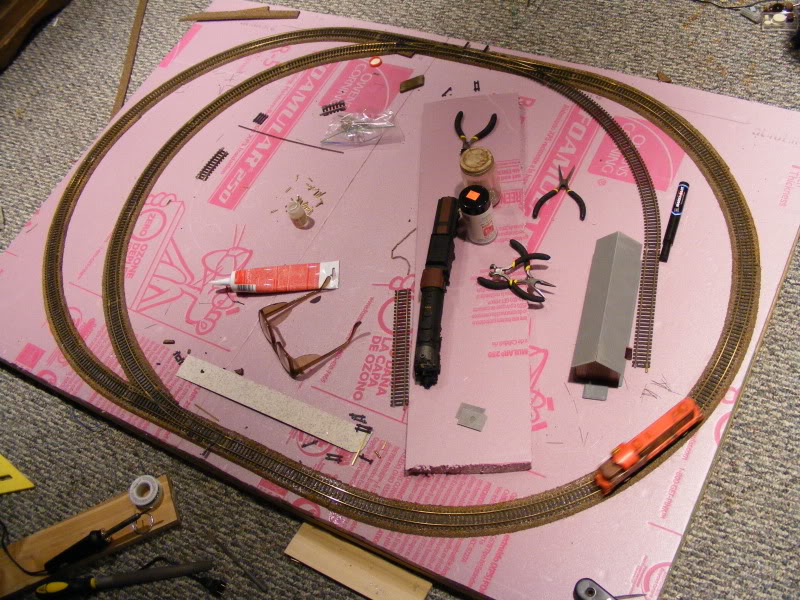
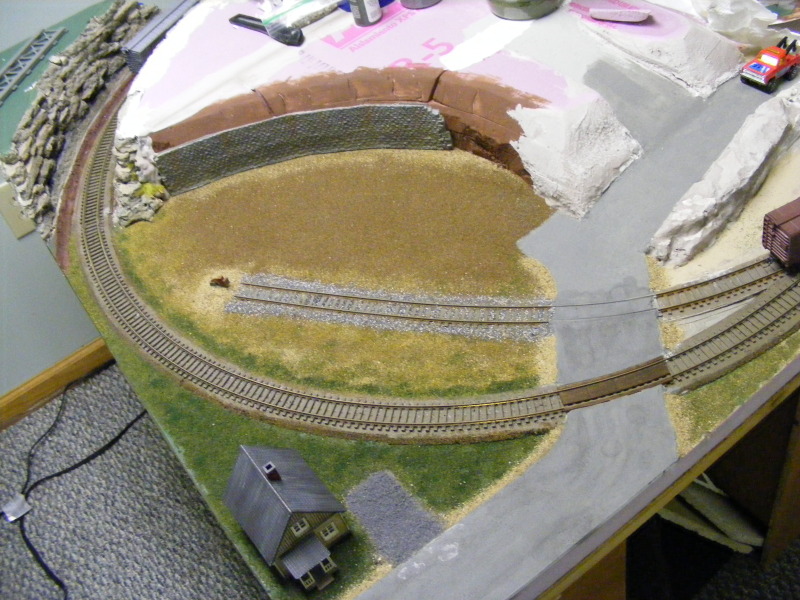
Got some roadbed down & mocked up a few things tonight.
First off I'm really happy with the spacing from the edge, its pretty much exactly what I wanted. The roadbed is held down with adhesive caulk. You can't see it in the pictures, but there are many pins holding the curves of the roadbed in place so that whole deal is going pretty well. The passing siding will probably end up a tad closer to the main when its done. The foam block across the middle is a possible location for a hill. The buildings are just there to check out how everything fits together. And so far its matching up with the vision I had in my head perfectly. I have to get some more cork since I don't have enough to do the sidings. And I'm still wondering if I should glue or nail the track in place.
Edited by - ChrisC on April 29 2010 01:06:41 AM
|
|
Country: USA ~
Posts: 531 ~
Member Since: January 29 2009 ~
Last Visit: July 10 2020
|
Alert Moderator
|
|
|
|
Posted - May 01 2010 : 11:19:53 AM
|
Looks like your off to a good start. I'd say glue the track in place. On cork and foam, glue would probably hold better than those little track nails. I'd say glue the track in place. On cork and foam, glue would probably hold better than those little track nails.
|
|
Country: Canada ~
Posts: 3448 ~
Member Since: September 22 2006 ~
Last Visit: April 03 2026
|
Alert Moderator
|
|
|
|
Posted - May 15 2010 : 01:22:29 AM
|
Early morning on May 15th, the first train completes its opening laps
Gluing the track down was a good move. Takes a while to get use to, but the end result is totally worth it. There are a few small issues. Switches are beat so the trains rumble over those. And some of the joints got mis-matched in height because I didn't trim the ties down enough. But I should be able to make it all work with some filing. I made the passing spur simpler, the other way I had planned was just to tight. The freight spur is going to sit lower than the rest of the mainline so I need to build a ramp for that.
My little golden spike ceremony!
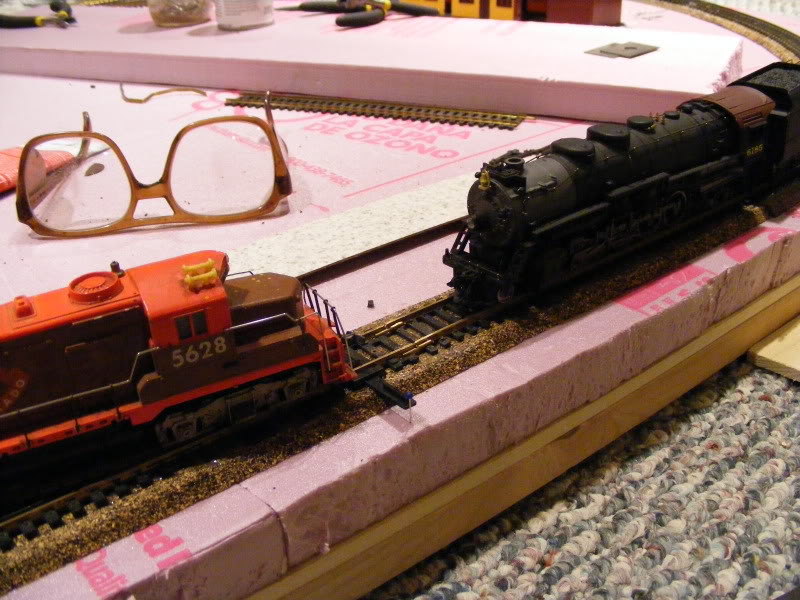
The Tyco on the left is special, its one of the original engines from my family's Christmas collection from years ago. I always said when I built my own layout it would get the first crack at it. The 2-10-2 on the right is a late model IHC offering that runs like a clock. However it also has one of the larger driver wheelbases of anything I own. So I pulled it from the rental layout and brought it home to test with. If it can make it most everything else should. And so far its been doing good. Its picked out a few weak spots I have to work on. But its shown the track as a whole to be about 90% error free and smooth so I'm REALLY happy about that!
Edited by - ChrisC on May 15 2010 01:33:25 AM
|
|
Country: USA ~
Posts: 531 ~
Member Since: January 29 2009 ~
Last Visit: July 10 2020
|
Alert Moderator
|
|
|
|
Posted - December 31 2011 : 02:23:47 AM
|
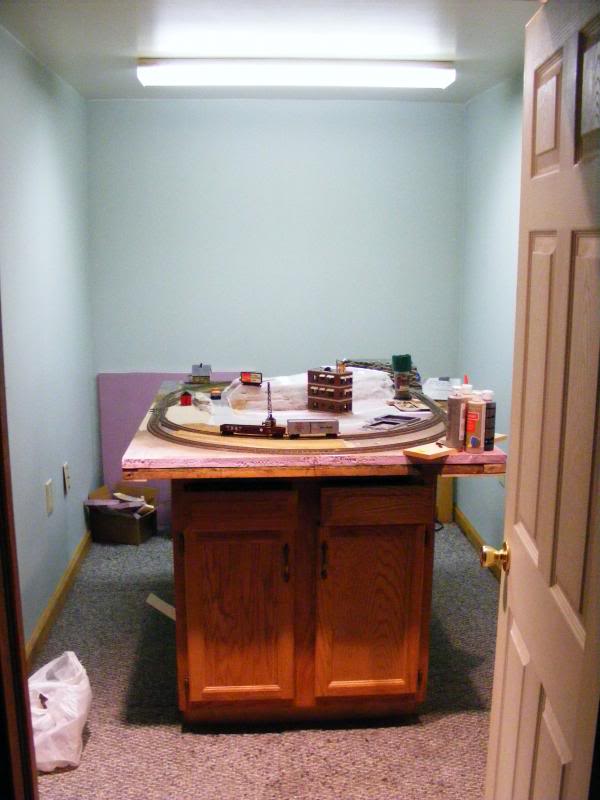
Coming into winter, been pushing things around on the layout again. I sorta ended up around here last winter I just never posted the updated photo. Got a little past this point (shaved the foam into hills) but then hit a few road blocks that kinda scared me away.
Got over a few rough spots with the layout and pushed forward a little. Sorta looks like this now.
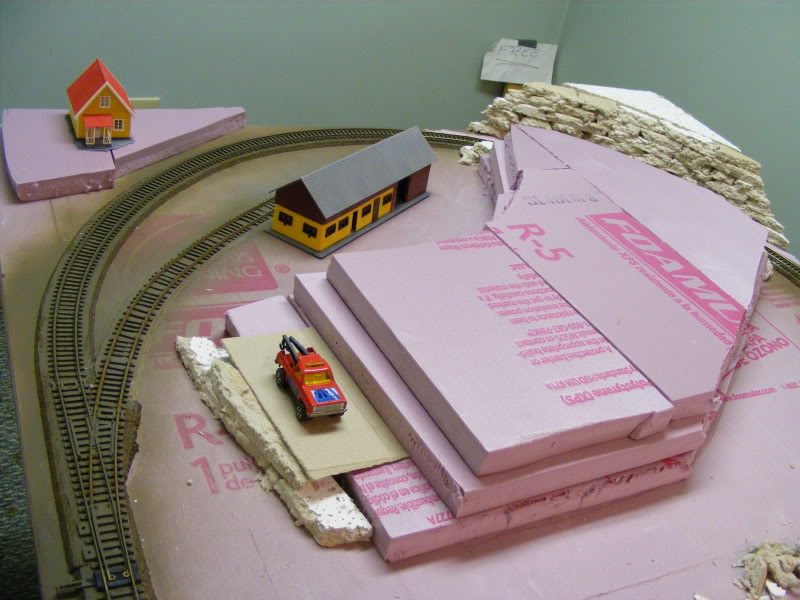
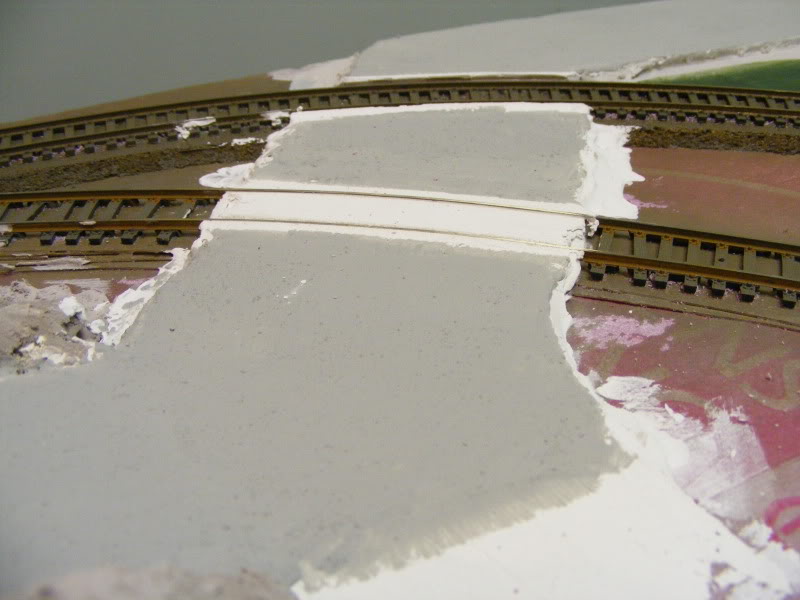
Roads were laid down with this stuff called Dry-Loc. Its a paint for basements that has sand or something gritty in it. Makes a great road texture and starts off a good color to boot! Though I've been playing around I'll eventually paint the road a shade darker or two. Check out the crossings (one of the things that were giving me fits). And below that just some close up of the roads going up & over the hill.
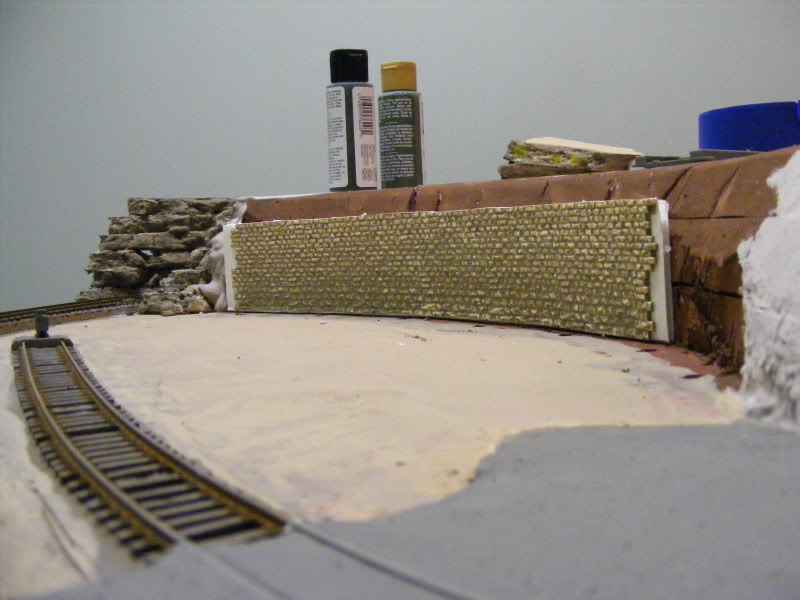
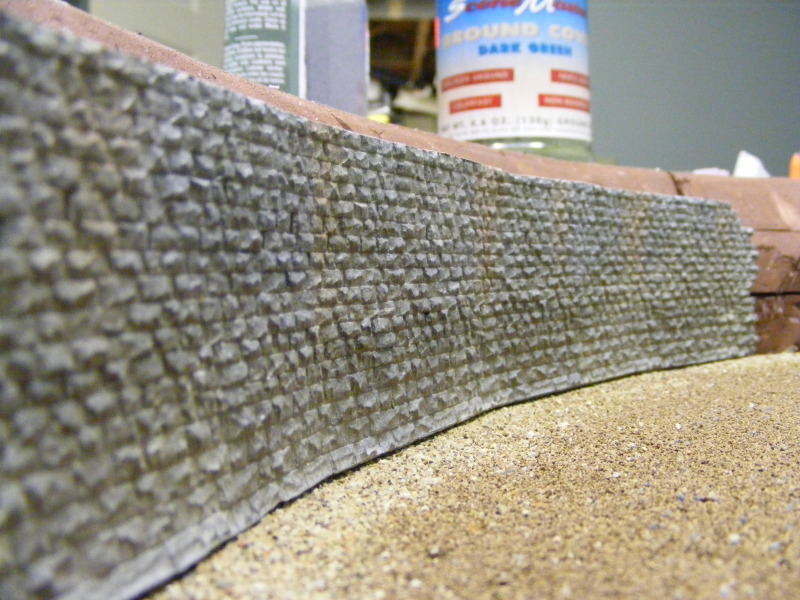
Other thing that gave me fits was the wall I needed to build for the one section. A friend gave me a supply of 3/16 wood dowels so I figured awesome I'll build a cribbed wall or something out of them. No dice, just not worth the hassle I was going through. The round dowels refused to be stacked into something resembling a wall on such a odd curve. SOOOooo a trip to the local hobby shop I found this stick on wall from Chooch Enterprises. Sticking it to a piece of foam core board kept it ridged. Yet with a few cuts in the back it let get get around the odd curve of the surface I needed to cover. Its a bit short, but I can make the rest work.
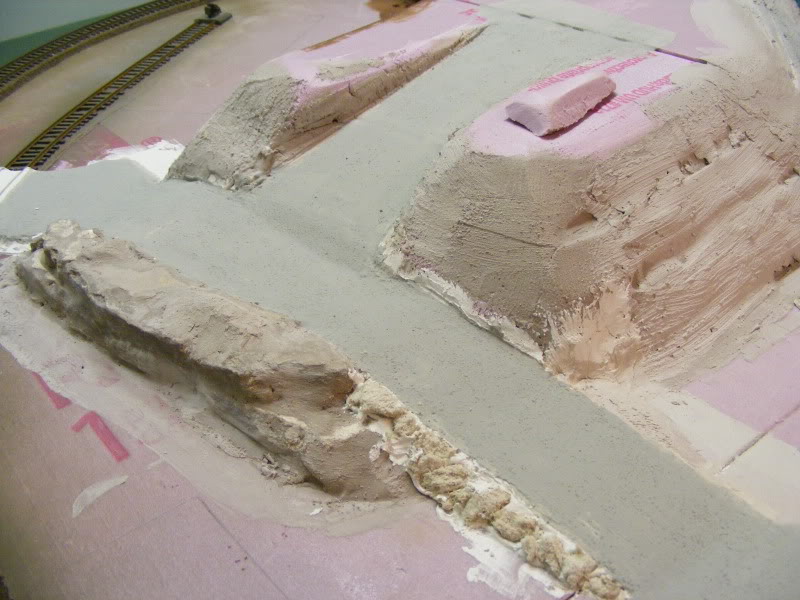
This part is coming out really cool. The ceiling tile rocks. Its already a different color from this picture it now has a tan wash over it. Rock faces/cliffs around here are like a dirty tan color so I got them pretty close now.
Actually working on buildings now. Which I like because I enjoy models for than scenery. However I'm having a hard time rehabilitating models that are molded bright colors lol. Stay tuned!
|
|
Country: USA ~
Posts: 531 ~
Member Since: January 29 2009 ~
Last Visit: July 10 2020
|
Alert Moderator
|
|
|
|
Posted - December 31 2011 : 06:39:18 AM
|
Looking good, ChrisC. The rock faces are awesome!
I hope my own layout turns out more like the "after" version than the "before".
|
Country:  Australia ~
Posts: 362 ~
Member Since: March 21 2009 ~
Last Visit: December 31 2011 Australia ~
Posts: 362 ~
Member Since: March 21 2009 ~
Last Visit: December 31 2011
|
Alert Moderator
|
|
|
|
Posted - December 31 2011 : 07:20:37 AM
|
I picked up an N scale layout from the trash but never rebuilt it. Good to see somebody that sticks with a plan. Nice work. My layout doesn't look that finished.
Alco Fan
|
|
Country: USA ~
Posts: 2496 ~
Member Since: August 03 2006 ~
Last Visit: September 17 2024
|
Alert Moderator
|
|
|
|
Posted - December 31 2011 : 10:09:30 AM


|
Nice work! I've got a couple test tracks in progress in both Z and N gauge , N will be on a corkboard that's about 3x4, the Z I'm putting in a nice wood pull-out keyboard shelf from a desk. Not sure I'll do any detailing yet, I just want something to OPERATE first, but I may do some small amount to them.
Anyway, keep up the good work ( and pic postings ), sure to inspire us. The Dry-Loc sounds interesting, how small a container does it come in? Might want to check that out myself.
Jerry
" When life throws you bananas...it's easy to slip up"
|
|
Country: USA ~
Posts: 3974 ~
Member Since: January 04 2009 ~
Last Visit: January 11 2019
|
Alert Moderator
|
|
|
|
Posted - December 31 2011 : 1:07:37 PM
|
| Lookin really good. Great job!!
|
|
Country: USA ~
Posts: 457 ~
Member Since: February 20 2010 ~
Last Visit: April 24 2020
|
Alert Moderator
|
|
|
|
Posted - December 31 2011 : 4:07:16 PM
|
Chris,
I'm new to the forum, and only recently dug out boxes of HO that I had as a kid. I haven't laid an inch of HO track in decades, yet this is exactly the kind of layout I was thinking about doing. Your pics are very inspiring.
Damion
|
|
Country: USA ~
Posts: 151 ~
Member Since: December 29 2011 ~
Last Visit: January 05 2015
|
Alert Moderator
|
|
|
|
Posted - January 06 2012 : 12:28:48 AM
|
quote: The Dry-Loc sounds interesting, how small a container does it come in? Might want to check that out myself.
Jerry
Originally posted by AMC_Gremlin_GT - December 31 2011 : 10:09:30 AM
|
Ask and ye shall receive.
http://www.ugl.com/drylokMasonry/masonryWaterproofer/latex.php
It seen it in most every big home store, but I'm not sure if it comes in smaller sizes. My brother bought this can originally and he just gave it to me. Its a little more dual purpose if you actually buy it to paint your basement with lol. But seriously it works good. And like I said when its painted & washed I think its really going to look nice.
Thanks everyone else for the compliments! Don't take anything I do as word. This is my first layout and I barely know what I'm doing half the time haha. But if it inspires someone else to make something on the cheap then that's a good thing
So I've taken a slight break from the layout. I finally hit a stage where I could justify working on a building. I've never done one and have been chomping at the bit to redo one. Well over half the buildings I have are life-like buildings bought 20 years ago that my father assembled. Some of them the glue didn't hold to well, so working around with a hobby knife I can gently pry details off and paint it as I see fit. However, this one was not the case...
/tyco/forum/uploaded/ChrisC/DSCF2875.jpg
Where to start? Its WAY to bright and happy for my taste. Whats worse is the glue on this one is rock solid (aside from the chimney that fell off). So no real chance of getting a total re-spray on it. So I just sorta worked at it for a bit. It also had a lot of body gaps in various areas & flashing left on it from when it was assembled. So in short its not perfect, but its workable for my needs. This is what I ended up with.
/tyco/forum/uploaded/ChrisC/DSCF2902.jpg
/tyco/forum/uploaded/ChrisC/DSCF2903.jpg
First thing I did was cut off the base which really wasn't to hard. The white trim that bordered the roof did come off with a little effort thankfully. The way I ended up toning down the yellow siding was as follows. White dry brushing, white acrylic wash, and black ink wash. That last step of the black ink wash went a bit overboard, but it worked. The roof was simple enough I was able to mask it off and spray paint it. I originally hand painted it brown and it didn't look right at all. Dry brushed, ink washed, & chalked the roof. Painted the base a concrete color I mixed up (it sorta worked). Added a scratch built light above the side door. Made two interior walls from foam core to block light from passing through the house (also painted the walls colors in case anyone gets real close). That's about it. I'm going to go back later on and add more details (I'm thinking window flower pots and a garden hose reel). But it works right now. I think its time to move back onto the layout and begin tossing ground foam down. Wish me luck lol.
|
|
Country: USA ~
Posts: 531 ~
Member Since: January 29 2009 ~
Last Visit: July 10 2020
|
Alert Moderator
|
|
|
|
 Posted - January 06 2012 : 01:40:54 AM Posted - January 06 2012 : 01:40:54 AM
|
quote:
Luck! ...although it doesn't look like you'll need it Did you weather the track? It looks good and I like what you did with the ties on the siding. The house looks really good as well
|
|
Country: Canada ~
Posts: 3448 ~
Member Since: September 22 2006 ~
Last Visit: April 03 2026
|
Alert Moderator
|
|
|
|
Posted - January 06 2012 : 05:47:26 AM
|
"(also painted the walls colors in case anyone gets real close). "
Chris, starting with a quick road trip and getting the board & track work for free is 100% cheap!
You making it look like quite a masterpiece is intensely Awesome! 
oh, the quote... you could attach on the inner walls, pictures out of a magazine. Old house, 72" flat-screen... Priceless! Some aluminum foil pieces on the inner walls would spook a few people, too. You'd watch the curious people trying to figure out if what they are seeing is a real miniature T.V. or just their own eye looking back at them.
John
I don't have a one track mind. It depends on the turn-out.
"I love your catenary!"
Is that a power-trip or just another pick-up line?
|
|
Country: Canada ~
Posts: 1124 ~
Member Since: December 15 2006 ~
Last Visit: January 30 2023
|
Alert Moderator
|
|
|
|
Posted - January 12 2012 : 05:29:28 AM
|
Chris, use some inexpensive black foam core for interior walls as a scene and light block, then selectively light a single window on one end and 2 windows elsewhere, leaving one dark. I use LEDs and often "paint" the clear bulb with dullcote to soften the light emitted.
As with other examples of your work, very very well done!
Siouxlake/Ron
|
|
Country: USA ~
Posts: 510 ~
Member Since: September 21 2011 ~
Last Visit: December 21 2014
|
Alert Moderator
|
|
|
|
Posted - January 12 2012 : 07:20:35 AM
|
quote:
I finally hit a stage where I could justify working on a building. I've never done one and ....Where to start? Its WAY to bright and happy for my taste. ..... The way I ended up toning down the yellow siding was as follows. White dry brushing, white acrylic wash, and black ink wash. That last step of the black ink wash went a bit overboard, but it worked. The roof was simple enough I was able to mask it off and spray paint it. .
Originally posted by ChrisC - January 06 2012 : 12:28:48 AM
|
I think the red clay roof shingles would have looked better dulled to a dark reddish color, but that's just my taste. The contrast between toyish bright plastic colors and your "enhanced weathering" has gone a long way to make it look more "real". Don't disparage your skills, you seem to have a fine knack for detail, regardless of your lack of experience. That will come with time, but you definitely have an artistic ability to cleverly change the whole attitude of the item you're working with. I like what you're doing, and please keep posting your projects!  Very inspiring. This is what practical model railroading is all about, taking some toy-like item and making it believably realistic on a budget is an excellent promotion of this hobby, and you're a fine ambassador by doing what you are doing. Very inspiring. This is what practical model railroading is all about, taking some toy-like item and making it believably realistic on a budget is an excellent promotion of this hobby, and you're a fine ambassador by doing what you are doing.
My sole building project ( still gathering dust on my workbench ) was a small bar and side business office, which someone had glued a wall on upside down, so the window was up high. LOL. I've taken it apart and re-glued the walls back together correctly, but as with most of my projects, I get side-tracked and lose interest for awhile, so I let them sit. I need to get back to that one. They'd glued in a silvery strip to mimic a bar mirror, I was thinking of replacing that with a more reflective one, there are some plastic silver laminates that are most mirror-like, so one reason I haven't put it back together yet. Want to get that detail done. Another was to make a tile floor for it, the one inside was hideous, so I was going to print one out on paper and glue it in. Another part of the project I"ve not gone forward on, either. I'm a slow mover! But your work is inspirational, ChrisC, I will have to drag my butt downstairs again sometime to take up reworking that poor bar/office building.
Jerry
At any rate,
" When life throws you bananas...it's easy to slip up"
|
|
Country: USA ~
Posts: 3974 ~
Member Since: January 04 2009 ~
Last Visit: January 11 2019
|
Alert Moderator
|
|
|
|
Posted - January 12 2012 : 09:19:47 AM
|
Jerry's comment:
"This is what practical model railroading is all about, taking some toy-like item and making it believably realistic on a budget is an excellent promotion of this hobby, and you're a fine ambassador by doing what you are doing." is heartily seconded by me.
Given current prices of new stuff, I get no greater satisfaction that from taking what is old or unremarkable and making it noticeable and fresh, if not new. Love those swap meets!
Chris, keep sharing your work, as you inspire some of us to do similar things! (but I promise not to copycat you any more!!!!
Siouxlake/Ron
|
|
Country: USA ~
Posts: 510 ~
Member Since: September 21 2011 ~
Last Visit: December 21 2014
|
Alert Moderator
|
|
|
|
Posted - January 12 2012 : 09:20:33 AM
|
Wow! Looking at the before and afters on the house is nothing short of cool! You should try and do an article on them....maybe even a step by step clinic here! Kudos!
just me Ray... and just because I have Tyco doesn't mean I am not a model railroader
|
|
Country: USA ~
Posts: 506 ~
Member Since: April 03 2011 ~
Last Visit: November 29 2025
|
Alert Moderator
|
|
|
|
Posted - January 18 2012 : 12:44:41 PM
|
Wow thanks for the complements! I really don't know what to say, I'm just going though this with half a clue on what I should be doing. I hoping the final product looks detailed enough to where it makes the models look even better when taking pictures. I don't have any secrets. When I was rummaging through the forums for the first time a few years ago, I was always amazed at how people like Ray, Shaygetz, and Tony would share their stuff or always answer questions.
John & Ron - I might go back later on and create actual rooms inside the house. But its not a huge priority since its windows are so small. The plan for all the buildings right now is the redo them once (mostly repainting) and when the layout is further along I'll revisit them and add some more detail. And Ron I have NO issues with you copying my stuff, you do a good job
Jerry - Funny you said that about the roof. Like I said I painted it a brown color that could have passed off as clay. But something didn't look right to me with it so I went darker. That whole house was a gamble since it was so bright. Its worked pretty well thus far. I think the house has set the tone for the rest of the buildings. You'll have to post your bar on here sometime. I would love to add something like that but I'm running out of space lol.
Ray - If anyone asked I'd be happy to go into more detail or do a step by step on anything. Not saying what I do is the correct way, but if it helps somebody else!
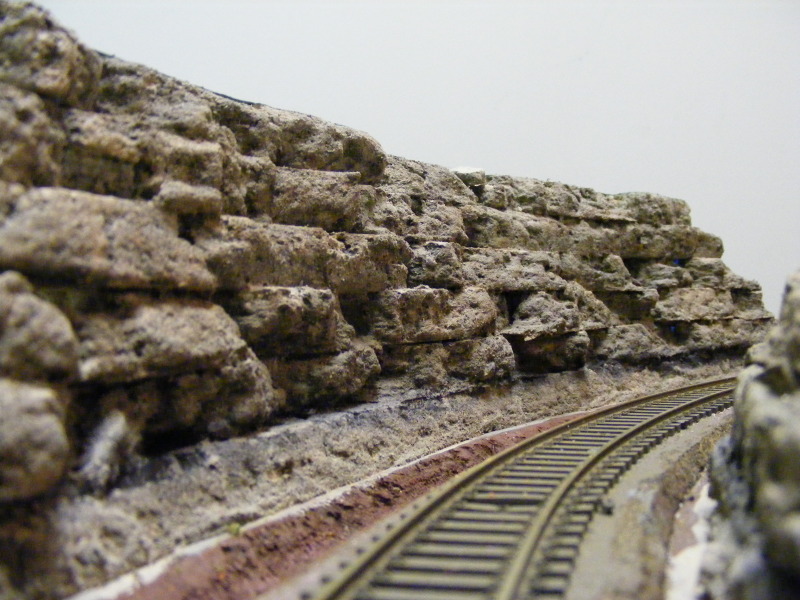
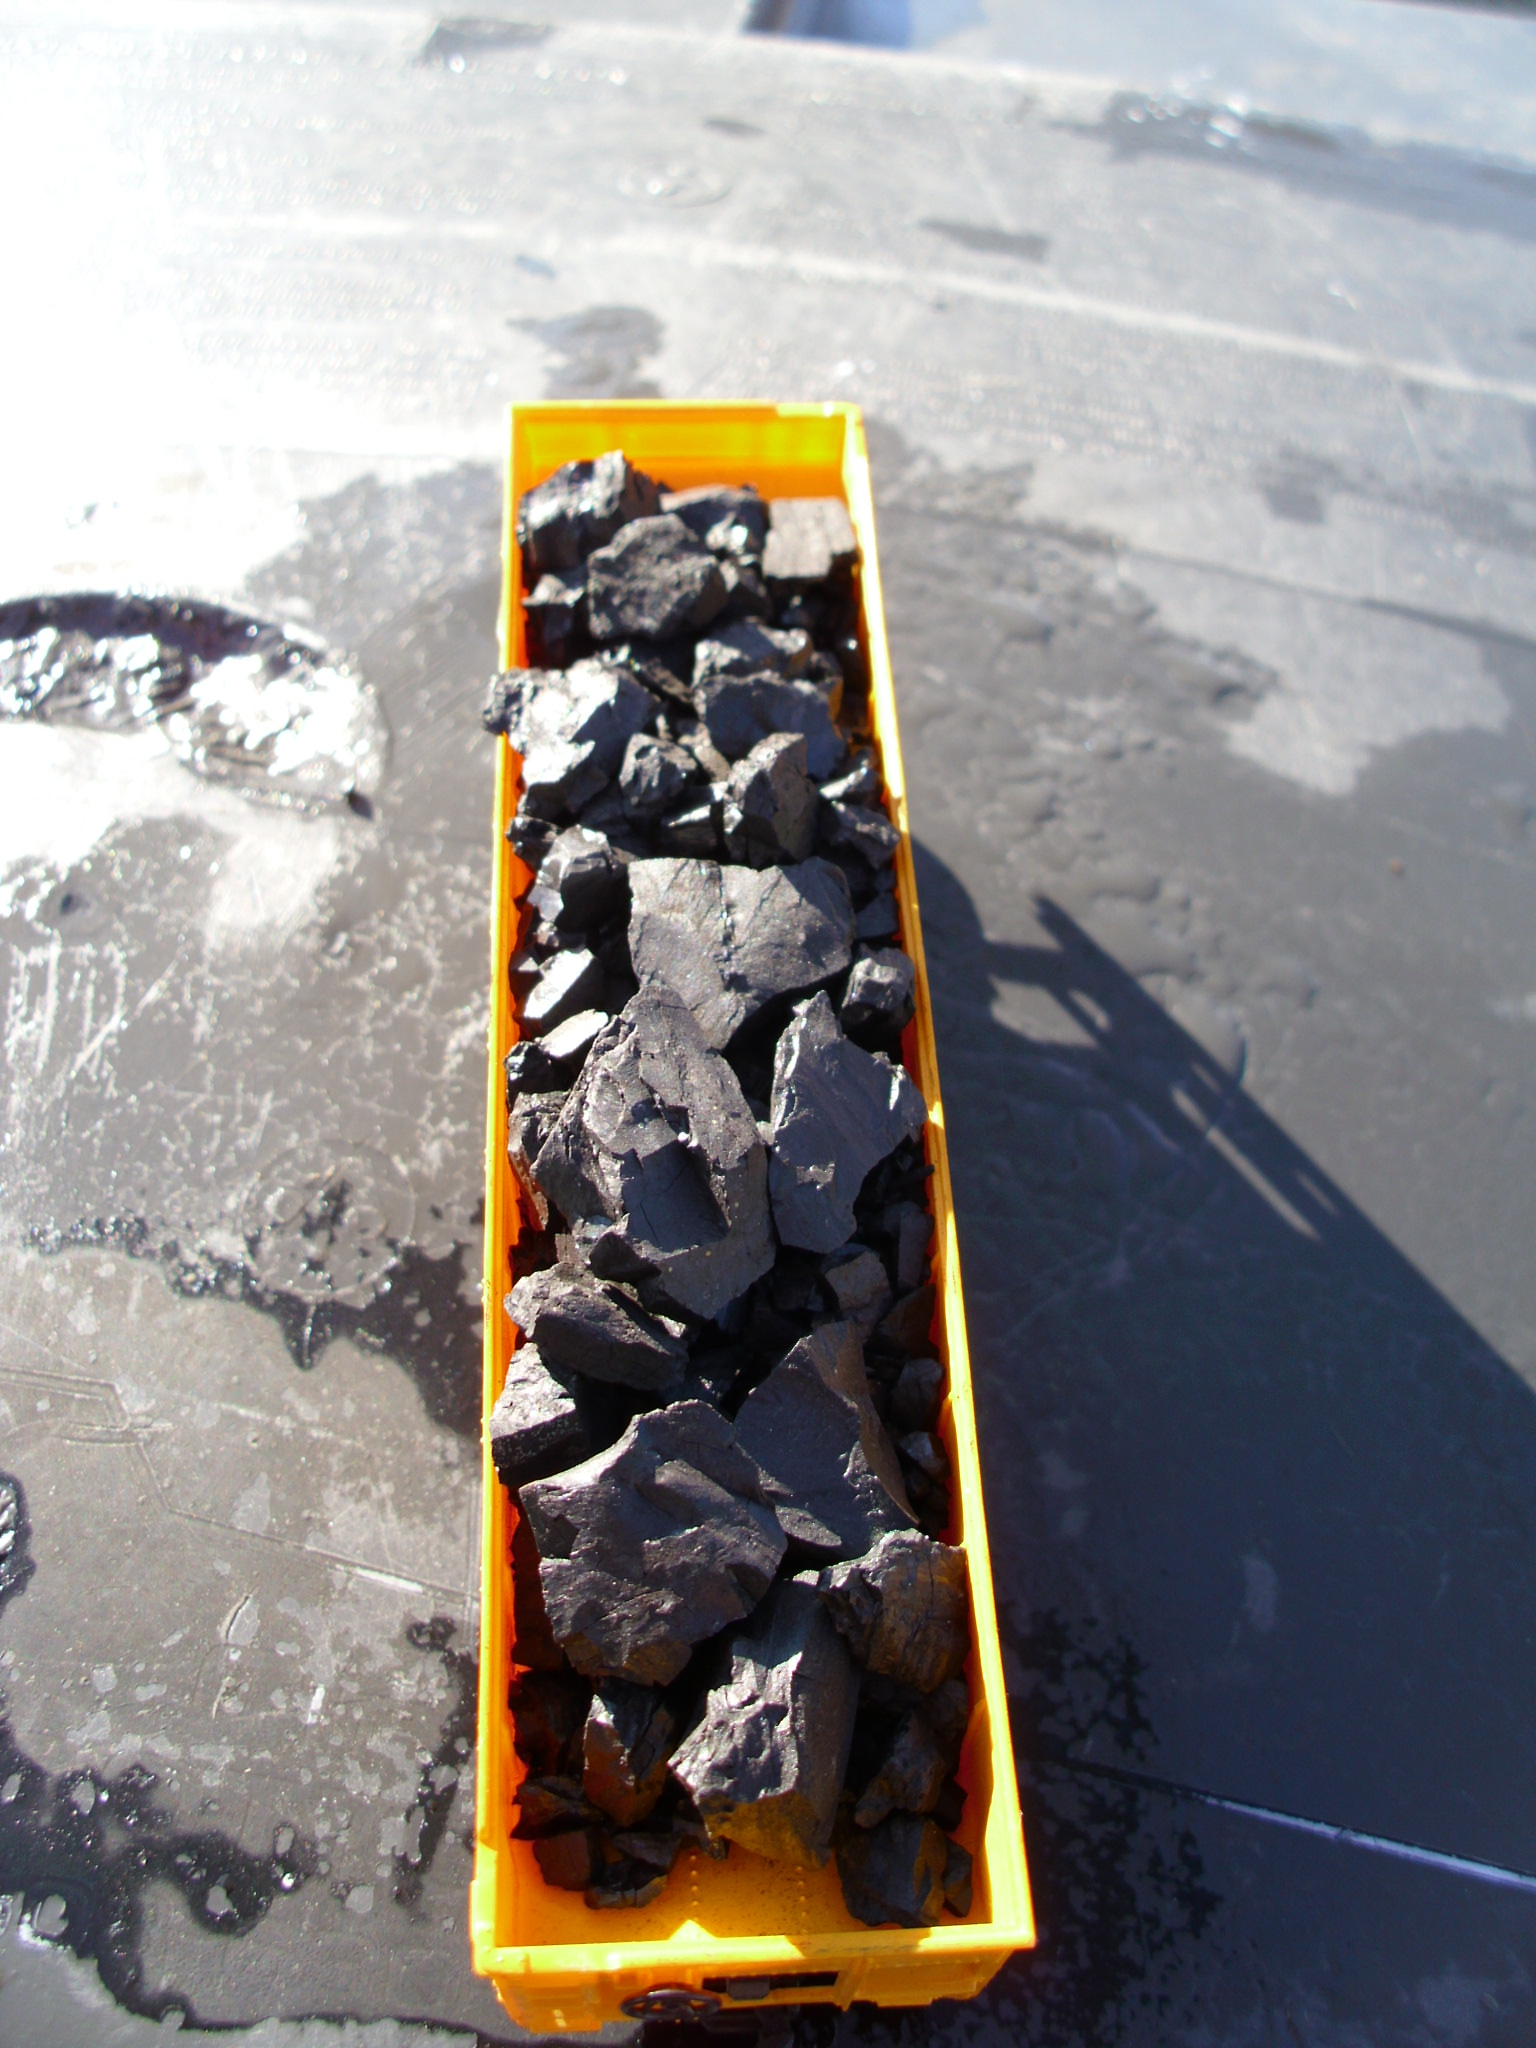
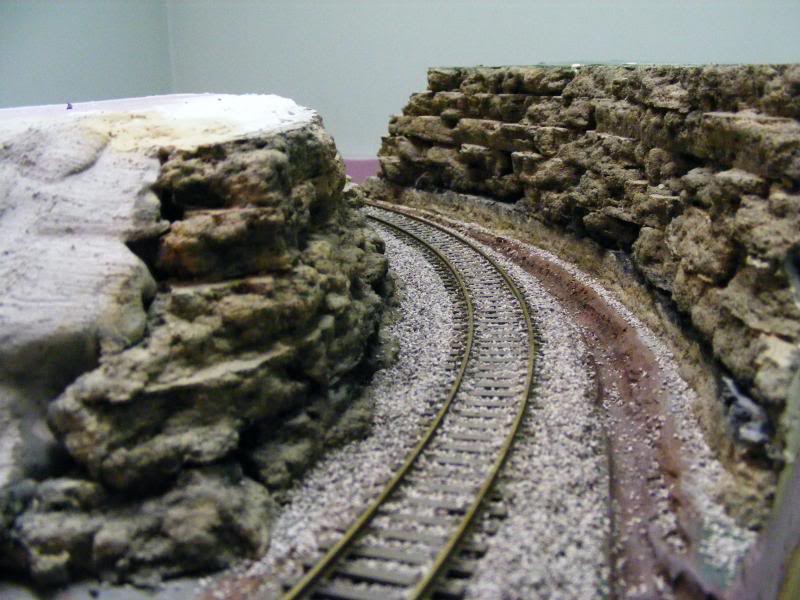
So to bring everyone up to speed I have in fact started on the ground cover. I looks pretty good thus far. However I'm having issues with my spray mixure to bond it to a solid surface. I've either mixed it with too much glue and it doesn't spray right, or too much water and it doesn't bond enough. While I to work that out I resprayed the brick wall that will be going in. Its now more of a grey color. It needs some dry brushing, chalk, and it should be ready to go on the layout. In a few days I should be ready to show some updated pictures of all of this. In the meantime, he is a teaser pics of the cut through the rocks and its new tan-ish looking color. Check out the coal seam along the bottom! It also has a few light color washes on it, but the pictures aren't doing it justice. Next step for these will be some rock talus & small plants along the rock faces.
Here are two fun tips I've sorta picked up on so I'm going to pass them on to anyone else who can use them. Looking for cheaper ground cover lead me to use some sand from a bag of tube sand in my garage. I had to strain it through a screen to get some of the larger rocks out. I also put a magenet in the bag with the sand to pick up any magnetic pieces. So watch for that if your using sand from a unknown source. For this reason I've been keeping it away from the tracks when using it (and the spots near the tracks are getting glued down heavily). Obviously you don't want trains picking stuff up.
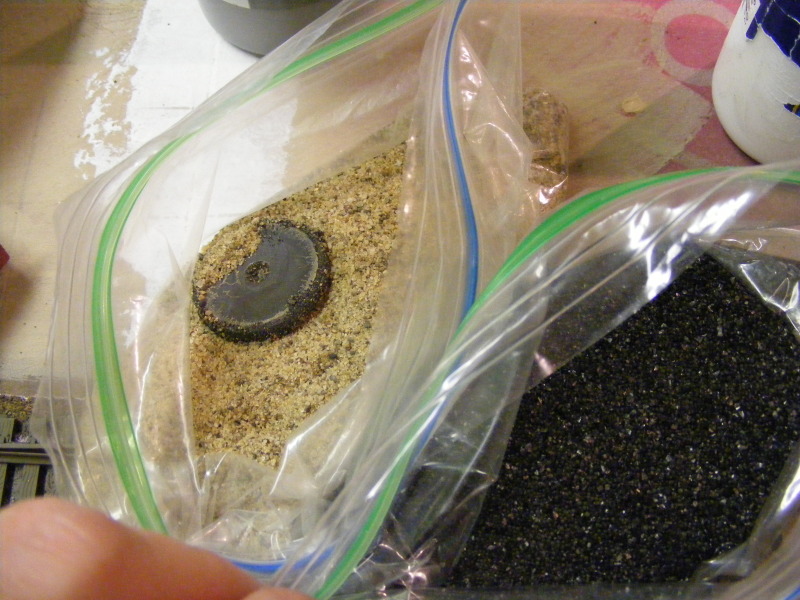
You probably saying "Neat sand, what's the black stuff the looks like scale coal?" I found that one on accident. Its the insides of a Brita water filter. However, when you view it up close it looks like this.
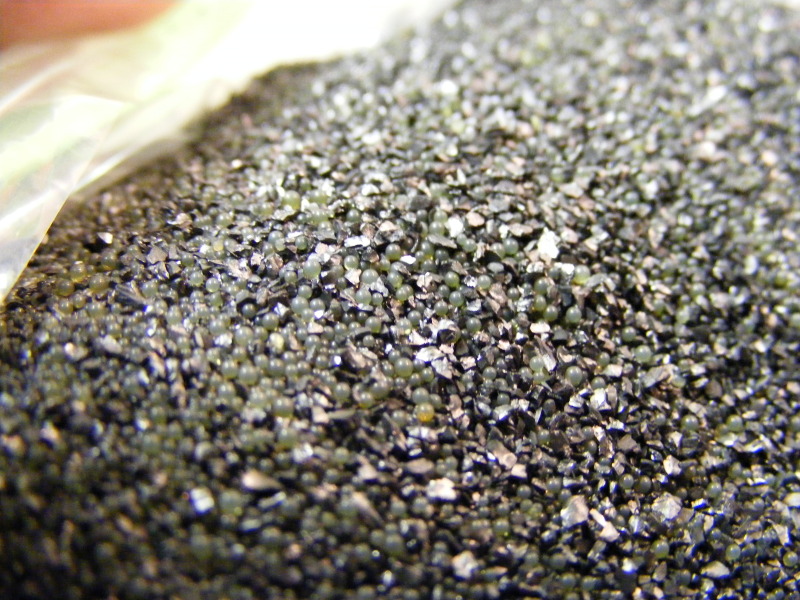
Strange little balls appear. I've tried various methods to remove them like pouring the mix into oil to see if the black flakes are heavier/lighter than the balls. No avail so far. However if you lump them into a pile. Bond them with a bonding agent to make them soild. Then go back and dry brush black over the surface you can make very convincing coal piles to the causual observer.
The next building on the list for renovation is the brown & yellow warehouse in the above photos. Thankfully its got some pretty weak glue bonds. So it will be a little more extreme of a makeover compared to the house. I hope to start that project in the next week or so. Stay tuned!
Edited by - ChrisC on January 18 2012 12:46:56 PM
|
|
Country: USA ~
Posts: 531 ~
Member Since: January 29 2009 ~
Last Visit: July 10 2020
|
Alert Moderator
|
|
|
|
Posted - January 18 2012 : 5:08:54 PM
|
oooooooooooooooooooooo, I knew there was a use for those Brita filter contents! 
Awesome!
John
I don't have a one track mind. It depends on the turn-out.
"I love your catenary!"
Is that a power-trip or just another pick-up line?
|
|
Country: Canada ~
Posts: 1124 ~
Member Since: December 15 2006 ~
Last Visit: January 30 2023
|
Alert Moderator
|
|
|
|
Posted - January 18 2012 : 9:40:09 PM
|
| I wish I could paint rocks that well Very nice! I usually put a few drops of dish soap in my glue/water spray to help it flow a little more easily.
|
|
Country: Canada ~
Posts: 3448 ~
Member Since: September 22 2006 ~
Last Visit: April 03 2026
|
Alert Moderator
|
|
|
|
Posted - January 25 2012 : 01:38:16 AM
|
Initial ground cover down. Wall mocked up in place. Roads partially ink washed. Its slowly moving forward Rock formation looks MUCH better from this angle.
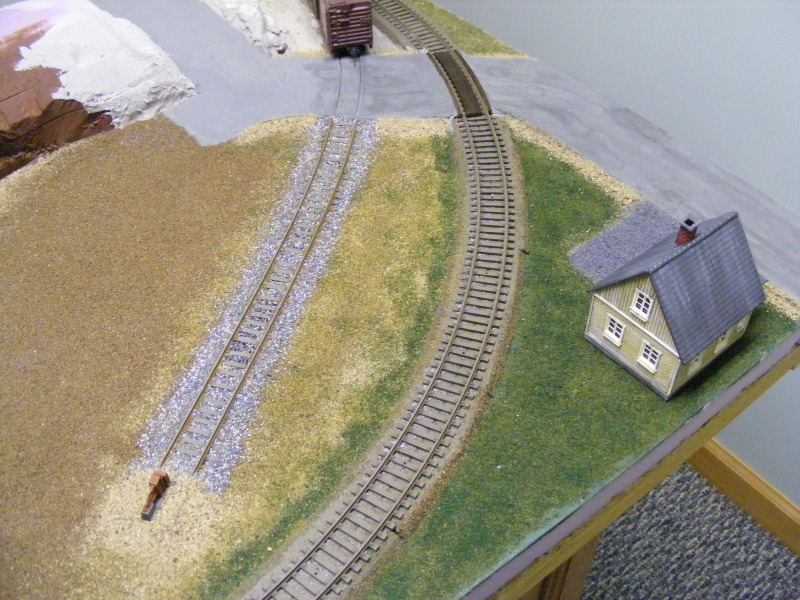
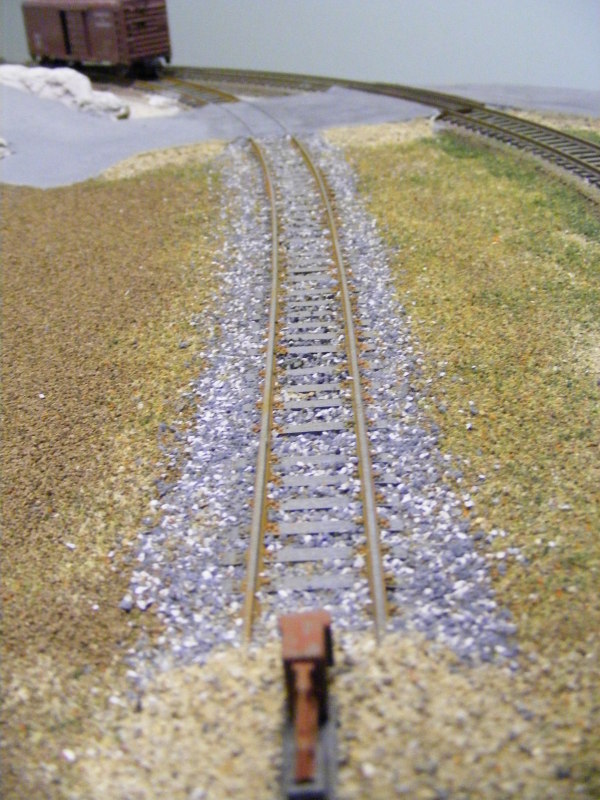
Spur needs some washes or chalk or something to blend the ballast in a little bit. Eventually weeds will grow here.
If you look at the earlier photos I totally resprayed the wall a different set of colors (yes I said colors). Then ink washed & chalked it a little. Looks pretty good I think. Covering the bare ends will take a bit of work, most likely with weeds & bushes.
Soon as I get some supplies later this week I'm going to start rebuilding the warehouse that sits here. Doing the buildings as I go is a nice mental break.
|
|
Country: USA ~
Posts: 531 ~
Member Since: January 29 2009 ~
Last Visit: July 10 2020
|
Alert Moderator
|
|
|
|
Posted - January 27 2012 : 7:46:10 PM
|
Chris: if you go to a Michael's Crafts store, you will find a black decorative sand in the plant decor area. It makes for excellent HO scale coal, as it is angular in randomized fashion. I have used this stuff with the Walthers coal and cinder hoist Ashpit structure, as well as for decorative use with other buildings. It comes in a one pound plastic bag and costs less than $5.00.
One note, don't confuse this stuff with the smaller-grained craft sands that are located in the arts and crafts aisles. Those may have other modeling uses, but the black one of that variety is better for N gauge as coal.
Siouxlake/Ron
|
|
Country: USA ~
Posts: 510 ~
Member Since: September 21 2011 ~
Last Visit: December 21 2014
|
Alert Moderator
|
|
|
|
Posted - January 27 2012 : 8:41:56 PM
|
Why buy the coal when REAL coal will do?
All you gotta do is find a recent coal train derailment & get some
Mine came from a friend as he used to burn coal in his wood stove
|
|
Country: USA ~
Posts: 15032 ~
Member Since: February 23 2009 ~
Last Visit: July 11 2026
|
Alert Moderator
|
|
|
|
Posted - January 27 2012 : 9:09:59 PM
|
Wow- what a GREAT thread!
Thanks Chris for sharing!
|
|
Country: USA ~
Posts: 201 ~
Member Since: March 14 2009 ~
Last Visit: October 28 2012
|
Alert Moderator
|
|
|
|
Posted - January 27 2012 : 9:15:11 PM
|
Awesome stuff, Chris. That layout is coming along great! I love your weathered & peeling Life Like house.
The Tyco Depot
Edited by - NickelPlate759 on January 27 2012 9:19:07 PM
|
|
Country: USA ~
Posts: 3927 ~
Member Since: June 20 2007 ~
Last Visit: November 19 2015
|
Alert Moderator
|
|
|
|
Posted - January 29 2012 : 01:28:30 AM
|
Your always full of ideas aren't you Ron? Its ok that we think alike haha. I did see that black sand. I don't need a ton of coal since I have no real coal operations aside from a few hoppers. However I did notice they have some other colors I might go after for cheap ground cover. Eventually there is a large locomotive service & scrap yard coming and I'll need it for that. Its going to be on the other side of the layout taking up one half of the inner passing siding. A brewery will get the other half. I have big plans for both those displays lol.
Nelson - Thanks! I started to go a bit further with the peeling. If you look at the close up pics, on the backside of the house you'll notice some heavier lines of grey along the siding. It looked ok, but I figured the house looked pretty damn decomposed already. I want people to at least think someone lives there lol.
Thanks for the comments microbuss & Johnny cane! Going to the hobby shop tomorrow I think. I really want to start on the warehouse. And figure out how I'm going to cover the rest of the wall where the brick's don't cover. I think I have a solution we'll see how it goes.
Edited by - ChrisC on January 29 2012 01:30:31 AM
|
|
Country: USA ~
Posts: 531 ~
Member Since: January 29 2009 ~
Last Visit: July 10 2020
|
Alert Moderator
|
|
|
|
Posted - January 29 2012 : 8:40:36 PM
|
quote:
Nelson - Thanks! I started to go a bit further with the peeling. If you look at the close up pics, on the backside of the house you'll notice some heavier lines of grey along the siding. It looked ok, but I figured the house looked pretty damn decomposed already. I want people to at least think someone lives there lol.
Originally posted by ChrisC - January 29 2012 : 01:28:30 AM
|
Well, I've seen people living in some pretty ramshackle places, so your model doesn't look that bad by comparison.
I like the spur as well, and the way you took it off the cork roadbed. I assume you broke out some of the ties yourself? Very effective.
As for the contents of the filter, the black stuff should be activated charcoal, and those are probably resin beads mixed in, which you find in water softener tanks.
The Tyco Depot
|
|
Country: USA ~
Posts: 3927 ~
Member Since: June 20 2007 ~
Last Visit: November 19 2015
|
Alert Moderator
|
|
|
|
Posted - February 13 2014 : 02:38:59 AM
|
He's baacckkk
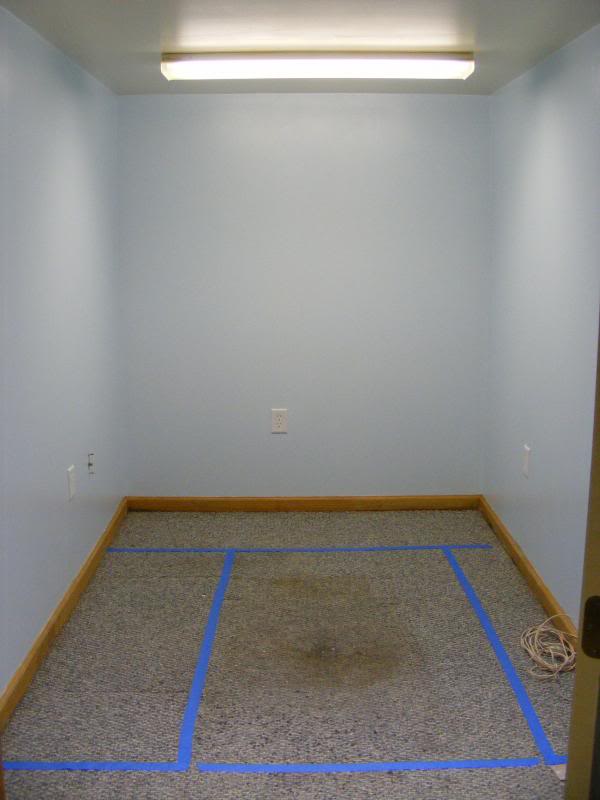
Sorry I haven't been around the forums much for those that still remember me haha. But I hate layout threads that never get updated. So it's been a reflective past year for me with the layout. As we entered the long winter and I started to poke at it again I had more questions than answers. It was clear that what I really wanted out of model railroading and what the layout was were two different things. So with that in mind, a month ago I made the decision to stop any more work to this layout and put it to bed.
Let's go over why.
First was the size. It's 18" radius (maybe a hair under) and it runs RIGHT along the edge. During testing on the track work years ago one of my larger engines picked a switch and toppled off the layout. Thankfully it was on the ground when that happened, but it stays in the back of your mind as a "what if". As as high as the layout sits now I don't want to see any loco take the plunge. Not to mention there is at least a 1/4 of my fleet that won't even run on it and that irks me that they are shelf queens. We have this same problem over on my friends home layout (see the thread labeled "The rental layout") because neither of us have big enough turns or good enough trackwork.
Second was the design. It was very efficient I thought for being a loop. But for the room it was in it was a terrible use of space. I really struggled with the idea of adding onto it. And I just couldn't reach a happy medium on how to situate the layout if I did a expansion off it. I was also running into space issues as I began to arrange where buildings would go down the road. No matter how well I arranged things it felt a bit forced to me I guess. Like I was just cramming stuff on there.
And finally was just things I learned building the layout. Thing's I would do differently with the track work, scenery, etc. It was the first time I ever laid track so there were a few things I'd do differently if I went to do it again. And some of the scenery ideas I was going after were giving me fits as well.
What was worse was while the building of the layout was going on I couldn't even run trains on it. I sprayed the track brown long ago, but figured I would clean the rails when I was done ballasting the whole thing. Well I was so wrapped up I was ballasting it in sections so basically for the past few years I've only run trains on it barely a handful of times. Really takes it down a notch.
So with all that in mind here are some of the photos of where the line ends for this layout.
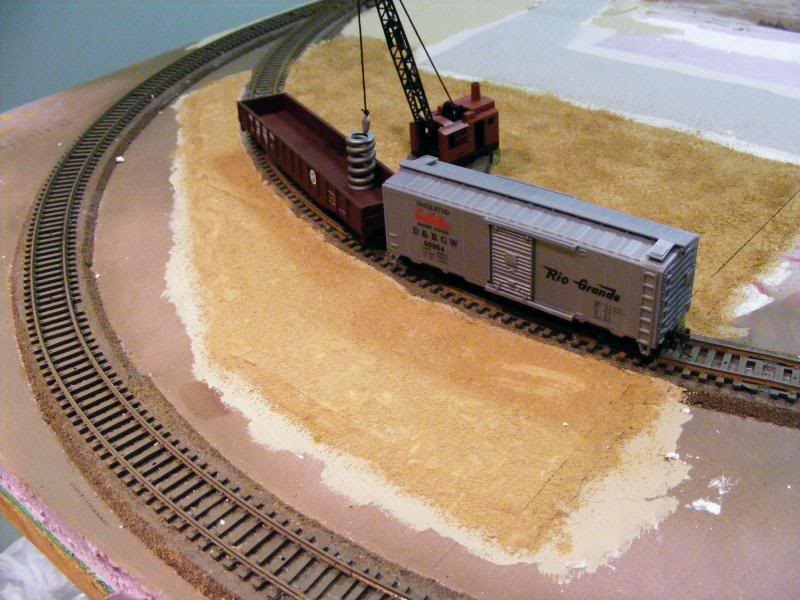
I started laying the ground work for the scrap yard I wanted to put in. I used foam core board to raise the land up to the track level then covered it with some dirt I collected outside.
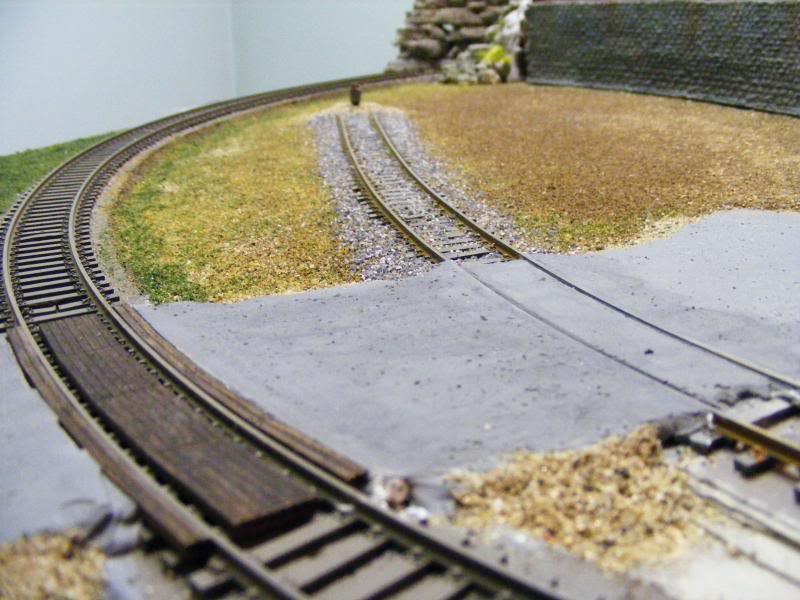
I was pretty proud of these two road crossings and the lowered spur next to the mainline. However it took me forever on the crossings to get them to work together since they were at different levels.
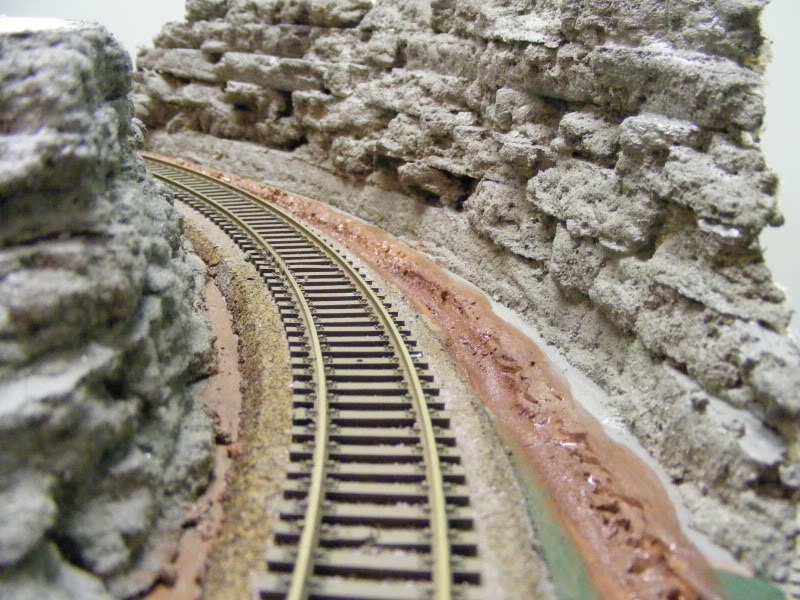
Ballasted the track between the rock cut!
Shot of the side of the layout. The tower was going to sit here. Really got a little too carried away with trying to make the terrain be interesting here. I had so many different materials involved I really was at a loss sometimes on how to finish it haha.

Trying to arrange the base of a few buildings. Everything was positioned at a angle and it looked weird to me. Plus any business I had to be served off the inner passing track couldn't be positioned too close to the track. Normal people would have seen nothing wrong with this lol.
With that, we say goodbye to the old layout. I learned a TON off it. The best learning experience I've ever had in model railroading by far. But I got too ambitious for my own good. If anyone lives near Western PA and is looking for a good small layout PM me I'd like to see it maybe go to a loving home. Will trade for locos lol.
What? You didn't think I was getting out of it did you? Rebirth would be a very strong word to use here
|
|
Country: USA ~
Posts: 531 ~
Member Since: January 29 2009 ~
Last Visit: July 10 2020
|
Alert Moderator
|
|
|
|
Posted - February 13 2014 : 02:44:48 AM
|
| Jackpot! Lucky find there, glad it went to a good home.
|
|
Country: USA ~
Posts: 867 ~
Member Since: December 21 2013 ~
Last Visit: December 08 2016
|
Alert Moderator
|
|
|
|
Posted - February 13 2014 : 12:47:12 PM
|
could give it away on Craigslist
& btw WELCOME BACK!!!
Edited by - microbusss on February 13 2014 12:48:01 PM
|
|
Country: USA ~
Posts: 15032 ~
Member Since: February 23 2009 ~
Last Visit: July 11 2026
|
Alert Moderator
|
|
|
|
Posted - February 13 2014 : 6:37:00 PM
|
Sometimes the challenge of the learning experience , and the wealth of knowledge you receive from it, makes it all worth it. Seems like a great little layout for a small 0-4-0 or Hustler diesel type. Testing your skills on a limiting configuration would challenge anyone. Glad you saved it, and can pass it on for re-use elsewhere. NOthing wrong with the time spent on it. Welcome back to Tycoland.
Jerry in snowy Virginia
" When life throws you bananas...it's easy to slip up"
|
|
Country: USA ~
Posts: 3974 ~
Member Since: January 04 2009 ~
Last Visit: January 11 2019
|
Alert Moderator
|
|
|
|
Posted - February 13 2014 : 11:43:56 PM
|
quote:| And finally was just things I learned building the layout. Thing's I would do differently with the track work, scenery, etc. It was the first time I ever laid track so there were a few things I'd do differently if I went to do it again. And some of the scenery ideas I was going after were giving me fits as well. |
Heh, that all sounds familiar. The important thing is that you gained skills and knowledge. I've found that no matter what I build, I'm never 100% happy with it. There's always something that could be done better. Luckily there's always a next time.
|
|
Country: Canada ~
Posts: 3448 ~
Member Since: September 22 2006 ~
Last Visit: April 03 2026
|
Alert Moderator
|
|
|
|
Posted - February 14 2014 : 01:45:15 AM
|
Thanks guys! Yea hopefully it ends up with someone who will appreciate it someday. I still think it has potential despite being a small layout.
Follow the new one here!
http://www.tycoforums.com/tyco/forum/topic.asp?TOPIC_ID=14385
|
|
Country: USA ~
Posts: 531 ~
Member Since: January 29 2009 ~
Last Visit: July 10 2020
|
Alert Moderator
|
|
|
|
Posted - February 14 2014 : 02:13:39 AM
|
| I have off and on belonged to a layout club here in Illinois that has had a tradition of giving away layouts to local nursing homes, just a thought.
|
|
Country: USA ~
Posts: 867 ~
Member Since: December 21 2013 ~
Last Visit: December 08 2016
|
Alert Moderator
|
|
|
|
Posted - February 28 2014 : 02:01:43 AM
|
quote:I've been posting this over on another forum, I finally get a chance to post it here as well! My brother calls me last week, tells me there is a train layout sitting out by the road nearby his house with the words "FREE" on it. Size was roughly 3x5, which is small by all standards. However I've been wanting to do a diorama to practice scenery & weathering on. Plus its free and can actually run trains in a loop so what the hey. I pick it up and drag it home.
What the picture doesn't convey, is that the outside loops are TIGHTER than 18", I don't even want to guess what the inside one is lol. Had this neat little bridge thing in the corner, the stones were actually painted styrofoam cubes and they pulled off the look quiet well.
And a shot with some of my old buildings on it since I was just playing around. Notice while the inner loop had a cork roadbed. The outer loop has painted black wood for its roadbed.
Obviously, I think its time to abandon the original ROW.
The wood roadbed was a pain to pull up. I'm saving most the brass track, I'm trying to do this project for cheap so I might reuse some of it and a little extra I had of my own. If its too much of a pain I'll just goto the local hobby store and get nickel silver stuff. All 3 switches go the same direction so that's not helping either. Next up is that pink foam you can see in the background of the photos. I have more of it. Guess where its going to end up?
I needed to make the whole thing just a tad wider to at least support 18" turns. So I carefully removed the nails and did my best to separate one of the supports on the one side which was held on with some glue.
The new piece of wood was cut & notched to work around the existing braces on the underside. You can also see the spacer piece off to the left to make the whole thing level with the existing surface.
The new extension was both glued and nailed back into place. And I didn't get a pic but I glued the spacers on also. The leftover spacer material I think I'll use on the underside and corner braces to help reinforce the whole thing and make it a tad more solid.
The cost of materials so far has been pretty well under control. The wood I bought for the extension was only a few bucks, it was the cheapest Home Depot had haha. Plus I'll use most all of it.
Next step, the foam base!
Originally posted by ChrisC - April 21 2010 : 11:56:14 PM
|
Bring her back to life and make her hum. Less is more. This is going to be a beautiful layout- the possibilities run off the page: logging? Florida Okafanokie swamps? Mining? Rocky Mountain branch line? Industrial? The brass track has a lovely patina.
Bring her back and give her new life, and share with us the journey! Good find!!
JMcNeal
|
|
Country: USA ~
Posts: 11686 ~
Member Since: December 09 2013 ~
Last Visit: May 26 2026
|
Alert Moderator
|
|
|
|
Posted - May 23 2014 : 08:47:27 AM
|
Really liking this layout! What a metamorphosis...I wish the original owner could see it. Probably got depressed that it wasn't turning out like the ones in the mags, and tossed it out...imagine the surprise...
quote:I wonder what the previous owner was running on those tight curves
Originally posted by DaCheez - April 22 2010 : 7:50:45 PM
|
DC:
Back in the early postwar days when there was a lot of focus on minimum size HO, 16 inch was the standard HO curve radius (which also matches the built-in curve of an actual #4 switch, as opposed to an Atlas #4 which is actually #4-1/2 and equates to ~22"R). The original G-D Line had a 14" and a 16"R on the inner loop:
[urlhttp://www.rmweb.co.uk/community/uploads/monthly_12_2013/post-6882-0-14994100-1387644947.jpg[/url]
People got away with this, because they were using cars of 40' or less, and small, short-wheelbase steam locos. You started with a Dockside or a Goat, and when you upgraded it was to an Eight Ball Mogul or a Belle of the 80s 4-4-0. I've experimented (using a Booster) that equipment like this can sometimes get down to 12"R without major problems. That's in Lionel train-set territory. :)
|
|
Country: USA ~
Posts: 432 ~
Member Since: March 04 2008 ~
Last Visit: December 28 2018
|
Alert Moderator
|
|