|
|
 Posted - February 14 2014 : 01:43:34 AM Posted - February 14 2014 : 01:43:34 AM


|
So to see how my first layout started and why I ended it, click here!
http://www.tycoforums.com/tyco/forum/topic.asp?whichpage=-1&TOPIC_ID=8318&REPLY_ID=76917
So my main reasons for starting over was I had been visiting a lot of local train clubs. Unfortunately none of these clubs were close enough to make joining them feasible. So this left me with a hankering to be able to run some of my bigger equipment which I was beginning to fear would be shelf queens forever. One thing I took away from the clubs was observing how they design things. One thing that struck me was how much better they were at using any given space. I started looking at my layout area and despite its small size I realized I was totally underusing the space. Putting the layout dead center in such a small space meant any expansions would be difficult at best, and still limited on where I could go. Even worse was the under side of the old layout wasn't built in a uniform fashion (no supporting benchwork either it rested on cabinets) so trying to hook something onto it would take some work.
Then poking around the layout area I realized one day doing some measuring that 22" curves would fit easily across the room. If I went along the walls, the chances of making the bigger curves I was looking for in the same location would be possible. While also gaining more room for the trains to be parked or run as well as a different scenery challenge that was pinned up against walls rather than trapped in a circle. What's more where you enter the layout area there is space behind the door where a tail end yard coming the layout could be located and it would still be out of the way of everything else. So with all that mind I decided to restart.
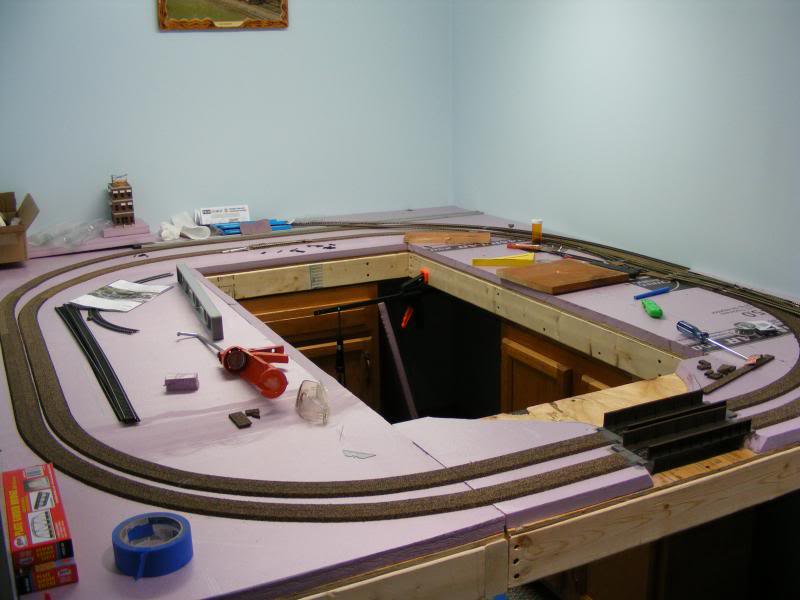
The general sketch. Two track mainline with curves exceeding 22". Small yard on the left to serve the inside track, maybe 4-5 tracks or so? Lower right you can see the location of the tail end yard for the outer loop. This will hold the bigger stuff and might even go DCC in a few years. Depending on the switch layout I might be able to fit anywhere from 5-7 tracks back there (probably closer to 5). The little part near the bottom will be a duck under. We debated building a lift out or swing door, but none of us are that good lol. Couple extra sidings off to the right for businesses. And there will probably be another one near the top side of the picture if there is room. Might do a coal mine there? I grew up in a heavily coal mined area when I was little so there is a lot of personal appeal there.
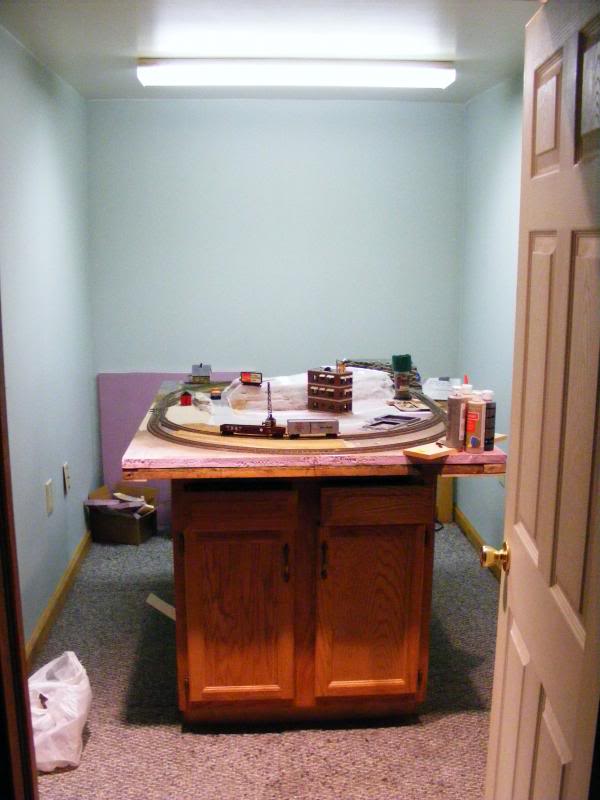
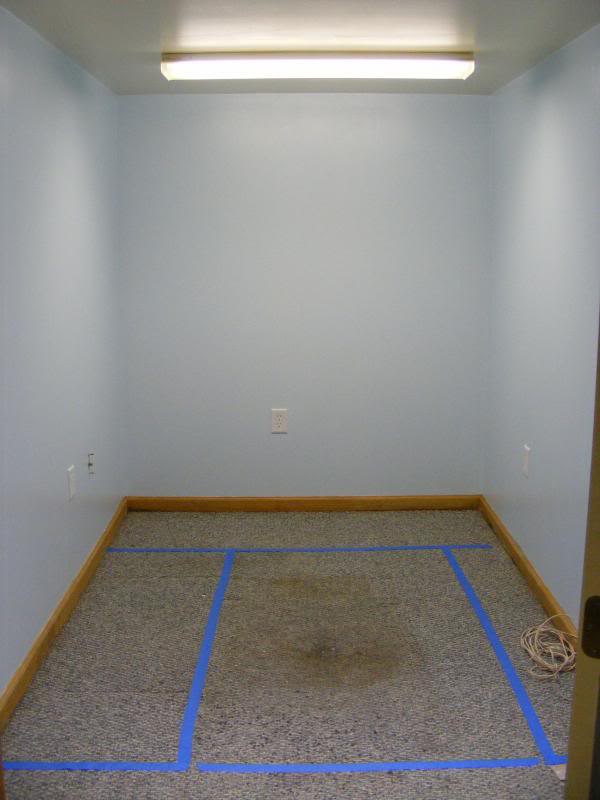
A quick before & after look at the room. The walls before were a light green and the lighting was what's usually referred to as "warm". I never liked how the pictures looked they always seemed off since the walls reflected green and the lights were the wrong color. Room is now blue, but only the two entry lights were converted to "daylight" LED's. I have to change the main florescent you see in the picture to daylight specifications yet. Once I do the blue should really come alive in here and give the models excellent lighting. You can see some of the lighting color difference on the floor near the bottom of the photo.
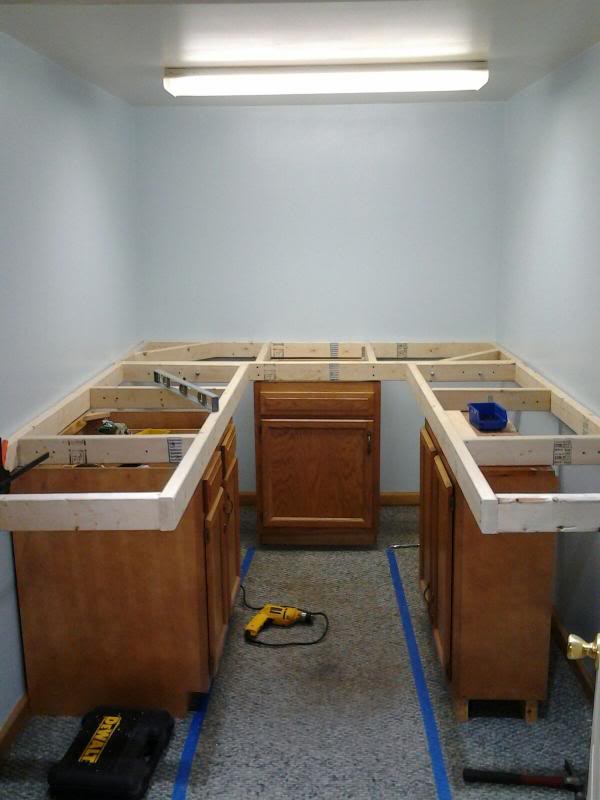
A friend of mine who is not into trains but is very good with basic home remodeling was listening to me talk about how I was going to handle the benchwork for this. He had better ideas in 5 mins than I had in a entire month of thinking lol. Despite how it looks the benchwork is attached to the cabinets, but actually bolted together in sections. The rear is one section, as are the left & right flanks. The duck under in the middle and tail end yard are also bolted. This way if it ever has to move it stands a chance of doing so. I'll be honest the 2x4's are overkill, but compared to what I came from it's nice to know if the house falls on the layout that the benchwork will hold it up lol.
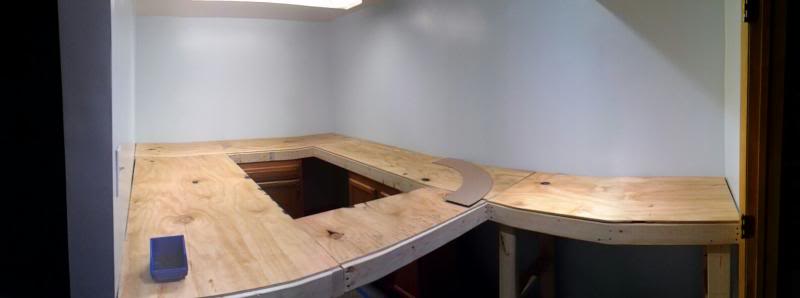
Used my phone's panoramic feature to show off the tail end yard. In this picture the duck under is bolted in. And we had no cabinet for the tail end yard so it got its own set of legs. The whole structure is VERY solid. Plywood is rather think 3/8's stuff just to give me a solid flat surface. Per my last layout I REALLY liked the foam as a sub-base there is so much you can do with the layout once you do that. So that will be posted shortly as it just needs trimmed right now.
My local hobby shop has plenty of cork & track but no switches. I wanted #6's for the bigger engines to be happy. However due to production line issues in China the only place I could get them from was Walthers. Turns out they had their medium size Peco's on sale for cheaper than their small size switches. So that was a good score even if they were a bit expensive. They will be worth it in the long run! Most of the yards will have the smaller #4's I think just to help with space issues.
Oh any where did the name "Spider Hill" come from? My brother is in the halloween prop business and I thought it would be cool to adopt his name onto the railroad. On top of that I have quite a few older locos that are "mutts" with no road names on them. As they get rebuilt they will get 'SHRR' sub-lettering and eventually some color scheme. If your into Halloween props give my brothers site a look  http://spiderhillpropworks.com/ http://spiderhillpropworks.com/
|
Country:  USA ~
Posts: 531 ~
Member Since: January 29 2009 ~
Last Visit: July 10 2020 USA ~
Posts: 531 ~
Member Since: January 29 2009 ~
Last Visit: July 10 2020
|
 Alert Moderator
|
|
|
|
 Posted - February 14 2014 : 06:31:00 AM Posted - February 14 2014 : 06:31:00 AM
|
Hi ChrisC,
I really like the way this is looking. Using the cabinets is a great idea. I may have to try to find some in my neck of the woods. I'm not handy with wood working so this is right up my alley. Built in storage without having to build it, nice.
I will watch this post to see your progress.
Thanks for sharing.
Mytyco
|
|
Country: USA ~
Posts: 790 ~
Member Since: April 30 2006 ~
Last Visit: July 21 2015
|
Alert Moderator

|
|
|
|
Posted - February 14 2014 : 09:04:07 AM

|
| hi ChrisC,thats a great start for a layout,all areas can be reached,nice storage,with loads of possibilities,looking forward to more photos ken
|
Country:  United Kingdom ~
Posts: 8294 ~
Member Since: September 28 2006 ~
Last Visit: October 20 2021 United Kingdom ~
Posts: 8294 ~
Member Since: September 28 2006 ~
Last Visit: October 20 2021
|
Alert Moderator
|
|
|
|
Posted - February 21 2014 : 01:09:05 AM
|
Thanks guys! Yea the cabinets work out great. Keeps the trains from overflowing into other rooms in the house so I know where everything is.
Little update, it's wearing foam now and mainline sketch marks are mostly in. So I put the first cork down tonight for both lines.
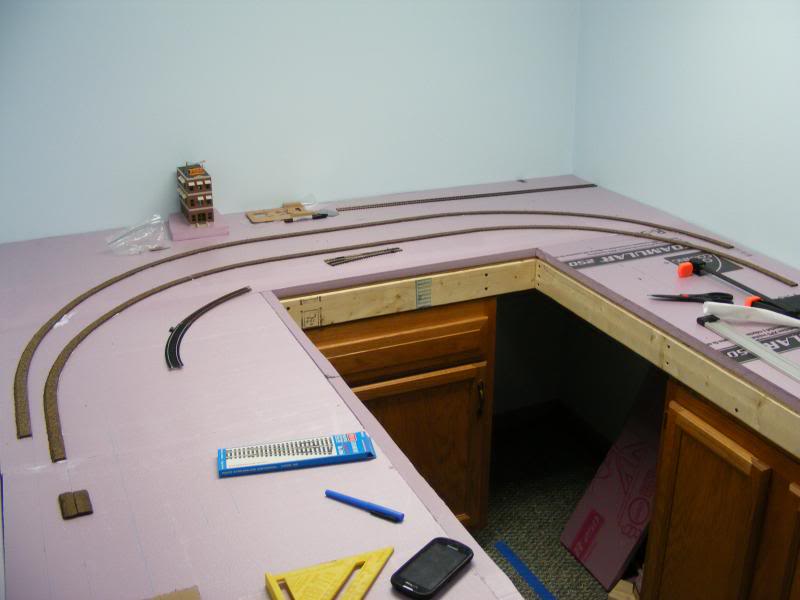
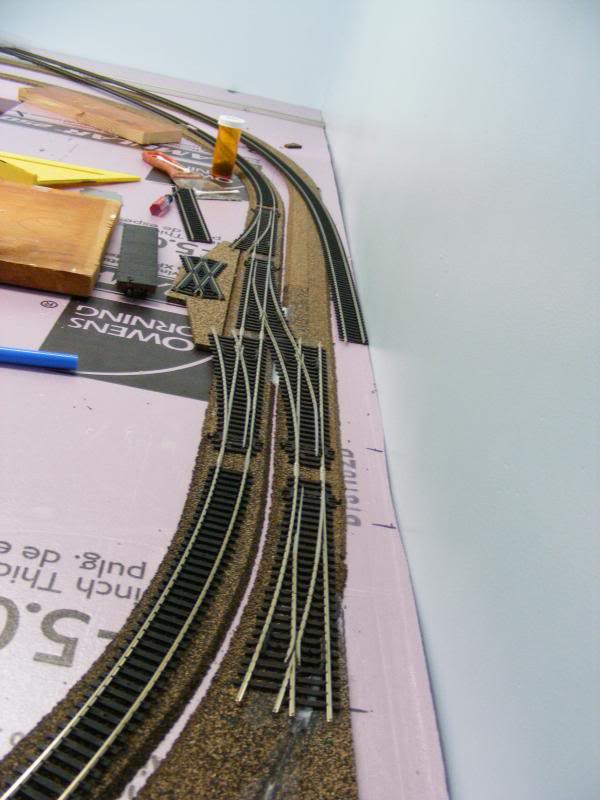
I left some room towards the back to get some buildings up along the wall. That will give me some room to buy more structures and provide a bit of a back drop scenery wise. You can see in the middle the mainlines move apart. The station will sit in between them. This eliminates me having to tweak the curves to keep the trains from rubbing when they pass so that's nice. The Peco's came in so I've been marveling at them. Still trying to figure out how to squeeze some yard tracks in on the left side. Might buy a few curved turnouts to ease them in there.
|
|
Country: USA ~
Posts: 531 ~
Member Since: January 29 2009 ~
Last Visit: July 10 2020
|
Alert Moderator
|
|
|
|
Posted - February 28 2014 : 01:57:53 AM
|
This is so well thought out and conceived. The very conception and design is amazing as it stands alone. I cannot wait to see what will be next. Keep it coming, don't slack now!
JMcNeal
|
|
Country: USA ~
Posts: 11686 ~
Member Since: December 09 2013 ~
Last Visit: May 26 2026
|
Alert Moderator
|
|
|
|
Posted - March 15 2014 : 03:02:56 AM
|
Not lacking, it's just a layout of this size does take some time. Why didn't anyone warn me of that before I started? lol. Cork is down, track laying is now in progress!
Peco's are totally wonderful. Then again I'm going off of years of abused poorly maintained brass switches so I'm slightly bias haha. They are expensive though so I'm only using them on the mainline. Only thing was I got the electrofrog versions since I run DC. Which are fine but you have to be mindful of putting insulators in at the right spots. I originally didn't want the mainlines to touch and figured maybe I would add in a connection later. But as you can see I went ahead and did it now. Glad I did since the switches are long so spacing is pretty tight. The crossover on the left will eventually be two spurs for industry.
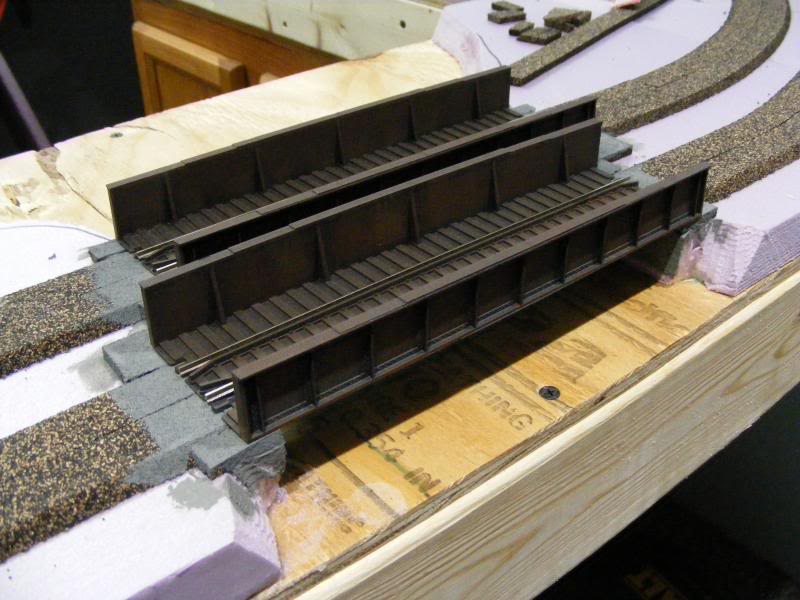
So originally the duck under part of the layout was going to be lift out bridge. After awhile we decided that was a lot to bite off. Also with the radius of the turns there wasn't a lot of straight track area to make a lift out wide enough. Still, I wanted bridges on that spot so I kept it simple. Small girder bridges are common around my neck of the woods and Atlas sells cheap ones thankfully. I had to do some quick weathering on them though since once they are in it would be a lot harder to weather them. Little overdone but I like them!
|
|
Country: USA ~
Posts: 531 ~
Member Since: January 29 2009 ~
Last Visit: July 10 2020
|
Alert Moderator
|
|
|
|
Posted - March 15 2014 : 07:52:22 AM
|
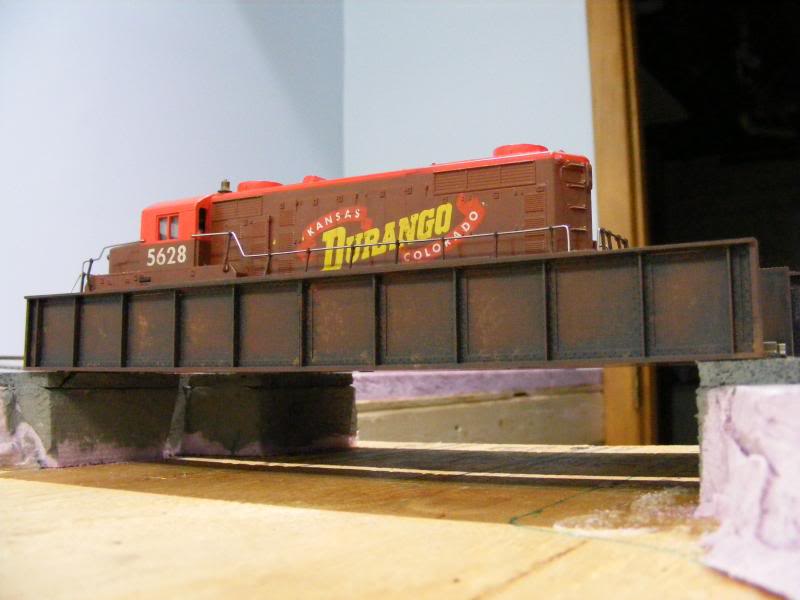
Chris - from what I can see in your photos the weathering on the bridges is not overdone at all - it looks perfect. It's exactly what I want to do with my girder bridges when I "get around to it".
Really like the the way you have the tracks crossing between the turnouts - interesting!
All in all looking great!
http://tycodepot.com/
|
|
|
|
|
Posted - April 05 2014 : 3:40:23 PM
|
In the wee early morning hours of March 5th, the outer loop became operational 
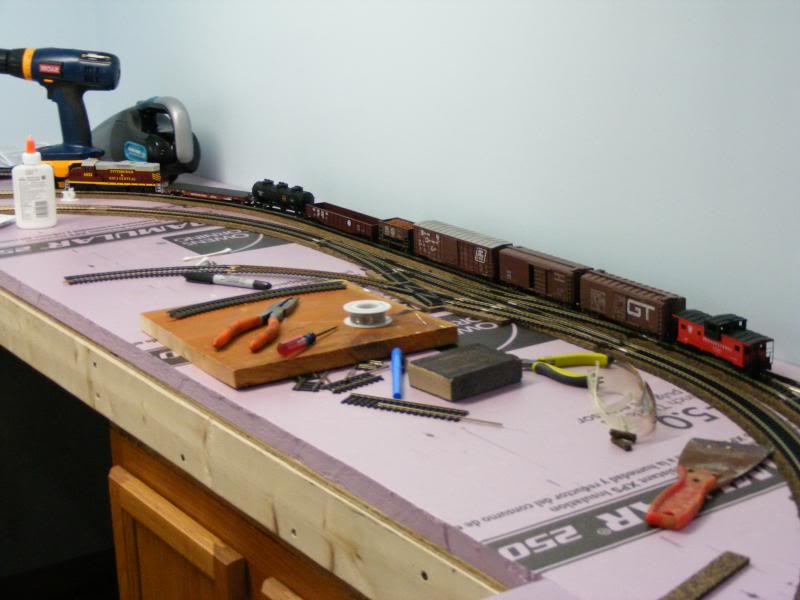
Let's back up a little and see what it took to get there. Occasionally I'd like to show some of the construction notes in case it helps anyone else down the road. First, building a railroad can be fairly expensive at times 
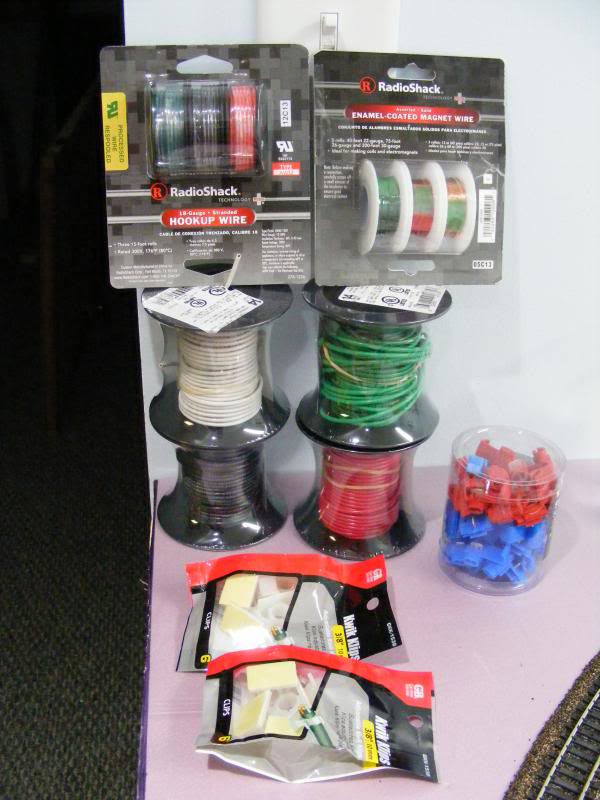
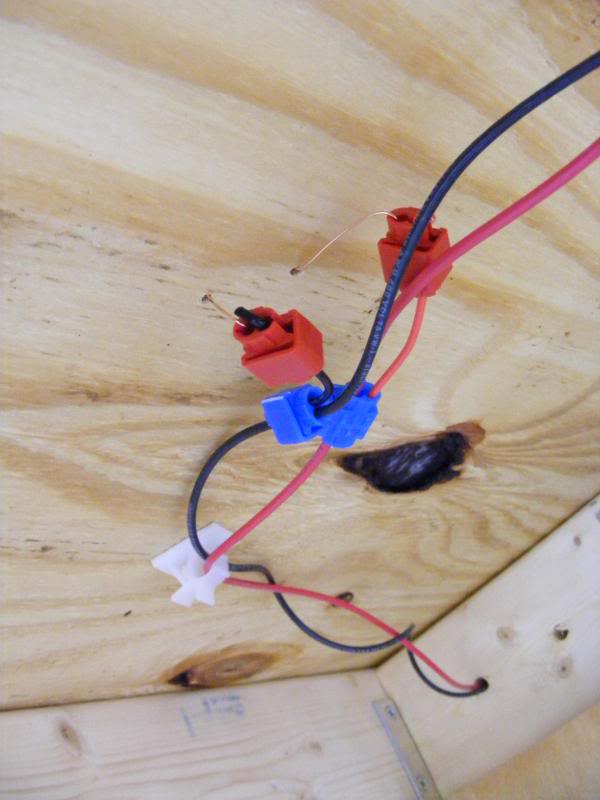
That said I pretty much have enough wire to do everything I need to do so that's fine. Each track has two 14 gauge bus wires underneath. Coming off each section of rail (mind you some of the flex track is soldered together so those sections only got one set of feeders) is a 22 gauge feeder that I barely manged to solder on without destroying too much lol. I can clean the soldering up that's not a big deal.
Below that the 22 gauge wire runs into a suitcase connector (Harbor Freight lets you buy these in large packs and they are cheap!). The connector lets you up size to 18 gauge wire. And the final connector lets the 18 tap into the 14 gauge bus lines. If/when I go DCC it won't be hard at all.
On a side note, the track works beautifully. It's clear I learned a LOT from the last layout. I was running the test train around a full speed and everything just cruised around the layout like it was on glass. Very pleased with how its come out. Aside from maybe 1-2 small spots I wouldn't change anything about how I did the track work. If I build another layout I'd do it again the same way. Best thing I learned was two solder two sections of flex track together while they are off the layout and straight, not curved so it results in a kink on the turn. And remove ties wherever you are connecting the flex track to anything. This will eliminate a rise where the connection is and you can always install the ties back under them later. It's basic stuff I know, but things that plagued me on the first layout.
|
|
Country: USA ~
Posts: 531 ~
Member Since: January 29 2009 ~
Last Visit: July 10 2020
|
Alert Moderator
|
|
|
|
Posted - April 05 2014 : 5:16:39 PM
|
Shouldn't the train be a MOW Work Train?
All kidding aside The layout building progress is looking good
|
|
Country: USA ~
Posts: 15032 ~
Member Since: February 23 2009 ~
Last Visit: July 11 2026
|
Alert Moderator
|
|
|
|
Posted - January 06 2015 : 11:06:26 PM
|
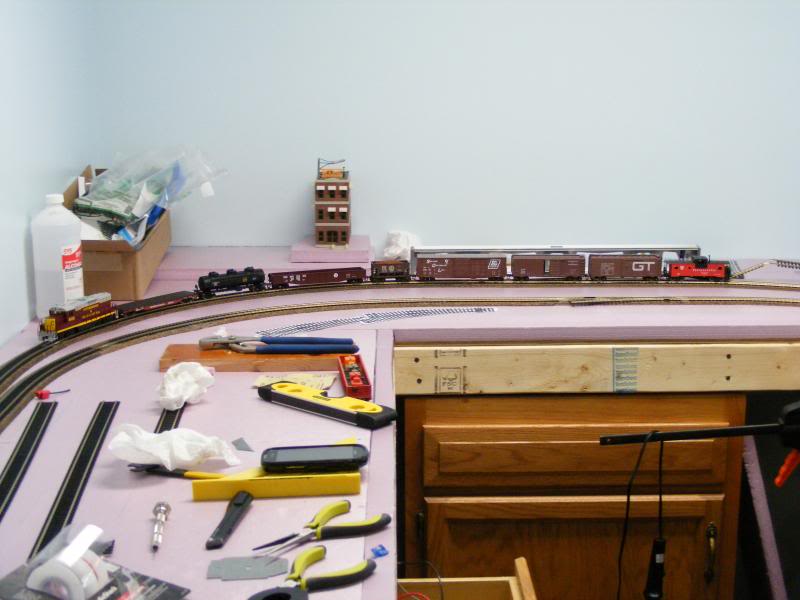
Yay any progress is good progress....I think? Couple little updates. The inner loop is finally wired up and running. Works great just like the outer loop. Really please with the track laying at this point it should be pretty solid from here on out.
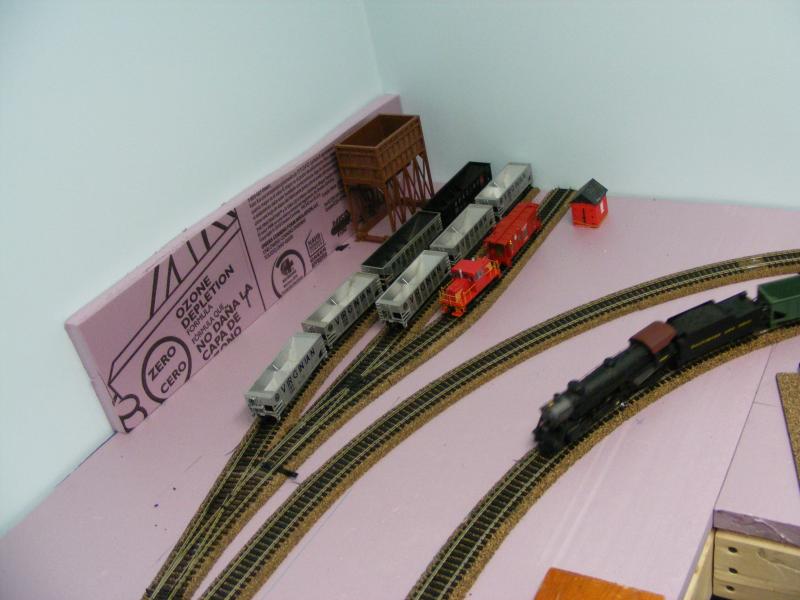
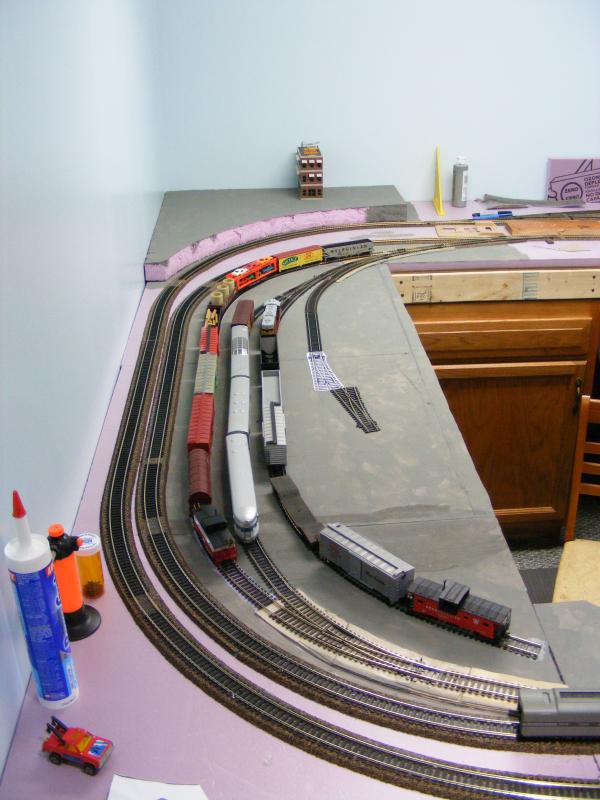
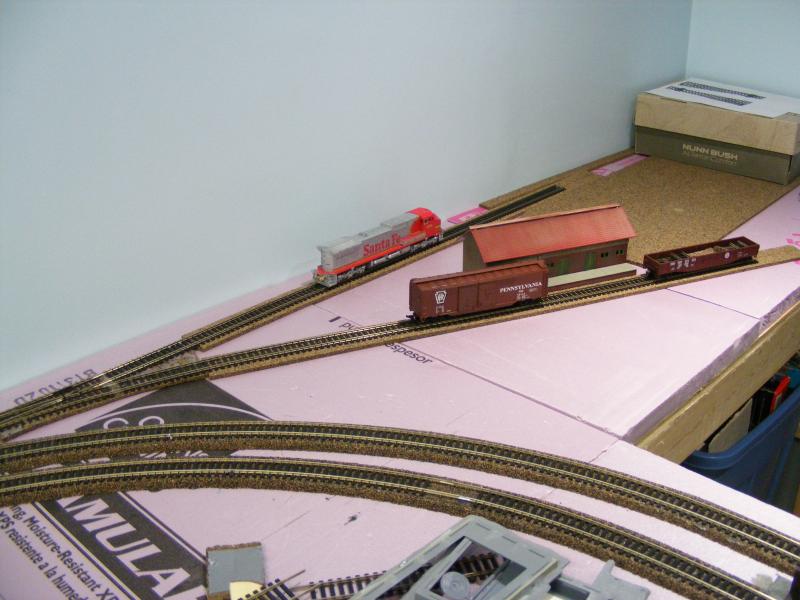
Decided to lay my first big addition in the far right corner. This will be a coal mine eventually. I intended to scratch build the building to fit the space and get the style that was local to where I live. I couldn't resist parking a few coal cars in there to get a feel for it. The spurs aren't long at all, but I'm thrilled to even just be able to model this a little bit. On the inside track you can see one of my steam locos doing a quick run by! The tipple and shed are just there to give me a visual. Both will probably get used elsewhere on the layout.
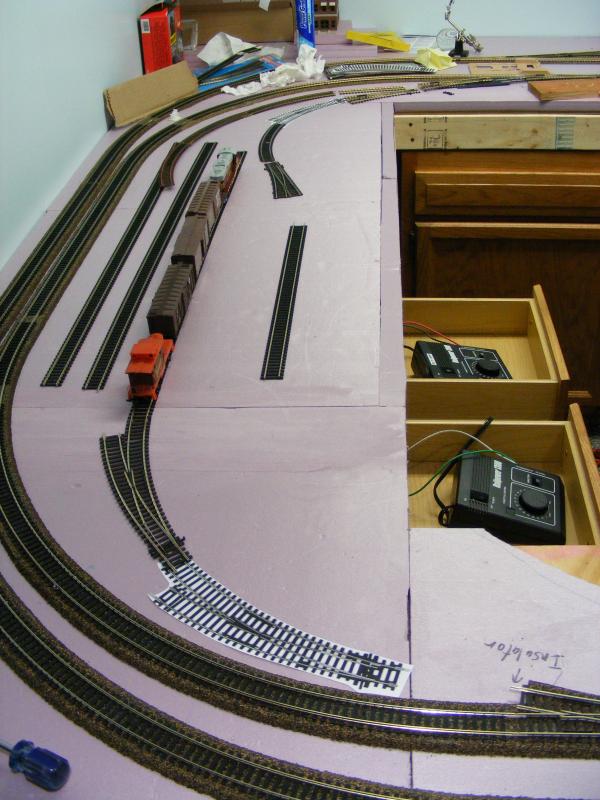
Next up will be the inside yard. Plan is to have at least 2-3 pull through tracks and a small service facility to park stuff. However the switch arrangement on the far end is giving me fits. Notice the paper copies of switches to allow of easy mock ups before I buy anything I don't need. Also check out the controllers living in the pull out drawers! I just need to put a power strip inside the cabinet so I can tuck the power cords in there as well.
|
|
Country: USA ~
Posts: 531 ~
Member Since: January 29 2009 ~
Last Visit: July 10 2020
|
Alert Moderator
|
|
|
|
Posted - January 07 2015 : 09:32:04 AM
|
Looking pretty good, so far.I wish I had the space to be able to build a layout like that in one piece because I have to do them in sections because of space. Well, it's better than nothing, right? 
-Steve
"A lot of modellers out there who go to these train shows see broken HO stuff and go, 'This is useless' when, in reality, they can still be used for modeling whether it's as a prop on your layout or a cool project to make something old new again."
Edited by - kovacste000 on January 07 2015 09:32:52 AM
|
|
Country: USA ~
Posts: 3533 ~
Member Since: February 17 2014 ~
Last Visit: January 11 2023
|
Alert Moderator
|
|
|
|
Posted - January 07 2015 : 09:59:42 AM
|
Chris,
Looks great! How was the cork roadbed to work with? I have some foam that I'm going to try. I hear it lasts longer.
I'd like to set up a coal mine also. There's one I'd like to model from memory that was in Charleroi.
For your turnouts, have you thought of building your own? I've been researching them and it doesn't seem too bad. What # turnouts are you using?
Tim
|
|
Country: USA ~
Posts: 259 ~
Member Since: October 23 2014 ~
Last Visit: March 28 2017
|
Alert Moderator
|
|
|
|
Posted - January 07 2015 : 10:33:20 AM
|
Thanks kovacste000! Yea I still kinda wish I had taken the false wall out on the left and gone bigger. But I learned from my last layout biting off more than you can chew is a bad thing lol. Seriously though I can run two trains with decent size curves to support larger engines. And there is plenty of side interest going on for any other random modeling efforts I have like the mine for instance.
Thanks Widecoupe the cork was easy to work with. I draw my centerline on the foam, then use the adhesive to hold the cork down and pin it in place till it dries. I do one side then the other. Sometimes I'll put something heavy on the cork just to keep it down. Cork on top of the foam makes for a really nice base. It's probably overkill but it's very solid and its very quiet most the time. I say most of the time because if enough metal wheels are rolling around the layout really sings lol. Nice thing about the foam is I know over time it won't degrade. Look up the post "The Rental layout" on here that's my buddies old layout. The homosote & plywood is having issues in sections because it wasn't supported properly and it's sagging. Taking the track along with it.
Turnouts I've been using Peco's. I just fell in love with them. They cost a little more, but what I've been doing is waiting till Walthers puts them on sale and buying them. They are spring loaded and the ties near the ends are undercut to fit rain joiners which is really slick. My trains have loved them they can literally hit them at any speed and they glide right over them. Just for the hell of it I did buy ONE Atlas turnout. It's over near the coal mine it's pretty easy to spot. The mainline switches are medium length (#6) and I've been using smaller #4's for everything else minus the curved ones to squeeze into the yard. I might try building a switch down the road, but at this phase it was just more than I wanted to get into. Using the Peco's keeps me moving forward a little quicker. I should also mention the mainline switches have the electro frogs on them. So old Tyco's and smaller locos don't jerk from power loss when going over them so that's nice too. The trackwork has proven very friendly to everything from old time 0-4-0's with pancake motors to my friends BLI N&W 611 & Athearn challenger.
After I get the yard done I might change gears and start actually start building the coal mine. Dying to try my hand at some buildings haha.
Edited by - ChrisC on January 07 2015 10:38:20 AM
|
|
Country: USA ~
Posts: 531 ~
Member Since: January 29 2009 ~
Last Visit: July 10 2020
|
Alert Moderator
|
|
|
|
Posted - January 07 2015 : 6:49:09 PM
|
quote:Thanks kovacste000! Yea I still kinda wish I had taken the false wall out on the left and gone bigger. But I learned from my last layout biting off more than you can chew is a bad thing lol. Seriously though I can run two trains with decent size curves to support larger engines. And there is plenty of side interest going on for any other random modeling efforts I have like the mine for instance.
Originally posted by ChrisC - January 07 2015 : 10:33:20 AM
|
Oh, that's cool. Definitely looking forward to what you'll do with it.
-Steve
"A lot of modellers out there who go to these train shows see broken HO stuff and go, 'This is useless' when, in reality, they can still be used for modeling whether it's as a prop on your layout or a cool project to make something old new again."
|
|
Country: USA ~
Posts: 3533 ~
Member Since: February 17 2014 ~
Last Visit: January 11 2023
|
Alert Moderator
|
|
|
|
Posted - January 20 2015 : 8:34:49 PM
|
What you have there is not John Allen's layout, but I see you have all the details failing into place for a really nice pike.
I love how you made the riverbed plausible at your bridge scene; abutments supporting the girders of the bridge, with a bit of a slope of the ground leading back from the bridge. The weathering looks just right, and the curves on your line look about right given the scope of the layout.
Keep up the good work and keep us posted; we'd love to see more.
|
|
Country: USA ~
Posts: 182 ~
Member Since: April 30 2011 ~
Last Visit: March 04 2023
|
Alert Moderator
|
|
|
|
Posted - January 22 2015 : 01:24:12 AM
|
| That is looking quite fun ChrisC. It's good to hear your thoughts on the various turnouts and products you're using.
|
|
Country: USA ~
Posts: 2087 ~
Member Since: March 16 2013 ~
Last Visit: July 05 2018
|
Alert Moderator
|
|
|
|
Posted - January 22 2015 : 01:52:04 AM
|
| Very Nice layout coming along well!
|
|
Country: USA ~
Posts: 6279 ~
Member Since: February 18 2009 ~
Last Visit: March 04 2022
|
Alert Moderator
|
|
|
|
Posted - January 24 2015 : 8:57:47 PM
|
Brilliant use of space. Peco's are top of the mark, but
be alert to the power routing frogs. Any two facing
turnouts will require an insulator on the inner rail, but
you probably already know this.
|
|
Country: USA ~
Posts: 11686 ~
Member Since: December 09 2013 ~
Last Visit: May 26 2026
|
Alert Moderator
|
|
|
|
Posted - January 27 2015 : 12:40:20 AM
|
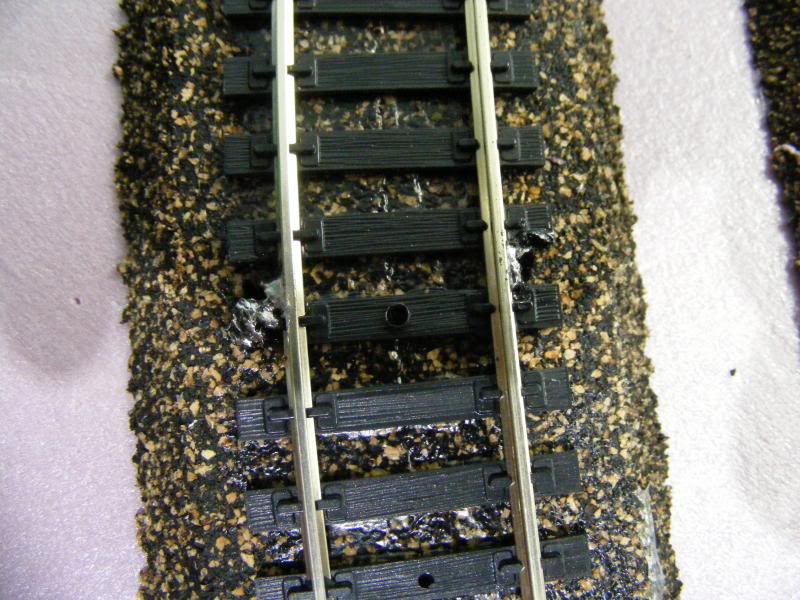
Thank you guys! You remind me I need to get my butt in gear and get the yard started lol. The ramps down into the yard are giving me fits. I made one out of cork and it is NOT grading down like I had hoped. I resorted to a method from the last layout for the other ramp and cut pieces of thin cardboard and layered it to get the same sloping effect. Crude but it should work.
Islanderh93 yea for what it is the layout is hitting its marks. It's fairly simple and I could have done more with the grades or track plan rather than just flat ovals. But truth is I enjoy building models more so the layout is really just a showcase for them. The bridges were a bit rough since it wasn't something I could go back and do later but I got it pretty good on the first pass.
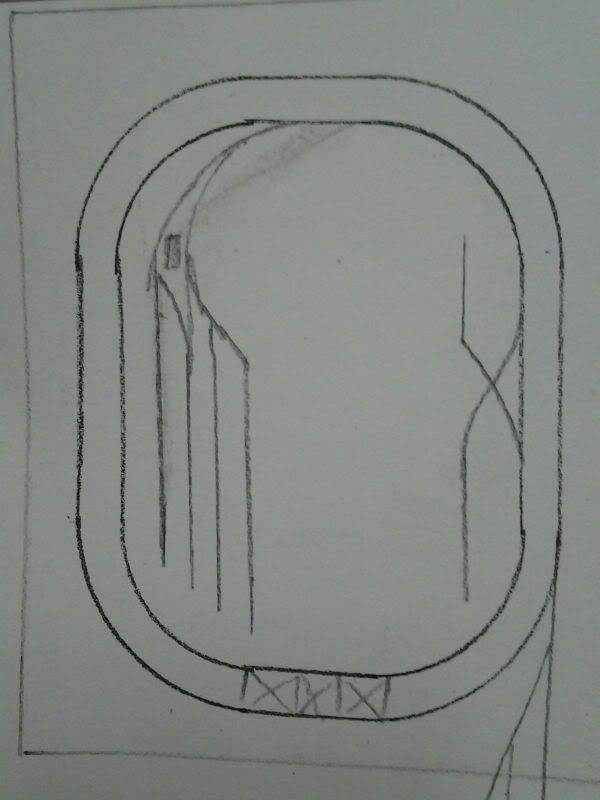
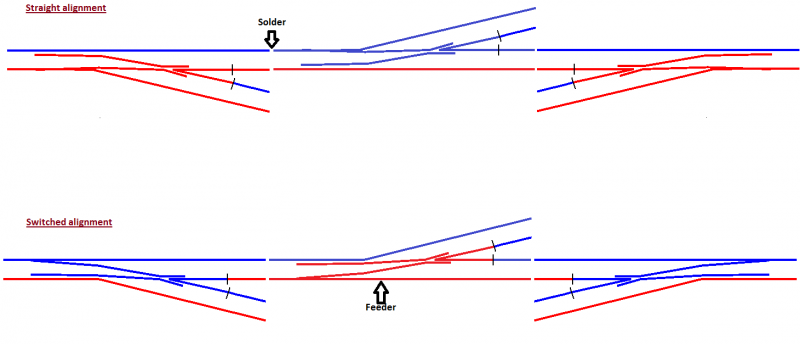
You guys were talking about the turnouts. This was my test diagram for the switches on the one side of the layout. All the black lines were insulators placed to block the Peco's from shorting anything out when I didn't want them too. It worked well in figuring out where the power was being routed, what I could solder together, what I needed feeders for, etc. Funny part is I've purposely been testing the turnouts at well over what would be considered "normal" operating speed and everything has got through them just fine.
Occasionally when I can I try to give insight on what the heck I'm thinking or doing. Especially when it comes to product choice. But for the coal mine I saw something at Michaels the other day that I might try for ground cover at the mine. They sell this black sand stuff that for a decent size bag is very inexpensive I think it was around $3 or so. And makes a very passable attempt at coal or boney piles depending on what look you are going for. You get a decent amount too so I'm hoping this works out!

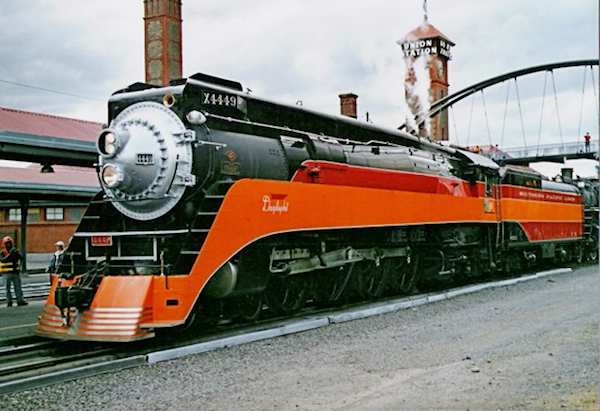
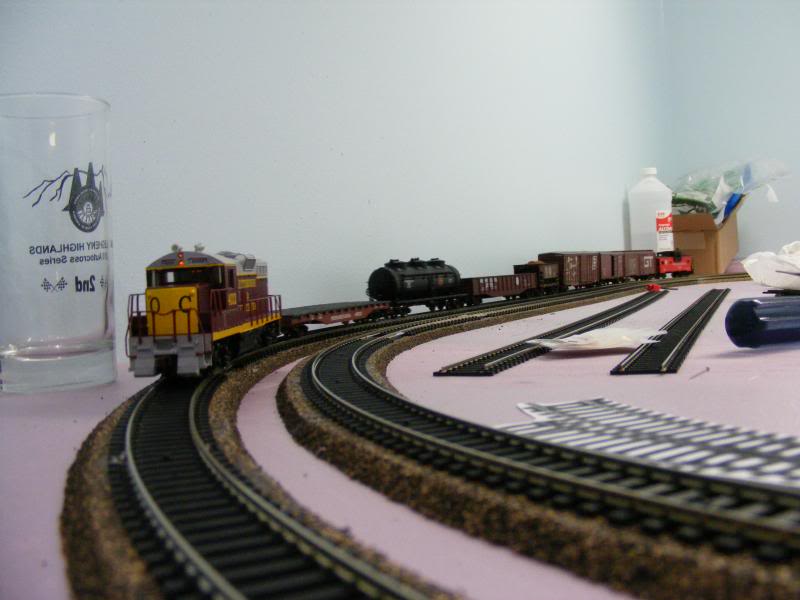
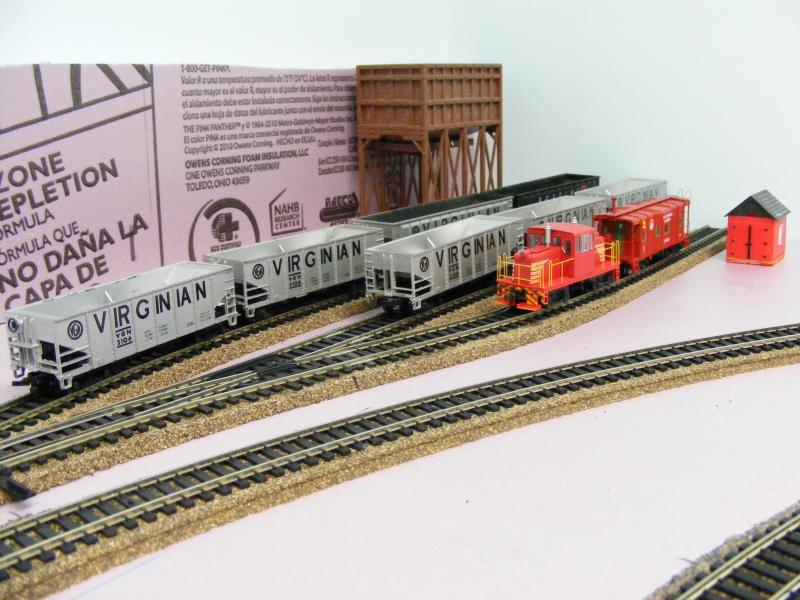
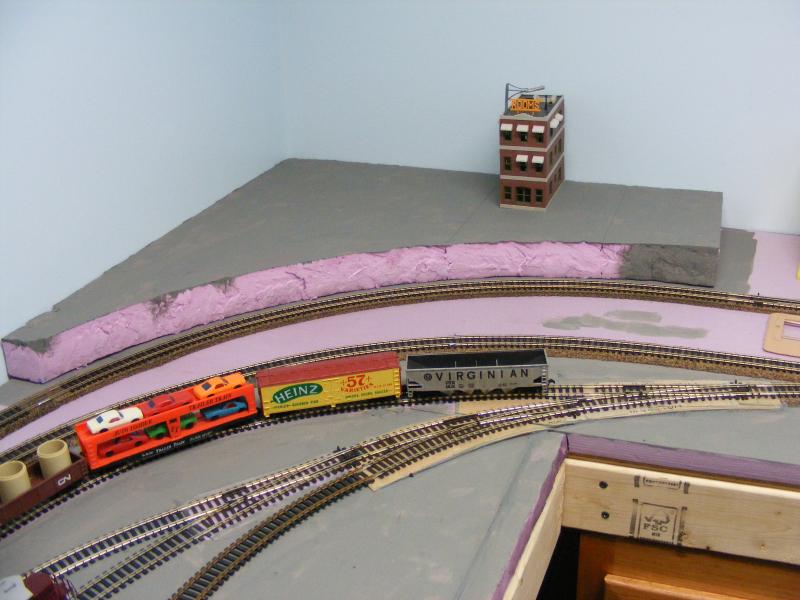
And I couldn't resist seeing what a coal drag might look like
|
|
Country: USA ~
Posts: 531 ~
Member Since: January 29 2009 ~
Last Visit: July 10 2020
|
Alert Moderator
|
|
|
|
Posted - January 27 2015 : 09:27:53 AM
|
 You're definitely showing progress with that layout of yours. Keep it up, man. You're definitely showing progress with that layout of yours. Keep it up, man.
-Steve
"A lot of modellers out there who go to these train shows see broken HO stuff and go, 'This is useless' when, in reality, they can still be used for modeling whether it's as a prop on your layout or a cool project to make something old new again."
|
|
Country: USA ~
Posts: 3533 ~
Member Since: February 17 2014 ~
Last Visit: January 11 2023
|
Alert Moderator
|
|
|
|
Posted - January 27 2015 : 09:32:21 AM
|
Thanks for sharing this! I definitely needed something like this to figure out how isolate and wire my switches. Going to try swapping out for Peco's also.
quote:
|
|
Country: USA ~
Posts: 259 ~
Member Since: October 23 2014 ~
Last Visit: March 28 2017
|
Alert Moderator
|
|
|
|
Posted - February 26 2015 : 02:24:21 AM
|
Well to took some fangeling, but I got the ramps into the yard finally done! Fun fact, stacking thin pieces of cardboard is a LOT faster than trying to sand down cork to make a ramp. So much faster lol. It's not as pretty, but ballast will cover it someday so I'm ok with that. Fun thing was this was pioneered on my old layout and worked great so I should have known better. There are two pull through sidings and a stub track. Off to the right of the staging tracks there will eventually be some sort of servicing facility for locomotives. The 3 staging tracks will be block powered eventually. The service area I might leave that unpowered we'll see.
Entrance into the yard. All the cars I was just randomly throwing out there for photo purposes.

So I've been doing a LOT of track work this winter it's wearing on me. So this is one of the next things I'm working on. Going to have a small town in the back. My brother gave me a leftover piece of this thick insulating foam which is great because it raises the down up. Visually this works great since it's in the far back corner.
I added one unique ability to the town's base...

It's fully removable. This will let me work on it without having to lean over half the layout and I can take it out of the basement to work on it. Gives me a lot more flexibility! You can see the 3 wood pins that keep the whole thing in place for when it take it on & off.
Something I haven't touched on a whole lot was the tail end yard that goes off the corner of the layout. Up to this point I've been using it a shelf since I haven't decided what is going to go on there next aside from some staging tracks. But I had some spare cork & flex track pieces laying around. The great thing about foam is you can use it to mock stuff up really easy using clothing pins. So nothing you see here is permanent it's just for visual enjoyment. Though the freight warehouse in the picture will probably end up on this section eventually.
Hopefully the next update involves me actually working on models. That would be just sooooo nice right now haha.
|
|
Country: USA ~
Posts: 531 ~
Member Since: January 29 2009 ~
Last Visit: July 10 2020
|
Alert Moderator
|
|
|
|
Posted - February 26 2015 : 11:13:17 AM
|
| It is a pleasure to view your progress and watch your techniques ChrisC.
|
|
Country: USA ~
Posts: 2087 ~
Member Since: March 16 2013 ~
Last Visit: July 05 2018
|
Alert Moderator
|
|