|
|
 Posted - October 30 2009 : 12:01:39 AM Posted - October 30 2009 : 12:01:39 AM


|
Well, I figured I would do a how to post on repowering a power torque with the tray motor from an older box style playstation 2. the pictures are not good, i have an older camera. it's the best i can do for now.
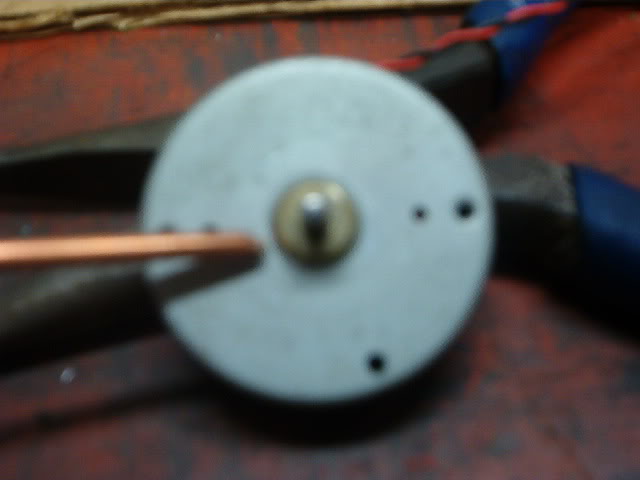
the fist thing you do is remove the old screwed up power torque from the engine. remove the brush plate off, remove the trucks side frames, remove the pinion gear with a couple small flat head screw drivers (don't screw it up, you will need it). after the pinion is removed, pull out the magnets & all the wheels & gears if you haven't already. remove the bronze bushing that the armature shaft goes through. All that's left is a bare power torque frame. I use a 9/32 drill bit to enlarge the hole the bushing came out of.
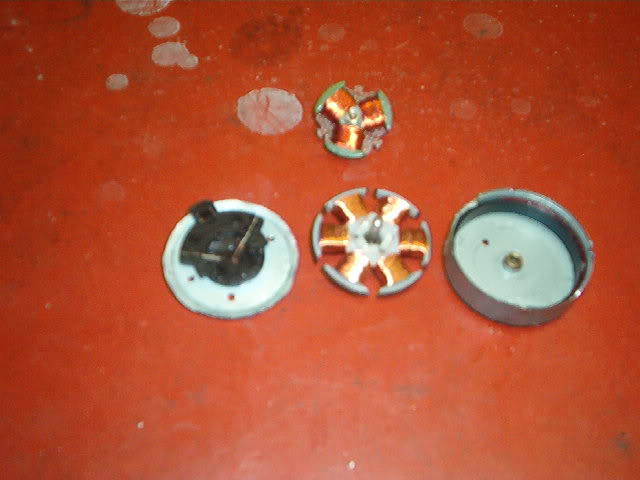
Then get out your dremmel, or die grinder or whatever you use & start making room for the larger ps2 motor. Notice in the picture I didn't try to make everything level, I just knocked out the high spots, & enlarged the opening for the new motor to fit in.
Check it to make sure the motor fits. I try to make it a little bigger than the motor, about .020" on each side is plenty. I do this so I can set the pinion tight up against the big ring gear. you need some room to play around.

after you get that fitting good, take the pinion gear & hand drill it. i use a pin vise & a 1.8mm bit. start on one side & go about half way through, the start on the other side & finish it all the way through. sorry no picture, i forgot i was doing a tutorial. see if it will fit the shaft. if it's a little small, go through the pinion gear with a 2mm bit, but no bigger.
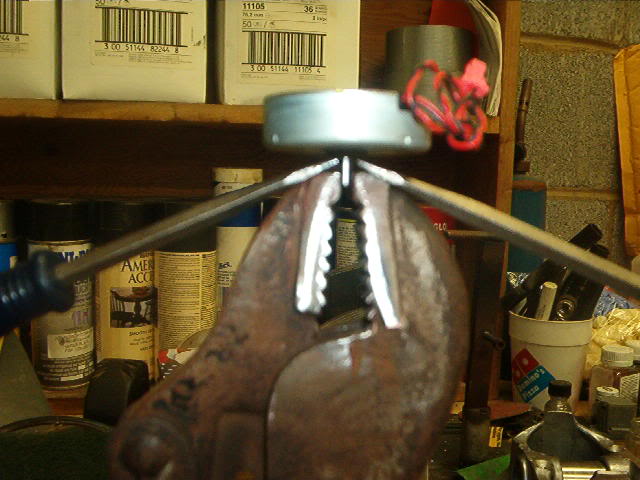
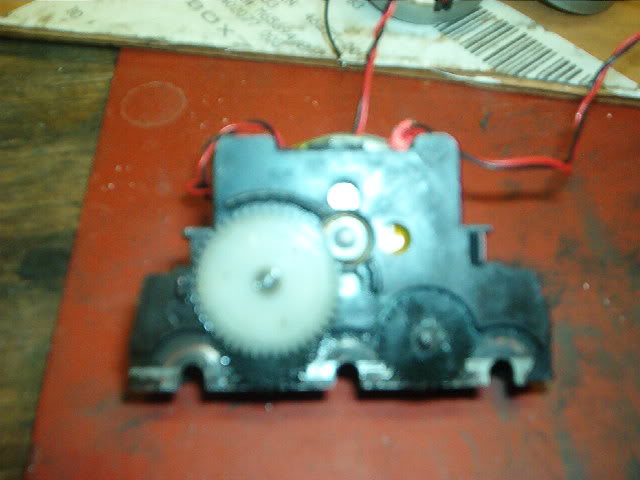
get a pair of vice grip pliers, & two small screw drivers. You can pry the shaft out of the new motor to help it reach the ring gear. I think I pulled mine out about .080" more than it was. if you do it like in the picture you shouldn't screw anything up.
before you install everything, take a little super glue & go around the bushing on the new motor. your gluing the bushing to the motor. do not get any glue on the shaft & the bushing. it's a PITA to get unstuck. ask me how i know.
get your plastic gears cleaned up, & grease them up & install them back on the power torque frame. now put the motor in, & install the pinion gear on the shaft. the round flat part goes out. mesh it up with the teeth on the ring gear. i push the pinion down to where the flat part of the pinion gear is about .010"-.015" from the teeth on the ring gear. if you don't have enough shaft sticking out for the pinion to go all the way down on, repeat the vise grips & screw driver trick until you do. after you have the pinion on the shaft where you want it, super glue the pinion to the shaft & let it dry. after it's dry your ready to glue in the motor for good. i use permatex yellow weather stripping glue. you can get it at auto zone. i put the glue in the PT frame & slide in the motor. then make sure the pinion is meshed up with the ring gear. i just push them together, & let them start to dry, then i spin the ring gear with my finger nail just so i know it will turn. i test it to make sure everything is going to work before i let it dry.
the first time you test it you might have to spin it with your finger nail. after you get it running good & smooth your done with the hard part. i take a 1.8mm drill bit & drill a small hole on the rear top of the PT frame. then tap it with a 2-56 tap. using the lower brush plate brush retainer plate, i screw it down into the hole i just drilled & tapped. this is where the red wire from the motor will solder to.
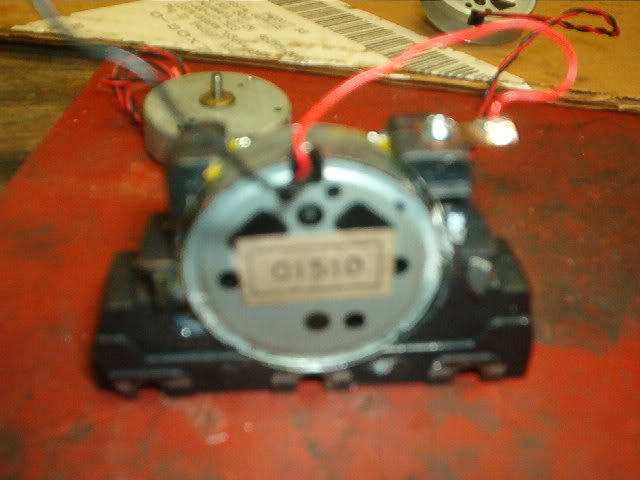
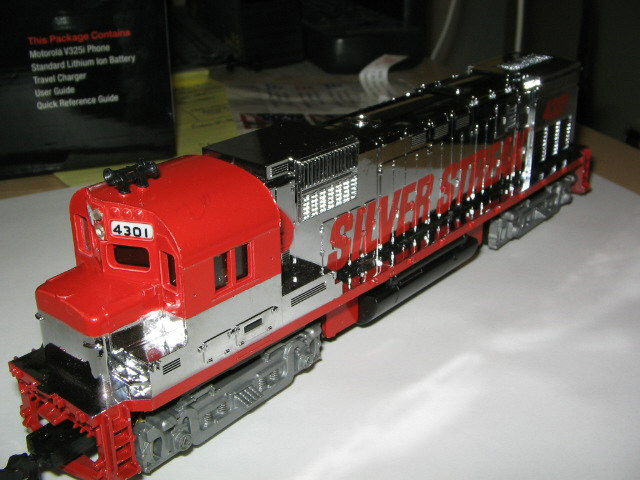
if you use it in a 630 you have to put the bolster on first before you solder it. if you using it in a 630 you modify the bolster a little. all you do is cut out the top center where the spring rides. you have to do this for clearance of the motor & bolster. i run the wires the the hole in the bolster. it keeps them out of the way. after you have the clearance needed (it will turn freely side to side), you can finish hooking up the wires, putting the trucks back on with the wheels, & install it back in the engine & run the heck out of it.
jerry
Edited by - smokie on October 31 2009 7:24:03 PM
|
Country:  USA ~
Posts: 553 ~
Member Since: January 14 2009 ~
Last Visit: September 13 2024 USA ~
Posts: 553 ~
Member Since: January 14 2009 ~
Last Visit: September 13 2024
|
 Alert Moderator
|
|
|
|
Posted - October 30 2009 : 06:53:27 AM
|
Great how to Smokie--to get a clearer photo on close ups- use the Macro setting on your camera - the symbol is a flower on your camera press it before shooting. press it before shooting.
|
|
Country: USA ~
Posts: 2507 ~
Member Since: January 31 2006 ~
Last Visit: October 21 2017
|
Alert Moderator

|
|
|
|
Posted - October 30 2009 : 10:54:51 AM
|
my camera is an older POS. it doesn't have the bells & whistles like the newer one do. it takes great pictures as long as their not close ups.
jerry
|
|
Country: USA ~
Posts: 553 ~
Member Since: January 14 2009 ~
Last Visit: September 13 2024
|
Alert Moderator
|
|
|
|
Posted - October 30 2009 : 11:42:48 AM
|
Great How to Article.
What I really like is it shows how to do it without fancy equipment.
I use a lathe to cut out the motor cavity but it isn't necessary.
Great job.
Ray
|
|
Country: USA ~
Posts: 1285 ~
Member Since: December 14 2005 ~
Last Visit: May 16 2019
|
Alert Moderator
|
|
|
|
Posted - October 31 2009 : 05:43:06 AM
|
Nice how-to, Smokie. 
Ray, I was lamenting not having a lathe or a milling machine, but I was really surprised at how efficient these steel cutters work on Zamac. I originally tried stones, but they barely make a dent and load up quickly.
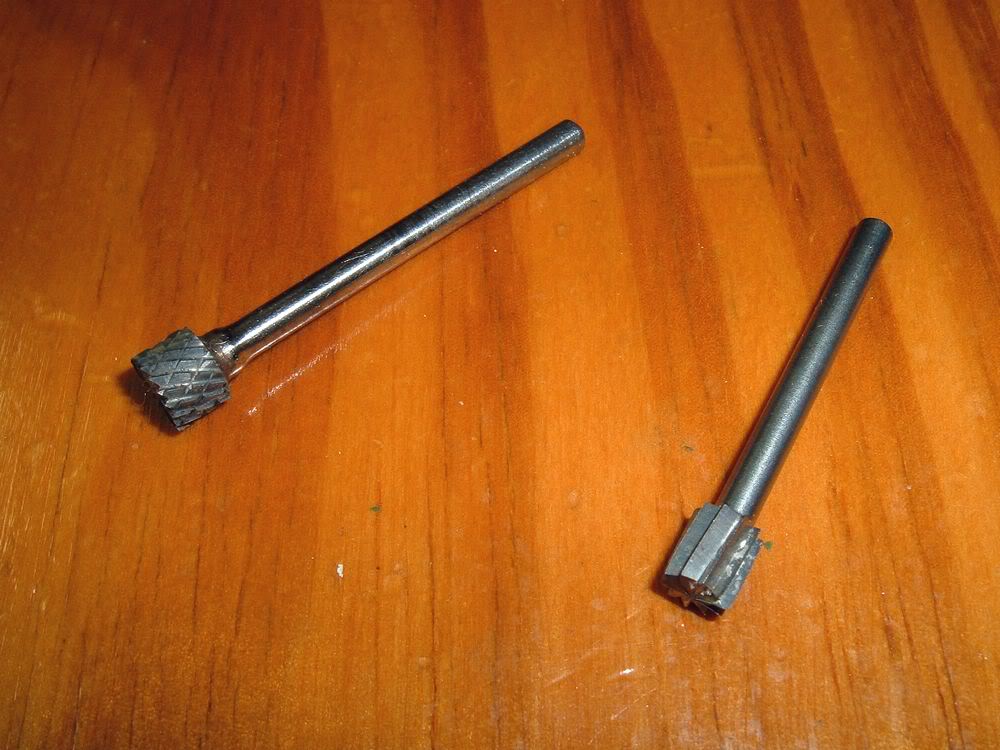
The one on the right is a commonly available cylindrical Dremel cutter, is quite coarse, and better for removing large amounts of metal very quickly. I have no idea who made the cutter on the left, but it's pretty much the perfect bur, working equally well on metal, resin, or plastic. It's finer, so it's much less likely to catch the material. I wish I knew here to get more, but it came in an old tool junk box from a yard sale, and I haven't found any others like it.
The Tyco Depot
Edited by - NickelPlate759 on October 31 2009 07:16:25 AM
|
|
Country: USA ~
Posts: 3927 ~
Member Since: June 20 2007 ~
Last Visit: November 19 2015
|
Alert Moderator
|
|
|
|
Posted - October 31 2009 : 1:26:14 PM
|
i use air tools myself. i use a 1/4" angle die grinder with a carbide cutter thats about .500" wide & about a 1.5" long, not counting the shank. it makes very quick work of removing metal. the sanding rolles for the dremmel tools work great for this too. the power torque frames are made of pretty soft metal.
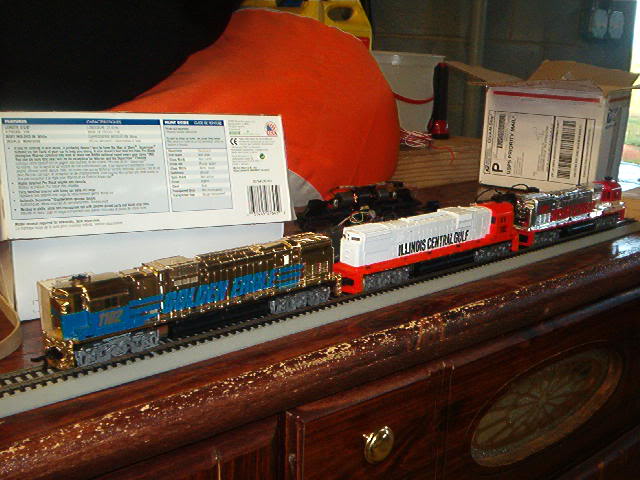
the only problem i had was figuring out the directional lighting that the engine i put this motor into has. i had to change the factory wiring on the lights to get them to work directionaly. the good news it most all tyco engines only have one light. i have two golden eagles, one with directional lighting, & one with only a front light.
i just bought 7 more of these little motors for $35.00 shipped. they don't have the wires comming from the top of the motors like the first bunch i bought. i had to solder little wires onto them. everything else is the same.
jerry
|
|
Country: USA ~
Posts: 553 ~
Member Since: January 14 2009 ~
Last Visit: September 13 2024
|
Alert Moderator
|
|
|
|
Posted - October 31 2009 : 8:17:00 PM
|
The fine cutter is 1/4" dia., and was perfect for making a countersink for the new motor bearing.
All they use for directional headlights is a diode in series with the bulb. If the bulb lights when going the wrong direction, flip the diode around.
The Tyco Depot
|
|
Country: USA ~
Posts: 3927 ~
Member Since: June 20 2007 ~
Last Visit: November 19 2015
|
Alert Moderator
|
|
|
|
Posted - November 01 2009 : 09:52:57 AM
|
i had to rewire the directional lighting because it wouldn't run the way tyco had it wired. it ran with the power torque, but wouldn't with the new motor. it was an easy fix, i just had to use the power of my mighty brain. lmao
jerry
|
|
Country: USA ~
Posts: 553 ~
Member Since: January 14 2009 ~
Last Visit: September 13 2024
|
Alert Moderator
|
|
|
|
Posted - November 14 2009 : 10:24:31 PM
|
| This has been very helpful. I'm about 3/4 through this project. The only bad thing is that I messed up my motor. It didn't have any leads attached to it and....long story short it doesn't run anymore. But no big deal. I can get another. Thanks for the demo!
|
|
Country: USA ~
Posts: 1166 ~
Member Since: October 18 2009 ~
Last Visit: December 23 2018
|
Alert Moderator
|
|
|
|
Posted - November 15 2009 : 09:58:14 AM
|
i bought 7 more motors a few weeks ago & they were a little different the the others ive been using. they are the same size & all, but doesn't have the wires on top, their on the back of the motor. no big deal, just have to solder on a couple wires. this is the thrird type of motor i've seen used in the ps2. the one with the wires on it from the factory are the easiest of the three to work with just because it has wires already on it.
i've done 6 so fare & they've all turned out great. it's best to test it before the glue you used to hold the motor in dries. i've had a couple that made a little noise on the test run, all i had to do was adjust the pinion depth, or the pinion to ring gear clearance.
jerry
|
|
Country: USA ~
Posts: 553 ~
Member Since: January 14 2009 ~
Last Visit: September 13 2024
|
Alert Moderator
|
|
|
|
Posted - November 16 2009 : 8:37:42 PM
|
Success! I repowered a Santa Fe GP20 with a motor from a CD-ROM drive. I did have a couple issues, though. I think the motors I salvaged are bigger than the PS2 ones. They're a little thick. It's not a big deal, but it was bumping the shell when the front truck turned. I had to shave a little off the inside of the shell to make the truck turn freely. It wouldn't have been a big deal, but I had the bright idea to use a dremel sanding drum. Now I have a small hole melted in the shell.  Fortunately, it's barely visible. I finished the job with an x-acto knife. Fortunately, it's barely visible. I finished the job with an x-acto knife.
Despite that, the result is great. It's a smooth, steady runner, especially at slow speed. I don't have to turn the throttle up much, either. Pulling power seemed fine. I didn't give it a real "test" but it was able to pull a string of 8 cars that was already on the track.
Thanks again, smokie for this great tutorial. I'll never pass up a "junk" powertorque again!
|
|
Country: USA ~
Posts: 1166 ~
Member Since: October 18 2009 ~
Last Visit: December 23 2018
|
Alert Moderator
|
|
|
|
Posted - November 16 2009 : 10:13:15 PM
|
well i'm glad i could help. every time you do one it will just get easier.
jerry
|
|
Country: USA ~
Posts: 553 ~
Member Since: January 14 2009 ~
Last Visit: September 13 2024
|
Alert Moderator
|
|
|
|
Posted - November 16 2009 : 11:21:34 PM
|
That's my thought exactly. I learned a lot from this. The other thing I forgot to mention is how I cut out the frame. I started with a dremel cut-off wheel. Then, I used a bit that looks similar to the ones pictured above...except I think it was meant for wood. I decided to sacrifice it to see what happened. It worked, but not great. Next time I'm in town I'll pick up some better dremel bits.
By the way...where do you get your motors? They seem a little slimmer than mine.
|
|
Country: USA ~
Posts: 1166 ~
Member Since: October 18 2009 ~
Last Visit: December 23 2018
|
Alert Moderator
|
|
|
|
Posted - November 16 2009 : 11:43:48 PM
|
i look online for playstation repair shops, & then just start asking if they have 6-7 they would sell (motors that is).
jerry
|
|
Country: USA ~
Posts: 553 ~
Member Since: January 14 2009 ~
Last Visit: September 13 2024
|
Alert Moderator
|
|
|
|
Posted - November 19 2009 : 9:03:08 PM
|
I did my second re-motor tonight. This time it was the BN Sharknose that I had to fix the gears on. It went much, much smoother than the first time. It seems to run well, but it is a little noisy. I think it's because of the trouble I had with the gears.
I want to add for anyone who's considering this: I used a dremel sanding drum this time, and it worked great. I also used a cut-off wheel. The cut off wheel was used to open up the top of the frame. The coarse sanding drum quickly removed material from the bottom of it.
The only other thing I had to do was modify the...uh...someone will give me the correct name....the bracket that the PT truck snaps into. I had to shave it down a little to accomodate the thicker motors I am using.
Edited by - burlington77 on November 19 2009 10:47:03 PM
|
|
Country: USA ~
Posts: 1166 ~
Member Since: October 18 2009 ~
Last Visit: December 23 2018
|
Alert Moderator
|
|
|
|
Posted - December 12 2009 : 3:20:32 PM
|
just a follow up. with the tyco power pack these repowered pt drives have no slow speed performance. this is because the tyco power packs suck! however, i bought a mrc tech 4 200 transformer & tried one with it & it has awesome slow speed capabilities. i would guess it can do about 1-2 scale mph. any slower & it begins cogging. the good thing is the mrc 200 transformers can be gotten for around $20.00 on ebay (if you keep your eye out for the bargains. i bought mine for $9.00 plus shipping & it was new.
i've been running a few of the first one's i converted to the ps2 tray motors about one hour everyday, pulling around 15 cars on average & haven't had a failer yet.
jerry
|
|
Country: USA ~
Posts: 553 ~
Member Since: January 14 2009 ~
Last Visit: September 13 2024
|
Alert Moderator
|
|
|
|
Posted - September 06 2010 : 8:51:11 PM
|
This is a great idea, I would love to see a video like Bryan does. His tutorials are great!!
I'm seriously considering repowering all three of my Alcos after seeing this article.
Cheers, Ian
|
|
Country: USA ~
Posts: 87 ~
Member Since: September 05 2010 ~
Last Visit: September 26 2012
|
Alert Moderator
|
|
|
|
Posted - September 06 2010 : 10:47:19 PM


|
quote:i look online for playstation repair shops, & then just start asking if they have (motors that is).
Originally posted by smokie - November 16 2009 : 11:43:48 PM
|
So, the Playstation 2's use tapes of some kind? I'm not familiar with them, not being a video-holic ( of home-type sets , just familiar with commercial arcades ). So what exactly DOES the motor do in a play-station? I thought it was all digital Enquiring mind wants to know....
Jerry
" When life throws you bananas...it's easy to slip up"
|
|
Country: USA ~
Posts: 3974 ~
Member Since: January 04 2009 ~
Last Visit: January 11 2019
|
Alert Moderator
|
|
|
|
Posted - September 06 2010 : 11:15:31 PM

|
quote:| So, the Playstation 2's use tapes of some kind? I'm not familiar with them, not being a video-holic ( of home-type sets , just familiar with commercial arcades ). So what exactly DOES the motor do in a play-station? I thought it was all digital Enquiring mind wants to know.... |
They use discs which are the same size and shape as a computer or music CD. The motor would be like the ones used in a CD player.
|
Country:  Canada ~
Posts: 3448 ~
Member Since: September 22 2006 ~
Last Visit: April 03 2026 Canada ~
Posts: 3448 ~
Member Since: September 22 2006 ~
Last Visit: April 03 2026
|
Alert Moderator
|
|
|
|
Posted - September 07 2010 : 12:12:26 AM
|
| well I does have a source for CD motors
|
|
Country: USA ~
Posts: 15032 ~
Member Since: February 23 2009 ~
Last Visit: July 11 2026
|
Alert Moderator
|
|
|
|
Posted - September 07 2010 : 03:26:22 AM
|
quote:well I does have a source for CD motors
Originally posted by microbusss - September 07 2010 : 12:12:26 AM
|
See If you can get the RF-400CA.
It is a narrow motor and can be used for the 3 axle truck.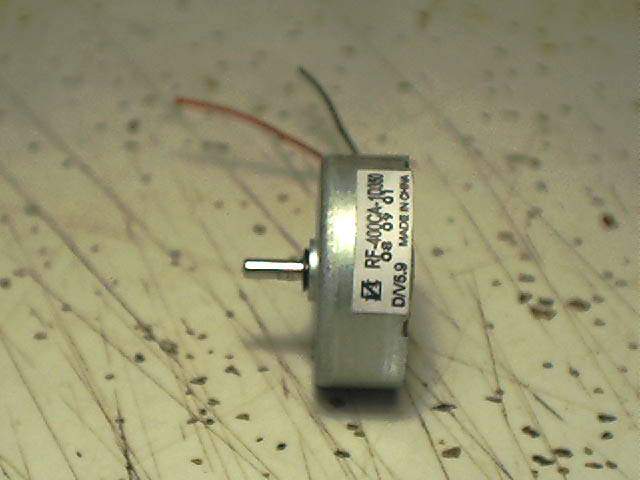
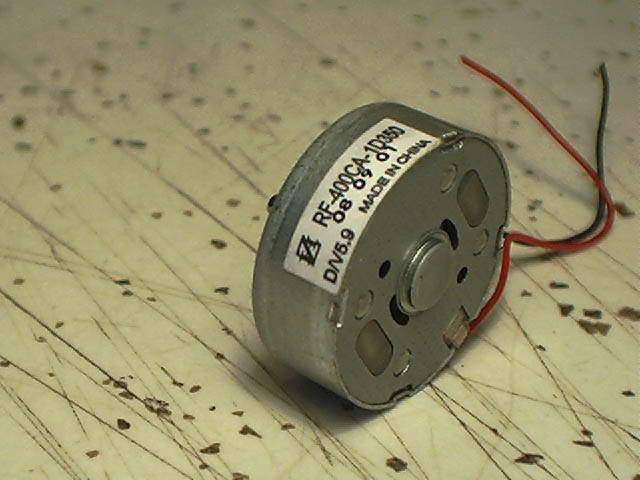
Ray
|
|
Country: USA ~
Posts: 1285 ~
Member Since: December 14 2005 ~
Last Visit: May 16 2019
|
Alert Moderator
|
|