|
|
 Posted - September 22 2016 : 4:53:10 PM Posted - September 22 2016 : 4:53:10 PM


|
It's not as bad as it sounds. This is the story of a scenic accessory. You see, I've modeled a factory on my layout and it receives coal in gondolas. The coal is hand shoveled over the sides into a pile alongside the tracks. People think that health club benefits are a recent progressive trend among employers, but my little postwar era HO people get paid for weight lifting.
So there's a pile of coal by the tracks and a coal bin hatch by the factory building, but how does the coal get from one to the other?
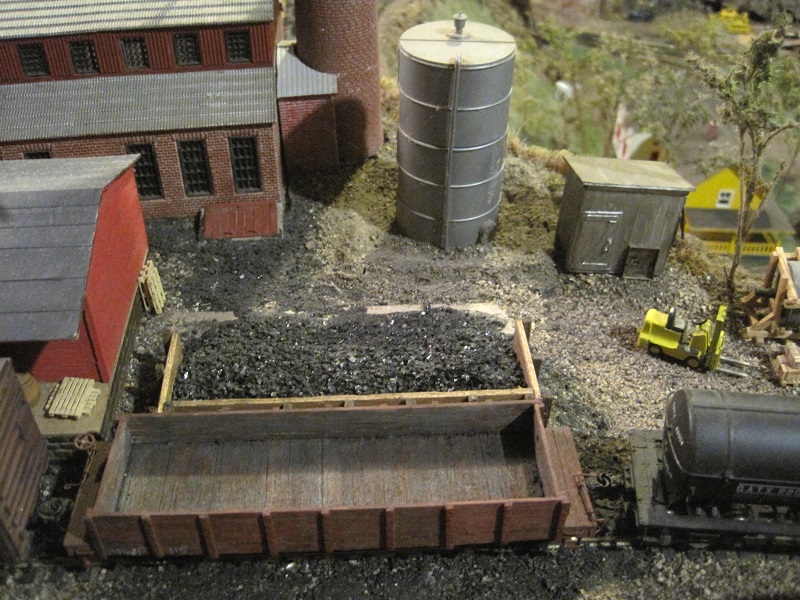
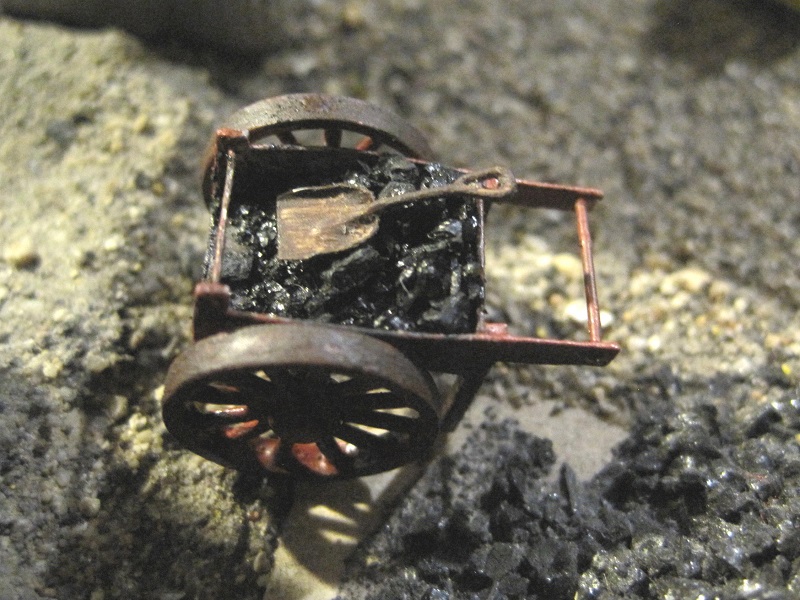
I've been pondering this question long enough for the fire to have gone out years ago. Finally, I came upon this hand cart at Monticello Railway Museum in Moticello, IL:
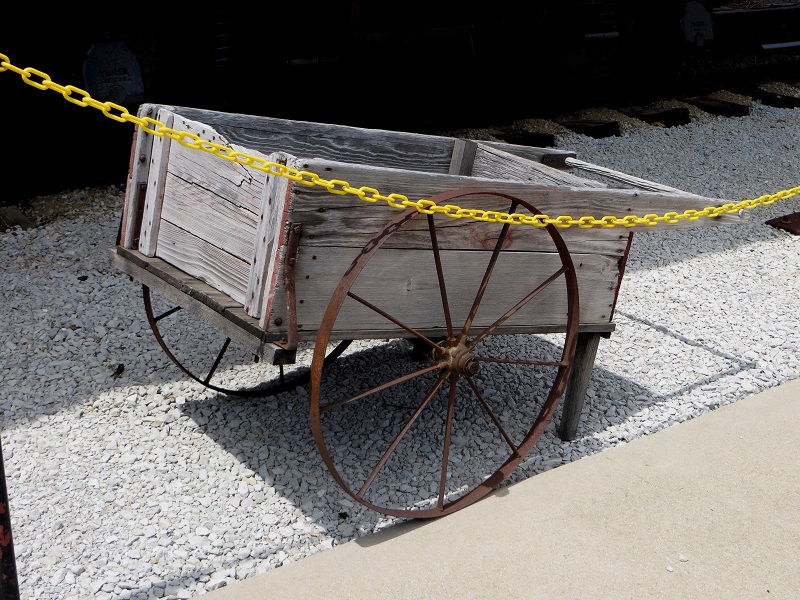
Years ago, I picked up some die cast spoked wheels at a swap meet. They're bigger, to scale, than the ones on the Monticello hand cart, but that's so much the better for bumping along over coal dust. I made up this cart, on the same basic principle but with some changes to adapt to the huge wheels:

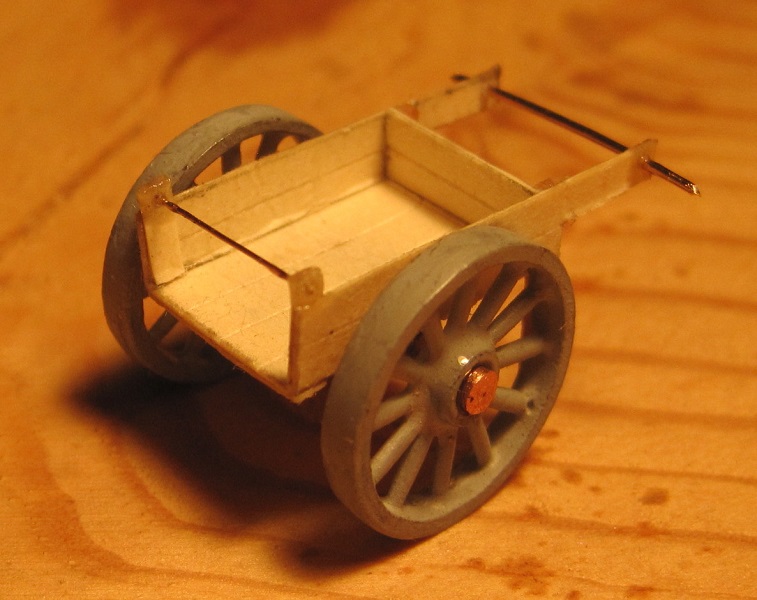
The axle is a piece of copper wire to fit the hubs on the wheels. It's soldered to a flat piece of brass to increase gluing surface and epoxied to the wheels and the underside of the box.
The box is folded together from file folder card board to approximate the thickness of 1" planks. The vertical boards that serve as legs behind the wheels are thin boards cut from a piece of basswood about 3 scale inches thick.
The handle is .020" wire. The tie wire holding the front of the box in shape is .010" wire. The wire is epoxied into holes drilled into the cardboard.
The whole thing was primed with solvent-based paint. This makes for a consistent color under the finish coat and strengthens and stiffens the cardboard. Here's the cart primed:
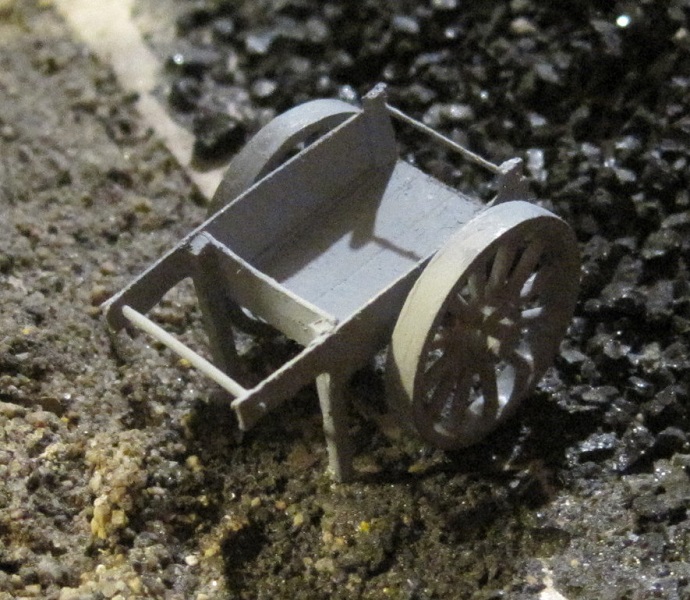
Finally, the cart was painted Zinc Chromate color to look like red lead paint, the all-purpose paint of the early 20th century. The wheel treads and the tie wire were painted burnt umber to look like old rust.
The cart had a tendency to rock over forward. Most weight was to the back, but the height of the thing made it unstable, so I knocked a chip off of a taconite pellet and glued it in back of the cart for weight. Then, I glued in a load of coal to finish off the model. Here it is by the coal pile:
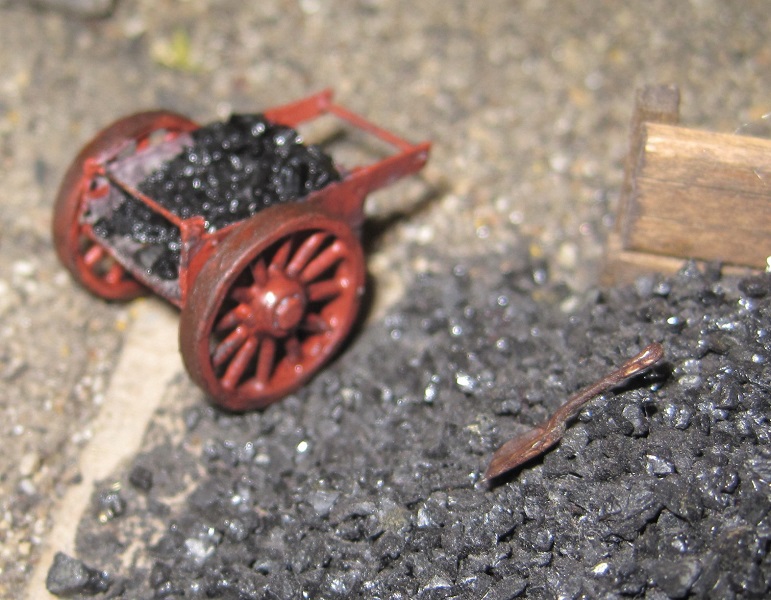
Carpe Manana!
|
Country:  USA ~
Posts: 2418 ~
Member Since: September 17 2013 ~
Last Visit: July 09 2026 USA ~
Posts: 2418 ~
Member Since: September 17 2013 ~
Last Visit: July 09 2026
|
 Alert Moderator
|
|
|
|
Posted - September 22 2016 : 5:25:52 PM
|
I love it!!!
Sean
"If everything seems under control, you're not going fast enough!" - Mario Andretti!
|
|
Country: USA ~
Posts: 1729 ~
Member Since: June 15 2011 ~
Last Visit: June 26 2021
|
Alert Moderator

|
|
|
|
Posted - September 22 2016 : 5:31:50 PM
|
Very nice.
|
Country:  Canada ~
Posts: 265 ~
Member Since: March 07 2014 ~
Last Visit: June 26 2018 Canada ~
Posts: 265 ~
Member Since: March 07 2014 ~
Last Visit: June 26 2018
|
Alert Moderator
|
|
|
|
Posted - September 22 2016 : 7:11:56 PM
|
nice job
Modeling on the cheap
|
|
Country: USA ~
Posts: 137 ~
Member Since: December 08 2015 ~
Last Visit: June 26 2017
|
Alert Moderator
|
|
|
|
Posted - September 22 2016 : 10:09:56 PM
|
Thanks, guys, for the kind words.
Carpe Manana!
|
|
Country: USA ~
Posts: 2418 ~
Member Since: September 17 2013 ~
Last Visit: July 09 2026
|
Alert Moderator
|
|
|
|
Posted - September 24 2016 : 10:39:54 AM
|
Hi scsshaggy,
Great looking work, I'm always happy to see people scratch building things in this day and age, it's almost a lost art!
I think the wheels you chose to use look better for your coal cart than exact replicas of the prototype. Coal is heavy and the wheels on the prototype look too flimsy for such heavy loads.
Scott
Proudly keeping Tyco Pluggers out of landfills since 2016
|
|
Country: USA ~
Posts: 821 ~
Member Since: December 26 2009 ~
Last Visit: July 08 2026
|
Alert Moderator
|
|
|
|
Posted - September 24 2016 : 3:13:32 PM
|
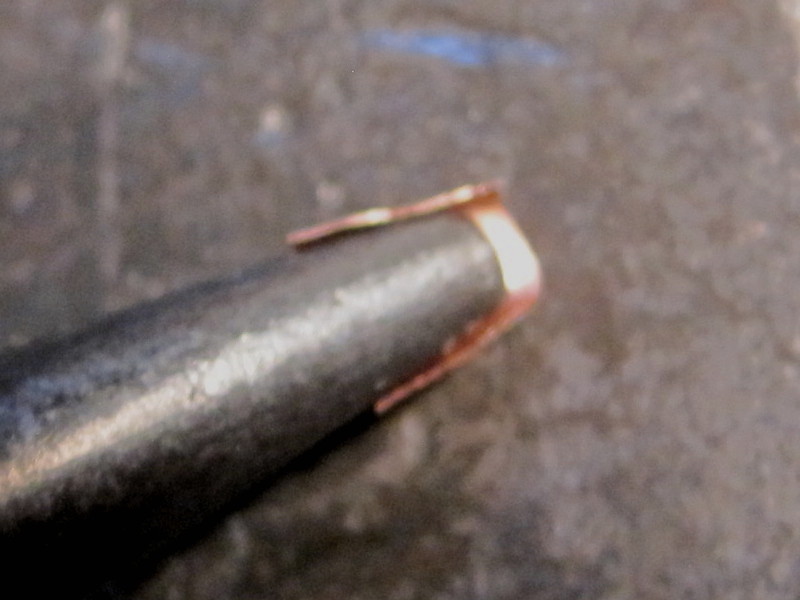
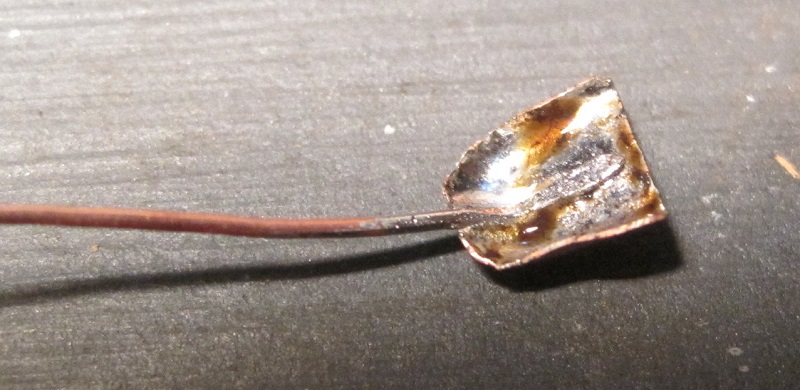
The question arises: How does the coal get into the cart? The natural answer is a scoop shovel. Does one pore over catalogs of detail parts looking for one to buy? Not if he once picked up a big sheet of thin copper, really cheap.
The first step in making the HO scoop shovel is to pick out a pair of needle nose pliers with a nose the size of an HO scoop shovel and trace around it on the copper, leaving some for the rim around the scoop:

Then, you roll the edges up around the jaws of the pliers to make the rim:
At first, the rim will look pretty crude, but it can be shaped a little more smoothly with a smaller pliers and filed to a smoother, nicer edge:
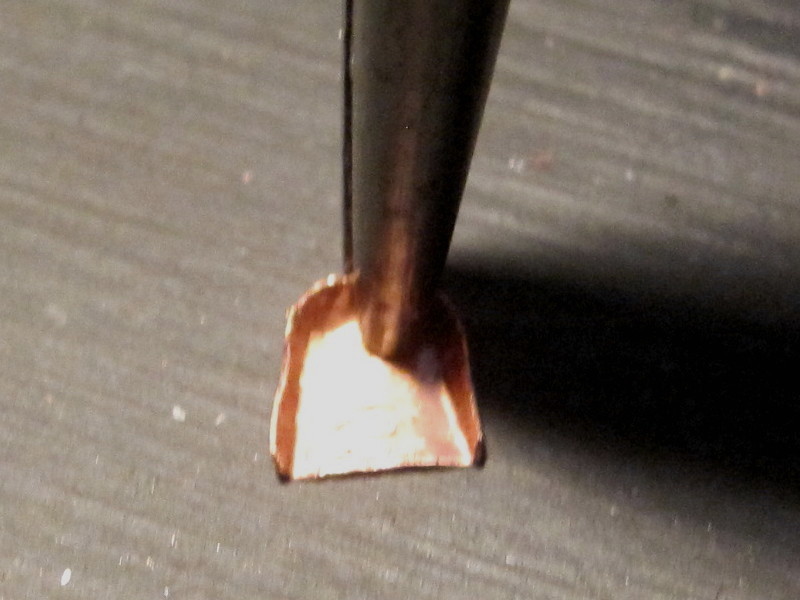
The handle is telephone wire, hammered flat on the end and filed to the proper width. It and the scoop are tinned with solder:
The handle is soldered into the scoop:
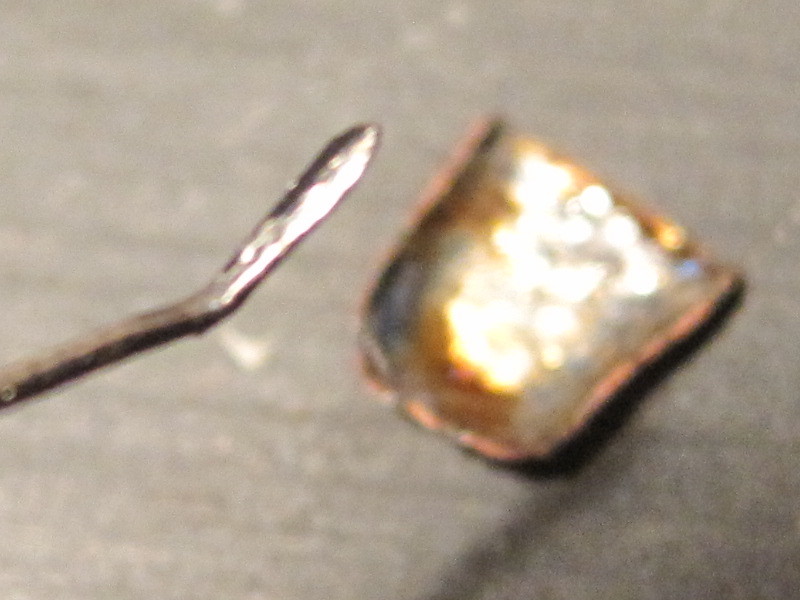
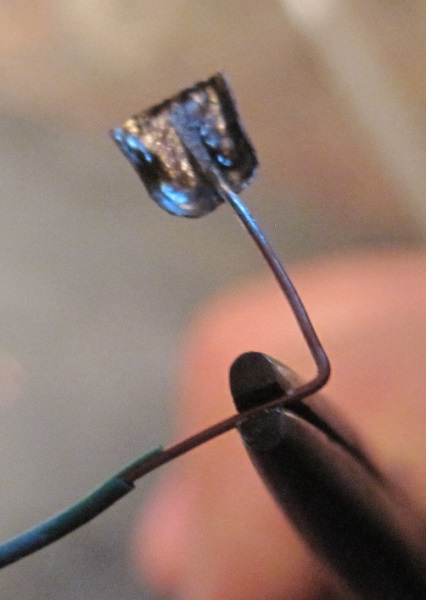
If it's to be a "D" handled shovel, the handle can be bent into shape:
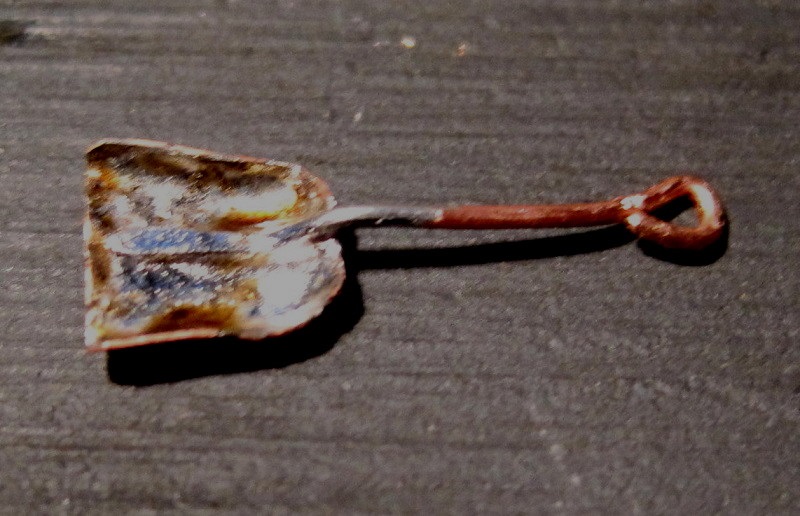
Here, the shovel is finished, but not yet painted:
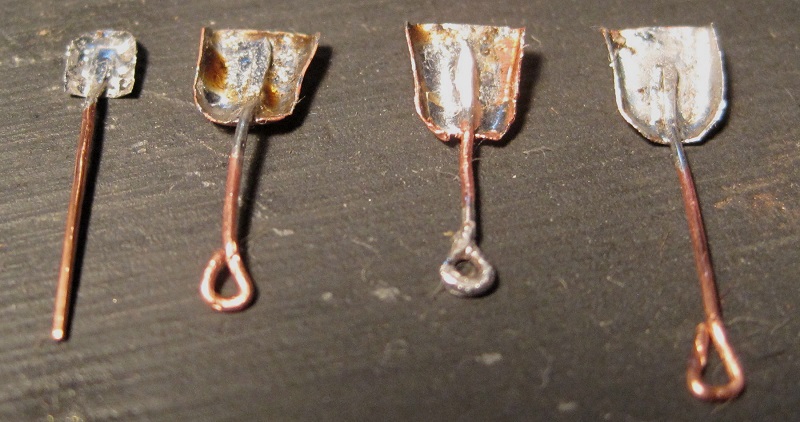
Of course, once you're set up to make shovels, it's best to make all you foresee wanting. Here are two short handled scoops, one long handled scoop and a spade:
Next, the shovels are primed:
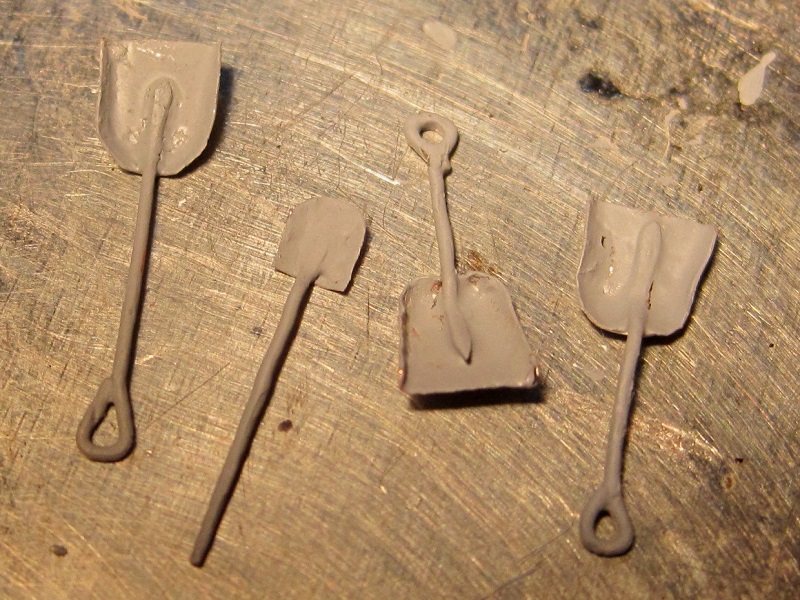
Finally, the shovel is painted. This one is painted to be an old shovel with lots of grime and rust:

The shovel sits on the cart full of coal:
Carpe Manana!
Edited by - scsshaggy on September 24 2016 3:15:43 PM
|
|
Country: USA ~
Posts: 2418 ~
Member Since: September 17 2013 ~
Last Visit: July 09 2026
|
Alert Moderator
|
|
|
|
Posted - September 24 2016 : 11:44:55 PM
|
Some sweet little labours of love.
Not what we usually see here.
Thanks for sharing these beauties.
Evan
|
|
Country: Canada ~
Posts: 505 ~
Member Since: August 09 2014 ~
Last Visit: June 01 2026
|
Alert Moderator
|
|
|
|
Posted - September 25 2016 : 10:31:38 AM
|
| Fun to watch this project come along Don.
|
|
Country: USA ~
Posts: 2087 ~
Member Since: March 16 2013 ~
Last Visit: July 05 2018
|
Alert Moderator
|
|