|
|
 Posted - March 25 2015 : 01:40:33 AM Posted - March 25 2015 : 01:40:33 AM


|
Ok. So far this is where I'm at on the set I found last year.
The locomotives:
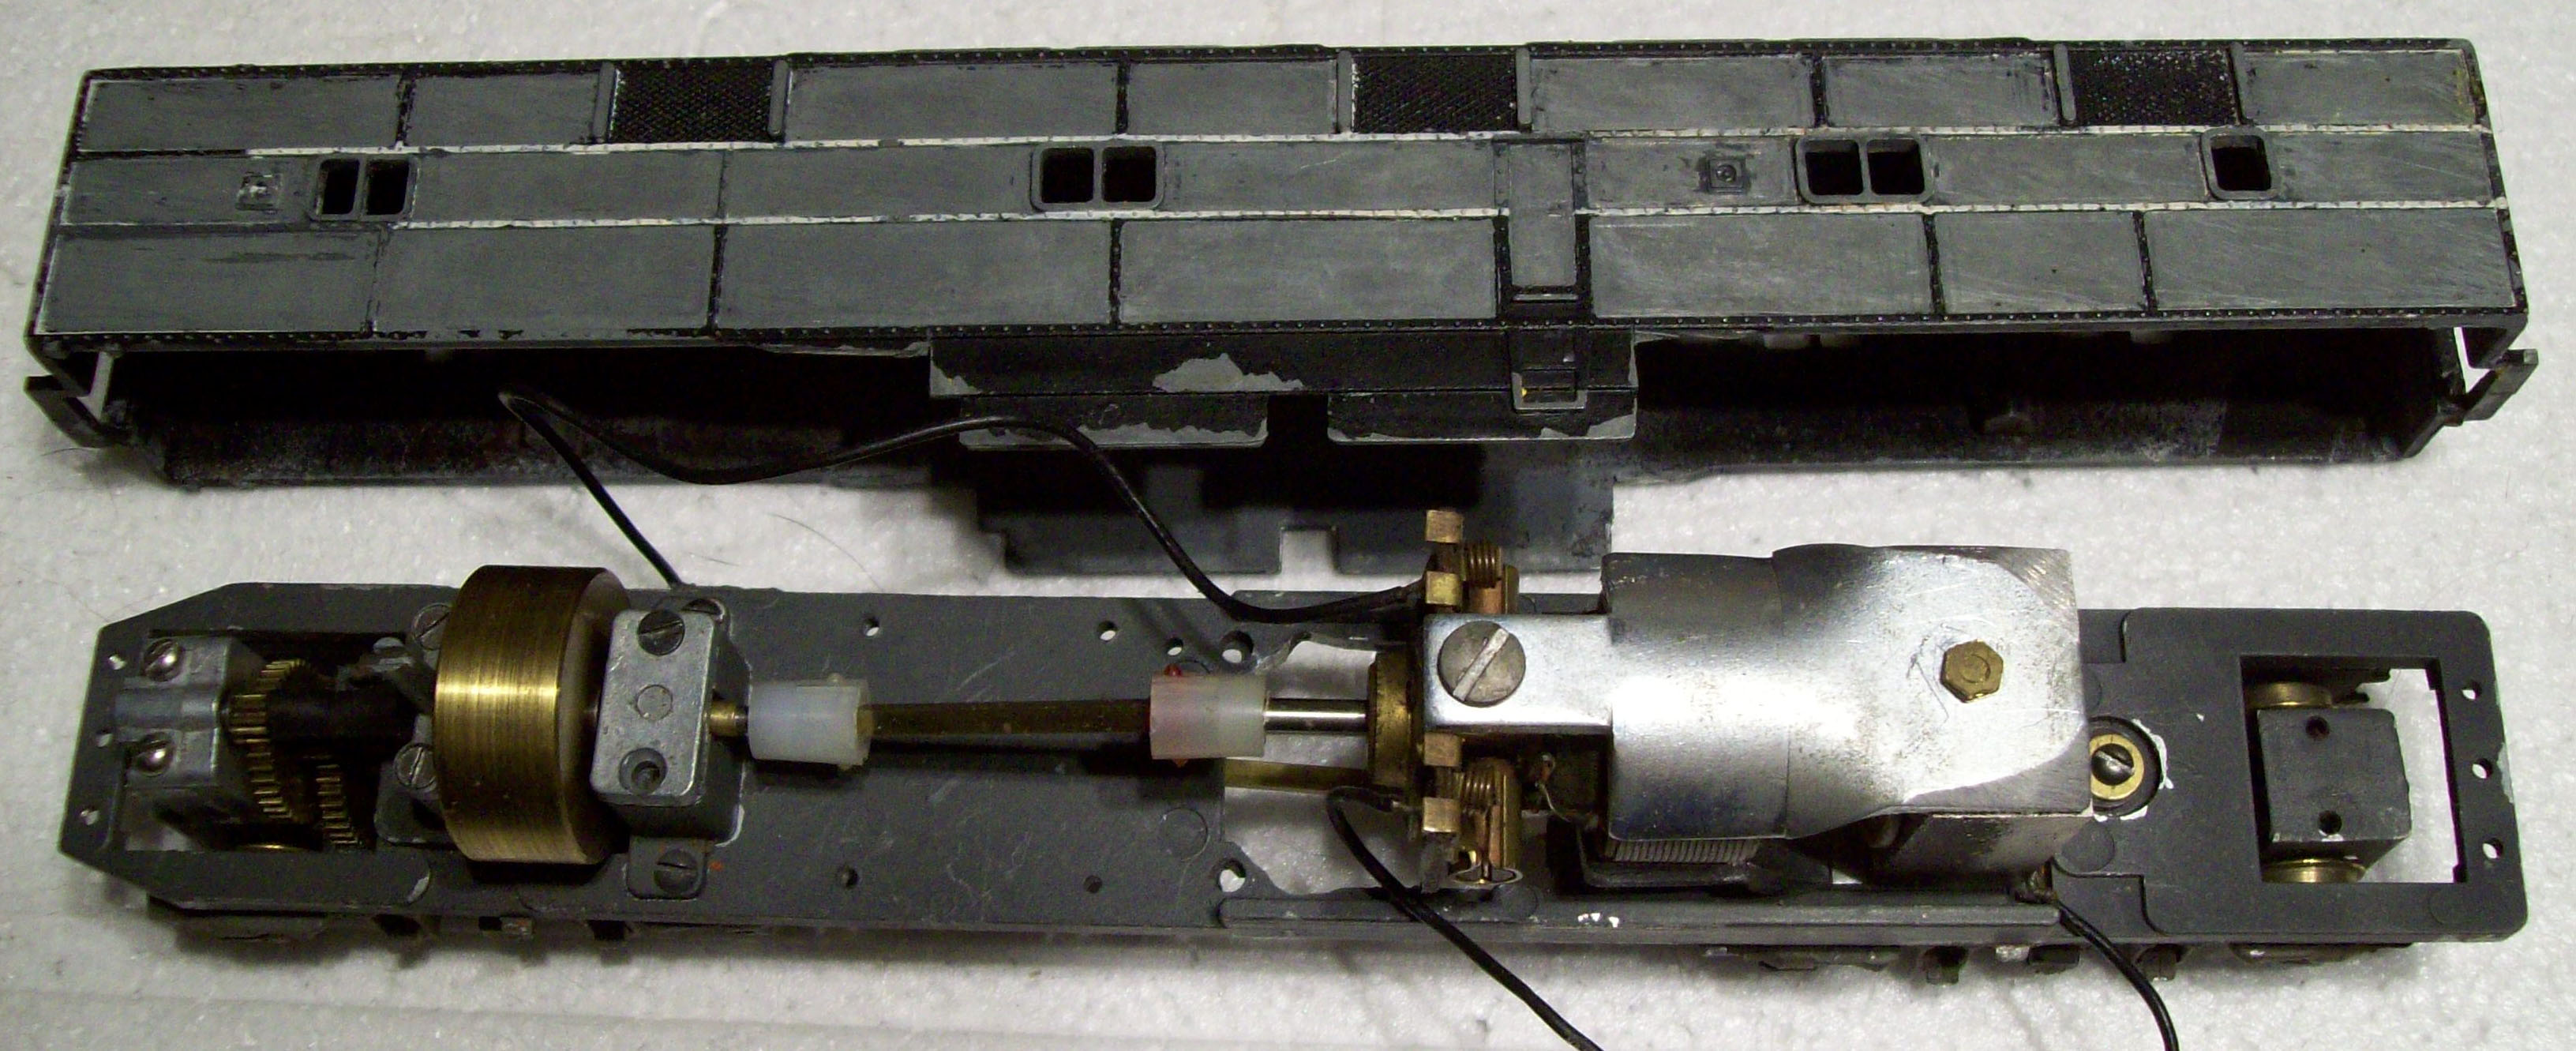
1. I've obtained frames and drives for both the A nd B units. I'm going to retune the drive units
as Darth Sante Fe did with his Alco PA-1 (thank you for the tips Darth).
2. Both have been stripped and are ready for the primer and paint.
The cars:
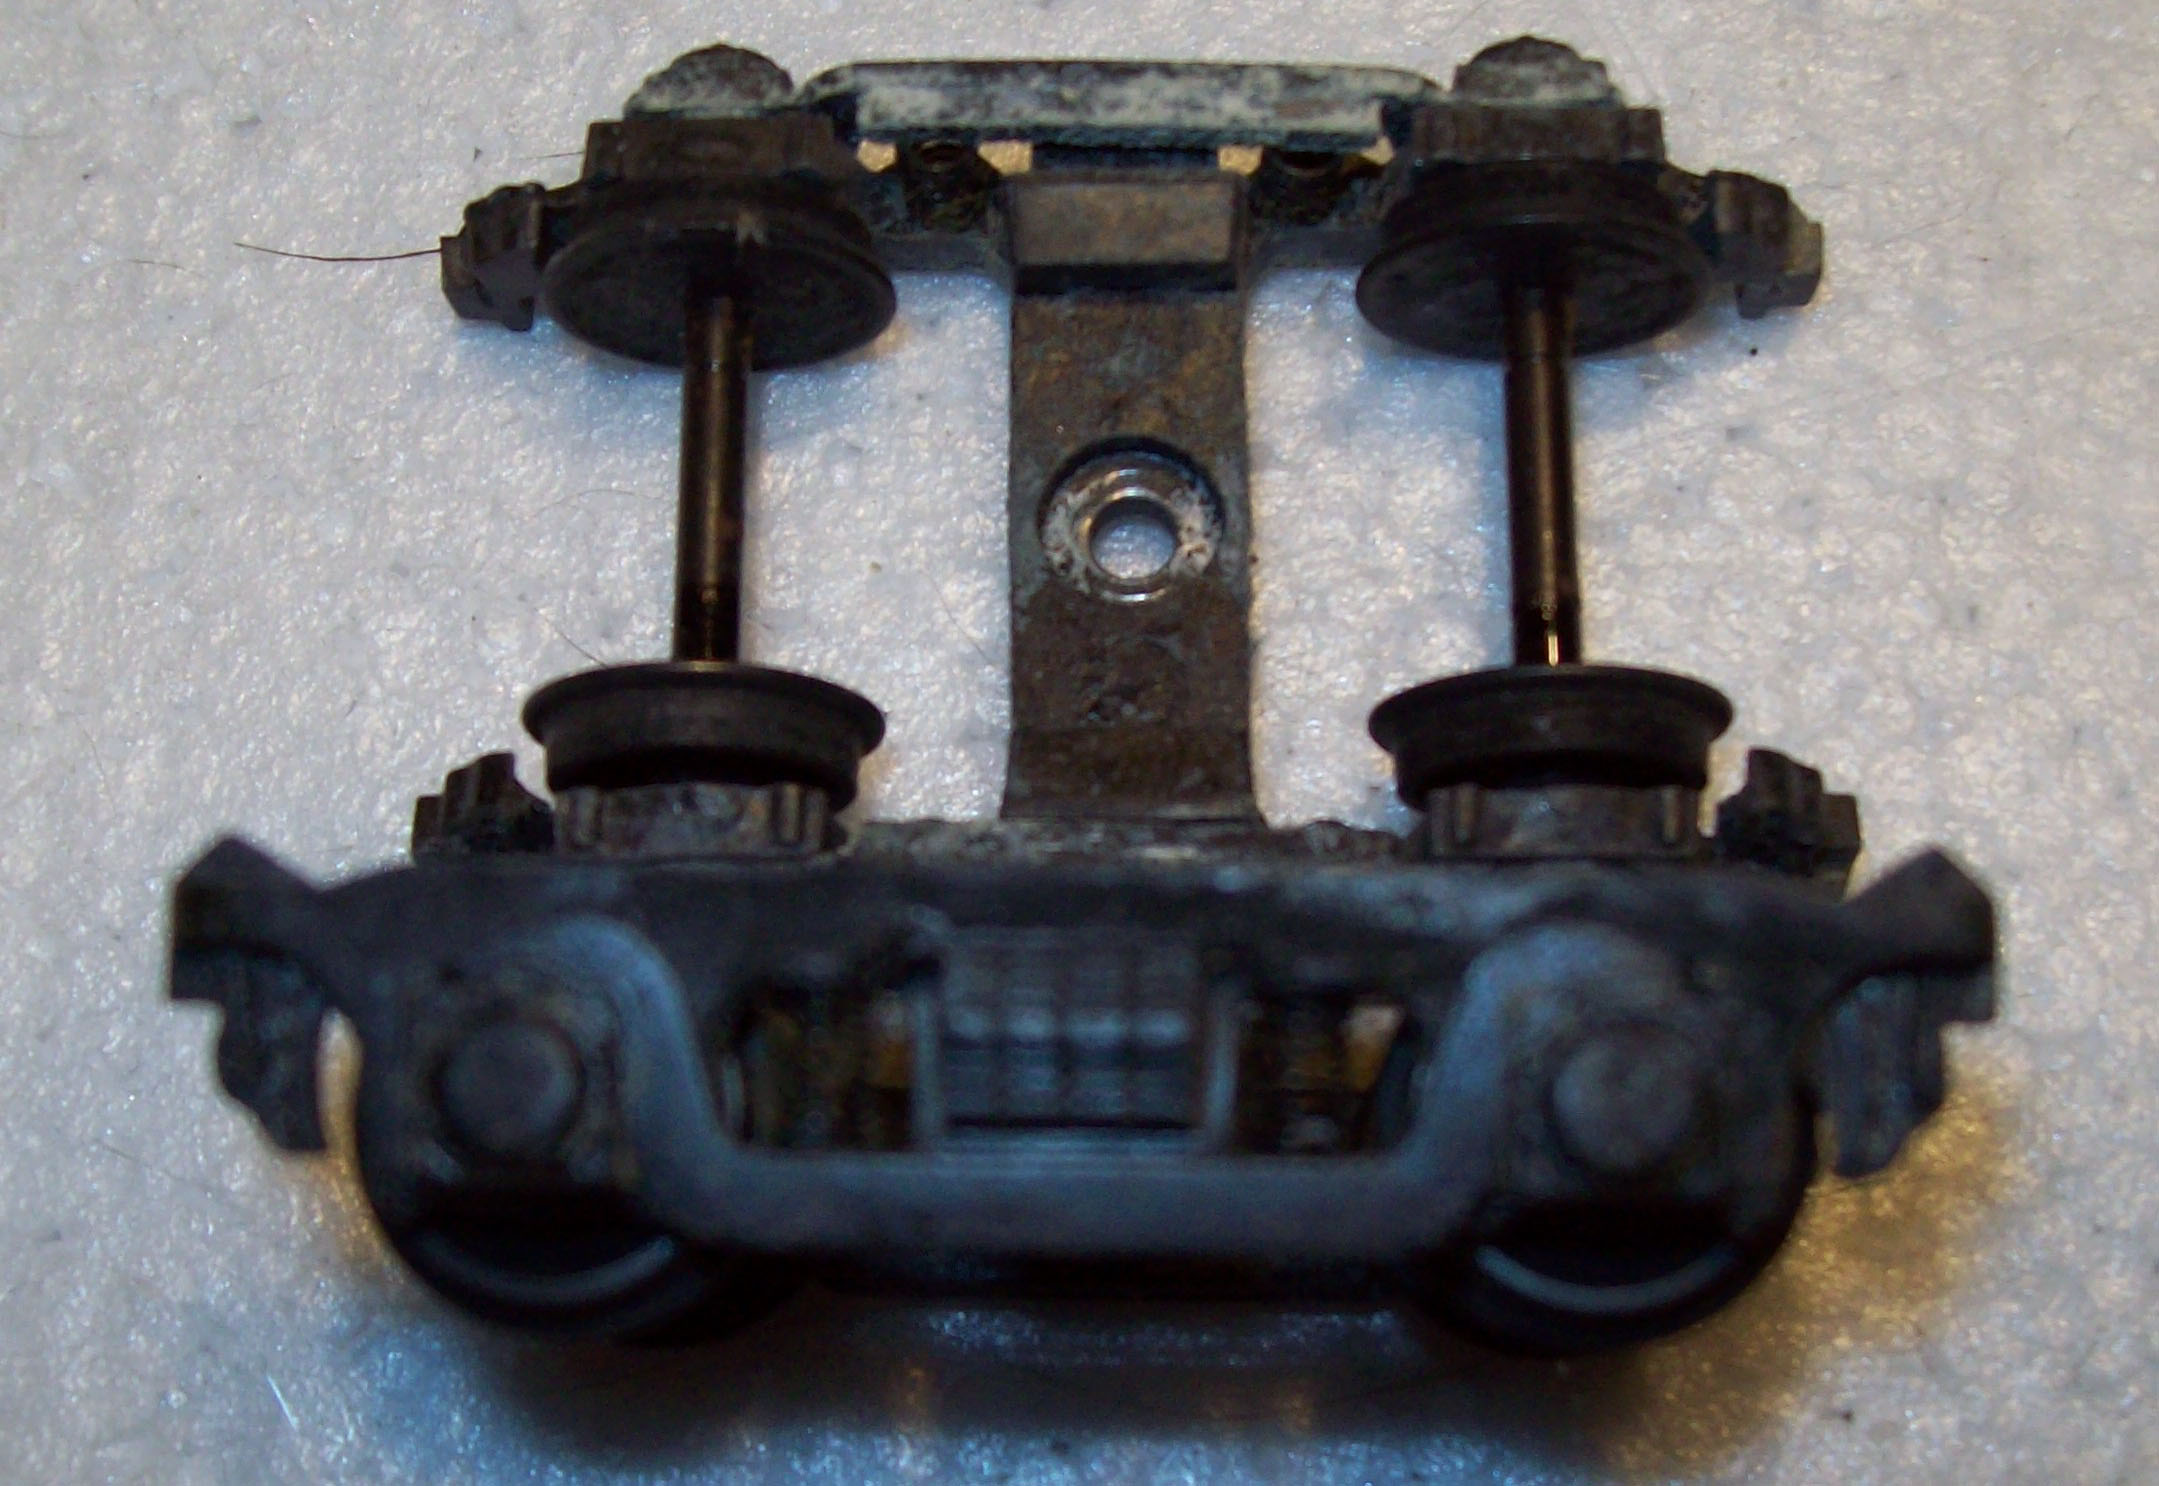
1. I have found new trucks for the units and have obtained a couple more to add to the construct.
2. I am replacing the floors with new strips of basswood and new bolsters.
3. The ends of the cars are either missing or damaged so I am going to have to use the good
ones I have and make some molds to make new ends for the other cars.
4. All cars have been stripped and cleaned and are ready for primer and paint.
I will add photos tomorrow when I can get them to upload.
|
Country:  USA ~
Posts: 865 ~
Member Since: September 23 2014 ~
Last Visit: May 01 2023 USA ~
Posts: 865 ~
Member Since: September 23 2014 ~
Last Visit: May 01 2023
|
 Alert Moderator
|
|
|
|
Posted - March 25 2015 : 09:25:27 AM
|
Love these kinds of projects! Always enjoyable to restore. Keep us posted!
Tim
|
|
Country: USA ~
Posts: 259 ~
Member Since: October 23 2014 ~
Last Visit: March 28 2017
|
Alert Moderator

|
|
|
|
Posted - March 25 2015 : 09:34:03 AM
|
This is going to be a great thread. Sounds like you have a good plan. Looking forward to seeing your progress!
http://tycodepot.com/
|
|
|
|
|
Posted - March 25 2015 : 10:21:55 AM

|
There's something about these old model streamliners from the 50's and 60's that I really love. Once the restoration is finished you're going to have one of the coolest passenger sets around. I'm looking forward to pictures. 
|
Country:  Canada ~
Posts: 3448 ~
Member Since: September 22 2006 ~
Last Visit: April 03 2026 Canada ~
Posts: 3448 ~
Member Since: September 22 2006 ~
Last Visit: April 03 2026
|
Alert Moderator
|
|
|
|
Posted - March 25 2015 : 12:41:00 PM
|
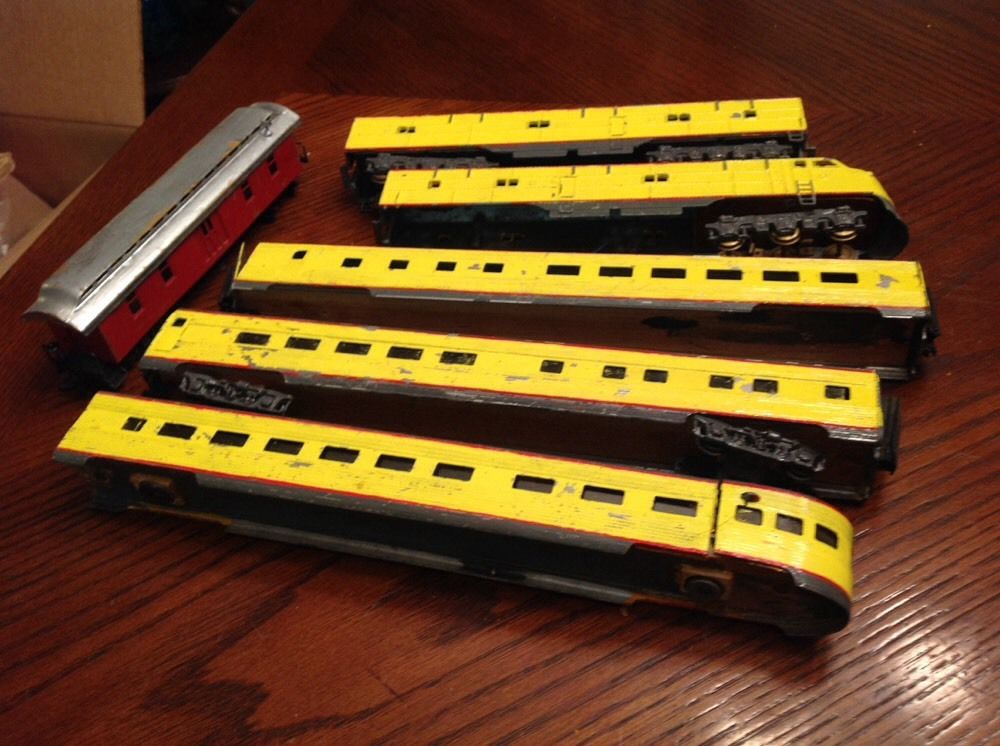
As I said yesterday, here's the photos.
The locomotives:
E7A unit: After stripping, I found it had been repainted in the UP livery. I have a new shell that I
am going to use instead of the old one.

E7B unit: This had the same problem as the A unit, so.... replacement time.
The cars:
(Top to bottom)
Parlor car
22 room car
Mail car
Pullman car
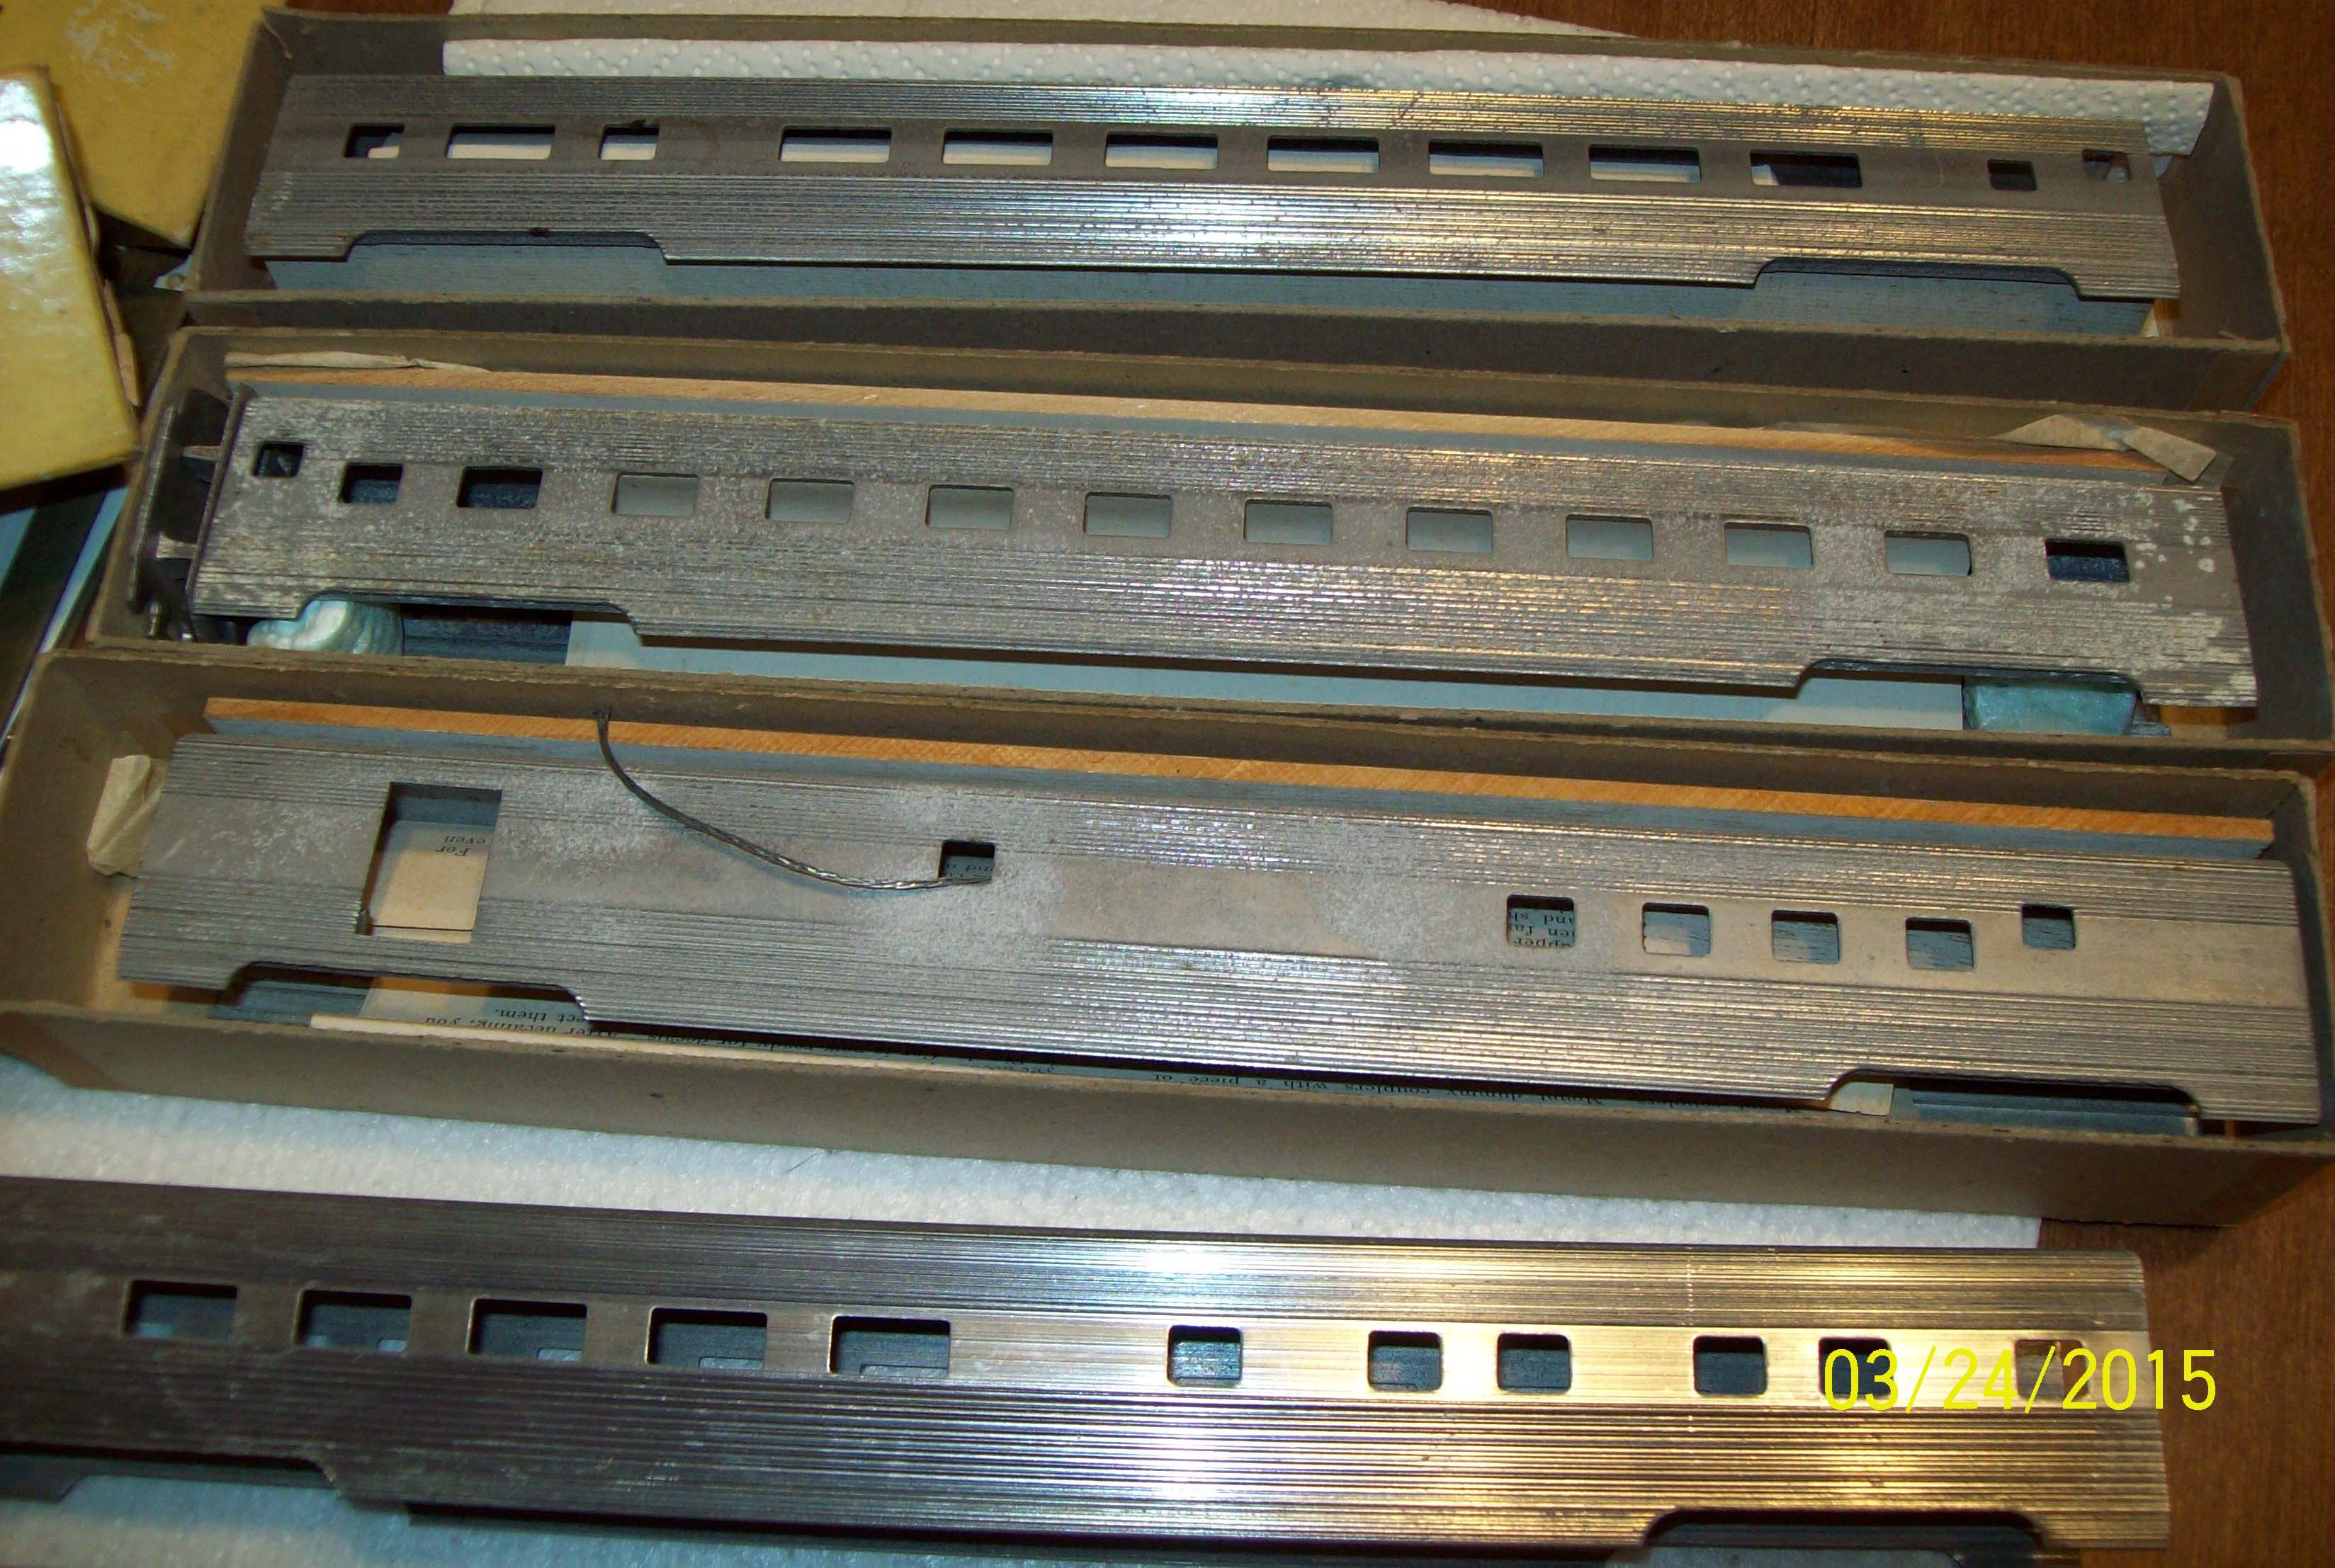
Diner car
Observation car
Baggage-Tavern-Lounge car
I got lucky and found a full set of old sprung trucks for the cars.
My next step is to buy a resin casting kit (bloody kit is $100, the most expensive part of this
restore), but i have other projects for it so I can divide the cost.
Overall, the cost will be about $200 to complete and restore this train. However, the memories
are gonna be well worth the cost and time. I will post more photos as I get the set finished.
George
|
|
Country: USA ~
Posts: 865 ~
Member Since: September 23 2014 ~
Last Visit: May 01 2023
|
Alert Moderator
|
|
|
|
Posted - March 25 2015 : 6:35:26 PM
|
I don't follow...why are you replacing the loco shells?
Glenn
I was thinking of the immortal words of Socrates, who said, "... I drank what?"
|
|
Country: USA ~
Posts: 1709 ~
Member Since: December 13 2008 ~
Last Visit: May 10 2026
|
Alert Moderator
|
|
|
|
Posted - March 25 2015 : 8:26:40 PM
|
I found some spots where the metal is failing. The second paint job covered a lot of cracks and some of the
steps have come off due to the problem. I don't want to go thru all of the work and have the shells start
falling apart from metal fatigue/age.
|
|
Country: USA ~
Posts: 865 ~
Member Since: September 23 2014 ~
Last Visit: May 01 2023
|
Alert Moderator
|
|
|
|
Posted - March 25 2015 : 8:38:03 PM
|
Ah, zinc rot got to them. Too bad... I think I might have come up with a cure for minor zinc rot, but I'm looking for something to test it on; any plans for the old shell?
--CRC
|
|
Country: USA ~
Posts: 930 ~
Member Since: January 25 2012 ~
Last Visit: August 23 2023
|
Alert Moderator
|
|
|
|
Posted - March 25 2015 : 9:19:11 PM
|
quote:Ah, zinc rot got to them. Too bad... I think I might have come up with a cure for minor zinc rot, but I'm looking for something to test it on; any plans for the old shell?
Originally posted by PRR 4800 - March 25 2015 : 8:38:03 PM
|
I have heard a few people soak the surface in CA with some success. Have never tried it.
http://tycodepot.com/
|
|
|
|
|
Posted - March 25 2015 : 10:16:37 PM
|
Before you go to the trouble of making a casting. check out eBay. There is an E7 B Hobbytown casting going for about 10 bucks currently. The Hobbytown and Cary shells go on eBay quite regularly at decent prices.
Good luck and regards, Vic B.
Vic Bitleris
|
|
Country: USA ~
Posts: 55 ~
Member Since: May 08 2013 ~
Last Visit: February 20 2022
|
Alert Moderator
|
|
|
|
Posted - March 26 2015 : 08:31:53 AM
|
Thanks for tip about the shell bitler, but earlier this year I found a E7 A&B kit on ebay that I got for
the frames and extra truck parts. Surprisingly, when it arrived it included the ENTIRE shell/frame
kits from Hobbytown in the original shipping box. So, I now have the shells as well. The casting I
have to do is for new ends for the passenger cars. Some of the passenger cars are missing the
ends and I have some good ones with the new kits I got.
Unfortunately, the shells are way beyond trying to repair. They are literally falling apart. Every
time I try to work with them, another piece falls off.
|
|
Country: USA ~
Posts: 865 ~
Member Since: September 23 2014 ~
Last Visit: May 01 2023
|
Alert Moderator
|
|
|
|
Posted - March 26 2015 : 10:34:59 AM
|
Not trying to hi-jack this thread but will speak briefly about something Jerry (WVa) mentioned. I had a tender drive Rivarossi 0-8-0. Off of the motor there was a zinc pest infected gear housing. I did what Jerry mentioned and really put the Super glue to it. Then I filed it and shaped it to fit the mounts. So far so good. It is running OK.
Randy
|
|
Country: USA ~
Posts: 369 ~
Member Since: April 30 2011 ~
Last Visit: June 16 2026
|
Alert Moderator
|
|
|
|
Posted - March 26 2015 : 1:47:47 PM
|
quote:Thanks for tip about the shell bitler, but earlier this year I found a E7 A&B kit on ebay that I got for
the frames and extra truck parts. Surprisingly, when it arrived it included the ENTIRE shell/frame
kits from Hobbytown in the original shipping box. So, I now have the shells as well. The casting I
have to do is for new ends for the passenger cars. Some of the passenger cars are missing the
ends and I have some good ones with the new kits I got.
Unfortunately, the shells are way beyond trying to repair. They are literally falling apart. Every
time I try to work with them, another piece falls off.
Originally posted by oldtimer52 - March 26 2015 : 08:31:53 AM
|
IIRC the ends on those Sampson cars were very crudely cast in very light, very POROUS magnesium. You -might- be better off swapping in a different part than trying to recreate the originals. Post a pic of the car ends so I can see if they're what I am remembering them to be?
Also, regarding the loco shells, rats 
--CRC
|
|
Country: USA ~
Posts: 930 ~
Member Since: January 25 2012 ~
Last Visit: August 23 2023
|
Alert Moderator
|
|
|
|
Posted - March 26 2015 : 3:46:28 PM
|
They actually made three different types of ends for these cars.
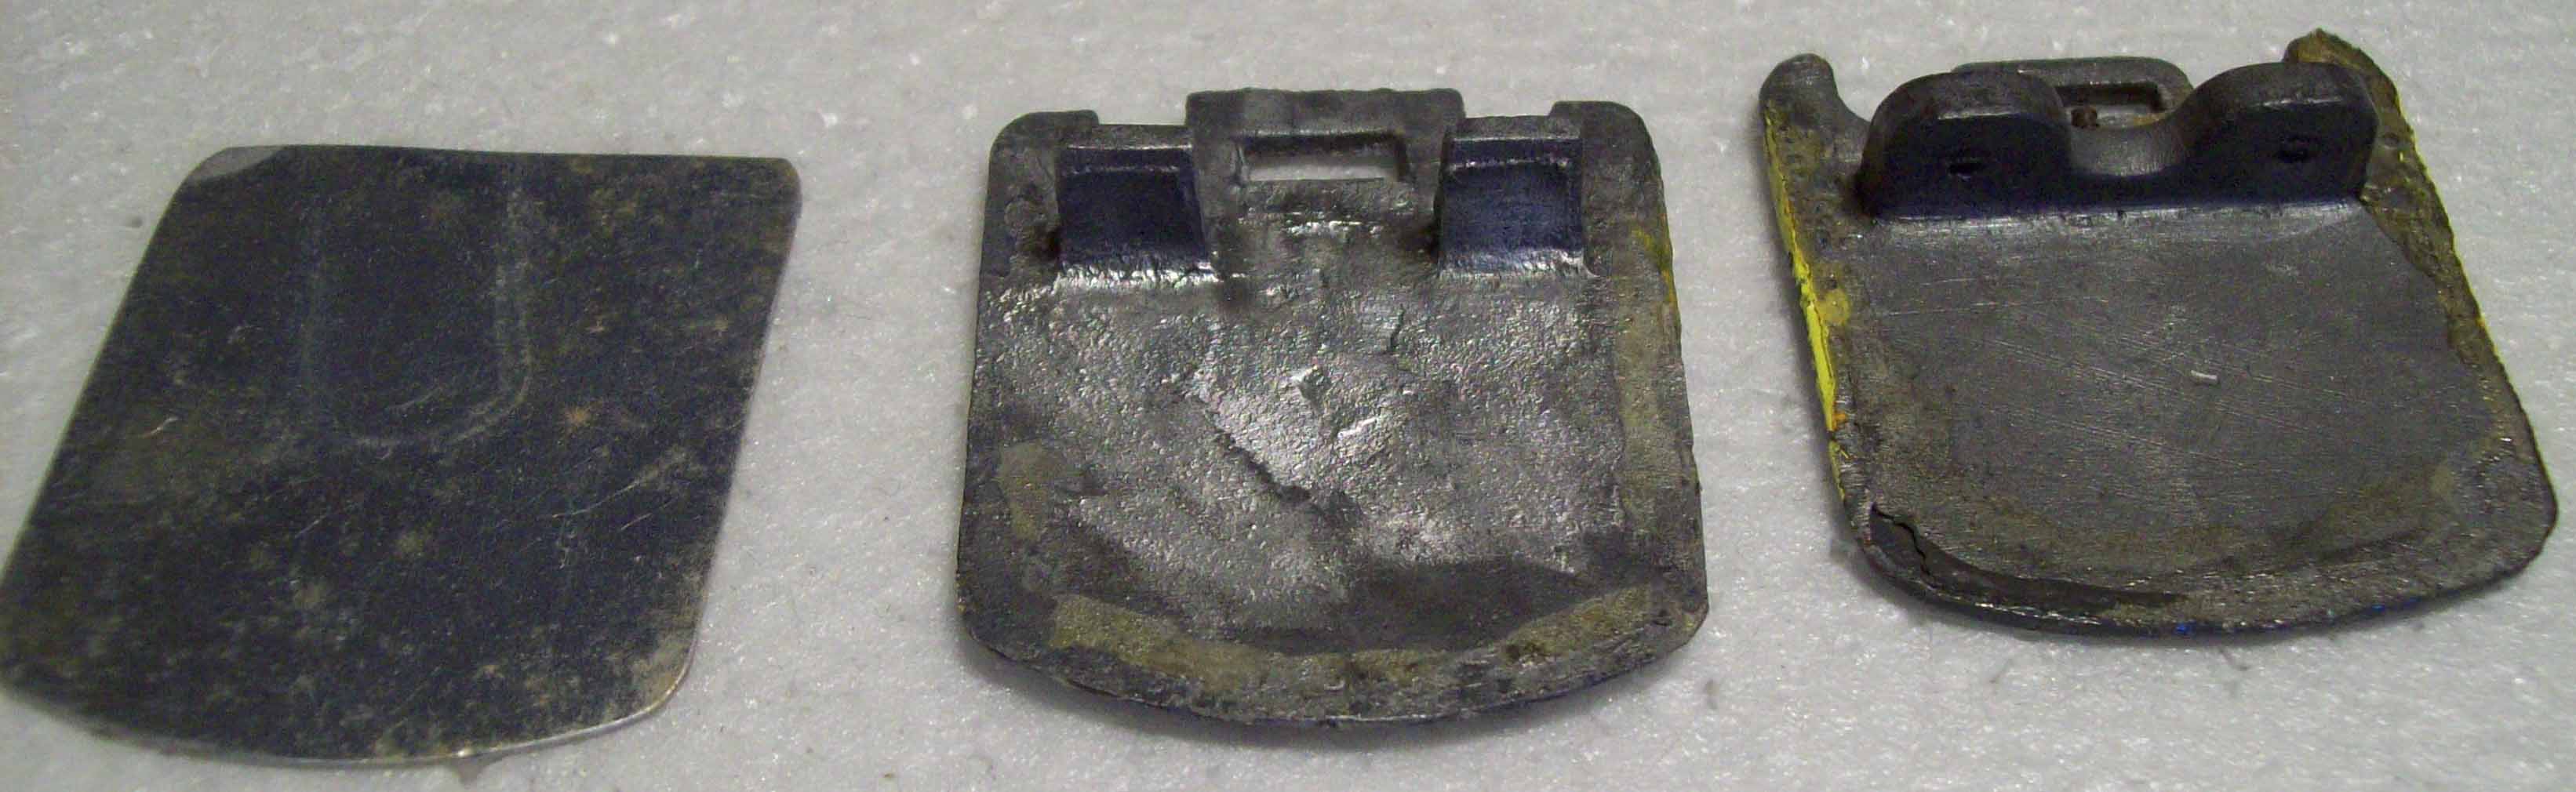
Left to right: newest end, oldest end, middle end.
I want to make a mold of the center one so that I can use the tabs to anchor the ends to the
floors and hold the floors in the car. The first one is just a cheap piece of metal.  The The
right end one has really short tabs to be really effective anchors.
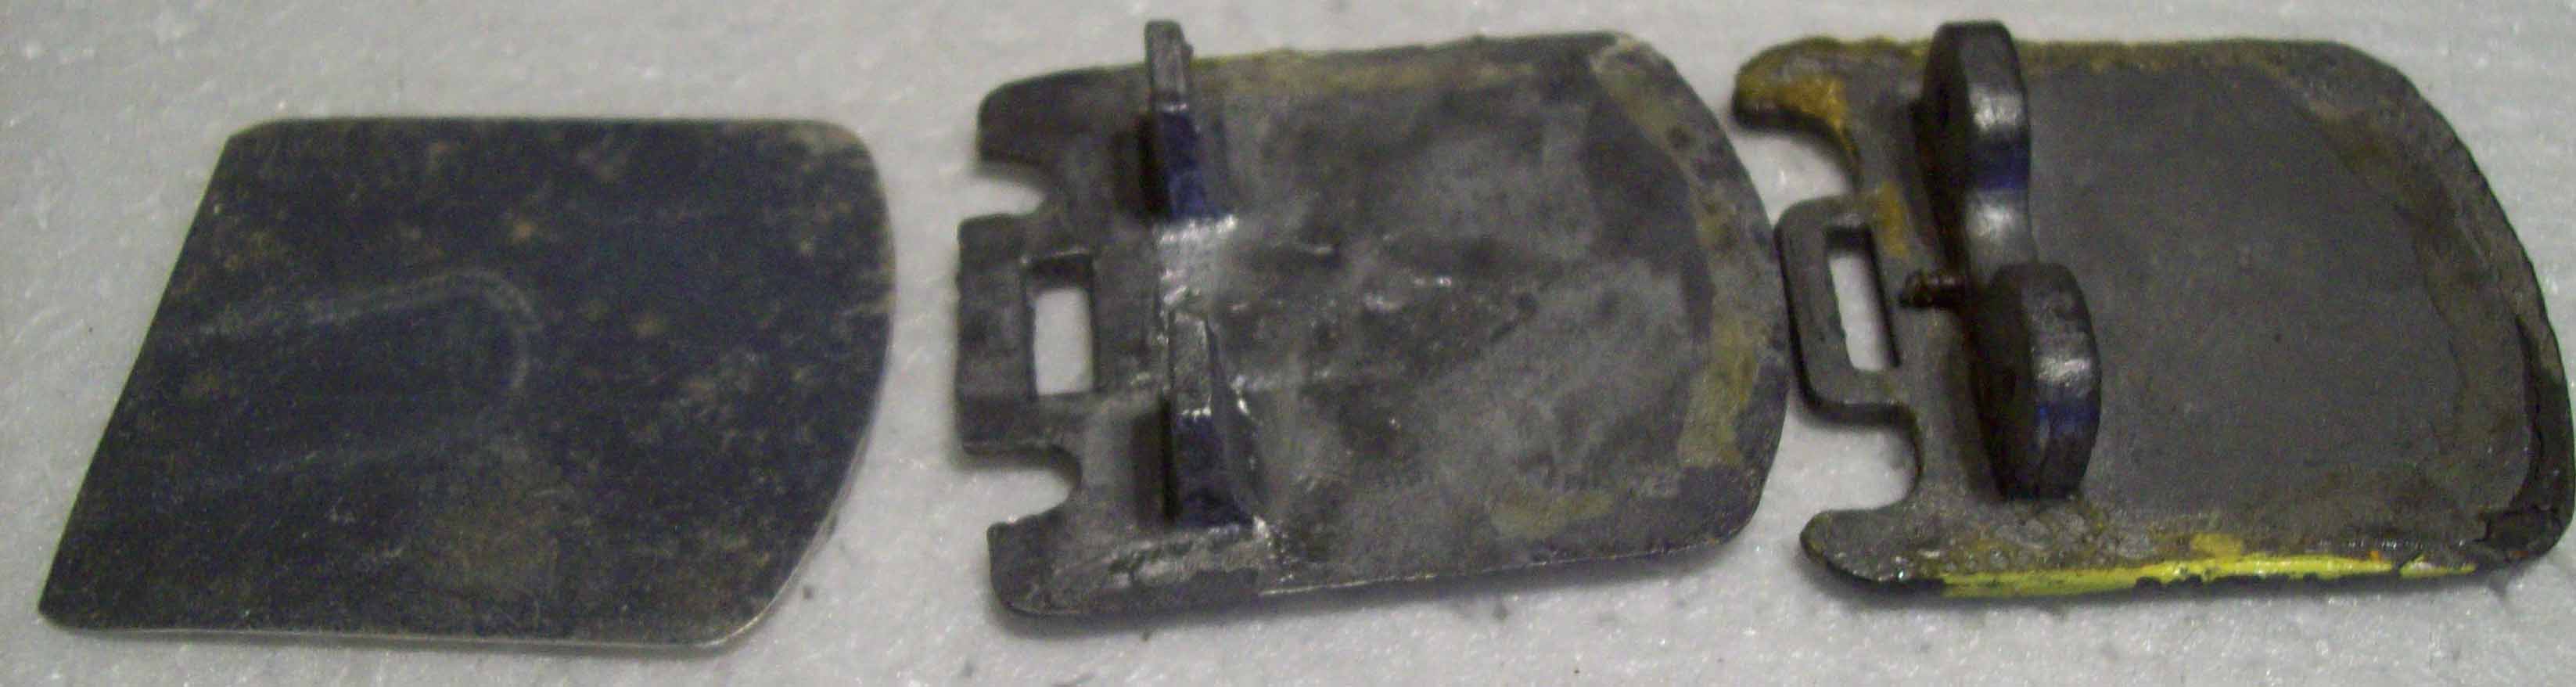
I plan on smoothing the piece and then coating it before making the mold.
|
|
Country: USA ~
Posts: 865 ~
Member Since: September 23 2014 ~
Last Visit: May 01 2023
|
Alert Moderator
|
|
|
|
Posted - May 01 2015 : 7:39:24 PM
|
Got started on finishing up the locos and was getting ready to do the finish sanding and @#$%,
my finishing sanding wheel decided to go south. Went looking for another and no more left.
Oh well, ordered some more. Decided to work on the trucks using the tips Darth gave on
the bearings. Everything went well, but 5 of the bearing didn't survive the reshaping. Back
to the order board again.
Ok, found a listing for the UP streamliner construct composition and found out that they used
more than just 7 cars. It seems that during the 1955-60 period, the passenger constructs consisted of 8-14 cars. Hmm, that makes me 1 shy now.
Construct:
2-6 44 seat coaches
1 48 seat diner
1-2 baggage
1 10-6 sleeper
2-3 6-6-4 sleepers
1 lounge/observation
This project is gonna take a lot longer than I planned. Oughta keep me out of trouble for a
while tho.
Found some more Sampson cars on evil bay. Got 4 of them for $9.81 each (including the
postage.

Gonna spend some time working on the cars while I wait for the new sanding wheels and
bearings to get here.
|
|
Country: USA ~
Posts: 865 ~
Member Since: September 23 2014 ~
Last Visit: May 01 2023
|
Alert Moderator
|
|
|
|
Posted - May 28 2015 : 10:38:08 PM
|
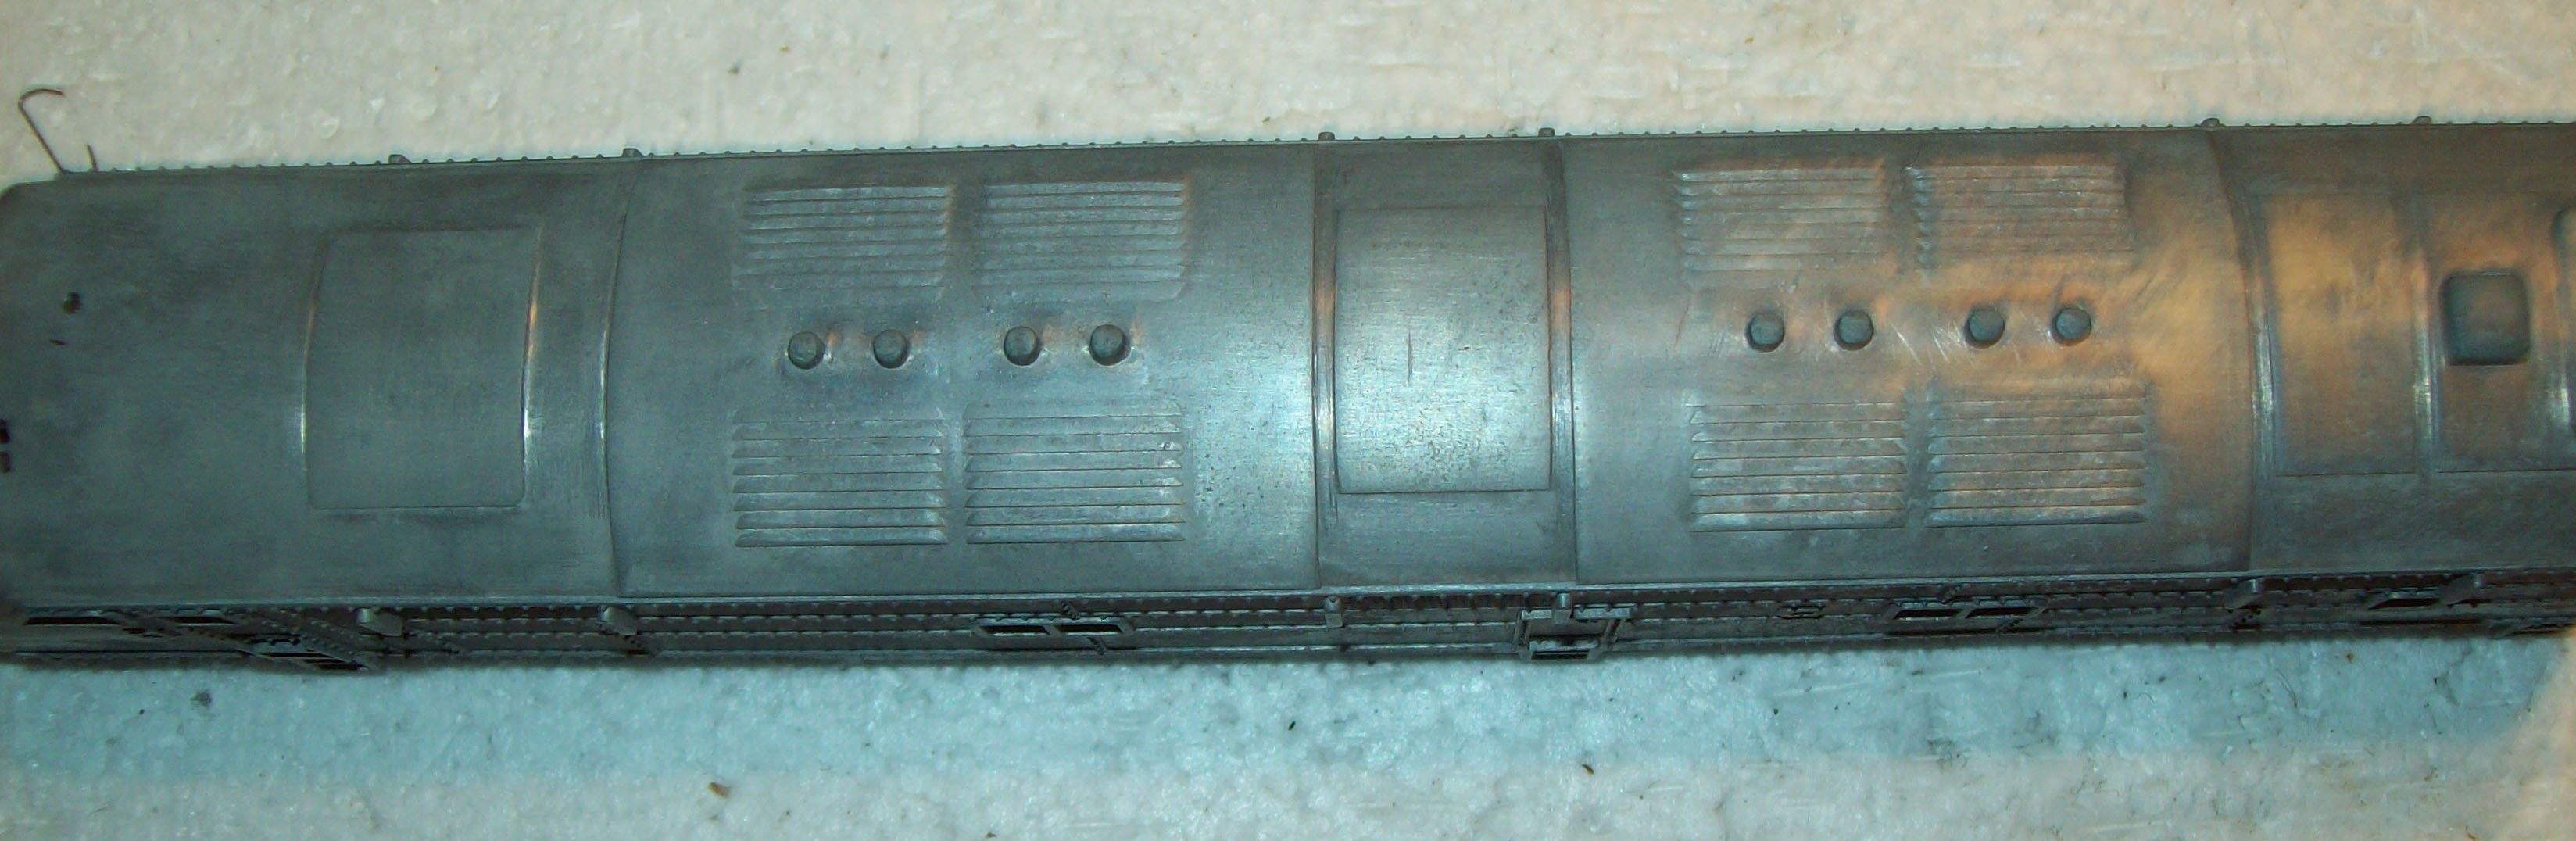
Ok. Update on my UP E7 project. Got the body prepped and ready for primer and paint.
After Darth's project, I got the detail bug and got a few extras for the loco.
Shell after sanding and vinegar treatment.
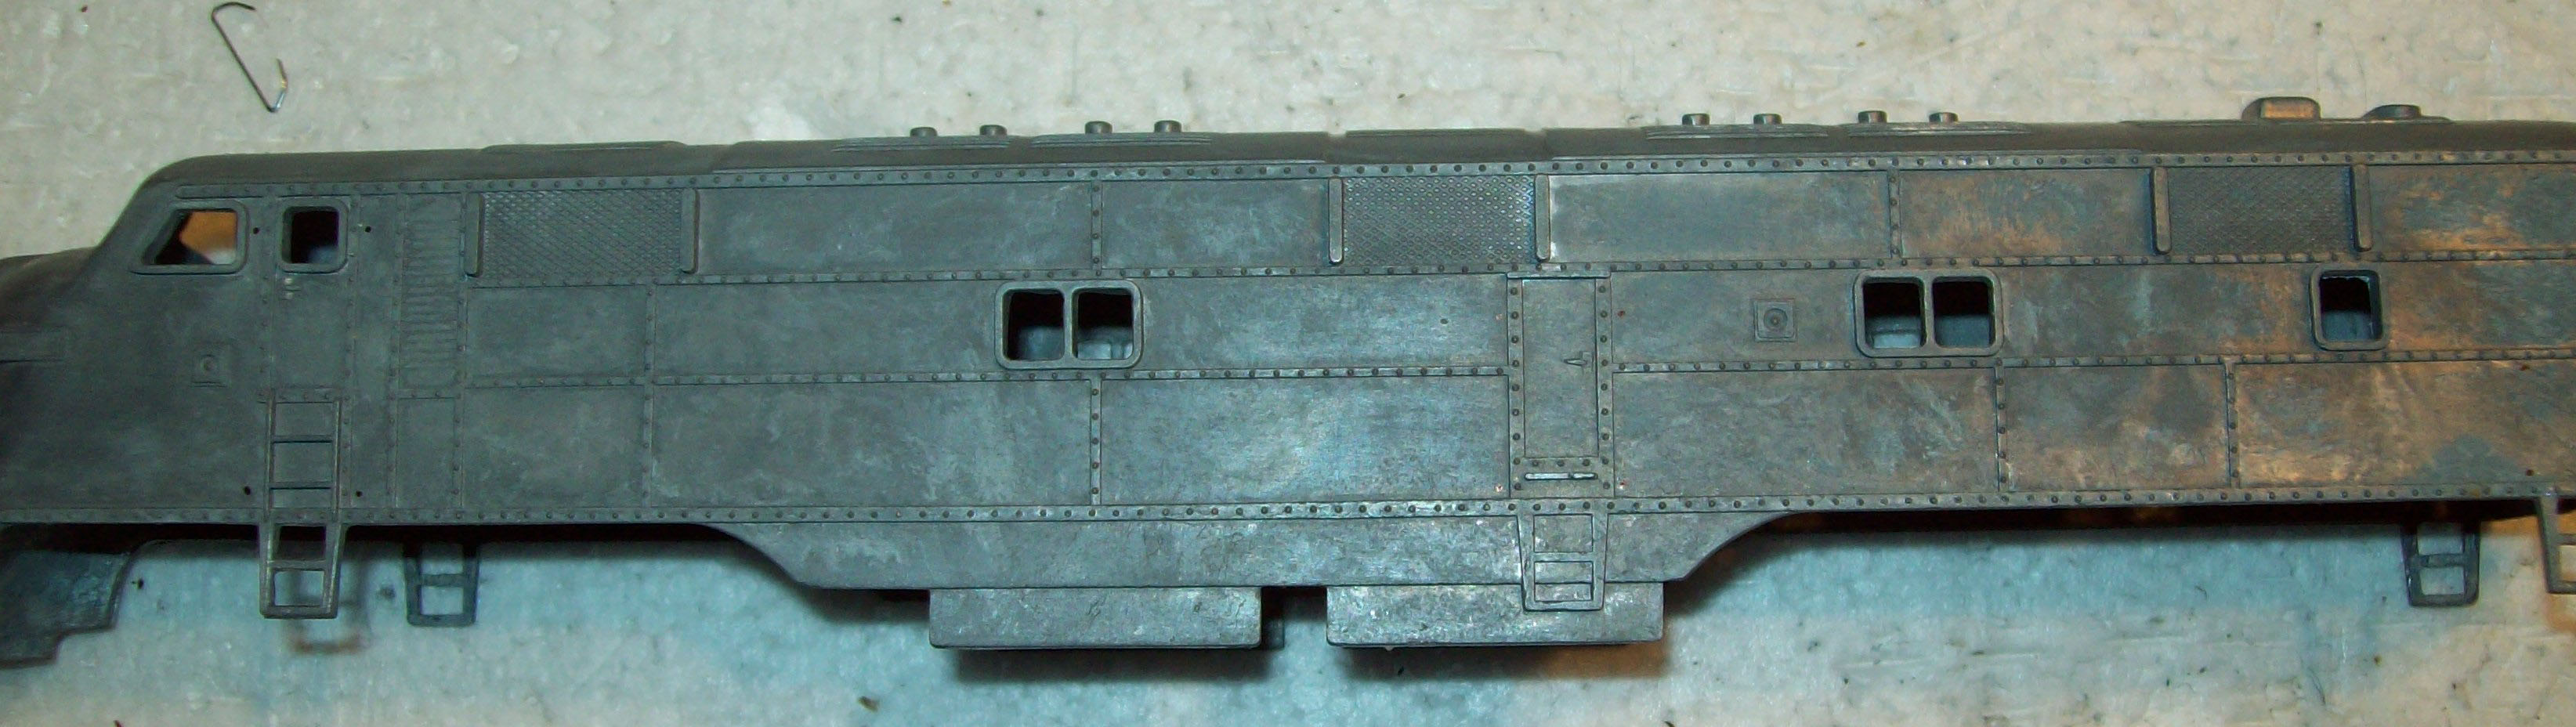
Thanks to Darth's influence, I found a Cab Interior, lift rings and handrails to put on as extras.
I will have to modify the back wall and make a control tower.
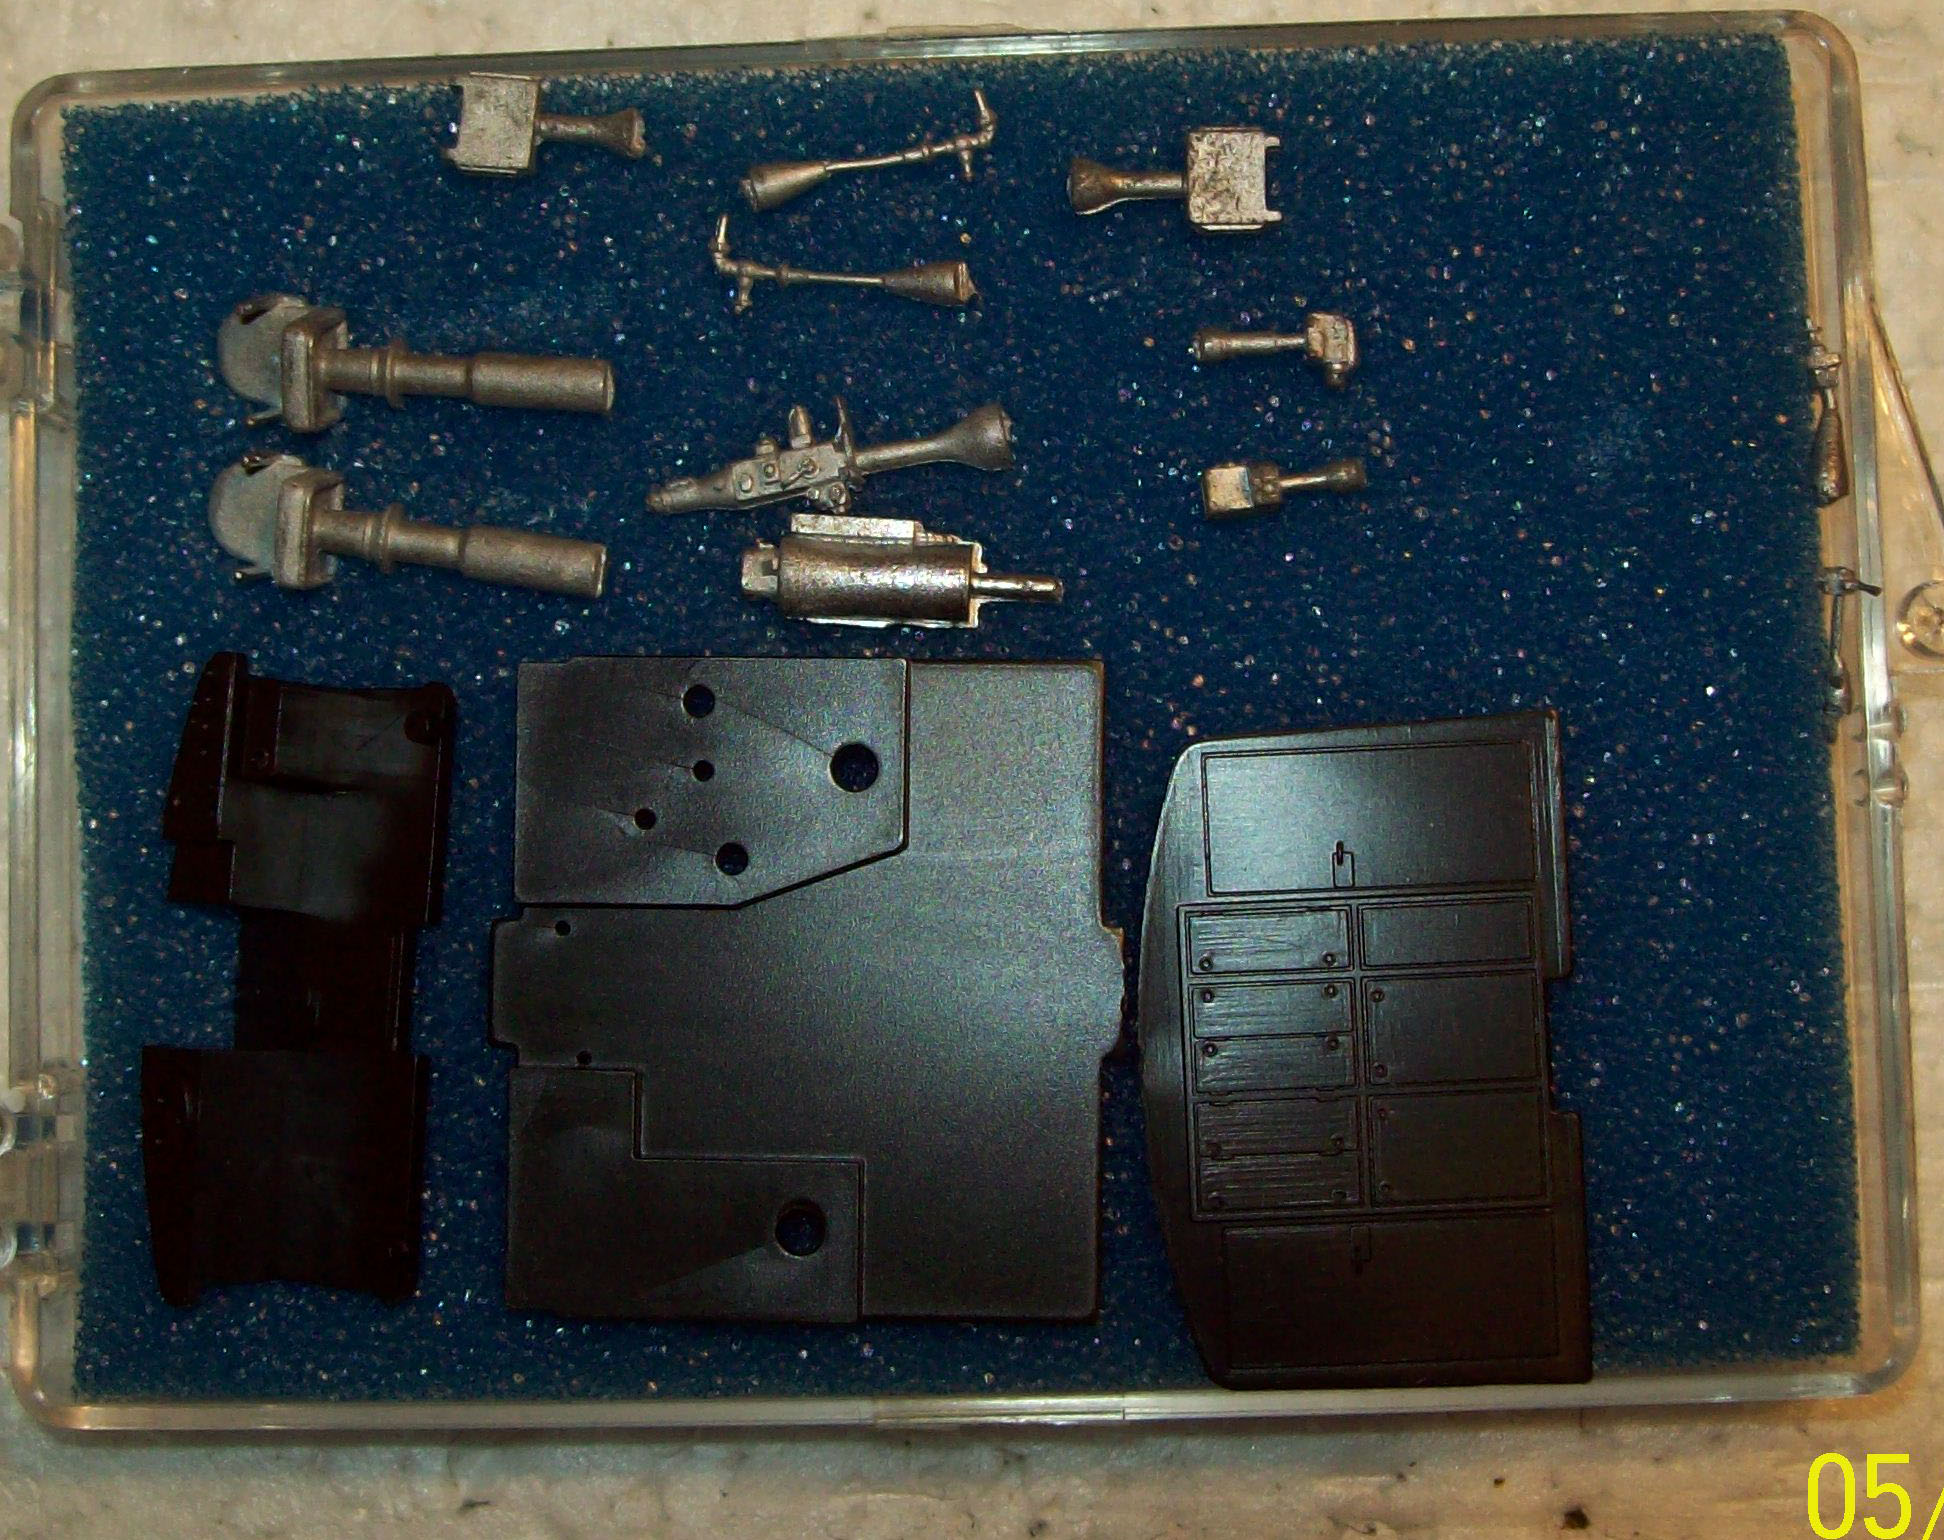
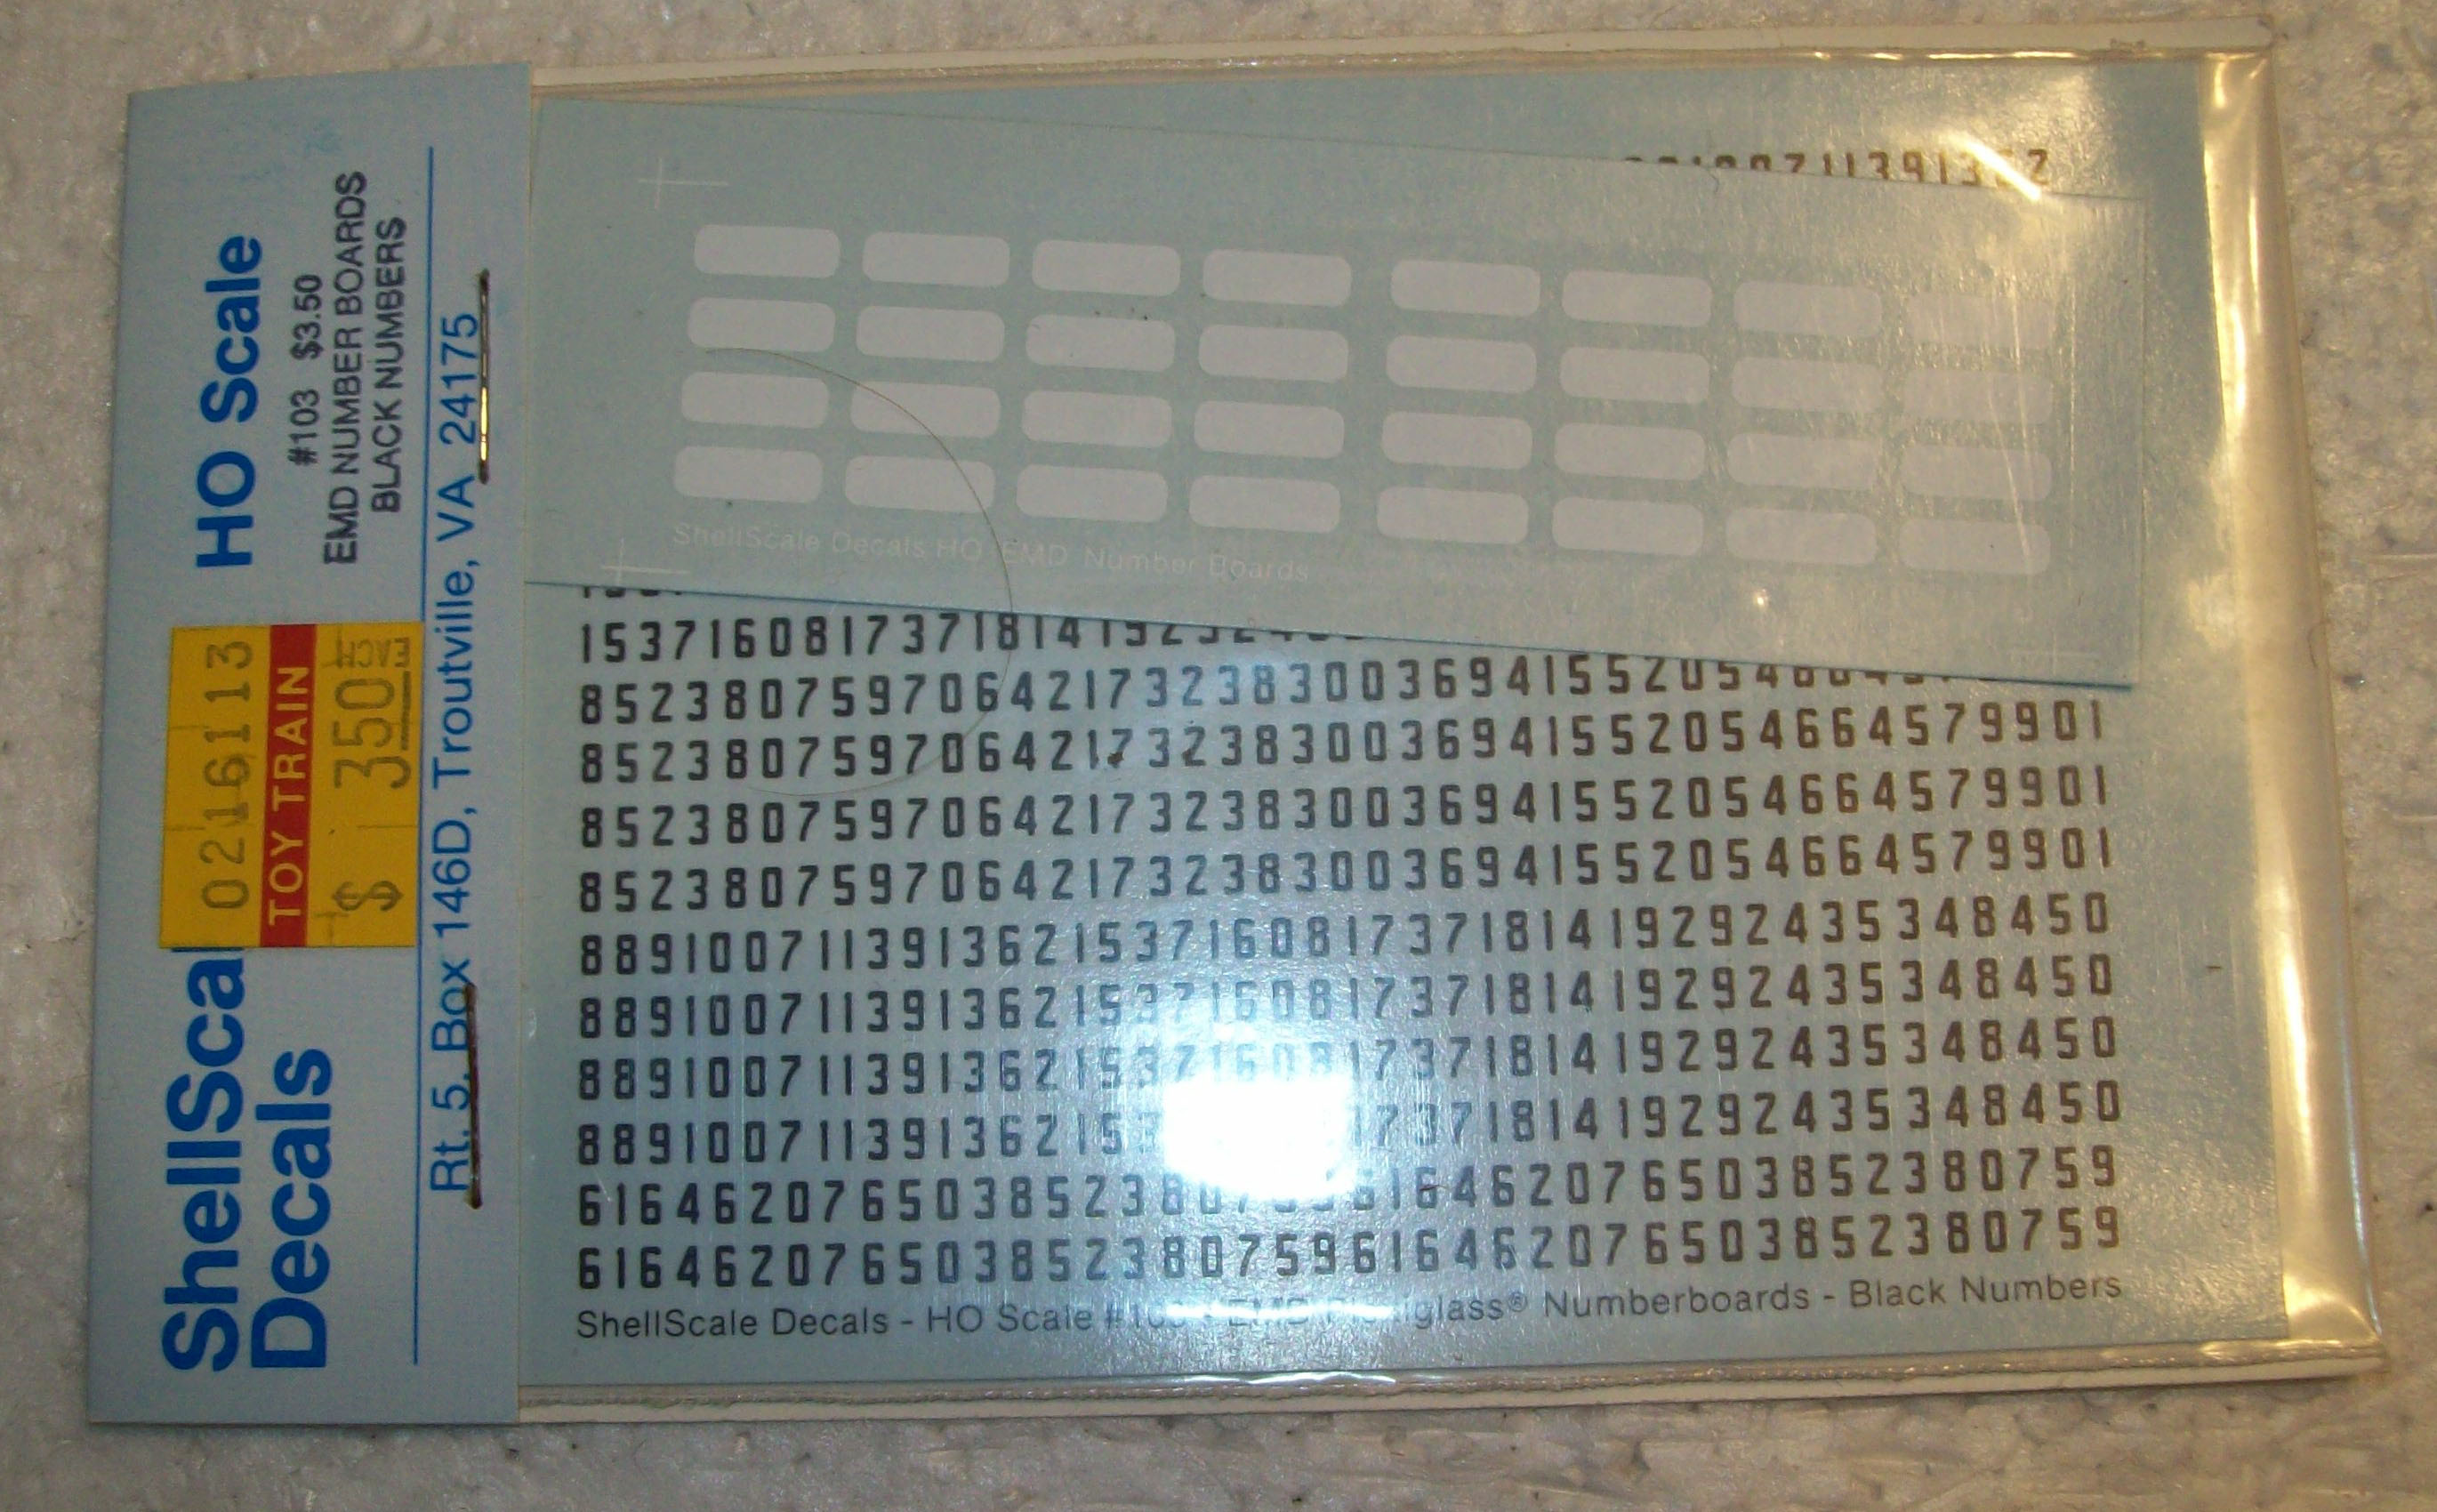
Then I found some lift rings and some number board decals. Handrails will be made of .025
phosphor/bronze wire.
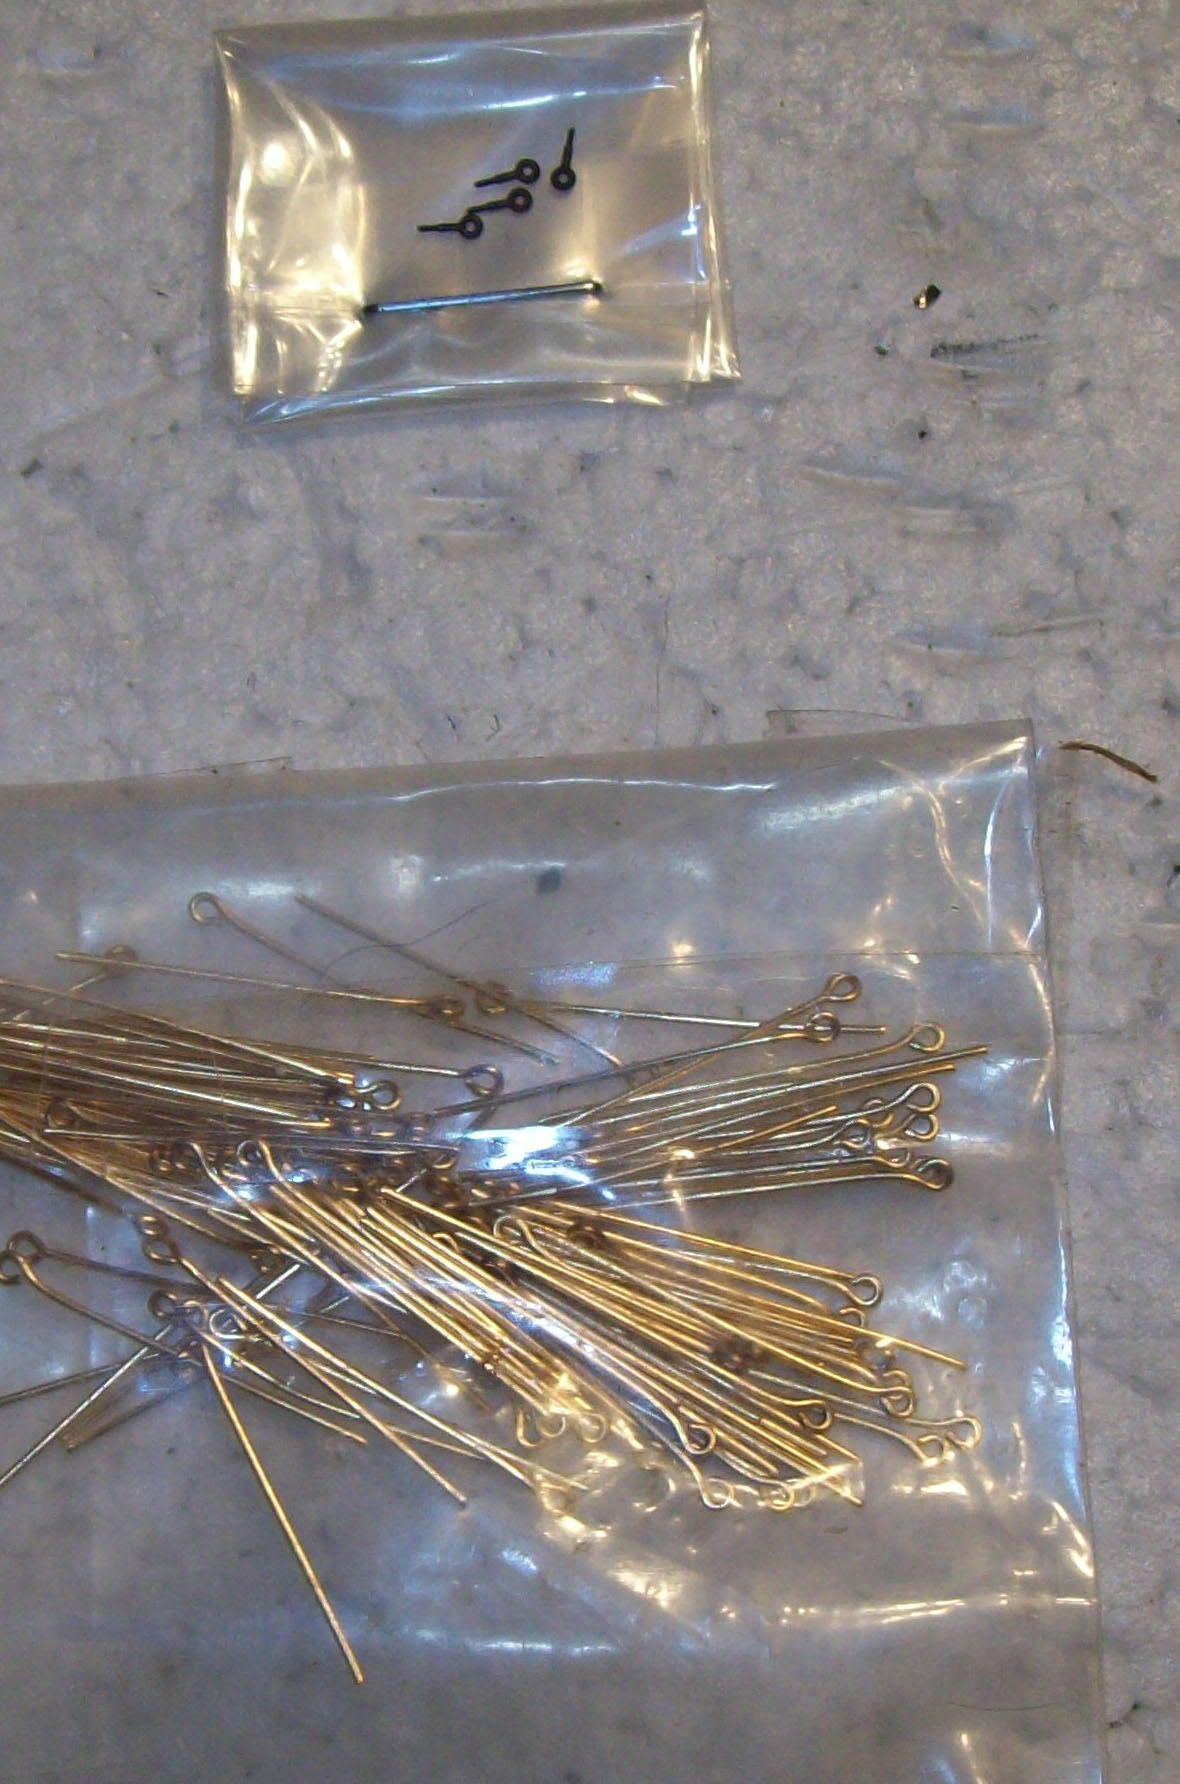
Last step is to drill the holes for the handrails and lift rings before primer and baking.
Unfortunately, that will have to wait until I get my retirement move completed over
the next couple of weeks.
|
|
Country: USA ~
Posts: 865 ~
Member Since: September 23 2014 ~
Last Visit: May 01 2023
|
Alert Moderator
|
|
|
|
Posted - May 31 2015 : 10:47:23 AM
|
OT52, have you had any success with molding new car ends?
If you have , I'd be interested in buying a handful.
I've noticed on the existing ends, a lot of tiny cracks.
I can see these crumbling after any handling.
The vestibule doors I'm sure I can fashion from something.
|
|
Country: Canada ~
Posts: 505 ~
Member Since: August 09 2014 ~
Last Visit: June 01 2026
|
Alert Moderator
|
|
|
|
Posted - May 31 2015 : 12:22:28 PM
|
I've gotten the mold making stuff, just haven't had any time to get started on it. With
my move coming up, it'll probably be a few more weeks til I can get set up to start
making the molds. I'll let ya know when I get some made.
|
|
Country: USA ~
Posts: 865 ~
Member Since: September 23 2014 ~
Last Visit: May 01 2023
|
Alert Moderator
|
|