|
|
 Posted - November 11 2014 : 9:24:23 PM Posted - November 11 2014 : 9:24:23 PM


|
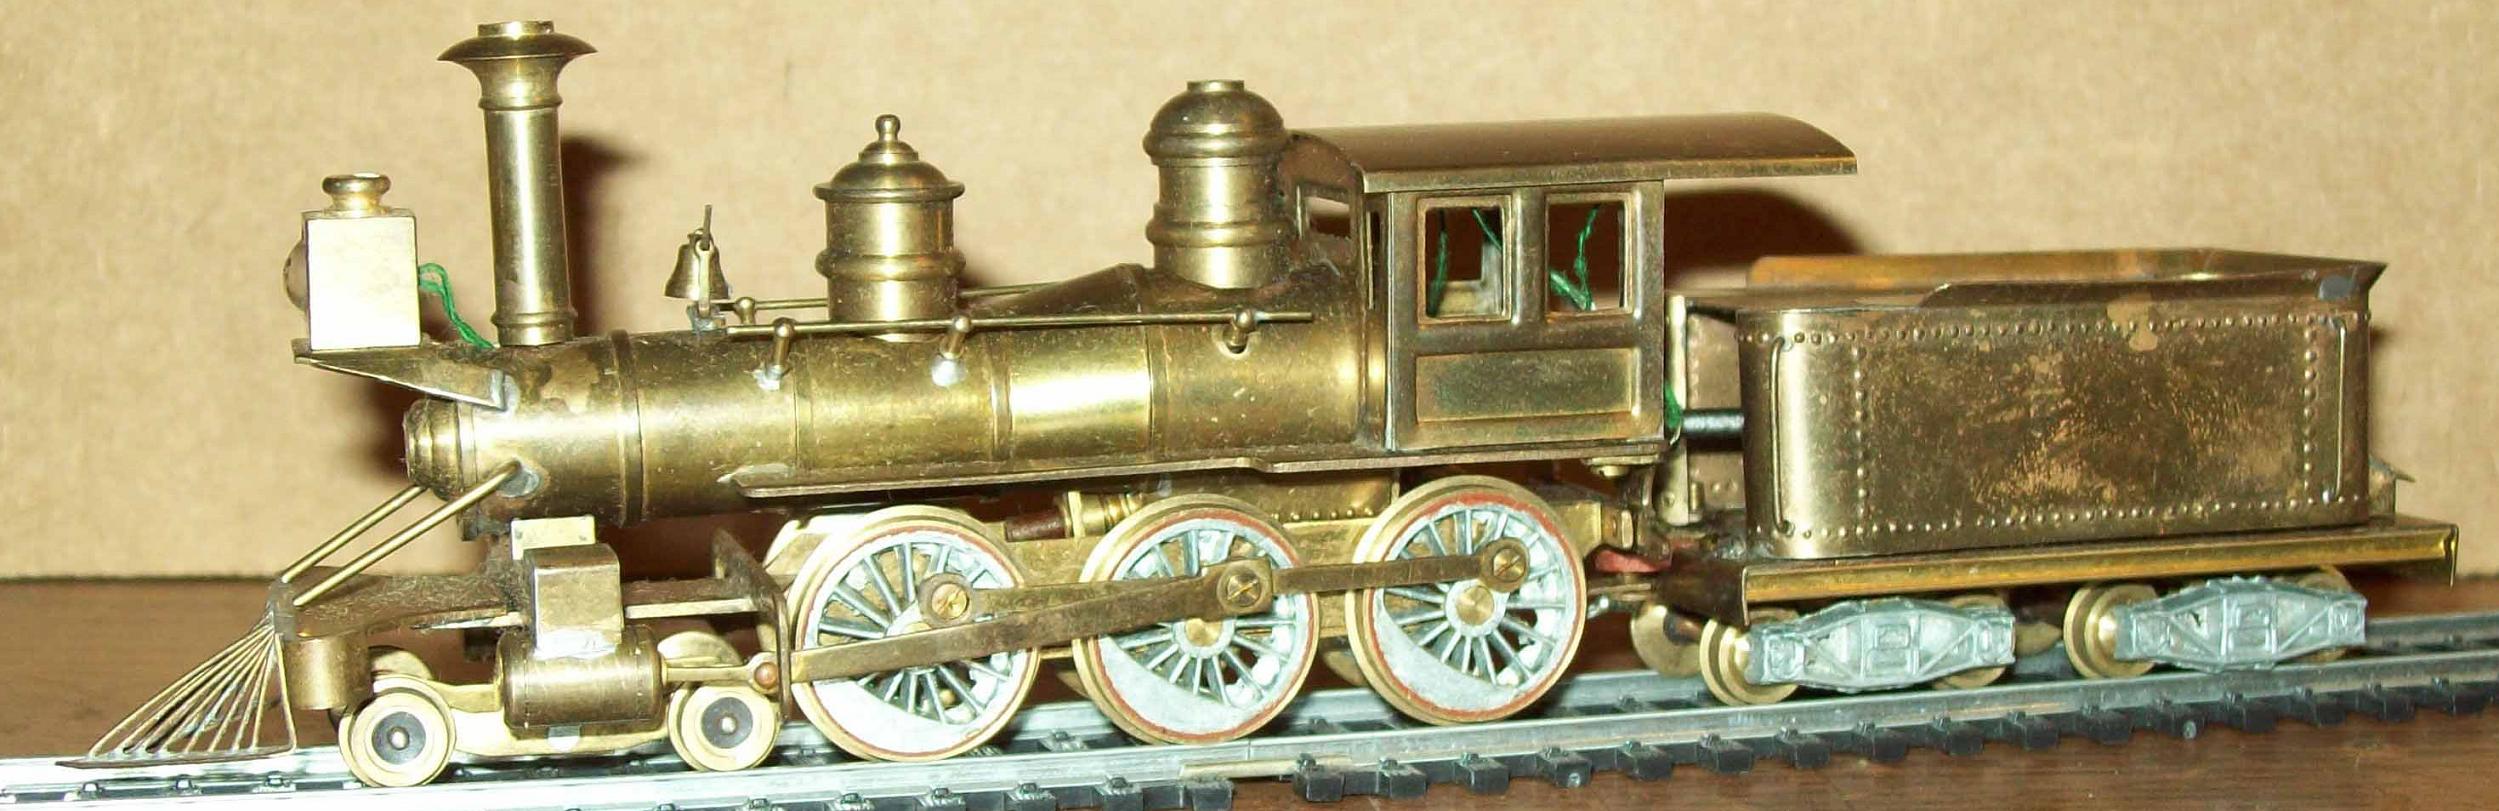
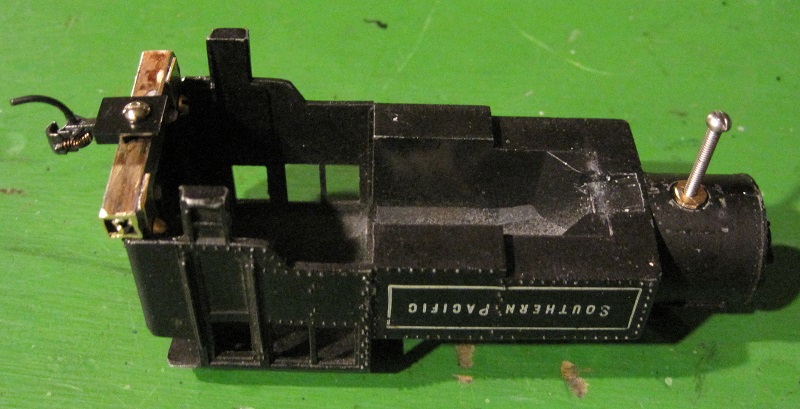
On Sunday, I picked up a Mantua Booster:
I'd really rather it was an 0-6-0T, but they only had the 0-4-0's at the train show. Rather than searching for a Little Six, I decided to put the chassis from a Big Six on the booster because I like its wheel spacing better than the spacing on the Little Six.
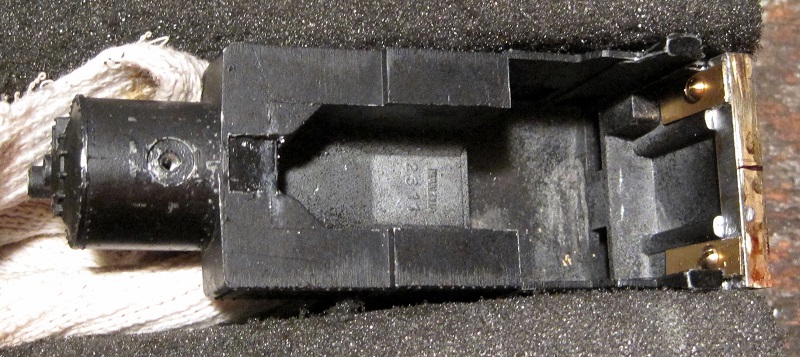
Here's the frame. It has some modifications toward picking up power from the left rail. There are more to come.

The frame has been modified to mate with the rear of the Booster shell:
The brass tab slips into a slot between the end beam and the oil bunker on the shell:
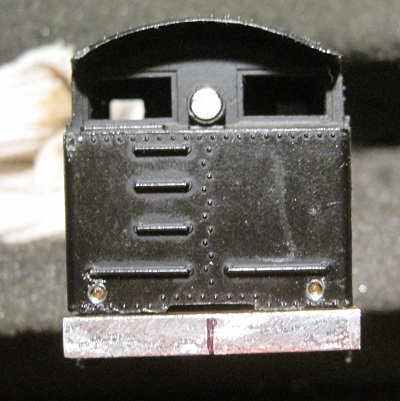 
The holes above the end beam will be hidden when I get to the cosmetic part of the project.
The Booster shell was modified with an end beam because the Booster frame had its own, but the Big Six frame did not.
A coupler was added to the end beam. It's a Kadee drop-shank whisker coupler:
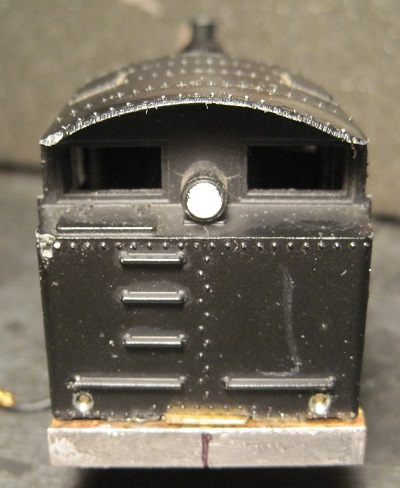
Here, the engine is starting to take shape:
Presently, the project is on hold while some glue dries. After that, I'll work on completing the changes to the electrical pickups. Once all the working parts are complete, I'll put a foot board pilot on the rear pilot beam and add an uncoupling lever.
Then, I'll start in on detailing the shell with things like an air compressor, air tanks, pop valves, a better whistle and various railings and ladders.
After that, some paint should finish it up nicely.
Carpe Manana!
|
Country:  USA ~
Posts: 2416 ~
Member Since: September 17 2013 ~
Last Visit: February 09 2026 USA ~
Posts: 2416 ~
Member Since: September 17 2013 ~
Last Visit: February 09 2026
|
 Alert Moderator
|
|
|
|
 Posted - November 11 2014 : 9:33:46 PM Posted - November 11 2014 : 9:33:46 PM
|
I love it Shaggy! Really nice metal work. I never like the wheel spacing of the 0-6-0T either; I don't know if it even had a prototype. The proportions look so much better now. 
The Tyco Depot
|
|
Country: USA ~
Posts: 3927 ~
Member Since: June 20 2007 ~
Last Visit: November 19 2015
|
Alert Moderator

|
|
|
|
Posted - November 11 2014 : 10:58:07 PM
|
Looking good Shaggy. I hope my project turns out like yours.
Edited by - oldtimer52 on November 11 2014 10:59:35 PM
|
|
Country: USA ~
Posts: 865 ~
Member Since: September 23 2014 ~
Last Visit: May 01 2023
|
Alert Moderator
|
|
|
|
Posted - November 11 2014 : 11:20:28 PM
|
Ooo, nice. Easily looks better than the Mantua 0-6-0T. On top of that, there's also a number of different prototypes for your custom locomotive. On top of that, there's also a number of different prototypes for your custom locomotive. 
-Steve
"A lot of modellers out there who go to these train shows see broken HO stuff and go, 'This is useless' when, in reality, they can still be used for modeling whether it's as a prop on your layout or a cool project to make something old new again."
|
|
Country: USA ~
Posts: 3533 ~
Member Since: February 17 2014 ~
Last Visit: January 11 2023
|
Alert Moderator
|
|
|
|
Posted - November 12 2014 : 12:28:51 PM
|
| Interesting project Don. Keep the photos coming. I use to dislike the wheel spacing on the Rogers 4-6-0's, until I saw some photos of Rogers locomotives with the same spacing.
|
|
Country: USA ~
Posts: 2087 ~
Member Since: March 16 2013 ~
Last Visit: July 05 2018
|
Alert Moderator
|
|
|
|
Posted - November 12 2014 : 7:45:27 PM
|
Thanks for the kind words, guys.
Here's another installment. Today, I completed the electrical parts and finished up the frame:

With all the components made, I disassembled the frame and primed the parts. When the primer dries completely, the frame will be painted flat black.
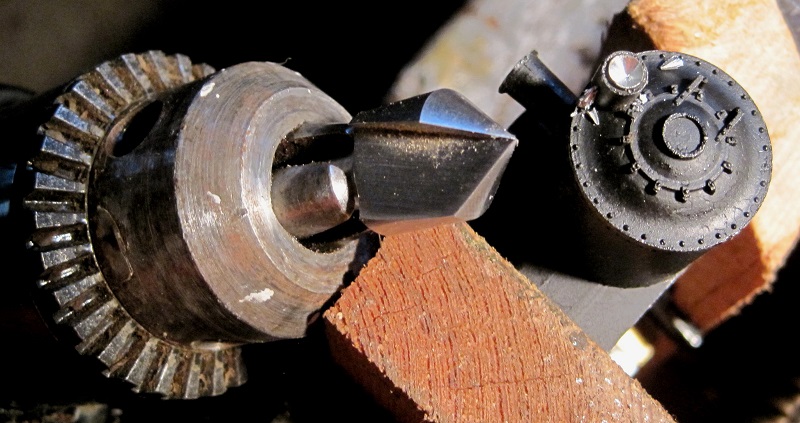
The headlight and backup light were just flat surfaces painted white. I drilled a 1/16" hole down the center of them then widened it out into a cone shape with a countersinking tool. I'll either glue a headlight jewel into those holes or glaze the hole with clear plastic so the cone shape looks like the reflector inside.
The molded on handrails on the smoke box looked a little too molded on for my liking so I filed them off and drilled mounting holes for handrail stanchions. The other molded on rails look okay to me, so I think these will be the only ones I replace.
I also cut off the cast on whistle. It was behind the steam dome to simplify mold parting, but whistles are usually mounted to the side or the top of the dome. Later, I'll add a whistle and some safety valves.
Carpe Manana!
|
|
Country: USA ~
Posts: 2416 ~
Member Since: September 17 2013 ~
Last Visit: February 09 2026
|
Alert Moderator
|
|
|
|
Posted - November 12 2014 : 7:56:02 PM
|
Looks good! I wonder if valve gear off the 2-6-2 would work or clear the body?
" Heck with counting 'em rivets, TRAINS ARE FOR FUN! Not called the Mad Scientist for nothing either!"
|
|
Country: USA ~
Posts: 3147 ~
Member Since: May 07 2007 ~
Last Visit: April 13 2026
|
Alert Moderator
|
|
|
|
Posted - November 12 2014 : 8:00:36 PM
|
quote:I use to dislike the wheel spacing on the Rogers 4-6-0's, until I saw some photos of Rogers locomotives with the same spacing.
Originally posted by Barry - November 12 2014 : 12:28:51 PM
|
I know what you mean. I think that uneven wheel spacing may be more typical than even spacing, sometimes, but this was just a matter of personal aesthetic taste rather than authenticity.
In the case of the Rogers 4-6-0's and many 2-6-0's the spacing is reminiscent of the spacing on a 4-4-0 with another axle thrown in ahead of the two usual ones. It seems to reflect a process of evolution from the 4-4-0 to the larger wheel arrangements. This development was happening about the period of your layout, which makes the Rogers 4-6-0's an especially interesting part of what you're doing. If I remember right, you have a couple of those, correct?
Carpe Manana!
|
|
Country: USA ~
Posts: 2416 ~
Member Since: September 17 2013 ~
Last Visit: February 09 2026
|
Alert Moderator
|
|
|
|
Posted - November 12 2014 : 8:07:40 PM
|
quote:I wonder if valve gear off the 2-6-2 would work or clear the body?
Originally posted by Redneck Justin - November 12 2014 : 7:56:02 PM
|
I'm pretty sure it would work. The valve gear is not taller than the valve cylinder and that fits under the body. Also, the parts diagram for the Little Six shows an alternate assembly for full valve gear.
Carpe Manana!
|
|
Country: USA ~
Posts: 2416 ~
Member Since: September 17 2013 ~
Last Visit: February 09 2026
|
Alert Moderator
|
|
|
|
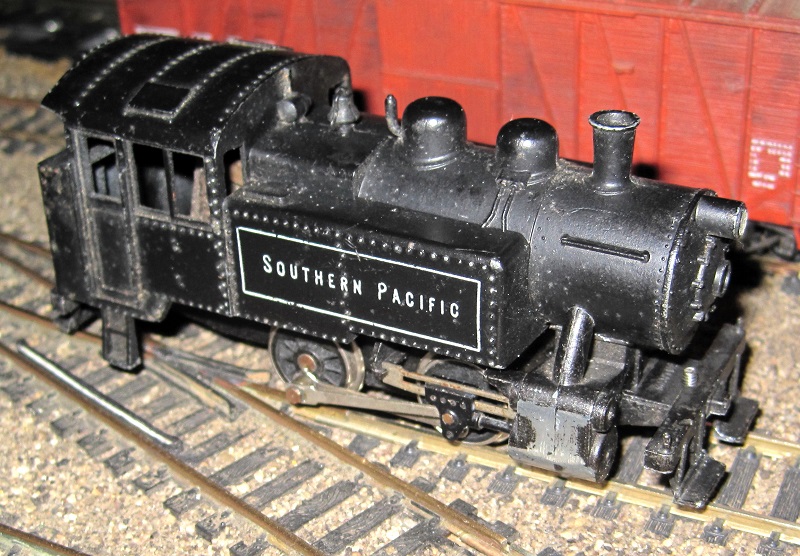
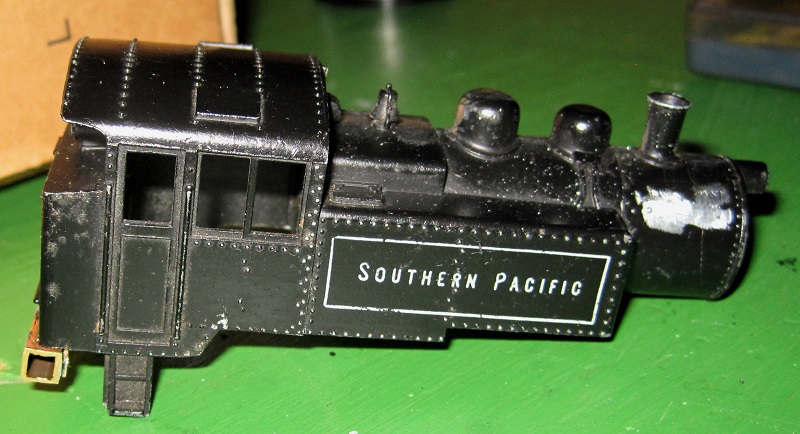
Posted - November 14 2014 : 7:55:00 PM
|
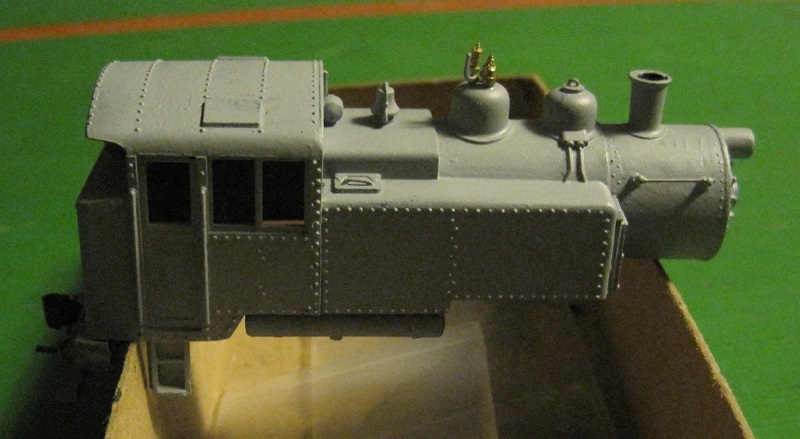
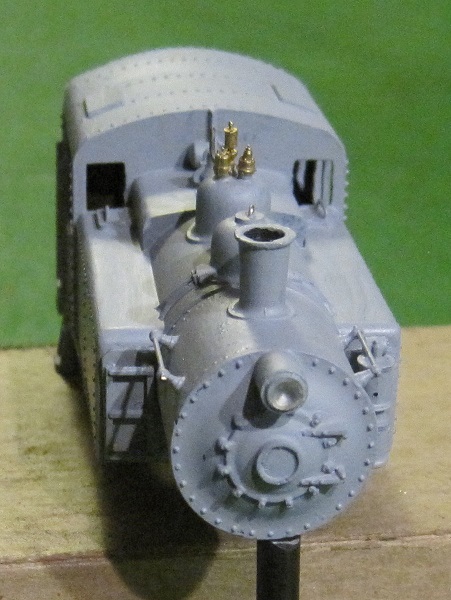
I've made some progress on detailing the shell. In this view, you can see that I've put pop valves and a whistle on top of the steam dome, a lid on the sand dome, handles on the water and fuel hatches, and an air compressor next to the smoke box.
From the front view, you can see the air compressor again and a ladder leading to the top of the water tank for access to the water hatches and the sand dome. Also, you can see the headlight which was modified from a flat white dot to a conical reflector shape with a clear lens on the front. The picture doesn't show it as well as it shows in person, but the shadow on the headlight shows the shape. Also, you can see that the molded on railings on the smoke box have been replaced with stanchions and railings.
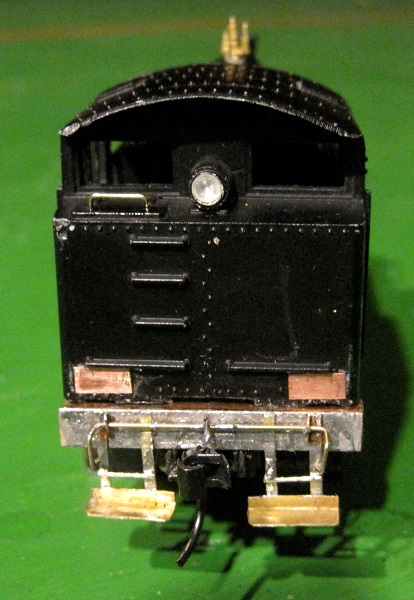
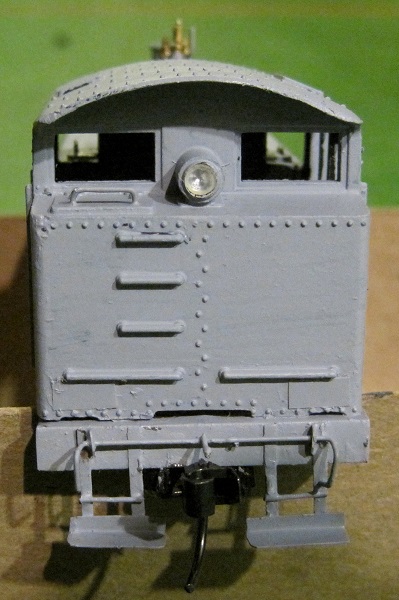
In this shot, you can see that the end beam (which is a square brass tube) has been plugged on the ends with JB Weld. The coupler has been mounted a bit more flush with the end beam. A step pilot has been added along with an uncoupling lever. A couple of patches have been added to the fuel bunker to hide the screw holes from mounting the end beam.
This shot shows more of a square-on view of the rear step pilot. The steps are made from brass from empty .22 caliber shells, and from .020" brass wire and are soldered together.
Parts of this project look somewhat crude, but I have found that a good coat of black paint will hide a whole lot of ugly. 
I have yet to add compressed air tanks. I first want to assemble it with the mechanism and check clearances to see where it is safe to put them. Presently, some paint is drying on the frame, so there's a delay on that.
Carpe Manana!
Edited by - scsshaggy on November 14 2014 7:58:46 PM
|
|
Country: USA ~
Posts: 2416 ~
Member Since: September 17 2013 ~
Last Visit: February 09 2026
|
Alert Moderator
|
|
|
|
Posted - November 14 2014 : 11:42:42 PM
|
| Mantua? Well it does resemble the RI Marx loco I has
|
|
Country: USA ~
Posts: 15026 ~
Member Since: February 23 2009 ~
Last Visit: May 25 2026
|
Alert Moderator
|
|
|
|
Posted - November 14 2014 : 11:46:09 PM
|
quote:Mantua? Well it does resemble the RI Marx loco I has
Originally posted by microbusss - November 14 2014 : 11:42:42 PM
|
 The thing is, Marx's 0-4-0 is obviously a cheap and blatant knockoff of the Mantua 0-4-0. I much prefer the Mantua 0-4-0 over Marx's. The thing is, Marx's 0-4-0 is obviously a cheap and blatant knockoff of the Mantua 0-4-0. I much prefer the Mantua 0-4-0 over Marx's.
-Steve
"A lot of modellers out there who go to these train shows see broken HO stuff and go, 'This is useless' when, in reality, they can still be used for modeling whether it's as a prop on your layout or a cool project to make something old new again."
|
|
Country: USA ~
Posts: 3533 ~
Member Since: February 17 2014 ~
Last Visit: January 11 2023
|
Alert Moderator
|
|
|
|
Posted - November 15 2014 : 12:03:31 AM
|
The detail work is looking impressive sschaggy. Looking forward to seeing more progress.
These are my favorite type of projects
http://tycodepot.com/
|
|
|
|
|
Posted - November 15 2014 : 12:57:25 AM
|
quote:
oh I see cool
I thought they looked the same
|
|
Country: USA ~
Posts: 15026 ~
Member Since: February 23 2009 ~
Last Visit: May 25 2026
|
Alert Moderator
|
|
|
|
Posted - November 15 2014 : 01:10:25 AM
|
quote: quote:
oh I see cool
I thought they looked the same
Originally posted by microbusss - November 15 2014 : 12:57:25 AM
|
They do have their differences though so there is something to set them apart easily unlike the Model Power 0-4-0s and whatnot. Still, it's a knockoff nonetheless.
-Steve
"A lot of modellers out there who go to these train shows see broken HO stuff and go, 'This is useless' when, in reality, they can still be used for modeling whether it's as a prop on your layout or a cool project to make something old new again."
|
|
Country: USA ~
Posts: 3533 ~
Member Since: February 17 2014 ~
Last Visit: January 11 2023
|
Alert Moderator
|
|
|
|
 Posted - November 15 2014 : 11:37:55 AM Posted - November 15 2014 : 11:37:55 AM
|
quote:
In the case of the Rogers 4-6-0's and many 2-6-0's the spacing is reminiscent of the spacing on a 4-4-0 with another axle thrown in ahead of the two usual ones. It seems to reflect a process of evolution from the 4-4-0 to the larger wheel arrangements.
Originally posted by scsshaggy - November 12 2014 : 8:00:36 PM
|
The reason for the widely spaced-out #2 and #3 axles on the Rodgers and many early 2-6-0 and 4-6-0 locos is to clear the firebox, which extends downward between them (and also between the frames). Early fireboxes were deep and narrow, and boilers were mounted low. The same situation exists on the classic 4-4-0, as you noted.
Some early 4-6-0 locos had such large drivers that the axles were far enough apart to clear the firebox without uneven spacing being needed.
Later 4-6-0 locomotives, like the G5, had high-mounted boilers, and wide fireboxes above the drivers, but still spaced out the #2 and #3 axles wider in order to provide clearance for the ash pan.
quote:
The Marx engine can live, I'm from Marx's hometown. But the Lima knockoff is flies in my soup. My Ebay soup. :P
Edited by - Autobus Prime on November 15 2014 11:39:19 AM
|
|
Country: USA ~
Posts: 432 ~
Member Since: March 04 2008 ~
Last Visit: December 28 2018
|
Alert Moderator
|
|
|
|
Posted - November 15 2014 : 12:03:02 PM
|
The Lima one is pretty bad as far as I can tell. I've seen them. I avoid them at all costs.
-Steve
"A lot of modellers out there who go to these train shows see broken HO stuff and go, 'This is useless' when, in reality, they can still be used for modeling whether it's as a prop on your layout or a cool project to make something old new again."
|
|
Country: USA ~
Posts: 3533 ~
Member Since: February 17 2014 ~
Last Visit: January 11 2023
|
Alert Moderator
|
|
|
|
Posted - November 15 2014 : 12:12:53 PM
|
| Don, you're talking about parts of the project looking crude. I'd say, you're looking pretty clean so far. I like the work you did with the rear steps and grab irons, and the grab irons on the doors to the water tanks . . . fine soldering. I do have a few of the 4-6-0's, though I've mostly been playing with the 2-6-0 Moguls these days. My knowledge of steam engines and all their mechanisms needs to improve before I can feel comfortable adding details that I don't really know about. It's coming . . . albeit slowly. Keep the photos comin' Don.
|
|
Country: USA ~
Posts: 2087 ~
Member Since: March 16 2013 ~
Last Visit: July 05 2018
|
Alert Moderator
|
|
|
|
Posted - November 15 2014 : 12:23:50 PM
|
quote:Don, you're talking about parts of the project looking crude. I'd say, you're looking pretty clean so far. I like the work you did with the rear steps and grab irons, and the grab irons on the doors to the water tanks . . . fine soldering. I do have a few of the 4-6-0's, though I've mostly been playing with the 2-6-0 Moguls these days. My knowledge of steam engines and all their mechanisms needs to improve before I can feel comfortable adding details that I don't really know about. It's coming . . . albeit slowly. Keep the photos comin' Don.
Originally posted by Barry - November 15 2014 : 12:12:53 PM
|
B:
With the early locos, at least, you have very few. You have injectors, sometimes pumps hung on the crosshead, a sand pipe or two, and air brakes if you're REALLY modern. :)
|
|
Country: USA ~
Posts: 432 ~
Member Since: March 04 2008 ~
Last Visit: December 28 2018
|
Alert Moderator
|
|
|
|
Posted - November 15 2014 : 9:25:35 PM
|
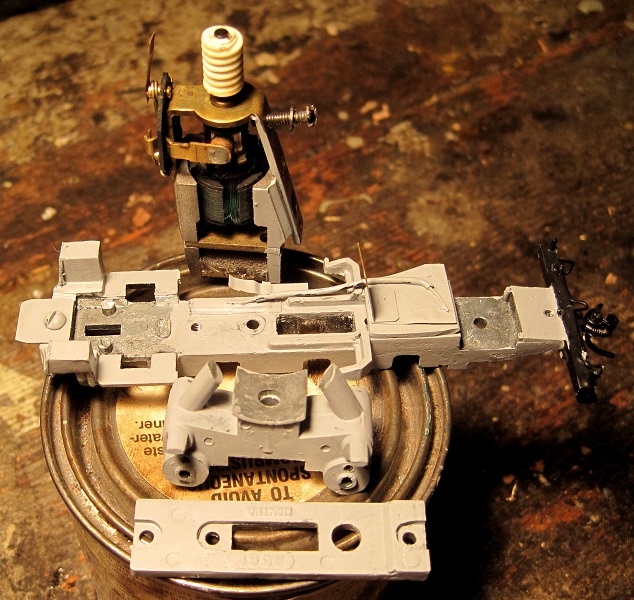
The frame and mechanism are back together and I tested the engine. It's a good puller. It pulled 5 loaded cars of coal and a caboose up and down a 5 percent grade, without slipping or struggling. See the video:
http://youtu.be/mvAvV-hSr_s
Here's the completed mechanism, ready to go under the shell:
/tyco/forum/uploaded/scsshaggy/20141115211442_001.JPG
Here, the shell is on the frame. I can measure clearances and decide what to do about compressed air tanks.
/tyco/forum/uploaded/scsshaggy/20141115211750_003.JPG
Here's the other side:
/tyco/forum/uploaded/scsshaggy/20141115211832_006.JPG
Here's the back. The coupler and steps seem to line up at about the right height.
/tyco/forum/uploaded/scsshaggy/20141115211930_004.JPG
At this time, I'll take a little while thinking and planning about where and how to place the tanks and then, once they've been added, I can paint the shell.
Carpe Manana!
|
|
Country: USA ~
Posts: 2416 ~
Member Since: September 17 2013 ~
Last Visit: February 09 2026
|
Alert Moderator
|
|
|
|
Posted - November 16 2014 : 2:56:09 PM
|
Don, Will you describe your electrical pick up system?
|
|
Country: USA ~
Posts: 2087 ~
Member Since: March 16 2013 ~
Last Visit: July 05 2018
|
Alert Moderator
|
|
|
|
Posted - November 16 2014 : 2:59:52 PM
|
| Good video of this Booster doing some work Don. How big is your layout?
|
|
Country: USA ~
Posts: 2087 ~
Member Since: March 16 2013 ~
Last Visit: July 05 2018
|
Alert Moderator
|
|
|
|
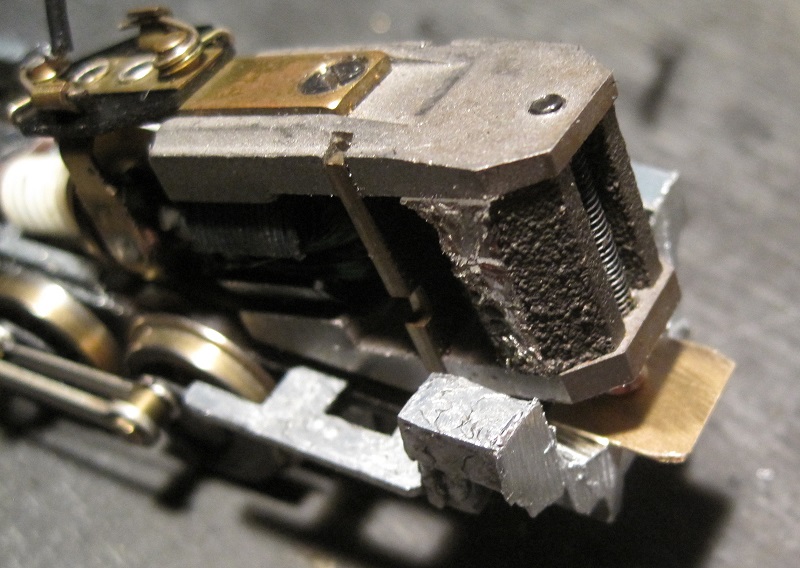
Posted - November 16 2014 : 6:36:18 PM
|
quote:Don, Will you describe your electrical pick up system?
Originally posted by Barry - November 16 2014 : 2:56:09 PM
|
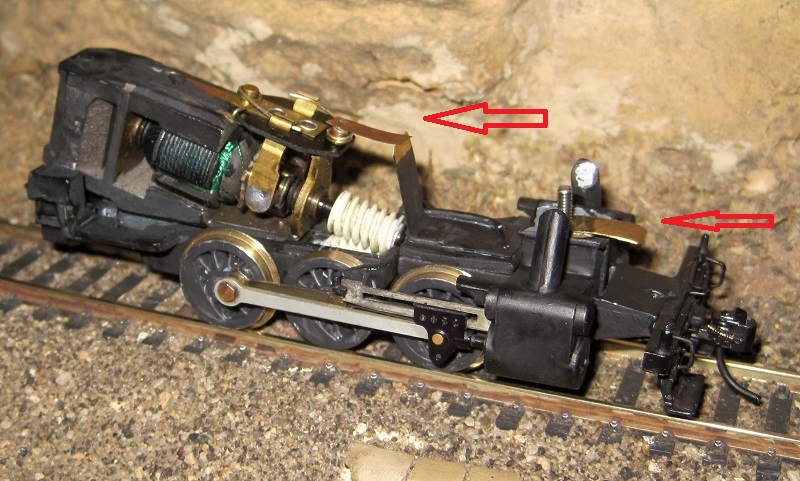
The brass thing on the right is not really part of the locomotive. It's a brass tab drilled and tapped for the screw that holds the boiler on. When the boiler is off, it holds the cylinder saddle on so the crosshead guides don't fall off.
This picture shows the setup better.
The power from the right rail comes up through the wheels, axles, bearings and frame to the motor. From the left rail it comes up the driver tires (which are insulated from the wheels) into the phosphor bronze wipers you see touching the left drivers. Those are straight strips soldered to brass tabs sticking out from the top of the frame.
The brass holding the pickup for the front axle is soldered to a piece of printed circuit board that is epoxied to the frame. This electrically isolates it from the frame. Both the PC board and the piece of brass are as big as I could make them to maximize the gluing surface. They are also rigid so the whole glue bond would have to break at once to fail (as opposed to being peeled off like a piece of tape).
One strip of brass is soldered atop the brass that holds the pickup. It sticks up ahead of the worm. A bronze strip soldered to the motor touches that brass riser to take the power from the left rail to the motor. This arrangement allows the motor to be taken off without disconnecting a wire.
A wire is soldered between that front assembly and a piece of brass holding the pickups for axles 2 and 3. That piece of brass is considerably smaller because it has to fit in a 1/8" wide space between the motor and the edge of the frame. The brass strip is about 3/32" wide. It's L shaped so the short leg of the L holds the bronze pickup wipers.
Anyway, that narrow strip of brass is epoxied to a piece of plastic (in this case, photographic film) which is epoxied to the frame. The epoxy has to be laid on kind of heavily to hold strong enough. The hardest part of this design is getting that glue joint tough enough. It seems to hold best if the epoxy oozes out from under the brass and the plastic and makes a fillet of glue between them and the frame.
quote:Good video of this Booster doing some work Don. How big is your layout?
Originally posted by Barry - November 16 2014 : 2:59:52 PM
|
Thanks for the kind words. The layout is L shaped. The long leg is 9' 6" on it longest side. The short leg is 6' 6.5" on its longest side. Both legs are 4' wide.
Carpe Manana!
Edited by - scsshaggy on November 16 2014 6:39:23 PM
|
|
Country: USA ~
Posts: 2416 ~
Member Since: September 17 2013 ~
Last Visit: February 09 2026
|
Alert Moderator
|
|
|
|
Posted - November 16 2014 : 10:05:00 PM
|
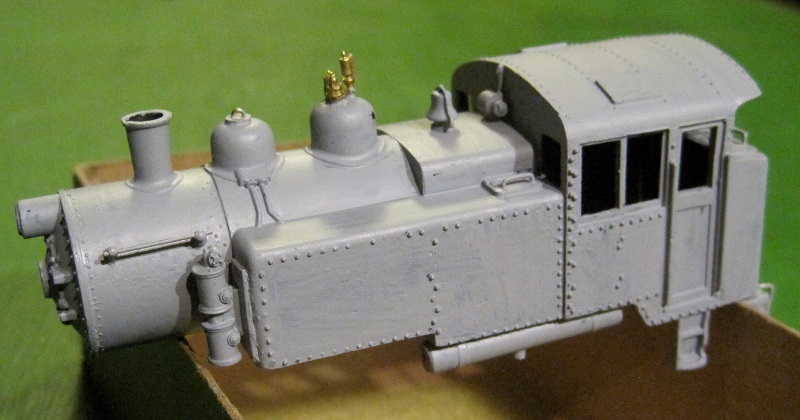
The shell is built and primed, now. The primer I used is slow to drive and I like it thoroughly dry before the finish coat, so it'll probably be another day or two before it's painted up right. The primer kind of ties things together, visually, and the engine begins to look more like a final product already.
Carpe Manana!
|
|
Country: USA ~
Posts: 2416 ~
Member Since: September 17 2013 ~
Last Visit: February 09 2026
|
Alert Moderator
|
|
|
|
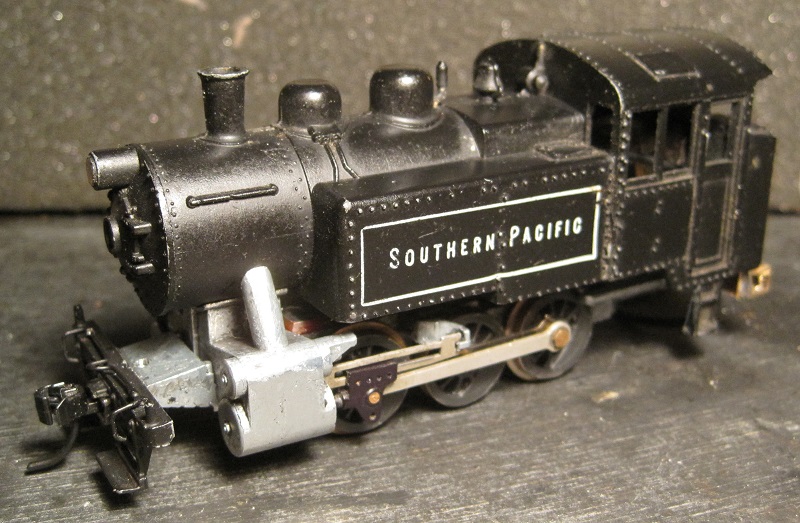
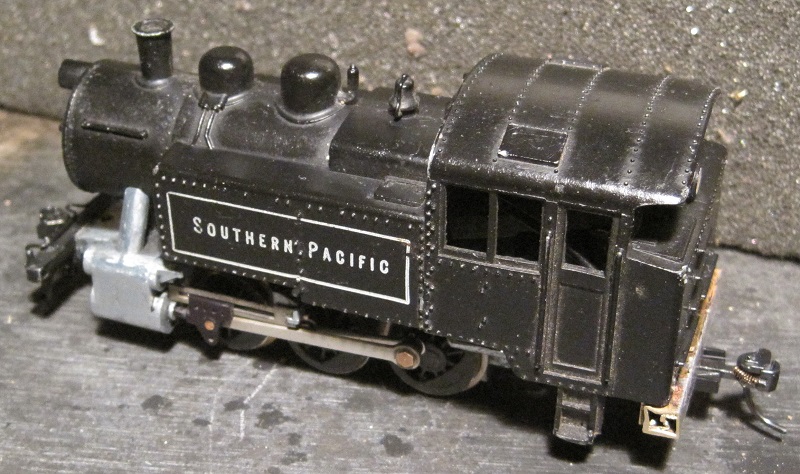
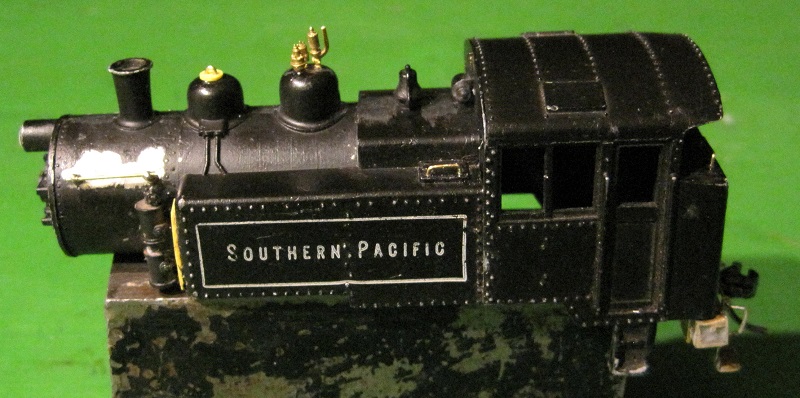
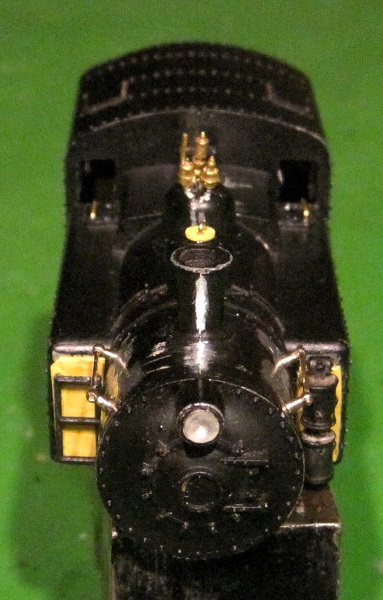
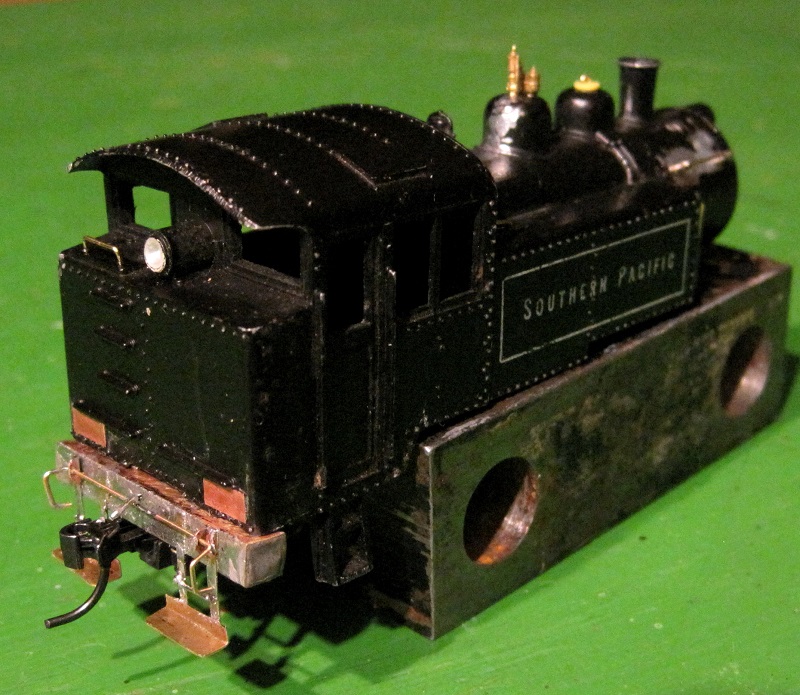
Posted - November 18 2014 : 3:52:11 PM
|
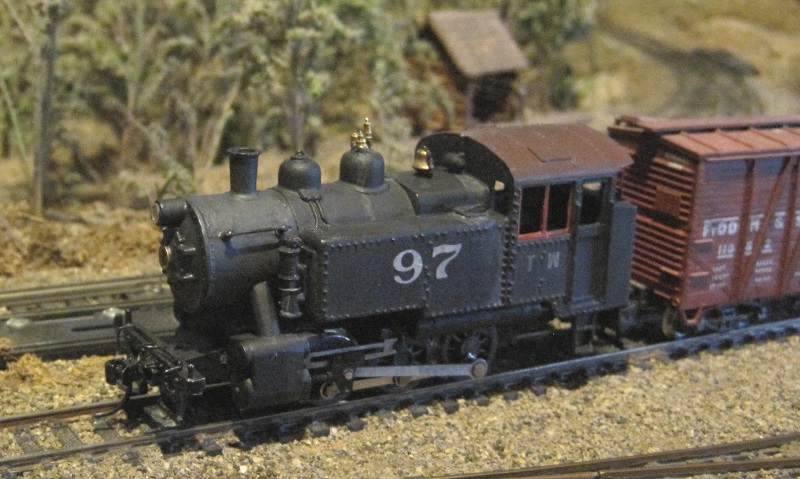
Some painting, dry-transfer lettering and weathering finish the engine:
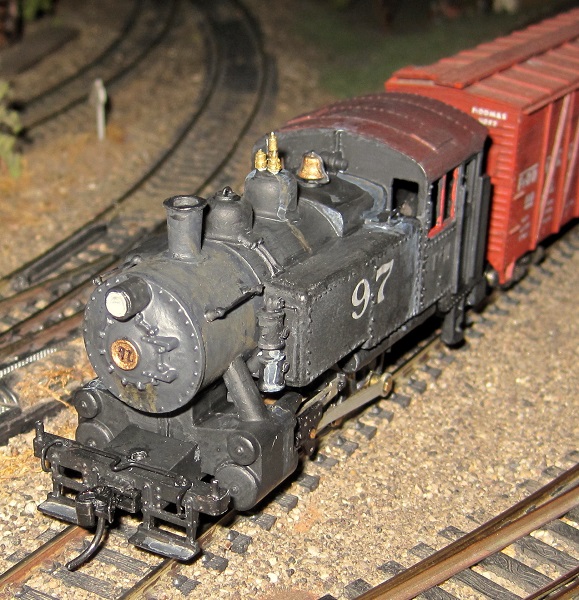
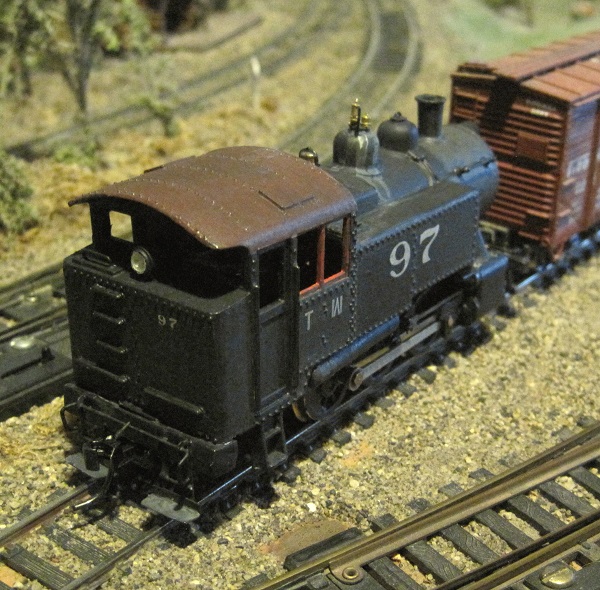
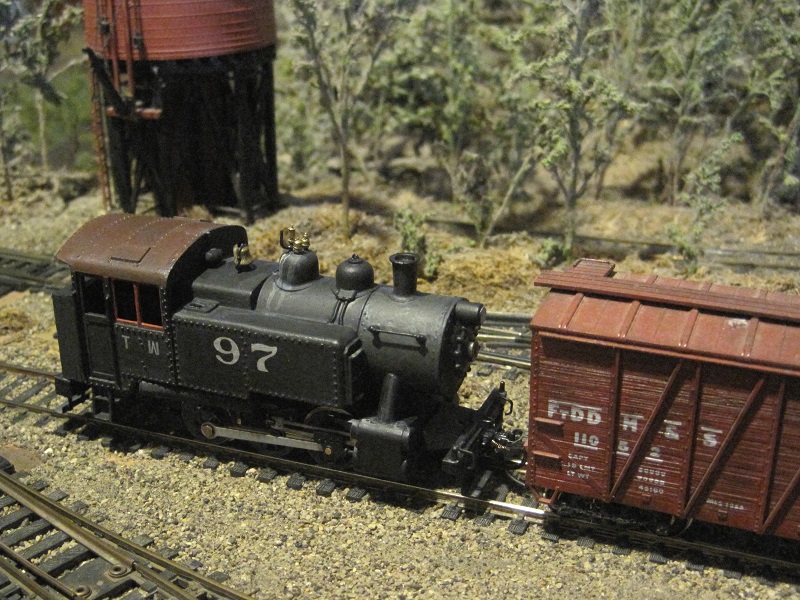
Carpe Manana!
|
|
Country: USA ~
Posts: 2416 ~
Member Since: September 17 2013 ~
Last Visit: February 09 2026
|
Alert Moderator
|
|
|
|
Posted - November 18 2014 : 5:12:44 PM
|
| Most impressive. Wish i could complete a rebuild like that - on anything.
|
Country:  Canada ~
Posts: 265 ~
Member Since: March 07 2014 ~
Last Visit: June 26 2018 Canada ~
Posts: 265 ~
Member Since: March 07 2014 ~
Last Visit: June 26 2018
|
Alert Moderator
|
|
|
|
Posted - November 18 2014 : 6:17:04 PM
|
quote:Most impressive. Wish i could complete a rebuild like that - on anything.
Originally posted by Retired Alex - November 18 2014 : 5:12:44 PM
|
Me too.It never ceases to amaze me what you can actually do with these things.
-Steve
"A lot of modellers out there who go to these train shows see broken HO stuff and go, 'This is useless' when, in reality, they can still be used for modeling whether it's as a prop on your layout or a cool project to make something old new again."
|
|
Country: USA ~
Posts: 3533 ~
Member Since: February 17 2014 ~
Last Visit: January 11 2023
|
Alert Moderator
|
|
|
|
Posted - November 18 2014 : 7:52:37 PM
|
Thanks for the kind words, guys.
Mantua uses so many interchangeable parts and repeating design principles that it's relatively easy to mix, match and modify their products. At one time, their advertising even played this up. There were ads showing super detail and customization jobs that people had done on Mantua locomotives.
They make it fun to tinker.
Carpe Manana!
|
|
Country: USA ~
Posts: 2416 ~
Member Since: September 17 2013 ~
Last Visit: February 09 2026
|
Alert Moderator
|
|
|
|
Posted - November 18 2014 : 8:51:17 PM
|
| Pretty slick Don. I continue to wonder where the red roofs on locomotives comes from and I have yet to receive an answer that seems satisfying . . . what's your take on them? Very nice painting and weathering . . . the water streaks down the steam dome . . . and the ash slime below the smoke box door. This has been a good photo story and a learning one.
|
|
Country: USA ~
Posts: 2087 ~
Member Since: March 16 2013 ~
Last Visit: July 05 2018
|
Alert Moderator
|
|
|
|
Posted - November 18 2014 : 8:57:32 PM
|
Excellent job, Shaggy.
quote:
Mantua uses so many interchangeable parts and repeating design principles that it's relatively easy to mix, match and modify their products. At one time, their advertising even played this up.
Originally posted by scsshaggy - November 18 2014 : 7:52:37 PM
|
I think Rivarossi was their polar opposite, when you consider how many different types of machine screws they turned for just one locomotive alone.
The Tyco Depot
|
|
Country: USA ~
Posts: 3927 ~
Member Since: June 20 2007 ~
Last Visit: November 19 2015
|
Alert Moderator
|
|
|
|
Posted - November 18 2014 : 10:24:43 PM
|
| Dang Shaggy, it looks outstanding.
|
|
Country: USA ~
Posts: 865 ~
Member Since: September 23 2014 ~
Last Visit: May 01 2023
|
Alert Moderator
|
|
|
|
Posted - November 18 2014 : 10:46:01 PM
|
quote:I continue to wonder where the red roofs on locomotives comes from and I have yet to receive an answer that seems satisfying . . . what's your take on them?
Originally posted by Barry - November 18 2014 : 8:51:17 PM
|
I have read that locomotive roofs were susceptible to rust and that it didn't show up so badly on an oxide red roof. I go with red roofs because my layout is not very brightly lit and a little break in the black monotony just looks good in that situation.
Another good break in the basic black is to make the smoke box a different shade or color. Often smoke box fronts were painted silver to make the approaching train more visible at a grade crossing. This engine being a yard engine, I decided that crossing safety was kind of irrelevant, but the smoke box is still a slightly grayer shade of black to represent a high-temperature graphite paint contrasted with the black paint on the jacket, cab and tanks.
Thanks, everyone, for the kind words.
Carpe Manana!
Edited by - scsshaggy on November 18 2014 10:49:24 PM
|
|
Country: USA ~
Posts: 2416 ~
Member Since: September 17 2013 ~
Last Visit: February 09 2026
|
Alert Moderator
|
|
|
|
Posted - November 18 2014 : 10:53:49 PM
|
Come to think of it, I wonder why Mantua didn't just use the Big Six frame in the first place. Maybe it was to make room for that big pickup shoe, but that doesn't explain the big gap between the center and rear axles. The whole wheelbase is stretched.
The Tyco Depot
|
|
Country: USA ~
Posts: 3927 ~
Member Since: June 20 2007 ~
Last Visit: November 19 2015
|
Alert Moderator
|
|
|
|
Posted - November 19 2014 : 09:56:15 AM
|
quote:Excellent job, Shaggy.
quote:
Mantua uses so many interchangeable parts and repeating design principles that it's relatively easy to mix, match and modify their products. At one time, their advertising even played this up.
Originally posted by scsshaggy - November 18 2014 : 7:52:37 PM
|
I think Rivarossi was their polar opposite, when you consider how many different types of machine screws they turned for just one locomotive alone.
Originally posted by NickelPlate759 - November 18 2014 : 8:57:32 PM
|
"Why use one part when five will do just as well?" Typical Rivarossi.
Also, I swear they had assemblers with six hands.
|
|
Country: USA ~
Posts: 432 ~
Member Since: March 04 2008 ~
Last Visit: December 28 2018
|
Alert Moderator
|
|