|
|
 Posted - October 22 2014 : 12:37:31 PM Posted - October 22 2014 : 12:37:31 PM


|
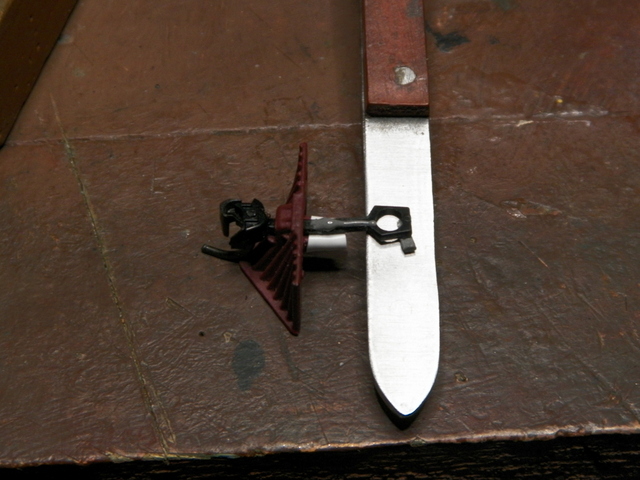
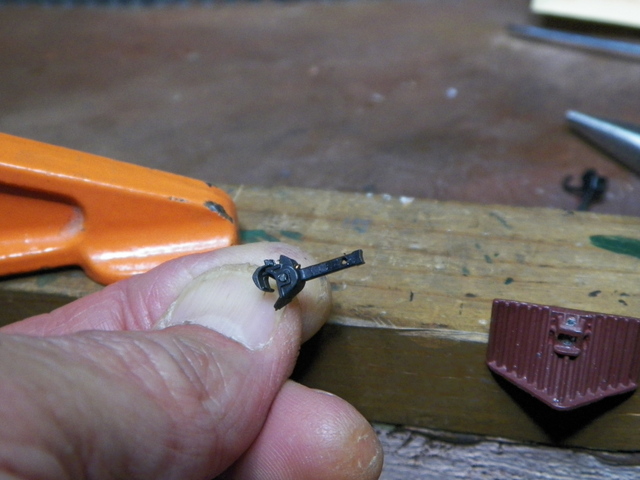
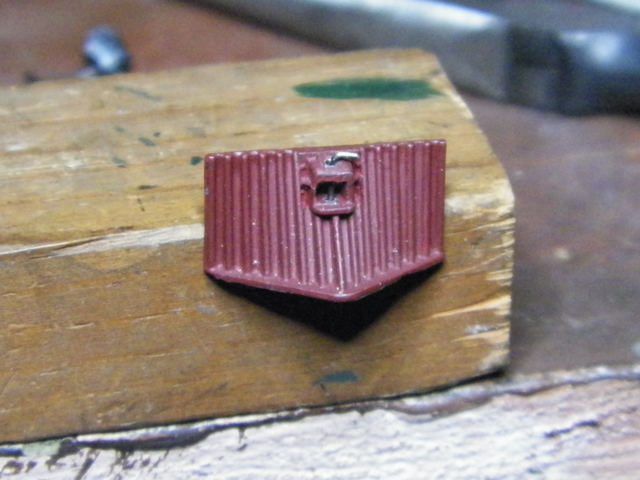
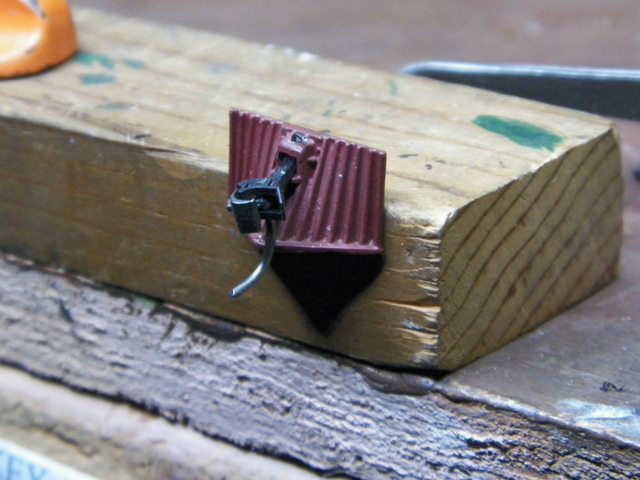
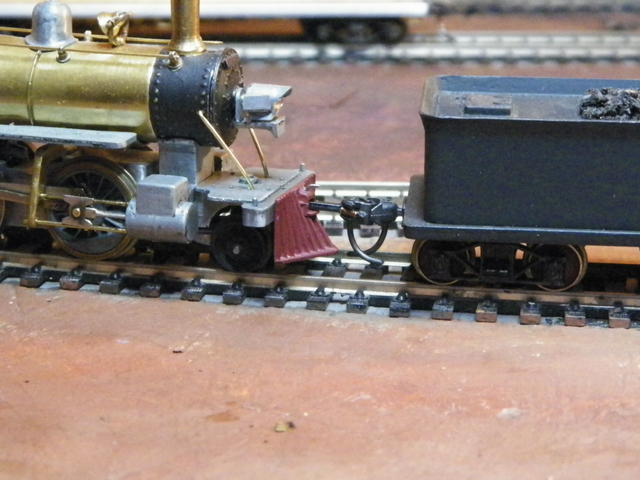
I want to put a coupler through this pilot which has a small opening; just a little larger than the shank on a Kadee coupler. My preference would be to find a ready made coupler that would fit, which is one of my questions . . . anyone know of a source for odd couplers? The other question is a fabrication question. In this photo you can see what will most likely be my futile attempt to get a coupler through the opening . . . hacking a couple in half and gluing the parts together (JB Weld) after it's through the opening. Any thoughts are appreciated. Thanks.
|
Country:  USA ~
Posts: 2087 ~
Member Since: March 16 2013 ~
Last Visit: July 05 2018 USA ~
Posts: 2087 ~
Member Since: March 16 2013 ~
Last Visit: July 05 2018
|
 Alert Moderator
|
|
|
|
Posted - October 22 2014 : 3:34:20 PM

|
Barry,
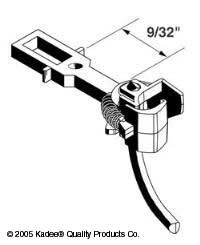
Since the coupler will be non-automatic because of the tight fit. I would cut the shank of the coupler and drill a small hole in the shank and pin it to the pilot. leaving it sticking out far enough so it can move back and forth in operation.
Regards, John
What was the best thing before sliced bread? <> George Carlin
|
|
Country: USA ~
Posts: 886 ~
Member Since: January 11 2012 ~
Last Visit: December 16 2023
|
Alert Moderator

|
|
|
|
Posted - October 22 2014 : 4:09:52 PM
|
Barry, I've found that discontinued Kadee #4's are often a good fit for pilots, if you can find them.
http://www.kadee.com/htmbord/page4.htm
I usually file off the little side tabs and then pin it in as John suggests.
But since these couplers are discontinued and almost impossible to find nowadays I will probably be following John's suggestion and drill a small hole in a modified #5 and pin it.
-Thomas
|
|
Country: USA ~
Posts: 1090 ~
Member Since: July 07 2011 ~
Last Visit: May 22 2026
|
Alert Moderator
|
|
|
|
Posted - October 22 2014 : 4:56:35 PM
|
Barry, I have some of those obsolete KD's if you need some. I found that they also make a nice brake wheel stand by cutting the coupler head off.
I like everything to operate so I make the hole in the pilot just large enough to get the shank through and used to then mount a coupler box. Now with the Whisker coupler, the tiny springs ride in the pilot hole and you just have to drill and tap a place for a #2-56 screw.
They don't always come out looking real prototypical but I have this OCD thing about a coupler having to work.
Randy
|
|
Country: USA ~
Posts: 367 ~
Member Since: April 30 2011 ~
Last Visit: May 25 2026
|
Alert Moderator
|
|
|
|
Posted - October 22 2014 : 6:45:58 PM
|
| Hey thank you folks for your great replies and solutions. I kind of dig the pin idea; I'm gonna think about it a bit before I take the risk of ruining the pilot by me making an error in drilling. Randy, what is the width and thickness of the #4? The clearance I have is like 3/32" wide and 2/32" high. Redwoods, yeah, I'm wantin' to find out more about those #4's . . . to see how much I can whittle it down.
|
|
Country: USA ~
Posts: 2087 ~
Member Since: March 16 2013 ~
Last Visit: July 05 2018
|
Alert Moderator
|
|
|
|
Posted - October 22 2014 : 7:12:14 PM
|
Barry, I would amplify John's idea about moving the coupler out farther forward.
When you couple your front coupler to something else, that car's coupler will have it's Kadee trip pin (a.k.a. air hose) sticking out toward the pilot. That means that couplers on "cow catcher" style pilots need to stick out farther than usual. I'll admit to having needed to learn this the hard way. 
Carpe Manana!
|
|
Country: USA ~
Posts: 2416 ~
Member Since: September 17 2013 ~
Last Visit: February 09 2026
|
Alert Moderator
|
|
|
|
Posted - October 22 2014 : 7:26:31 PM
|
quote:Barry, I would amplify John's idea about moving the coupler out farther forward.
When you couple your front coupler to something else, that car's coupler will have it's Kadee trip pin (a.k.a. air hose) sticking out toward the pilot. That means that couplers on "cow catcher" style pilots need to stick out farther than usual. I'll admit to having needed to learn this the hard way.
Originally posted by scsshaggy - October 22 2014 : 7:12:14 PM
|
A solution would be to cut the trip pins off. Not an attractive one if you are coupling a lot of different cars to that side, but if you only couple a few specific cars to the cowcatcher side it might be something to consider. Of course that's assuming you don't use the trip pins for automatic uncoupling.
http://tycodepot.com/
|
|
|
|
|
Posted - October 22 2014 : 8:15:08 PM
|
Jerry, it measures .050" thick by .188" wide at it widest area which are two tits; one on each side. If these are ground off then it measures .129" wide.
Randy
|
|
Country: USA ~
Posts: 367 ~
Member Since: April 30 2011 ~
Last Visit: May 25 2026
|
Alert Moderator
|
|
|
|
Posted - October 22 2014 : 9:19:31 PM
|
Randy, Thanks for measuring that. In decimals the pilot opening is .0625 by .0937.
I would need to shave off more than the "tits" and I don't think there's room to do that. The business about the "trip pins" was something I hadn't considered either.
John's idea about "pinning" the shank to the pilot is intriguing and I'm thinking there may even be enough room on the mounting flange to run a pin through . . . given that I could get enough of the shank in a forward position. You guys have given me good thoughts to work this out.
So far . . . the JB Weld has held on the side pictured; enough so that I was able to turn the coupler over to do the other side. If it survives some gentle filing, I'm going to hook it up . . . long enough to see it get pulled apart.
|
|
Country: USA ~
Posts: 2087 ~
Member Since: March 16 2013 ~
Last Visit: July 05 2018
|
Alert Moderator
|
|
|
|
Posted - October 22 2014 : 9:31:25 PM
|
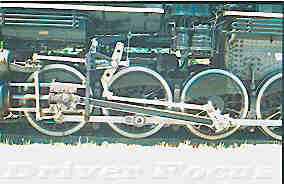
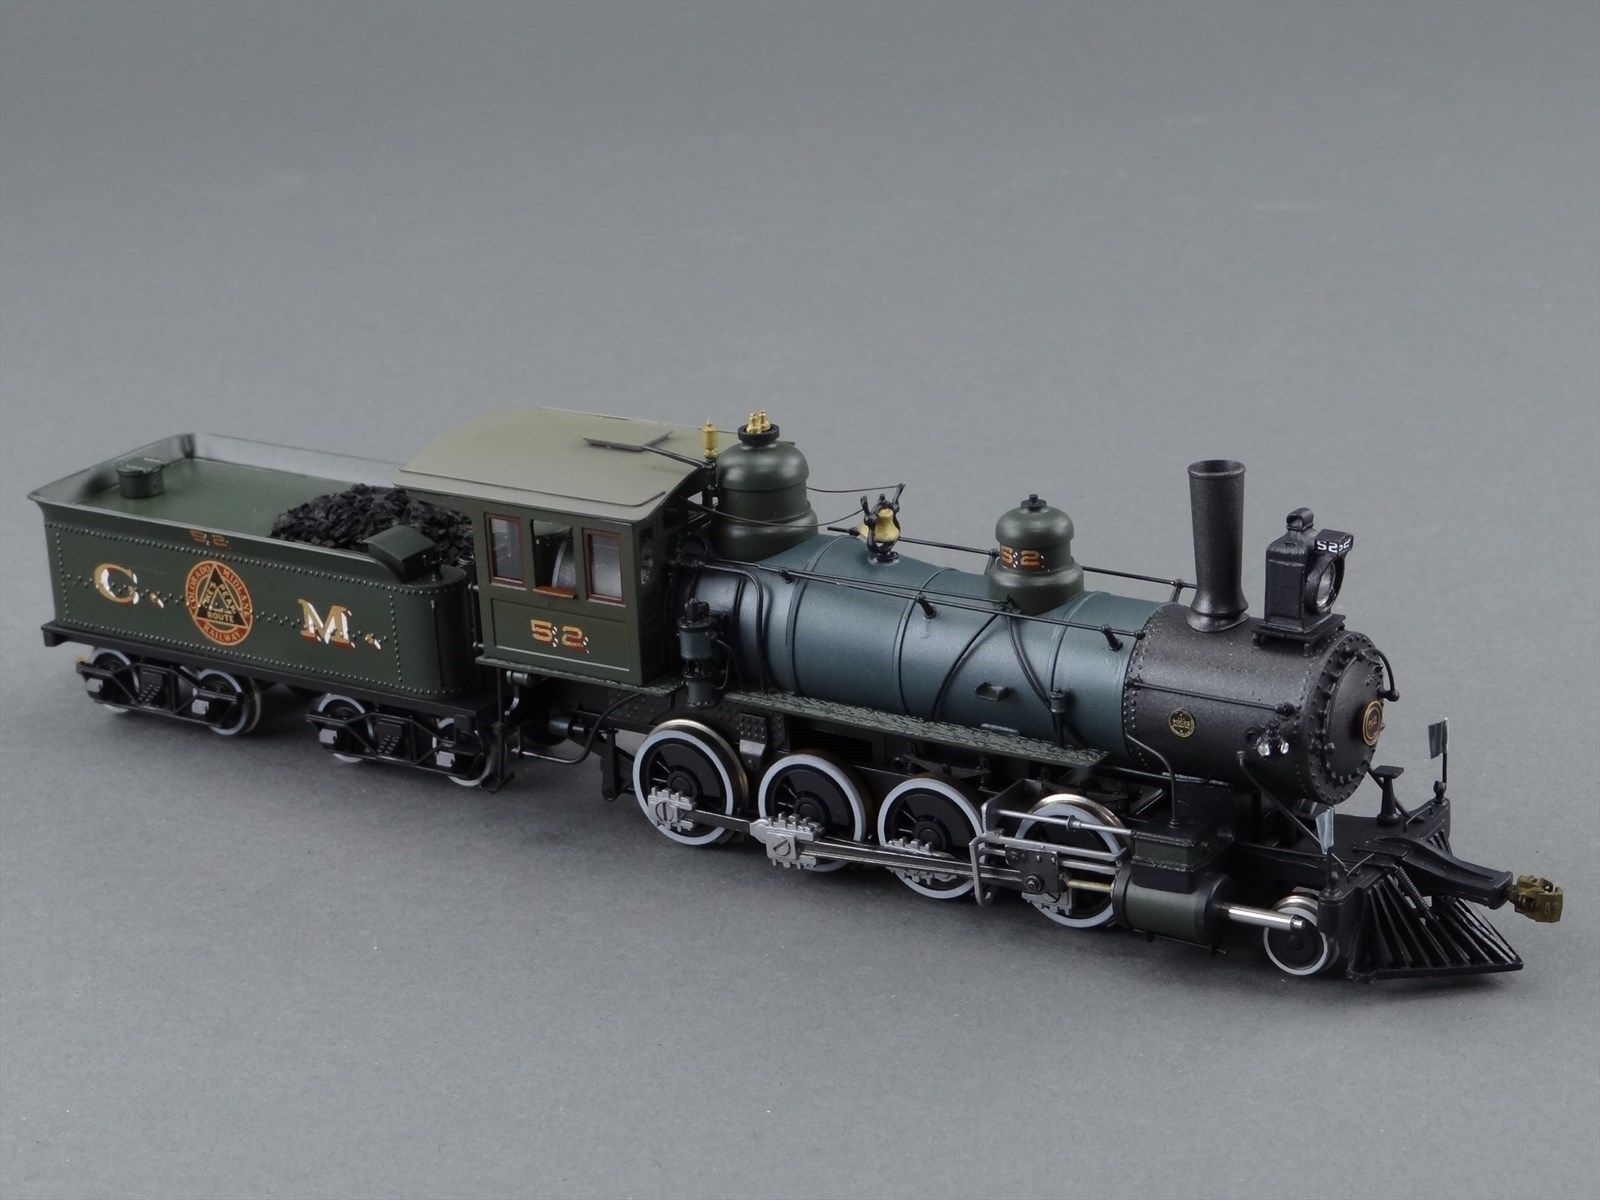
I just saw this crazy extended pilot coupler "housing" on this model on eBay . . .
|
|
Country: USA ~
Posts: 2087 ~
Member Since: March 16 2013 ~
Last Visit: July 05 2018
|
Alert Moderator
|
|
|
|
Posted - October 22 2014 : 9:49:17 PM
|
You people are awesome. I have a very similar problem and I believe #4's are the answer. While I do have a supply of them, I have no experience installing them on anything. Anyone have advice on installing #4's in tight spaces?
--CRC
|
|
Country: USA ~
Posts: 930 ~
Member Since: January 25 2012 ~
Last Visit: August 23 2023
|
Alert Moderator
|
|
|
|
Posted - October 22 2014 : 10:19:28 PM
|
quote:I just saw this crazy extended pilot coupler "housing" on this model on eBay . . .
Originally posted by Barry - October 22 2014 : 9:31:25 PM
|
I wonder how hard it'd be to put a hinge on that coupler mount
Since them old Link n Pins were always laying on the cowcatcher 
& thats a Colorado Midland loco
|
|
Country: USA ~
Posts: 15026 ~
Member Since: February 23 2009 ~
Last Visit: May 25 2026
|
Alert Moderator
|
|
|
|
Posted - October 22 2014 : 11:24:51 PM
|
quote:I wonder how hard it'd be to put a hinge on that coupler mount
Since them old Link n Pins were always laying on the cowcatcher
Originally posted by microbusss - October 22 2014 : 10:19:28 PM
|
Pity the brakeman who'd have to lift and lower a Janney coupler on a hinge and then lock it into place, somehow.  Those beasts are heavy! Those beasts are heavy!
It's much easier to lift a little draw bar and poke it into a link and pin socket. It also fits between the bars of the pilot a whole lot better.
Carpe Manana!
|
|
Country: USA ~
Posts: 2416 ~
Member Since: September 17 2013 ~
Last Visit: February 09 2026
|
Alert Moderator
|
|
|
|
Posted - October 23 2014 : 01:13:21 AM
|
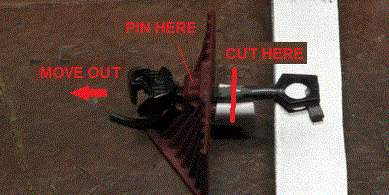
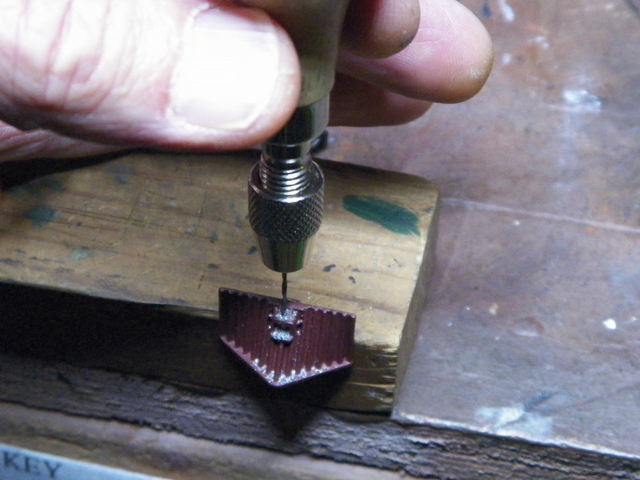
Well . . . I ended up taking John's solution and even though I have yet to mount the pilot on the frame, I'm real happy with the results. I also realized that even if I did get a coupler shank to go all the way through the pilot to be secured along with the pilot flange . . . well, that would not have worked because the thickness of the coupler where the screw would pass through would be the same distance closer to the track that the pilot would come . . . and in this particular case, I believe that would have touched and shorted everything out.
So . . first I had to figure out if I had a bit to drill ("carve", hey?) a hole that small. I ended up using a 67. I mounted the pilot on a block of wood using the flange that would be used to mount the pilot to the frame and clamped the block of wood, to improve my chances of getting it done half-way in alignment.

I also realized I could gain another 2mm in shank length if I cut the shank between the legs of the pivot hole (e.g., 1mm for that and 1mm for my previous short cut).
I had thought of having the wire pin go all the way through the cast metal, but the thickness of the pilot at this spot is essentially just shy of touching the track so even if I did drill through, it would be a risk having one end of the wire pin dragging the track (I suppose you could find a use for that, hey?). So, at this time, the wire pin drops into a hole below the coupler that may be like 1 mm or so.
One of the pleasant surprises was that there is some lateral motion of the coupler, and it may just be far enough out from the pilot that I don't have to chop the air hoses off?
I'm not sure about coupler height yet . . . ready to take a break and approach the fine adjustment tomorrow. Bottom line, I think John's idea was technically good and it even looks prototypical. Don, I'm gonna have to look into that Janney coupler business.
I'll get some photos of the stuff tomorrow; mounting and adjusting and . . . maybe a "double header" . . . which is why I wanted to try it in the first place. I dig the idea that it can be taken on and off by just removing the pin. May well need to replace that coupler a time or two since there's not much skin outside the pin hole, though I think that particular plastic is fairly tough.
|
|
Country: USA ~
Posts: 2087 ~
Member Since: March 16 2013 ~
Last Visit: July 05 2018
|
Alert Moderator
|
|
|
|
Posted - October 23 2014 : 08:34:59 AM
|
quote:Don, I'm gonna have to look into that Janney coupler business.
Originally posted by Barry - October 23 2014 : 01:13:21 AM
|
That was just me laughing along with Microbuss about the idea of hinging the extended draft gear on this front coupler:

the way locomotives had a drop-down drawbar on the pilot:
in the days of link and pin couplers.
Carpe Manana!
|
|
Country: USA ~
Posts: 2416 ~
Member Since: September 17 2013 ~
Last Visit: February 09 2026
|
Alert Moderator
|
|
|
|
Posted - October 23 2014 : 10:19:21 AM
|
| Don, do you happen to have any photos of one of those drop down draw bars in use?
|
|
Country: USA ~
Posts: 2087 ~
Member Since: March 16 2013 ~
Last Visit: July 05 2018
|
Alert Moderator
|
|
|
|
Posted - October 23 2014 : 11:45:28 AM
|
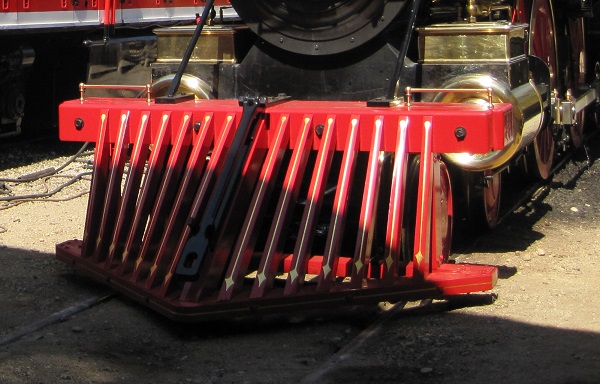
Just an observation- that photo above of the link in the front of the cowcatcher...I looked at that photo and saw art, not just mechanical parts- look at how the individual tines had been decorated with the gold arrows and the color scheme. Great image!
Siouxlake Ron
|
|
Country: USA ~
Posts: 510 ~
Member Since: September 21 2011 ~
Last Visit: December 21 2014
|
Alert Moderator
|
|
|
|
Posted - October 23 2014 : 11:59:10 AM
|
quote:Don, do you happen to have any photos of one of those drop down draw bars in use?
Originally posted by Barry - October 23 2014 : 10:19:21 AM
|
No, I don't. I got to thinking about it and the likeliest engine to be coupled that way, at this late date, is the Inyo at Nevada State Railroad Museum. I did some searching for such an image and the best I could find was the image at the top of their Facebook page:
https://www.facebook.com/NSRMCC
Unfortunately the picture leaves of just short of the car to which the engine is coupled. 
Carpe Manana!
|
|
Country: USA ~
Posts: 2416 ~
Member Since: September 17 2013 ~
Last Visit: February 09 2026
|
Alert Moderator
|
|
|
|
Posted - October 23 2014 : 12:01:12 PM
|
Here's my fun this morning . . .
The alignment and air hoses presented no problem and no adjustment for height was required. The "pin" does have a tendency to work it's way out some, but stays in enough to keep the train together. I'm going to try a bit heavier wire.
This video is at 50% throttle. Prior to the double header, if I added the tank car to the brass locomotive by itself, it would "spin" a little in rough trackage . . . no problems with that at this point.
Now, I've been screwing around with this stuff and neglecting my work. "Catch you on the rebound".
Best regards,
Barry
|
|
Country: USA ~
Posts: 2087 ~
Member Since: March 16 2013 ~
Last Visit: July 05 2018
|
Alert Moderator
|
|
|
|
Posted - October 23 2014 : 12:09:34 PM
|
quote:Just an observation- that photo above of the link in the front of the cowcatcher...I looked at that photo and saw art, not just mechanical parts- look at how the individual tines had been decorated with the gold arrows and the color scheme.
Originally posted by siouxlake - October 23 2014 : 11:45:28 AM
|
The engine is the "Leviathan" from Kloke Locomotive Works. It was built, in part, borrowing tooling and plans collected by the National Park Service for its replica of Central Pacific's "Jupiter."
That makes it a replica of the 1860's style of locomotive building. Engines of that era were unbelievably ornate.
Carpe Manana!
|
|
Country: USA ~
Posts: 2416 ~
Member Since: September 17 2013 ~
Last Visit: February 09 2026
|
Alert Moderator
|
|
|
|
Posted - October 23 2014 : 2:23:30 PM
|
Barry,
I like it. It looks good.
Regards, John
Did you notice that last week Jay Carney blamed the low GDP growth on a hard cold winter, and this week he is defending global warming initiatives! I'm glad I don't have his job! <> Junior
|
|
Country: USA ~
Posts: 886 ~
Member Since: January 11 2012 ~
Last Visit: December 16 2023
|
Alert Moderator
|
|
|
|
Posted - October 23 2014 : 3:08:17 PM
|
Air Brakes...
There weren't any, back in the day. Check out the video about Westinghouse. It took quite some time for railroads to accept the use of air brakes. And, even so, freight trains were not equipped with air brakes until well after passenger trains were.
As with the modern day application (and seemingly repeated) ATC, railroads fought tie and spike before the gov't stepped in and said it was manditory for "ALL TRAINS" to have air brakes. Eventual items were also added like roller-bearing trucks.
I saw a picture, here in this thread, with a "pin" for that coupler/link... if you want prototype looks, and are OCD about it, then wouldn't you also be the same about when air brakes were actually accepted, and then know that air brakes could almost be seen humorously as a luxury as air-conditioning?
I know... sounds like rivet counting. But it also seems like there's a method of choosing which rivets to count.
Lost my train of thought and got off track about the pin...
I think you could actually (with tweezers?) include a coupling operation using the "link/pin" idea for at least this locomotive.
Oh, I went to the webpage of the Nevada State Railroad... scroll down and you will see an old picture of such a locomotive's pilot/cowcatcher "pinned" to a water car.
my $0.05
John
uh, p.s. In the model train world, the air hoses on these couplers were put there so that one could use a magnet device to uncouple the cars. Pre-1900's cars did not have any air brakes/hoses. The sole stopping force was made by the locomotive... and the brakemen who had to get out and ride the roofs!
I don't have a one track mind. It depends on the turn-out.
"I love your catenary!"
Is that a power-trip or just another pick-up line?
Edited by - zebrails on October 23 2014 3:18:08 PM
|
Country:  Canada ~
Posts: 1124 ~
Member Since: December 15 2006 ~
Last Visit: January 30 2023 Canada ~
Posts: 1124 ~
Member Since: December 15 2006 ~
Last Visit: January 30 2023
|
Alert Moderator
|
|
|
|
Posted - October 23 2014 : 8:47:09 PM
|
| Hey [Zebrails] John, thanks for the info on the air hoses. I will confess my ignorance; I've learned a bunch from this forum and you just helped me along. That is an interesting thought about converting to link and pin couplers. At this point, I really had to think about wanting to put a pin through that pilot, but I figured if I couldn't stand it, then I could fill the hole and paint it and it wouldn't be seen. I'm really not wanting to add a bunch of detail to these older Mantua things; beyond what comes with the kit . . . I think? At any rate, that is very interesting to learn about. I did just try to look at the Nevada State Railroad site in several spots, but I never could find the photo you were talking about. If you come across it again, send me a link.
|
|
Country: USA ~
Posts: 2087 ~
Member Since: March 16 2013 ~
Last Visit: July 05 2018
|
Alert Moderator
|
|
|
|
Posted - November 05 2014 : 11:51:42 PM
|
quote:Hey [Zebrails] John, thanks for the info on the air hoses. ... send me a link.
Originally posted by Barry - October 23 2014 : 8:47:09 PM
|
https://www.facebook.com/NSRMCC/photos/a.10150660061400669.387779.187469455668/10152361906140669/?type=1&theater
The link, sir!
John
I don't have a one track mind. It depends on the turn-out.
"I love your catenary!"
Is that a power-trip or just another pick-up line?
|
|
Country: Canada ~
Posts: 1124 ~
Member Since: December 15 2006 ~
Last Visit: January 30 2023
|
Alert Moderator
|
|
|
|
Posted - November 06 2014 : 01:44:23 AM
|
| Thanks for the link John. That picture tells it. It would look cool (albeit a bit more complicated to couple and uncouple) to convert. A little pricey, though, as well.
|
|
Country: USA ~
Posts: 2087 ~
Member Since: March 16 2013 ~
Last Visit: July 05 2018
|
Alert Moderator
|
|