|
|
 Posted - September 25 2014 : 2:09:34 PM Posted - September 25 2014 : 2:09:34 PM


|
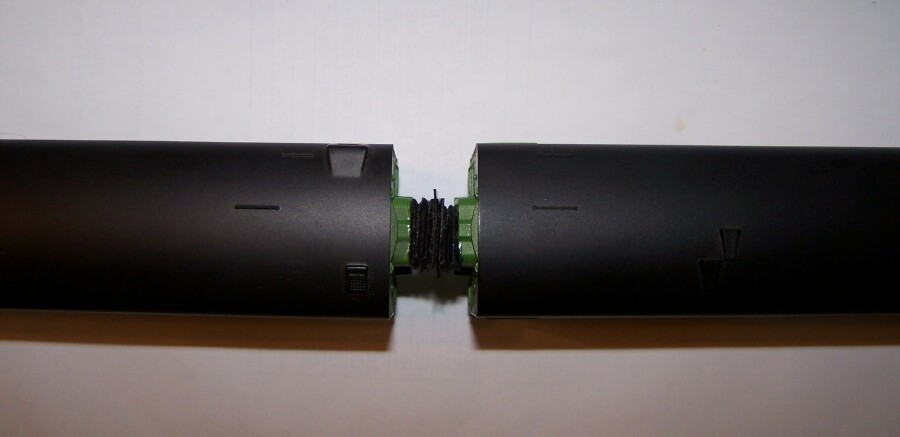
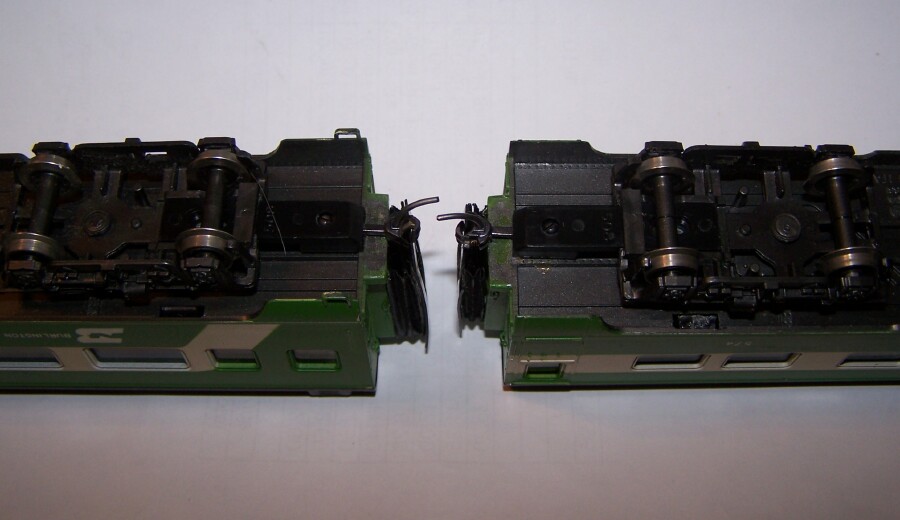
I ordered some Kadee 508 passenger truck upgrade kits for my Burlington Northern AHM / Rivarossi passenger cars last week, and started working on a couple this week. The 3 I started with have accordian pleats on each end. I have others without. The 508 set came with #5's, they were a bit short with the pleats on, so I subbed #26's which are about 1/8 inch longer.
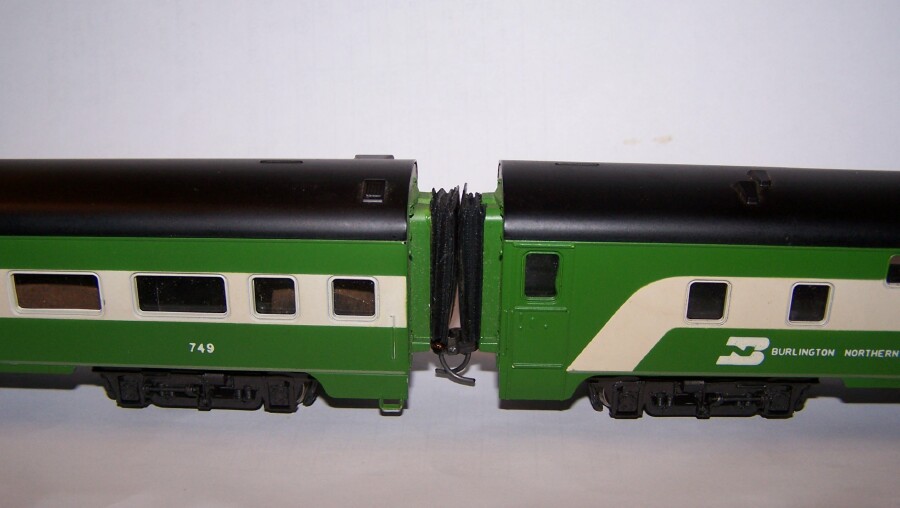
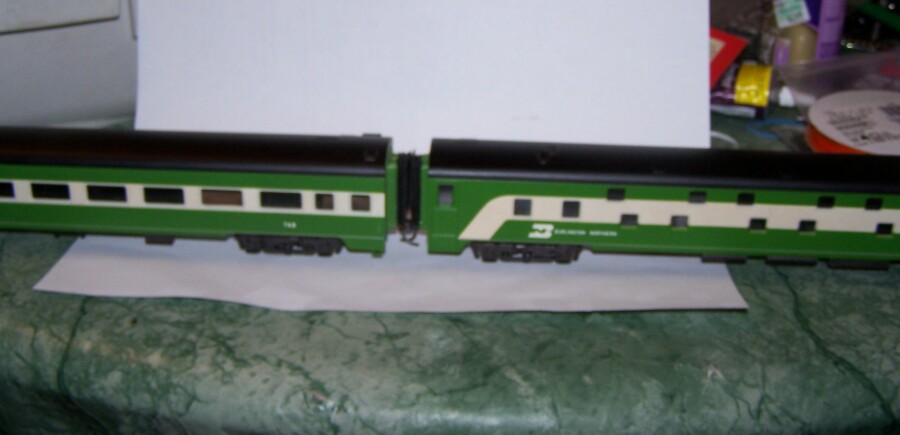
Now, my issue - do they look like they're too far apart? The car body already has a protruding area, like fake pleats? Not sure. So are the added-on pleats making them sit too far apart? I don't know. I don't want to take this too far, then have to switch them all again. So I did two cars, and took some pictures. I haven't run proto-realistic passenger cars before, so not sure if they look right or not. Maybe I need to just paint the plastic protrusions black, and put #5's back on? Anyone else done the 4-wheel conversions before, and what is a realistic look for them? Thanks in advance for any input.
Jerry
" When life throws you bananas...it's easy to slip up"
|
Country:  USA ~
Posts: 3974 ~
Member Since: January 04 2009 ~
Last Visit: January 11 2019 USA ~
Posts: 3974 ~
Member Since: January 04 2009 ~
Last Visit: January 11 2019
|
 Alert Moderator
|
|
|
|
Posted - September 25 2014 : 2:42:06 PM
|
Jerry,
1. What about removing the plastic on the cars, and installing couplers with shorter shanks.
2. If one wanted diaphragms, one could just install one on one end of each car and on the other
end install a short shank coupler. The cars could only be run in one direction on your layout.
3, As for me, I would just paint the protrusions black and change the couplers.
Regards John
The reason grandparents and grandchildren get along so well is that they have a common enemy. <> Sam Levenson
Edited by - JRG1951 on September 25 2014 3:10:13 PM
|
|
Country: USA ~
Posts: 886 ~
Member Since: January 11 2012 ~
Last Visit: December 16 2023
|
Alert Moderator

|
|
|
|
Posted - September 25 2014 : 7:01:26 PM
|
Jerry - I have probably done 100 of these 4-wheel (and 6-wheel) conversions on AHM/IHC/Con-Cor/Rivarossi/etc...
The Kadee literature advises to adjust the position of the coupler so that the vertical trip pin axis aligns with the back edge of the 'protrusion' as you call them. At the very least, this is a good starting place. And, since the 508 has a slotted mounting hole, try to drill the hole for the screw in the truck at a place that allows you to use that for some adjusting play, forward and backward.
Also...looking at your installation...I remove that bottom bar on the truck that you have retained. Might appear that it is needed for reinforcement purposes but it is not necessary and makes adjustments/installation much easier. You have also mounted your 508 back farther from the edge than I do - which is why you needed those longer shanked couplers.
The variable in this is the large diaphragms you are using .Being pleated and therefore having the ability to compress freely, I would adjust the coupler postion so that the diaphragms are touching fairly close when the cars are straight, yet don't interfere with your train tracking around curves (or look funky). Try it out, see how it looks and operates - if it needs more space slide your couplers out a bit.
Just me, I wouldn't mess with the protrusions or cut them back. Seems too radical a surgery to me.
Those pleated diaphragms do look pretty good - I have used another type, the Walthers rubber diapragms that are a good bit thinner. They don't have the 'too much' look that you are trying to get away from, but on the other hand they have no play around curves so they separate too much.
Hope these observations help - those are great looking cars.
http://tycodepot.com/
|
|
|
|
|
Posted - September 25 2014 : 9:40:46 PM
|
quote:Jerry - I have probably done 100 of these 4-wheel (and 6-wheel) conversions on AHM/IHC/Con-Cor/Rivarossi/etc...
The Kadee literature advises to adjust the position of the coupler so that the vertical trip pin axis aligns with the back edge of the 'protrusion' as you call them. |
Jerry in VA says - well, that would have been the position, had the cars not had the pleats/accordions on the ends. With those one, and they can only compress so far, I had to move the couplers out some.
quote:| ... since the 508 has a slotted mounting hole, try to drill the hole for the screw in the truck at a place that allows you to use that for some adjusting play, forward and backward. |
Jerry in VA says - the problem with that is, there is a "neck" on the 508 shank , and also some plastic nubs protruding into the coupler shaft area. I didn't trim those nubs off all the way, as the neck rests there for support, instead of just the slotted mounting screw taking all the work. See below for more....
quote:| Also.....I remove that bottom bar on the truck that you have retained. Might appear that it is needed for reinforcement purposes but it is not necessary and makes adjustments/installation much easier. You have also mounted your 508 back farther from the edge than I do - which is why you needed those longer shanked couplers. |
Jerry in VA says - the reason it's so far back is that those nubs rest against the shank neck, and keep it from pulling out, instead of just relying on that screw. There is physical plastic that is holding it on. To negate that neck, I'd have to cut that bottom bar off, or remove all the nub plastic, which I didn't want to do. I want it to be a retention device, not the screw only holding the coupler bar in place. So it has to be back further to clear the neck. The #5 couplers would have worked even with this mounting position, if not for those accordions. They take up just enough room that I needed an extra 1/8 inch each end. I could remove the accordion pleats and use #5 Kadee's that came with the 508 kit, but again, not sure if that's how the passenger car really looks or not. ??? Are those supposed to be fake accordions or not? I won't cut them off, but I would paint them black if necessary, for more realism. While I'm not counting rivets or pleats here, I'm just looking for " a look" that is realistic.
quote: The variable in this is the large diaphragms you are using .Being pleated and therefore having the ability to compress freely, I would adjust the coupler postion so that the diaphragms are touching fairly close when the cars are straight,
Just me, I wouldn't mess with the protrusions or cut them back. Seems too radical a surgery to me. |
Jerry in VA says - They're darn near perfect the way they are now, they are compressed slightly with the #26 couplers hooked together. At this point my only concern is do they look stock/real, or not?
quote:Those pleated diaphragms do look pretty good - I have used another type, the Walthers rubber diapragms that are a good bit thinner. They don't have the 'too much' look that you are trying to get away from, but on the other hand they have no play around curves so they separate too much.
Hope these observations help - those are great looking cars.
Originally posted by JNXT 7707 - September 25 2014 : 7:01:26 PM
|
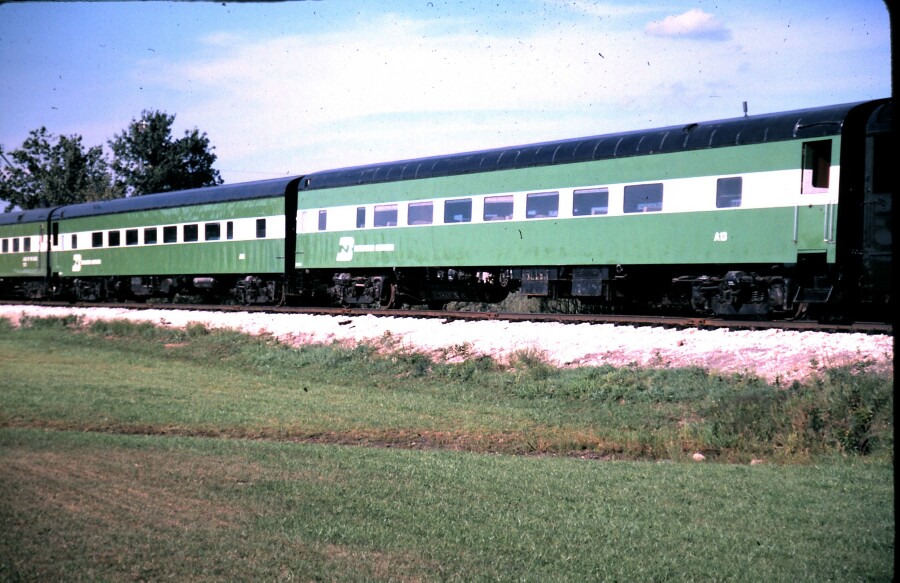
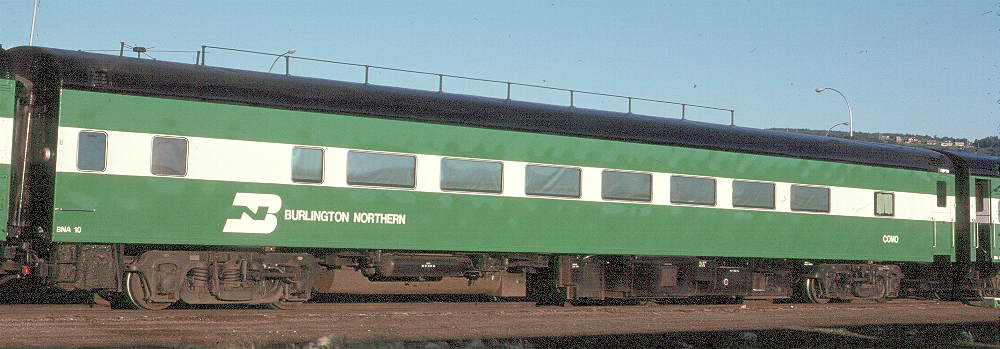
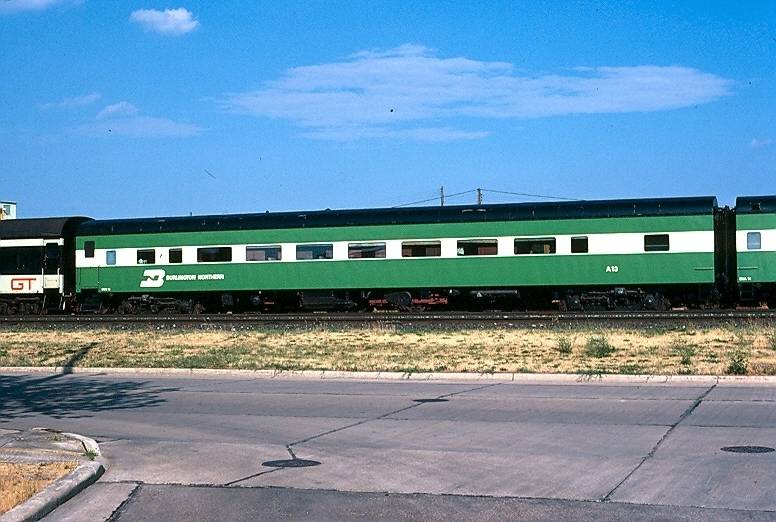
Jerry in VA says - yes, appreciate the comments so far. I love these green cars, they just caught my fancy some years ago. Here's a few pictures I "borrowed" off the web, by looking at the ends, you can tell they are probably closer than the two I have hooked together, so I am assuming the added accordions are the issue, as the green protrusions are supposed to be the "stock" pleats. I'm assuming. So right now, I'm in a quandry, do I remove the added accordions and paint the protrusions black, cut'em off and remount the realistic accordions? Seeing real-life pictures, mine are just too far apart I think.
" When life throws you bananas...it's easy to slip up"
|
|
Country: USA ~
Posts: 3974 ~
Member Since: January 04 2009 ~
Last Visit: January 11 2019
|
Alert Moderator
|
|
|
|
Posted - September 25 2014 : 10:07:18 PM
|
Jerry - from looking at your prototype photos and comparing them to your cars, I'd say you are indeed a bit farther apart. I would bet those accordions were originally intended to fill the gap between cars on their own - without the protrusions that are present.
So...if you are trying to match that prototype gap...something has to give. Perhaps, in addition to painting the protrusions black - you could cut down the size of the accordion? Leave just enough to give a flexible diaphragm that touches?
-------------------------------------------------------------------------------
About that bar that I cut off - yes, you are indeed relying on that little screw, but IMHO it is more than enough strength to fill the need. Never had the hint of an issue with those things failing. And, Kadee themselves say cut the bar in certain installation situations (when the nubs are needed).
Those 'nubs' on the 508 shank are there to compensate for wheel diameter. If you use 36" wheels, you need those nubs as a spacer to lower the coupler. However if you stay with the wheels that usually come on those cars (I think they are 31") you need to sand down the nubs nearly flat. I have always replaced those wheels with Kadee 36" ones (hence the need to remove that bar). On a recent set of cars I got with interior lighting, I kept the original wheels....but those nubs had to go.
http://tycodepot.com/
|
|
|
|
|
Posted - September 25 2014 : 10:17:56 PM
|
cool Will hafta find MOAR of these BN passenger cars
As I only got ONE Dome Car 
|
|
Country: USA ~
Posts: 15026 ~
Member Since: February 23 2009 ~
Last Visit: May 26 2026
|
Alert Moderator
|
|
|
|
Posted - September 25 2014 : 10:43:26 PM
|
quote:Jerry - from looking at your prototype photos and comparing them to your cars, I'd say you are indeed a bit farther apart. I would bet those accordions were originally intended to fill the gap between cars on their own - without the protrusions that are present.
So...if you are trying to match that prototype gap...something has to give. Perhaps, in addition to painting the protrusions black - you could cut down the size of the accordion? Leave just enough to give a flexible diaphragm that touches? |
Jerry in VA says - Yes, that was what I was thinking, too, cut off and just leave a single pleat on each end, paint the protrusions black, and see how it looks.
-------------------------------------------------------------------------------
quote:About that bar that I cut off - yes, you are indeed relying on that little screw, but IMHO it is more than enough strength to fill the need.
Those 'nubs' on the 508 shank are there to compensate for wheel diameter. |
Originally posted by JNXT 7707 - September 25 2014 : 10:07:18 PM
[/quote]
Jerry in VA says - Actually, the "nubs" I was referring to weren't the raised ones on the top of the 508 coupler shank, but they're on that bar you cut off on the truck itself. the shank has a wider part behind where the coupler pocket screws on. The wider part will fit behind those nubs on the bar IF you trim them some, as the 508 shank won't drop down between them, not wide enough as is. Then the shank can't pull out, even if the screw is loose, because the wide part of the shank will rest against them and it can't pull out any. Which is why I left the shank so far back in the truck pocket.  I want the mechanical retention as well as the screw's friction fit to hold the shank secrurely. It took a bit of work with the Xact-o knife, but I got them to fit perfectly the way I THOUGHT it should work best ( for me ). I want the mechanical retention as well as the screw's friction fit to hold the shank secrurely. It took a bit of work with the Xact-o knife, but I got them to fit perfectly the way I THOUGHT it should work best ( for me ).
Bottom line is, I"m not happy with the look as it is now. It's too far apart. I will probably redo these two, paint the protrusions black, and see if I can downsize the accordions and glue the shorty piece back on the ends.
" When life throws you bananas...it's easy to slip up"
|
|
Country: USA ~
Posts: 3974 ~
Member Since: January 04 2009 ~
Last Visit: January 11 2019
|
Alert Moderator
|
|
|
|
Posted - September 25 2014 : 11:43:13 PM
|
Ahhh...I see. Important to get our 'nub' definitions straight 
Well we have different approaches but in the end the issue is that gap between the cars. I think your solution is probably best, without doing surgery on the protrusions. looking forward to seeing your progress.
http://tycodepot.com/
|
|
|
|
|
Posted - September 29 2014 : 11:37:45 AM
|
I took the easy way out with my cars. I bought McHenry couplers which are a direct replacement to the stock horn hook. Once I add weight and change out the wheels, they run great but I do feel that is a temporary fix.
If you are not having fun, you are not doing it right.
|
|
Country: USA ~
Posts: 881 ~
Member Since: August 31 2011 ~
Last Visit: September 30 2025
|
Alert Moderator
|
|


