|
|
 Posted - June 12 2014 : 6:10:34 PM Posted - June 12 2014 : 6:10:34 PM


|
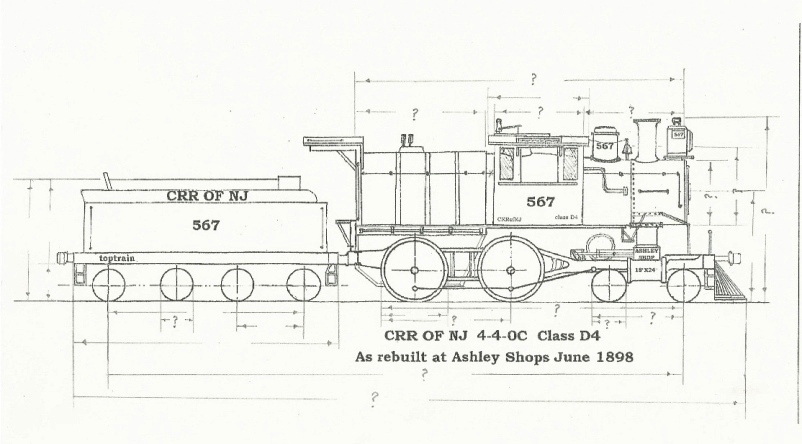
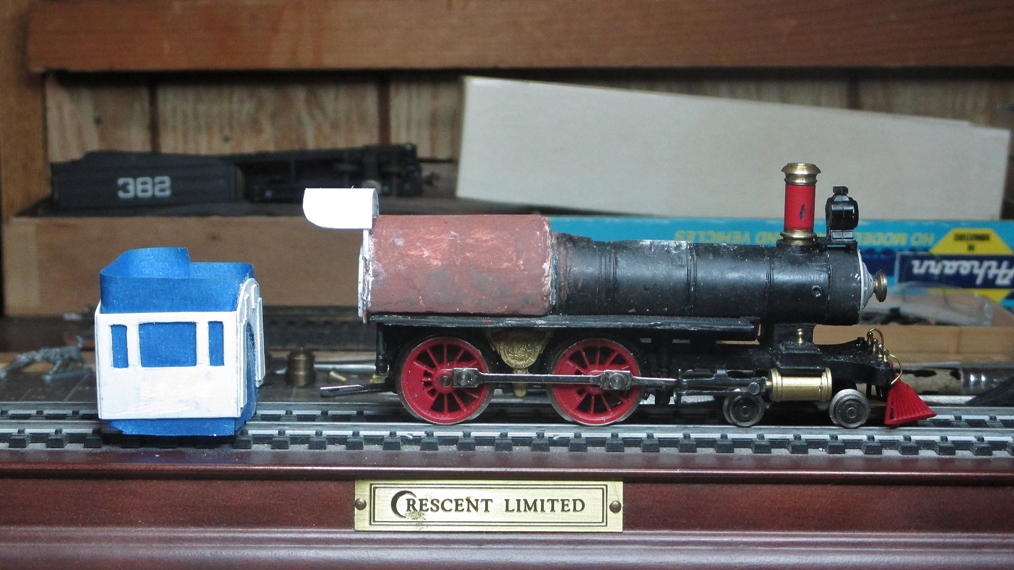
* Just looking now to get info, photos and drawings for a CRR of NJ 4-4-0c, I like the way the Lehigh valley 4-4-0c came out, so I'll just make another one. This time a Central Railroad Of New Jersey. . I am looking at one of a small group built By Baldwin as standard rear cab 4-4-0's in June 1882. With the number 172. Then rebuilt at Ashley shops in June of 1898 immerged as 4-4-0 camelback still with the number 172. One year latter it would be renumbered 545. This is the one I want to model for I like the different cab and the locos use of the old style slide for the piston rod to main connection. This makes the drive I will use look accurate for the model. I have a good engineer side photo of #567. One that I can use for measurements if no elevation drawing is found. #567 is a 1903 number. In 1899 it was #545, and previous to that #172. As rebuilt at Ashley it is a D4 class. I don't know when this form of classification began. It went into Ashley a Baldwin 4-4-0 CRRofNJ class 8 47/34 and came out a 8 54/40c. I do not understand that old type of classification system. I found a drawing for a D9s class for engines 558 and 559. Does anybody have any info on the D4 class 4-4-0c. I have a angled photo of #549. this number is a 1899 number. It would become 564 in 1903. It shows me the angled front fireman's side. It looks brand new so I think it is as delivered from Ashley shops in Dec of 1897 after its RO rebuild. This is the same rebuild the 567 also received 6 months later completed in June of 1898 at the Ashley Shops.
INFO:
The photo of 549 is from the Jersey Central Story, on page 20.
The photo for 567 is from Locomotives 1 to 999 on page 11.
The D9 class drawing is from Locomotives 1 to 999 on page 12
A RO rebuild I write of is listed in Locomotives 1 to 999, New boiler, Wooten firebox, new cylinders, retaining old running gear. Along with this rebuild come a new center cab, A fireman's shelter, and the only things from the Baldwin build on the body is maybe the bell. This makes the rebuild a completely different locomotive, but built on the old Baldwin frame, drivers, and front pilot.
Now would anyone have or know of a elevation drawing of a D4 class 4-4-0c that can be share
Here is a drawing I have made for the new 4-4-0c.
frank
toptrain
" It's a Heck of a Day " !!!
Edited by - toptrain on July 31 2014 10:03:18 AM
|
Country:  USA ~
Posts: 7538 ~
Member Since: August 07 2008 ~
Last Visit: December 06 2025 USA ~
Posts: 7538 ~
Member Since: August 07 2008 ~
Last Visit: December 06 2025
|
 Alert Moderator
|
|
|
|
Posted - June 12 2014 : 6:18:55 PM
|
Here is a photo of CRR of NJ 4-4-0c #567 as I want to build it, but with the original tender.
Photo of 567 from" north east railfan.net "
http://www.northeast.railfan.net/images/cnj567s.jpg
toptrain
" It's a Heck of a Day " !!!
Edited by - toptrain on September 11 2014 08:20:17 AM
|
|
Country: USA ~
Posts: 7538 ~
Member Since: August 07 2008 ~
Last Visit: December 06 2025
|
Alert Moderator

|
|
|
|
Posted - June 14 2014 : 2:07:38 PM
|
Looking forward to seeing how it turns out.
-Steve
"A lot of modellers out there who go to these train shows see broken HO stuff and go, 'This is useless' when, in reality, they can still be used for modeling whether it's as a prop on your layout or a cool project to make something old new again."
|
|
Country: USA ~
Posts: 3533 ~
Member Since: February 17 2014 ~
Last Visit: January 11 2023
|
Alert Moderator
|
|
|
|
Posted - June 14 2014 : 2:47:58 PM
|
| If your previous Camel 4-4-0 was any indication, this'll be another beauty.
|
|
Country: USA ~
Posts: 239 ~
Member Since: September 17 2012 ~
Last Visit: November 09 2021
|
Alert Moderator
|
|
|
|
Posted - June 15 2014 : 1:46:15 PM
|
* Now would anyone have or know of a elevation drawing of a D4 class 4-4-0c that can be share
*Here is a drawing I have made for the new 4-4-0c.
* The ones with the question marks and letters are the ones I need the measurements for.
frank
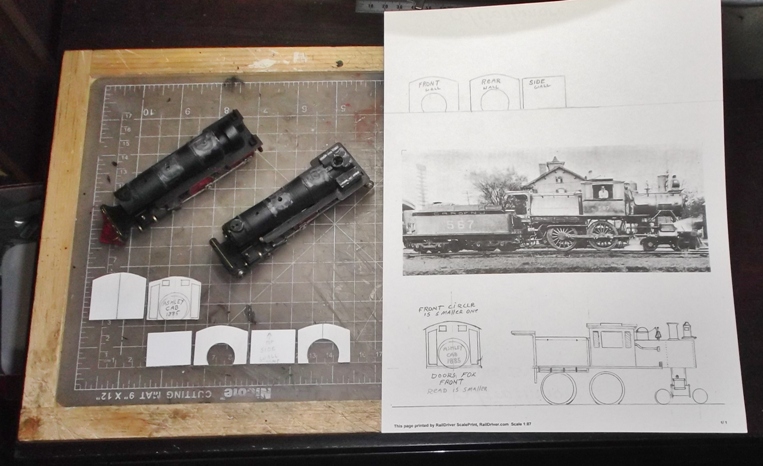
Latest drawing. This is not a scale drawing. Measurements are incorrect. If anyone can help me with the correct measurements, it will help me a lot. The measurements with ? symbol and the ones necessary to making a good model. The other that are blank would be nice to get.
Frank
link to drawing
https://www.flickr.com/photos/30431536@N03/14432591346/
toptrain
" It's a Heck of a Day " !!!
Edited by - toptrain on June 18 2014 10:58:10 PM
|
|
Country: USA ~
Posts: 7538 ~
Member Since: August 07 2008 ~
Last Visit: December 06 2025
|
Alert Moderator
|
|
|
|
Posted - June 15 2014 : 8:06:34 PM
|
| Asked a group on Facebook. Hopefully they'll have something
|
|
Country: USA ~
Posts: 239 ~
Member Since: September 17 2012 ~
Last Visit: November 09 2021
|
Alert Moderator
|
|
|
|
Posted - June 16 2014 : 09:44:31 AM
|
Only things I got was a better resolution picture of 567 and a photo of 560 in her later years.
http://www.tycoforums.com/tyco/forum/uploaded/lglrr845/20140616094359_10431437_10201503130254768_4447506227502899086_n.jpg
|
|
Country: USA ~
Posts: 239 ~
Member Since: September 17 2012 ~
Last Visit: November 09 2021
|
Alert Moderator
|
|
|
|
Posted - June 16 2014 : 12:05:25 PM
|
Like you say it is too new, and also a angle shot , useless for measurements. I have the photo of 567 that is on page 12 of Locos 1 too 999 of the Jersey Central. It will be good for a few measurements. I'll just redraw my diagram if I cant get the ones I need.
frank
toptrain
" It's a Heck of a Day " !!!
Edited by - toptrain on June 17 2014 11:04:52 AM
|
|
Country: USA ~
Posts: 7538 ~
Member Since: August 07 2008 ~
Last Visit: December 06 2025
|
Alert Moderator
|
|
|
|
Posted - June 19 2014 : 12:07:30 AM
|
I don't know if it will help or not, but I have an issue of Model Railroader from the late '50s or early '60s with an article about calculating measurements from angled prototype photos. It you're interested, I will try to scan and upload it.
Glenn
I was thinking of the immortal words of Socrates, who said, "... I drank what?"
|
|
Country: USA ~
Posts: 1709 ~
Member Since: December 13 2008 ~
Last Visit: May 10 2026
|
Alert Moderator
|
|
|
|
Posted - June 19 2014 : 08:13:12 AM
|
quote:I don't know if it will help or not, but I have an issue of Model Railroader from the late '50s or early '60s with an article about calculating measurements from angled prototype photos. It you're interested, I will try to scan and upload it.
Originally posted by gmoney - June 19 2014 : 12:07:30 AM
|
Glen that is a great idea.
toptrain1@aol.com
toptrain
" It's a Heck of a Day " !!!
|
|
Country: USA ~
Posts: 7538 ~
Member Since: August 07 2008 ~
Last Visit: December 06 2025
|
Alert Moderator
|
|
|
|
Posted - June 19 2014 : 08:30:38 AM
|
Glen; if you can scan it and sent it to me that will be great. I have copied a photo 0f loco 567 from the book locomotives "1 to 999 of the Jersey Central ". It is at the bottom of page 11. It is how I want my loco to look with the period center cab. I have seen CRRofNJ loco photos of 0-6-0c, 2-6-0c, 4-4-0c 2-8-0c, and other types all with this cab. Baldwin has built for other railroads of the period camelbacks with this type cab. I have never seen a model, even one of brass using this cab. The photo I speak of is one of a almost perfect side view. Problem being photo is taken looking up at loco from a low spot, downhill on its side. Maybe this article will tell me how to compensate for the angle the photo was taken.
* Here is the link to North East Rail photo I posted previously here. This is not the good photo in the book.
http://www.northeast.railfan.net/images/cnj567s.jpg
* about this photo; in a time line, you can see it has a Brooks built replacement tender, so it is before this locomotives next rebuild in May of 1909. My model will use the Original Baldwin tender that this locomotive had when made into a camelback at the Ashley shop's.
frank
toptrain
" It's a Heck of a Day " !!!
Edited by - toptrain on June 19 2014 09:05:28 AM
|
|
Country: USA ~
Posts: 7538 ~
Member Since: August 07 2008 ~
Last Visit: December 06 2025
|
Alert Moderator
|
|
|
|
Posted - June 19 2014 : 3:13:09 PM
|
Frank, I think the article is geared towards using 3/4 angle shots, but you may be able to apply the concepts to your photo. I will scan and send it as soon as I get the chance.
Glenn
I was thinking of the immortal words of Socrates, who said, "... I drank what?"
|
|
Country: USA ~
Posts: 1709 ~
Member Since: December 13 2008 ~
Last Visit: May 10 2026
|
Alert Moderator
|
|
|
|
Posted - June 23 2014 : 11:36:21 AM
|
Glen, this came up in a search. Model railroad craftsmen issues
Locomotive articles.
1952 April page 8
1959 March page 26 D5 class.
they both are CRRofNJ 4-4-0's
Have you access to these ?
frank
toptrain
" It's a Heck of a Day " !!!
|
|
Country: USA ~
Posts: 7538 ~
Member Since: August 07 2008 ~
Last Visit: December 06 2025
|
Alert Moderator
|
|
|
|
Posted - June 23 2014 : 10:22:35 PM
|
quote:Glen, this came up in a search. Model railroad craftsmen issues
Locomotive articles.
1952 April page 8
1959 March page 26 D5 class.
they both are CRRofNJ 4-4-0's
Have you access to these ?
frank
Originally posted by toptrain - June 23 2014 : 11:36:21 AM
|
Frank,
I don't have very many issues of MRC so probably not, but I will look. Hey, does anybody else on the Forum have these issues?
Glenn
I was thinking of the immortal words of Socrates, who said, "... I drank what?"
|
|
Country: USA ~
Posts: 1709 ~
Member Since: December 13 2008 ~
Last Visit: May 10 2026
|
Alert Moderator
|
|
|
|
Posted - June 24 2014 : 07:27:30 AM
|
quote: quote:Glen, this came up in a search. Model railroad craftsmen issues
Locomotive articles.
1952 April page 8
1959 March page 26 D5 class.
they both are CRRofNJ 4-4-0's
Have you access to these ? frank
Originally posted by toptrain - June 23 2014 : 11:36:21 AM
|
Frank,
I don't have very many issues of MRC so probably not, but I will look. Hey, does anybody else on the Forum have these issues?
Originally posted by gmoney - June 23 2014 : 10:22:35 PM
|
Glenn thank you very much, for how much you have helped. Your quick responses mean a lot. If you want I'll send you the photo and drawing with measurements I got off of it. I am comparing those to info gotten from similar P&R locomotives. Because of the lack of info aviable, My engine will look Ok if my skills are also Ok. If not I'll have a funny looking camelback.
frank
toptrain
" It's a Heck of a Day " !!!
|
|
Country: USA ~
Posts: 7538 ~
Member Since: August 07 2008 ~
Last Visit: December 06 2025
|
Alert Moderator
|
|
|
|
Posted - June 24 2014 : 12:10:52 PM
|
Here is a redone drawing with measurements taken from a HO scale photo of this locomotive. 6-24-2014. If I cant get correct information I will use these measurements.
frank
link to drawing: edited 7-9-14
https://www.flickr.com/photos/30431536@N03/14536138294/
toptrain
" It's a Heck of a Day " !!!
Edited by - toptrain on July 09 2014 08:23:55 AM
|
|
Country: USA ~
Posts: 7538 ~
Member Since: August 07 2008 ~
Last Visit: December 06 2025
|
Alert Moderator
|
|
|
|
Posted - June 24 2014 : 12:58:44 PM
|
quote:Glenn thank you very much, for how much you have helped. Your quick responses mean a lot. If you want I'll send you the photo and drawing with measurements I got off of it. I am comparing those to info gotten from similar P&R locomotives. Because of the lack of info aviable, My engine will look Ok if my skills are also Ok. If not I'll have a funny looking camelback.
frank
Originally posted by toptrain - June 24 2014 : 07:27:30 AM
|
Frank, you're welcome. I'm glad to help if I can. I *would* like to see the photo and drawing *if* it's not any trouble. And if your previous work is any indication (and I'm sure it is), this model is going to turn out quite well!
Glenn
I was thinking of the immortal words of Socrates, who said, "... I drank what?"
|
|
Country: USA ~
Posts: 1709 ~
Member Since: December 13 2008 ~
Last Visit: May 10 2026
|
Alert Moderator
|
|
|
|
Posted - June 24 2014 : 1:29:53 PM
|
Hi Glens. The drawing is in my last post with measurements from a photo. the photo I'll post here . I am posting other photos there also.
frank
here is the drawing: edited 7-9-14
https://www.flickr.com/photos/30431536@N03/14536138294/
toptrain
" It's a Heck of a Day " !!!
Edited by - toptrain on September 25 2014 09:42:22 AM
|
|
Country: USA ~
Posts: 7538 ~
Member Since: August 07 2008 ~
Last Visit: December 06 2025
|
Alert Moderator
|
|
|
|
Posted - June 24 2014 : 3:54:23 PM
|
quote:If your previous Camel 4-4-0 was any indication, this'll be another beauty.
Originally posted by LGLrr845 - June 14 2014 : 2:47:58 PM
|
That's exactly what I was thinking, actually. Honestly, it's gonna look sweet and I'm looking forward to seeing you post your photos and stuff about how the project is going. Honestly, it's gonna look sweet and I'm looking forward to seeing you post your photos and stuff about how the project is going.
-Steve
"A lot of modellers out there who go to these train shows see broken HO stuff and go, 'This is useless' when, in reality, they can still be used for modeling whether it's as a prop on your layout or a cool project to make something old new again."
|
|
Country: USA ~
Posts: 3533 ~
Member Since: February 17 2014 ~
Last Visit: January 11 2023
|
Alert Moderator
|
|
|
|
Posted - June 27 2014 : 7:36:11 PM
|
Great drawing, Frank. Were you a draftsman?
The Tyco Depot
|
|
Country: USA ~
Posts: 3927 ~
Member Since: June 20 2007 ~
Last Visit: November 19 2015
|
Alert Moderator
|
|
|
|
Posted - June 28 2014 : 08:05:54 AM
|
No Nelson, just a bum who likes a beer or two. Also a hiker, bike rider, and bad photographer. At 68 not to aggressive a hiker or bike rider. I get passes by little girls and boys when riding popular rail trails and park pathways. There just to fast for me.
frank
toptrain
" It's a Heck of a Day " !!!
Edited by - toptrain on July 31 2014 10:10:50 AM
|
|
Country: USA ~
Posts: 7538 ~
Member Since: August 07 2008 ~
Last Visit: December 06 2025
|
Alert Moderator
|
|
|
|
Posted - September 03 2014 : 06:38:49 AM
|
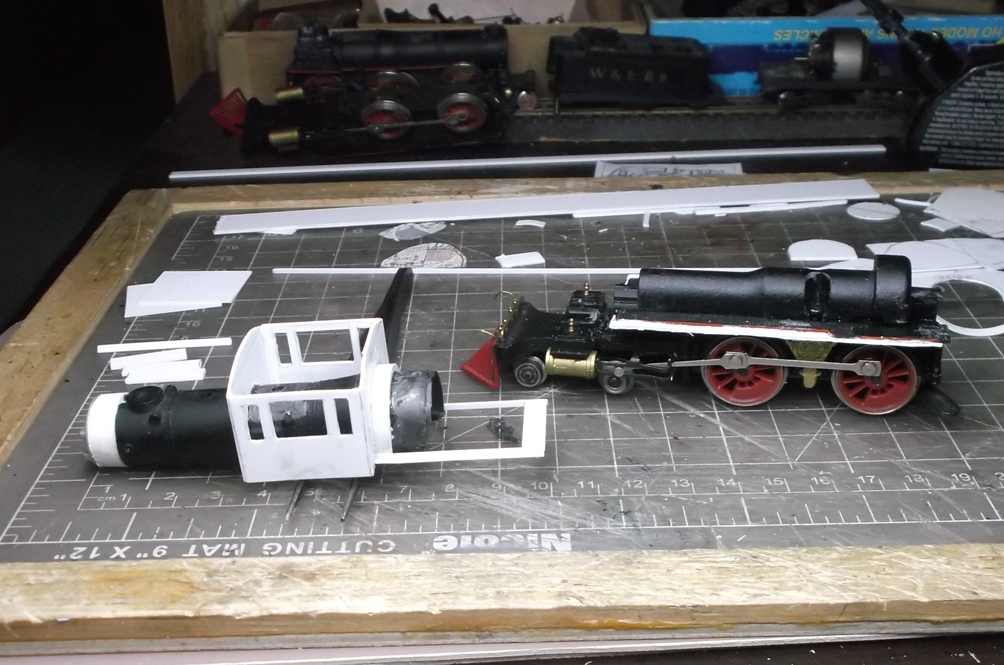
Yesterday I started on the project. I will be kitbashing these locos. Removed some unwanted details from 2 bodies. Redraw loco to help with parts for center cab. A more correct drawing. I guess as I go on it will become more complete.
* About this photo; It is in the Crater book " Locomotives of the Jersey Central " on page 11 and is list as UNK. I take this to be unknown in reference to owner of photo. I do here give credit to the writer and editor of this book. For this is my source for the photo. This side view is where I get my measurements from for this build. It is ashamed but no real info for this locomotive of what is a D4 class have I been able to find. Lots of guessing done here.
frank
toptrain
" It's a Heck of a Day " !!!
Edited by - toptrain on October 31 2014 07:53:29 AM
|
|
Country: USA ~
Posts: 7538 ~
Member Since: August 07 2008 ~
Last Visit: December 06 2025
|
Alert Moderator
|
|
|
|
Posted - September 09 2014 : 08:56:37 AM
|
That, believe it or not actually looks like a locomotive plan instead of an H0 scale plan.
-Steve
"A lot of modellers out there who go to these train shows see broken HO stuff and go, 'This is useless' when, in reality, they can still be used for modeling whether it's as a prop on your layout or a cool project to make something old new again."
|
|
Country: USA ~
Posts: 3533 ~
Member Since: February 17 2014 ~
Last Visit: January 11 2023
|
Alert Moderator
|
|
|
|
Posted - September 09 2014 : 2:28:16 PM
|
Well Stephen glade you like it.
frank
toptrain
" It's a Heck of a Day " !!!
|
|
Country: USA ~
Posts: 7538 ~
Member Since: August 07 2008 ~
Last Visit: December 06 2025
|
Alert Moderator
|
|
|
|
Posted - September 11 2014 : 08:55:22 AM
|
That's a pretty darn cool locomotive Frank!
Sean
"If everything seems under control, you're not going fast enough!" - Mario Andretti!
|
|
Country: USA ~
Posts: 1729 ~
Member Since: June 15 2011 ~
Last Visit: June 26 2021
|
Alert Moderator
|
|
|
|
Posted - September 11 2014 : 10:12:17 AM
|
quote:That's a pretty darn cool locomotive Frank!
Originally posted by Mustangs_n_Trains - September 11 2014 : 08:55:22 AM
|
Well Sean, I got some more done now, but not ready for another photo yet. Its a funny thing, you widen the walkway on one body easily and the second one gives you problems. Will be very busy till Sunday so won't even pick up the work till then.
* I hope it looks like the photo when done, then I'll have a dam cool loco. We will see.
frank
toptrain
" It's a Heck of a Day " !!!
Edited by - toptrain on September 20 2014 08:39:58 AM
|
|
Country: USA ~
Posts: 7538 ~
Member Since: August 07 2008 ~
Last Visit: December 06 2025
|
Alert Moderator
|
|
|
|
Posted - September 17 2014 : 07:19:35 AM
|
* Back to the model. I have started on the centercab . Not to much to say about it right now other than size looks good.
frank
toptrain
" It's a Heck of a Day " !!!
|
|
Country: USA ~
Posts: 7538 ~
Member Since: August 07 2008 ~
Last Visit: December 06 2025
|
Alert Moderator
|
|
|
|
Posted - September 20 2014 : 08:34:35 AM
|
* I have started on 2 more things. The extension of the smoke box, and the Wootten firebox. For the smoke box a inside ring installed to allow for lengthening. Then the smoke box addition to glued to both the new inside ring and the original edge of the smoke box. With the firebox I am building up a supporting surface for the new outside sheeting. lot of little stuff to do for the firebox. I'll get back to it another day.
frank
toptrain
" It's a Heck of a Day " !!!
Edited by - toptrain on September 20 2014 2:04:12 PM
|
|
Country: USA ~
Posts: 7538 ~
Member Since: August 07 2008 ~
Last Visit: December 06 2025
|
Alert Moderator
|
|
|
|
Posted - September 25 2014 : 9:55:30 PM
|
* The next accomplishment is shorting the too long smoke box front to a proper size. After that adding a floor frame for the Wootten firebox. Do a little here, and do a little there ! The material used for the floor side frame is el' shaped giving me a edge to glue the firebox sheeting to. Looking ahead.
frank
toptrain
" It's a Heck of a Day " !!!
|
|
Country: USA ~
Posts: 7538 ~
Member Since: August 07 2008 ~
Last Visit: December 06 2025
|
Alert Moderator
|
|
|
|
Posted - September 25 2014 : 9:56:47 PM
|
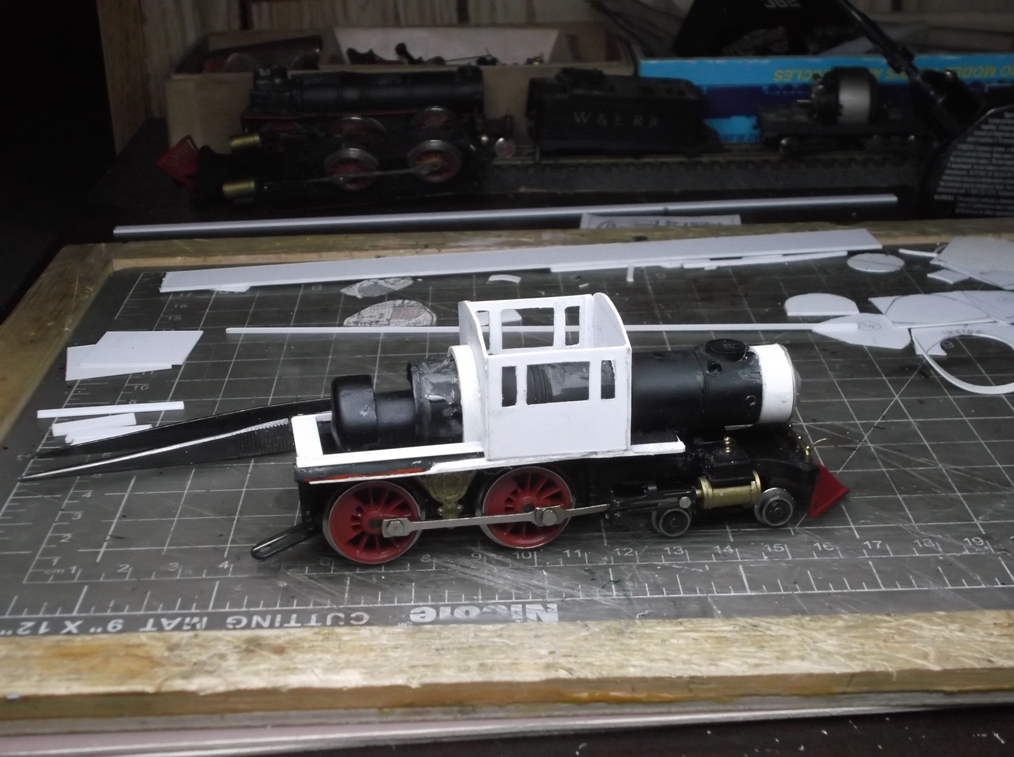
* A look at the body on the drive.
frank
toptrain
" It's a Heck of a Day " !!!
|
|
Country: USA ~
Posts: 7538 ~
Member Since: August 07 2008 ~
Last Visit: December 06 2025
|
Alert Moderator
|
|
|
|
Posted - September 25 2014 : 9:58:21 PM
|
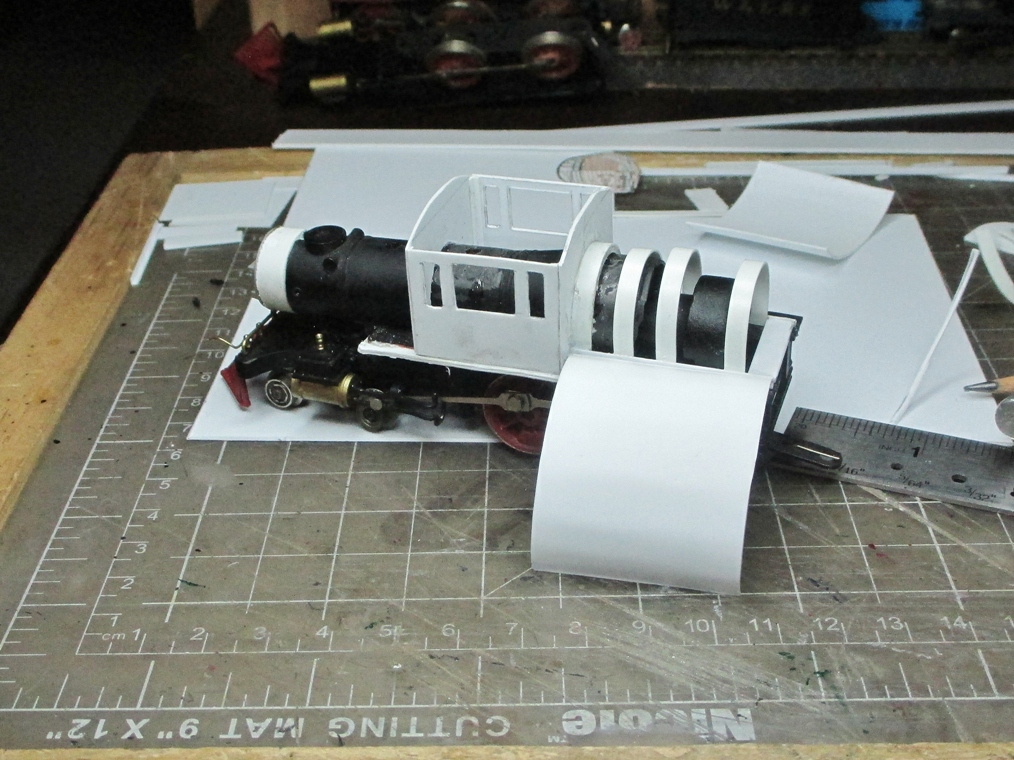
* Next is something I have never done before. To support the firebox sheeting I am making a skeleton frame. Lets see how this works out. I have cut out and shaped the sheeting.
frank
toptrain
" It's a Heck of a Day " !!!
|
|
Country: USA ~
Posts: 7538 ~
Member Since: August 07 2008 ~
Last Visit: December 06 2025
|
Alert Moderator
|
|
|
|
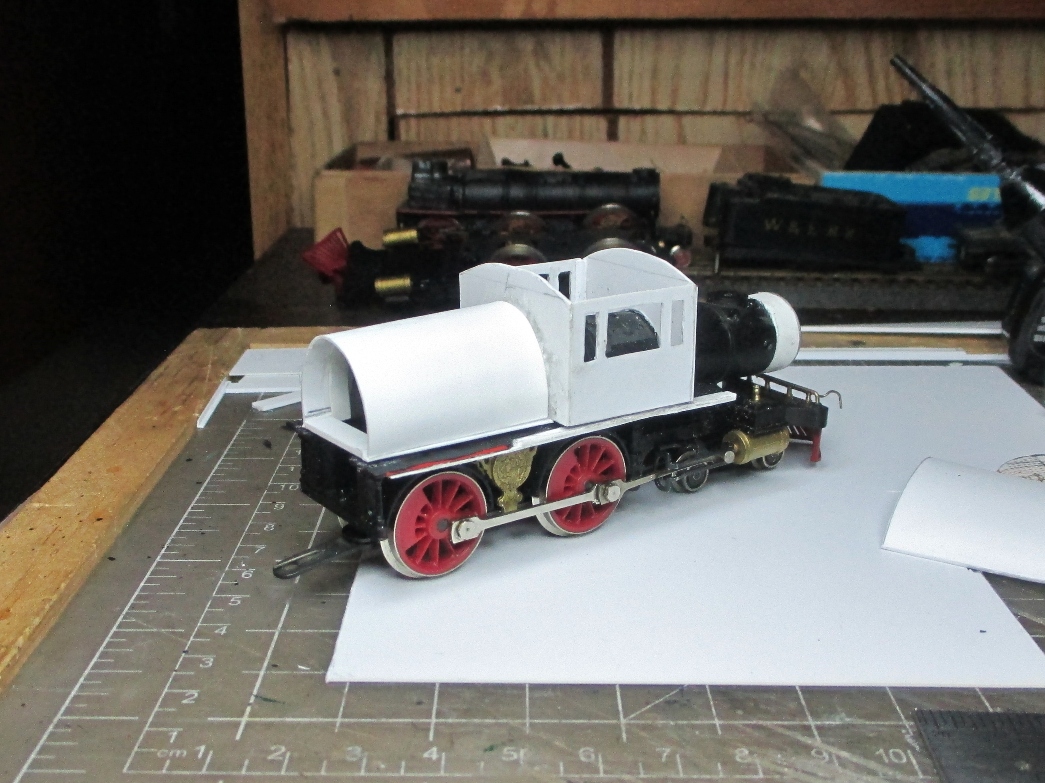
Posted - September 25 2014 : 9:59:51 PM
|
Now the sheeting is glued to the frame. That is 4 posts with pictures today. This lazy old man has gotten something done. Well I'll Be !.
frank
V-860
toptrain
" It's a Heck of a Day " !!!
Edited by - toptrain on September 25 2014 10:01:29 PM
|
|
Country: USA ~
Posts: 7538 ~
Member Since: August 07 2008 ~
Last Visit: December 06 2025
|
Alert Moderator
|
|
|
|
Posted - September 25 2014 : 10:21:53 PM
|
I see your project is coming around pretty good I must say.
-Steve
"A lot of modellers out there who go to these train shows see broken HO stuff and go, 'This is useless' when, in reality, they can still be used for modeling whether it's as a prop on your layout or a cool project to make something old new again."
|
|
Country: USA ~
Posts: 3533 ~
Member Since: February 17 2014 ~
Last Visit: January 11 2023
|
Alert Moderator
|
|
|
|
Posted - September 26 2014 : 7:08:30 PM
|
Well Stephen here is the backhead. Not detailed just yet.
frank
toptrain
" It's a Heck of a Day " !!!
|
|
Country: USA ~
Posts: 7538 ~
Member Since: August 07 2008 ~
Last Visit: December 06 2025
|
Alert Moderator
|
|
|
|
Posted - October 01 2014 : 5:05:59 PM
|
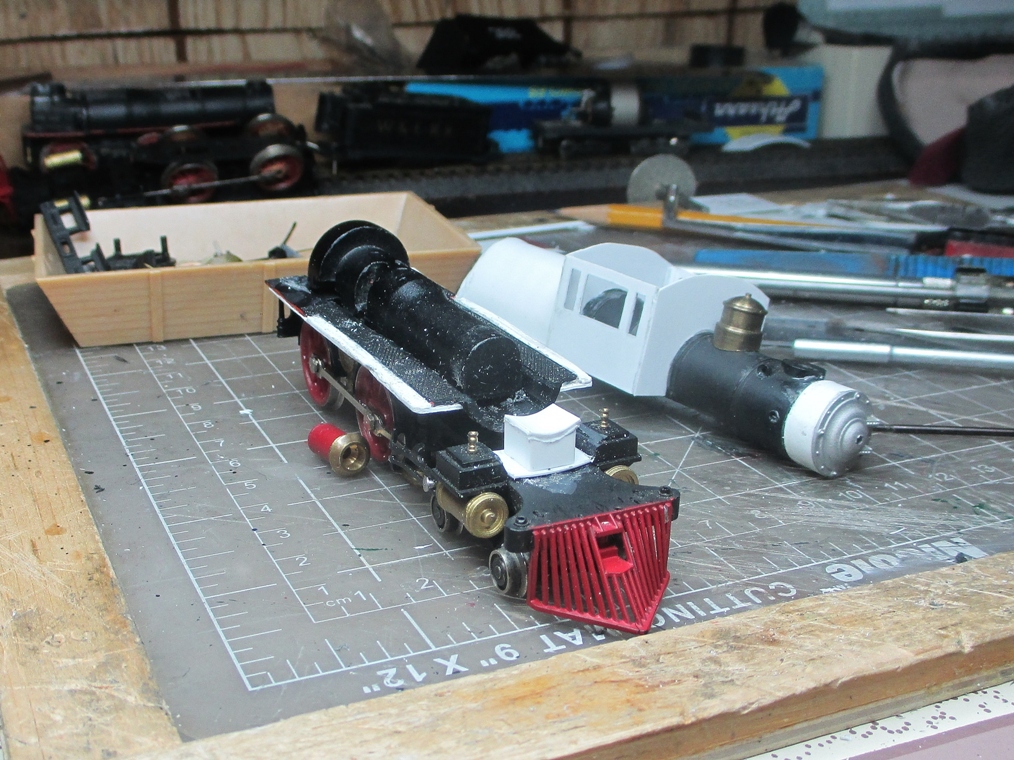
** Here is the photo showing what got done today. **
* First had to rebuild the cylinder boiler support. I removed it. made a new longer one and replaced it. Mounted the sand dome. put the boiler on the frame and attached the smoke stack.
frank
toptrain
" It's a Heck of a Day " !!!
|
|
Country: USA ~
Posts: 7538 ~
Member Since: August 07 2008 ~
Last Visit: December 06 2025
|
Alert Moderator
|
|
|
|
Posted - October 01 2014 : 11:51:14 PM
|
| Very interesting to watch this build come along Frank.
|
|
Country: USA ~
Posts: 2087 ~
Member Since: March 16 2013 ~
Last Visit: July 05 2018
|
Alert Moderator
|
|
|
|
Posted - October 19 2014 : 6:43:50 PM
|
I am just not getting anywhere. The shape of the firebox. it is supposed to be flat in the centers on both sides. Every time I fix something when sanding, I wreck something else. I need to get some metallic steel and olive green colored paint. From what I see of the old colors of the time that is how it needs to be painted. Those were the original colors when it was built as a rear cab by Baldwin. No record of color at the time of the rebuild. I will switch over and do the work on the tender body, and get the paint. Them go back to the fire box and the fireman's shelter.
It is the same plan just trying to talk myself into it.
today on the workbench.
frank
toptrain
" It's a Heck of a Day " !!!
|
|
Country: USA ~
Posts: 7538 ~
Member Since: August 07 2008 ~
Last Visit: December 06 2025
|
Alert Moderator
|
|
|
|
Posted - October 21 2014 : 12:06:08 AM
|
Hey Frank. That's tough trying to build up filler or body putty or whatever. You could probably bend some brass to the correct shape pretty easily. Regarding the colors Baldwin used, I've got some Baldwin locomotive data .pdf for a scattering of years circa 1886 to 1908 which I used to find schemes for some Colorado Midland equipment. Seems a lot of locomotives were built with Olive Green, Dark Green, Brunswick Green and "aluminum" (paint, I'm guessing) lettering. I just tried to upload one of the .pdf files, but it must be too big. If you're interested, I could burn a CD with all of them, or you could give me information on what year and what road (Lehigh Valley?) and I'll look it up.
|
|
Country: USA ~
Posts: 2087 ~
Member Since: March 16 2013 ~
Last Visit: July 05 2018
|
Alert Moderator
|
|
|
|
Posted - October 21 2014 : 12:11:50 AM
|
I just realized I should have read your post more carefully . . . interesting power source you've got going on there . . .

|
|
Country: USA ~
Posts: 2087 ~
Member Since: March 16 2013 ~
Last Visit: July 05 2018
|
Alert Moderator
|
|
|
|
Posted - October 22 2014 : 11:42:09 AM
|
| This pics make me wish to build one too! Very nice work! - Erich
|
Country:  Austria ~
Posts: 1046 ~
Member Since: December 03 2008 ~
Last Visit: April 24 2026 Austria ~
Posts: 1046 ~
Member Since: December 03 2008 ~
Last Visit: April 24 2026
|
Alert Moderator
|
|
|
|
Posted - October 23 2014 : 05:14:08 AM
|
quote:This pics make me wish to build one too! Very nice work! - Erich
Originally posted by Erich - October 22 2014 : 11:42:09 AM
|
Erick; like everything I do, it takes a long time. And Barry that is my junk yard dog. Hangs around the work bench
frank
toptrain
" It's a Heck of a Day " !!!
Edited by - toptrain on October 23 2014 05:15:42 AM
|
|
Country: USA ~
Posts: 7538 ~
Member Since: August 07 2008 ~
Last Visit: December 06 2025
|
Alert Moderator
|
|
|
|
Posted - October 28 2014 : 10:19:01 PM
|
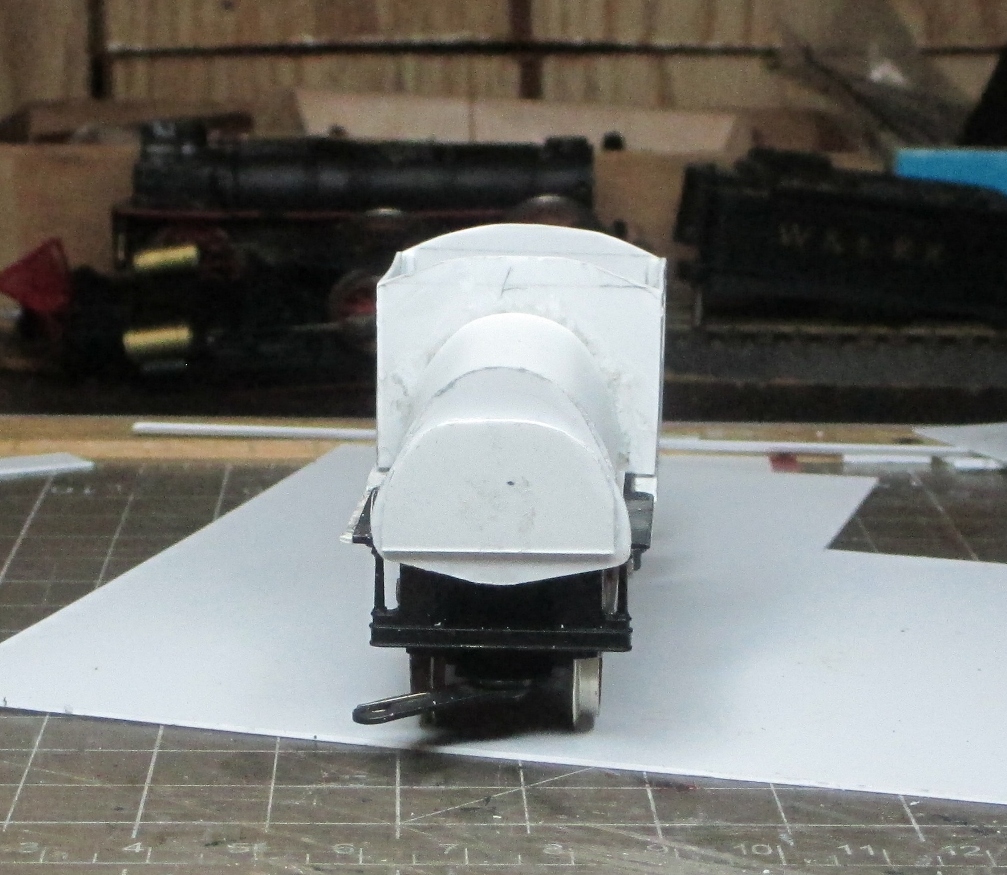
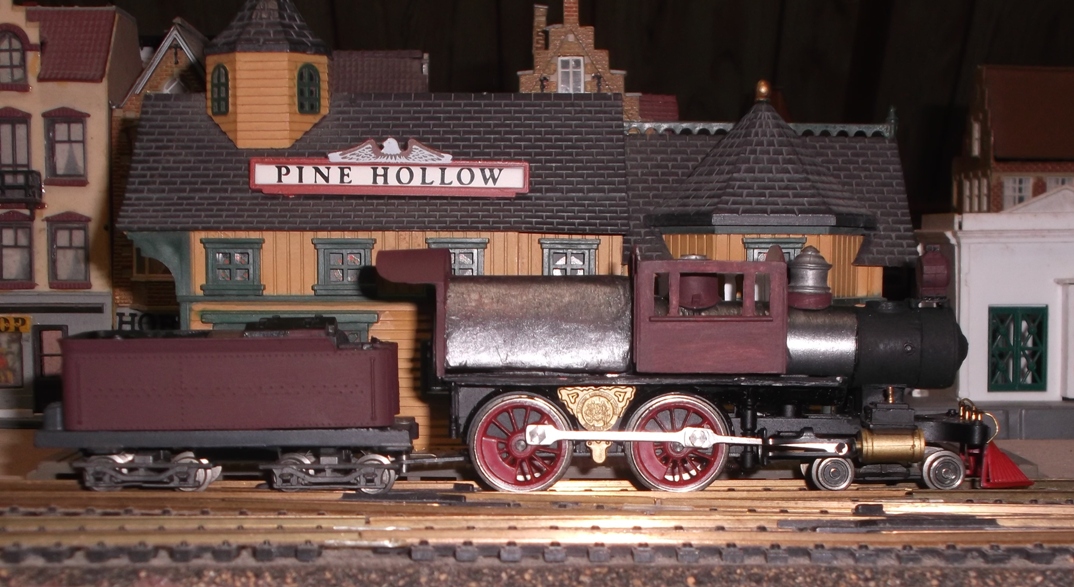
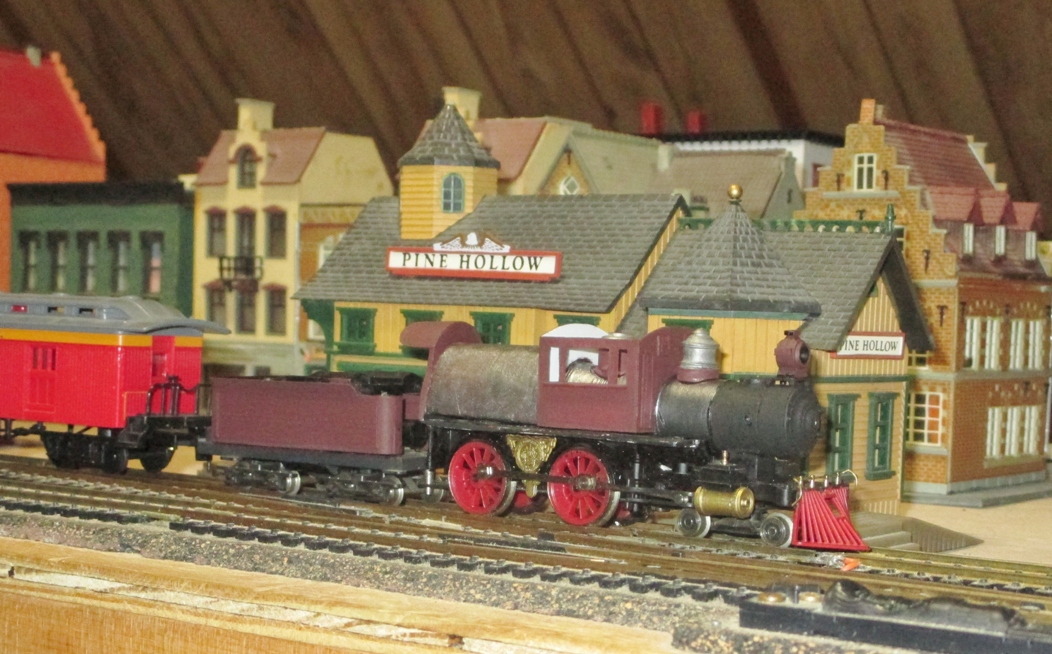
Started on the fireman's shelter.
frank
toptrain
" It's a Heck of a Day " !!!
|
|
Country: USA ~
Posts: 7538 ~
Member Since: August 07 2008 ~
Last Visit: December 06 2025
|
Alert Moderator
|
|
|
|
Posted - October 29 2014 : 2:03:04 PM
|
| That locomotive is looking real nice Frank. Windows in that cab look nice and square. Are you using painters tape to hold that cab together?
|
|
Country: USA ~
Posts: 2087 ~
Member Since: March 16 2013 ~
Last Visit: July 05 2018
|
Alert Moderator
|
|
|
|
Posted - October 29 2014 : 6:48:29 PM
|
quote:That locomotive is looking real nice Frank. Windows in that cab look nice and square. Are you using painters tape to hold that cab together?
Originally posted by Barry - October 29 2014 : 2:03:04 PM
|
Hi Barry. Yep it is painters edging tape. The cab is already glued together. The inside surfaces are taped so when I do paint, the inside will stay white and reflect light better to see stuff inside the cab. If I get any stuff to put inside. Like my last 4-4-0 camelback the roof will be removable.
frank
toptrain
" It's a Heck of a Day " !!!
|
|
Country: USA ~
Posts: 7538 ~
Member Since: August 07 2008 ~
Last Visit: December 06 2025
|
Alert Moderator
|
|
|
|
Posted - October 29 2014 : 10:18:27 PM
|
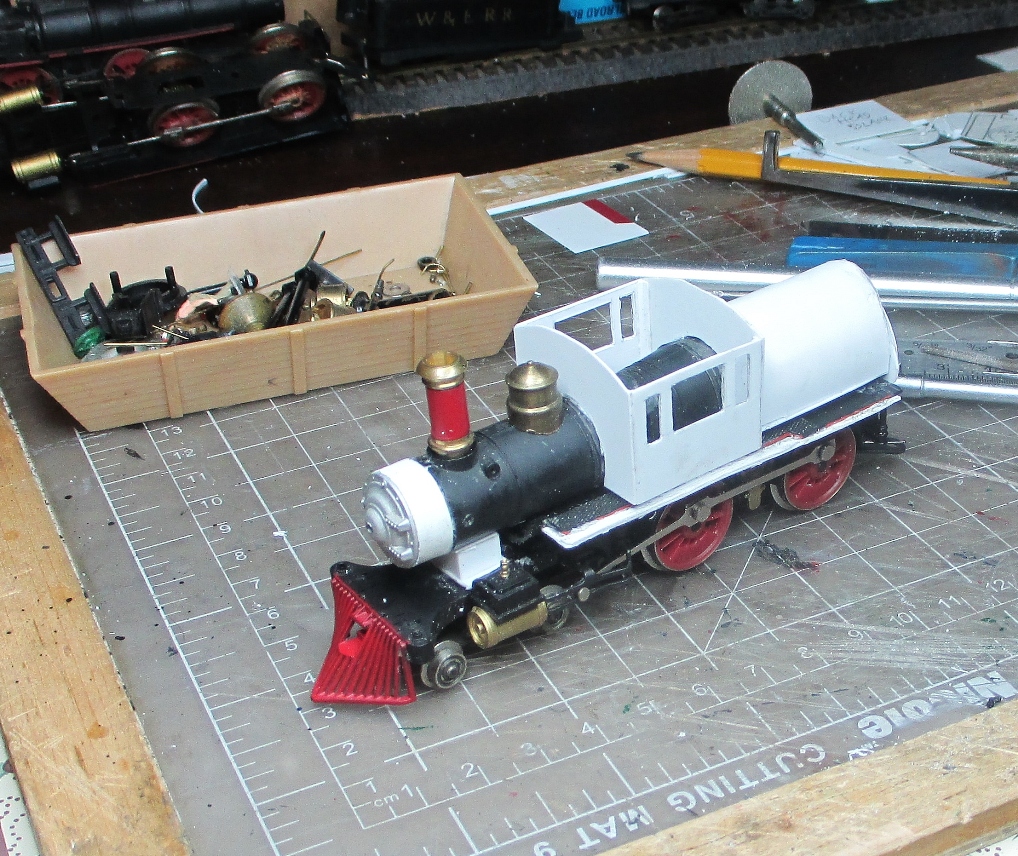
Here it is now. Still far from done. Still decisions to make. When this locomotive was built in 1881 as a rear cab 4-4-0 Baldwin Painted it as requested by the CRRofNJ. The color wanted was tuscan brown with gold lettering. Now looking at other 4-4-0 built be Baldwin around the same time this was the color used. Freight and switching locomotives were colored Olive Green and gold. Now the CRRofNJ rebuilt this loco and many others into camelbacks. This loco was done 8 years after it was built. I would imagine it keep the same color. So I am trying a tuscan with steel sheeted boiler to see how it looks.
frank
toptrain
" It's a Heck of a Day " !!!
Edited by - toptrain on October 30 2014 3:27:44 PM
|
|
Country: USA ~
Posts: 7538 ~
Member Since: August 07 2008 ~
Last Visit: December 06 2025
|
Alert Moderator
|
|
|
|
Posted - October 29 2014 : 10:31:12 PM
|
Looking pretty good so far, as you always do with these things.
-Steve
"A lot of modellers out there who go to these train shows see broken HO stuff and go, 'This is useless' when, in reality, they can still be used for modeling whether it's as a prop on your layout or a cool project to make something old new again."
|
|
Country: USA ~
Posts: 3533 ~
Member Since: February 17 2014 ~
Last Visit: January 11 2023
|
Alert Moderator
|
|
|
|
Posted - October 29 2014 : 10:40:20 PM
|
quote:Looking pretty good so far, as you always do with these things.
Originally posted by kovacste000 - October 29 2014 : 10:31:12 PM
|
Hey Steve. Getting late had to stop. Not sure if I like it. Maybe a darker gray, or the tuscan on the fire box to remove some of the shinny stuff. Don't know.
I put a bigger picture in.
frank
PS I'll edit another photo into here.
toptrain
" It's a Heck of a Day " !!!
Edited by - toptrain on October 29 2014 10:45:42 PM
|
|
Country: USA ~
Posts: 7538 ~
Member Since: August 07 2008 ~
Last Visit: December 06 2025
|
Alert Moderator
|
|
|
|
Posted - October 29 2014 : 11:20:41 PM
|
| Very Nice work, Frank...
|
|
Country: USA ~
Posts: 6279 ~
Member Since: February 18 2009 ~
Last Visit: March 04 2022
|
Alert Moderator
|
|
|
|
Posted - October 30 2014 : 7:52:46 PM
|
| Frank, I'm wondering if the Tuscan that Baldwin used might have been a hard glossy finish to bring out a deep rich red brown. The "flat" Tuscan (as it appears in the photos) might just fit better with a bit more "depth". Think of the hard glossy paint they used to finish machines with. Are there any Baldwin "builder's photos" of anything similar to what you're doing?
|
|
Country: USA ~
Posts: 2087 ~
Member Since: March 16 2013 ~
Last Visit: July 05 2018
|
Alert Moderator
|
|
|
|
Posted - October 31 2014 : 07:10:13 AM
|
quote:Frank, I'm wondering if the Tuscan that Baldwin used might have been a hard glossy finish to bring out a deep rich red brown. The "flat" Tuscan (as it appears in the photos) might just fit better with a bit more "depth". Think of the hard glossy paint they used to finish machines with. Are there any Baldwin "builder's photos" of anything similar to what you're doing? On my Lehigh Valley I completely scratchbuilt the loco body. I tried using the original casting on this model to see if it would work. It does, but it doesn't. We'll see how it comes out.
Originally posted by Barry - October 30 2014 : 7:52:46 PM
|
Barry. this is not a Baldwin locomotive. It is built at CRRofNJ's Ashley shops. Gives me some time. I need a lot of time. Loco will receive a gloss clear coat when done. I am disappointed with the walkways. they were the original ones. on this version drive they are riveted to the frame. The rivet has the walkway pulled down and bent. I am thinking of cutting off the molded on walkways and replacing them.
frank
toptrain
" It's a Heck of a Day " !!!
Edited by - toptrain on October 31 2014 07:56:54 AM
|
|
Country: USA ~
Posts: 7538 ~
Member Since: August 07 2008 ~
Last Visit: December 06 2025
|
Alert Moderator
|
|
|
|
Posted - November 01 2014 : 11:08:38 AM
|
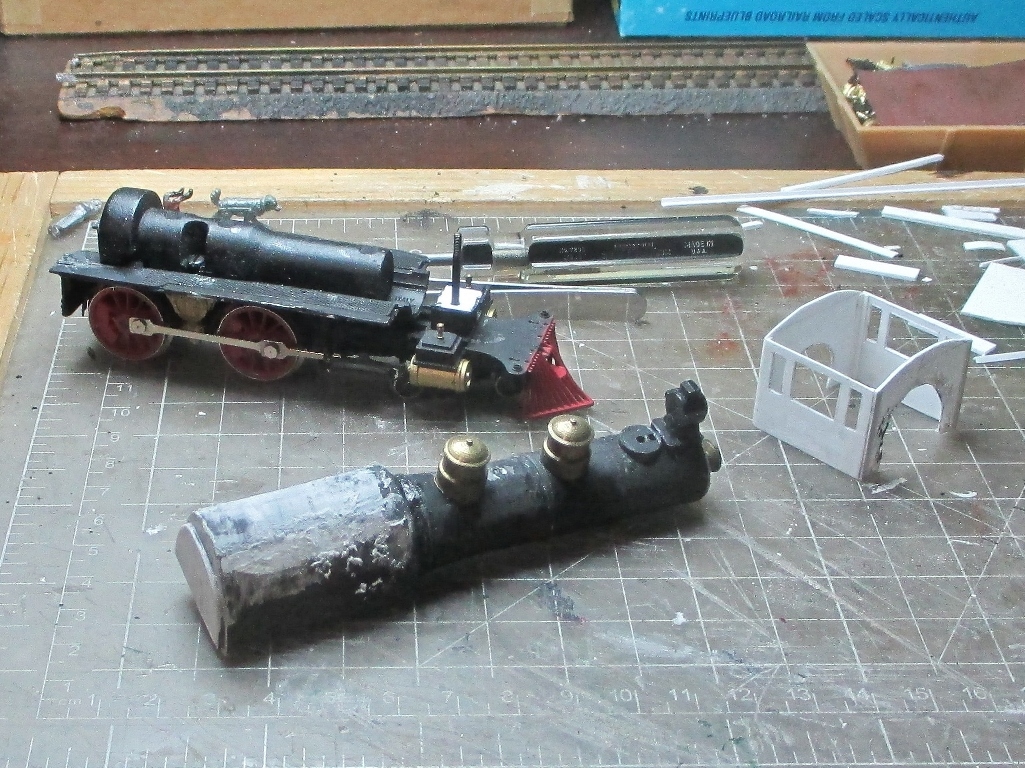
*** Here is what I think of my nice work.
*** After yesterday inspection of the locomotive in its present state, changes were required. Two glaring problems stood out. The backhead was glued crookedly on and needs to be removed and replaced. Along with this the fireman's shelter which isn't done right, needs to be redone. Now the other main defect is that association of the Rivarossi method of riveting the lower plastic frame to the drive frame really messed up the alignment of this locomotive. As originally done this rivet compressed the lower boiler casting with walkways down on a angle which caused the lower boiler casting to not align with the upper section. Now everything I mentioned was slightly off and I tried to live with it. Figuring that something would cover it up. Well everything I did to compensate messed it up more. I am going to remove the rivet and place the boiler weight within the, I hope now aligned, boiler. Then make from plastic round stock a spacer of the proper length to raise the boiler, and fasten the boiler front to the frame and cylinder slide hanger. I will need to find a way to fasten the firebox to the frame. I also may need to tear off the cylinder extension which supports the smoke box, and replace it, to do all this realigning, to get the open clear area between frame and boiler proper.
* I am tempted to just complete the model as is.
*In other words, finishing it as it is wouldn't make the model I want, using what I have done would get It to looks like a camelback, but not the one I want to make. Another homogenized camelback. A make believe one.
toptrain
" It's a Heck of a Day " !!!
Edited by - toptrain on November 01 2014 11:45:36 AM
|
|
Country: USA ~
Posts: 7538 ~
Member Since: August 07 2008 ~
Last Visit: December 06 2025
|
Alert Moderator
|
|