|
MikeK
Switcher

Status:
offline
| |
 Posted - December 19 2013 : 2:23:14 PM Posted - December 19 2013 : 2:23:14 PM


|
Which ends are poles of individual magnets in this pic? The poles must fit just so in my motor.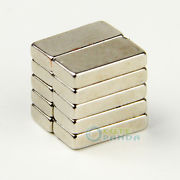
|
Country:  USA ~
Posts: 50 ~
Member Since: December 15 2013 ~
Last Visit: August 27 2014 USA ~
Posts: 50 ~
Member Since: December 15 2013 ~
Last Visit: August 27 2014
|
 Alert Moderator
|
|
|
|
Posted - December 19 2013 : 3:26:33 PM
|
Check the seller's specs. They should have that info, but my guess is that the poles are on the widest surfaces.
The Tyco Depot
|
|
Country: USA ~
Posts: 3927 ~
Member Since: June 20 2007 ~
Last Visit: November 19 2015
|
Alert Moderator

|
|
|
|
Posted - December 19 2013 : 3:40:22 PM
|
| Hey Mike, When you get ready to install those, would you mind doing a little photo story on it? I've been wanting to mess with that on my locomotives, but I feel pretty ignorant about how to pull it off. Thanks. Barry
|
|
Country: USA ~
Posts: 2087 ~
Member Since: March 16 2013 ~
Last Visit: July 05 2018
|
Alert Moderator
|
|
|
MikeK
Switcher
Status:
offline
| |
Posted - December 19 2013 : 4:08:44 PM
|
Sho' nuff, Barry. I'll try to document everything I do, have some ideas on a magnetic drive. I bookmarked this other thread, will try to post it.
http://www.tycoforums.com/tyco/forum/link.asp?topic_id=12192
|
|
Country: USA ~
Posts: 50 ~
Member Since: December 15 2013 ~
Last Visit: August 27 2014
|
Alert Moderator
|
|
|
|
Posted - December 19 2013 : 7:51:48 PM
|
quote:Which ends are poles of individual magnets in this pic? The poles must fit just so in my motor.
Originally posted by MikeK - December 19 2013 : 2:23:14 PM
|
You can use a compass to find the poles of the original magnet and the new magnets, and then install the new ones to match the old ones.
Carpe Manana!
|
|
Country: USA ~
Posts: 2417 ~
Member Since: September 17 2013 ~
Last Visit: June 17 2026
|
Alert Moderator
|
|
|
MikeK
Switcher
Status:
offline
| |
Posted - December 19 2013 : 8:39:40 PM
|
Thanks, scsshaggy, I'm trying to determine polarity on magnets on E-bay, from the pic. I know in a single stack, they will orient N to S, so it's easy to tell on those stacks. When I see a stack with multiple rows and columns, then it gets confusing. I don't mind buying some extra stacks, never know what the next motor will need, but I want to get some that will fit my current needs.
They come in all sizes, I'm looking for a clue to know how they stack naturally.
|
|
Country: USA ~
Posts: 50 ~
Member Since: December 15 2013 ~
Last Visit: August 27 2014
|
Alert Moderator
|
|
|
|
Posted - December 19 2013 : 10:43:07 PM
|
There is a very common style of neodymium magnet that looks like those.
They're 1/4" by 1/2" by 1/8", polarized through the 1/8" dimension.
There's no certain way to tell, from the picture, if that's what these are.
If they are what I think they are, the natural tendency of the magnets would be to stack in series with the north side of one touching the south side of the next.
The two stacks, side by side, would want to be reversed in polarity, so that one stack would be north on top and the other would be south on top.
When shoved into a motor frame, the stacks can be put in the same polarity and will stay that way, but on their own, they will fight hard to swap ends.
I hope that helps.
Carpe Manana!
Edited by - scsshaggy on December 19 2013 10:44:36 PM
|
|
Country: USA ~
Posts: 2417 ~
Member Since: September 17 2013 ~
Last Visit: June 17 2026
|
Alert Moderator
|
|
|
|
Posted - December 21 2013 : 11:06:17 AM
|
I had an MDC Boxcab, long ago, with a bad magnet in the motor and replaced that months ago. I have another Boxcab and to get the two motors in shouting distance of the same speed, I replaced the other motor's magnets, yesterday. They're now close enough to double-head though not dead on the same speed.
If you reverse the polarity of the magnet, it'll reverse the motor. To keep everything standard, I used a compass to find the old magnet's polarity:
/tyco/forum/uploaded/scsshaggy/20131221103952_RemagOld01.JPG
/tyco/forum/uploaded/scsshaggy/20131221104111_RemagOld02.JPG
You can see that the glow in the dark end of the needle points to the bottom of the motor and the bare end points to the top of the motor.
Now, I set a stack of magnets on the workbench and located its poles with the compass:
/tyco/forum/uploaded/scsshaggy/20131221104315_RemagNew01.JPG
/tyco/forum/uploaded/scsshaggy/20131221104346_RemagNew02.JPG
With the magnets aligned so the bare end pointed to the top of the stack and the glow in the dark end pointed to the bottom, I marked the end that should go to the top of the motor.
I took the screw out of the motor frame and pulled out the old magnet. At this point, the old magnet is ruined, since ferrite magnets are charged in the frame and lose much of their intensity if you take them out. Don't do this step unless you plan to go all the way with the replacement.
Since my stack was 1/2" high and the motor takes a 5/8" magnet, I added a 1/8" by 1/2" by 1/4" magnet to the stack. This magnet is polarized through the 1/8" dimension, so it hopped onto he stack the way it needed to be aligned. I put the stack in the motor orienting it how it was marked in a previous step. The compass shows proper alignment:
/tyco/forum/uploaded/scsshaggy/20131221104946_RemagRepl.JPG
Predictably, the motor still runs and in the right direction.
There are many suppliers for these magnets. The one I used is K&J magnetics:
http://www.kjmagnetics.com/
Their prices seem competitive with others and they have a nice, large selection. I say this, not to endorse them over the competition, but to give a starting point for where to find these magnets.
Cautions:
1) Use a cheap compass. Rare earth magnets are so powerful that they can change other magnets. My compass now points dependably to the south.
2) Keep the rare earth magnets away from motors you do not intend to upgrade. They can foul up the old ferrite magnets.
3) The new magnets are hard and brittle and can shatter. They also will jump at each other from a great distance and can hit with enough force to chip and shatter. This is as dangerous for your eyes as for the magnets.
4) You can get pinched between two magnets as they jump together.
5) The motor will not run unless the magnetic field is polarized along the line for which the motor is designed. For example, my motor was polarized top to bottom. Had I put in magnets polarized from side to side, the motor would not run.
6) If you put multiple stacks of magnets in the motor, all stacks much be polarized the same way. If one stack has the north pole on top and the other has it on the bottom, the motor does not run.
Carpe Manana!
Edited by - scsshaggy on December 21 2013 11:07:07 AM
|
|
Country: USA ~
Posts: 2417 ~
Member Since: September 17 2013 ~
Last Visit: June 17 2026
|
Alert Moderator
|
|
|
MikeK
Switcher
Status:
offline
| |
Posted - December 22 2013 : 12:45:37 PM
|
| Thanks, scsshaggy, that's a good post. I may try to print it for future reference. Mike
|
|
Country: USA ~
Posts: 50 ~
Member Since: December 15 2013 ~
Last Visit: August 27 2014
|
Alert Moderator
|
|
|
|
Posted - December 22 2013 : 1:28:50 PM
|
| Thank you much for this Don. It does leave me with a couple of questions and what comes to mind first is the possibility that I have been doing something bad for my motors. And that is when taking them apart to clean them, I have removed the frame/magnet assembly from the armature . . . does this alter the magnet's power? Secondly, I see you've used some sort of bolt or threaded rod to hold the new magnets in place . . . is this something you made and then you drilled and threaded the frame? Thanks again Don. Barry
|
|
Country: USA ~
Posts: 2087 ~
Member Since: March 16 2013 ~
Last Visit: July 05 2018
|
Alert Moderator
|
|
|
|
Posted - December 22 2013 : 3:20:32 PM
|
quote:Thank you much for this Don. I have removed the frame/magnet assembly from the armature . . . does this alter the magnet's power?
I see you've used some sort of bolt or threaded rod to hold the new magnets in place . . . is this something you made and then you drilled and threaded the frame?
Originally posted by Barry - December 22 2013 : 1:28:50 PM
|
I think removing the armature can weaken the magnet if it's a metal one. The ceramic magnets and rare earth magnets are okay. I've read that if you take the armature out of an open frame motor, you should stick the magnet end on a big piece of iron like a vise or anvil to hold the magnetic field while the armature is gone.
The threaded rod is a screw that was part of the motor in the first place. It's to hold the frame together. The magnets will stay put by their own attraction to the iron in the frame.
Carpe Manana!
|
|
Country: USA ~
Posts: 2417 ~
Member Since: September 17 2013 ~
Last Visit: June 17 2026
|
Alert Moderator
|
|
|
|
Posted - December 23 2013 : 01:25:38 AM
|
Barry, alnico magnets in open frame motors were inherently weak, so an extra charge with a large coil was used to boost the magnetism of the assembled motor. Removing the armature (which acts as a keeper) from the field of such a motor dissipates that charge instantly, sometimes leaving the motor too weak to even move the loco. You can use a vise, a steel car weight, etc. across the magnet end of the poles as a keeper when taking it apart as Shaggy suggested.
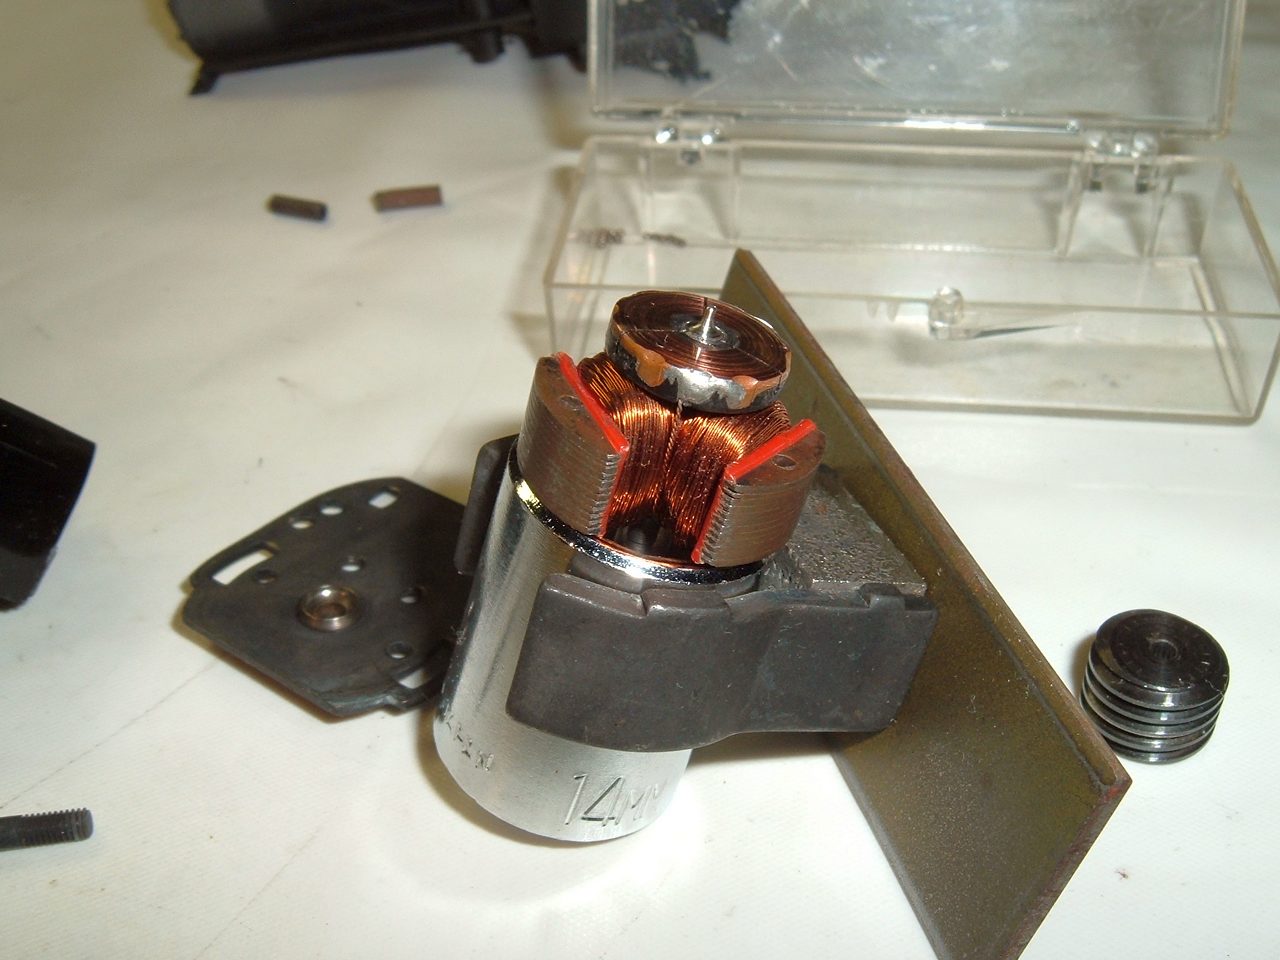
When I rebuild motors like this Rivarossi ball bearing motor (where the magnet is positioned next to the armature poles, instead of at one end of the shaft), I use a keeper on the magnet, but also press the armature out of the field with an appropriate size socket wrench to keep the pole pieces in proper relation to each other.
The Tyco Depot
|
|
Country: USA ~
Posts: 3927 ~
Member Since: June 20 2007 ~
Last Visit: November 19 2015
|
Alert Moderator
|
|
|
|
Posted - December 23 2013 : 10:03:43 AM
|
| Nelson, in the photo, is that rectangular piece of what looks like brass your "keeper" in this case? Thanks. Barry
|
|
Country: USA ~
Posts: 2087 ~
Member Since: March 16 2013 ~
Last Visit: July 05 2018
|
Alert Moderator
|
|
|
|
Posted - December 23 2013 : 1:42:10 PM
|
That's a steel car weight... the camera gave it a brownish cast. Brass is non-magnetic and can't be used as a keeper, of course.
This magnetic field isn't screwed or riveted together as it is on a Pittman type, so it's important to keep everything square. I could use the socket alone as a keeper, but the car weight provides extra insurance against breaking the field.
The Tyco Depot
|
|
Country: USA ~
Posts: 3927 ~
Member Since: June 20 2007 ~
Last Visit: November 19 2015
|
Alert Moderator
|
|

