|
|
 Posted - August 01 2013 : 8:38:04 PM Posted - August 01 2013 : 8:38:04 PM


|
Just sevryone continues to have something to look at . . . I've been working on a shadowbox for some time; about 5 inches deep, 18 inches high and 36 inches long. Anyway, in the shadowbox an old steam excursion train will be running through a canon . . . exiting a tunnel to cross a pile bridge. So this is what's going on with the tunnel. Basically it's constructed of crumpled up grocery bag and elmers glue; sort of paper mache. If it seems like the car is a tight fit, the prototype width for these rock tunnels (at least for the Colorado Midland Railroad) was 15 feet. 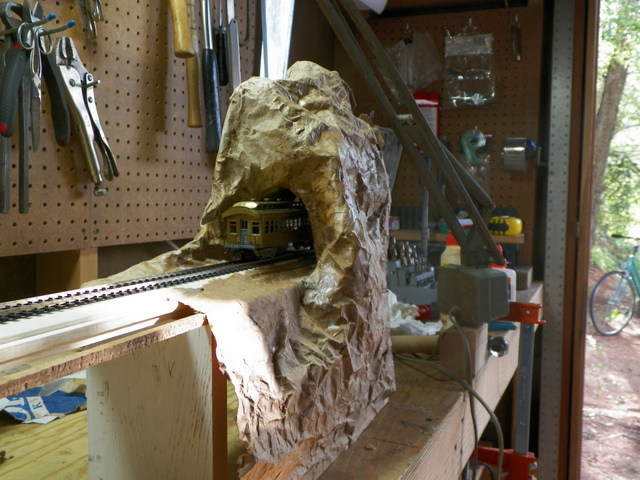 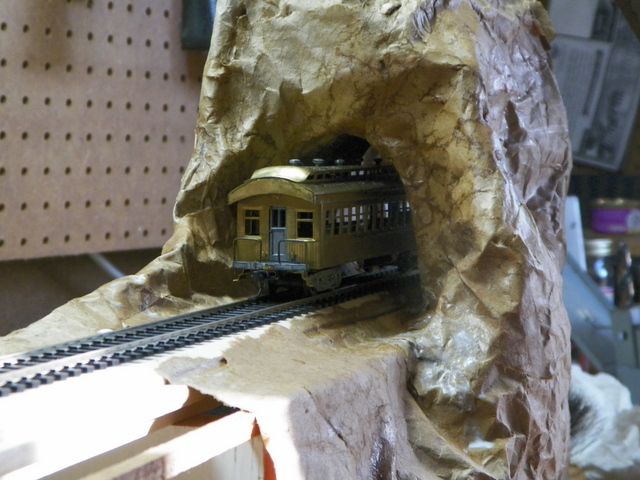
|
Country:  USA ~
Posts: 2087 ~
Member Since: March 16 2013 ~
Last Visit: July 05 2018 USA ~
Posts: 2087 ~
Member Since: March 16 2013 ~
Last Visit: July 05 2018
|
 Alert Moderator
|
|
|
|
Posted - August 01 2013 : 10:50:21 PM


|
Barry,
Is this, something your trying to do?

Let me be the first to say, its a difficult task to "stuff" A LOT in a small space, and make it look right! This case you see, is merely 5 and a half inches wide, front edge to the rear panel, 28 inches wide, side to side, and 16 inches from top to bottom.....These measurements are INSIDE diameters as well........The thickness is 3/4th inch. NOT included in those measurements.
I might add, to say that what you got going on so far, will LOOK awesome, however, the "case" to surround that is the key......What might you have planned for that to create your shadow box, or as I like to call it, Museum Display Case.....?
P.S. I'm also adding 4 LED spot lights inside of my case, 2 in each upper corner facing slightly different directions.
~John
Many have tried to, and failed, ya just can't repair stupid... 
Do NOT try to Idiot-Proof anything!!!! God, will simply create a better......IDIOT!
|
|
Country: USA ~
Posts: 2911 ~
Member Since: March 26 2012 ~
Last Visit: January 14 2014
|
Alert Moderator

|
|
|
|
Posted - August 01 2013 : 11:23:37 PM
|
John, I dig it. That Baltimore and Ohio iron trestle is awesome. I wouldn't mind seeing more photos. I just took a couple of my shadowbox. It's been in the works for some months, trying to think about how to do things. The background is a photo from public library digital files and it's amazing how the photographs from those old large format cameras can be blown up (it's actually in like 9 or 12 pages that are taped together). The front glass panel is hinged so in the future if I really want to run the display around a track, I can . . . or I can change the entire thing; it is a work in progress. I can lift the track section out separately so I can change the background photo.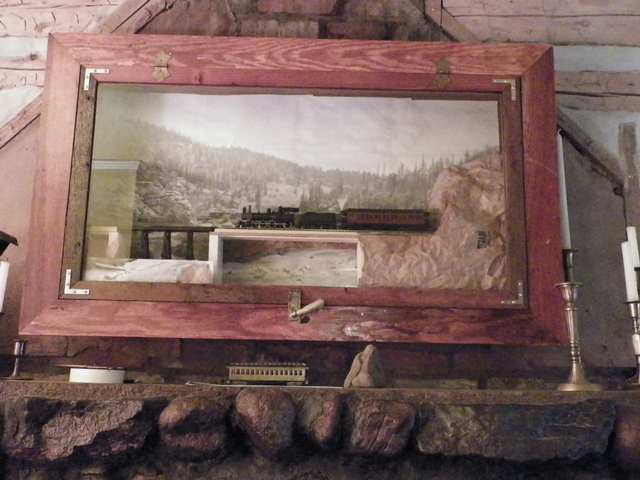 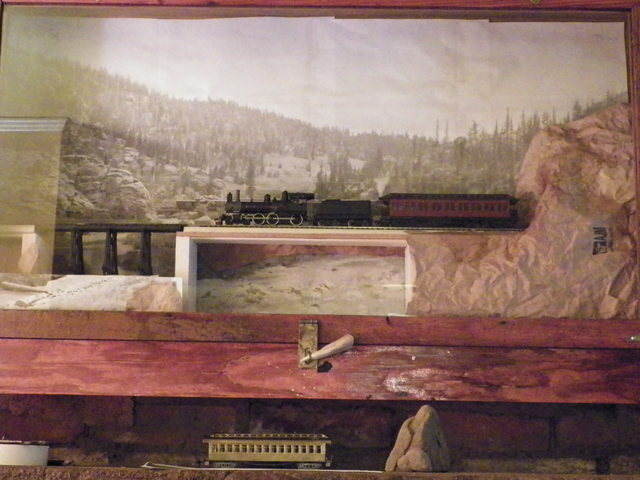
|
|
Country: USA ~
Posts: 2087 ~
Member Since: March 16 2013 ~
Last Visit: July 05 2018
|
Alert Moderator
|
|
|
|
Posted - August 02 2013 : 12:18:50 AM
|
Barry,
More pictures? You got it! I have done alittle to get shots of the inside of this case.....
The following picture showsthe far left side of this case, the bottom. It has a small drainage ditch, with water and real "mud" made from Epoxy coating to table tops, to simulate water, mixed with the color of "dirt" to make that shade from the actual home area I model.....Pennsylvania on the B&O through "Sand Patch" that redish dirt is right off Sand Patch grade!
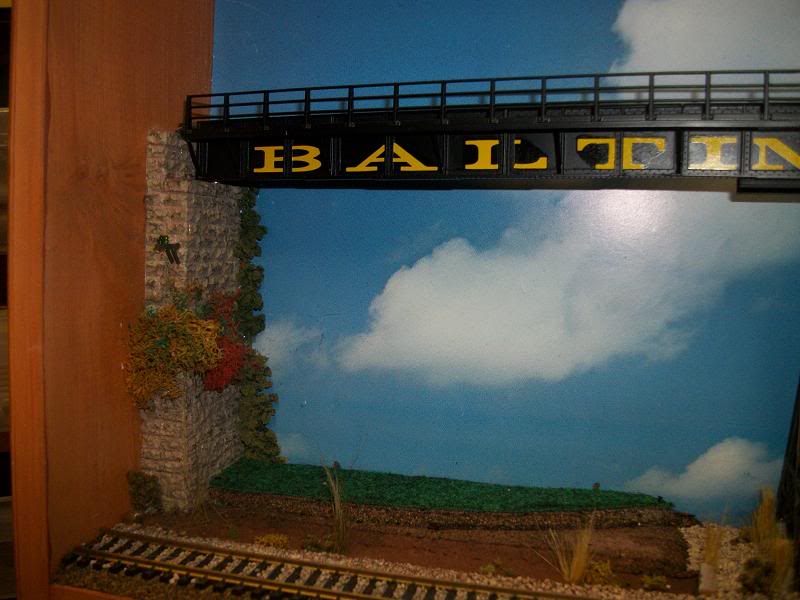
Then, you have the "center" of the case, with the Trestle bent....Which shows growth of weeds and such even a signal connected to the trestle, also to indicate "B&O Property" with the type of signal they used.....Also a signal box, or control box as used by the B&O, with the ditch, having a "culvert" that would end on the oppositie of the road seen 2 pictures below!!

THEN, when I added the trestle in place, I moved stuff around till I found the best location of it to sort of through off the "stright lines" indicated by a display case, for something unique....Notice the trestle placement, it goes from the deepest inner corner on the left, to the outter most edge on the right....HENCE the curve in the lower track, and on the right, the railroad crossing:
Then an over all picture with no locomotives in it:

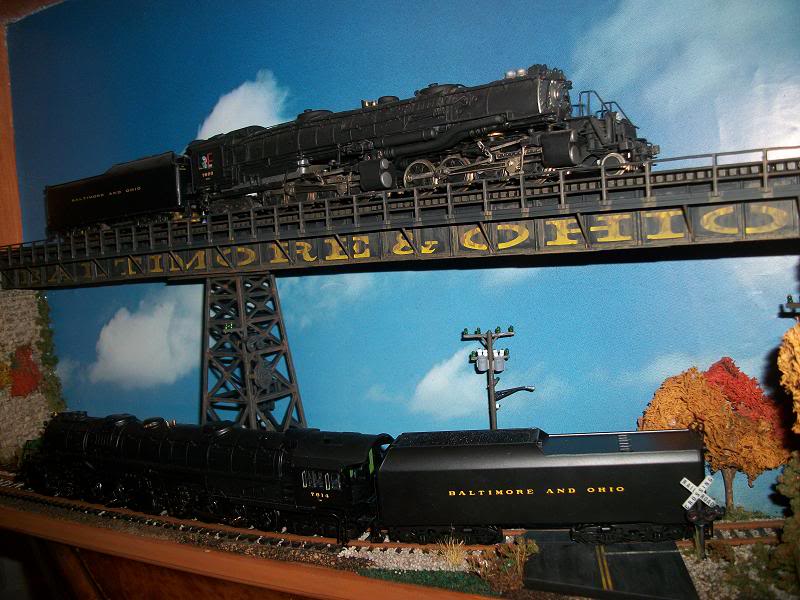
The large "BALTIMORE AND OHIO" I was going to add it in scale, BUT, I thought, this is a display case, adding it in scale isn't enough, so G scale lettering was the lettering of choice, big money for the lettering tho, as an Alphabet set but....That's the most money I spent in the whole project! So, I wanted it to be loud, and I think I got.....just that, loud!
Then, a more up close picture of the trestle:
I have yet to do alot of work to finish this....I plan to put 4 LED spot lights in the top corners shinning down onto the locomotives. The background is from a poster found at a yard sale, that my wife spotted, knowing I was looking for blue skies and clouds for the purpose of a backdrop for this display case. This poster was actually taken in Hawaii!!!! I had to cut out the Ocean water that was on the bottom edge of the poster, but didn't have to worry its all one big section added with Contact Cement!
The Trestle itself, was made with multiple Atlas Girder Bridges, cut to fit the length, and made to fit a section of white vinyl trim boards used on out door applications so that I could glue the sides of the bridges to that inner section and still be able to place the track and walkway and such without using a differenttype glue. The white vinyl board was cut in my table saw, to thickness, height, and then made to fit the outter most case, which is real wood, stained.
The Trestle bent, is a Life-Like yard tower, or water tower, "tower" beefed up a bit, cut and made to fit under the girder, and into 4 concrete casted detail parts I made for my B&O signal masts. I then detailed the inner walkway to the maintaining of the signal itself, and added the signal as it would have been to a high tower corner..... Then not far away from that was the placement of the "signal control box".
As you can see, there is A LOT of weeds, and under growth, even fallen dead sections placed, and some in the ditch, in the water as well. Plus all the weathering.....
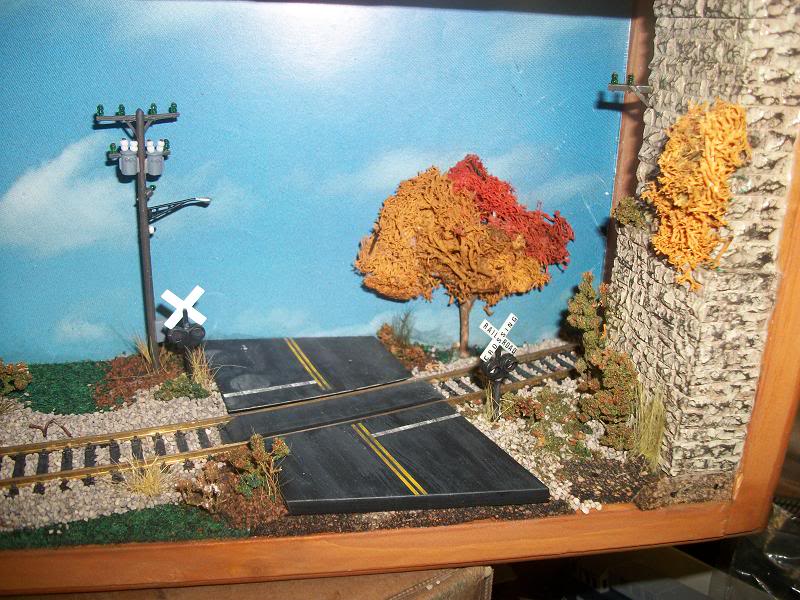
The road is made from laminating plastic sheet as needed to get over the tie height to be even withthe rail heads....Painted, decalled with the needed strips and then weathered, dullcoted, and it too, both sections, glued in place, with contact cement.....
I have also placed telegraph line isolators, that I made, and yes those too are real glass! I also placed railroad crossing signs on the road....The whole thing is placed in fall as you can see with the trees....I also plan to add a 1942 B&O Railroad truck for the "signal Maintainer" on the roadside closest to the signal box. to depict "year" AS the 2 B&O locomotives that you seen, were delivered to the B&O September 1st, of 1944!
I also plan to add the Signal Maintainer in the tower on the cat walk, along with a girl running along the road, with a little girl with her, and another railroader going across the trestle, along with a dog with the runner, and a white rabbit on the left side to depict me, my grandfather, my wife, our dog and my daughters rabit.
Not sure who I'm going to be, BUT my grandfather is in the top locomotive... He engineered the B&O 7600 from 1944 to his death is 1958....My wife and daughter will be the runners along the road, and the dog with them, and the rabbit being free under the Autum trees on the left.
Have not figured out much yet on what else to add, BUT its not completed yet so.....I'll probably end up being the crazy SOB on the Trestle with a HUGE 2-8-8-4 headed right at me!
~John
Many have tried to, and failed, ya just can't repair stupid...
Do NOT try to Idiot-Proof anything!!!! God, will simply create a better......IDIOT!
Edited by - EM-1 on August 02 2013 12:23:13 AM
|
|
Country: USA ~
Posts: 2911 ~
Member Since: March 26 2012 ~
Last Visit: January 14 2014
|
Alert Moderator
|
|
|
|
Posted - August 02 2013 : 12:38:06 AM
|
Barry: Your box is looking awesome, both inside and out! The exterior of the case appears to have an antique look which matches the old time train/scenery on the inside very nicely. I'm liking the way the mountain is looking so far as well; that's a clever way of constructing the rock. 
|
Country:  Canada ~
Posts: 3448 ~
Member Since: September 22 2006 ~
Last Visit: April 03 2026 Canada ~
Posts: 3448 ~
Member Since: September 22 2006 ~
Last Visit: April 03 2026
|
Alert Moderator
|
|
|
|
Posted - August 02 2013 : 10:03:46 AM
|
Hey John, Thinking about your Grandfather engineering a locomotive and your talk of depicting the "2-8-8-4 heading right toward" you . . . my great-grandfather (a "bridge man" for the Lake Shore Railroad) was struck by a fast freight on the Sandusky Bay Bridge in 1910. It is a possible other shadowbox I would like to do; not of him getting killed, but of a similar train.
You did some crafty and imaginative model work. That is really fine how you brought the girder bridges and signal tower together to come up with that steel trestle. The lettering looks great. Regarding your talk of using larger than scale size lettering, that seems to have worked just fine. It strikes me that things like that need to be done at times to get the overall feeling of the composition to come through.
One thing I've decided that I like about these shadowbox projects is that you can keep messing with them, just like a table or bench layout.
The shadow box I'm working on now was made from old tongue and groove wood flooring and then I built a separate frame for the glass that I hinged to the perimeter frame. The "box" is constructed out of 1/4" stock.
The photos I'm including with this note are of the first shadow box I made which sort of documents my "re-entry" into model railroading. Last fall I found this General 4-4-0 that someone had painted in the scheme of the Colorado Midland (old Midland rail bed adjoins my house property). I soon learned the Colorado Midland never had a 4-4-0 and the paint job wasn't right either. But that got me started.
I still don't feel like can put out $500 for an accurate brass locomotive, but I've had a lot of fun messing with these Tyco Mantua engines.
The second photo of the 4-6-0 and caboose is a later version of the original shadow box, but with an attempt at pile bridges and scenery included. The background photo on this one shows our house (circa 1920) just above the tender. I need to figure out how to photograph these. The glass on this first case doesn't open.
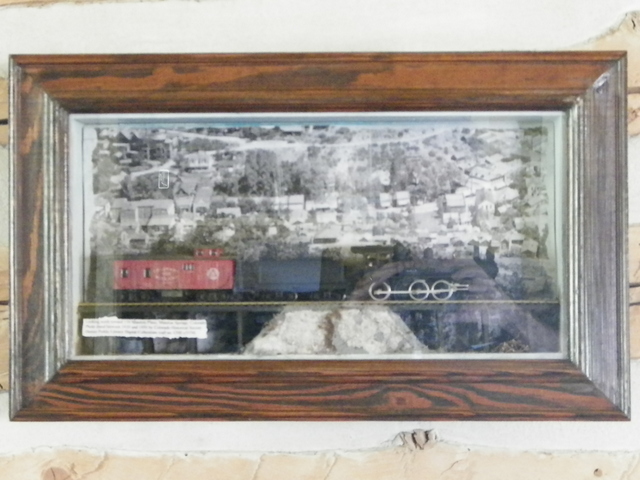 
In the photo with the General, my original shadow box was vertical; changed to horizontal for the 4-6-0.
|
|
Country: USA ~
Posts: 2087 ~
Member Since: March 16 2013 ~
Last Visit: July 05 2018
|
Alert Moderator
|
|
|
|
Posted - August 02 2013 : 10:06:48 AM
|
| Regarding the photo with the General in it, the red vertical line points to our house in the photo. In the lower right of the photo, you can see some Colorado Midland freight cars on the track to the east of our house (if you squint and look carefully).
|
|
Country: USA ~
Posts: 2087 ~
Member Since: March 16 2013 ~
Last Visit: July 05 2018
|
Alert Moderator
|
|
|
|
Posted - August 02 2013 : 11:51:31 AM
|
Cheez,
Is right, your use of the old mountain paper looks GREAT! I actually enjoy seeing stuff like this!
Barry,
Do you plan to use a tunnel portal on the mountain, OR you plan to leave it as a "natural" tunnel?
In my case, the front will be hinged. I plan to use quarter inch Lexan, that can be drilled and taped to except threaded screws to hold the "glass" onto a set of hinges, to be opened thats mounted to the top of the case.
In the first picture you posted, that almost looks like a picture frame! How deep is that and what scale is inside? HO? Thats impressive and looks as impressive as well, compared to the size, or how it looks! NICE WORK!
Did you use a frame already shaped, or did you do it yourself? I have to ask as I like how that looks on the shadow box you pictured!!
The shadow box with the red line is interesting, to bad, I couldn't have found a "Sand Patch" area picture like that to go onto the background of mine but, builders can't be choosy that way due to the fact, that the area "Sand Patch" would not have had a Trestle going through it. BUT, to the west of the actual Sand Patch tunnel, about a mile away there is a Trestle, but you would have never seen a B&O locomotive going across it as it was the Western Maryland Railway, BUT that would have been a Challenger, which I also have! See below:
Granted this picture seen above, is over 10 years old! It was taken in my shop, when I resided on the actual "Sand Patch" grade for the B&O, Chessie System, and now, CSX. BUT, I have yet to update this model, I want to add DCC and sound to this one as well, so that it can be run at the local train club, along with both of the 2-8-8-4's in the case, that you seen!
Granted with the new loco's, I agree.....I can't spend $500.00 for a loco, hell, my wife would hang me, with a personally made nuce to do so if I had! I got a few brass models, and for good prices! I don't have $200 in ALL of them together, (I was in the right place, at the right time) BUT, it took me 10 years to get the few I have! I actually paid more for my spectrum 2-8-8-4, then I got in the whole lot of Brass I have.
BUT, those that I do have and look as the 3 favorites seen here, I had the thought of making one of these "shadow boxes" and my wife, chimed in and asked if I were to lite them, and such, and pointed to a place in my living room to hang the case, once it was done for those 2 "Yellowstones" pictured in the shadow box....
See, the B&O's EM-1 class, 2-8-8-4 is my favorite locomotive, even before I knew my Great Grandfather (I made a typo, NOT my grandfather) Engineered the 7600. SO, in the top, the brass one on the Trestle is the 7600, with painted figures inside the cab, which is to represent my G. Grandfather.....And then because Bachmann came out with the new model, I just had to get one. THAT was the MOST I ever paid for a locomotive......I'd love to have a second one, to make 3 of them, BUT, I can't justify that....Unless a really good deal would come my way then I'd take the advantage to have that 3rd one.
My wife knowing this, (I have a portrait of the 7600 with my G. Grandfather along side, power washing the running gear) And knowing that, thats why she had mentioned about the placement of the shadow box I am building.
Now, back to the modeling, if you look closely, you can see the cat walk inside the Trestles bent, that goes to the signal I added. I tried to get as much "B&O Flavor" in this as I could possibly think up to add! I model the B&O and the Western Maryland in steam BUT I got others as well! I actually got other details to add, I got telephone lines to add that criss cross the road, as you can see the telephone pole, and if you look at the bridge abutments, you can see the railroad telegraph line isolator parts, along with just above the signal face on the trestle bent is another one to be a center holder as the lines are curved.
What you don't see, is the track work that will be on the trestle...Its all bridge ties and guard rails, I have the trestle currently, removable, as I'm not finished detailing and adding weeds and trees to the lower level. PLUS, I'm working on how I can add Telegraph lines to the higher level track......Might be a fun one! Thats a long span to have with lines going over and not much to "tie off" too....
See, I had a few thoughts when I started. The box itself, inside diameter was in fact, pretty big, and as you ee on some of the ideas I had, I had to make a reason for the trestle to be "angled". SO, that made me have to add something to give reason, to have the curved rail on the lower level....The Trestle bent was one reason, BUT the placement of the trestle on the long span had to be justified as the span of the trestle on the right is a bit more then most railroads are willing to go....UNLESS they had a good reason too, hence the placement of the road! THEN, with the added road, I had to think up a way to "date" the landscape. Placing a 1942 B&O Railroad truck, would do just that, EVEN THO, its actually 1944, they're was NO auto's manufacturered in the USA from 1943, to 1945.....Due to the war. Which means, the 1942 auto's, were the base and exactly the same as the 1946 models. As you can read this, the 1943 models early that year, were built from left over parts BEFORE the assembly lines shut down, Just as the 1946 models late that year, were classified, 1947 models! Even tho, they were assembled in 1946.
Interesting how a display case can go into a history lesson!!!
So with that said, I'm looking for a truck that I can paint to what the B&O had back then for service trucks that were NOT hi-rail trucks as I don't believe they had "hi-rail" trucks back then!
But as you see, alot going on with this one! I got to get some loose "fall leaves" to spread over the green grass.....Which that is NOT from a hobby shop, that green grass is from a pet store! Its a "mat" used for lizard care, needed cut to fit the tank that holds my Daughters 2 Leopard Geckos....I had the wife, save the cut off as it actually upside down, looks pretty good for grass. AND is higher to look like it has grown, which was why I used it. Plus, its not completely the same shade overall, it varries and thats a nice touch as well.....
Needless to say Barry, VERY nice work on yours, how many of these have you made, to date?
~John
Many have tried to, and failed, ya just can't repair stupid...
Do NOT try to Idiot-Proof anything!!!! God, will simply create a better......IDIOT!
|
|
Country: USA ~
Posts: 2911 ~
Member Since: March 26 2012 ~
Last Visit: January 14 2014
|
Alert Moderator
|
|
|
|
Posted - August 02 2013 : 1:48:13 PM
|
That Challenger has amazing detail. The tunnel is modeled "after" the actual tunnels in this neighborhood; only the few with unstable rock were timbered, and then not usually with a formal portal. There are still black smudges on the ceiling and faces of the tunnels from the old steamers. That first, smaller shadow box, is just that, a picture frame. I again used 1/4's stock, in this case about 3 1/2 inches wide. The 1/4" stock seems to fit nicely on the routed part of the frame where the glass rests. After I make the boxes, I connect them to the frame with angle brackets.
I'm looking forward to seeing more photos as you get the phone lines in place and such. Sounds to me like it could be fun to do a project with the photo of your grandfather in the background. I'm guessing that when railroads were the big thing, there were a whole bunch of families that had railroad men in them. Crazy how the technology has changed in the short years.
I'd like to do some lighting as well, but I haven't found anything that looks natural to me yet. I may end up settling for just a lamp to illuminate the case, but I'm thinking, with a little messing around you could do a moonlight thing.
That amazes me when folks tell me about the crazy buys they find (brass engine at a yard sale for $10)! Guess I don't get out much.
|
|
Country: USA ~
Posts: 2087 ~
Member Since: March 16 2013 ~
Last Visit: July 05 2018
|
Alert Moderator
|
|
|
|
Posted - August 02 2013 : 2:16:02 PM
|
quote:That Challenger has amazing detail. The tunnel is modeled "after" the actual tunnels in this neighborhood; only the few with unstable rock were timbered, and then not usually with a formal portal. There are still black smudges on the ceiling and faces of the tunnels from the old steamers. That first, smaller shadow box, is just that, a picture frame. I again used 1/4's stock, in this case about 3 1/2 inches wide. The 1/4" stock seems to fit nicely on the routed part of the frame where the glass rests. After I make the boxes, I connect them to the frame with angle brackets.
I'm looking forward to seeing more photos as you get the phone lines in place and such. Sounds to me like it could be fun to do a project with the photo of your grandfather in the background. I'm guessing that when railroads were the big thing, there were a whole bunch of families that had railroad men in them. Crazy how the technology has changed in the short years.
I'd like to do some lighting as well, but I haven't found anything that looks natural to me yet. I may end up settling for just a lamp to illuminate the case, but I'm thinking, with a little messing around you could do a moonlight thing.
That amazes me when folks tell me about the crazy buys they find (brass engine at a yard sale for $10)! Guess I don't get out much.
Originally posted by Barry - August 02 2013 : 1:48:13 PM
|
Barry,
Believe it or not......that Challenger, is an EX. Union Pacific Challenger from Rivarossi, that dates to 1972! I got it about 15 years ago, for a whooping $50.00 in pretty much mint shape (When I got it, I seriously doubt it was EVER ran!) I couldn't pass it up!
I took the Union Pacific tender off it, and sold it to get the materials I needed to make it into a Western Maryland M2, Challenger. Its NOT prototype, But a close "stand-in" To make it prototypical, I need to change the cab, and add a All-Weather cab plate to the tender, and it will be prototypical as the real one! ALL the "added" detail is made out of brass, by me and epoxied to the model....I do have a few small pipes I will change as well as they aren't exact, but they are close.
So your tunnel in your shadow box is going to be a "natural" portal.....It in real life was merely widened, to get a train to pass through it, thats AWESOME!
That old frame thats a picture frame is like a "surrounding" to the actual case itself.....Kind of "framing" it once its hung on the wall!
The angle brakets you use to connect the 2, once done are they easily seen?
As for the adding my G. Grandfather, I thought about it on another one for the other Brass loco I have as he engineered it once in awhile when the big 7600 was in for service....BUT, I want to get this one done, first.....
I know what you mean with the guys being in the right place, at the right time1 I have fallen into that A LOT in the past year, but I still haven't beat the time I got that Brass 2-8-8-4.....Sure, its old, I wanted one didn't matter who made it, but the price always killed me, $500 to $1400 I as a single guy couldn't afford it nor could I as a family man....BUT 2 years after I got married a friend of mine found that brass 2-8-8-4 for a whooping $100!!!!! I about fell over, as he bought it, for me and I wound up trading a BLI loco on it, and $100 cash as he was a good friend and I couldn't say no.....He got a loco for his efforts, and I got the bill that he got for paying for it and to this day, I don't consider getting ripped off with the deal as it was worth that plus. WAS NOT in the shape you see it now (I re-conditioned it) but at $500, in value, I couldn't say no! Not considering I wanted one since I was about 10 years old......
BUT thats a pretty good deal and to this day I haven't beat it....The only way I could come close is to find an HO scale Brass Max Gray Western Maryland 3 truck Shay WM #6.....The next one I'd love to find! Those are hitting $800 to $1200 right now in half decent shape!
Yes, things have changed greatly over the years.....I'm the "next" railroad interest in my family since my G. Grandfather.....As I was told, he was like me, I just wished I could have found his Lionel trains before my home place burned up.....They went with it if they were not sold, before I was born...Nothing to indicate this but a pretty good guess!
So, yeah I understand where your coming from!
The lighting I'm going to use is the type lighting that the craft store Michaels sell around Christmas, to their "Christmas house" Lemax set up...... They were on sale and the spot lights are small enough, and have positionible heads to point them, not a lot of movement but enough and are small enough to fit the case....AND they are LED lighted, which will not create heat, inside the wooden display case on all the plastic.....And for their size, I have to say they are really bright for the size of the LEDs!
Sadly in my area, I don't get out a lot I find a lot through friends who have seen something......OR I walk into a place and find it....Not a lot but at times, it walks to me, and thats when I'm in trouble.....
~John
Many have tried to, and failed, ya just can't repair stupid...
Do NOT try to Idiot-Proof anything!!!! God, will simply create a better......IDIOT!
Edited by - EM-1 on August 02 2013 2:16:37 PM
|
|
Country: USA ~
Posts: 2911 ~
Member Since: March 26 2012 ~
Last Visit: January 14 2014
|
Alert Moderator
|
|
|
|
Posted - August 03 2013 : 7:07:22 PM
|
Hey John, The boxes I made do stick out from the wall and you do see the construction and hardware if you get up near the wall and try to look at it. In our house, which is small, they do take up a bunch of space, but "so far, so good". Regarding the "portal", they did actually make the openings and blast and dig them out. There are some great photos of tunnel work being done, with details that would make yet another interesting diorama. I'm gonna have to check out those lights you're talking about at Michaels. John, check out the following link. It is to the Denver Public Libary's digital on line photos. Once you bring up a photo, you can use the icons to blow it up (most of them) quite large and see tremendous detail. The link goes to the B&O railroad photo and they have more http://digital.denverlibrary.org/cdm/singleitem/collection/p15330coll22/id/82897/rec/2/rec/2
I also added a couple of photos from today. Tried a little gray paint to see how far off I am from getting a right color./tyco/forum/uploaded/barry/20130803190249_100_2757.JPG /tyco/forum/uploaded/barry/20130803190355_100_2760.JPG /tyco/forum/uploaded/barry/20130803190512_100_2766.JPG /tyco/forum/uploaded/barry/20130803190543_100_2764.JPG /tyco/forum/uploaded/barry/20130803190601_100_2763.JPG
I mistakenly told you the boxes were constructed of 1/4" stock; the back is 1/4", but the sides are 1/2".
|
|
Country: USA ~
Posts: 2087 ~
Member Since: March 16 2013 ~
Last Visit: July 05 2018
|
Alert Moderator
|
|
|
|
Posted - August 03 2013 : 9:03:45 PM
|
Nice work! You know on a more permanent placement, inside "interior" wall, you could "French" them into the wall! And use the frame work around the outside edge to set them in a picture type setting.
This way "inset" into the wall, would take up less space, BUT is a semi-permanent placement due to the square "hole" left in the wall, if ever relocated, or moved.
As for the portals your using, its blasted open for clearance, but left "natural" as its strong enough as is.....A lot of times railroads used stone or brick to make the portal strong, and to keep the edges of the mountain from falling in on the railroad tracks, or in other cases, even a road! The way, your modeling them, states the natural landscape is strong enough to hold itself.
~John
Many have tried to, and failed, ya just can't repair stupid...
Do NOT try to Idiot-Proof anything!!!! God, will simply create a better......IDIOT!
|
|
Country: USA ~
Posts: 2911 ~
Member Since: March 26 2012 ~
Last Visit: January 14 2014
|
Alert Moderator
|
|
|
|
Posted - August 03 2013 : 9:05:13 PM
|
Barry, got to have a look at the link you posted, and that does show some good detail! NICE, I'll be adding that to my favorites list!
~John
Many have tried to, and failed, ya just can't repair stupid...
Do NOT try to Idiot-Proof anything!!!! God, will simply create a better......IDIOT!
|
|
Country: USA ~
Posts: 2911 ~
Member Since: March 26 2012 ~
Last Visit: January 14 2014
|
Alert Moderator
|
|
|
|
Posted - August 04 2013 : 12:41:45 PM
|
| I do like that idea of "frenching" them in to the wall (you must be an old custom car enthusiast), but we have a limited supply of frame walls in this place. I sort of decided last night that I don't like the way that tunnel looks with the gray paint. I'm gonna cover it with brown paper bags again and start over. It's always something, hey?
|
|
Country: USA ~
Posts: 2087 ~
Member Since: March 16 2013 ~
Last Visit: July 05 2018
|
Alert Moderator
|
|
|
|
Posted - August 04 2013 : 1:20:26 PM
|
quote:I do like that idea of "frenching" them in to the wall (you must be an old custom car enthusiast), but we have a limited supply of frame walls in this place. I sort of decided last night that I don't like the way that tunnel looks with the gray paint. I'm gonna cover it with brown paper bags again and start over. It's always something, hey?
Originally posted by Barry - August 04 2013 : 12:41:45 PM
|
Barry,
Actually, yes, I am an custom car enthusiast, or used to be...It has been awhile Old? Nahh....I'm 34! BUT, I have built a couple 426 Hemi's, and I have rebuilt custom a 1934 Ford T bucket, and 3 1930's Plymouth, 3 and 5 window coupes! I've also painted multiple Muscle cars from the 1970's. I'm proud to say that my favorite builds go to a 1933 Plymouth 3 window cope that I stuffed a 426 Hemi under the hood. THEN right be hind that comes a 1970 Dodge Super Bee R/T that had a stock road model 426 Hemi in it that I totally redone the car, all factory and nothing extra....Paint and all! And my 3rd favorite has to go to a 1972 Olds "442", that had the big 455 "Golden Rocket" under the hood. All these cars, not only did I rebuild the motors, but I done ALL the body work, and painted them!
As for the "frenching" tho.....You having the "picture" frame work around the actual shadow box, and that "frames in" the whole unit, which looks AWESOME and thats where I got the "frenching in" part from! As that would entail a framed picture hung on the wall!
Gray paint? What type of gray paint? You may be able to simply re-paint over the gray, say a brown shade of some sort, as you can do that with out re-applying the brown paper to except the new paint. The 2 tones may look good as well, sort of a weathering technique! Then you could simply keep adding to that to get that "look" your seeking......
~John
Many have tried to, and failed, ya just can't repair stupid...
Do NOT try to Idiot-Proof anything!!!! God, will simply create a better......IDIOT!
|
|
Country: USA ~
Posts: 2911 ~
Member Since: March 26 2012 ~
Last Visit: January 14 2014
|
Alert Moderator
|
|
|
|
Posted - August 05 2013 : 09:32:49 AM
|
Nice bunch of automobiles you've had there John. My truck is a '50 Chevy 3/4 ton. Was my daily driver for 25 years; then my daughter turned me on to a Volvo, so now (having gotten use to being able to hear myself think when driving) I reserve the truck for truck duties. It's more of a beater than a clean classic.
Re: The tunnel; I may still try and do something with paint, but I did start redoing the brown paper bag stuff. If you drive up in to this Colorado canon (a gravel road replaces the rail bed now), you can see that the rocks look more brown than grey. My original thoughts were to try and match some of the greys in the black and white photo, but it may be that it is printed with a color ribbon in the printer and there are other colors involved? My daughter suggested that I try using maybe a yellow along with the white to make a grey, or another primary color? Here's a couple photos of what I messed with yesterday.  It seems that maybe a single color will allow the shadows to develop naturally as the light hits the various folds; whereas if I paint on different colors and they aren't in the right spot where shadows would be, then . . . I'm thinkin' now maybe spraying the brown paper with dull coat and see what happens. It's trial and error presently. It seems that maybe a single color will allow the shadows to develop naturally as the light hits the various folds; whereas if I paint on different colors and they aren't in the right spot where shadows would be, then . . . I'm thinkin' now maybe spraying the brown paper with dull coat and see what happens. It's trial and error presently.
|
|
Country: USA ~
Posts: 2087 ~
Member Since: March 16 2013 ~
Last Visit: July 05 2018
|
Alert Moderator
|
|
|
|
Posted - August 05 2013 : 5:31:12 PM
|
Barry,
I never owned these cars, I merely built them/painted them for a garage I once worked for!
RE: I have to say the brown would be a base, to make different shades to come close to that your trying to achieve. Easier said then done, I know....
Black & hite pictures do propose a difficulty in painting specially in this sence that your trying to achieve. Needless to say, anything worth doing, is going to be trial and error!
~John
Many have tried to, and failed, ya just can't repair stupid...
Do NOT try to Idiot-Proof anything!!!! God, will simply create a better......IDIOT!
|
|
Country: USA ~
Posts: 2911 ~
Member Since: March 26 2012 ~
Last Visit: January 14 2014
|
Alert Moderator
|
|
|
|
Posted - September 11 2013 : 10:13:36 AM
|
Great project - the shadowbox. And they look very impressive - I am inspired to begin thinking of doing one myself.
John - not to nit pic, but a question - are you going to include any rolling stock behind your locomotives? Just a thought that came to me looking at it.
http://tycodepot.com/
|
|
|
|
|
|
|


