|
|
 Posted - September 10 2012 : 8:41:12 PM Posted - September 10 2012 : 8:41:12 PM


|
Hello guys,
I normally post on the MRR, Atlas Rescue and a few other forums. I was invited by a friend to join here, so this is my first thread. I've been experimenting with Alclad2 for several years and have been enjoying it. I've been encouraging passenger car modelers to try it.
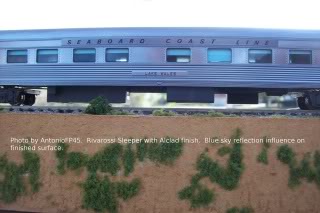
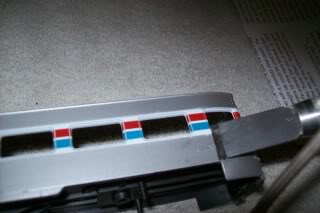
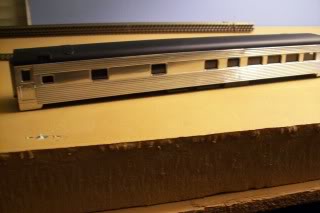
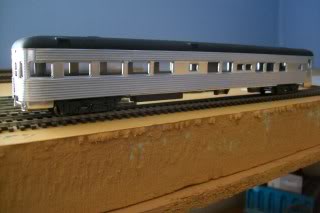
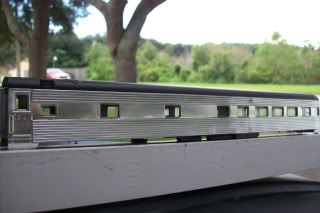
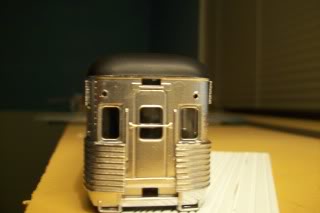
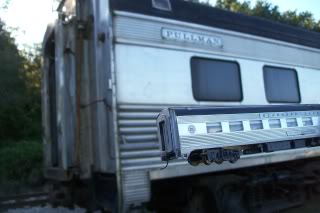
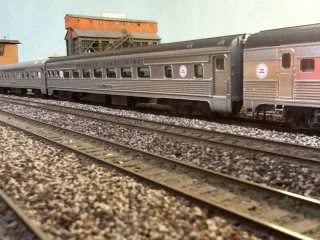
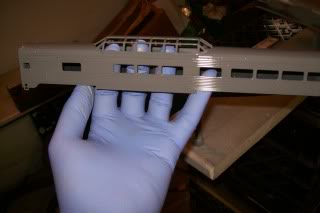
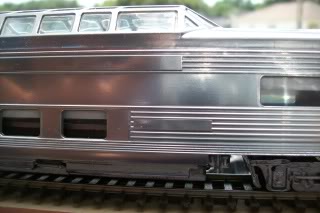
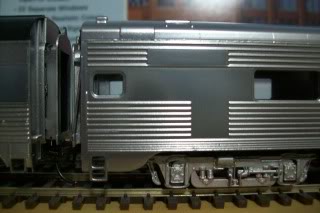
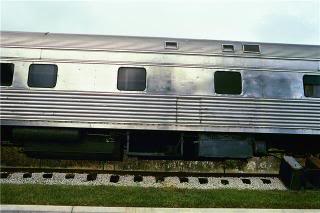
This is an HO Rivarossi Budd streamlined sleeper (basically a generic 10-6) that I refinished to the Seaboard Coast Line RR scheme circa 1967-68. I stripped the shell with 91% alcohol, applied Scale Coat 2's high gloss NYC Dk. Gray for the basecoat foundation, followed by an application of Alclad 107, then sealed with one coat of gloss clear for protection and a foundation for decals. Typically after applying decals, one to two coats of clear is applied to tone down the shine to a realistic appearance.
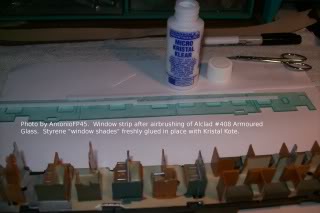
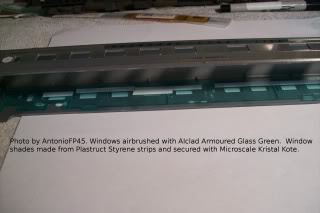
The window glazing was sprayed with Alclad2 Armoured Glass to simulate the green tint typically found on the classic Budds. I hand painted and installed an IHC sleeping car interior that I purchased about 20 years ago.
For window blinds, I just use white styrene strips and glue them above the window rows at various heights to simulate them in various positions. I also replaced the stock plastic wheels with metal ones. To increase the weight and improve tracking, I filled the empty pockets in the floor with BB shot pellets and covered them with Elmer's Glue. Remarkable difference.
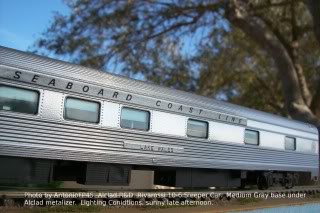 
Typically these Rivarossi Budds are criticized by some modelers for their generic body detailing, but imho, considering that they were tooled and produced in the late 1980s-early 90s (long before the Walthers Budd units were) I think they're good looking cars overall and with a painted interior, weathering, and the Alclad2 treatment, ..they're nice looking cars! 
Be creative, share and enjoy the hobby :-)
Edited by - AntonioFP45 on September 12 2012 10:12:27 PM
|
Country:  USA ~
Posts: 32 ~
Member Since: July 23 2012 ~
Last Visit: December 20 2015 USA ~
Posts: 32 ~
Member Since: July 23 2012 ~
Last Visit: December 20 2015
|
 Alert Moderator
|
|
|
|
 Posted - September 10 2012 : 8:50:01 PM Posted - September 10 2012 : 8:50:01 PM
|
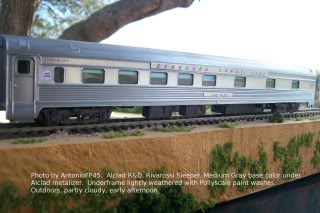
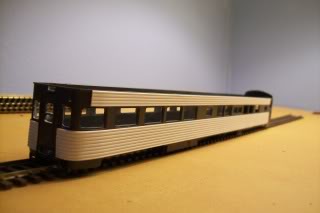
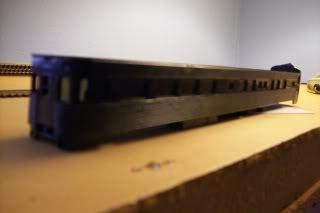
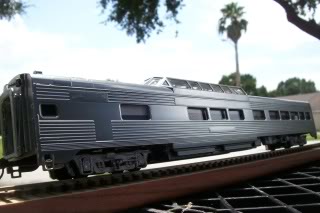
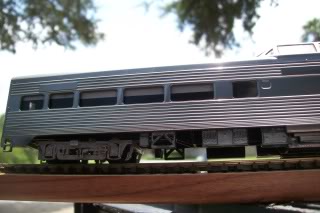
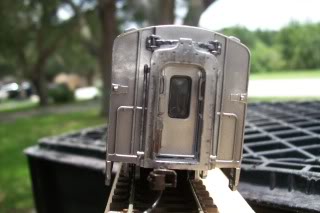
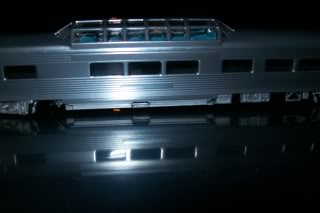
Here is an AHM "Blunt ended" Observation car that I paint stripped and applied Alclad2 to. Although it's based on a Pullman Standard unit, I wanted it to "vaguely" resemble a blunt ended Budd unit. My intent was to use this car a a "stand in" for the blunt ended Budd Tavern Observation cars used on the Atlantic Coast Line's Champion streamliner. The corrugated Pullman Standard fluting came from Union Station Products.
Be creative, share and enjoy the hobby :-)
Edited by - AntonioFP45 on September 12 2012 10:14:26 PM
|
|
Country: USA ~
Posts: 32 ~
Member Since: July 23 2012 ~
Last Visit: December 20 2015
|
Alert Moderator

|
|
|
|
Posted - September 10 2012 : 10:50:28 PM
|
Welcome, Antonio! You may remember me as Steamfreak over on the MR forum. Ron's been talking about being a friend of yours, and I understand he also got one of your metalized originals.
I'm surprised you could strip those RR coaches with 91% alcohol, since their paint is usually bullet proof. The finished products look amazing, particularly that Budd streamliner. Are they criticized for inaccuracies, or just lack of detail?
Don't be afraid of posting larger photos, since the forum software is capable of automatically re-sizing them.
The Tyco Depot
|
|
Country: USA ~
Posts: 3927 ~
Member Since: June 20 2007 ~
Last Visit: November 19 2015
|
Alert Moderator
|
|
|
|
Posted - September 10 2012 : 11:02:55 PM

|
The finished results look great! Do you have any whole consists that you've completed like this? Some day when I have my own little painting area I'll have to give that a try .
Welcome to the forum! 
Cheez
|
Country:  Canada ~
Posts: 3448 ~
Member Since: September 22 2006 ~
Last Visit: April 03 2026 Canada ~
Posts: 3448 ~
Member Since: September 22 2006 ~
Last Visit: April 03 2026
|
Alert Moderator
|
|
|
|
Posted - September 11 2012 : 05:49:30 AM
|
Nelson,
Great seeing you here! Hello Cheez.
Thank you for your kind comments. My modeling era is from the late 60s- thru early 70s.
Re: the criticism of the Riv and AHM cars. As we know, Walthers raised the bar back in the early 2000s when their newly tooled streamliners were introduced which featured much better detailing. However, for me, although I like and prefer prototypical accuracy I'm one of those modelers that can live with a car that might not have the correct underbody detailing or window arrangements as the prototype.
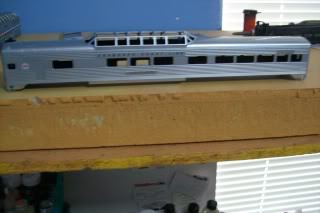
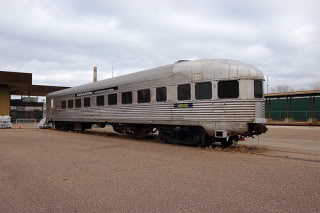
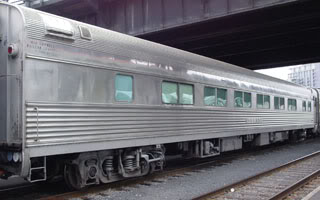
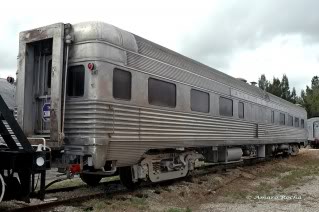
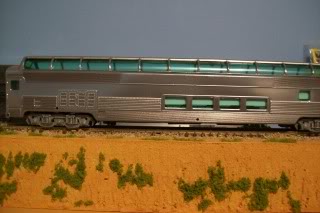
I discovered Alclad2 by reading a 2003 article in MRR Magazine in which a modeler detailed and metalized a pair of N-scale RDCs. I was amazed as I had grown very dissatisfied with silver paint on passenger cars that were supposed to be stainless steel. Long story short, I started experimenting with Alclad2 and discovered that by using gloss gray finishes instead of jet black, it was possible to simulate prototype stainless steel on rail cars. Below is a Walthers dining car that I stripped and refinished with Alclad2. My wife and I took a trip to see a prototype Budd car at a museum and we were amazed at how closely the Alclad2 finish resembled the prototype Budd's stainless steel surface.
---------------------------------------------
The old AHM and Rivarossi passenger cars are a piece of cake to strip as are the older run Bachmann Amfleet cars and Metroliners. I've found older Athearn equipment to be a challenge to paint strip.
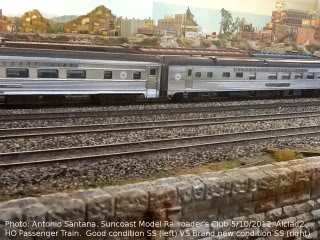
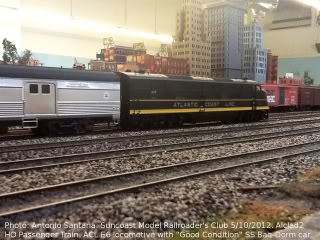
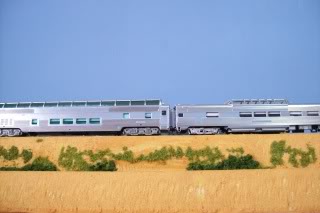
I've posted a number of threads on the other forums on the steps I use and have been sharing the info. My plan is to metalize my fleet of Walthers streamlined cars into SCL with a few cars in ACL so that I can have a decent representation of the SCL Champion. I'm not there yet, but am getting closer. Below is a mix of Walthers and Rivarassi cars that I brought to the Suncoast Model Railroad Club in Largo, Florida. What a good group of guys! I'm a former member but had to drop out due to increased demands from my job and family. But the membership was very kind in allowing me to bring my units. They members provided helpful critiques on the finishes. I'm one of the volunteer testers for Alclad2 and have been passing the feedback to Alclad's owner Tony Hipp who is currently developing a basecoat color line specifically for stainless steel trains.
Be creative, share and enjoy the hobby :-)
Edited by - AntonioFP45 on September 11 2012 06:02:45 AM
|
|
Country: USA ~
Posts: 32 ~
Member Since: July 23 2012 ~
Last Visit: December 20 2015
|
Alert Moderator
|
|
|
|
Posted - September 11 2012 : 06:31:31 AM

|
Antonio,
Welcome Aboard!
I too am surprised that 91% Alcohol worked for removing the Rivarossi paint, as Nelson said, I and I agree its usually bulletproof!
Your metal plating looks AWESOME! I know alittle of that myself, with the use of the different ways of doing it, does the model have to be scratchless and pretty much 100% on the shell? Most are and alot of touchy that way.....
I'm interested in how you achieve the looks your getting!
~John
Many have tried to, and failed, ya just can't repair stupid... 
Do NOT try to Idiot-Proof anything!!!! God, will simply create a better......IDIOT!
|
|
Country: USA ~
Posts: 2911 ~
Member Since: March 26 2012 ~
Last Visit: January 14 2014
|
Alert Moderator
|
|
|
|
Posted - September 11 2012 : 10:30:24 PM
|
quote:Antonio,
Welcome Aboard!
I too am surprised that 91% Alcohol worked for removing the Rivarossi paint, as Nelson said, I and I agree its usually bulletproof! - EM-1 |
Ok, I understand your reaction but remember that during the 60s, 70s, and 80s those manufacturers changed paint formulas more than once, if I'm not mistaken. Depends on the manufacturer and sometimes on the product line itself. As I alluded to earlier, stripping a 1970s Athearn locomotive can be a bear of a job, but paint stripping late 70s thru early 90s Rivarassi, AHM, and Bachmann rolling stock is easy. But some of the locomotive shells, however, can be a challenge. I remember Bachmann HO Chessie System F-units having a hard, high gloss on them. They were probably a challenge to strip.
quote:"Your metal plating looks AWESOME! I know alittle of that myself, with the use of the different ways of doing it, does the model have to be scratchless and pretty much 100% on the shell? Most are and alot of touchy that way.....
I'm interested in how you achieve the looks your getting! - EM-1
Originally posted by EM-1 - September 11 2012 : 06:31:31 AM
|
Thank you EM-1. Believe me I've had my share of mistakes. What I've been doing is taking notes and posting them on the forums to share with other modelers.
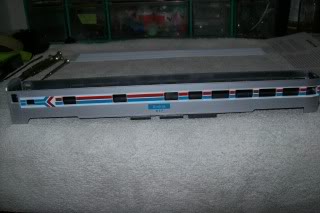
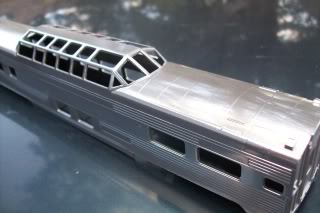
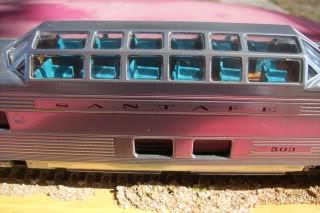
Below is a step-by-step process that I posted in 2011 on the MR Forum (I've edited it slightly). It was for an IHC Dome Car that was based on Santa Fe's Pleasure dome. I hope this will be of help:
----------------------------------------------------------------------------------------
Hello Crew,
Please forgive my gung-ho enthusiasm, but I have to tell you this process is becoming more and more enjoyable and feel that if a klutz like me can do this.....so can anyone that can handle an airbrush! The intent here is to demonstrate how to take a relatively inexpensive car that's commonly found on ebay and swap meets and easily transform it into something that looks much more prototypical that you'd enjoy running on your layout..
A. Subject: HO scale 1980's IHC dome car. Model is based on prototype Pullman Standard unit used by the Santa Fe (Pleasure Dome). Belongs to a good friend of mine, my wife's cousin, who is a Santa Fe & BNSF fan. He purchased it at a train show for a bargain at $10. (ironic, for me, that it was in the SCL scheme!)
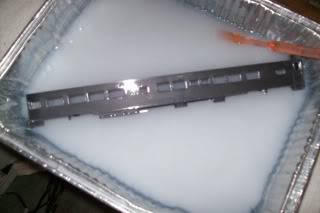
1. I removed the shell from the chassis and gave it a 91% alcohol bath. After soaking for just 5 minutes, the factory silver paint came off easily with a toothbrush. After stripping, the shell was washed with warm water and an inexpensive dishwashing liquid.
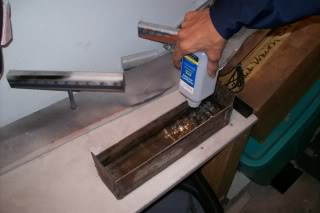 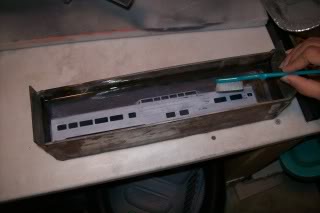 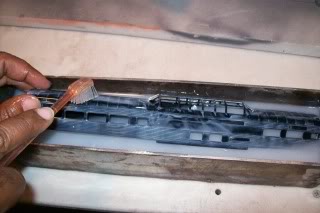
2. Basecoat Color (foundation) - Scalecoat 2, New York Central Light Gray. Thinned 60%. Airbrush (Paasche VL. Needle and aircap sizes: #3 (medium). Air pressure at tip: 25psi. Distance to shell: 3" inches. Total number of coats: Two, medium wet.
3. Critical stage: Gray finish must be SMOOTH! After drying; check the shell for dry or rough spots. If mistakes are discovered, this is the time to fix them. Wet sand spots, clean and apply another coat over shell if needed. When finished, flush out & clean airbrush with lacquer thinner
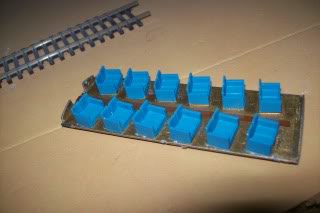
4. As the basecolor cured, I took the molded black plastic seating unit that was in the dome section and hand painted it with Polyscale acrylics. The floor: gold/brown with a dark brown mat in the center. The seats, a blue mix based on forum member Smitty's photo of his Santa Fe dome car .
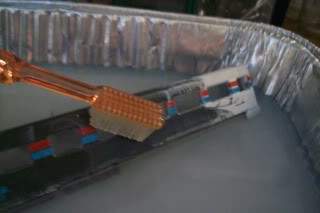
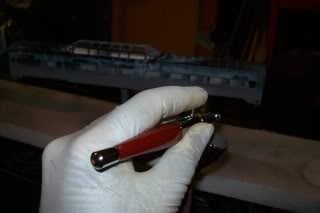
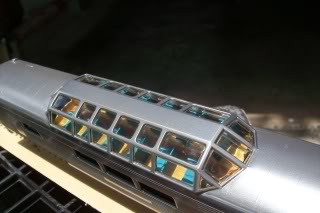
5. Alclad Application - Formula: Chrome. No thinning. Airbrush Needle & aircap sizes-#1 (fine). Air pressure at tip: 15psi. Distance to shell: 2" inches. Number of coats: 3. FIRST, I spent several minutes testing myself on the back section of a scrap FP45 shell to make sure the airbrush was spraying well and my distance/stroke speed were good. This step is a headache preventer as I discovered that I needed to increase my speed, slightly.
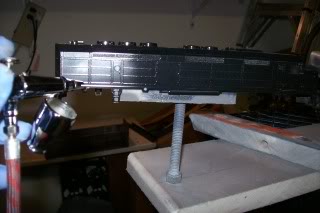
6. Spraying the Alclad 2. Relax and enjoy. (I had my smooth jazz tunes playing) Maintain the airbrush parallel to the surface. Spray in a LIGHT MIST COAT and stroke your airbrush as if you were painting with a modeler's paint brush. Tip: ( Wearing an appropriate respirator) As you spray, keep your head within 10" of your model, but over it, and either to the right or left of the airbrush so you can monitor your speed and distance. Some people have a tendency of standing directly behind the airbrush while spraying and not clearly seeing if they're getting too close or far. (yes, been there, done that!) Wait 5 minutes between coats if temperature is over 75F. Wait longer at lower temps. Check shell carefully for any areas missed; and stroke over if needed. Flush & clean airbrush upon finishing
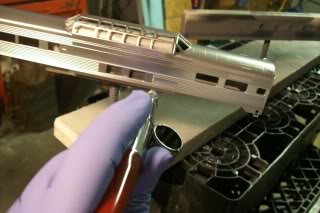
7. Sealing/Toning down sheen - New product. Instead of the Testor's Acryl or Pollyscale clears, I applied one of Alclad's NEW waterbased clear; #ALC 600. Thinning: None. Airbrush needle & aircap sizes #3 (medium). Air pressure at tip 20 psi. Distance 3" inches. Number of coats: One:
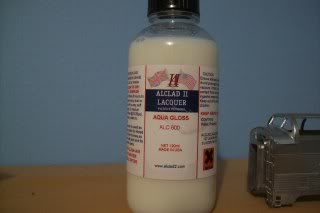
After practicing for several minutes with the medium size needle/aircap set up, I applied the clear to the shell. I was surprised at how fine this atomizes and smoothly lays on top of the Alclad finish. IMHO, this performed superior to the clears I've used before. However, upon finishing the airbrush must be flushed out immediately. I used a mixture of distilled water and alcohol to flush out.
8. The sheen toned down beautifully, imho, to the appearance of highly polished, reflective stainless steel. Only one coat was applied since this will be the foundation for the Santa Fe decals. Afterwards, 1 to 2 more coats of clear will seal the decals and tone down the sheen more. This shot is before re-assembly:
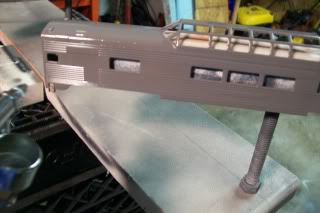
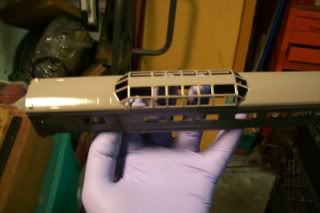
9. After lightly weathering the underframe and diaphrams, Re-assembly: White styrene strips were positioned and glued in place to resemble window shades. Dome interior seat module was reinstalled and body installed on to chassis. OUTDOOR PHOTOS:
 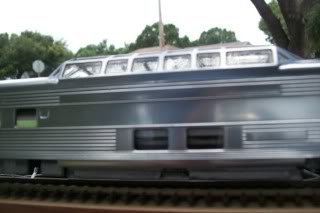   
Weathering on diaphram
Indoor photos:
----------------------------------------------------------------------------------
Now, respectfully, here are some photos (not taken by me) of prototype stainless steel units, including the Santa Fe dome.
Gentlemen and ladies, you can clearly see the reason why we should not be so deeply worried about getting a "PERFECT" stainless steel match. Except for when these cars were new........there's no such thing! The combination of weather, dirt/grime, maintenance practices, and photographic lighting conditions only help to affirm this. Pullman Standard, deep sheen, good condition-
SCL (photo by Dixon) older, polished surface with dents & stains
ACF cars in fairly new condition. Stainless steel sheathing is "whiter" than Budd and Pullman Standard cars of similar age:
(BCoolidge photo) 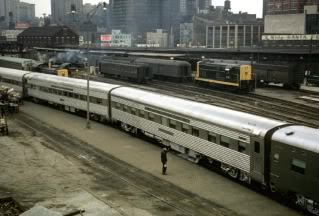
Now, take a good look at these photos of the same car YEARS APART. Note that as the car aged (and was likely neglected), the sheen dulled considerably and the surface faded to a lighter grayish hue
As a former transit shop collision repair tech that often worked with steels, imho, the arguments regarding which finish is the best or most realistic is like the old Ford vs Chevy argument. Walthers Pine series. and Rapido's stainless steel finishes differ from each other Y-E-T they are both correct. My only, humble, criticism is that the Walthers Superliners have too high a sheen which is very pronounced over the dark hue (likely a black base underneath the plating). However, they would look more realistic with a semi-gloss clear applied onto their surfaces.
Those of you with unplated cars that seem to greatly want the stainless steel look should give this a go. IT IS PROTOTYPICAL if stainless steel hues and sheens within a train don't match up perfectly! I'm not a salesman, but as I've stated so often, back in the day I fantasized about having onboard sound in HO locomotives, and HO passenger cars with surfaces that looked just like the prototype streamliners......... instead of "silver" paint, Here we are!
Another point: I'm frequently asked why I apply Alclad #107 instead of #115, Stainless Steel. I'll explain again. Alclad #115 Stainless Steel resembles the finish that you see on SS appliances and sinks. Even with alloying and machining differences Budd, PS, and ACF used high Chromium content on their cars surfaces resulting in "High Reflectivity". By applying the Clear on top of the Chrome, you can instantly tone it down to the level that you desire, whether you're using photographs or have access to a prototype car. With Alclad Stainless Steel #115, the reflectivity is knocked down considerably. Yet, even some cars with considerably faded exteriors will still display reflectivity, like these two:
As a high schooler back in the late 70s, I spent a lot of time in and around Amtrak Heritage cars, including units still in their predecessor finishes. Guys, I have photos and can tell you a lot of those sheens were deeper and more brilliant than what's on the Walthers Pine cars, like this photo (not mine).
Inspite of the problems posed by photography and the persistence of some modelers that "photos are subjective", one thing that MANY, MANY photos reveal that's undeniable regardless of lighting, color saturation, pixel counts, overexposure, underexposure and even black&white photography......is reflective sheens! Alclad Chrome resembles "Chromium". The prototype streamliners we are talking about contained "Chromium" in their surfaces, which is why they were so mirror-like when new (after extensive polishing in the plant).
Guys, I am having so much fun with this and only wish some of you that enjoy realistic finishes would jump on the bandwagon as well. Lots of room and it's an enjoyable ride!
Would be cool if one of you modern Amtrak modelers would try this on an Amfleet car. Some of you already own Bachmann or Walthers Amfleet cars that were produced years back. Give it a shot! (use a NYC dark gray or similarly colored charcoal gray as a base foundation).
Be creative, share and enjoy the hobby :-)
Edited by - AntonioFP45 on September 13 2012 7:56:45 PM
|
|
Country: USA ~
Posts: 32 ~
Member Since: July 23 2012 ~
Last Visit: December 20 2015
|
Alert Moderator
|
|
|
|
Posted - September 12 2012 : 5:31:04 PM
|
I am very proud to be the "friend" that lured Tony onto this forum. One of the hallmarks of this watering hole is the fact that some of us, never met, become friends through the commonality of our shared hobby. I am fortunate in that I work alongside Tony daily and have direct access to his counsel and advice (when we have a minute or two). Tony, enjoy the hospitality here- a great bunch of railroaders with a strong dose of small town friendliness, no matter where they hail from!
Siouxlake/Ron
Chief Engineer- Minnesota, Sioux Lake & Western Railroad
Proud father of a University of South Florida lovely and talented daughter!
|
|
Country: USA ~
Posts: 510 ~
Member Since: September 21 2011 ~
Last Visit: December 21 2014
|
Alert Moderator
|
|
|
|
Posted - September 12 2012 : 7:15:19 PM
|
| neat job Tho I do like the dome end car in Amtrak That car always made me think it looks like a caboose
|
|
Country: USA ~
Posts: 15033 ~
Member Since: February 23 2009 ~
Last Visit: July 19 2026
|
Alert Moderator
|
|
|
|
Posted - September 12 2012 : 8:40:21 PM
|
Antonio,
Where might I be able to get the Alclad that you used?
I am an avid airbrush painter (I am a actual Commercial spray painter, so.....) Anyway, I like the looks of that finish and to stand the silver finish to the Alclad "Stainless" steel look is difficult to achieve!
Any insight is appreciated!
~John
Many have tried to, and failed, ya just can't repair stupid...
Do NOT try to Idiot-Proof anything!!!! God, will simply create a better......IDIOT!
|
|
Country: USA ~
Posts: 2911 ~
Member Since: March 26 2012 ~
Last Visit: January 14 2014
|
Alert Moderator
|
|
|
|
Posted - September 12 2012 : 10:37:39 PM
|
SiouxLakeRon,
Thank you Ron. I wasn't sure if you wanted me to post your name here as I didn't want to violate your privacy. Thanks for putting up with me, you've been a good , patient friend.
EM-1, here is a link on Alclad2's website, but I know that more stores than what are shown carry Alclad2 products. From my understanding, some model railroad web dealers are starting to keep Alclad2 in stock as well since interest in "plating" or metalizing has grown.
http://alclad2.com/buy/us-retailers-distributors/
quote: Antonio,
Where might I be able to get the Alclad that you used?
I am an avid airbrush painter (I am a actual Commercial spray painter, so.....) Anyway, I like the looks of that finish and to stand the silver finish to the Alclad "Stainless" steel look is difficult to achieve!
Any insight is appreciated!
Originally posted by EM-1 - September 12 2012 : 8:40:21 PM
|
Be creative, share and enjoy the hobby :-)
Edited by - AntonioFP45 on September 12 2012 10:43:07 PM
|
|
Country: USA ~
Posts: 32 ~
Member Since: July 23 2012 ~
Last Visit: December 20 2015
|
Alert Moderator
|
|
|
|
Posted - September 13 2012 : 1:21:56 PM
|
Ron, if I had Tony at my disposal I'd try to talk him into Alclad-ing my whole car. 
Tony, the finish on that vista dome is unreal. (Or should I say totally real?) 
The Tyco Depot
|
|
Country: USA ~
Posts: 3927 ~
Member Since: June 20 2007 ~
Last Visit: November 19 2015
|
Alert Moderator
|
|
|
|
Posted - September 13 2012 : 9:09:08 PM
|
Thank you Nickel Plate.
I've been posting these threads because, as a passenger train modeler, I've really enjoyed doing this and have been encouraging other modelers to give it a go as well.
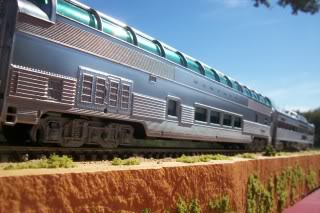
Forgot to mention that the Santa Fe pleasure dome belongs to my wife's cousin as does the Bachmann full length dome as well, both pictured below.
Note: I did not tint the Pleasure Dome's windows, only the full length dome.
Be creative, share and enjoy the hobby :-)
Edited by - AntonioFP45 on September 13 2012 9:10:40 PM
|
|
Country: USA ~
Posts: 32 ~
Member Since: July 23 2012 ~
Last Visit: December 20 2015
|
Alert Moderator
|
|
|
|
Posted - September 29 2012 : 01:34:17 AM
|
quote:SiouxLakeRon,
Thank you Ron. I wasn't sure if you wanted me to post your name here as I didn't want to violate your privacy. Thanks for putting up with me, you've been a good , patient friend.
EM-1, here is a link on Alclad2's website, but I know that more stores than what are shown carry Alclad2 products. From my understanding, some model railroad web dealers are starting to keep Alclad2 in stock as well since interest in "plating" or metalizing has grown.
http://alclad2.com/buy/us-retailers-distributors/
quote: Antonio,
Where might I be able to get the Alclad that you used?
I am an avid airbrush painter (I am a actual Commercial spray painter, so.....) Anyway, I like the looks of that finish and to stand the silver finish to the Alclad "Stainless" steel look is difficult to achieve!
Any insight is appreciated!
Originally posted by EM-1 - September 12 2012 : 8:40:21 PM
|
Originally posted by AntonioFP45 - September 12 2012 : 10:37:39 PM
|
Antonio,
Sorry for the late reply, I got side-tracked!
I got to looking for this paint you have brought out and I HAVE it. And nope didn't have to order any or anything.....I just thought for some reason the name Alclad II looked familiar, and no wonder...... I've been using it, myself!
I'll have to look and see just what I had bought it for and what I have used it on!
~John
Many have tried to, and failed, ya just can't repair stupid...
Do NOT try to Idiot-Proof anything!!!! God, will simply create a better......IDIOT!
|
|
Country: USA ~
Posts: 2911 ~
Member Since: March 26 2012 ~
Last Visit: January 14 2014
|
Alert Moderator
|
|
|
|
 Posted - November 22 2014 : 06:34:05 AM Posted - November 22 2014 : 06:34:05 AM
|
No problema John!
I hope that you give it a go. Just send me a pm if you have any questions that I can help with
Be creative, share and enjoy the hobby :-)
|
|
Country: USA ~
Posts: 32 ~
Member Since: July 23 2012 ~
Last Visit: December 20 2015
|
Alert Moderator
|
|
|
|
Posted - November 22 2014 : 10:20:37 AM
|
Those aluminum coaches look fantastic!Seriously though, why the heck did modellers criticize these things so much? Just add on some extra detail, maybe a more realistic livery and there you go.
-Steve
"A lot of modellers out there who go to these train shows see broken HO stuff and go, 'This is useless' when, in reality, they can still be used for modeling whether it's as a prop on your layout or a cool project to make something old new again."
|
|
Country: USA ~
Posts: 3533 ~
Member Since: February 17 2014 ~
Last Visit: January 11 2023
|
Alert Moderator
|
|
|
|
Posted - November 22 2014 : 11:07:43 AM
|
Antonio,
FYI we have not heard from John for awhile. Your work does look great.
Regards John
|
|
Country: USA ~
Posts: 886 ~
Member Since: January 11 2012 ~
Last Visit: December 16 2023
|
Alert Moderator
|
|