|
|
 Posted - August 03 2012 : 06:51:20 AM Posted - August 03 2012 : 06:51:20 AM


|
|
Hey guys. I am finally going to take the plunge and attempt to build my own layout. I have been doing some research and I still have a few questions; 1), what is the best foam base to put on top of my 4X8 plywood? 2), I am not going to use the 3 feet flex track, so do I still need to solder all the joints? 3), if I use the cork strips under the track, do I still put the ballast over it. 4), how do you spread ballast so that it looks flat and realistic and not like two piles of rocks on either side of the tracks? 5) I know some way or somehow I would like to attempt a round house, is there a good source or a tutorial on this? Lastly, I would like to post my progress for comments (good or bad) to help me along with the process. My layout is down to two choices, the "Twice around" in my Atlas magazine or the layout in the Tycoscene's booklet. I will decide by Saturday when I actually start. I was hoping to buy one Craigslist, but I could not find one that I liked here in Virginia Beach. ANY input is greatly appreciated. Thanks
|
Country:  USA ~
Posts: 664 ~
Member Since: May 05 2012 ~
Last Visit: June 11 2024 USA ~
Posts: 664 ~
Member Since: May 05 2012 ~
Last Visit: June 11 2024
|
 Alert Moderator
|
|
|
|
Posted - August 03 2012 : 10:42:05 AM
|
Foam insulation makes a noisy layout! Roadbed on plywood is best. Railjoiners don;t have to be soldered,but, it helps to solder them to prevent any gradual loosening. They make ballast spreaders that help. Never used it. As for the roundhouse, not sure about that. I used to be in Ft Eustis VA. Loved Norfolk! Ya oughta check out a hobby shop called Engine House Trains. Then one other one to check out is one is in Newport News. Can't recall the name.
" Heck with counting 'em rivets, TRAINS ARE FOR FUN! Not called the Mad Scientist for nothing either!"
|
|
Country: USA ~
Posts: 3147 ~
Member Since: May 07 2007 ~
Last Visit: June 01 2026
|
Alert Moderator

|
|
|
|
Posted - August 03 2012 : 12:06:01 PM
|
yeah if your using cork roadbed, put ballast over it. i have cork roadbed i planned to use but i didnt have enough for all my track so ive never used it and i wont until i build another layout
I buy, repair, and collect
http://scvr.weebly.com/
http://seyboldlocomotiveworks.weebly.com/
http://www.youtube.com/user/TheDeputation?feature=watch
Hyde.
|
|
Country: USA ~
Posts: 1352 ~
Member Since: January 15 2012 ~
Last Visit: July 25 2021
|
Alert Moderator
|
|
|
|
Posted - August 03 2012 : 12:25:36 PM
|
| Justin, Engine House trains is my favorite!! The economy has really hit him hard and every time I go in there I absolutely make it a point to buy something. His prices are fantastic and he is the nicest person, even though he hates TYCO trains. Another good one is Dale’s trains in Norfolk, he has the best trains, but you’re going to pay the price. Thanks for the tips guys, you already saved me money.
|
|
Country: USA ~
Posts: 664 ~
Member Since: May 05 2012 ~
Last Visit: June 11 2024
|
Alert Moderator
|
|
|
|
Posted - August 03 2012 : 3:58:41 PM
|
Yep, Engine House is a nice fella. Got a Tyco C430 So76 near mint in box for like $15!
" Heck with counting 'em rivets, TRAINS ARE FOR FUN! Not called the Mad Scientist for nothing either!"
|
|
Country: USA ~
Posts: 3147 ~
Member Since: May 07 2007 ~
Last Visit: June 01 2026
|
Alert Moderator
|
|
|
|
Posted - August 03 2012 : 10:51:57 PM

|
1. Blue foam insulation boards are the best...if you're not going to be cutting into it though you can get away with the pink insulation boards.
2. You don't need to solder the joints, although it will help the current flow through the rails, especially in the future when your tracks start to gather dirt.
3/4. You don't NEED to put ballast over the cork, but it does add realism  . There are different techniques people have for doing this. The way I like to do it is by shoveling the ballast onto the tracks with a spoon. Different sized paint brushes are then used to spread/smooth the ballast. You then use a spray bottle filled with water to wet the ballast, followed immediately by a spray bottle filled with a mixture of white glue/water/dish soap. You may have to do a few coats of glue mix. Make sure to wipe off the rails after each spraying. . There are different techniques people have for doing this. The way I like to do it is by shoveling the ballast onto the tracks with a spoon. Different sized paint brushes are then used to spread/smooth the ballast. You then use a spray bottle filled with water to wet the ballast, followed immediately by a spray bottle filled with a mixture of white glue/water/dish soap. You may have to do a few coats of glue mix. Make sure to wipe off the rails after each spraying.
As I said, everyone has slightly different techniques so you may want to search the web (google and YouTube are good places to start)
I hope that helps! I look forward to seeing your progress 
Cheez
|
Country:  Canada ~
Posts: 3448 ~
Member Since: September 22 2006 ~
Last Visit: April 03 2026 Canada ~
Posts: 3448 ~
Member Since: September 22 2006 ~
Last Visit: April 03 2026
|
Alert Moderator
|
|
|
|
Posted - August 04 2012 : 09:04:27 AM
|
* GG ; Good luck with your layout. There isn't much to say then to be very exacting with your track work. Especially on turns. Remember that a radius is measured to the center of the track. Most cork road bed is cut one side thinner than the other. I dont know why. It just is. Adjust for this. when you layout the drawing of your curves, draw the outside or inside edge. Keep your radius wide. Use flex track in 3 foot lengths as much as possible. Unless you hand lay your track. I run code 100 completely. I like to run my old collectable trains. Most of these dont have RP25 flanges. The English trains like Triang have large flanges but run fine on my layout. I can run anything I own on my track work. to DCC or DC is something else. I DC with block control. All my newer DC locos that have DCC in them also run on DC. Those are decisions you need to make.
* Again good luck.
topt
toptrain
" It's a Heck of a Day " !!!
|
|
Country: USA ~
Posts: 7538 ~
Member Since: August 07 2008 ~
Last Visit: December 06 2025
|
Alert Moderator
|
|
|
|
Posted - August 04 2012 : 09:51:38 AM
|
| Thanks DaCheez and Toptrain for the input, today is the day and I am very excited!
|
|
Country: USA ~
Posts: 664 ~
Member Since: May 05 2012 ~
Last Visit: June 11 2024
|
Alert Moderator
|
|
|
|
Posted - August 05 2012 : 08:17:06 AM
|
Maybe I am a traditionalist, but I have my layout under (slow) construction- with all these projects I do, no wonder! At any rate, when I started it 2yrs ago, I read up on the foam board methods, but also kept encountering stories of how those who used foam were struggling with mounting switch machines underneath, adhering track to the foam, etc. I also read of those who were happy with the foam as an easier method of developing terrain and natural geography, as it cuts easily. The other issue seems to be sound control.
In the end, I stayed with a plywood base, built on a frame with cross supports. To mount a switch machine, I only cut thru 3/8 inch of material, and I use cork roadbed or cork sheeting under the track.
I understand the desire to go with foam- the light weight, etc, but the sound issues and the lack of a solid support base worries me, particularly when additional measures need to be taken to reinforce attachments to the foam, because it's, well, just foam!
Siouxlake Ron
|
|
Country: USA ~
Posts: 510 ~
Member Since: September 21 2011 ~
Last Visit: December 21 2014
|
Alert Moderator
|
|
|
|
Posted - August 05 2012 : 11:39:11 AM
|
For a first layout, I would follow one of the many project layouts shown in Model Railroader magazine.
or at least read a few of the articles and use the procedure with a modified track plan.
Having a set of instructions so to speak will make building a first layout easier and more enjoyable.
On a first layout, I would avoid things like under the table turnout motors and track plans that require complex wiring.
That's just my opinion, I have seen (and bought the layouts of) people who jumped in over their heads building complex first layouts only to get frustrated and give up on the hobby altogether.
Ray
|
|
Country: USA ~
Posts: 1285 ~
Member Since: December 14 2005 ~
Last Visit: May 16 2019
|
Alert Moderator
|
|
|
|
Posted - August 05 2012 : 6:00:32 PM


|
quote:
3/4. There are different techniques people have for (applying ballast). Different sized paint brushes are then used to spread/smooth the ballast. You then use a spray bottle filled with water to wet the ballast, followed immediately by a spray bottle filled with a mixture of white glue/water/dish soap. You may have to do a few coats of glue mix. Make sure to wipe off the rails after each spraying.
Cheez
Originally posted by DaCheez - August 03 2012 : 10:51:57 PM
|
To add to the above, what you want initially is called "wet water", ie water and dishwashing liquid soap in it to flow through the ballast, otherwise plain water will just run off. Also do NOT spray DOWN on the ballast, spray UP, and let it rain gently down on the dry powdery stuff , or it will blow everywhere. And soak it good. One thing my club did was to use blue tape on the outside of the ties, AND on the rails themselves, as this keeps clean-up to a minimum, and gives a razor-sharp boundry, so your ballasting doesn't look snakey.   Ballast prepping is VERY important, as it will be looked at, and once glued down, difficult to redo. So take your time, get it smoothed flat, and brush it off the tops of the ties, use anything from brushes to formed cardboard to get a nice shaped edge at the tie ends. Then Wet Water it, spraying UP, and when soaked, then go to the water/glue combo ( squirt bottle is what we used, gently ), and let it set up overnight. You might want to make a double-track 3 foot plywood "display" section, and practice on that first, before attempting to do your actual layout. Get the technique down, and once you're comfortable with it, start on the layout portions. Good luck, and post pics while you're doing it for us to ogle. Ballast prepping is VERY important, as it will be looked at, and once glued down, difficult to redo. So take your time, get it smoothed flat, and brush it off the tops of the ties, use anything from brushes to formed cardboard to get a nice shaped edge at the tie ends. Then Wet Water it, spraying UP, and when soaked, then go to the water/glue combo ( squirt bottle is what we used, gently ), and let it set up overnight. You might want to make a double-track 3 foot plywood "display" section, and practice on that first, before attempting to do your actual layout. Get the technique down, and once you're comfortable with it, start on the layout portions. Good luck, and post pics while you're doing it for us to ogle. 
Jerry in Virginia (northern)
" When life throws you bananas...it's easy to slip up"
|
|
Country: USA ~
Posts: 3974 ~
Member Since: January 04 2009 ~
Last Visit: January 11 2019
|
Alert Moderator
|
|
|
|
Posted - August 06 2012 : 11:10:49 AM
|
I would use foam for a first layout. My first layout was plywood and later regretted it because it is much harder to make water features and signs have to have large unrealistic bases. On a foam board it is easy to cut out water features and signs can be pushed right into the foam. I would use Either a very thick foam board or a foam board affixed to a plywood board. The only downside is that foam is very easy to cut so you have to be careful so as to not get any unintended gashes and ravines. Also make sure to use a paint that doesn't melt the foam. I prefer foam roadbed on the foam board, the roll of roadbed from woodland scenics is a continuous roll and takes a lot less time to attach. If you do use foam roadbed be prepared to have to put a lot of weights on it especially on the curves. If you do not already have it the book HO Railroad From Start To Finish has a lot of good tips.
Good luck building your first layout.
ChessieRR
|
|
Country: USA ~
Posts: 332 ~
Member Since: February 24 2012 ~
Last Visit: January 26 2015
|
Alert Moderator
|
|
|
|
Posted - August 06 2012 : 11:58:40 PM
|
i am very happy that i used 1 inch pink foam glued to 3/8 plywood. on top of 1 x 4 frame
as far as sound guess i'd have to listen to other layouts on different substrates to see if there is a noticeable difference
If i want a ditch i hot wire one, same with rivers and lakes. If i want a mountain i add a second and third layer and carve away. Like Chessie said you can stick trees , telephone poles, fences what ever with ease. To avoid a flat look on fields i sculpt a few rises and gullies out of plaster or sand a rolling terrain. .
I glued down my cork bed with foam adhesive and held it in place with long dress makers pins. Afterwards laid the flex track and pinned it through the cork and into the foam.
Ballast is easy. Use a spoon to spread first between the tracks and brush off the excess. I don't bother to spray "wet" water. I take a squeeze bottle 1/4 white glue 3/4 water, couple drops dish detergent and dribble it down the middle of the tracks keeping just enough speed so that it just runs out under the track.
After it drys come back and do the out sides same way but have to be careful not to wash the ballast off the slope.
After it drys take a shop vac and hold a piece of panty hose over the end of the nozzle and suck up the excess ballast. Go over what you did with an X Acto knife to clean up areas where the ballast shouldn't be.
The glue besides holding the ballast holds down the track so if you want the pins can be removed
Check out your public library system for model rail road books. I was surprised how many there are available with layouts and scenery techniques
|
|
Country: USA ~
Posts: 424 ~
Member Since: June 25 2010 ~
Last Visit: July 30 2021
|
Alert Moderator
|
|
|
|
Posted - November 16 2012 : 12:06:05 PM
|
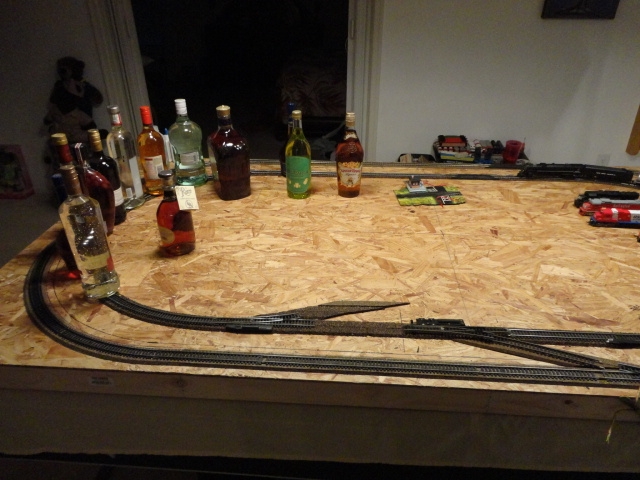
Well, the layout is coming along pretty good, but I have so many ideas that my head feels like its going to bust. Here are some things that I will surely have to fix for my next layout. 1) Use some sort of extruded plastic or something above the plywood. Even though I used the cork bed under the tracks, once it was glued down to the board and track glued to it, it became just as noisy. Besides, I would have loved to put a pond with a bridge somewhere on my layout. 2) Do at least a 5 X 8 instead of a 4 x 8. On my 4 X 8 there is not a lot of room on the outside of the tracks to do anything with, everything is inside of the tracks. 3) I hate flex track, spent too much time trying to make even cuts!!! 4) I'm sure there is a purpose for the round re-railers, but I hate the clunk the loco's make when they hit them. 5) Use the pre-cut cork roadbed for the switches instead of trying the cut them out myself. 6) Bigger curves, my Bachmann 4-8-4’s have a slight hesitation going around the outside corners sometime. Here are some pic’s of where I’m at so far, and don’t laugh at what I had to use to hold down the glued track, its all I had heave in my pool table room.
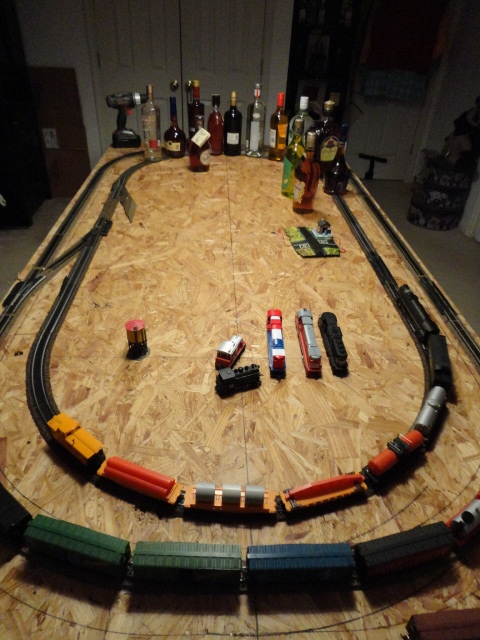

The last switch will end up at a round hose or something, not to sure yet.
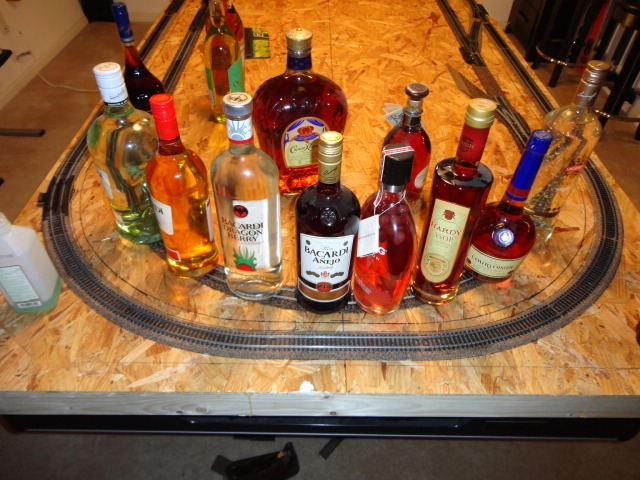
Since I quit drinking, my alcohol collection is only good for holding down my glued track.
What will that last switch lead to, huh? I'm on my way to the train shop now.
|
|
Country: USA ~
Posts: 664 ~
Member Since: May 05 2012 ~
Last Visit: June 11 2024
|
Alert Moderator
|
|
|
|
Posted - November 16 2012 : 11:50:31 PM
|
Looks like you're off to a good start! The track work looks straight and even which is always a good sign.
I'm sorry, but I had to laugh at the line of alcohol bottles. It always amuses me to see what people use as weights when gluing track. I've used/seen people use everything from paint bottles to driveway pavers
|
|
Country: Canada ~
Posts: 3448 ~
Member Since: September 22 2006 ~
Last Visit: April 03 2026
|
Alert Moderator
|
|
|
|
Posted - November 17 2012 : 09:00:31 AM
|
Looks like a good start for a first layout. Nice simple track plan too. DaCheez, I know some people use real railroad spikes and rail sections to hold their track down!
ChessieRR
|
|
Country: USA ~
Posts: 332 ~
Member Since: February 24 2012 ~
Last Visit: January 26 2015
|
Alert Moderator
|
|
|
|
Posted - November 17 2012 : 11:33:12 PM
|
| A big old chunk o' rail would do the trick, that's for sure
|
|
Country: Canada ~
Posts: 3448 ~
Member Since: September 22 2006 ~
Last Visit: April 03 2026
|
Alert Moderator
|
|
|
|
Posted - November 17 2012 : 11:54:02 PM
|
| excellent taste in liquor
|
|
Country: USA ~
Posts: 424 ~
Member Since: June 25 2010 ~
Last Visit: July 30 2021
|
Alert Moderator
|
|
|
|
Posted - November 18 2012 : 9:17:28 PM
|
If you are going to ballast you are going to cover all the cork anyhow so don't worry if it looks bad under your turnouts.
Here's a good video on how to do ballast. This is how I do it and it works great.
You don't HAVE to solder all your joint but I recommend it. Once you are running for a while you may find there are some deal spots in your layout where the current doesn't flow all that well and you'll need to solder. Then you'll find another one, and another one, and another one. If you just solder it all up at the start it will be easier later. Soldering after you have laid ballast is more of a pain. Soldering takes a little practice but isn't too hard.
A roundhouse is hard on a 4x8 because they are huge. What I ended up doing is a small engine maintenance facility. There are a number of two stall buildings out there that are nice.
~CamdenLine
|
|
Country: USA ~
Posts: 178 ~
Member Since: July 02 2010 ~
Last Visit: August 22 2023
|
Alert Moderator
|
|