|
|
 Posted - October 20 2011 : 4:53:09 PM Posted - October 20 2011 : 4:53:09 PM


|
This is a call for help from NickelPlate 759/ Nelson (or any other knowledgeable railroader):
The metal worm gears (pack of four) came in the mail today and the gear is already situated on a shaft.
Now, do I open the motor tabs and replace the shaft or remove the old plastic worm from the existing shaft and also remove the metal one from it's shaft, then try to secure the new metal one on the old shaft. And, how would remove both and then secure the new one on the old shaft??????
Any advice will be appreciated.
Siouxlake (Ron)
|
Country:  USA ~
Posts: 510 ~
Member Since: September 21 2011 ~
Last Visit: December 21 2014 USA ~
Posts: 510 ~
Member Since: September 21 2011 ~
Last Visit: December 21 2014
|
 Alert Moderator
|
|
|
|
 Posted - October 20 2011 : 5:14:34 PM Posted - October 20 2011 : 5:14:34 PM
|
Ron,
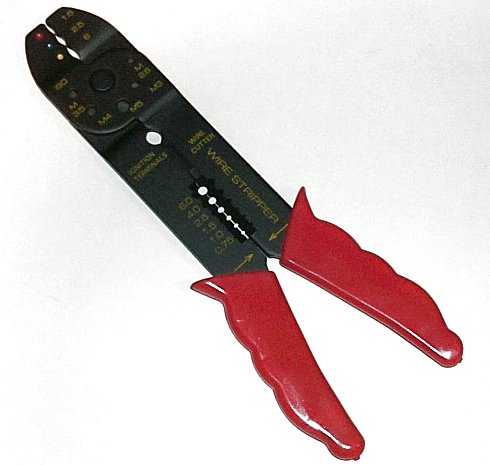
You have to remove one of the new worms from its shaft and press it on the motor's shaft. I have a few gear pullers, but you can tap the shaft through the brass worm until it's flush with one end, then you should be able to use a finishing nail or (if you have one) a very small nail punch to hammer it out through the gear. You can position the worm over a vise with the jaws slightly open, another trick is to use a set of wire stripping pliers with the different sized holes along the handle and rest it on that across a vise.
When you press on the new worm, make sure you're putting all of the pressure on the other end of the motor shaft, not the motor housing.
The Tyco Depot
|
|
Country: USA ~
Posts: 3927 ~
Member Since: June 20 2007 ~
Last Visit: November 19 2015
|
Alert Moderator

|
|
|
|
Posted - October 20 2011 : 5:44:50 PM
|
I have enough of a garage shop (woodworking standalone and bench tools and a great workplace table with vises) to handle the mechanics as described, but have also read about securing the replacement metal worm (although for a different application) with 2 part epoxy and letting it set up. That same advice cautioned against using CA to secure it, due to failure of the bond once the motor was in use. Sorry for all these ( hopefully valid ) questions, but as mentioned, this is a first learning curve type project, and the more I bug fellow railroaders now, the more I learn. Wish my students were more like me, but they are too busy to play with trains, build models or electronic circuits, apply 5 coats of tung oil to a piece of wood, etc,etc. (sigh)
|
|
Country: USA ~
Posts: 510 ~
Member Since: September 21 2011 ~
Last Visit: December 21 2014
|
Alert Moderator
|
|
|
|
Posted - October 20 2011 : 6:25:30 PM
|
I know what you mean... when was the last time you saw plastic model kits in the toy department of any store? If they have any, it's a small selection.
There's no need to glue the worm in place. It will be a good friction fit. That's only necessary with some NWSL replacements, or replacement flywheels. I've never had a problem using CA, though, but you need the slow cure stuff and the parts have to be oil free.
The Tyco Depot
|
|
Country: USA ~
Posts: 3927 ~
Member Since: June 20 2007 ~
Last Visit: November 19 2015
|
Alert Moderator
|
|
|
|
Posted - October 20 2011 : 7:32:58 PM
|
Nels- Should do this with my daughter's IPAD2 camera, but anyway...
Got the metal gear off its shaft easily enough, using my hobby hammer (the kind with interchangeable heads) and, first using a very narrow nail set, then a flat topped wire nail (smaller than the shaft diameter) So far so good.
When looking at holding the shaft just behind the plastic worm, the only thing narrow enough to fit in the space between the motor housing and the back end of the plastic worm to clamp and stabilize the shaft is the end of my flat electrician's pliers. Should I then do so and try to carefully pull the plastic worm with another small pliers, or is there a way to do so and save the integrity of the original plastic worm.
Alternatively, I could just use a small xacto saw and cut the plastic one off, securing the plastic worm in a vise (with wood interior facing liners).
(geez, this is like remote surgery using a doctor advising an ordinary yokel on how to remove an apendix)
Siouxlake/Ron
|
|
Country: USA ~
Posts: 510 ~
Member Since: September 21 2011 ~
Last Visit: December 21 2014
|
Alert Moderator
|
|
|
|
Posted - October 20 2011 : 7:48:56 PM
|
Are these the pliers you're talking about? If so, you can lock the shaft in the appropriate sized hole, then rubber band the handles shut and rest it over a vice. Use the flat side to support the worm.
The Tyco Depot
|
|
Country: USA ~
Posts: 3927 ~
Member Since: June 20 2007 ~
Last Visit: November 19 2015
|
Alert Moderator
|
|
|
|
Posted - October 20 2011 : 8:15:12 PM
|
Mine are Stanley brand, but pretty much the same. Will do that in the AM. Got a day off from school Friday, so with our cool weather all of a sudden, feels like a good day to railroad while mom is at work.
I just ran across a home made gear puller article online (MIGHT BE A GOOD MINI-PROJECT) and Hobbytown has one for $ 8.00 with interchangeable pins (1-5mm). Might be a good investment, as I move into the engine rehab business. Talk back to you tomorrow.
Siouxlake/Ron
|
|
Country: USA ~
Posts: 510 ~
Member Since: September 21 2011 ~
Last Visit: December 21 2014
|
Alert Moderator
|
|
|
|
Posted - November 20 2011 : 1:57:48 PM
|
SL:
You can use a Bench vise as a stand in gear puller. Vise's work in two directions though typically they are used to hold things by tightening.
By the way this is what my old boss when I ws a motorcylce mechanic would call a "dirty" use of a tool. Well "dirty" will have to suffice. I like to think of it a adaptation, or versatility!!!?  
-Gareth
"A is A"
-Aristotle
Law of Identification
|
Country:  Canada ~
Posts: 4200 ~
Member Since: January 08 2006 ~
Last Visit: November 09 2021 Canada ~
Posts: 4200 ~
Member Since: January 08 2006 ~
Last Visit: November 09 2021
|
Alert Moderator
|
|
|
|
Posted - November 20 2011 : 2:17:49 PM
|
Not quite sure what you mean, Gareth. A bench vise has jaws, but what are you proposing to use to grab the gear and press the shaft through it? The wire strippers here provide backing for the gear, and the shaft can be hammered out with a small punch, especially for stubborn gears like Rivarossi's steel worms.
You don't want to close a gear in a vise, or try to pull it off by putting all the stress on the motor housing & bearings.
The Tyco Depot
|
|
Country: USA ~
Posts: 3927 ~
Member Since: June 20 2007 ~
Last Visit: November 19 2015
|
Alert Moderator
|
|
|
|
Posted - November 20 2011 : 2:31:38 PM
|
I use "The Puller" from NWSL. It actually is more like a pusher - you wind the main screw to push the axle off the gear.
/tyco/forum/uploaded/Redwoods/thepuller.jpg
If you want to build one yourself, Instructables has a good tutorial:
http://www.instructables.com/id/Cheap-and-Simple-Gear-Puller/
-Thomas
|
|
Country: USA ~
Posts: 1090 ~
Member Since: July 07 2011 ~
Last Visit: June 03 2026
|
Alert Moderator
|
|
|
|
Posted - November 20 2011 : 3:12:57 PM
|
I have the NWSL's Puller I & II, and another one I picked up that's like a mini automotive flywheel puller. Still, there are times with certain problem gears that only some sharp raps from a hammer will break it's hold on the shaft.
I'd like to make a steel version like the one in the link. The biggest flaw of the NWSL pullers is the flexible aluminum box.
http://www.nwsl.com/uploads/cat_chap1_TOOLS_for_web.pdf
The Tyco Depot
|
|
Country: USA ~
Posts: 3927 ~
Member Since: June 20 2007 ~
Last Visit: November 19 2015
|
Alert Moderator
|
|
|
|
Posted - November 20 2011 : 6:32:14 PM
|
Seeing as how it was my call for help that got this thread going, I'll tell you how I got the metal worm off the shaft when I start the rebuild of the AHM Center Cab: the guy at Hobbytown near my house took two pliers, one with an angled needle nose and the other flat, like the electrical plier. He gripped the shaft with the flat plier and gently pulled at the base of the worm with the bent plier, and slowly pulled towards the end. Boy, did I feel like a yokel! I later realized I could have done this at home....
You can also use a vise with wood faces to hold the worm and pull the shaft, again, something I could have easily done in my garage shop....
Well, it won't happen again ( the Hobbytown experience!
Siouxlake/Ron
|
|
Country: USA ~
Posts: 510 ~
Member Since: September 21 2011 ~
Last Visit: December 21 2014
|
Alert Moderator
|
|
|
|
Posted - November 20 2011 : 6:42:08 PM
|
Ron, that's easy to do with a plastic worm, but you could really mess things up if it's brass or steel.
The Tyco Depot
|
|
Country: USA ~
Posts: 3927 ~
Member Since: June 20 2007 ~
Last Visit: November 19 2015
|
Alert Moderator
|
|
|
|
Posted - November 20 2011 : 8:47:37 PM
|
Okay, now I know what I was describing- how the guy at Hobbytown helped me get the plastic worm off first.

I was fully able to put the metal one on using a small piece of hard wood and an engineers hammer, after which I used a small nail set and carefully drove the metal one onto the shaft far enough to engage the top gear. ( and used a very small dab of threadlock fluid on the shaft before starting.
Recollection mistakes like these only happen when my wife goes out of town and leaves me in charge of everything ( like this week). Otherwise I am fully in kommand of my centzes!!!!!!!
Siouxlake/Ron
|
|
Country: USA ~
Posts: 510 ~
Member Since: September 21 2011 ~
Last Visit: December 21 2014
|
Alert Moderator
|
|
|
|
Posted - November 21 2011 : 4:59:15 PM
|
Yeah, I don't recommend the plier method. Even with smooth jawed pliers it's easy to mar the shaft (I've done it in a pinch), which would damage the bearing if you ever took the motor apart without sanding it smooth again. You can also bend it if it isn't hardened steel, and you'd probably just tear up a metal worm. 
The Tyco Depot
|
|
Country: USA ~
Posts: 3927 ~
Member Since: June 20 2007 ~
Last Visit: November 19 2015
|
Alert Moderator
|
|
|
|
Posted - November 21 2011 : 5:20:48 PM

|
I've had good luck with just punches and a stack of bolts, but that's just me....
just me Ray... and just because I have Tyco doesn't mean I am not a model railroader
|
|
Country: USA ~
Posts: 506 ~
Member Since: April 03 2011 ~
Last Visit: November 29 2025
|
Alert Moderator
|
|
|
|
Posted - November 21 2011 : 7:56:12 PM
|
How do you use the bolt/punch combo?
-Gareth
"A is A"
-Aristotle
Law of Identification
|
|
Country: Canada ~
Posts: 4200 ~
Member Since: January 08 2006 ~
Last Visit: November 09 2021
|
Alert Moderator
|
|