|
|
 Posted - June 21 2011 : 02:21:28 AM Posted - June 21 2011 : 02:21:28 AM


|
Summer is starting and so are my summer projects  This year I decided to take a whack at building an N-scale layout. My goal is something sturdy, portable, and easy to run. This year I decided to take a whack at building an N-scale layout. My goal is something sturdy, portable, and easy to run.
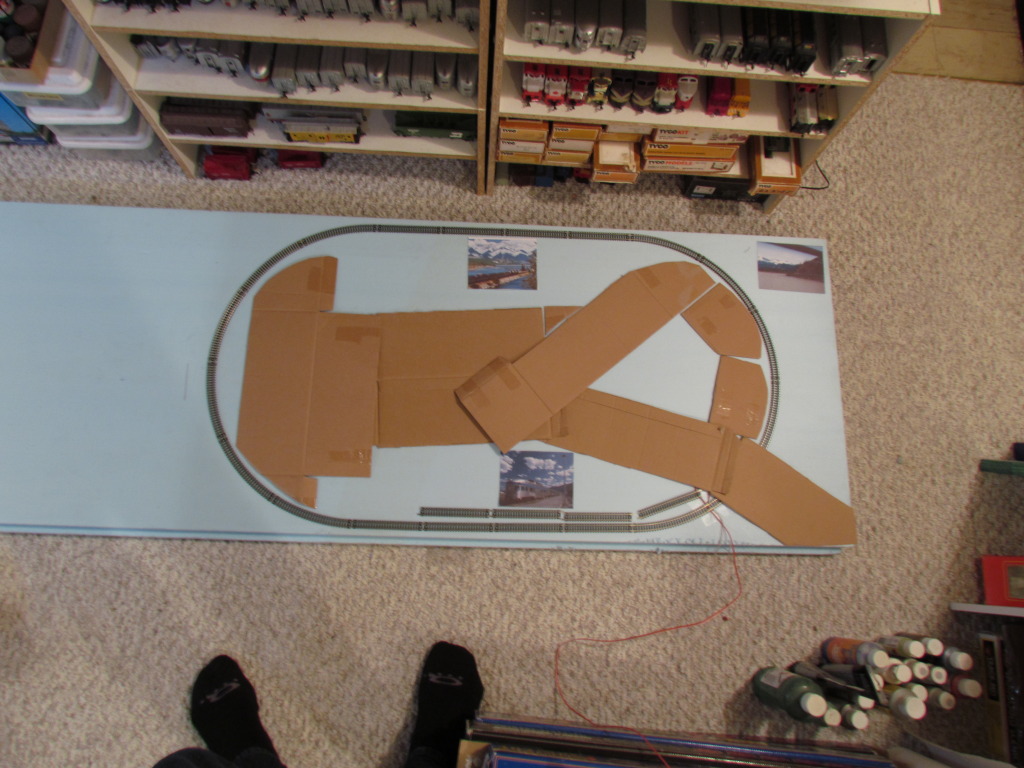
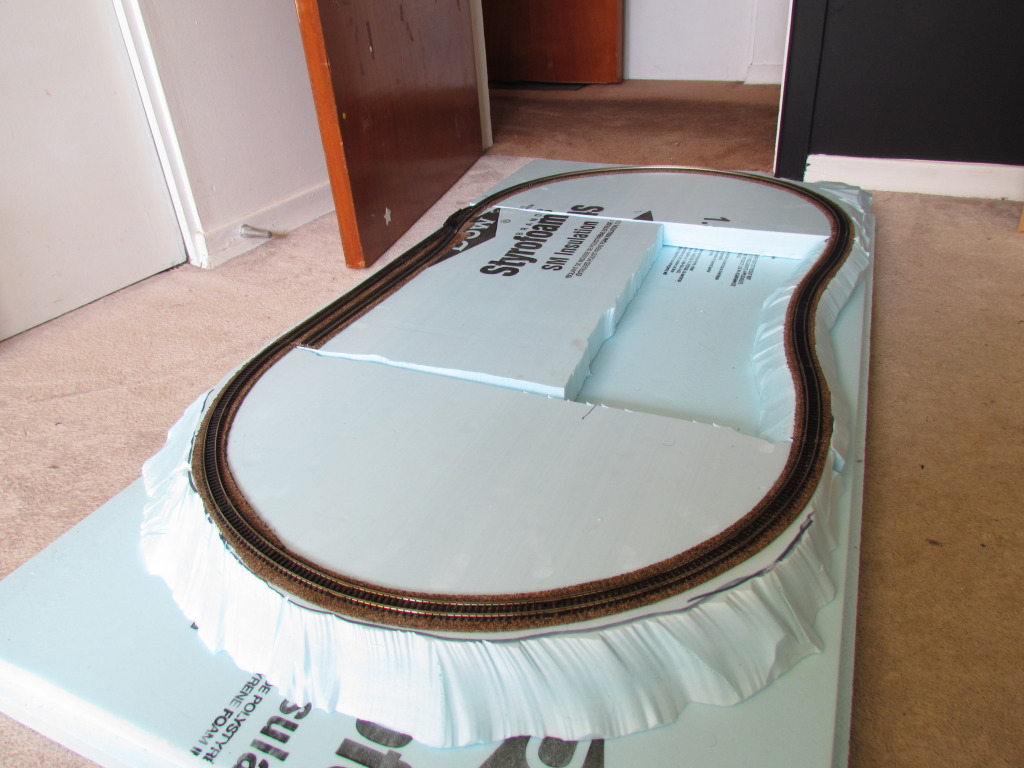
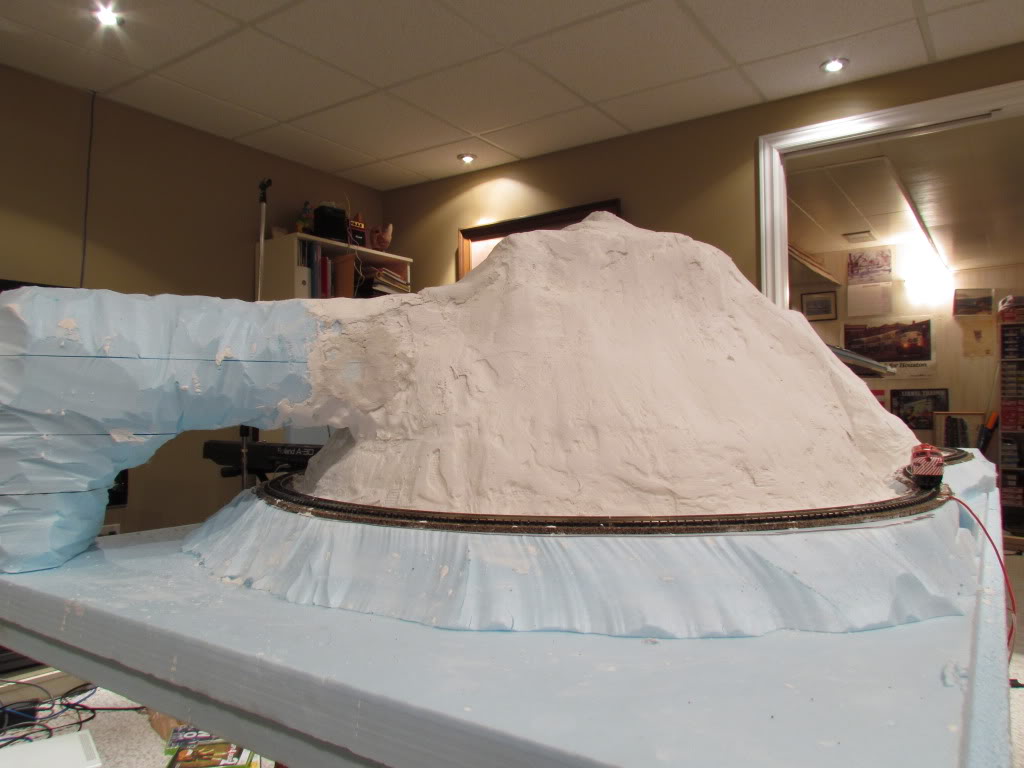
For scenery I thought I'd go with a nice 1960's/1970's Western Canada theme. I'm building it on a 2x4 sheet of insulation foam (I'll mount it on some wood later). Basically it's going to be a mountain in the middle with water around the edges and a station platform on one side.
Here's where I'm at so far. I know some of you do N-scale...if you have any suggestions, tips, comments, criticisms....whatever ya got, let me know 
This a visualization of where everything will be. The bottom is the station, right side is a shoreline, top is a lake type thing, and the cardboard is mountains. The very simple trackplan has been changed slightly from this pic.
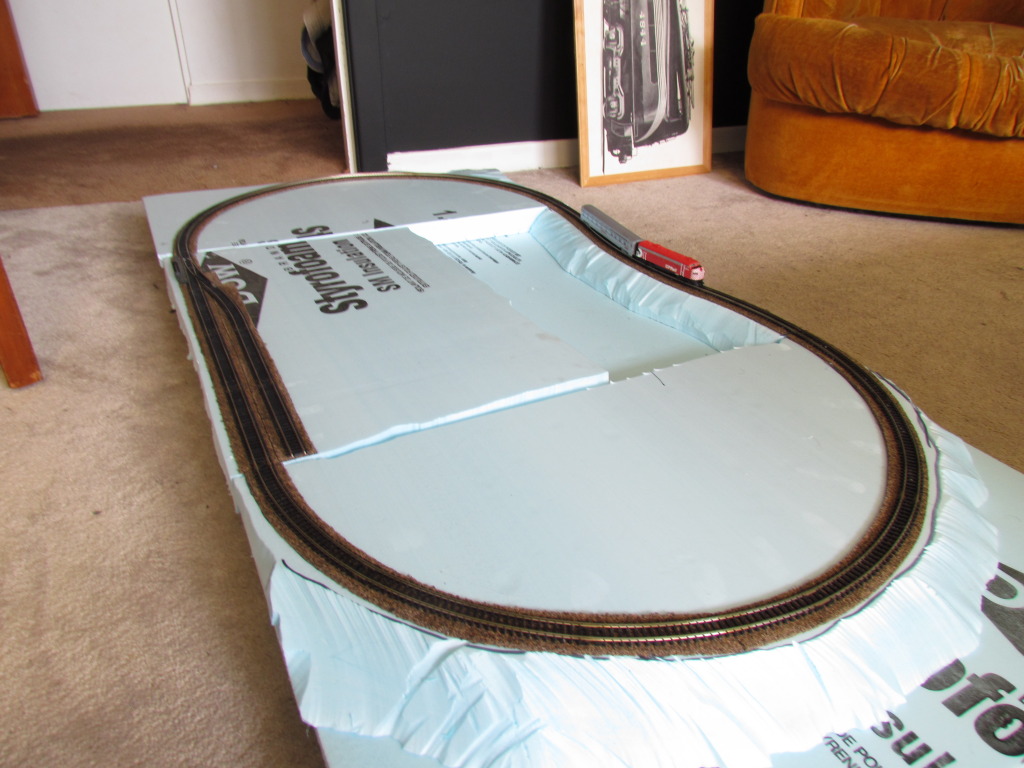
I'm building the track in 4 sections and fitting them all together. This piece will be the shoreline.
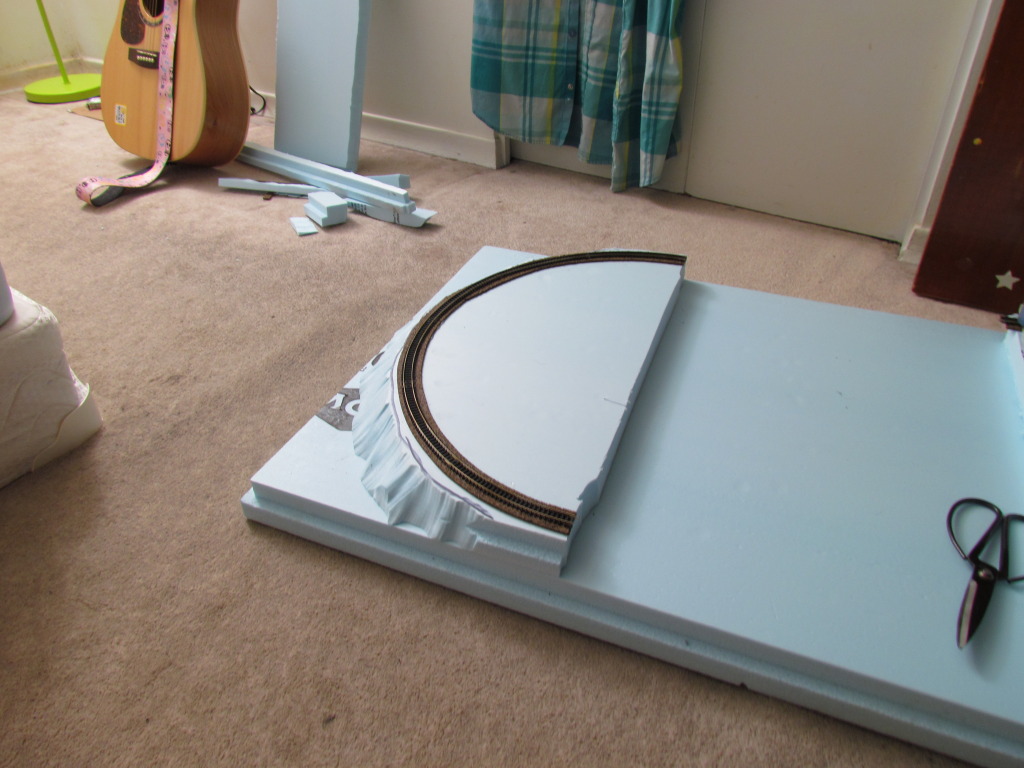
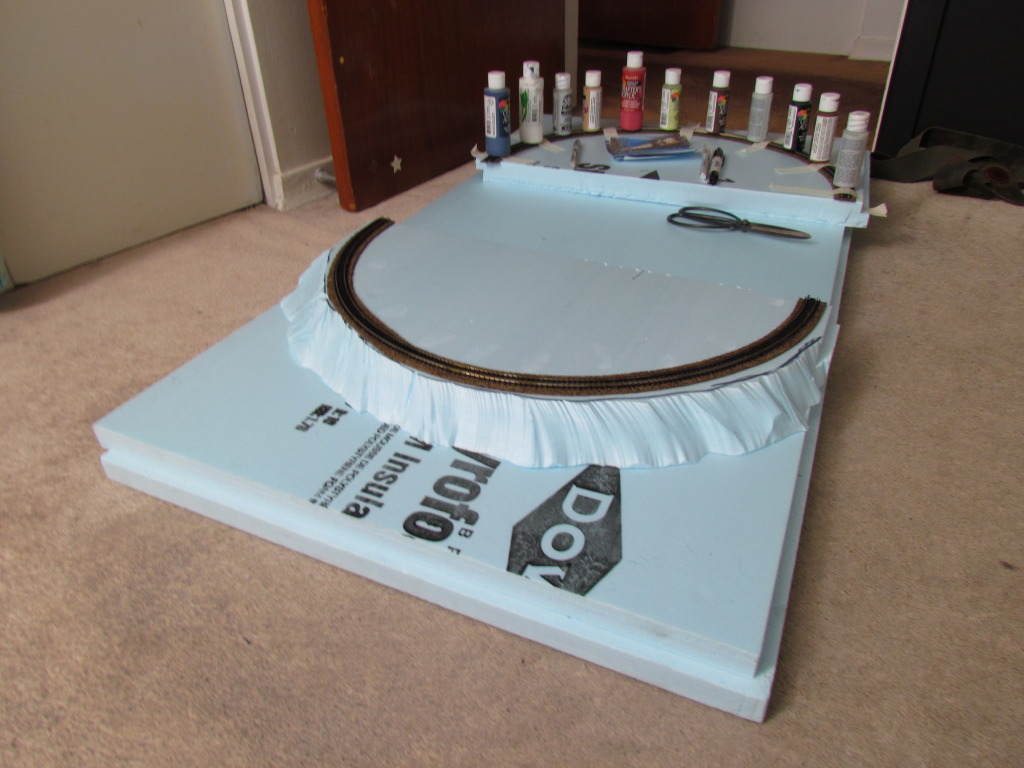
In this one you can see the opposite curved section. The paint bottles are just weight to hold the track down while the glue dries. The other two sections are drying elsewhere. The hole in the middle will be covered by the mountain.
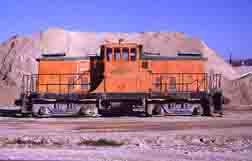
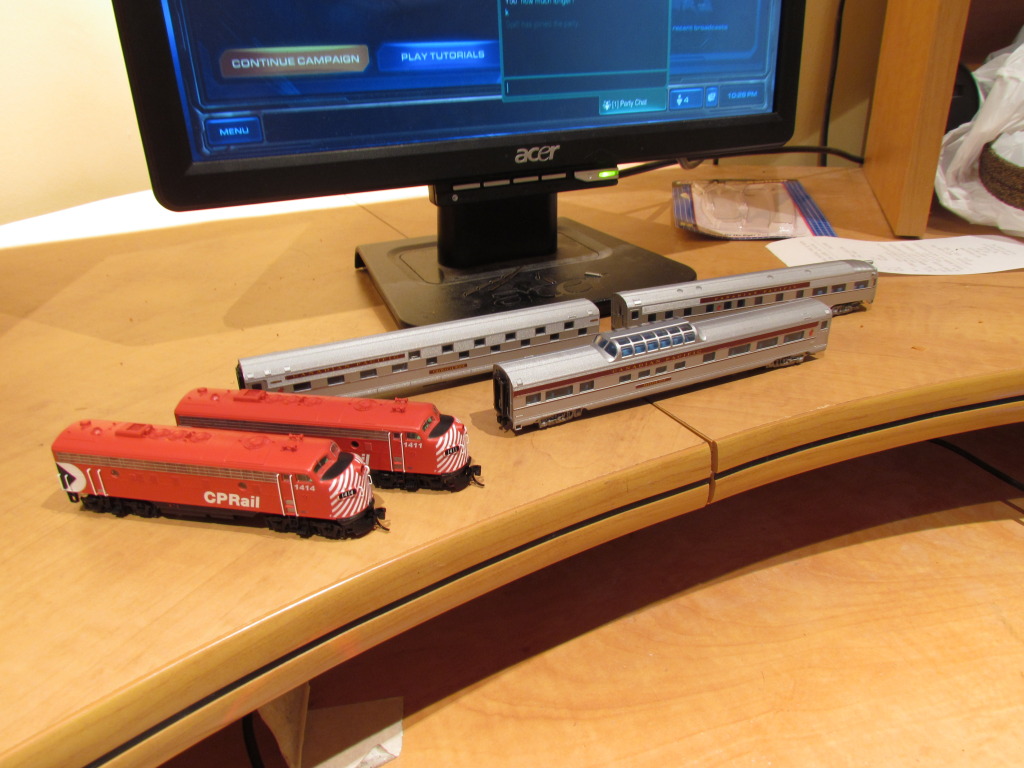
And finally, here is the train.
I'll upload some pics as I go
cheez
|
Country:  Canada ~
Posts: 3448 ~
Member Since: September 22 2006 ~
Last Visit: April 03 2026 Canada ~
Posts: 3448 ~
Member Since: September 22 2006 ~
Last Visit: April 03 2026
|
 Alert Moderator
|
|
|
|
 Posted - June 21 2011 : 8:48:56 PM Posted - June 21 2011 : 8:48:56 PM
|
Hey Cheez,
That is looking real nice. Very clean work. For sure keep us posted on your progress.
Mike
|
Country:  USA ~
Posts: 790 ~
Member Since: April 30 2006 ~
Last Visit: July 21 2015 USA ~
Posts: 790 ~
Member Since: April 30 2006 ~
Last Visit: July 21 2015
|
Alert Moderator

|
|
|
|
Posted - June 21 2011 : 9:24:22 PM


|
Looks like a fun little diorama-railroad there taking shape. I'm putting together a 3-loop N gauge test track on a discarded corkboard from work, they threw out about 5 of them when we downsized last year, about 36 x 30 inches in size. I'm also doing an HO slot track on another corkboard, and maybe a Z oval on the last one I have. Flat, easy to lay the track ( all cork ), and easily storable. Keep us apprised of your N gauge work, maybe i'll even complete mine this year. 
Jerry
" When life throws you bananas...it's easy to slip up"
|
|
Country: USA ~
Posts: 3974 ~
Member Since: January 04 2009 ~
Last Visit: January 11 2019
|
Alert Moderator
|
|
|
|
Posted - June 21 2011 : 9:48:06 PM
|
interesting aspect on using foam insulation, question, how does it hold up to holding ground cover?
just me Ray... and just because I have Tyco doesn't mean I am not a model railroader
|
|
Country: USA ~
Posts: 506 ~
Member Since: April 03 2011 ~
Last Visit: November 29 2025
|
Alert Moderator
|
|
|
|
Posted - June 22 2011 : 5:30:50 PM
|
Hey Jerry. Sounds neat. I'd love to see some pics of those when you get them finished. Z scale would've been fun to do, but I don't think there's a single place in town to get it 
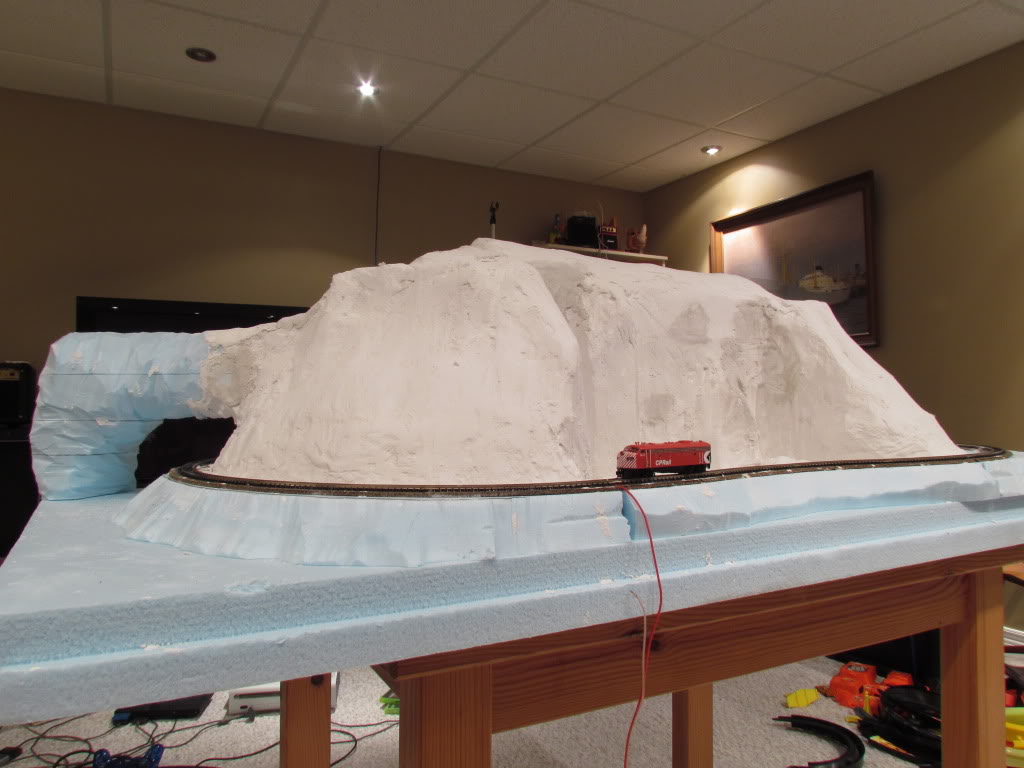
The foam holds the ground cover quite well. It usually takes a couple coats of paint to cover up all that blue, but other than that I've never had a problem
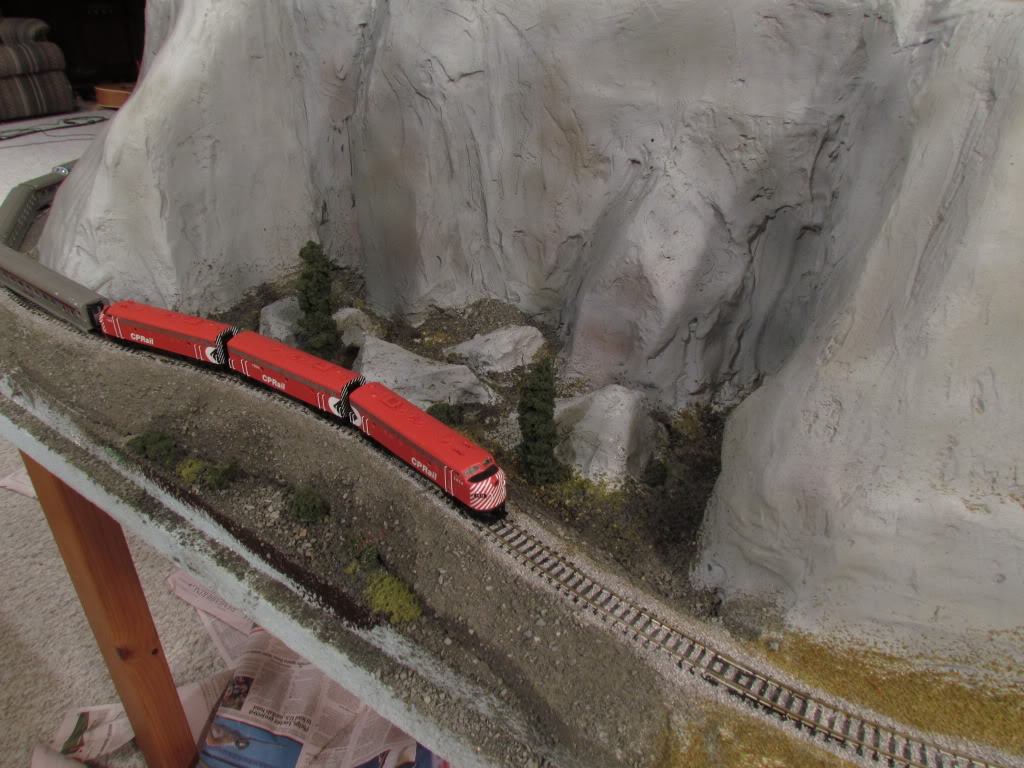
Here's a picture of the completed track. As you can see I've already carved some of the foam. Once I get the 4 sections glued down I can start building up the terrain. That'll be done with more foam and some plaster.
|
|
Country: Canada ~
Posts: 3448 ~
Member Since: September 22 2006 ~
Last Visit: April 03 2026
|
Alert Moderator
|
|
|
|
Posted - June 22 2011 : 5:54:40 PM
|
*plays the Silver Streak theme* 
Looks good Not a bad start
|
|
Country: USA ~
Posts: 15031 ~
Member Since: February 23 2009 ~
Last Visit: July 07 2026
|
Alert Moderator
|
|
|
|
Posted - June 23 2011 : 10:44:23 AM
|
| Great stuff! The contours on the foam are looking good. Very clean start; can't wait to see the progress as you go!
|
|
Country: USA ~
Posts: 2798 ~
Member Since: September 17 2010 ~
Last Visit: July 22 2015
|
Alert Moderator
|
|
|
|
Posted - June 24 2011 : 12:50:41 PM
|
looks great so far
-Matthew-
|
|
Country: Canada ~
Posts: 20 ~
Member Since: October 28 2010 ~
Last Visit: November 09 2021
|
Alert Moderator
|
|
|
|
Posted - June 24 2011 : 8:41:46 PM
|
Nice work there Cheez!
Alco Fan
|
|
Country: USA ~
Posts: 2496 ~
Member Since: August 03 2006 ~
Last Visit: September 17 2024
|
Alert Moderator
|
|
|
|
Posted - July 31 2011 : 9:38:08 PM
|
Very Simple! Me Likey!
|
|
Country: USA ~
Posts: 1102 ~
Member Since: July 28 2011 ~
Last Visit: July 01 2015
|
Alert Moderator
|
|
|
|
Posted - September 28 2011 : 11:59:31 PM
|
Summer may be done with, but my project is still crawling along
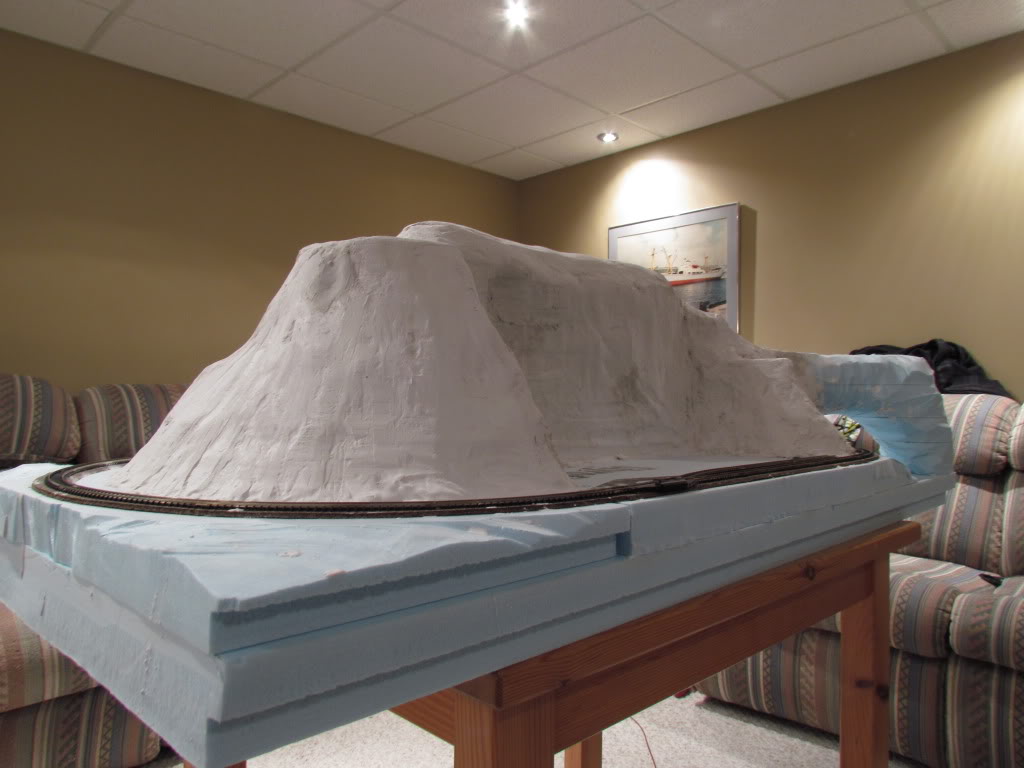
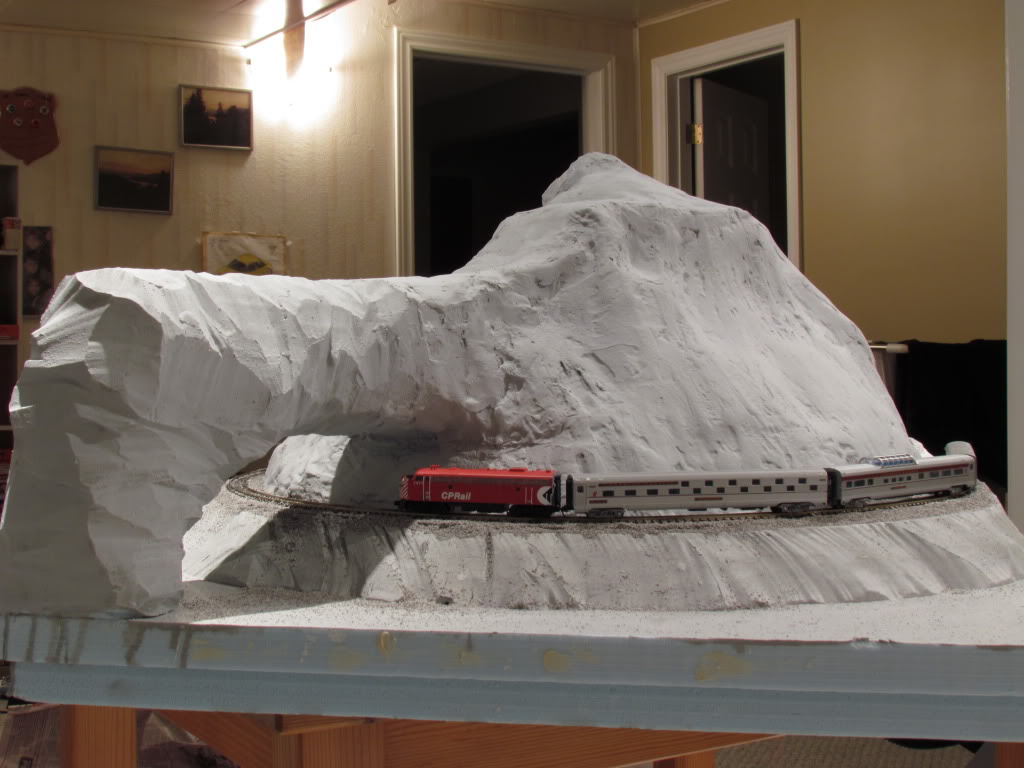
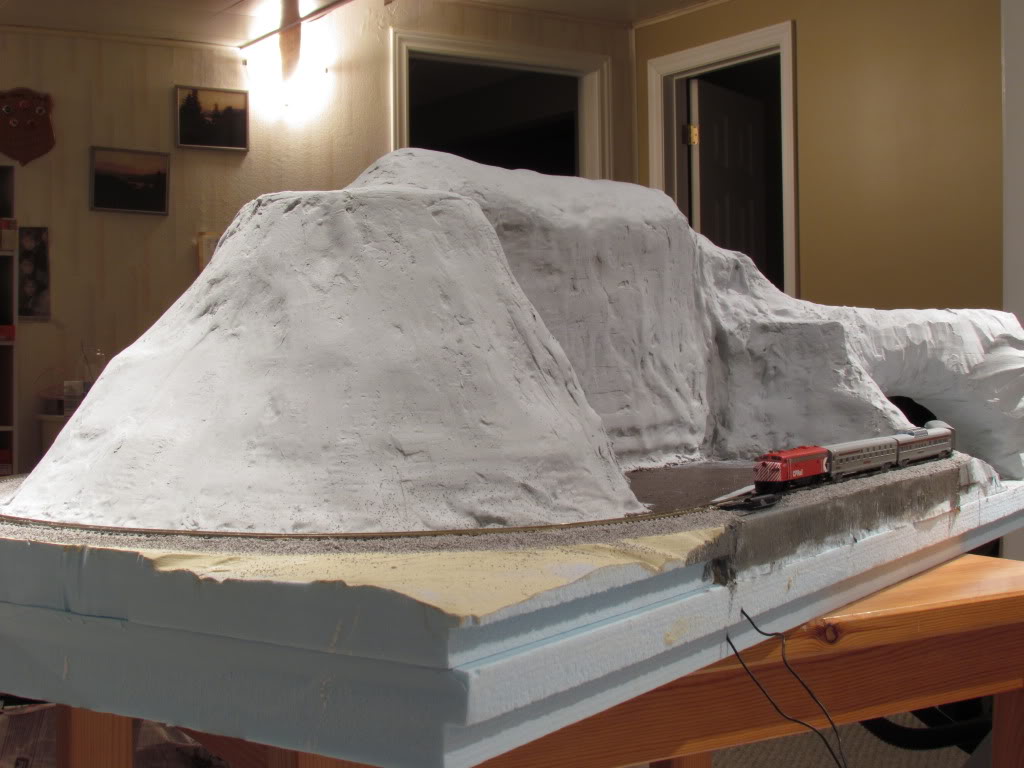
I started building my mountains back in July/August with foam insulation board but wasn't happy with the curves and edges I was getting. I decided to scrap the all-foam idea and go with plaster. Despite the fact that 70% of this is going to be covered with ground foam and rocks, I've been sanding, filling and sanding like a mad man! I think I'm almost there
Anyway here's what I came up with. Some of the slopes and rock faces are a little unrealistic, but I think it will look alright once I get the scenery done. The layout's meant to be viewed in sections, not as a whole (if that makes sense)
-cheez
|
|
Country: Canada ~
Posts: 3448 ~
Member Since: September 22 2006 ~
Last Visit: April 03 2026
|
Alert Moderator
|
|
|
|
Posted - September 29 2011 : 9:48:36 PM
|
Atsa somma bigga mountain!
Nice work Cheez,I'm about to re-do my little 2X4' n scale layout.
Carl T.
President of the Cape James Terminal RR.
|
|
Country: USA ~
Posts: 691 ~
Member Since: April 16 2006 ~
Last Visit: November 01 2020
|
Alert Moderator
|
|
|
|
Posted - September 29 2011 : 9:50:01 PM
|
Very Good! The Scenery Is Fantastic!
|
|
Country: USA ~
Posts: 1102 ~
Member Since: July 28 2011 ~
Last Visit: July 01 2015
|
Alert Moderator
|
|
|
|
Posted - December 22 2011 : 6:54:32 PM
|
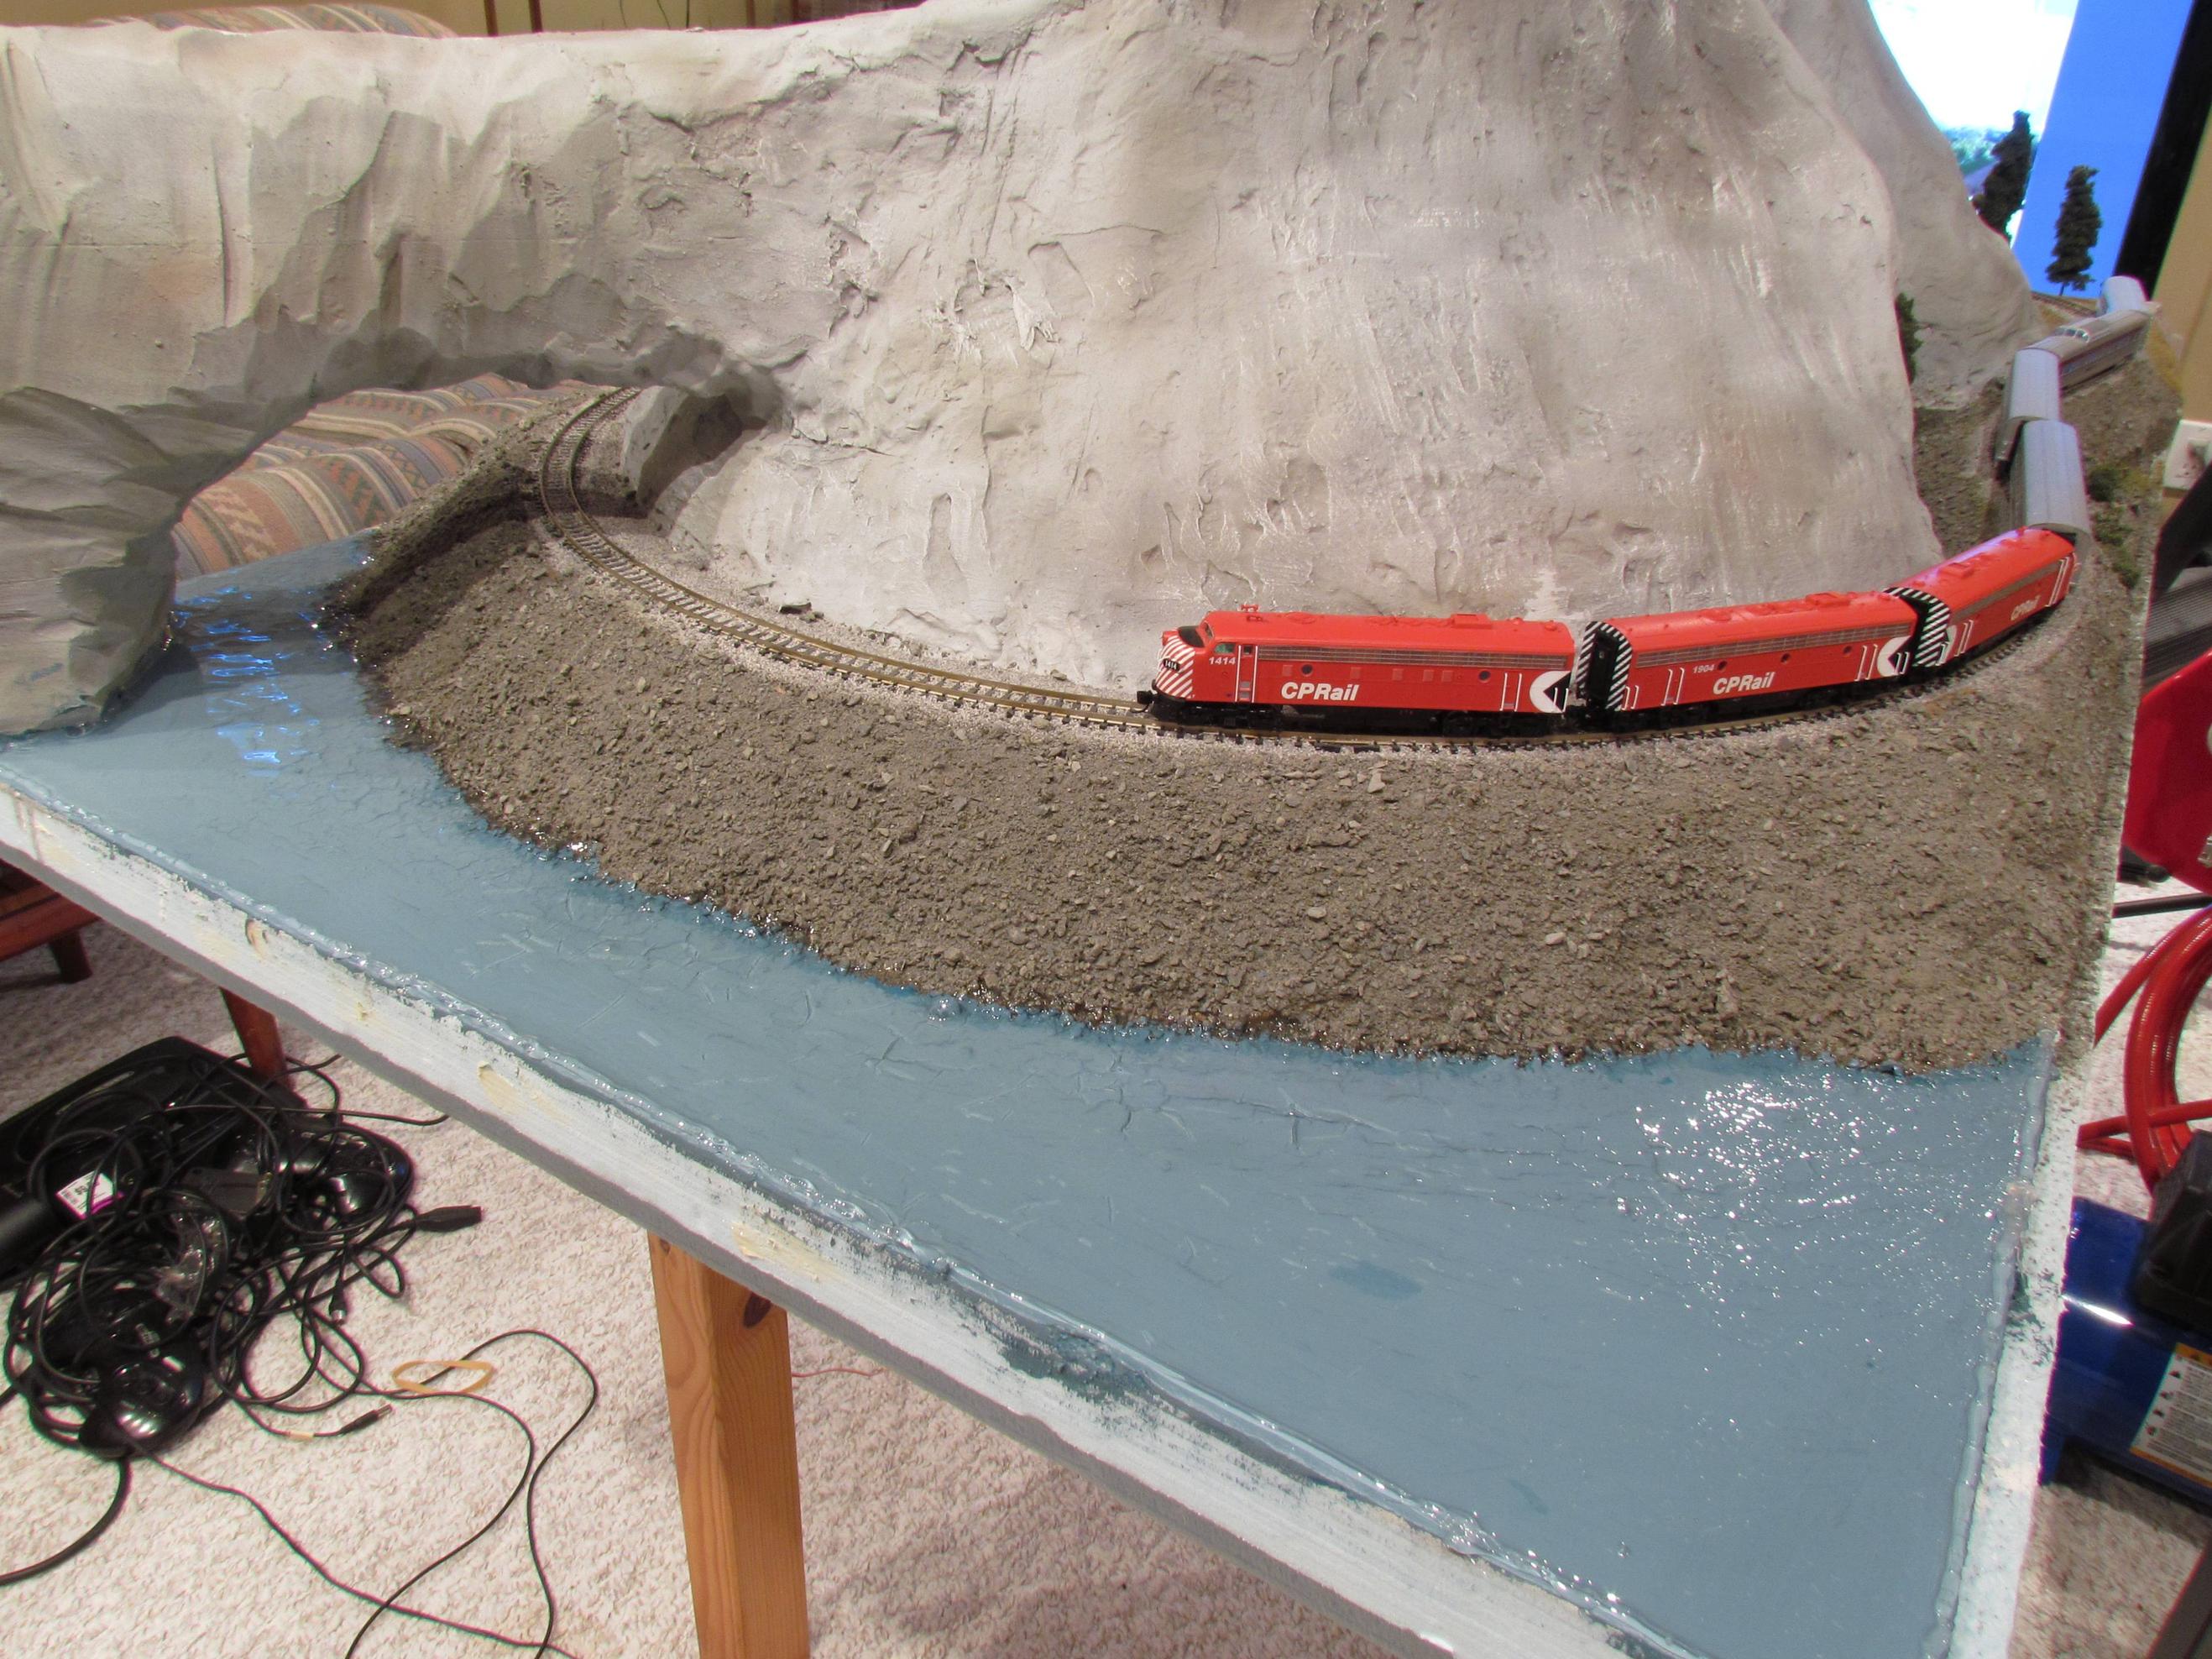
Summer seems to have lasted longer than I expected ...but you can't rush layout building
Ballasting has finished and painting is well underway. The rocky faces are now a nice, solid gray colour. I'm hoping to get to air brushing in the next couple of weeks to highlight/weather the rock.

My trees are also taking shape. The glue is drying currently...once dry I'll trim them to the desired shape.
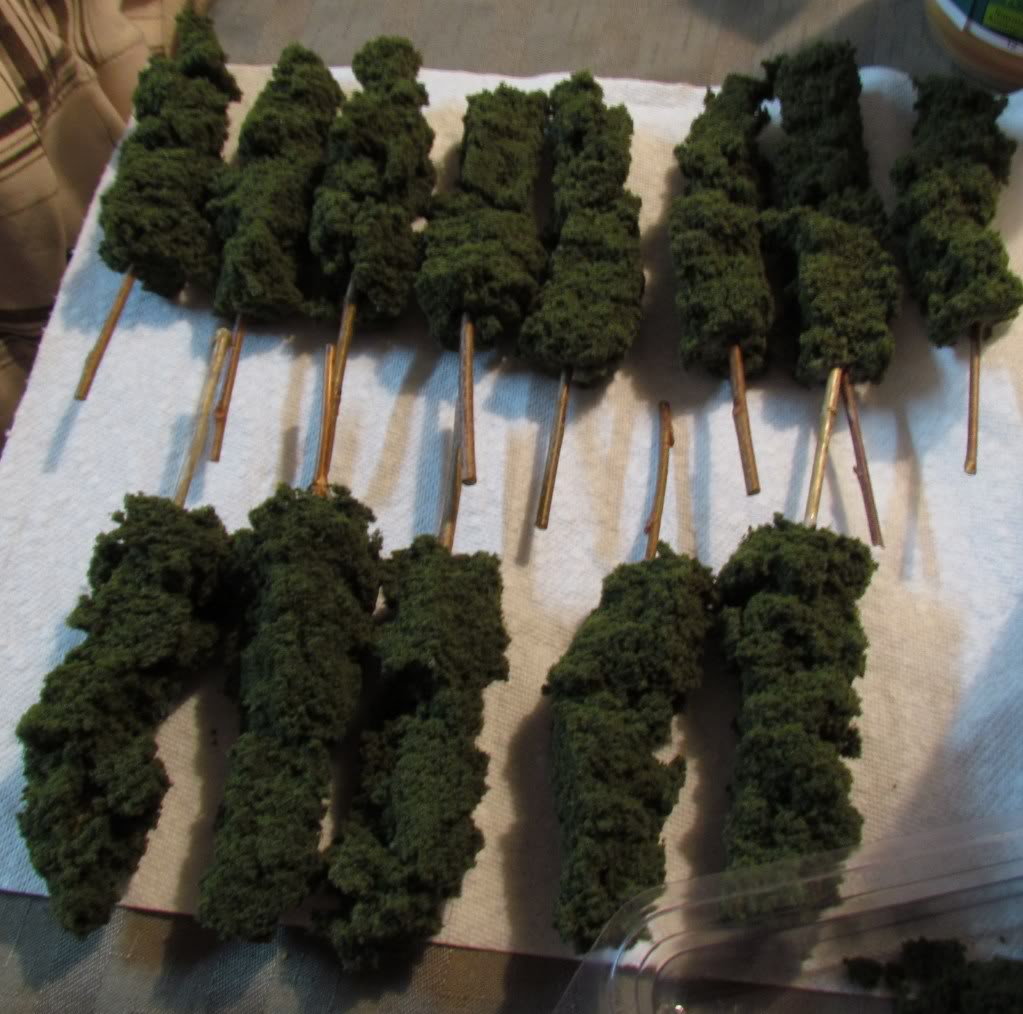
Thanks for looking!
cheez
|
|
Country: Canada ~
Posts: 3448 ~
Member Since: September 22 2006 ~
Last Visit: April 03 2026
|
Alert Moderator
|
|
|
|
Posted - December 22 2011 : 7:00:59 PM
|
| Looking great! I really like the mountain. I thought about N scale to go with my 027 and ho but im undecided. Now my uncle is building a portable N scale to take camping with him in the RV and he said he will put it up on the picnic table.He wants to be the only one in the campground witha train layout at his site.
|
|
Country: USA ~
Posts: 457 ~
Member Since: February 20 2010 ~
Last Visit: April 24 2020
|
Alert Moderator
|
|
|
|
Posted - December 22 2011 : 7:14:44 PM
|
| Thanks! The mountains are the biggest piece of scenery, so I was hoping they'd turn out somewhat decent What kind of track plan is your uncle going with? N scale is small, but even a simple loop like mine takes up a good amount of space
|
|
Country: Canada ~
Posts: 3448 ~
Member Since: September 22 2006 ~
Last Visit: April 03 2026
|
Alert Moderator
|
|
|
|
Posted - December 22 2011 : 10:45:29 PM
|
Those are some impressive Rockies, Cheez. I can't wait to see how it turns out.
The Tyco Depot
|
|
Country: USA ~
Posts: 3927 ~
Member Since: June 20 2007 ~
Last Visit: November 19 2015
|
Alert Moderator
|
|
|
|
Posted - December 22 2011 : 11:16:18 PM
|
| Words can't describe how awesome that looks. I've been thinking about something similar, because I've got some N stuff around, but I'm absolutely out of space. I live in a small house with three girls.
|
|
Country: USA ~
Posts: 1166 ~
Member Since: October 18 2009 ~
Last Visit: December 23 2018
|
Alert Moderator
|
|
|
|
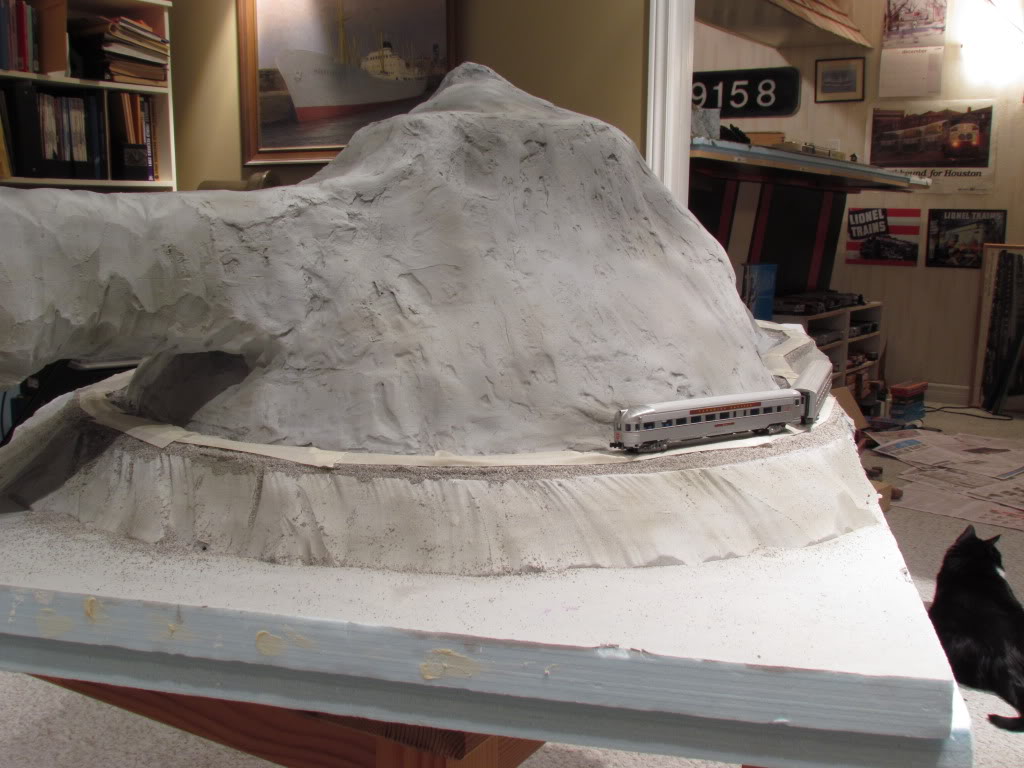
Posted - January 06 2012 : 02:17:14 AM
|
Not a single foot of space Burlington? I guess family before trains, right? I'll be down-sizing sometime in the near future...I'm hoping this will be small enough to come along.
I finally got to do a little air brushing today. The mountain was shot first with a dark shade of grey. It was then sprayed with a lighter shade to help the first coat blend in better. I'll probably spray one more coat of the darker colour just to accent a few spots and then dry-brush some white for highlights. Here's how it looks so far:

|
|
Country: Canada ~
Posts: 3448 ~
Member Since: September 22 2006 ~
Last Visit: April 03 2026
|
Alert Moderator
|
|
|
|
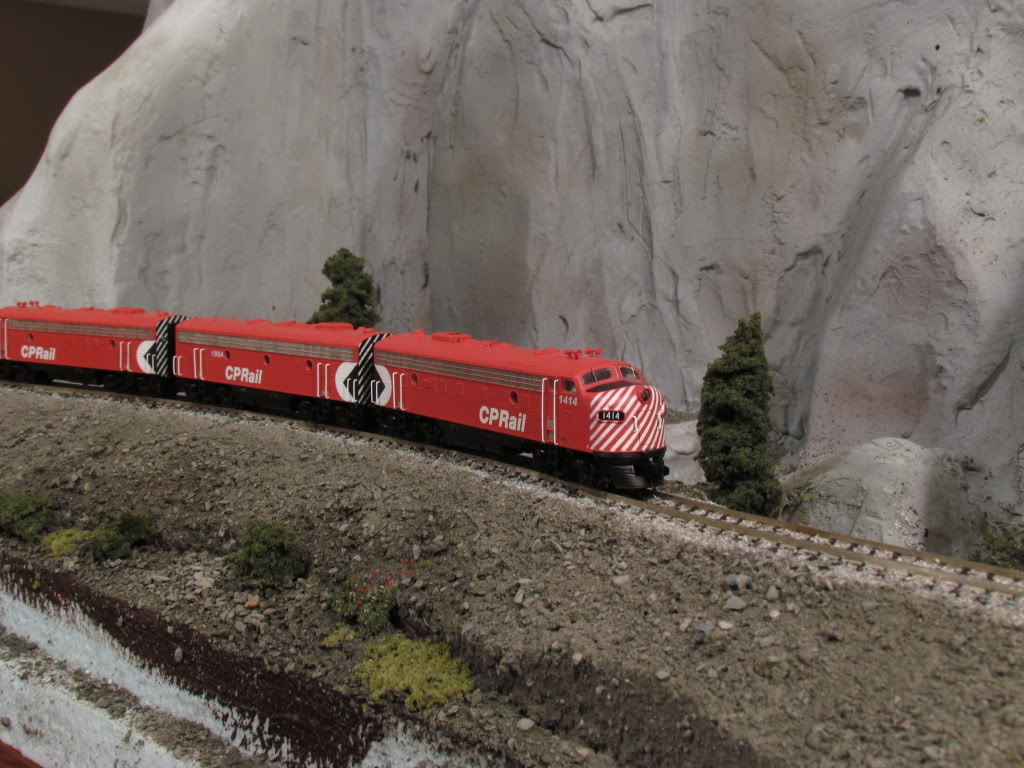
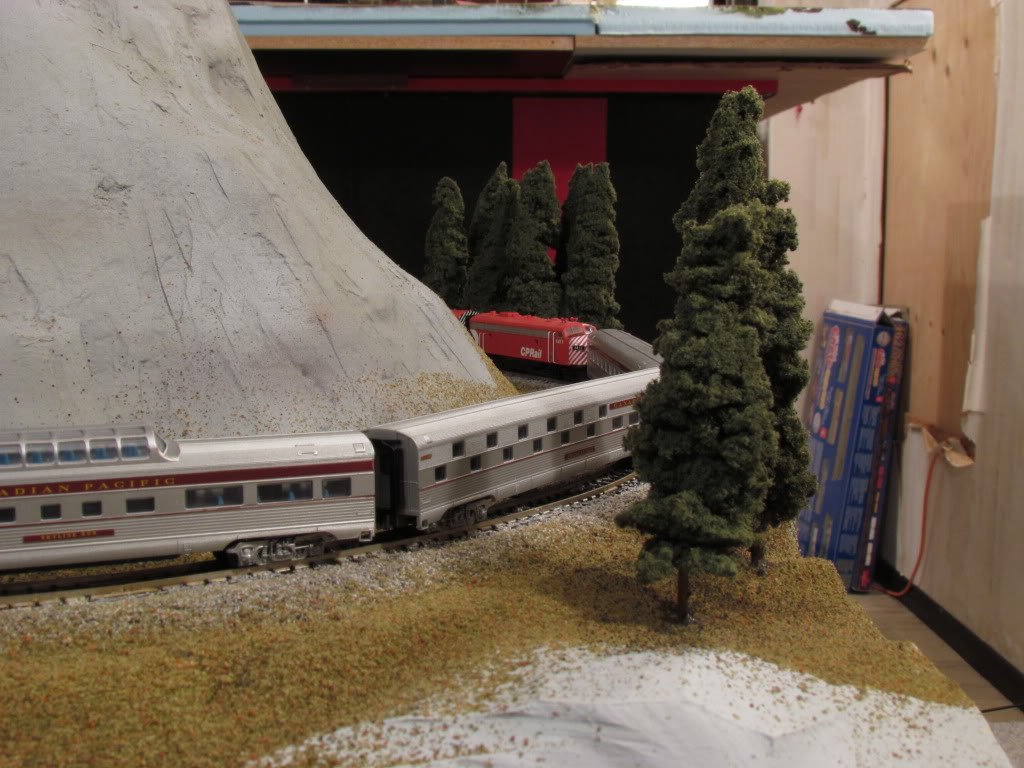
Posted - February 03 2012 : 11:11:12 PM
|
Scenery on the layout is progressing well. Here are some pictures so far:
|
|
Country: Canada ~
Posts: 3448 ~
Member Since: September 22 2006 ~
Last Visit: April 03 2026
|
Alert Moderator
|
|
|
|
Posted - February 04 2012 : 06:36:46 AM
|
| Cheese - Awesome - Love mtn railroads. Here is a tip for the sides of your rock mtn face - find some very fine gravel dust and sprinkle on the face of the flat wall. apply some glue in an even coat first and sling the dust against it. Spray glue in an can worked really good for me. It may take a few times to get everything covered right. I found my gravel dust out of a driveway near me. When mine dried - it sparkled from the crushed rock which i believe contained formica rock powder. Looked very real for a rock face.
|
|
Country: USA ~
Posts: 2507 ~
Member Since: January 31 2006 ~
Last Visit: October 21 2017
|
Alert Moderator
|
|
|
|
Posted - February 04 2012 : 10:11:18 AM
|
| Thanks for tip Brian :). I've been using stone dust on the areas you see so far with gravel. A 60lb bag cost me $3 and I'm very happy with how it's working. I'll sift out some of the bigger rocks from the fine stuff and give your suggestion a shot :P
|
|
Country: Canada ~
Posts: 3448 ~
Member Since: September 22 2006 ~
Last Visit: April 03 2026
|
Alert Moderator
|
|
|
|
Posted - February 04 2012 : 10:39:15 AM
|
*plays Silver Streak theme music*
Looking good there 
|
|
Country: USA ~
Posts: 15031 ~
Member Since: February 23 2009 ~
Last Visit: July 07 2026
|
Alert Moderator
|
|
|
|
Posted - February 15 2012 : 08:34:58 AM
|
Looks good Cheez! Its amazing the photo's it gives off for being such a small layout!
If your looking for more color on the rocks you could always do a few acrylic washes. That's basically all I did on mine was the base grey/tan color. Then various washes of burnt umber, burnt sienna, and a few other random colors splashed about. I haven't added any rock talus or small plants yet growing off the rock faces that's next for me.
|
|
Country: USA ~
Posts: 531 ~
Member Since: January 29 2009 ~
Last Visit: July 10 2020
|
Alert Moderator
|
|
|
|
Posted - February 17 2012 : 2:06:50 PM
|
Thanks Chris!
That's a good idea. So far I've air brushed a few coats of dark grey and brown (you can kinda see it in the last few pics). I'm happy with how it turned out, but a little more colour wouldn't hurt. I'll have to do some washes like you suggested. I really like how your rocks turned out
|
|
Country: Canada ~
Posts: 3448 ~
Member Since: September 22 2006 ~
Last Visit: April 03 2026
|
Alert Moderator
|
|
|
|
Posted - February 18 2012 : 01:20:18 AM
|
Thanks, though I'm still toying with my rocks. I'll never be happy lol.
Best advice I can give if you decide to try it. Use the biggest brush possible. And start out with a much higher ratio of water than paint. This way if things start to look weird you haven't stained things too much. Be aware of the water is going for the lowest point. Watch from it settling into the same trails as it goes down the mountain. If your getting big drip runs use the brush to break them up and fade them into the mountain a little. I'd do a few spots around the mountain, let it dry a day and see how it looks. If you layer the washes give the darkest colors priority, put them on first and build with the lighter colors.
If you really want to be daring after the washes have dried you can dry brush a few areas with a VERY light color to gain some highlights (I need to follow my own advice lol).
I don't want to come across as criticizing what you've done already because I think it looks damn good. Just giving you some pointers if you decide to take it further!
|
|
Country: USA ~
Posts: 531 ~
Member Since: January 29 2009 ~
Last Visit: July 10 2020
|
Alert Moderator
|
|
|
|
Posted - February 19 2012 : 6:19:57 PM
|
quote:| I don't want to come across as criticizing what you've done already because I think it looks damn good. Just giving you some pointers if you decide to take it further! |
I would be a fool not to listen to advice/criticism. I do appreciate the input
Two summers ago when I did a small section of my HO layout I used the "wash" technique on the rocks (although it didn't get as many colours/washes as your layout is getting). It turned out good in some places and not so good in others I like the effect air brushing is giving this layout but I think a few spots will benefit from a wash, or at the very least a little dry-brushing
|
|
Country: Canada ~
Posts: 3448 ~
Member Since: September 22 2006 ~
Last Visit: April 03 2026
|
Alert Moderator
|
|
|
|
Posted - February 19 2012 : 8:41:05 PM
|
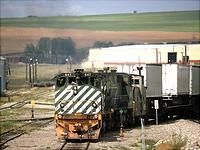
I like the natural tunnel, but the train looks small for 3 engines
|
|
Country: USA ~
Posts: 1102 ~
Member Since: July 28 2011 ~
Last Visit: July 01 2015
|
Alert Moderator
|
|
|
|
Posted - February 19 2012 : 8:57:20 PM
|
It's overkill at this point, but I've learned to buy engines in sets when buying new If you ever decide you want to expand your roster later on it can be a pain finding matching ones (same drive, paint colours, etc.,). I'm running them all so they each get the same amount of runtime/break-in time.
I do have more passenger cars on order
Edited by - DaCheez on February 19 2012 8:58:35 PM
|
|
Country: Canada ~
Posts: 3448 ~
Member Since: September 22 2006 ~
Last Visit: April 03 2026
|
Alert Moderator
|
|
|
|
Posted - April 23 2013 : 9:06:33 PM
|
I finally got the water installed. I used Woodland Scenics "Realistic Water". There were some issues with the paint peeling underneath the water...apparently "Acrylic Color" doesn't necessarily mean 100% acrylic paint Ah well, live and learn, right? It still looks ok...the flaky paint adds more texture to the water

Man, summer of 2011 just keeps on going and going
cheez
|
|
Country: Canada ~
Posts: 3448 ~
Member Since: September 22 2006 ~
Last Visit: April 03 2026
|
Alert Moderator
|
|
|
|
Posted - March 02 2014 : 6:02:55 PM
|
| Great pictures so far of your N scale layout. Would like updated photos to see how the wonderful scenery has progressed.
|
|
Country: USA ~
Posts: 7773 ~
Member Since: February 12 2014 ~
Last Visit: July 09 2026
|
Alert Moderator
|
|
|
|
Posted - March 02 2014 : 6:30:46 PM
|
| great work cheez,like it so far,bet i will love it when finished ken
|
Country:  United Kingdom ~
Posts: 8294 ~
Member Since: September 28 2006 ~
Last Visit: October 20 2021 United Kingdom ~
Posts: 8294 ~
Member Since: September 28 2006 ~
Last Visit: October 20 2021
|
Alert Moderator
|
|
|
|
Posted - March 02 2014 : 7:20:03 PM
|
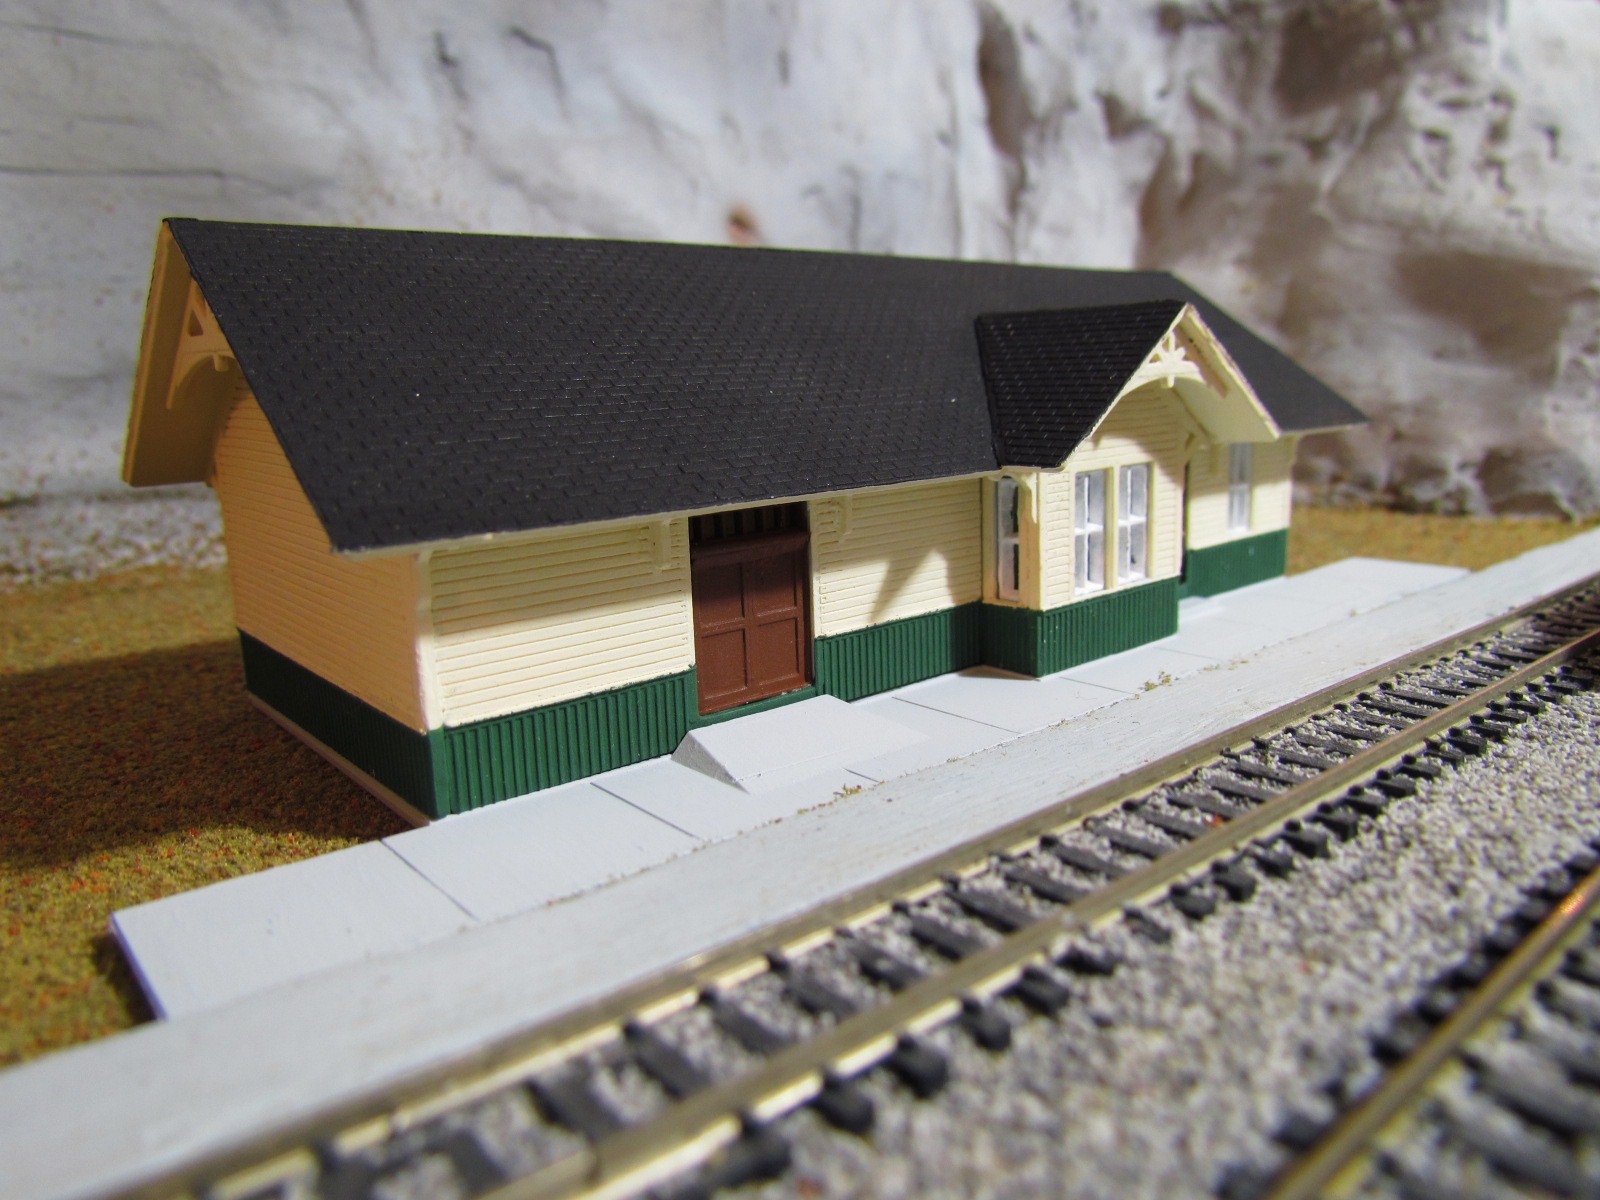
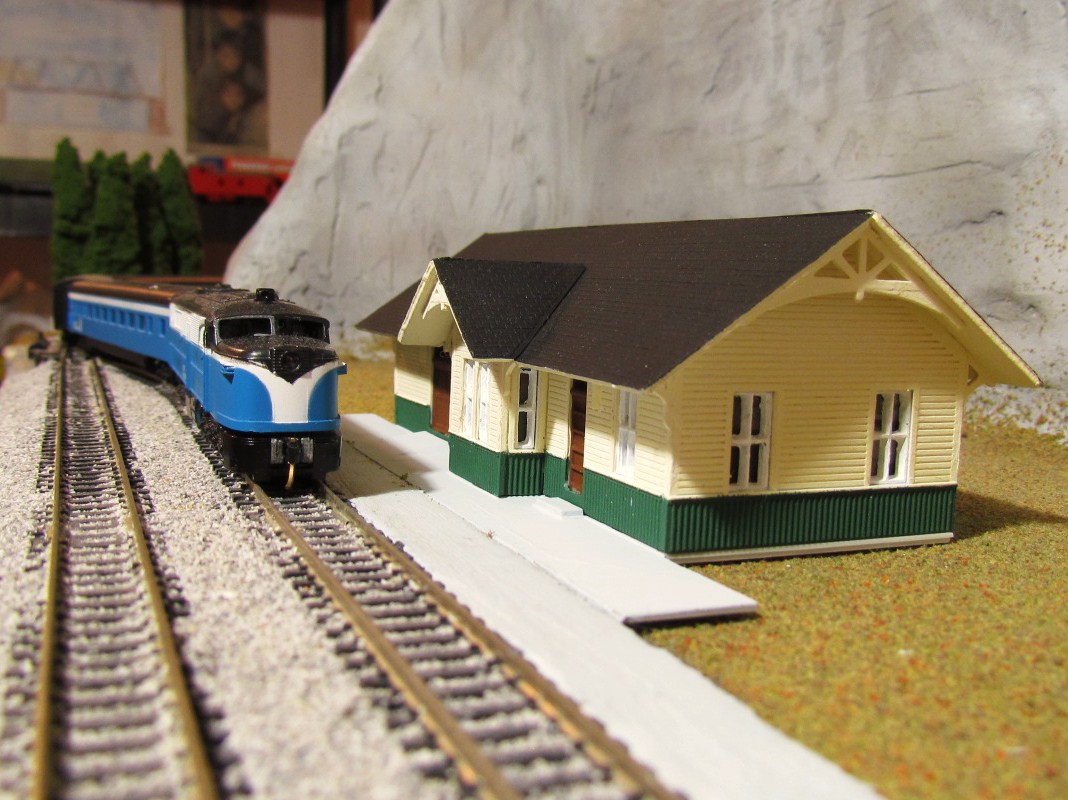
Hey guys. It's been a few months since I've done any work on the N scale layout. The latest thing completed was the construction of the station. I haven't got around to properly installing it on the layout yet. Here are the most recent pics I can offer.
|
|
Country: Canada ~
Posts: 3448 ~
Member Since: September 22 2006 ~
Last Visit: April 03 2026
|
Alert Moderator
|
|
|
|
Posted - March 02 2014 : 7:33:15 PM
|
Cheez - looking great. Don't know how I missed this thread. Love the A/B/A loco set.
Was wondering, how is your WS Realistic Water holding up? Any issues with bubbles forming?
http://tycodepot.com/
|
|
|
|
|
Posted - March 02 2014 : 11:22:17 PM
|
| Thanks Jerry! I just checked the water. There are a few small bubbles, but those probably formed while the water was still setting. It's no where near the pictures I've seen of your layout.
|
|
Country: Canada ~
Posts: 3448 ~
Member Since: September 22 2006 ~
Last Visit: April 03 2026
|
Alert Moderator
|
|
|
|
Posted - March 03 2014 : 10:57:14 AM
|
| show me a real river or creek WITHOUT bubbles in them!
|
|
Country: USA ~
Posts: 15031 ~
Member Since: February 23 2009 ~
Last Visit: July 07 2026
|
Alert Moderator
|
|
|
|
Posted - March 03 2014 : 12:49:31 PM
|
quote:show me a real river or creek WITHOUT bubbles in them!
Originally posted by microbusss - March 03 2014 : 10:57:14 AM
|
I've seen that in a severe drought and that would be the easiest to model since you would not even have to model water.
Carpe Manana!
|
|
Country: USA ~
Posts: 2418 ~
Member Since: September 17 2013 ~
Last Visit: July 09 2026
|
Alert Moderator
|
|
|
|
Posted - March 03 2014 : 10:16:30 PM
|
| Lookin' good Eric.
|
|
Country: USA ~
Posts: 2087 ~
Member Since: March 16 2013 ~
Last Visit: July 05 2018
|
Alert Moderator
|
|
|
|
Posted - March 24 2016 : 7:31:49 PM
|
| Nice photos Eric. I always enjoy N scale products in action. Maybe you will update this thread in the near future.
|
|
Country: USA ~
Posts: 7773 ~
Member Since: February 12 2014 ~
Last Visit: July 09 2026
|
Alert Moderator
|
|
|
|
Posted - March 24 2016 : 8:56:47 PM
|
hehehe
https://www.youtube.com/watch?v=80afvthU834
still want to do the whole train
also the one from The Fugitive & Unstoppable Plus the REAL CSX #8888 Crazy Eights
|
|
Country: USA ~
Posts: 15031 ~
Member Since: February 23 2009 ~
Last Visit: July 07 2026
|
Alert Moderator
|
|
|
|
Posted - March 25 2016 : 12:35:49 AM
|
| That's a heckuva whack. Not even summer yet!
|
|
Country: USA ~
Posts: 11686 ~
Member Since: December 09 2013 ~
Last Visit: May 26 2026
|
Alert Moderator
|
|
|
|
Posted - March 25 2016 : 11:07:50 AM
|
quote:| Nice photos Eric. I always enjoy N scale products in action. Maybe you will update this thread in the near future.
Originally posted by wks - March 24 2016 : 7:31:49 PM
|
Unfortunately I sold this layout last year. It was an excellent learning experience but I'd taken it as far as I wanted to and it was just kind of taking up space. At the end it was actually sitting on top of Atomic Lake...I literally has a stack of layouts. The track work was rock solid though so I put it up on Craigslist and ended up selling it to a guy who lived in an apartment and didn't have room for anything bigger.
I do however still have most of the trains. Surely they'll make a comeback at some point!
|
|
Country: Canada ~
Posts: 3448 ~
Member Since: September 22 2006 ~
Last Visit: April 03 2026
|
Alert Moderator
|
|
|
|
Posted - March 25 2016 : 11:57:23 AM
|
quote:
Unfortunately I sold this layout last year. It was an excellent learning experience but I'd taken it as far as I wanted to and it was just kind of taking up space. At the end it was actually sitting on top of Atomic Lake...I literally has a stack of layouts. The track work was rock solid though so I put it up on Craigslist and ended up selling it to a guy who lived in an apartment and didn't have room for anything bigger.
I do however still have most of the trains. Surely they'll make a comeback at some point!
Originally posted by DaCheez - March 25 2016 : 11:07:50 AM
|
gimmies the CP Rail passenger train!
|
|
Country: USA ~
Posts: 15031 ~
Member Since: February 23 2009 ~
Last Visit: July 07 2026
|
Alert Moderator
|
|
|
|
Posted - March 25 2016 : 12:40:52 PM
|
| Heh, you wish!
|
|
Country: Canada ~
Posts: 3448 ~
Member Since: September 22 2006 ~
Last Visit: April 03 2026
|
Alert Moderator
|
|
|
|
Posted - March 25 2016 : 1:26:11 PM
|
quote:Heh, you wish!
Originally posted by DaCheez - March 25 2016 : 12:40:52 PM
|
oh you bet I do!
Tho I wants the exact CP Rail locos #4070 & #4067
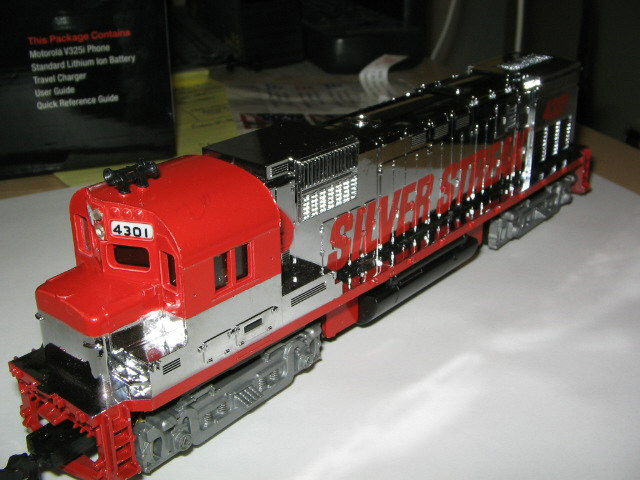
do want the original 1934 Silver Streak too
Edited by - microbusss on March 25 2016 1:27:11 PM
|
|
Country: USA ~
Posts: 15031 ~
Member Since: February 23 2009 ~
Last Visit: July 07 2026
|
Alert Moderator
|
|
|
|
Posted - March 27 2016 : 5:02:01 PM
|
Speaking of which, Micro, when are you going to post more of
those Varney Aerotrain pics? One could almost hear the
shrieks of envy around the country when you bagged that
puppy.
|
|
Country: USA ~
Posts: 11686 ~
Member Since: December 09 2013 ~
Last Visit: May 26 2026
|
Alert Moderator
|
|