|
|
 Posted - January 17 2025 : 8:08:16 PM Posted - January 17 2025 : 8:08:16 PM


|
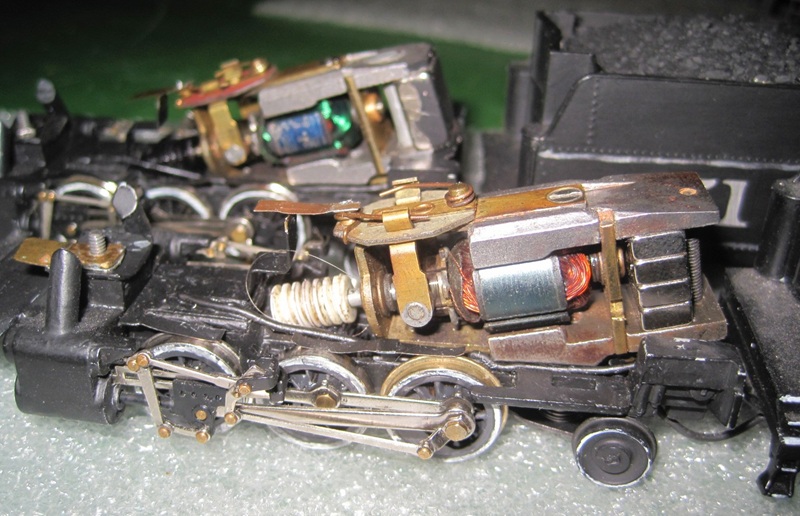
My layout has a very steep grade. When a train goes downhill, the force of the train wanting to roll downhill presses the axle gear teeth against the worm like a caliper on a disk brake. The more low-end torque a motor has, the more smoothly it can overcome that force on a slow downhill trip. I have been upgrading the magnets on my PM-1 motors to increase low-end torque. Where the magnet goes, some motors are held together by a screw, so the new magnet sits ahead of the screw and closer to the armature. Other motors have a rivet farther forward, forcing the replacement magnet farther from the armature, and appreciably reducing torque. Compare the motors in this picture:
I took the riveted motor apart and drilled and tapped a screw hole where the screw goes in the screwed together motor. This is centered from side to side, and 3/32" in from the end:
The metal is a soft steel that carries the magnetic field ahead to the armature. The steel being soft, my drill bits and tap would cut it. I carefully measured to where I wanted the hole in the bottom steel core and drilled through as straight as I could with a number 50 bit, the tap drill for a 2-56 screw.
With the bit in that hole, I placed its end where the hole needs to go through the top steel core. This made the holes line up. Then, I drilled through that.
I tapped the top hole for a 2-56 thread and drilled out the bottom hole to a number 41 hole (clearance for a 2-56 screw). At this point, a 3/4" 2-56 screw would hold the motor together.
With the screw not in place, I hacksawed the rivet and removed it. The hole around the rivet has burrs on it, so the metal had to be cleaned up with a file so the magnet would fit where the rivet had been.
This picture shows the motor taken apart with the rivet removed and the screw holes in place. The magnet is not in the picture. Had I tried that, all the steel parts would have been piled all over it.
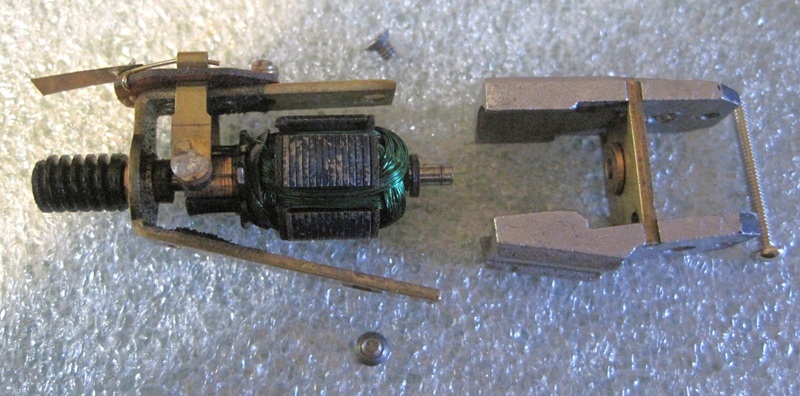
Note: This disassembly was harmless because I was replacing the magnet. The original magnet was magnetized in the assembled motor, and if you take the motor apart, you'll lose some magnetic strength. Don't dismantle a motor if you're not replacing the magnet.
I put the armature and brass frame back together with the steel cores and then slipped in the magnet and put the screw in. Tightening the screw pulled all the pieces into place.
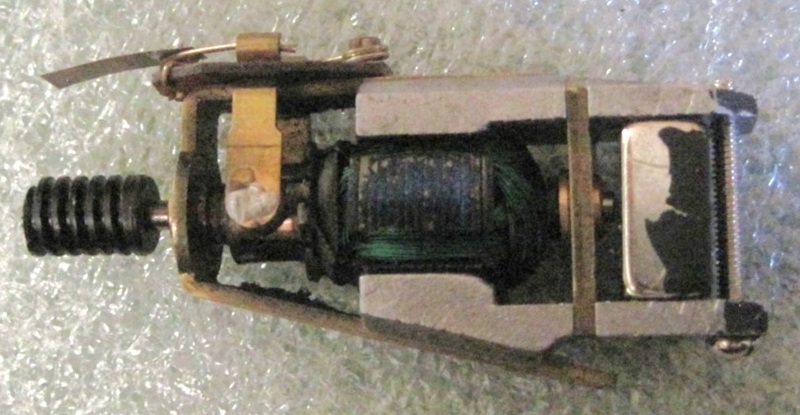
While I was as careful as I could be not to do a sloppy job, it's all hand tools and is not machine shop precision, so I was a little scared I'd get something out of line and the motor would run noisy, but when I put it back together and oiled the bearings, it ran like a champ. This is probably more of a tribute to a rugged little motor than to my skill with a drill.
The 3/4" screw sticks out of the top about 1/16". In the Prairie in the picture, there's room for this. I think that in an 0-4-0, the screw would need to be trimmed flush with the top of the motor.
I tested the locomotive going downhill with the altered motor, and it went downhill as smoothly as I had hoped.
Carpe Manana!
|
Country:  USA ~
Posts: 2417 ~
Member Since: September 17 2013 ~
Last Visit: July 02 2026 USA ~
Posts: 2417 ~
Member Since: September 17 2013 ~
Last Visit: July 02 2026
|
 Alert Moderator
|
|
|
|
Posted - January 19 2025 : 12:45:13 PM

|
| Very clean work! The little intricacies of these old engines is always fascinating.
|
Country:  Canada ~
Posts: 3448 ~
Member Since: September 22 2006 ~
Last Visit: April 03 2026 Canada ~
Posts: 3448 ~
Member Since: September 22 2006 ~
Last Visit: April 03 2026
|
Alert Moderator

|
|
|
|
Posted - January 20 2025 : 12:17:22 AM
|
| Great job!
|
|
Country: USA ~
Posts: 11686 ~
Member Since: December 09 2013 ~
Last Visit: May 26 2026
|
Alert Moderator
|
|
|
|
Posted - March 10 2025 : 5:46:38 PM
|
| Nicely done!
|
|
Country: USA ~
Posts: 1091 ~
Member Since: July 07 2011 ~
Last Visit: July 07 2026
|
Alert Moderator
|
|
|
|
Posted - March 11 2025 : 2:20:36 PM
|
would a Rare Earth Magnet work too? 
|
|
Country: USA ~
Posts: 15031 ~
Member Since: February 23 2009 ~
Last Visit: July 07 2026
|
Alert Moderator
|
|
|
|
Posted - March 12 2025 : 7:54:56 PM
|
quote:would a Rare Earth Magnet work too?
Originally posted by microbusss - March 11 2025 : 2:20:36 PM
|
This is a rare earth magnet. The original magnets already land in the right place in both motors. The point of this is to put the replacement magnet where its field will be most powerful.
Carpe Manana!
|
|
Country: USA ~
Posts: 2417 ~
Member Since: September 17 2013 ~
Last Visit: July 02 2026
|
Alert Moderator
|
|