|
|
 Posted - December 08 2010 : 6:09:19 PM Posted - December 08 2010 : 6:09:19 PM


|
why after laying track, checking each joint, running engines and tweaking until no problems and then laying ballest
i get derails.
what is driving me nuts is no one engine or car derails the same or the same place. but they consistantly each have their own pattern
The penn Central runs like a dream pulling the new Haven cars, go figure, one of my inexpensive locos. I did grind down O rings and put them on which raised the wheels just enough to derail at times. Took off the rings and painted on a couple of layers of contact cement---works fine
When the penn central pulls the new Haven they derail on every switch at the frog. I put in weights and they still derail at switch frogs
The Santa Fe derails at just one switch and in just one direction
The CSX my best loco derails on a curve where there is no joint but only running counter clock wise.
I run it real slow and can see the wheel climb the track yet i cannot see why. there is no discernible bump, kink, twist etc
I have guaged the track and switches.
I know you can't help me as you have to be here to see it.
In the case of the New Havens i suspect the wheel flange is shallow and will try converting to steel wheels.
as far as the Choo Chhoo the guy at the Hobby shop was right a P O S. It derails going over every cross over and swirch when it hit the frogs. Whoever was the genius that felt tenders with rubber tires should be the source of power to push heavy engines should be ----------
There was a point today i wanted to grab my chain saw and when finished take up radio controlled airplanes
thanks for listening
fred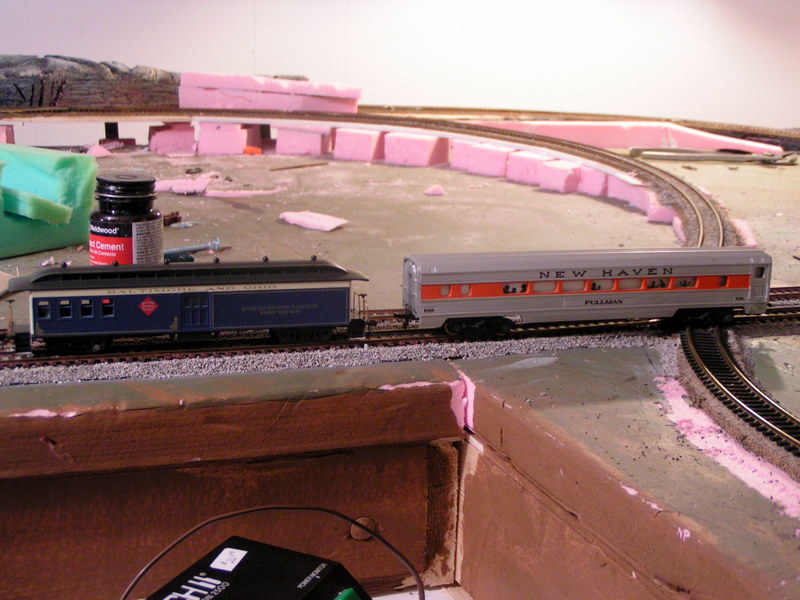 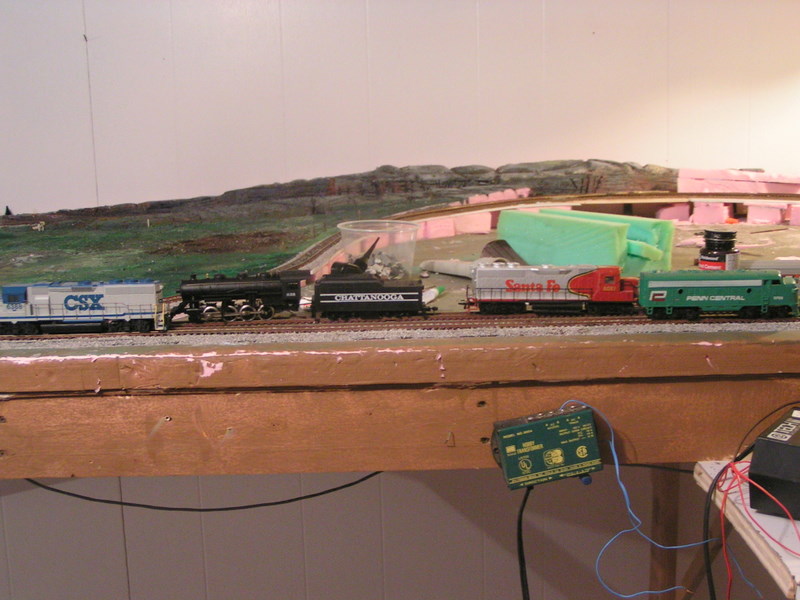
|
Country:  USA ~
Posts: 424 ~
Member Since: June 25 2010 ~
Last Visit: July 30 2021 USA ~
Posts: 424 ~
Member Since: June 25 2010 ~
Last Visit: July 30 2021
|
 Alert Moderator
|
|
|
|
Posted - December 08 2010 : 8:34:05 PM
|
| you using code 100 or 83 track? Code 83 from my experience is not good - I bought Atlas code83 and had constant derailments on switches and crossovers - went back to code 100- smooth sailing. I use flex track to minimize joints.
|
|
Country: USA ~
Posts: 2507 ~
Member Since: January 31 2006 ~
Last Visit: October 21 2017
|
Alert Moderator

|
|
|
|
Posted - December 08 2010 : 8:44:12 PM
|
I saw your picture and noticed one thing that I have had issues with in the past. You have an S curve in your layout. I have found that some of my trains will derail if part of them is turning left while the other part is turning right. This is more likely the greater the speed. To fix these issues I place a straight section of track between where one cure ends and the other begins. This section needs to be at least 1.5 times as long as the logest piece of the train.
You did not mention the size or brand of switches you installed. I have found that some of the Atlas ones have frogs that need to be filed slightly to keep the cars from hopping when hitting them. Also I have found that the snap switches generally create to tight of a curve, they are slightly tighter then an 18r piece of track.
If the car behind the locomotive is derailing try using a car with a shorter wheelbase. I have found this to help at times.
Hope this helps. These are just things I have run into with my layout.
|
|
Country: USA ~
Posts: 332 ~
Member Since: August 28 2010 ~
Last Visit: April 23 2020
|
Alert Moderator
|
|
|
farace
Switcher

Status:
offline
| |
Posted - December 08 2010 : 8:50:47 PM
|
| You mentioned gauging the track and switches; did you check the gauge on the car wheelsets? I was having issues with derailments recently and it turned out that the wheelsets on one of my passenger cars were out of gauge (too narrow, IIRC). I don't have an NMRA gauge, but I do have a caliper, so I adjusted them as close as I could to the spec, and haven't had issues since (with that set, anyway; the John Bull set I just got off eBay is a different story, being way too light; if I sneeze in the next room it will derail).
|
|
Country: USA ~
Posts: 70 ~
Member Since: January 20 2010 ~
Last Visit: March 06 2011
|
Alert Moderator
|
|
|
|
Posted - December 08 2010 : 9:20:48 PM


|
quote:why after ...laying ballest....i get derails.
.
When the penn central pulls the new Haven they derail on every switch at the frog. I put in weights and they still derail at switch frogs
I run it real slow and can see the wheel climb the track yet i cannot see why. there is no discernible bump, kink, twist etc
..
I know you can't help me as you have to be here to see it.
There was a point today i wanted to grab my chain saw and when finished take up radio controlled airplanes
thanks for listening
fred
Originally posted by derfberger - December 08 2010 : 6:09:19 PM
|
So, your problems started AFTER you laid down ballast? So it could be glue or ballast grit. For your frogs, check the running groove, if it gets glue in it and raises the wheel flanges up, it'll derail the cars easier. Same with your mystery curve, if the glue is dried, you may not can see it. Our club layout had issues like that, glue clumps on the inside of the rails, the car flanges would ride up, and over they go...especially prevalent in the curves, as the flange is being forced outwards.
Get a loose metal-wheeled truck ( a nice one, which rolls well, not a cheap one ), and run it over the track with your finger over the spots the cars derail at. If there's any bumps from foreign material or glue, you should feel them as the truck passes over the spot. That's one way I try to find them, if there is something there, you will feel it, even if you can't see it.
Jerry
" When life throws you bananas...it's easy to slip up"
|
|
Country: USA ~
Posts: 3974 ~
Member Since: January 04 2009 ~
Last Visit: January 11 2019
|
Alert Moderator
|
|
|
|
Posted - December 08 2010 : 10:28:16 PM
|
| I don't have a lot to add to what has been said, other than "welcome to the world of HO scale model railroading." Keep working at it. Check the wheels of the offending pieces for deformities or severe gunk buildup. Sometimes track needs to be shimmed one way or the other to keep things level. With patience you can make it work.
|
|
Country: USA ~
Posts: 1166 ~
Member Since: October 18 2009 ~
Last Visit: December 23 2018
|
Alert Moderator
|
|
|
|
Posted - December 08 2010 : 10:31:02 PM
|
I feel your pain. I was having this same issue tonight. I have an atlas engine and a TYCO tanker. I added a proto2000 knuckle coupler to one side of the TYCO as a conversion car. Every time it goes over this one switch the tanker derails. It only happens when connected to the engine. If I attach the TYCO further back in the consist then it does fine. Something about the combo of the engine and the TYCO. Driving me nuts.
~CamdenLine
|
|
Country: USA ~
Posts: 178 ~
Member Since: July 02 2010 ~
Last Visit: August 22 2023
|
Alert Moderator
|
|
|
|
Posted - December 08 2010 : 10:47:20 PM
|
There you go. Sometimes certain car/loco combinations don't work well. You can tinker with it or just move it, depending on your personality and patience. Sometimes you get cars that just seem to love to derail. Again, sometimes it's better to just stuff them in a drawer for awhile so you don't get frustrated.
Also, a lot of older, cheaper locos (like Tyco and Life-Like) have trouble on switches. That's just part of the game.
What maker is that CSX? It kinda looks like an Athearn in the photos. If so, the wheels may be out of gauge. Sometimes they can drive you crazy until you get them adjusted right.
|
|
Country: USA ~
Posts: 1166 ~
Member Since: October 18 2009 ~
Last Visit: December 23 2018
|
Alert Moderator
|
|
|
|
Posted - December 09 2010 : 09:50:50 AM
|
also check the Kadee couplers sometimes that "pipe" thingy hangs to low & can & will get caught on switches & turnouts So all you gotta do its carefully squeeze it up more 
|
|
Country: USA ~
Posts: 15029 ~
Member Since: February 23 2009 ~
Last Visit: June 26 2026
|
Alert Moderator
|
|
|
|
Posted - December 09 2010 : 7:32:59 PM
|
| Good call. Even "regular" couplers occasionally drag and catch on switches or ties.
|
|
Country: USA ~
Posts: 1166 ~
Member Since: October 18 2009 ~
Last Visit: December 23 2018
|
Alert Moderator
|
|
|
|
Posted - December 09 2010 : 9:52:25 PM
|
wow you people are right on with suggestions, so happy that i am not alone.
using code 100
I did today find a Atlas Y switch where the point was above the track and not tight against the rail. Also the space between the divergent point and the stock rail was too narrow. That explains why it worked O k one way and not the other. I'll end up buying a new one as i screwed it up worse trying to adjust -------impossible to tweak
---
i'll try to address each one
fortunately no derailments at the s curves but there is one leaving a cross over and going into a switch. that has a slight s configuraltion, not sure what i will do.
Somewhere i read that a piece of track in between the s helps to avoid problems. I have a cross over which does the job. Granted if you look down the track you'd wonder why it doesn't crash as i had to force the cross overs to fit so there is a bit of a wiggle
I also gauged all the wheels and found the Choo Choo wheels had slipped off the shaft quite a bit. Fixed them and they still derail on any and all frogs and cross overs. I'm about ready to give up on this guy but i thinks he's cool and am sorry
as far as couplers both the Kaydees and horn hooks can catch a cross over so i've found. Especially with my layout where i immediately go into an incline from a cross over. Some of the points on the horn hook will grab the cross over as will the Kadee. I trimmed them which means i probably won't be able to uncouple----Oh well.. As much as the horn hooks are unrealistic i will have to say they don't uncouple when entering or leaving an incline----Kadees will
I've ruled out coupler attached to truck vs separate as it's not a problem so far.
It's the locos that each have their special place to derail.. I haven't even started with all my cars which will drive me to drink
i will definitely check for ballast and gunk in the frogs and inside the tracks. I notice a crackling sound when i run after i laid down ballast
I believe I have a combo of Atlas and Tyco switches.. not the best but it's what i have. are there better switches???
Other than the choo coo which derails on all switches most happens elsewhere. In places that makes no sense like no splices or sharp curves
I will spend minutes going back and forth with an engine over the same spot. I see it happen but can not see why. There has been one instance where i ripped up two feet of flex and laid new and it went away and i'll never know why
again thanks for all the support
i will be taking a hiatus for 10 weeks from the layout and escaping the Mi winters to FL.
will check out all the hobby shops while down their
have a Happy Holiday
fred
|
|
Country: USA ~
Posts: 424 ~
Member Since: June 25 2010 ~
Last Visit: July 30 2021
|
Alert Moderator
|
|
|
|
Posted - December 09 2010 : 9:54:39 PM
|
P S
one thing i have to do is buy a scale a weigh all my cars
the New Haven could be a problem
still doesn't explain the engines other than some of the trucks don't turn as much as others
|
|
Country: USA ~
Posts: 424 ~
Member Since: June 25 2010 ~
Last Visit: July 30 2021
|
Alert Moderator
|
|
|
|
Posted - December 09 2010 : 10:19:12 PM
|
Like others have said, "keep at it". I had a particular problem with an Atlas turnout: derailments in the frog. Discovered that the frog was too deep. When the wheel is between the ends of the frog it is actually riding on it's flange. Don't know if that is how it is supposed to be or not. Anyway, since the frog was too deep, when the wheel flange dropped down to the bottom of the frog, the wheel at the other end of the axle would ride up over the rails. I made a shim, shaped like an X, and glued it in the bottom of the frog. I think the shim was .010" in that particular case. With that shim the wheel made a smooth transition across the frog. No more derailments (at least for that piece of track.)
Yes, there are better brands of turnouts. $$$. Of course, you could hand lay your own track.
Talk about going crazy. I couldn't do it.
Unspoken expectations are premeditated failures.
Edited by - NC shortlines on December 09 2010 10:20:17 PM
|
|
Country: USA ~
Posts: 825 ~
Member Since: December 22 2008 ~
Last Visit: March 16 2015
|
Alert Moderator
|
|
|
|
Posted - December 10 2010 : 1:02:45 PM
|
Good suggestions from everyone... to those I have little to add, but here goes:
- You mention that you had to "force" a few pieces to fit. Right then and there is a bad bad bad idea. Track should never be forced. I know it's hard to avoid, especially when you're either on a tight budget and/or have this great track plan idea that just HAS to work... but forced track = bad track! It's not a matter of IF but WHEN the slightest kink will cause a problem. Rails have to be smooth and seamless; any transition noticeable to the human eye is amplified to a jarring degree on a tiny flanged wheel.
- Turnouts are always problematic. That said, my layout has about a dozen Atlas switches and none of them have ever given me any problems, save one that I messed up with ballast glue that got into the frog and was very difficult to clean out... no derailments but a spotty short when some locos would cross. The tips others have given are good things to look for. But I would use caution with "used" turnouts, as the slightest abuse can lead to big problems.
- As for certain locos derailing in certain spots: These are the most mechanically complex components in the train, so make SURE they are tip-top. Make sure both trucks swivel smooth, pivot left/right/up/down with equal travel and no resistance in any and all directions. Check the wheel gauges. Pop the shell off the chassis and make sure you don't have any wiring or other parts that might be causing a truck to bind.
- About Kaydee couplers: get a Kadee gauge. Seems pricey for what little it actually is, but this is an invaluable tool: not only does it ensure couplers are all the same height, but it has a shim above the ties that you can use to adjust the trip pin ("air hose"). You could also fashion your own gauge with a spare piece of track, a piece of styrene, and a spare freight car with a properly-installed coupler... but the KD gauge is much easier to use.
Don't get discouraged. When I first built the STC, it was largely trouble free.... ran it for a year with no issues. Then I bought some brand-new Atlas SD35s and they kept derailing on the 18"R curve at the west end. WTF? It drove me mad... until closer inspection yielded an astounding discovery: every single piece of 18"R Atlas track I'd used in that section, was warped! They'd been stored, MIP, in an outdoor shed for a few years before use, and the heat must have done it. They "nested" flat to each other and looked flat individually, but when critically inspected on a bench, lo and behold: a slight "twist" netted opposing 1 mm inclines in each rail; when pieces were connected a "ripple effect" was created through the curve at the joints. 2-axle loco trucks had no issues, but rigid 3-axle trucks would pop one wheel off in the ripple at the joints.
I had to rip up and replace that portion of track age: problem solved, knowledge gained.
Keep things simple, and keep them precise... but most of all, keep at it!
Edited by - spiderj76 on December 10 2010 1:05:02 PM
|
|
Country: USA ~
Posts: 2798 ~
Member Since: September 17 2010 ~
Last Visit: July 22 2015
|
Alert Moderator
|
|
|
farace
Switcher
Status:
offline
| |
Posted - December 11 2010 : 12:57:32 AM
|
| I'll give another thumb's up on buying a Kadee gauge. Wondered if I was wasting my money at the time, but it's been well worth it. There are times I'll be having problems with cars spontaneously uncoupling, and it will turn out that some car I got, of a brand that always took, say, a #5, should have gotten say a #27 instead. Now I check every car when I install the couplers, both ends (because I've found swapped trucks at times, at one end only). It's shown me some low trip pins, too. Not that digging into the ties isn't a clue, but it's not always that obvious.
|
|
Country: USA ~
Posts: 70 ~
Member Since: January 20 2010 ~
Last Visit: March 06 2011
|
Alert Moderator
|
|
|
|
Posted - December 19 2010 : 12:28:09 PM
|
again thanks for all the hints
my gage besides having wheel check has a frog depth and width gage and a coupler height gage. The frogs look o k but when i get home will check again as never thought too deep could be a problem. I found if entering an incline at too acute an angle the knuckle couplers will disengage and/or the horn hook will catch a tie
how do you know when you have the wrong coupler I E ""say, a #5, should have gotten say a #27 """
as far as making turnouts from scratch i have a detailed chapter in a book on how to do and all i can say is no thanks
yep i did force a few fits. especially the single track crossing the double tracks as i couldn't find the perfect angle. But oddly enough that isn't where the problem is.
as i said it's at places with no joints and gradual radiuses. Got to check for warp and humps.
haven't had time yet to check out hobby shops here in SW Fl but definately will
|
|
Country: USA ~
Posts: 424 ~
Member Since: June 25 2010 ~
Last Visit: July 30 2021
|
Alert Moderator
|
|
|
farace
Switcher
Status:
offline
| |
Posted - December 19 2010 : 9:48:53 PM
|
quote:how do you know when you have the wrong coupler I E ""say, a #5, should have gotten say a #27 """
|
The gauge sits on the track and part of it is a coupler mounted at the correct height. You put the car on the track next to it and bring it up to the gauge. Sometimes you find that the coupler is only engaging about half of its height, which tells you that you need an underset or overset coupler, depending on which way it has to move.
It's happened more than once that I've put what should have been the correct couplers (according to Kadee's conversion list) into a car and found out it was at the wrong height. I think it happens because it's so easy to snap trucks out of some of these cars, especially the talgo style, they probably get swapped around.
|
|
Country: USA ~
Posts: 70 ~
Member Since: January 20 2010 ~
Last Visit: March 06 2011
|
Alert Moderator
|
|
|
|
Posted - April 04 2011 : 12:07:17 PM
|
OK this may be a silly question but on the cars, what type of wheels are you using? are the trucks snap in or screw in?
on the loco, it may be a case of deep flanges (had this issue with some old AHM engines) trimming the bflanges dow may be difficulkt (anyone know of a cheap, easy solution?) if not deep flanges see if the drive wheels are "sloppy" (I.E. shift from side to side but stay in gauge...hope that's a good explanation :P) if they don't have some slop to them that could be an issue on curves if they slipped out of gauge more than once some loctite or a toothpick of crazy glue can help.
on ballasted trackwork my best cleanup and chekup tool waqs a piece of plexiglass mounted to some old plastic life like trucks then by "hand power" move the car around and feel for imperfections once I find one out comes the sandpaper or the emery board until it feels smooth
hope these tips help
just me Ray... and just because I have Tyco doesn't mean I am not a model railroader
|
|
Country: USA ~
Posts: 506 ~
Member Since: April 03 2011 ~
Last Visit: November 29 2025
|
Alert Moderator
|
|
|
|
Posted - August 15 2012 : 1:37:10 PM
|
I'm back
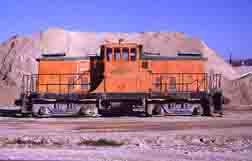
By far the most frustrating part of this hobby is keeping the trains and cars on the track..The cheapest Penn Central Tyco is the only engine that runs both ways over everything and doesn't derail, including pulling a load of cars.
Everything else has it's own personality. Could be a switch, X over or even a curve. and many times only in one direction.
I have replaced with new switches to no avail.
The latest is a new Y switch and the Black Penn engine. It either derails when entering the point or when hitting the frog.
I tried to make the groove in the frog deeper.
To me it would help if all these engines have a deeper wheel flange and the movable point was curved to the same radius as the rail entering and leaving
The C S X my most expensive is the worse. I've gaged the wheels and found nothing.
It will jump 20 in diameter curves. It's like the trucks don't have a large enough swing
here are some picks
I know not seeing it first hand is not much 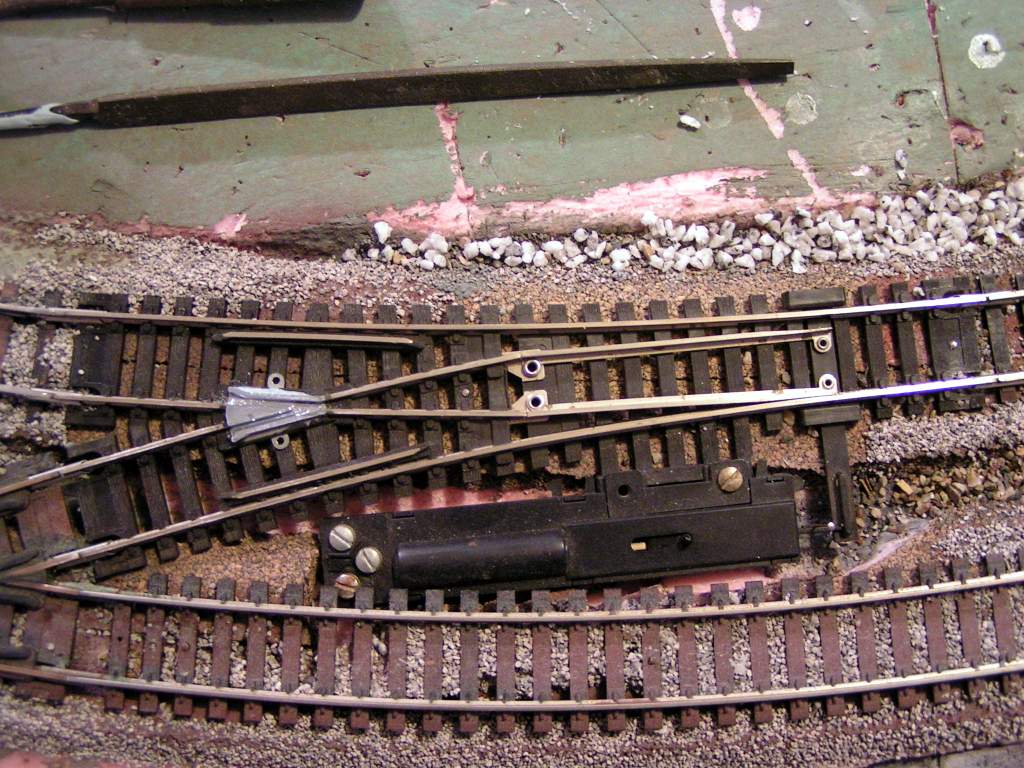 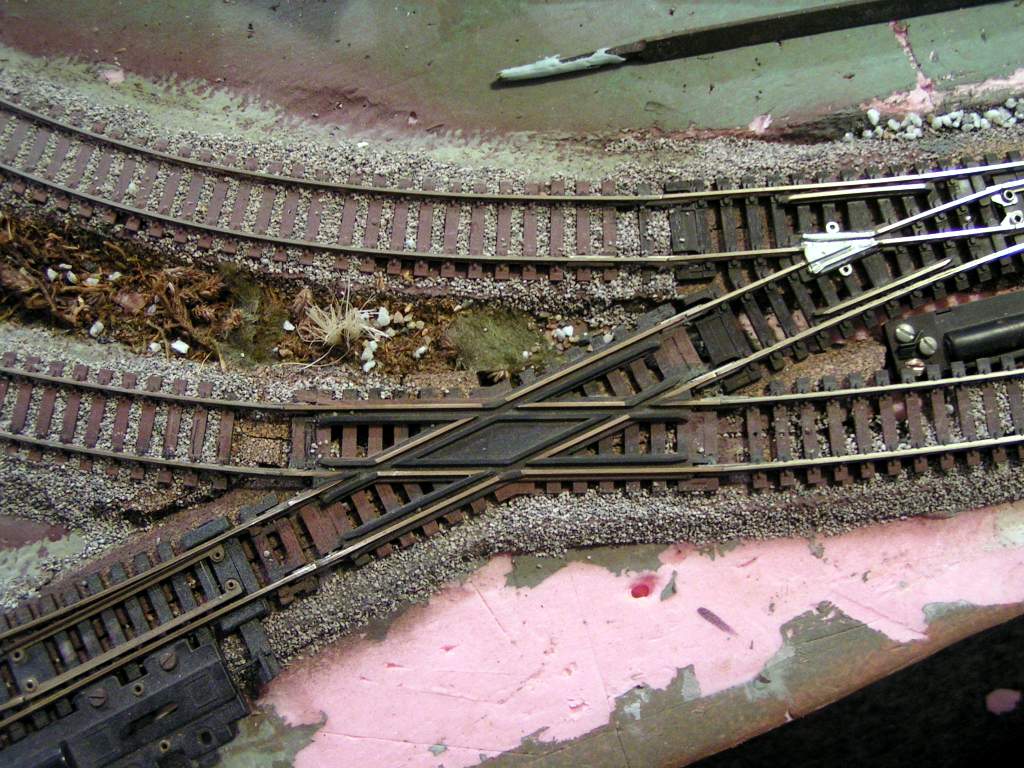 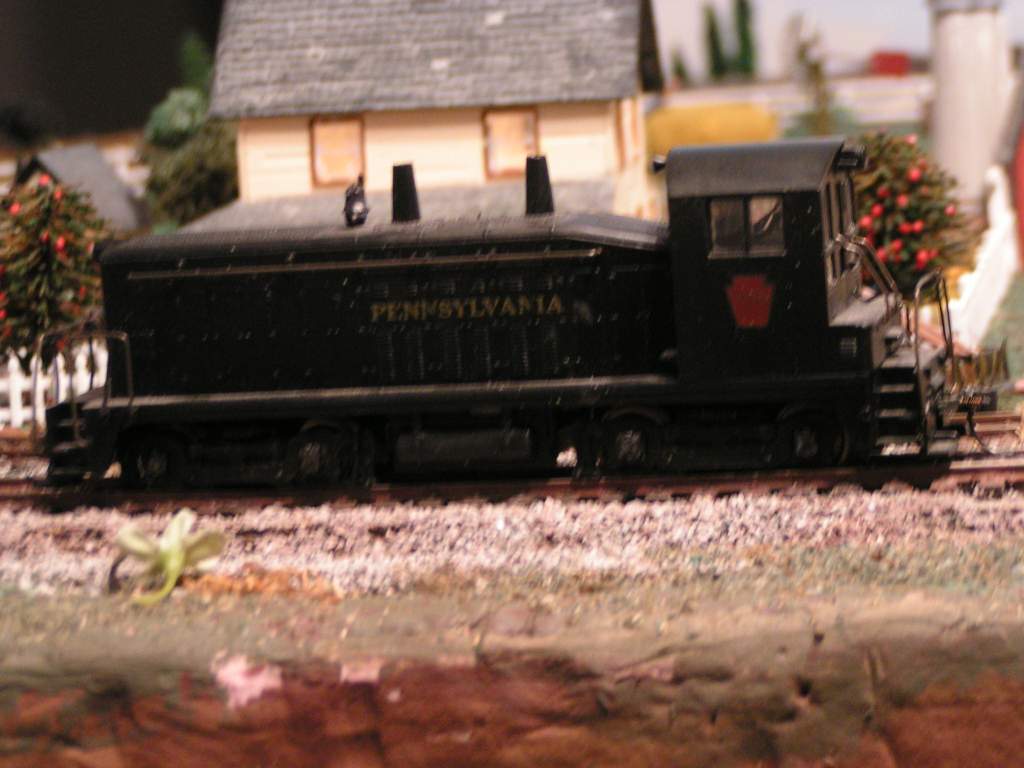 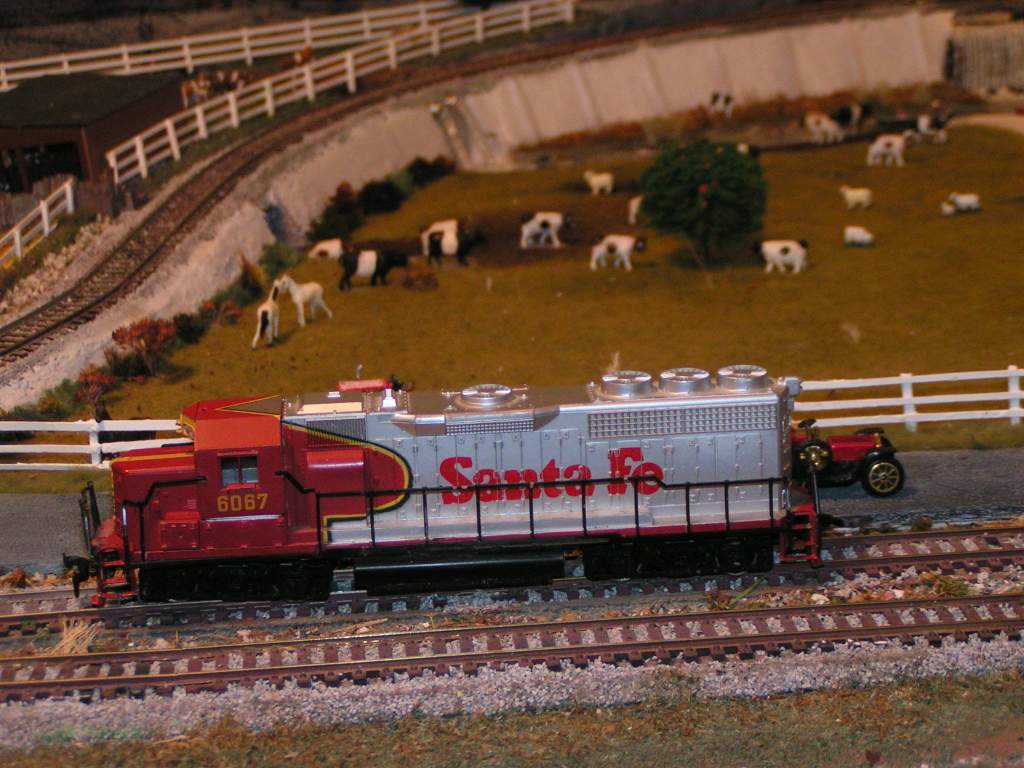 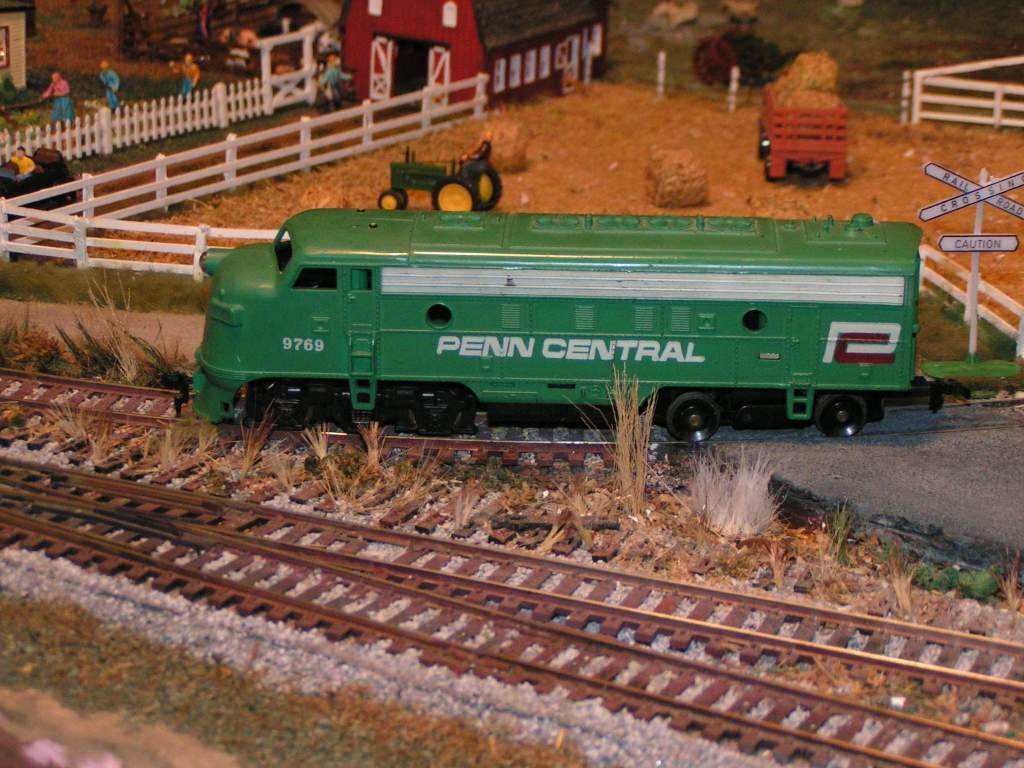 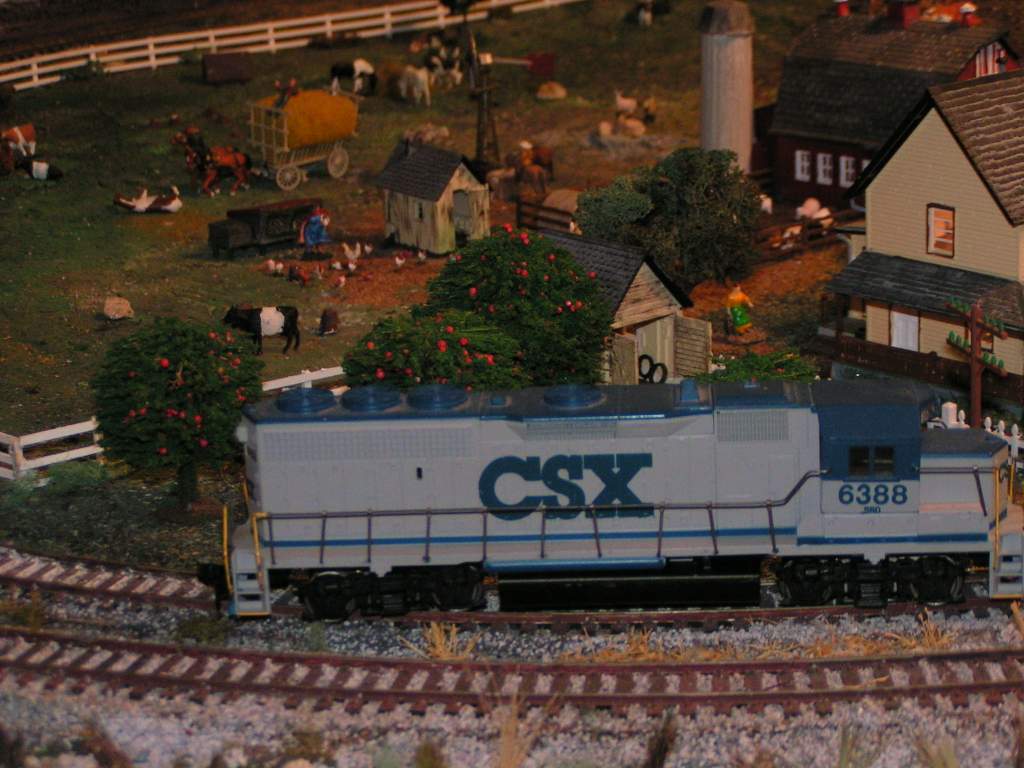
|
|
Country: USA ~
Posts: 424 ~
Member Since: June 25 2010 ~
Last Visit: July 30 2021
|
Alert Moderator
|
|
|
|
Posted - August 15 2012 : 1:51:56 PM
|
Looking at your pics, I don't see anything obvious. Recheck your rails with a NMRA gauge to make sure that the rails are not too narrow or wide.
There are a few things that I do to solve derailment issues. First is to replace all plastic wheelsets with metal wheelsets. In my experience Kadee wheelsets are consistently the best. The next thing is to add weight to all cars until they are at least 3.5 oz.
As far as locos go, they are a bit more tricky. But in general, if a loco doesn't have enough truck swing, open it up and find out what is hindering it. Often its a wire or a protrusion in the shell.
When all else fails, I will sometimes add guard rails in those spots that consistently derail.
Stay with it and eventually you'll have smooth operations.
-Thomas
|
|
Country: USA ~
Posts: 1091 ~
Member Since: July 07 2011 ~
Last Visit: June 26 2026
|
Alert Moderator
|
|
|
|
Posted - August 15 2012 : 8:59:17 PM
|
Could be an optical illusion but, on that last picture with the CSX loco. at the extreme left side of the photo it looks like the ballast is too high. Maybe it is bumping the wheel flange?
I'm not an experienced railroader but, I've had some derail problems. Sometimes I just run the problem vehicle over and over, slowly or the slowest speed I can that still causes the derail.
By carefully watching I usually can detect the problem.I have thought of setting up a video camera in some instances and just watch the replay.
Keep in mind that most of the locomotives have no suspension in the axles. So vertical uneven track could cause a problem. A .025" vertical rise in one rail and not the other is a scale 2 inches
in difference. Without sprung trucks a small variation is a big deal to this little trains. That may not be a problem on your layout but, as an illustration, I cured a derail problem at a turnout frog with a .020 shim. Think small.
Unspoken expectations are premeditated failures.
|
|
Country: USA ~
Posts: 825 ~
Member Since: December 22 2008 ~
Last Visit: March 16 2015
|
Alert Moderator
|
|
|
|
Posted - August 15 2012 : 10:41:42 PM
|
thanks
one of the problems could be un even and i will check with a straight edge
I too run it forwards and back as slow as possible to catch the problem area. Why just one engine out of 5 deralis at one spot in one direction only is a mystery.
The frog seems to be the problem spot. I've tried to deepen the groove
How do i make a guard rail
|
|
Country: USA ~
Posts: 424 ~
Member Since: June 25 2010 ~
Last Visit: July 30 2021
|
Alert Moderator
|
|
|
|
Posted - August 15 2012 : 10:49:54 PM

|
with your pictures. does the locomotives derail going from right to left as you shown the first picture of the Y turnout?
I would say take that Y turnout off the layout, and with a small flat file, take those damned point rails, and file a slight angle to the top corners just 1/32 of an inch 45 degree angle....... those point rails or slide rails, are always a problem with the square points on the slide rails.........The fillet and flange of the wheelsets catch that point and "picks" it and that throws the wheelset around as the train is in motion.
Try that and see what happens....
THEN wiuth a LARGE flat bastard file, lay it flat on the frog, and file the ever loving Hell out of it, till its smooth across the frog to ALL of the rails it leads into......
This should stop that issue, BUT your not done there.....Take a "v" pitted file (a not so flat file thats kind of shaped like a V if stood on edge, and stick the narrowest part of it into the flangeway of that frog and file Godly file till you almost hit plastic tie material, this will deepen the flangeway, as you filed material off the top of the frog so that lowers the depth of the flangeway, and you need to gain that back again.
Then one other thing I see in the picture is your switch motor, is buried under the tie of the passing track, SO, on the other end of that, right across from the switch motor, drill a few small holes into the ENDS of the ties and drive those ties across from the swtich into the roadbed, as the pressure, on the switch motor, is pulling down which will pull the ties up, on opposite side of the track...... This is causing your track to "twist" like an airplane propeller, which will cause derailments too. DO NOT drill these holes within one railroad tie of the points throw bar... it will not allow it to snap it one way or the other if you do......IF nothing else, put a 3x5 index card under the ties then drive your track nails and then remove the card......This will allow alittle play but not enough to cause hamper on the twisting effect OR to tight that your points can't be thrown!
HTH
~John
Many have tried to, and failed, ya just can't repair stupid...
Do NOT try to Idiot-Proof anything!!!! God, will simply create a better......IDIOT!
|
|
Country: USA ~
Posts: 2911 ~
Member Since: March 26 2012 ~
Last Visit: January 14 2014
|
Alert Moderator
|
|
|
|
Posted - August 15 2012 : 10:55:34 PM
|
on your Athearn CSX GP40-2 it looks like you might have something hampering the movement of the truck. remove the shell to look inside of it too and not just on the outside! Same goes with the Bachmann Santa Fe GP40.
ON the picture with the CSX loco, if you follow the rail that furtherest away from you, it looks to have some glue build up on the inside of the rail. take a pick a small flat screw driver, anything pointy and pick that out away from the railroad tie spikes...... this is causing your flanges to raise up and then go over the rail heads......causing a derailment.....
Under the Santa Fe, theres a rail joint, see if the ends of the rail are smooth on the INSIDE by running your finger wrapped in a piece of toilet paper and if it rips the toilet paper, your joint needs some attention.....file the inside edge a little or unsolder, put pressure on the rail that sticks out to push it in, and resolder and you'll be good to go!
HTH
~John
Many have tried to, and failed, ya just can't repair stupid...
Do NOT try to Idiot-Proof anything!!!! God, will simply create a better......IDIOT!
|
|
Country: USA ~
Posts: 2911 ~
Member Since: March 26 2012 ~
Last Visit: January 14 2014
|
Alert Moderator
|
|
|
|
Posted - August 16 2012 : 3:16:05 PM
|
""does the locomotives derail going from right to left as you shown the first picture of the Y turnout?""
yes , usually when it hits the frog
"""take those damned point rails, and file a slight angle to the top corner"""
that is a new switch. Had to replace because i started to mess with the point rail and ended up bending so it wouldn't fit into the cut out. Those rails are so finicky and delicate, just one wrong twist and it's junk I'll try again. Any suggestion on who makes a switch that works out of the box??
""THEN wiuth a LARGE flat bastard file, lay it flat on the frog, and file the ever loving Hell out of it, till its smooth across the frog to ALL of the rails it leads into....""".
did that this morning and did find the frog higher than everything else. After doing so i gauged with a frog gauge and it seems deep enough
"""stick the narrowest part of it into the flangeway of that frog and file Godly file till you almost hit plastic tie material,""""
if i hit plastic is there a danger of the frog separating?
""""Then one other thing I see in the picture is your switch motor, is buried under the tie of the passing track, SO, on the other end of that, right across from the switch motor, drill a few small holes into the ENDS of the ties and drive those ties across from the swtich into the roadbed, as the pressure, on the switch motor, is pulling down which will pull the ties up, on opposite side of the track."""
sorry but not clear on this step
what do you mean "on ther other end of that"? what is "That"?
what if i just clip/grind off the ties on top of the motor?
All in all an EXCELLENT analysis and solutions.
I must apologize as the pics of the Engines are not where the derails are happening. but will check for problem areas Just wanted to show the engines in case any one has had problems with one or another.
I did find one set of wheels that guaged narrow on both the C S X and Black Penn, since corrected
thanks again, back to the basement
Fred in MI
|
|
Country: USA ~
Posts: 424 ~
Member Since: June 25 2010 ~
Last Visit: July 30 2021
|
Alert Moderator
|
|
|
|
Posted - August 16 2012 : 4:13:00 PM
|
Fred, regarding the turnout, one other thing to check out is the spacing of the guard rails. The guard rail is supposed to push against the inside of the wheel while the opposite wheel is going through the frog. The idea is to guide the wheel smoothly through the frog keeping it away from the point. If the guard rail is not doing it's job, the flange of the wheel going through the frog may hit the point of the frog.
See section 2 Flangeways here:
http://www.nmra.org/standards/sandrp/rp2.html
I've seen this problem with Atlas code 100 turnouts. I actually have had better success with Tyco (Yay!) steel track turnouts, especially the Tyco wye.
However, you can still fix the problem by glueing a shim to the guard rail. Another approach that I've done in the past is to carefully add some solder to the guard rail (if it's metal) and then file the solder down until I get wheels going smoothly through the frog.
--Thomas
|
|
Country: USA ~
Posts: 1091 ~
Member Since: July 07 2011 ~
Last Visit: June 26 2026
|
Alert Moderator
|
|
|
|
Posted - August 16 2012 : 6:43:28 PM
|
quote:""does the locomotives derail going from right to left as you shown the first picture of the Y turnout?""
yes , usually when it hits the frog
"""take those damned point rails, and file a slight angle to the top corner"""
that is a new switch. Had to replace because i started to mess with the point rail and ended up bending so it wouldn't fit into the cut out. Those rails are so finicky and delicate, just one wrong twist and it's junk I'll try again. Any suggestion on who makes a switch that works out of the box??
""THEN wiuth a LARGE flat bastard file, lay it flat on the frog, and file the ever loving Hell out of it, till its smooth across the frog to ALL of the rails it leads into....""".
did that this morning and did find the frog higher than everything else. After doing so i gauged with a frog gauge and it seems deep enough
"""stick the narrowest part of it into the flangeway of that frog and file Godly file till you almost hit plastic tie material,""""
if i hit plastic is there a danger of the frog separating?
""""Then one other thing I see in the picture is your switch motor, is buried under the tie of the passing track, SO, on the other end of that, right across from the switch motor, drill a few small holes into the ENDS of the ties and drive those ties across from the swtich into the roadbed, as the pressure, on the switch motor, is pulling down which will pull the ties up, on opposite side of the track."""
sorry but not clear on this step
what do you mean "on ther other end of that"? what is "That"?
what if i just clip/grind off the ties on top of the motor?
All in all an EXCELLENT analysis and solutions.
I must apologize as the pics of the Engines are not where the derails are happening. but will check for problem areas Just wanted to show the engines in case any one has had problems with one or another.
I did find one set of wheels that guaged narrow on both the C S X and Black Penn, since corrected
thanks again, back to the basement
Fred in MI
Originally posted by derfberger - August 16 2012 : 3:16:05 PM
|
Fred,
See this picture:
See the red dots on the ends of the railroad ties across from the turnout motor? You would want to drill small holes here big enough to tap a track nail down into the layout to hold down the ties from the turnout motor being under the other railroad track.
You could clip off the ties on the other railroad tracks thats going over top the turnout motor, but that doesn't allow your track to look the part, and will be noticable even more when its ballasted there.
Then, the filing of the frog flangeways, see the red circles I went around on the picture? Those "ears" pretty much hold the frog in place. Thing is, if you file the flangeways, do it slowly, and keep track of the depth that your gaining. With that, you should have no issues, and file slow, but with moderate pressure.
Those "ears" are actually for adding a "powered" frog for short wheel based locomotives, which is run off of a Atlas "Snap Relay" Which, routs power when the points are thrown to give whatever rail is aligned to the frog to keep from causing a short in your track work.
What this wiring does, is when a short wheel based locomotive goes across a dead frog, they stall OR do the herky jerky, powering this frog will allow in most cases for the locomotive to creep right over it without stalling. Flywheels have helped this greatly over the years, but the sudden loss of power still to this day doesn't allow the locomotive to run smoothly over a section of track with a turnout in place.
HTH
~John
Many have tried to, and failed, ya just can't repair stupid...
Do NOT try to Idiot-Proof anything!!!! God, will simply create a better......IDIOT!
|
|
Country: USA ~
Posts: 2911 ~
Member Since: March 26 2012 ~
Last Visit: January 14 2014
|
Alert Moderator
|
|
|
|
Posted - August 17 2012 : 12:19:22 AM
|
what can i say but thank you
what an incredable amount of knowledge
I never realized a switch could be so complicated
not sure which suggestion did it but seems to run O K now. I didn't file on the points as i know i'd screw them up.
The ties that are sitting on top of the switch motor look like they touch but they don't. there is a very slight incline coming off the x over
thanks again
B T W my guage has 3 bumps on the side marked flangeways. The middle bump is a hair wider and i'm assuming used to measure the flange way width on the frog. If too wide not
sure what one can do since it's a cast part
is there a way to measure the correct guard rail width. How do you glue a shim to the guard rail
these rails don't move very much being the ties are injection molded around them
|
|
Country: USA ~
Posts: 424 ~
Member Since: June 25 2010 ~
Last Visit: July 30 2021
|
Alert Moderator
|
|
|
|
Posted - August 17 2012 : 01:33:59 AM
|
I wouldn't bother with the flangeways of the guard rails honestly, as if you try to "add" into the gap, to much will cause serious drag on your drivers, and freight car wheels. They really are only there for looks, UNLESS on a open sided bridge as that guard rail works just like the real thing! They were used on bridges to "catch" the opposite flange to letting whatever derailed fall off the bridge!
If anything you want as much space to clear different thickness of flanges through the flangeways of a turnout, on the frog and around the guard rails.
Again, HTH
~John
Many have tried to, and failed, ya just can't repair stupid...
Do NOT try to Idiot-Proof anything!!!! God, will simply create a better......IDIOT!
|
|
Country: USA ~
Posts: 2911 ~
Member Since: March 26 2012 ~
Last Visit: January 14 2014
|
Alert Moderator
|
|
|
|
Posted - August 17 2012 : 7:48:36 PM
|
Hey Fred. I'm slightly off topic here, but I wanted to say your scenery looks great! 
|
Country:  Canada ~
Posts: 3448 ~
Member Since: September 22 2006 ~
Last Visit: April 03 2026 Canada ~
Posts: 3448 ~
Member Since: September 22 2006 ~
Last Visit: April 03 2026
|
Alert Moderator
|
|
|
|
Posted - August 18 2012 : 12:07:07 PM
|
One thing my club required when the layout was built was to use nothing less than #6 turnouts. If you are using #4, then you are inviting problems with any but the sloppiest of locomotives. #6's have a smoother, wider radius than the tight #4's, so if you have a 3-axle truck, it will bind up going into that tight curve at the switch point. Running small switcher diesels and 2-axle trucks work fine with #4 turnouts, but when you start running bigger engines, you get into the situation of binding up the front and rear axles. Looking at several of those switches, they "look" like #4's, so that might be part of your problem with larger diesels and long steam engines. Also the throw rail looks straight, not curved, which on cheaper switches will cause binding on longer trucks. I bet if you throw the switch to the curved part, and gauge that section, it will be narrower in the center than the ends. Just a thought to check on.
Jerry
" When life throws you bananas...it's easy to slip up"
Edited by - AMC_Gremlin_GT on August 18 2012 12:17:20 PM
|
|
Country: USA ~
Posts: 3974 ~
Member Since: January 04 2009 ~
Last Visit: January 11 2019
|
Alert Moderator
|
|
|
|
Posted - August 18 2012 : 1:28:45 PM
|
Fred,
I forgot to mention on a question you had asked, "is there a better turnout made that works?"
Answer is yes! its a Peco turnout, these are GREAT I have a double slip switch on my layout and it works AWESOME, As I had tried using an older Roco version and even a AHM/IHC version, not one of these worked flawlessly as the Peco does. HOWVER, I'll warn you, Peco turnouts.......you'll pay for them but worth EVERY CENT!
Case in point? That "Y" turnout you got, I'd rip that out and buy a Peco to replace it, BUT when you go to buy the Peco, get the larger one as the smaller one is a REAL tight radius as mentioned by Jerry. BUT even tho the small Peco is tight, I BET money its better flowing and smoother travels for your locomotives and even the cars!
HTH
~John
Many have tried to, and failed, ya just can't repair stupid...
Do NOT try to Idiot-Proof anything!!!! God, will simply create a better......IDIOT!
|
|
Country: USA ~
Posts: 2911 ~
Member Since: March 26 2012 ~
Last Visit: January 14 2014
|
Alert Moderator
|
|
|
|
Posted - August 20 2012 : 10:19:07 PM
|
every time i ask a question and get a good answer it still brings up a dozen more
How can i tell a #4 from a #6 and if i convert will i have enough room
I called the local hobby shop and asked if they have Peco "no but can order' they have Shinohara, are they any good.
Checked my throw rails and all are straight but one (See Pic.) ""I bet if you throw the switch to the curved part, and gauge that section, it will be narrower in the center than the ends. Just a thought to check on. " I'll bet your right makes sense when one throw is straight and the opposite track is curved
Trucks are a mix of snap in and screw--should i convert to all screw. or just convert to those that derail
I also read get rid of plastic and convert to steel wheels.
How do you move wheel on steel axil if found to be out of guage?
Adding weight to cars is controversial--some say "yes" others "no" The "nos" argue that rail road companies don't add weight to cars, they fix the wheel
so far things are running o k over the Y switch
"""Hey Fred. I'm slightly off topic here, but I wanted to say your scenery looks great"""
thanks for the compliment "Cheeze" many hours and searching for the right stuff. I'll post some better ones
problem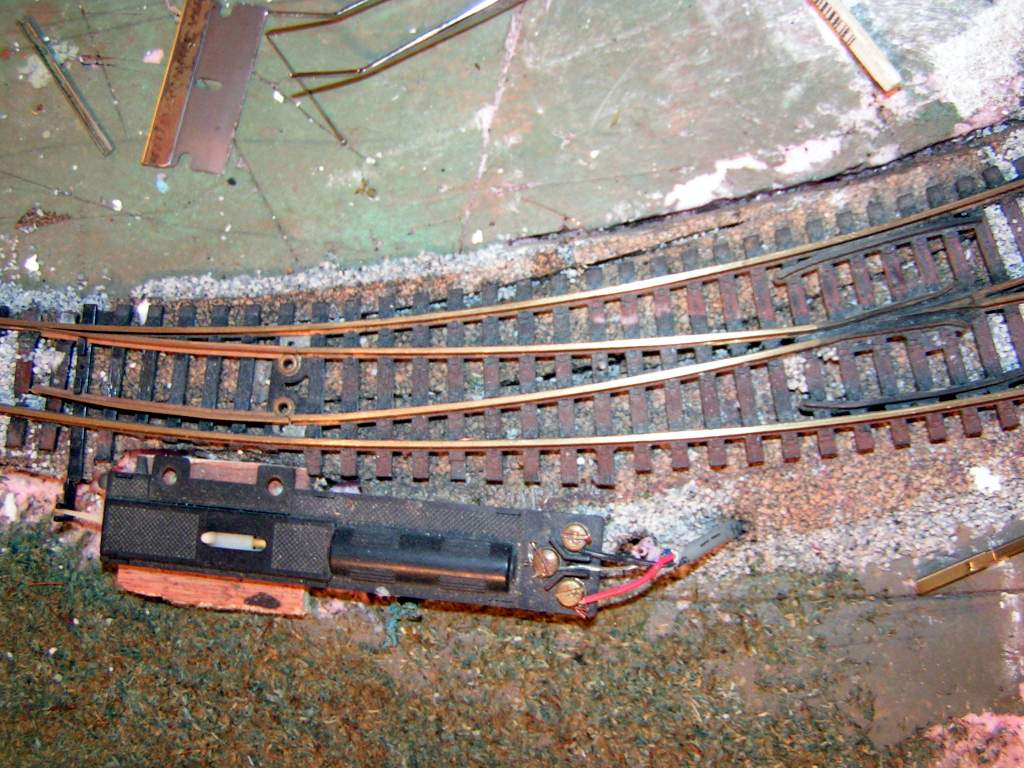
|
|
Country: USA ~
Posts: 424 ~
Member Since: June 25 2010 ~
Last Visit: July 30 2021
|
Alert Moderator
|
|
|
|
Posted - August 21 2012 : 11:11:48 AM
|
| didn't show up as active
|
|
Country: USA ~
Posts: 424 ~
Member Since: June 25 2010 ~
Last Visit: July 30 2021
|
Alert Moderator
|
|