|
|
 Posted - July 17 2010 : 6:14:10 PM Posted - July 17 2010 : 6:14:10 PM


|
Hey all,
I was looking into purchasing bridge supports but saw a suggestion online to make them out of pink insulation foam. This was my first try at making anything like this and I'm pretty happy with the result. I may do all of my retaining walls and tunnel entrances using this same technique. I figured out an easy way to get nicely rounded edges on all of the stone blocks. If people are interested I can throw together a video one of these days and put it up on youtube. The camera flash lights them up a bit too much. I think they look a tad better in real life.
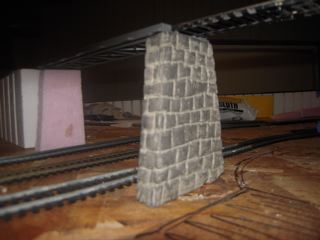 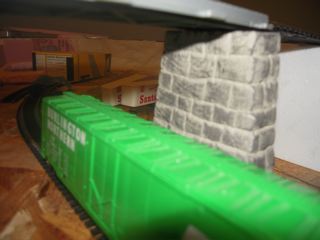  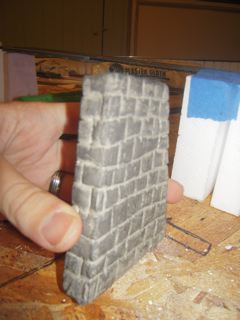
I painted the foam a natural stone color and then dry brushed with black. I don't think this is completely done. I want to add a little more detail with paint. Anyhow, thought I'd share and as always I welcome your feedback.
~CamdenLine
|
Country:  USA ~
Posts: 178 ~
Member Since: July 02 2010 ~
Last Visit: August 22 2023 USA ~
Posts: 178 ~
Member Since: July 02 2010 ~
Last Visit: August 22 2023
|
 Alert Moderator
|
|
|
steve
Big Six


Status:
offline
| |
Posted - July 17 2010 : 6:20:37 PM

|
| I think they look nice!!
|
|
Country: USA ~
Posts: 227 ~
Member Since: January 26 2010 ~
Last Visit: May 18 2016
|
Alert Moderator

|
|
|
|
Posted - July 17 2010 : 8:33:08 PM


|
quote:Hey all,
This was my first try at making anything like this and I'm pretty happy with the result.
I painted the foam a natural stone color and then dry brushed with black..... Anyhow, thought I'd share and as always I welcome your feedback.
~CamdenLine
Originally posted by CamdenLine - July 17 2010 : 6:14:10 PM
|
Turned out nice! If you hadn't said you made them out of foam, I would never have guessed. They look great.
Jerry
" When life throws you bananas...it's easy to slip up"
|
|
Country: USA ~
Posts: 3974 ~
Member Since: January 04 2009 ~
Last Visit: January 11 2019
|
Alert Moderator
|
|
|
|
Posted - July 17 2010 : 9:49:10 PM
|
| Those look great! I'd love to know how you made them. I'm working on some scenery that needs something just like that.
|
Country:  Canada ~
Posts: 3448 ~
Member Since: September 22 2006 ~
Last Visit: April 03 2026 Canada ~
Posts: 3448 ~
Member Since: September 22 2006 ~
Last Visit: April 03 2026
|
Alert Moderator
|
|
|
|
Posted - July 17 2010 : 10:26:27 PM
|
that pink foam is super stuff, so many possibilities for uses
I also would like some details on how you did, no video necessary.. Like using a Dremmel or hot needle solder iron, etc would get me going
|
|
Country: USA ~
Posts: 424 ~
Member Since: June 25 2010 ~
Last Visit: July 30 2021
|
Alert Moderator
|
|
|
|
Posted - July 17 2010 : 10:29:02 PM
|
| Nice - They look real -
|
|
Country: USA ~
Posts: 2507 ~
Member Since: January 31 2006 ~
Last Visit: October 21 2017
|
Alert Moderator
|
|
|
|
Posted - July 18 2010 : 01:34:09 AM
|
looks good to me, how'de you do it?
jerry
|
|
Country: USA ~
Posts: 553 ~
Member Since: January 14 2009 ~
Last Visit: September 13 2024
|
Alert Moderator
|
|
|
|
Posted - July 18 2010 : 12:39:10 PM
|
Thanks for all the nice comments. I wrote up a whole description and then the computer deleted it. Good fun.
Anyhow, here we go again. I'll do my best to describe the process.
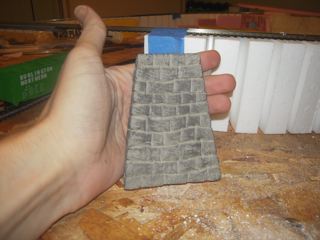
First of, cut your foam to the correct shape. This technique works for bridge supports, retaining walls, etc.
Once you have the general shape, take a knife and cut horizontal lines across it to mark the row of the blocks. You do not need to cut very deep. Think about scale and figure out ahead of time what size blocks you want.
In my case since it was a bridge support and is visible on both sides the horizontal lines have to be done on all sides and edges.
Once the horizontal lines are cut do the same with the verticals. These should be staggered like brickwork. You can do square blocks or rectangles or whatever strikes your fancy.
At this point all you have is a foam piece with a bunch of lines on it. An article I read recommended running a nail along the lines to make the indentation but I used the edge of a two and a half inch flat topped screw. The top of the screw has a nice sloping edge where it meets the shaft of the screw. This can be rolled along the cut line to create a rounded edge to the blocks. Once you have rolled the head of the screw along all of the horizontal lines in one direction you can turn it over and do the lines in the other direction to round off the other side of the blocks.
Repeat with the vertical lines.
This is kind of a poky process. I like the result but will try it with just the end of a framing nail as well to compare. I think it would be faster to do both the top of one block and the bottom of the one above it at the same time.
There is a bonus to using the screw as the threads scratch the foam as you roll it along and the occasional scratched and nicks make the rock look good. I think they look like quarry marks.
I painted the entire thing with mudstone colored arcylic paint from Delta Ceramcoat. It was then dry brushed with black. I used a very large brush for the dry brushing.
Any questions? Like I said, maybe I'll do a quick video this week. It might be easier to see. The whole thing was really easy to do.
~CamdenLine
|
|
Country: USA ~
Posts: 178 ~
Member Since: July 02 2010 ~
Last Visit: August 22 2023
|
Alert Moderator
|
|
|
|
Posted - July 18 2010 : 10:32:51 PM
|
a video would help me for sure.
just one question, what is dry brushing?
jerry
|
|
Country: USA ~
Posts: 553 ~
Member Since: January 14 2009 ~
Last Visit: September 13 2024
|
Alert Moderator
|
|
|
|
Posted - July 19 2010 : 4:16:35 PM
|
Thanks for the explanation! I'll definitely be able to use this technique.
|
|
Country: Canada ~
Posts: 3448 ~
Member Since: September 22 2006 ~
Last Visit: April 03 2026
|
Alert Moderator
|
|
|
|
Posted - July 19 2010 : 4:22:05 PM
|
hi camdenline nice work looks terrific
hi smokie dry brushing explained ken
http://www.youtube.com/watch?v=lcIYkCz-Dco
http://www.youtube.com/watch?v=vlQR5lna51M&feature=related
Edited by - catfordken on July 19 2010 4:43:41 PM
|
Country:  United Kingdom ~
Posts: 8294 ~
Member Since: September 28 2006 ~
Last Visit: October 20 2021 United Kingdom ~
Posts: 8294 ~
Member Since: September 28 2006 ~
Last Visit: October 20 2021
|
Alert Moderator
|
|
|
|
Posted - July 26 2010 : 1:10:17 PM
|
Yes, they look good.
Alco Fan
|
|
Country: USA ~
Posts: 2496 ~
Member Since: August 03 2006 ~
Last Visit: September 17 2024
|
Alert Moderator
|
|