|
|
 Posted - April 15 2010 : 10:04:51 AM Posted - April 15 2010 : 10:04:51 AM


|
OK, thanks to those of you who have given advice and offered parts so far. I'm getting started now.
To recap, I have decided to keep my Tyco Santa Fe GP20 from childhood intact for sentimental reasons. I'm rolling out what is something of a 3-step (possibly 4-step) plan to learn how to detail locomotives:
1) Repaint the "junk" GP20 I bought for the handrails and DB blister. Probably nothing more than a paint job.
2) Acquire another "junk" GP20 and detail, paint, and decal it.
3) Acquire either a new ModelPower GP20 or a better quality GP (maybe a GP40) and fully detail it.
4) Move to N scale.
How well I do at each stage will determine how aggressive I get on the next stage (how nice a loco, how detailed the work).
The HO units will all be display models, except - depending on how well it goes - the Step 3 loco might see limited run time on the local club layout. As I've mentioned, my running layout is N scale due to space considerations and scenery-to-loco scale interest. My interest in HO (and possibly larger) is in learning how to make detailed display models.
Anyway, I've gotten started with Step 1. I'll try to attach a picture or two, but just in case, you can see the progress on my Flickr account: http://www.flickr.com/photos/bgtwindad/sets/72157623733817899/
I bought this Geep from an LHS for $7 from their parts drawer. It had at least two thick layers of paint on it. I tried prying off the DB blister to use on a different loco, but that didn't go well (blister destroyed, shell slightly damaged). Fortunately, Hypoponera has provided me with a new DB blister to use on this project.
First thing was removing the railings and stripping the paint. I didn't have any Pine-Sol handy, but I had a big jug of Lysol cleaner, so I tried that instead. It worked, but very slowly. After a full day, the top layer of decals was gone and a little bit of paint. Scrubbing wasn't helping. Not sure whether this was due to the Lysol not being very good or the paint being very thick. I think the Lysol would have worked OK on a factory paint job, but not on this guy!
Second try was DOT-3 brake fluid. I made up a little "bucket" of aluminum foil, since the brake fluid is quite a bit more expensive than the Lysol. This worked very well. In about 2 hours I had the car stripped to the bare plastic.
Now, my first question: There are a few tough spots - tight corners, vent details and the like - that still remain. What's the best way to tackle those? Good stiff brush? Knife edge? Some stronger chemical used sparingly?
Second question: How do I get the sideframes off the trucks? It's clear I need to unscrew the bottom of the truck from "the rest of it", but can I then remove the sides from the bottom for stripping/painting, or should I treat them as a unit?
OK, pictures:
Before:
/tyco/forum/uploaded/TwinDad/4522717282_3d2146b958.jpg
After:
/tyco/forum/uploaded/TwinDad/4522086393_28e805e783.jpg
Edited by - TwinDad on April 15 2010 10:18:06 AM
|
Country:  USA ~
Posts: 21 ~
Member Since: March 21 2010 ~
Last Visit: June 30 2010 USA ~
Posts: 21 ~
Member Since: March 21 2010 ~
Last Visit: June 30 2010
|
 Alert Moderator
|
|
|
|
Posted - April 15 2010 : 10:27:20 AM

|
when stripping plastic,anything metal will leave marks,patience and stiff brush is best,others may disagree but thats how i do it,not quick,but i get there in end,as anyone knows its the prep that makes a great model,i use a dilution of washing liquid before painting,ken
Edited by - catfordken on September 22 2010 2:26:00 PM
|
Country:  United Kingdom ~
Posts: 8294 ~
Member Since: September 28 2006 ~
Last Visit: October 20 2021 United Kingdom ~
Posts: 8294 ~
Member Since: September 28 2006 ~
Last Visit: October 20 2021
|
Alert Moderator

|
|
|
|
Posted - April 15 2010 : 5:12:34 PM
|
I don't have any great advice. The more you work on this the more you learn. Nice Idea about making a trough out of the foil and putting the stripper in, I'd never seen that. I used Pinesol once with good results stripping the chrome off a Silver Streak shell. Sorry Brian :( I have painted over the left over paint with good results.
I just painted flat black over a VGN Alco shell after scrubbing it to remove grease and help new paint stick and it covered nicely without stripping.
Hang in there and have fun.
BTW forget the N scale thoughts :)
Alco Fan
|
|
Country: USA ~
Posts: 2496 ~
Member Since: August 03 2006 ~
Last Visit: September 17 2024
|
Alert Moderator
|
|
|
|
Posted - April 15 2010 : 7:26:10 PM
|
Thanks! the foil trough would have worked better if I had taken the time to make it more water-tight. Good thing I had the whole thing sitting in a foil baking pan!
I'm going to let it soak a bit more and hit it again with a stiff brush. I want to get it as clean as I can before priming.
FTR I took it out of the soak and rinsed it off overnight and while a work. I didn't want to take a chance on the brake fluid eating the plastic if left for an extended time. No idea if it actually *would* but why take chances?
|
|
Country: USA ~
Posts: 21 ~
Member Since: March 21 2010 ~
Last Visit: June 30 2010
|
Alert Moderator
|
|
|
|
Posted - April 16 2010 : 7:03:33 PM
|
Yes, be careful with any chemical used to strip paint. The plastic used for shells varied over the years and some types are prone to being eaten. Well, melted anyway. There are several model paint strippers available from hobby shops that you can try as well. I've had good results with most of them, but the warning regarding "plastic compatibility" still applies. A "plastic safe" stripper isn't always safe with all types of plastic. I've used ELO with great results on Athearn shells and out of the blue I had a single SDP-40 shell just crumble while rinsing the stripper off. Never happened before or since.
I have found a good scrubbing with an old tooth brush to be the best choice. If needed, a toothpick or similiar can be used in those tight spaces. Be careful as the plastic surface may be "softened" by the paint stripper and you can dig into it with the toothpick.
|
|
Country: USA ~
Posts: 715 ~
Member Since: May 03 2006 ~
Last Visit: September 19 2025
|
Alert Moderator
|
|
|
|
Posted - April 19 2010 : 10:15:34 AM
|
So I'm having pretty good luck getting the paint off. The DOT-3 brake fluid cleared most of it off quite nicely, and I've carefully followed up with some non-acetone nail polish remover (small doses frequently rinsed off with water - no "baths"). I've been using a stiff-bristled toothbrush - hard to come by, darned dentists! - and some of those little dental between-teeth-brushes meant for kids with braces. I think I'm down to just a few nooks & crannies, and places where grey putty was used in the original reworking.
Interesting thing is, I've gone through AT LEAST two different layers of UP paint, complete with stickers. And now that it's bare plastic, I can see the last remnants of what was once a Durango paint scheme. That's right, somebody stripped off the Durango, painted it UP, complete with stickers, and then RE-painted it UP without stripping the old scheme off. Could have been more than one someone.
Anyway, now that I've got it stripped, I think I will do some very basic customizing, like closing up the pilots, body mounting couplers, and adding the DB hood. Then it will be time to learn how to paint. The original plan was for this one to get only the DB and paint, but I don't think I can resist at least trying to fix the pilots...
Let's see if I can add a picture or two...

|
|
Country: USA ~
Posts: 21 ~
Member Since: March 21 2010 ~
Last Visit: June 30 2010
|
Alert Moderator
|
|
|
|
Posted - April 19 2010 : 11:56:50 AM
|
| Nice progress...one thing I use in clean paint out in tight places is toothpicks---hard enough to move it without damaging the plastic shell.
|
|
|
|
|
Posted - April 19 2010 : 12:41:54 PM
|
To get a stiffer brush, trim down the height of the bristles to about half their original height.
Couldn't resist fillin' in the pilots, eh. Sounds like your on a roll with this one.
For dipping or dunking in paint remover; I have a re-sealable tupperware container. It's a cylinder about 15 inches tall, 2 1/2 inches diameter. Also, have a homemade PVC pipe container, with a screw on top.
|
|
Country: USA ~
Posts: 825 ~
Member Since: December 22 2008 ~
Last Visit: March 16 2015
|
Alert Moderator
|
|
|
|
Posted - April 24 2010 : 9:31:47 PM
|
OK, stripping is progressing slowly but surely (finding little time to work on it this week, but still moving).
I'm also making progress on the paint & decal design. Will be posting a final candidate shortly.
Question: Can somebody confirm these measurements?
I picked up a set of Kadee #5 couplers and some .060 sheet styrene to fix the pilots and body-mount the couplers.
The Kadee directions say the top of the draft gear should be 29/64" (11.5mm) from the railhead. I measured the bottom of the pilot to be 8mm (20/64") from the railhead. So that would make the distance from the top of draft gear box to bottom of pilot only 9/64", right?
|
|
Country: USA ~
Posts: 21 ~
Member Since: March 21 2010 ~
Last Visit: June 30 2010
|
Alert Moderator
|
|
|
|
Posted - May 20 2010 : 11:38:46 AM
|
Just checking in with an update.
I've got the shell pretty much stripped. Still haven't found time to finish cleaning up the railings.
I got the paint just yesterday, and also a new airbrush. I need to spend some time learning how to use the brush, and then I'll be ready to start priming and painting.
Still need to clean up the decals (haven't found time to adjust the size).
Slow motion, but some motion.
|
|
Country: USA ~
Posts: 21 ~
Member Since: March 21 2010 ~
Last Visit: June 30 2010
|
Alert Moderator
|
|
|
|
Posted - June 01 2010 : 9:43:00 PM
|
More pics... if I can get them on here. I've been practicing with my new airbrush, getting ready to paint. But first, some body work.
First, I test fit the DB blister that Hypoponera cast for me (thanks!):
/tyco/forum/uploaded/TwinDad/4661407583_3ec876aee8.jpg
http://www.flickr.com/photos/bgtwindad/4661407583/
I also cut off what was left of the (broken) horn from the hood and sanded it smooth.
Then I cut some .060 styrene to close up the pilots:
/tyco/forum/uploaded/TwinDad/4662028754_343a91b137.jpg
http://www.flickr.com/photos/bgtwindad/4662028754/in/set-72157623733817899/
/tyco/forum/uploaded/TwinDad/4661407631_a14facb84a.jpg
http://www.flickr.com/photos/bgtwindad/4661407631/in/set-72157623733817899/
Finally, I started on the front coupler. I cut a slot, but it's too high. I still need to expand the slot to get the position right, and build up a screw boss behind the pilot to mount the coupler. The coupler is a Kadee #5.
/tyco/forum/uploaded/TwinDad/4662028860_c378b4ca99.jpg
http://www.flickr.com/photos/bgtwindad/4662028860/in/set-72157623733817899/
/tyco/forum/uploaded/TwinDad/4661407719_d2a165181e.jpg
http://www.flickr.com/photos/bgtwindad/4661407719/in/set-72157623733817899/
Nothing's glued into place yet. I need to fill in some cuts in the body around the DB blister (from the previous owner) and get the coupler mounting right before going to glue. Hopefully by that time, I'll have learned to use my airbrush!!
I'll take whatever advice you'd like to give!!
|
|
Country: USA ~
Posts: 21 ~
Member Since: March 21 2010 ~
Last Visit: June 30 2010
|
Alert Moderator
|
|
|
|
Posted - June 01 2010 : 10:38:14 PM
|
What type of paint are you planning on using?
|
|
Country: USA ~
Posts: 825 ~
Member Since: December 22 2008 ~
Last Visit: March 16 2015
|
Alert Moderator
|
|
|
|
Posted - June 03 2010 : 1:05:30 PM
|
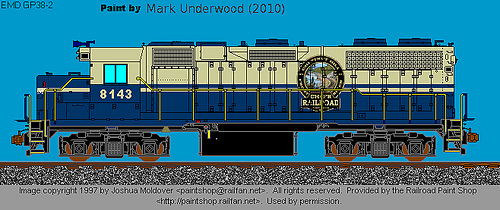
I'm going to airbrush it with Polly Scale acrylics. Specifically CSX Tan and ATSF Blue, with the frame and trucks in some TBD shade of black. All of that over a coat of primer. Debating Krylon rattle can or something airbrushed. I've heard good things about the Krylon and I already have a can but I'm a little concerned about laying it down too thick.
Gotta learn how to use my airbrush first, though.
|
|
Country: USA ~
Posts: 21 ~
Member Since: March 21 2010 ~
Last Visit: June 30 2010
|
Alert Moderator
|
|
|
|
Posted - September 08 2010 : 09:59:57 AM
|
Hey Mark:
Any progress on this puppy? Love the paint scheme!
I hate to be vicarious but C'mon lets go with an update!!!???
Best,
Gareth
"A is A"
-Aristotle
Law of Identification
Edited by - romcat on September 22 2010 2:36:54 PM
|
Country:  Canada ~
Posts: 4200 ~
Member Since: January 08 2006 ~
Last Visit: November 09 2021 Canada ~
Posts: 4200 ~
Member Since: January 08 2006 ~
Last Visit: November 09 2021
|
Alert Moderator
|
|