|
|
 Posted - October 18 2020 : 2:07:32 PM Posted - October 18 2020 : 2:07:32 PM


|
Many of us use the Atlas Snap Track type switches and their clones. They've been an industry standard in the trainset world, and are common in the model railroad world as the trainset grows into a layout. They have the misfortune to be the site of many of our derailments and there are ways to tune them for fewer derailments.
Before leaping into that subject, let's get our terminology on the same page. First of all, you'll notice that the package calls them turnouts. Technically, the whole shebang is called a turnout, and the moving parts are the switch. No need to be doctrinaire about it. It's common to call a turnout a switch, but it doesn't hurt to know the real terms, in case someone uses them.
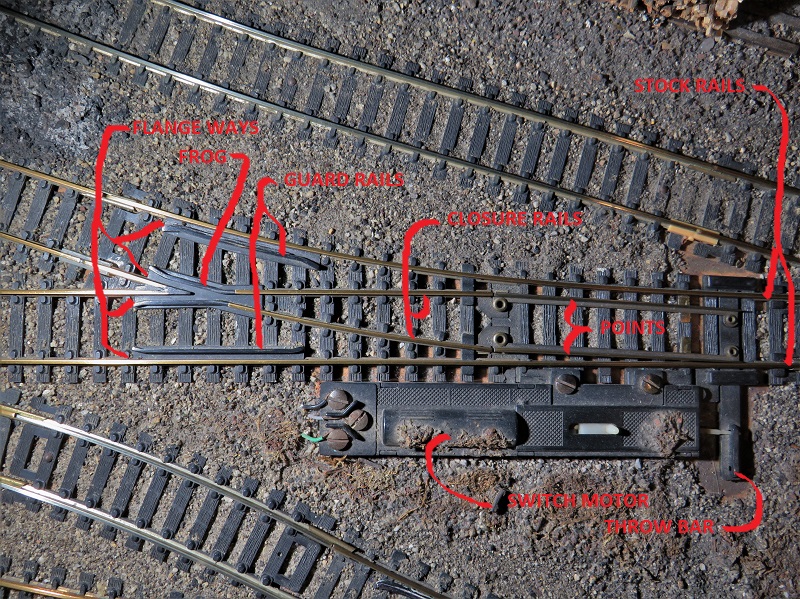
The various parts are labeled in this picture:
Around the frog, a couple things can plague you. The first is picking the frog. The switch can be thrown to the right, for example, but a wheel flange can wander off down the left flange way or just climb up over the center. Across from the frog on either side there are guard rails. These are supposed to grab the inside edge of the opposite wheel's flange and pull it over so the wheel in the frog can't pick it. Unfortunately, the flange ways between the stock rail and the guard rail are made quite wide to accommodate the larges flanges and stiffest wheel bases. This keeps the guard rail from serving its purpose. You can narrow that flange way by gluing a strip of plastic to the side of the guard rail as seen on the circled guard rail:
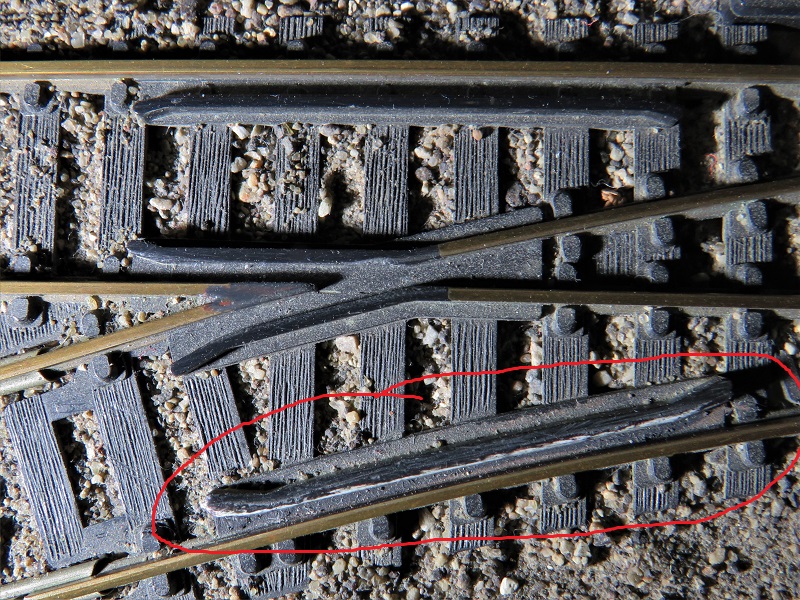
If you narrow the flange way too much, big old pizza cutter flanges, especially ones on long wheel bases like the Mantua Mikado has, can get stuck. Fortunately, it doesn't take much narrowing to fix the frog picking. Once in place, the plastic strip can be filed thinner with a nail file, if you find it's too thick.
While you're looking at this picture note the paint on the rail heads just left of the frog. Those rails are the opposite electrical polarity, and there's been a problem with wheels shorting across them. The paint stops that.
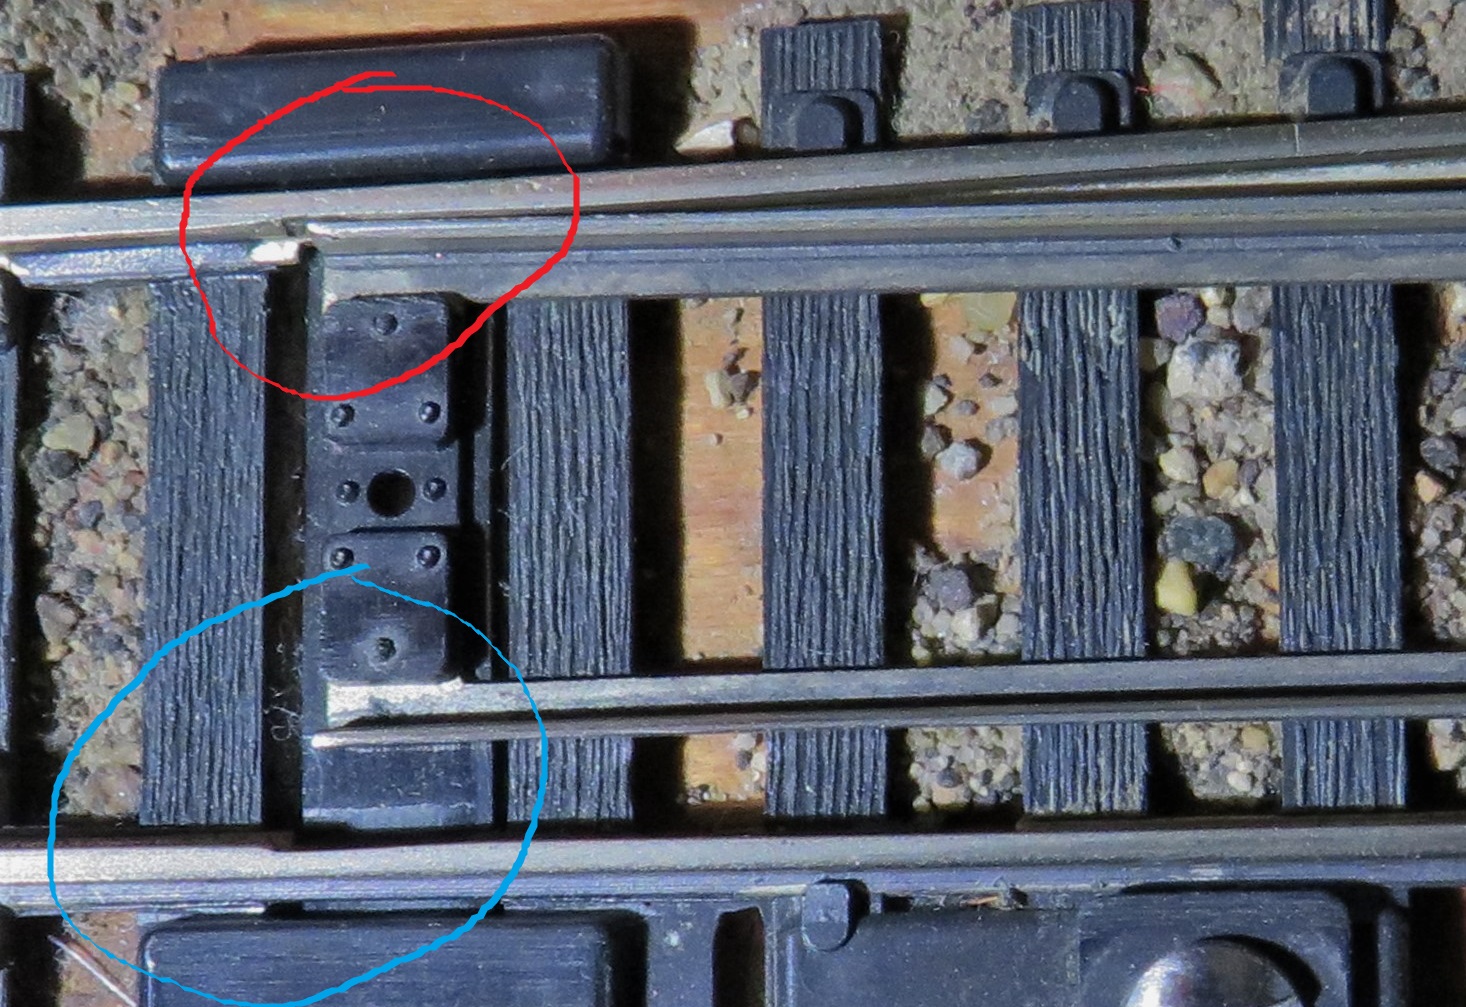
Down by the points there is trouble brewing, as well. Sometime a flange will pry its way between the point onto which it should roll and the stock rail (picking the point). Out of the box, these point ends are kind of blunt. They can be filed sharp to prevent that. See what's circled in green:
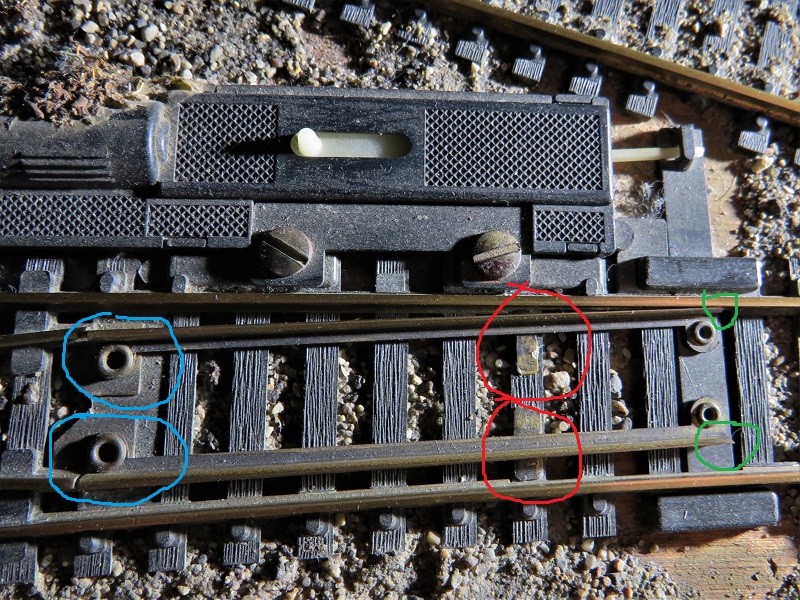
In the red circles are some brass shims, glued to the tie. The points can be lower than the stock rails so that the outside edge of a wheel will catch the inside edge of the stock rail and be pushed to the side rather than rolling onto the stock rail from the point. The shims raise the point to match the stock rail.
The blue circles indicate the rivets on which the points pivot. They are the electrical path to the points and can corrode a bit leaving a dead point with plenty of opportunity for your locomotives to stall. When I install a turnout, I'll let some automatic transmission fluid seep in between the moving parts to prevent corrosion.
Some newer Atlas turnouts have a notch in the stock rail to prevent wheels from picking points:
I'll still sharpen the points, even on these switches. Also, the notch has a pretty abrupt end as originally made, so I file that down a bit more streamlined to keep flanges from climbing it. This is especially visible in the red circle. So how does one file down in that little hole? There are curved jeweler's files, called riffler files, that are very handy for this kind of work.
A layout design consideration:
Turnouts tuned as described above are pretty trouble free, when laid on a flat, level area. Most any turnout on a grade transition can be a source of headaches. I have four, and have got things to where I can live with them, but if you have a choice at design time, start and end hills a little way away from your switches.
Carpe Manana!
|
Country:  USA ~
Posts: 2417 ~
Member Since: September 17 2013 ~
Last Visit: June 29 2026 USA ~
Posts: 2417 ~
Member Since: September 17 2013 ~
Last Visit: June 29 2026
|
 Alert Moderator
|
|
|
|
Posted - October 18 2020 : 2:42:48 PM
|
Great explanation and tips, scsshaggy!
"Let your light so shine before men, that they may see your good works, and glorify your Father which is in Heaven." - Matthew 5:16
Youtube Channel: www.youtube.com/rpmodelrailroads
Instagram: https://www.instagram.com/rp_model_railroads/
|
|
Country: USA ~
Posts: 4669 ~
Member Since: August 11 2017 ~
Last Visit: July 20 2023
|
Alert Moderator

|
|
|
|
Posted - October 18 2020 : 4:17:21 PM
|
Nice tips, thanks for sharing
I have to search the forums for data about other derailing issues, but this shows the ones for turnouts quite well
|
|
Country: USA ~
Posts: 170 ~
Member Since: October 09 2020 ~
Last Visit: June 28 2026
|
Alert Moderator
|
|
|
|
Posted - October 26 2020 : 10:32:06 PM
|
| Very helpful tips - thank you!
|
|
Country: USA ~
Posts: 37 ~
Member Since: January 02 2016 ~
Last Visit: June 03 2025
|
Alert Moderator
|
|
|
|
|
|