|
|
 Posted - December 10 2013 : 2:06:41 PM Posted - December 10 2013 : 2:06:41 PM


|
This little gang has their work cut out for them on this mess of a layout . . .
Having some Scot in my blood, I opted for the corrugated cardboard for economy and also because it was the easiest way I could think of to come up with a roadbed that was lower and more like the crude western steam era roads; I let the track run without roadbed in the yards, except for the engine house area (which is under construction like everything else). I got this engine house and the two shops you see in the photo as already built "restore" items. Little did I know (though I should have) that my economy buy would turn into 80 hours of restore; you may see a couple pieces of the engine house lying around the layout. I haven't touched the shops yet, but I think they will be fun to paint and personalize. When it comes down to it, I'd probably spend almost as much time with a new model as with a restore. Who knows. Now I'd better stop screwin' around and get something done.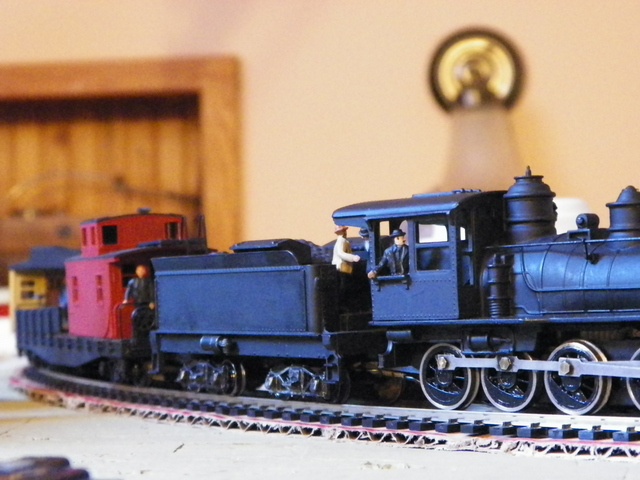 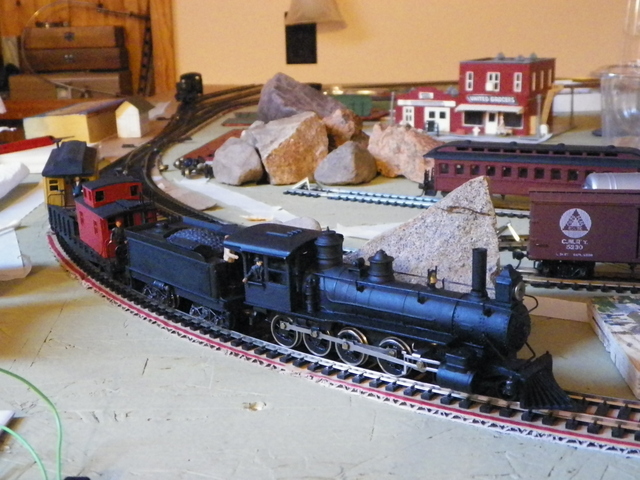 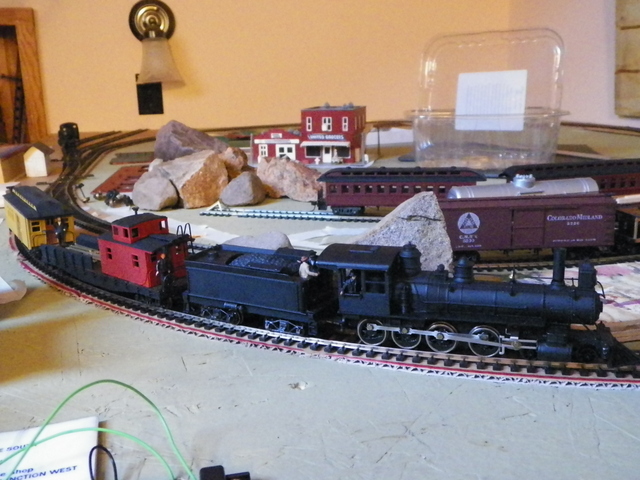
|
Country:  USA ~
Posts: 2087 ~
Member Since: March 16 2013 ~
Last Visit: July 05 2018 USA ~
Posts: 2087 ~
Member Since: March 16 2013 ~
Last Visit: July 05 2018
|
 Alert Moderator
|
|
|
|
Posted - December 10 2013 : 4:07:26 PM
|
Nice looking train! Amazing what the addition of people can do to bring life to a scene.
I like the idea of the corrugated cardboard roadbed for your western railroad. Is it glued to the board? The only downside I can think of is I'm wondering if the cardboard will warp in any way when it gets wet during the ballasting process. If it is securely fastened to the board, probably not an issue...
I had to smile though, I have a collection of rocks too that I have drug home over the last few years that I plan on using on my next layout. I don't think you can beat natural rock for scenery.
http://tycodepot.com/
|
|
|
|
|
Posted - December 10 2013 : 4:51:22 PM
|
| Thanks Jerry. The only thing holding the corrugated cardboard down is the track nails. Yeah, I spilled coffee on it already. I didn't glue it because I wanted to see if I really liked it. I'm going to experiment a bit more and glue torn brown paper bags along the side to mellow out the edges and create some trackside terrain. If it looks any good, I'll post a photo. Lots of people is good. I can see someone droppin' a couple of grand to people a layout; or spending a 1000 hours shaping and painting them.
|
|
Country: USA ~
Posts: 2087 ~
Member Since: March 16 2013 ~
Last Visit: July 05 2018
|
Alert Moderator

|
|
|
|
Posted - December 10 2013 : 5:46:10 PM
|
It will be interesting to see how it turns out. Plenty of experimentation is good though!
And YES it is amazing what HO figures sell for
I lucked into some sets at a flea market a couple years ago, as well as a bunch of loose ones of all description. Some guy was selling off his entire railroad collection - I wish I had bought everything he had now, he was practically giving it away.
My sister gave me an ebay certificate for my b-day this year, so I found some sets on there to complete a few of my scenes. ebay is averaging about $8 a WS set if you are patient, and sometimes you can find a Model Power figure set for $6 or under - and honestly they are just as good as WS.
So anyway - you can populate a layout without breaking the bank, but it takes some time and a good amount of luck 
http://tycodepot.com/
|
|
|
|
|
Posted - December 10 2013 : 7:23:49 PM


|
NOt bad looking!  NOthing wrong with a little cost savings. NOthing wrong with a little cost savings.  The old card-board tie track used to warp when you wet and ballasted it years ago. Having plastic tie track ON cardboard may not cause much of an issue, though. Worth trying anyway. Go with it... The old card-board tie track used to warp when you wet and ballasted it years ago. Having plastic tie track ON cardboard may not cause much of an issue, though. Worth trying anyway. Go with it...
Jerry
" When life throws you bananas...it's easy to slip up"
|
|
Country: USA ~
Posts: 3974 ~
Member Since: January 04 2009 ~
Last Visit: January 11 2019
|
Alert Moderator
|
|
|
|
Posted - December 14 2013 : 12:42:12 AM

|
When I built my big train layout I tried making a station platform using cork covered in cereal box cardboard. It looked good until I ballasted the track beside it. The spray bottle left me with a rather wavy platform, although the cardboard stayed in place for the most part. The cardboard on your layout is corrugated and will be covered in ballast, so hopefully it won't be affected too much.
Your layout looks great so far. Keep us updated!
|
Country:  Canada ~
Posts: 3448 ~
Member Since: September 22 2006 ~
Last Visit: April 03 2026 Canada ~
Posts: 3448 ~
Member Since: September 22 2006 ~
Last Visit: April 03 2026
|
Alert Moderator
|
|
|
|
Posted - December 14 2013 : 8:12:48 PM
|
Thanks Eric. I'm not sure what I'm going to put down for ballast. For the yards, I'm thinking just some kind of dirt and whatever is "native" to the terrain. For the main line; maybe something a little more dressy to look like maybe a little grooming has been done. I plan on "softening" those harsh cut edges of the corrugated cardboard with some brown paper and then maybe that will tell me what I need to do next? I'm still not entirely satisfied with the electronics (e.g., some engines stalling in turnouts, and not sure if I want to try those electrified frog turnouts or use wipers on the locomotives and tenders or what) so things aren't really "nailed down" tight yet.
Here's a couple of photos I just took. First one shows the main line on the far right; then to the left, the passing track and the south and north yards.
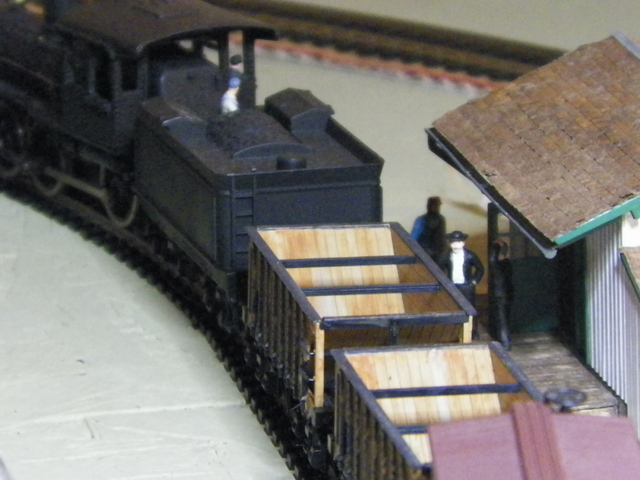
And a closer look at activity at the freight depot . . .
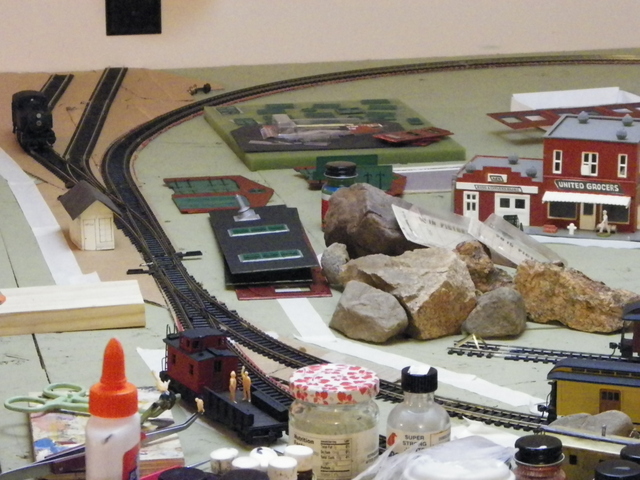
This next photo is to show the engine house yards at the north end. The masking tape is to show some potential road areas. I'm not sure if there will be shops on this or not, but they came with the engine house (which you can see in pieces) and I just sat the building on the layout for awhile (as with all the other crap that ends up sitting there.
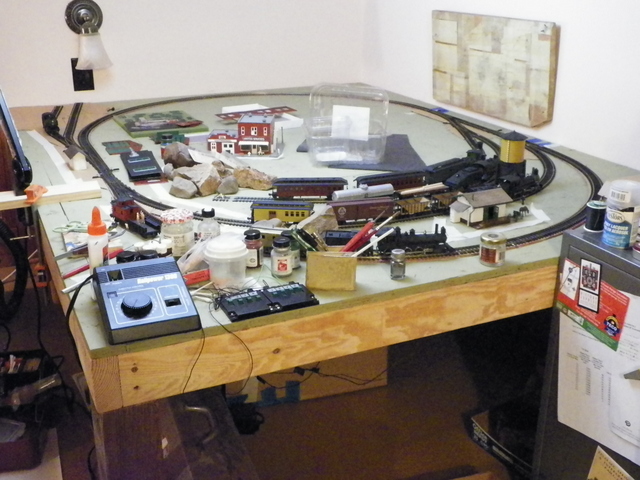
And lastly, a shot of the entire layout, which is pretty Spartan right now and the complementary lighting in my photography probably highlights the austerity. This layout is 54" by 72".
|
|
Country: USA ~
Posts: 2087 ~
Member Since: March 16 2013 ~
Last Visit: July 05 2018
|
Alert Moderator
|
|
|
|
Posted - December 14 2013 : 9:53:24 PM
|
quote:Thanks Eric. I'm not sure what I'm going to put down for ballast. For the yards, I'm thinking just some kind of dirt and whatever is "native" to the terrain. For the main line; maybe something a little more dressy to look like maybe a little grooming has been done. I plan on "softening" those harsh cut edges of the corrugated cardboard with some brown paper and then maybe that will tell me what I need to do next? I'm still not entirely satisfied with the electronics (e.g., some engines stalling in turnouts, and not sure if I want to try those electrified frog turnouts or use wipers on the locomotives and tenders or what) so things aren't really "nailed down" tight yet.
Here's a couple of photos I just took. First one shows the main line on the far right; then to the left, the passing track and the south and north yards.
I like it, Barry. I've been using sifted gravel from the side of the road for ballast. It's cheap, and won't warp. I'd like to find a place where I could sift some white rock and not get arrested, so I could have some white rock ballast
And a closer look at activity at the freight depot . . .
This next photo is to show the engine house yards at the north end. The masking tape is to show some potential road areas. I'm not sure if there will be shops on this or not, but they came with the engine house (which you can see in pieces) and I just sat the building on the layout for awhile (as with all the other crap that ends up sitting there.
And lastly, a shot of the entire layout, which is pretty Spartan right now and the complementary lighting in my photography probably highlights the austerity. This layout is 54" by 72".
Originally posted by Barry - December 14 2013 : 8:12:48 PM
|
String Bob
|
|
Country: USA ~
Posts: 85 ~
Member Since: December 13 2013 ~
Last Visit: February 27 2014
|
Alert Moderator
|
|
|
|
Posted - December 15 2013 : 12:26:01 AM
|
looking goood
I'll do my layout abit bigger anyway & it will take up 3/4 of one room 
|
|
Country: USA ~
Posts: 15029 ~
Member Since: February 23 2009 ~
Last Visit: June 22 2026
|
Alert Moderator
|
|
|
|
Posted - December 15 2013 : 10:13:15 AM
|
quote:
Originally posted by Barry - December 14 2013 : 8:12:48 PM
|
Barry, if you post a picture containing something as intriguing as those wooden hopper cars without elaborating on them further, the curiosity police will break down your door in the darkest part of the night and put tickley things up your nose.
Did you build them? If so, how? Do you have more detailed photos of them? If so, would it be convenient to post them? Intruding minds want to know.
Carpe Manana!
|
|
Country: USA ~
Posts: 2417 ~
Member Since: September 17 2013 ~
Last Visit: June 17 2026
|
Alert Moderator
|
|
|
|
Posted - December 15 2013 : 11:42:26 AM
|
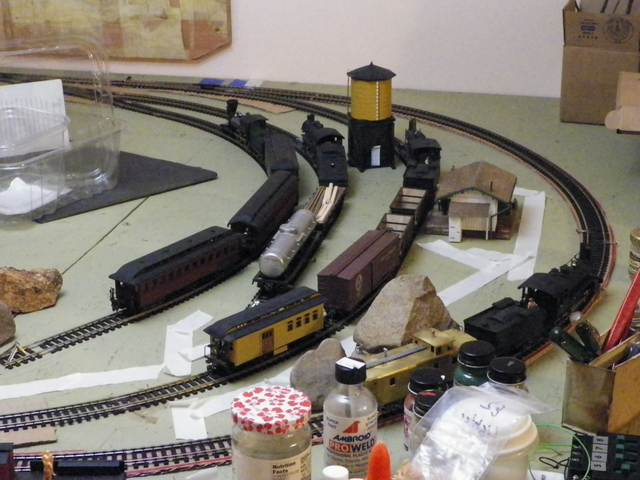
Hey Don, These are Gould Company (Tichy Train Group?; seems like those two are intertwined some how).
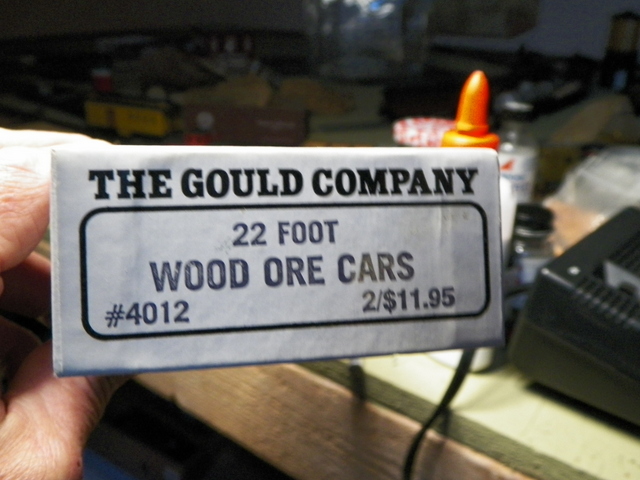
It's a pretty detailed all plastic kit, like those Jordon models with all the tiny little parts. It was one of the first models I put together in the past year that I've gotten back into MR. It tested my skills with both assembling with tiny amounts of glue and painting in tiny spots.
I had gotten these cars simply because I liked the way they looked, but these type of cars were not used by the railroad that I'm sort of trying to model. And when I painted them, I was going for what they might have looked like when they were new, rather than weathering them. However, try as I might to look at old photos of new ore cars, I had a hard time figuring out what should be painted to resemble steel and which parts were made of wood. The detail on the model helps you figure out some of it. Anyway, here's more detailed photos Don . . .
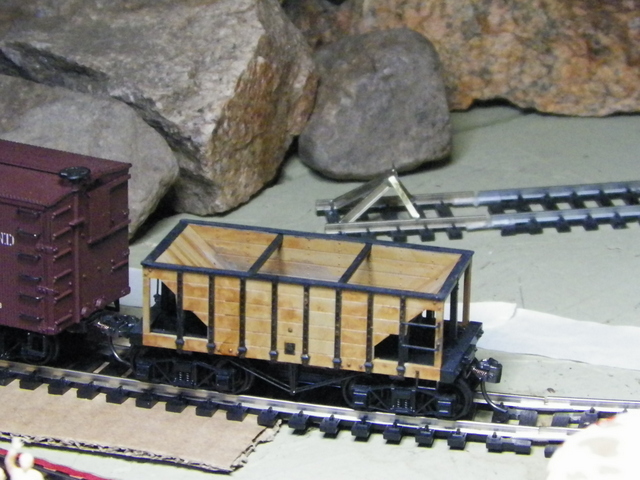 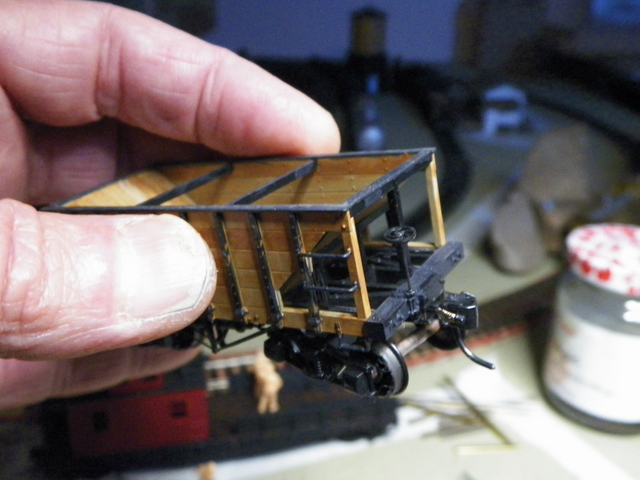 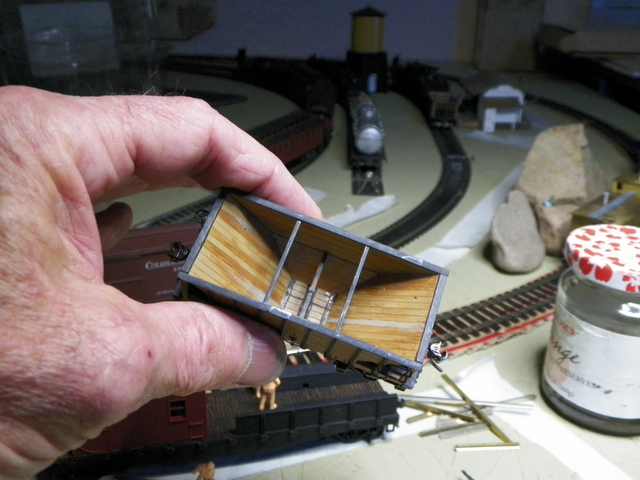 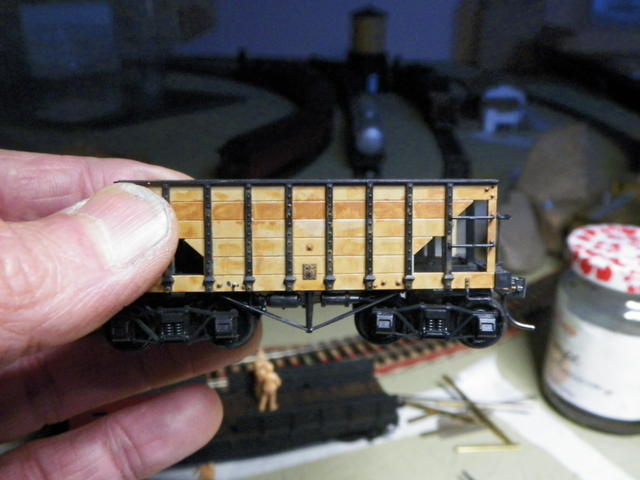
For the wood part, I used Floquil "Foundation" and then some various browns (maybe some Minwax stain?) sort of half-assed dry brushed. I don't think I'd do it that way again, but no way am I going to try and remove the paint from these now.
|
|
Country: USA ~
Posts: 2087 ~
Member Since: March 16 2013 ~
Last Visit: July 05 2018
|
Alert Moderator
|
|
|
|
Posted - December 15 2013 : 12:15:04 PM
|
| I just remembered there were some tiny parts I didn't put on because they were so tiny I didn't see anyway I could do it without making a mess. Those parts were the covers for the journal boxes. If you look at the model you can see there is just a square opening where a little cover should fit over it. Maybe I could try it now?
|
|
Country: USA ~
Posts: 2087 ~
Member Since: March 16 2013 ~
Last Visit: July 05 2018
|
Alert Moderator
|
|
|
|
Posted - December 15 2013 : 12:48:34 PM
|
Barry - you are way too modest, I would have sworn before you revealed they were al plastic models that they were constructed of real wood and metal. Whatever your technique was, it worked - at least in the photos anyway. Great job.
http://tycodepot.com/
|
|
|
|
|
Posted - December 15 2013 : 7:54:33 PM
|
Shaggy, get out of my head! Thanks for posing my question in a very entertaining way. (Would those tickley things be bits of lichen?)
Barry, I also thought the planking in the hopper bed was strip balsa. Nice 'staining' job. Very unique little hoppers.
The Tyco Depot
|
|
Country: USA ~
Posts: 3927 ~
Member Since: June 20 2007 ~
Last Visit: November 19 2015
|
Alert Moderator
|
|
|
|
Posted - December 15 2013 : 9:44:59 PM
|
quote:
It tested my skills with both assembling with tiny amounts of glue and painting in tiny spots. Originally posted by Barry - December 15 2013 : 11:42:26 AM
|
I always come away from the little Jordan models feeling that way (and I must admit they test my patience more than a little). The Tichy model I built was really a test.
I will say that you got great results. The job you did of making plastic look like wood was phenomenal. Those little cars are real honeys. Thanks for posting the photos.
Carpe Manana!
|
|
Country: USA ~
Posts: 2417 ~
Member Since: September 17 2013 ~
Last Visit: June 17 2026
|
Alert Moderator
|
|
|
|
Posted - December 15 2013 : 10:31:42 PM
|
| Thank you folks for your kind comments. It's all trial and error, hey?
|
|
Country: USA ~
Posts: 2087 ~
Member Since: March 16 2013 ~
Last Visit: July 05 2018
|
Alert Moderator
|
|


