|
|
 Posted - September 25 2013 : 8:12:28 PM Posted - September 25 2013 : 8:12:28 PM


|
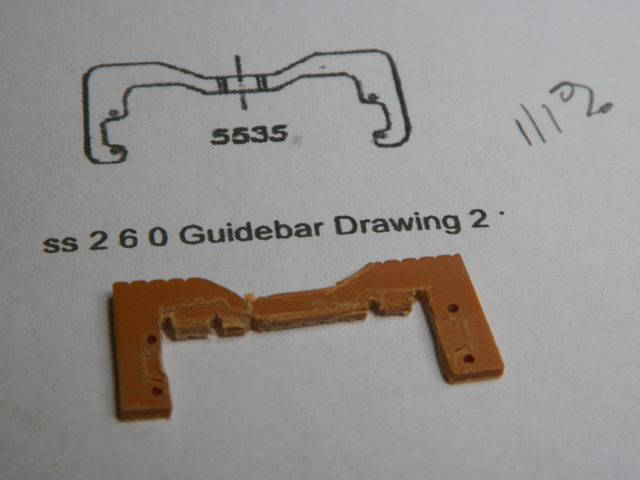
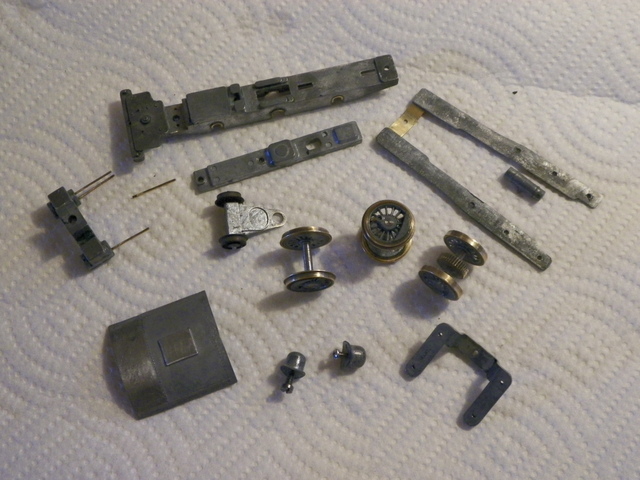
Got it running today (here's a short video if you're so inclined http://youtu.be/98HKCXSUJEk ). Runs fair enough that it wont spend all it's days on the shelf. I'm thinking the guide bars for the rod and linkage and all that stuff that I haven't yet memorized the names for are the limiting factor to smooth operation (e.g., "rolls FREELY"). They do flex some which I haven't decided yet whether that's good or bad (please jump in and straighten me out at any time here). Presently, I've got them adjusted so the top lies a wee bit over the front hub and the bottom one lies just a bit under the front hub. Looks like I'm missing a piece as well, a "guide bar yoke" and maybe that would be the answer to smoother operation? Got the tender ready to be painted and the locomotive cab roof has some JB Weld that needs to be sanded out. I only took the paint off of these pieces; hoping I'll do better this time around. We'll see. Ken, if you happen to have one of these guide bar yokes that's not built into a locomotive, would you photograph it next to a ruler? Most importantly, I guess I need to know the location of the factory holes for the guide rods. Thanks. Barry
/tyco/forum/uploaded/barry/20130925200123_100_3117.JPG /tyco/forum/uploaded/barry/20130925200142_100_3121.JPG /tyco/forum/uploaded/barry/20130925201025_100_3133.JPG
|
Country:  USA ~
Posts: 2087 ~
Member Since: March 16 2013 ~
Last Visit: July 05 2018 USA ~
Posts: 2087 ~
Member Since: March 16 2013 ~
Last Visit: July 05 2018
|
 Alert Moderator
|
|
|
|
Posted - September 26 2013 : 01:10:29 AM
|
So I got to looking at the instructions that I had (from www.hoseeker.net ) and enlarged the drawing by 111% (trial and error) which seemed close to the crude measurements I was able to guesstimate from maybe how things should go on the locomotive. The plastic I used for my prototype wasn't good though; too flexible. Maybe something from a 3D printer? Maybe a lost wax casting? ? ? ? Piece of steel? Any thoughts?
|
|
Country: USA ~
Posts: 2087 ~
Member Since: March 16 2013 ~
Last Visit: July 05 2018
|
Alert Moderator

|
|
|
|
Posted - September 26 2013 : 01:47:27 AM
|
Looks nice and smooth. I'd go with a piece of brass and keep it as original as possible.
The Tyco Depot
|
|
Country: USA ~
Posts: 3927 ~
Member Since: June 20 2007 ~
Last Visit: November 19 2015
|
Alert Moderator
|
|
|
|
Posted - September 26 2013 : 06:53:18 AM


|
I agree with Nelson, that valve gear hanger should be brass.....IT would have originally been made from sheet brass, contoured and bent (if needed for the mounting of it to the top of the frame) the rest, cut to shape.
The detail part is from PSM, and wouldn't be close to the original part...BUT would have the "details" of rivets and all the others on it that was like the real thing, (which would look GREAT) finding one be the issue, if you didn't order it.....Factory, is plain ole sheet brass....
~John
Many have tried to, and failed, ya just can't repair stupid... 
Do NOT try to Idiot-Proof anything!!!! God, will simply create a better......IDIOT!
|
|
Country: USA ~
Posts: 2911 ~
Member Since: March 26 2012 ~
Last Visit: January 14 2014
|
Alert Moderator
|
|
|
|
Posted - September 26 2013 : 06:59:55 AM
|
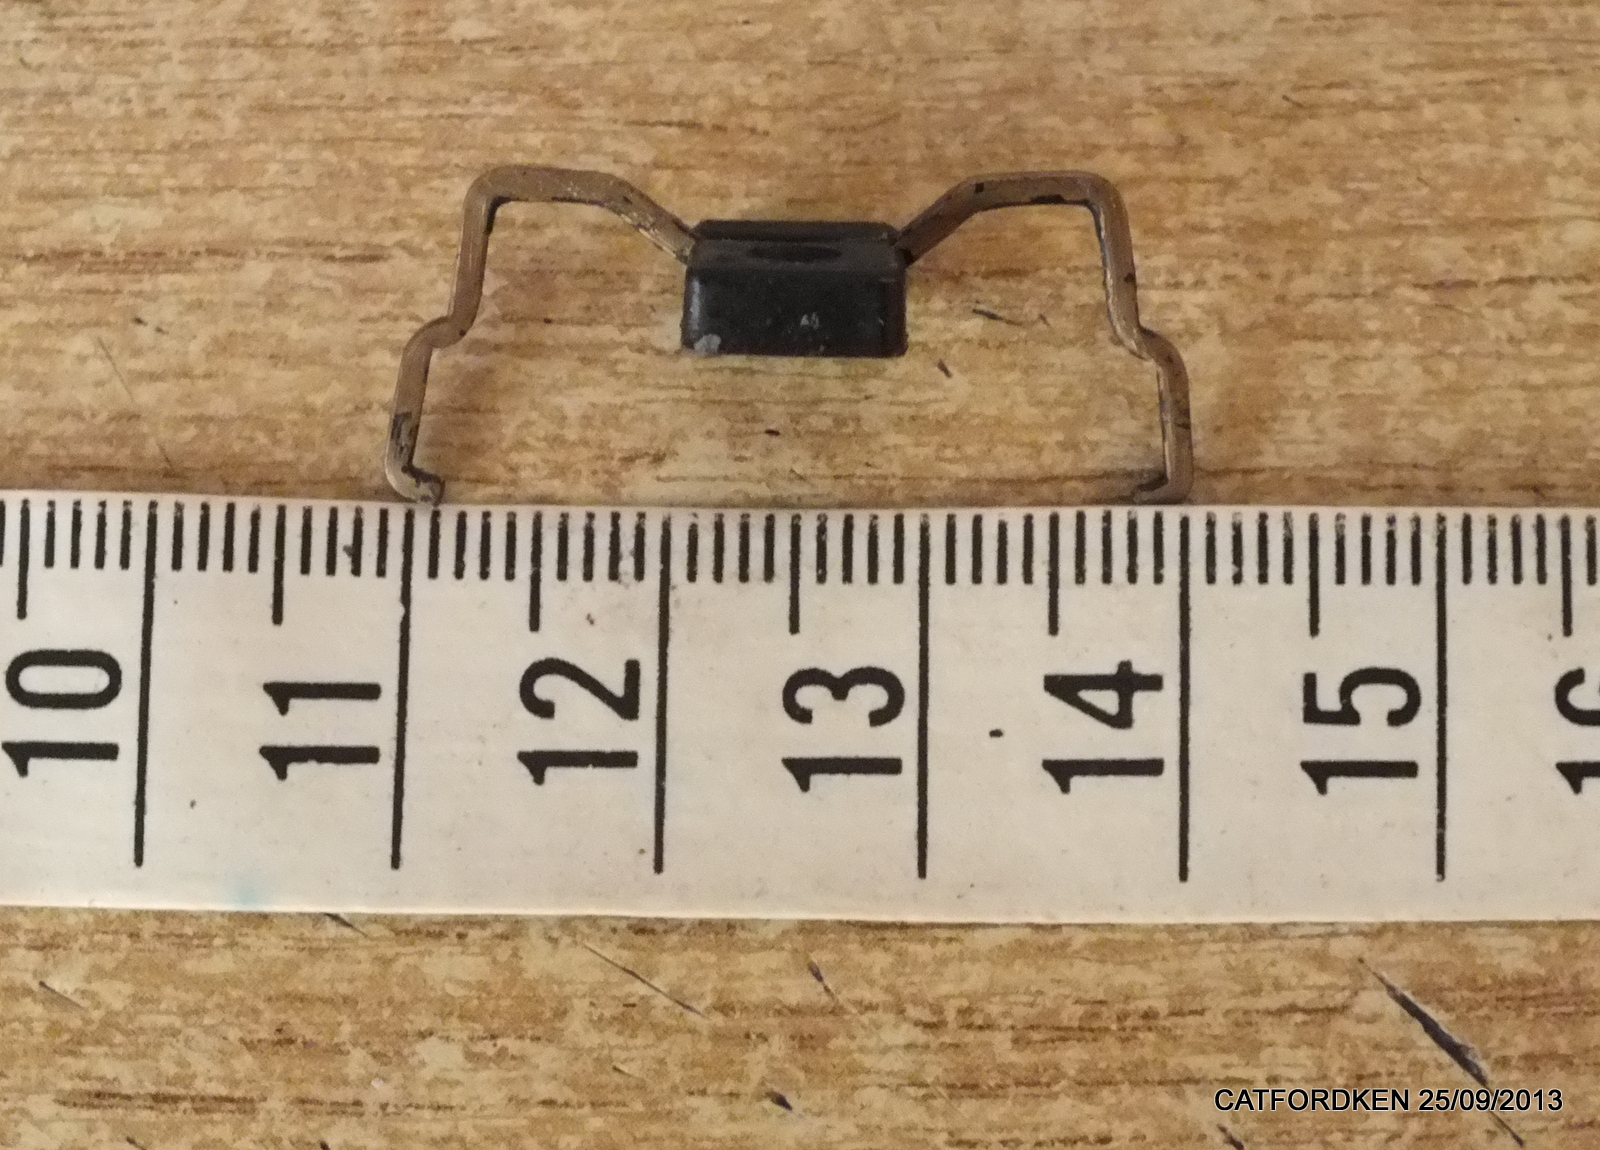
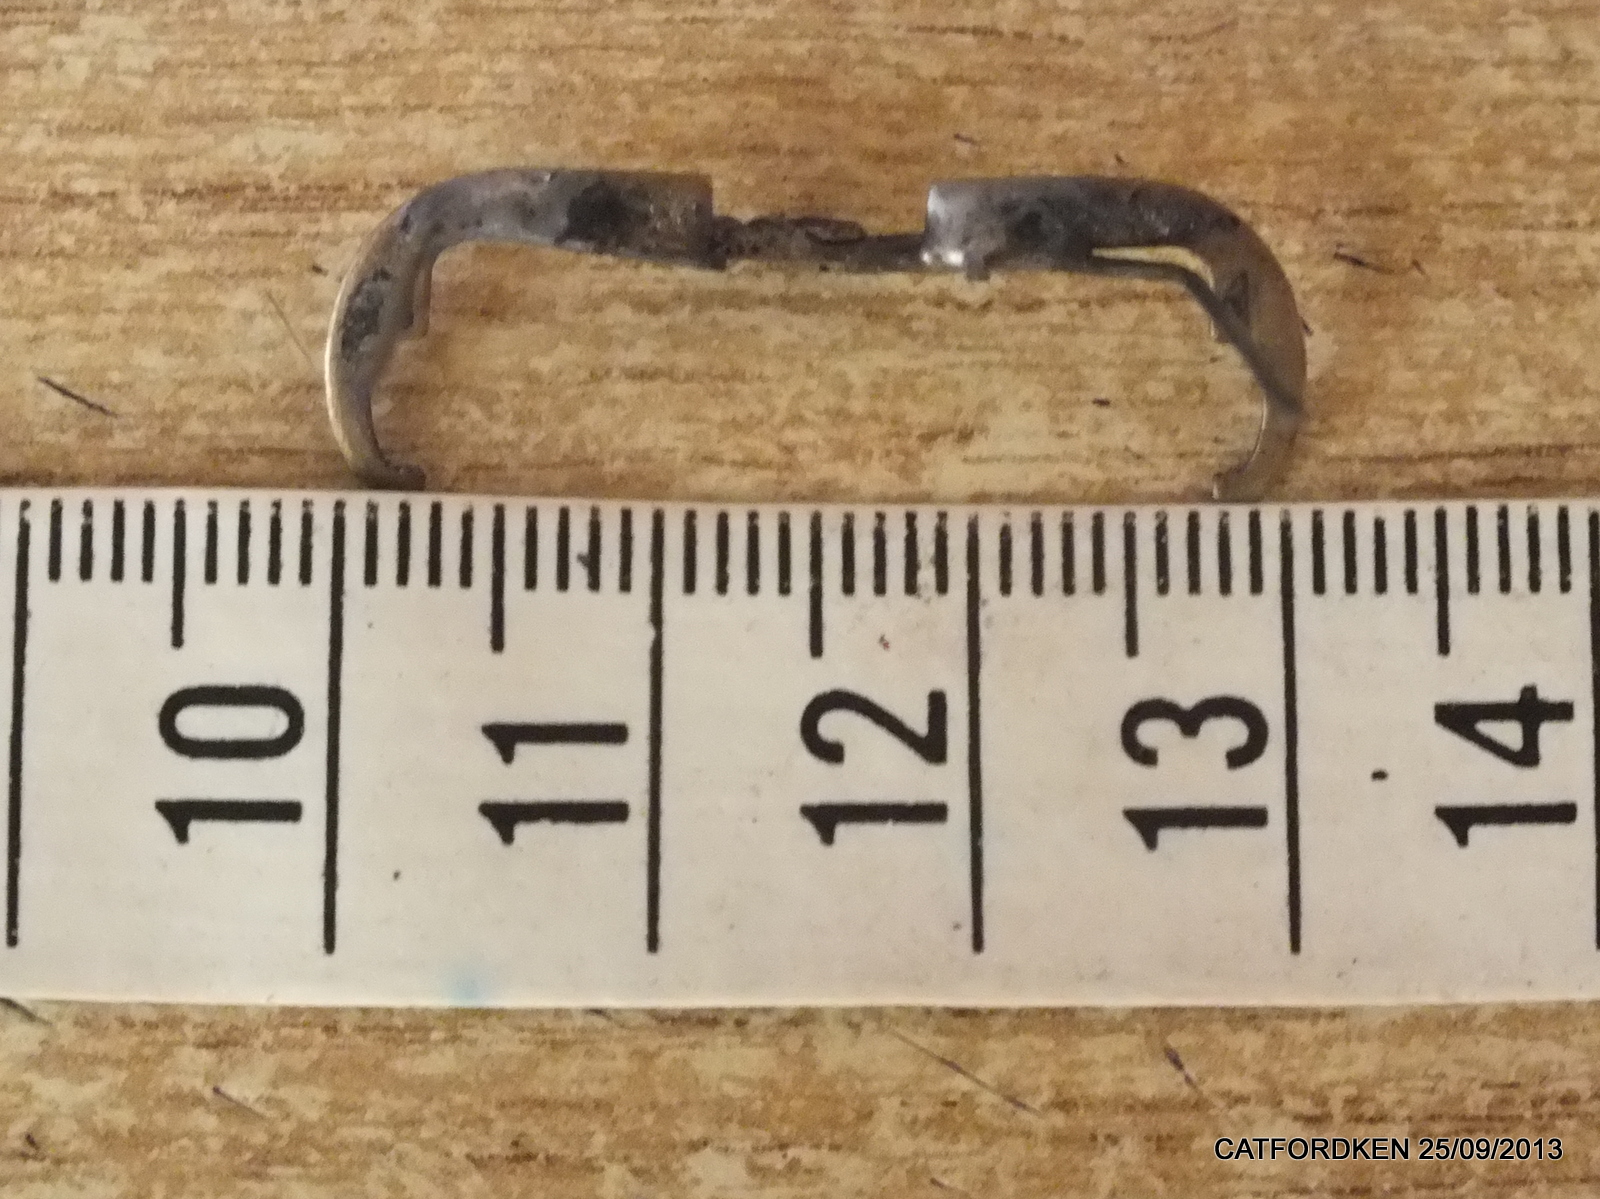
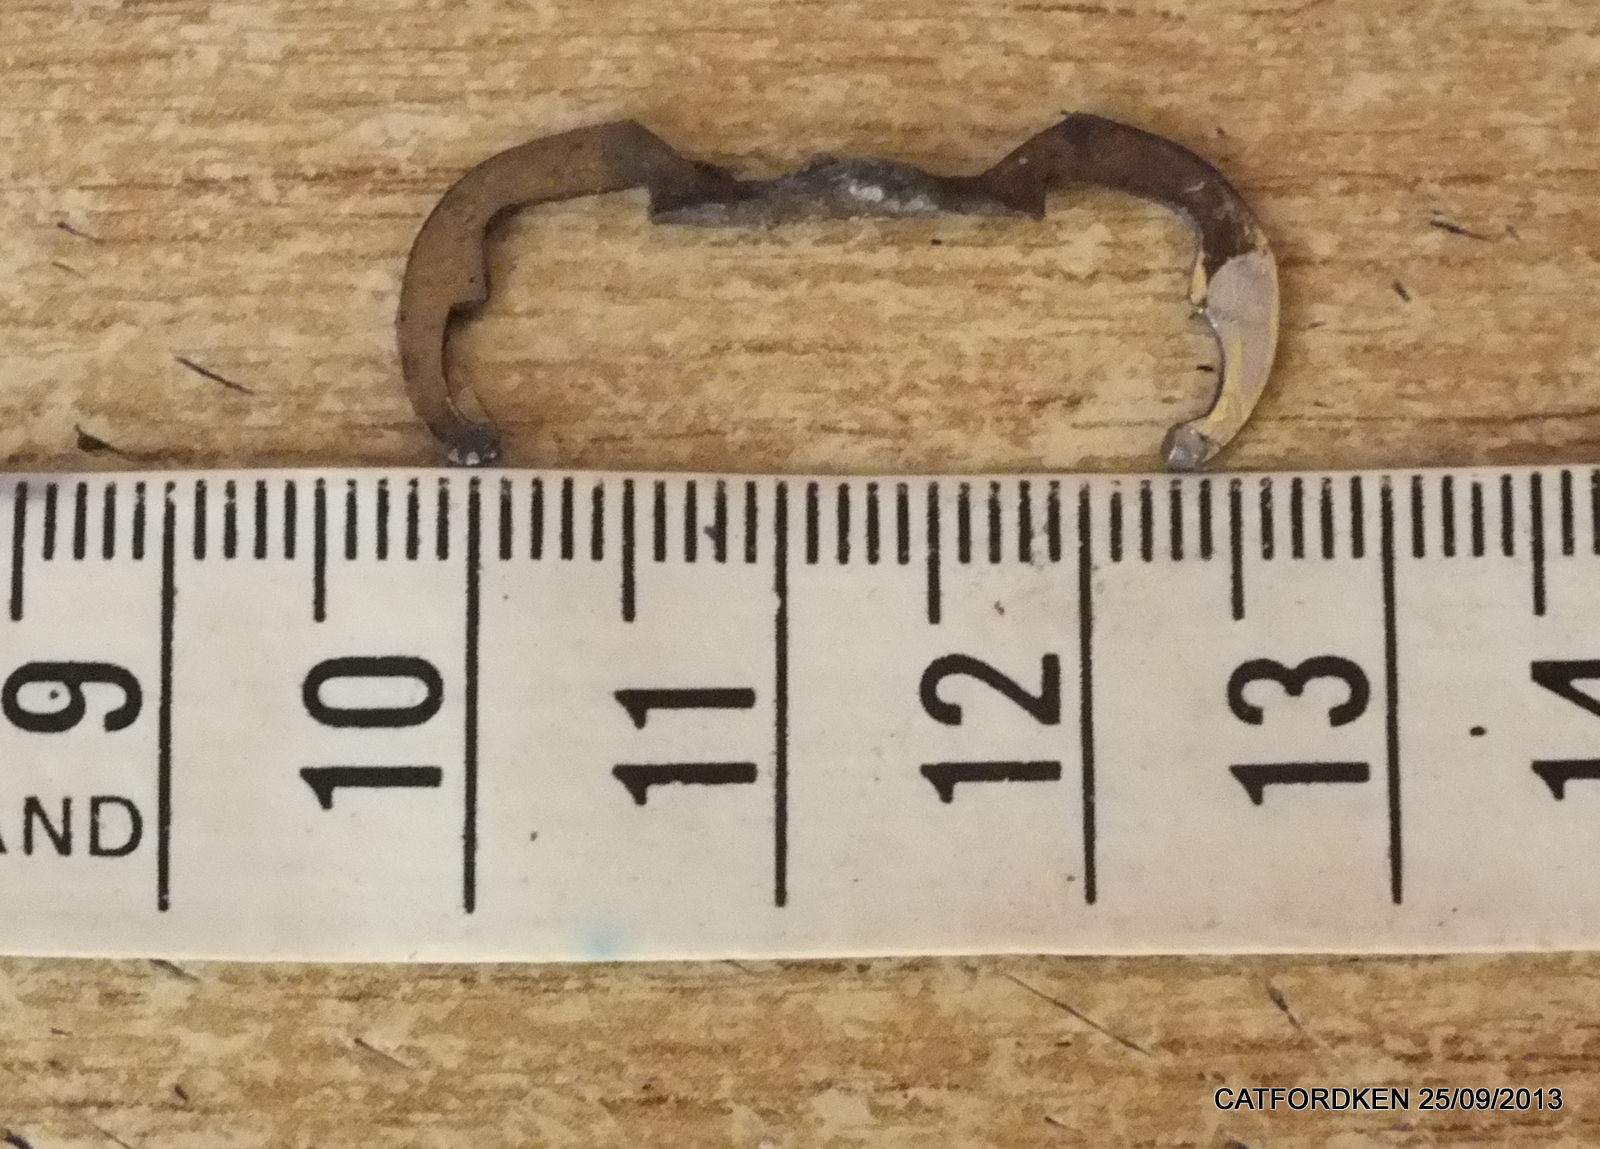
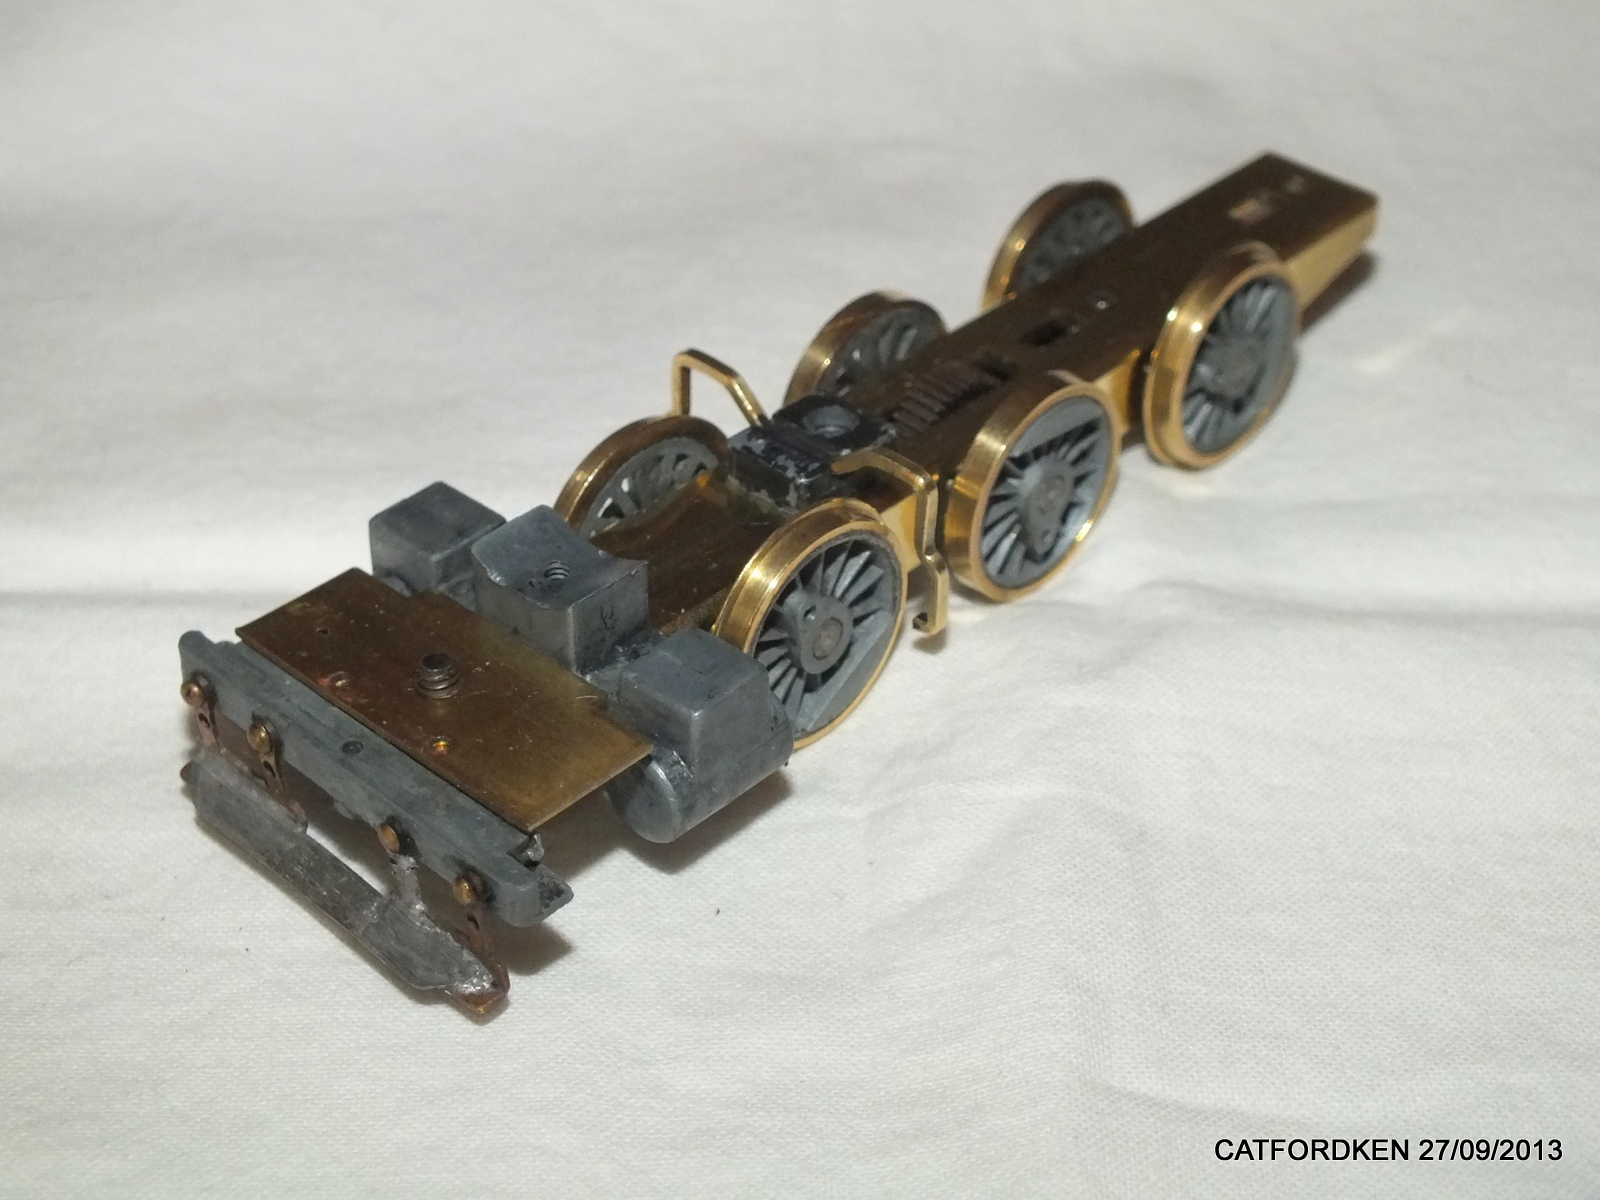
hi barry,all 3 of the yolks i have,ken
|
Country:  United Kingdom ~
Posts: 8294 ~
Member Since: September 28 2006 ~
Last Visit: October 20 2021 United Kingdom ~
Posts: 8294 ~
Member Since: September 28 2006 ~
Last Visit: October 20 2021
|
Alert Moderator
|
|
|
|
Posted - September 26 2013 : 10:43:00 AM
|
| Hey Ken, Thank you very much for posting those photos. 3 cm was what I was coming up with as well regarding the width. In looking at the photos of yours, I don't see holes where the guide rods would pass through? Do the guide rods on these just ride outside the bottom and top ridges?
|
|
Country: USA ~
Posts: 2087 ~
Member Since: March 16 2013 ~
Last Visit: July 05 2018
|
Alert Moderator
|
|
|
|
Posted - September 26 2013 : 10:46:02 AM
|
| By the way, I did check with a 3D printer and I'm not ready to pop the $50 or so it would cost to get one made out of plastic, so I think I will pick up a piece of brass and try and whittle away at it. Thanks Ken and John for your tips.
|
|
Country: USA ~
Posts: 2087 ~
Member Since: March 16 2013 ~
Last Visit: July 05 2018
|
Alert Moderator
|
|
|
|
Posted - September 26 2013 : 11:07:15 AM
|
hi barry if you look at photo 2 they are soldered as one piece,these all need de soldering,cleaning and re soldering,ken
Edited by - catfordken on September 26 2013 11:08:46 AM
|
|
Country: United Kingdom ~
Posts: 8294 ~
Member Since: September 28 2006 ~
Last Visit: October 20 2021
|
Alert Moderator
|
|
|
|
Posted - September 26 2013 : 2:05:23 PM
|
Barry, your welcome!, I would ask, use a Dremel to do the "whittling"... Reason? Cut in, as relief cuts to then cut the other way with a rail nipper, (Xuron), then whats left, use the Dremel cut-off wheel and side ways slowly, move the edge of the cut off wheel to take it down to your marking line.....Finish with a small needle file.
Dremeling it like this will make it easier, be sure tho, if you do the "grinding" to use the Dremel #426 Cut-off wheels, their stronger for such work!
~John
Many have tried to, and failed, ya just can't repair stupid...
Do NOT try to Idiot-Proof anything!!!! God, will simply create a better......IDIOT!
|
|
Country: USA ~
Posts: 2911 ~
Member Since: March 26 2012 ~
Last Visit: January 14 2014
|
Alert Moderator
|
|
|
|
Posted - September 26 2013 : 5:07:33 PM
|
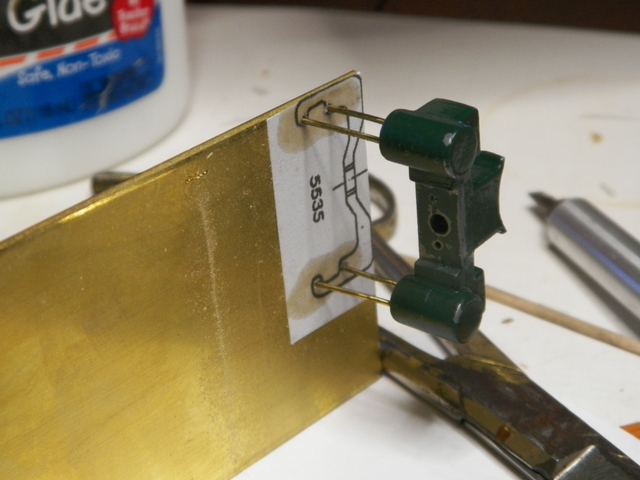
Thanks for the tips. I just may have to pop for a Dremel. Glued the [hopefully] scale drawing to .064" brass; that thickness seemed like it would work when I tried to fit it in the slot where the holder goes. Drilled the holes. Will be interesting to see if eliminating stretch and flex in the guide rods will help performance. There weren't any significant differences in the spread of the guide rods and the holes I drilled, so I guess that's good. Now I better get some housework done before my wife gets home. (Looks like I painted prematurely as much as I'm handling these parts.)
|
|
Country: USA ~
Posts: 2087 ~
Member Since: March 16 2013 ~
Last Visit: July 05 2018
|
Alert Moderator
|
|
|
|
Posted - September 26 2013 : 6:17:39 PM
|
Good idea Barry! This be the reason to go get a Dremel.....
~John
Many have tried to, and failed, ya just can't repair stupid...
Do NOT try to Idiot-Proof anything!!!! God, will simply create a better......IDIOT!
|
|
Country: USA ~
Posts: 2911 ~
Member Since: March 26 2012 ~
Last Visit: January 14 2014
|
Alert Moderator
|
|
|
|
Posted - September 28 2013 : 9:24:53 PM
|
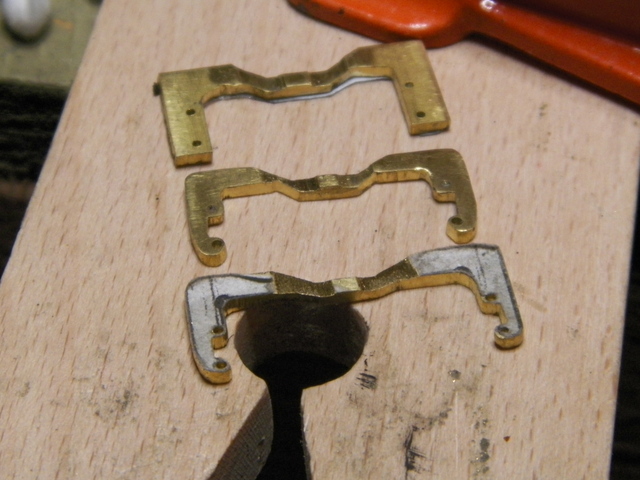
hi barry my loco is definatly a 8 ball mogul,as my guide rods fit in lower cut out of a brass yoke,where as yours should be diecast with holes in them,see pic ken
going to strip the paint off the central screw holder,and rub epoxy all over it,to hopefully strengthen it and hold back the zamac rot
Edited by - catfordken on September 29 2013 12:19:11 PM
|
|
Country: United Kingdom ~
Posts: 8294 ~
Member Since: September 28 2006 ~
Last Visit: October 20 2021
|
Alert Moderator
|
|
|
|
Posted - September 29 2013 : 09:36:58 AM
|
the one bit i really need and want is the chimney`s on both the mogul and belle,but they have been alluding me,ken
my intention is not only to preserve the mantua brass,but to case it,and leave to kids,so am after making them to the highest standards i can,a hard one to finish but thats my intentions
Edited by - catfordken on September 29 2013 12:21:34 PM
|
|
Country: United Kingdom ~
Posts: 8294 ~
Member Since: September 28 2006 ~
Last Visit: October 20 2021
|
Alert Moderator
|
|
|
|
Posted - September 29 2013 : 11:49:36 PM
|
Thanks Ken. You take good photographs. I'd ultimately like to have my 2-6-0 be all original (thought the "numbers wont match"), but in the meantime I'm going to try and make that piece out of brass. To that end, I went out and got a jewelers saw and I'm just about ready to see how much brass I can waste while I learn to use it. I do have a photo of the 2-6-0 with the diecast piece in place (attached; looking at the model in this photo is what made me want to paint mine in an attempt to avoid the metal rot).

|
|
Country: USA ~
Posts: 2087 ~
Member Since: March 16 2013 ~
Last Visit: July 05 2018
|
Alert Moderator
|
|
|
|
Posted - September 30 2013 : 07:28:08 AM
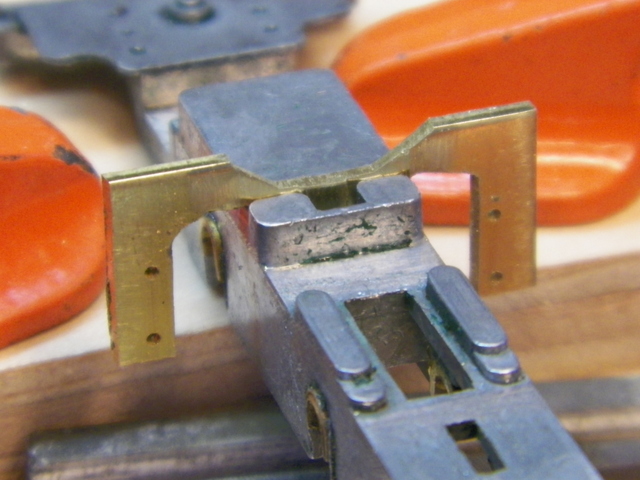
|
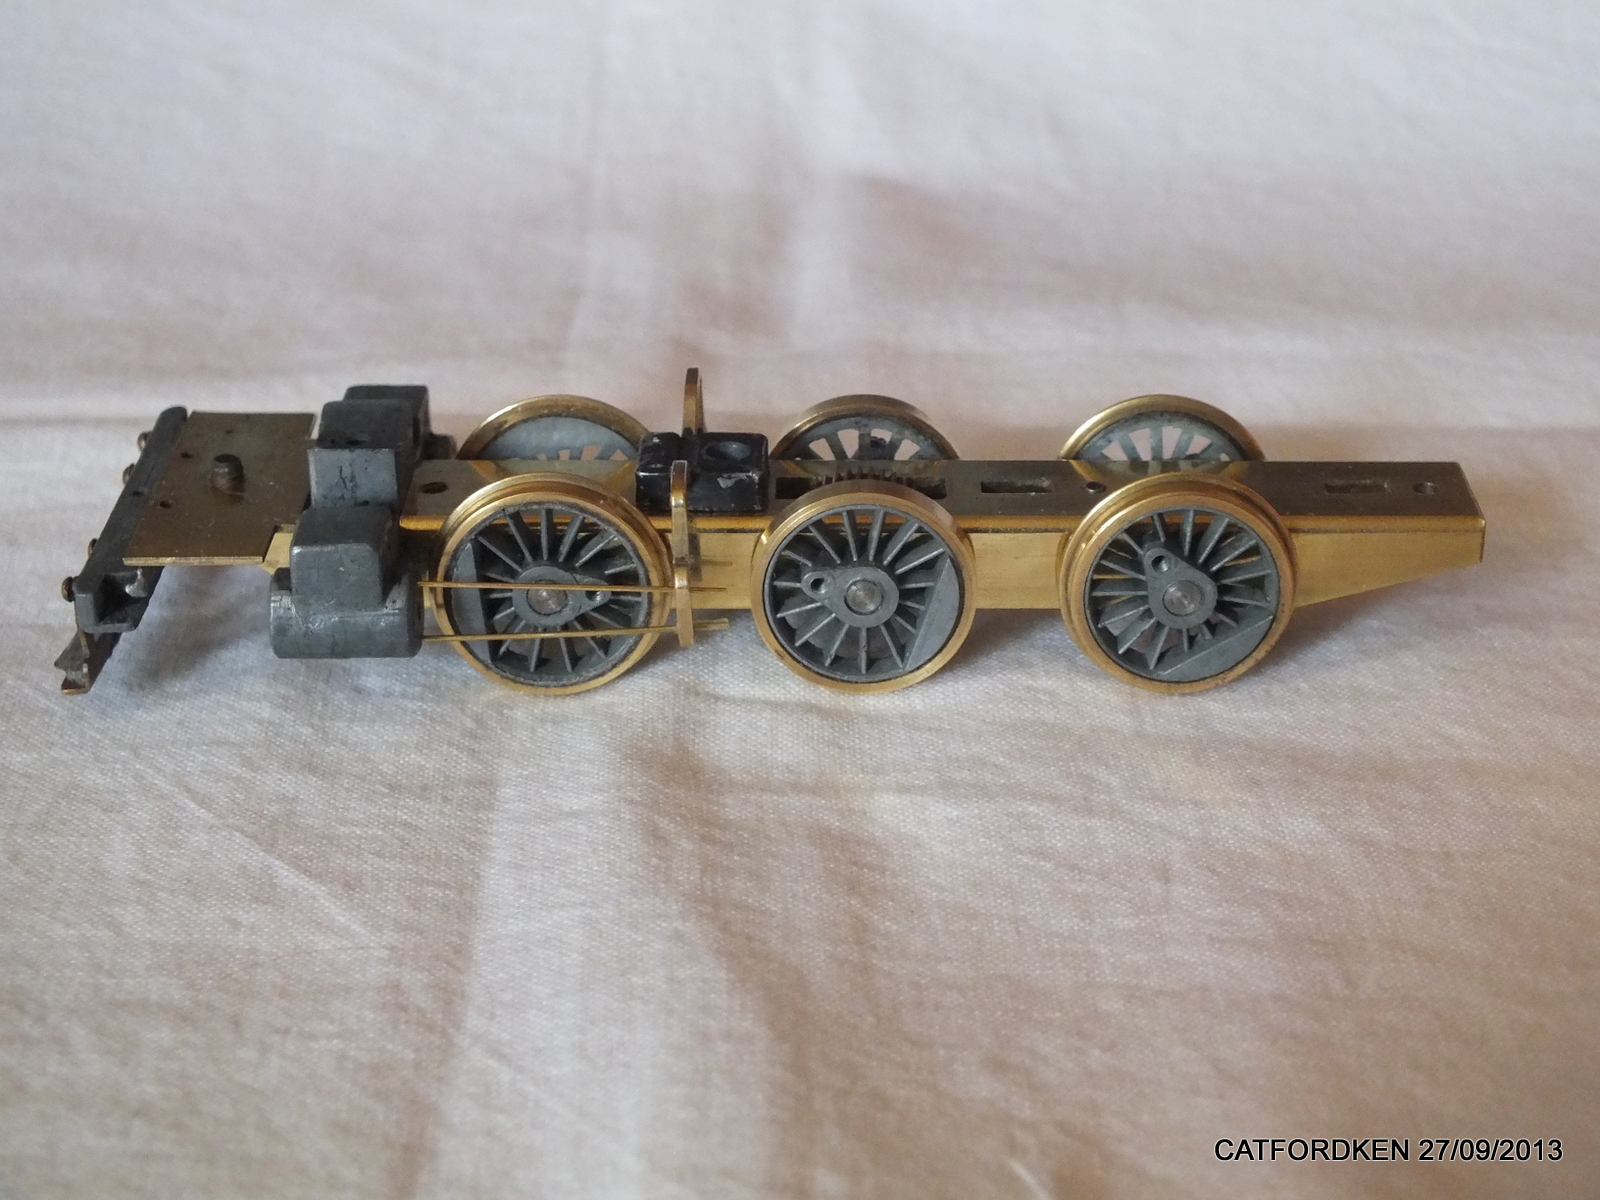
this is how mine set up,rods not in correct,just to give idea
Edited by - catfordken on September 30 2013 12:45:21 PM
|
|
Country: United Kingdom ~
Posts: 8294 ~
Member Since: September 28 2006 ~
Last Visit: October 20 2021
|
Alert Moderator
|
|
|
|
Posted - September 30 2013 : 10:13:10 PM
|
| Thanks for the picture Ken. That looks about the thickness of brass I'm working with. Is this (from the front) kind of C shaped (e.g., no holes for the rods to pass through)? Looks like a sturdy mounting set-up; I haven't quite figured that part out yet. I'm thinking maybe I can see how easy it is to bend that brass to a nice tight angle, or maybe solder something like an early Mantua brass freight car step to it and use that screw/mounting hole? I also decided today to remove the paint from everything and start over. Reason being, I was sanding out the excess JB weld from the little fissure that was in the cab roof and it looked so nice that I decided if I was going to put this much time into the thing, I shouldn't be happy with a less than ideal paint job. So . . . I think I'm gonna do some rattle can gloss black, just like many of those old time toy trains.
|
|
Country: USA ~
Posts: 2087 ~
Member Since: March 16 2013 ~
Last Visit: July 05 2018
|
Alert Moderator
|
|
|
|
Posted - September 30 2013 : 10:15:22 PM
|
| Ken, is the yoke in the most recent picture you posted (of the entire frame), the same as the top yoke in the pictures you posted of the 3 yokes?
|
|
Country: USA ~
Posts: 2087 ~
Member Since: March 16 2013 ~
Last Visit: July 05 2018
|
Alert Moderator
|
|
|
|
Posted - October 01 2013 : 07:02:25 AM
|
| hi barry the yoke is indeed the top one of the 3 posted ken
|
|
Country: United Kingdom ~
Posts: 8294 ~
Member Since: September 28 2006 ~
Last Visit: October 20 2021
|
Alert Moderator
|
|
|
|
Posted - October 02 2013 : 12:17:21 PM
|
Paint's off again. One of the big reasons I painted it in the first place was my concern over metal rot and thinking that paint might protect it. Now I learn that the metal rot is due to some impurities (salts?) so . . . what do you think? Does paint protect? Should these metal castings be clear coated if nothing else?
|
|
Country: USA ~
Posts: 2087 ~
Member Since: March 16 2013 ~
Last Visit: July 05 2018
|
Alert Moderator
|
|
|
|
Posted - October 02 2013 : 12:29:06 PM
|
http://www.tcamembers.org/standards/TCA%20Prewar%20Trains%20Grading%20Guide.pdf
Just found the above Train Collectors Association Standards. 83 pages; haven't had time to read it thoroughly, but hoping it might have something to say about metal protection. Neat photos in it from what little I've read so far.
|
|
Country: USA ~
Posts: 2087 ~
Member Since: March 16 2013 ~
Last Visit: July 05 2018
|
Alert Moderator
|
|
|
|
Posted - October 02 2013 : 12:42:21 PM
|
hi barry all parts on my brass locos have or will have all non moving parts clear coated,ken
Edited by - catfordken on October 02 2013 12:50:23 PM
|
|
Country: United Kingdom ~
Posts: 8294 ~
Member Since: September 28 2006 ~
Last Visit: October 20 2021
|
Alert Moderator
|
|
|
|
Posted - October 02 2013 : 6:45:31 PM
|
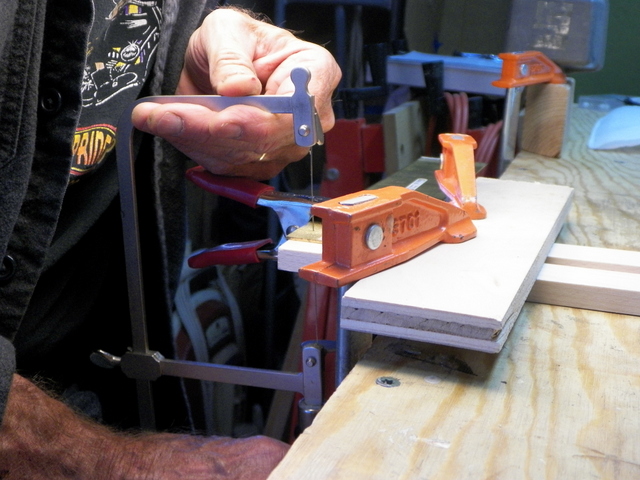
Practicing to become a human band saw today. I'm actually quite pleased with the way a jewelers saw works. And, I'm thinking it might even be cleaner than a Dremel? But . . . it takes a while, though it seems like when you get into the Zen of it (ha,ha), the brass cuts like butter. Taking a break now before I go at the gruesome cuts.
|
|
Country: USA ~
Posts: 2087 ~
Member Since: March 16 2013 ~
Last Visit: July 05 2018
|
Alert Moderator
|
|
|
|
Posted - October 02 2013 : 6:48:40 PM
|
| its a good idea,if you fancy the practice,i will have one,,ken
|
|
Country: United Kingdom ~
Posts: 8294 ~
Member Since: September 28 2006 ~
Last Visit: October 20 2021
|
Alert Moderator
|
|
|
|
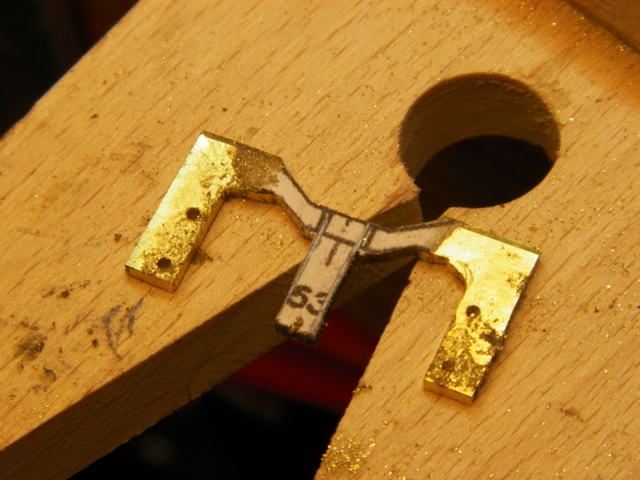
Posted - October 03 2013 : 6:36:45 PM
|
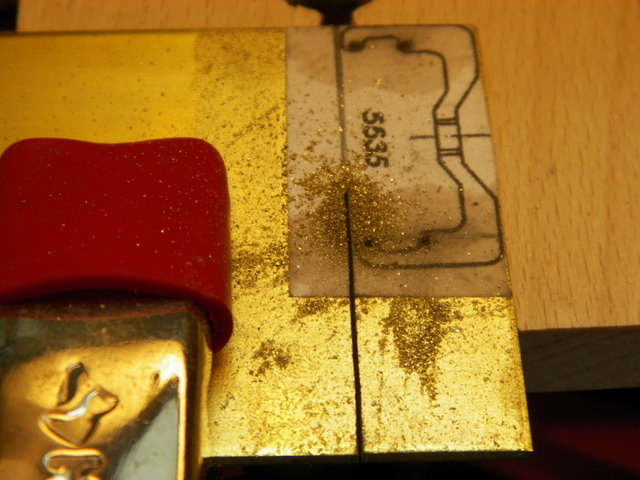
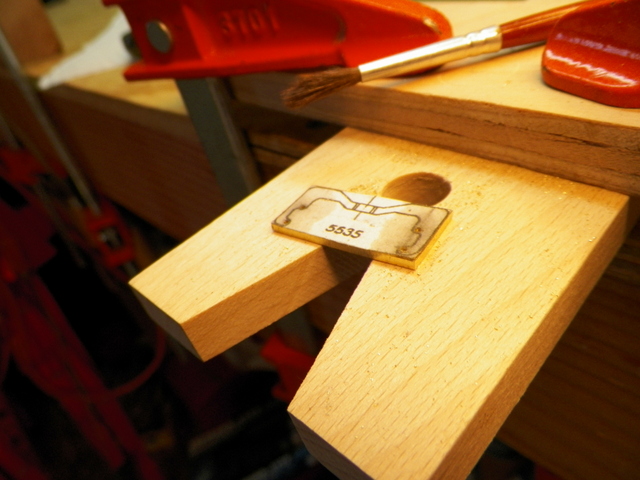
The first photo shows a "tab" I left on the piece with the thought of possibly bending it 90 degrees and using it as a mount. However, after doing a trial bend on another piece, it just looked messy and the bend was 'round' enough that it would have prevented a tight fit. So it looks like some soldering will be involved. Did get the piece to fit tightly where it's suppose to though. I'm learning that the jewelers saw will cut as close to the line as you have nerve for. It's really sort of a gentle way to cut. Biggest problem so far is that the paper template I had glued to the brass came loose on the edges and ultimately came off, though I had most of the cutting done by then. Next time I would say I need to be more careful about gluing the template on and more gentle about cutting.
|
|
Country: USA ~
Posts: 2087 ~
Member Since: March 16 2013 ~
Last Visit: July 05 2018
|
Alert Moderator
|
|
|
|
Posted - October 03 2013 : 9:05:29 PM
|
DAMN nice work Barry! What for saw blade you runnin' by hand to get results like that? I got a band saw....wonder if that type blade you got can be had for a variable speed band saw?
~John
Many have tried to, and failed, ya just can't repair stupid...
Do NOT try to Idiot-Proof anything!!!! God, will simply create a better......IDIOT!
|
|
Country: USA ~
Posts: 2911 ~
Member Since: March 26 2012 ~
Last Visit: January 14 2014
|
Alert Moderator
|
|
|
|
Posted - October 04 2013 : 1:27:03 PM
|
| John this is all new to me. I was surprised my local train shop didn't have a jewelers saw. I think pretty much everyone is using Dremels. I found one at a "rock shop". I can't believe they would be able to cut rock, but I think some of the same folks are in to making jewelry. The blades were numbered like one through four. And the guy suggested I start out with a number two. It worked. I was timid with it to start, but it really does follow the line pretty darn well. I think the ideal thing would be to have the pattern laid on the piece in ink rather than depending upon a piece of paper glued on the piece, but I haven't figured out how to do that. I'm still timid about getting after the piece; keep waiting for the time I remove too much material and have to start over, but what the hell; we've got nothing but time right?
|
|
Country: USA ~
Posts: 2087 ~
Member Since: March 16 2013 ~
Last Visit: July 05 2018
|
Alert Moderator
|
|
|
|
Posted - October 04 2013 : 2:52:21 PM
|
Barry,
Well the start you have looks AWESOME! a little thinning of areas of what you have mounted on the frame, will look GREAT! I'm simply impressed with the cut it made in the brass! AND it doesn't look like it needed a lot of "cleaning" up either, file on the edge to remove edge burrs.....
What was the true thickness of the sheet of brass you cut that from? The work to this point looks GREAT!
~John
Many have tried to, and failed, ya just can't repair stupid...
Do NOT try to Idiot-Proof anything!!!! God, will simply create a better......IDIOT!
|
|
Country: USA ~
Posts: 2911 ~
Member Since: March 26 2012 ~
Last Visit: January 14 2014
|
Alert Moderator
|
|
|
|
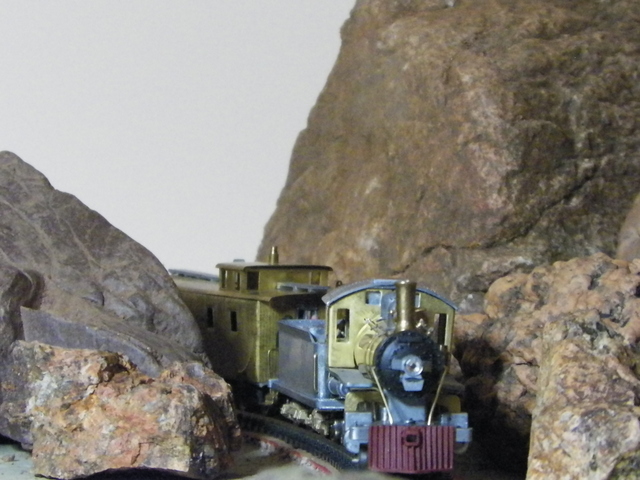
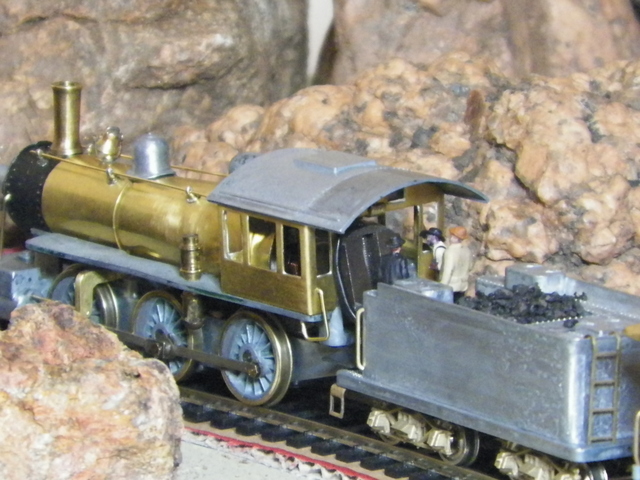
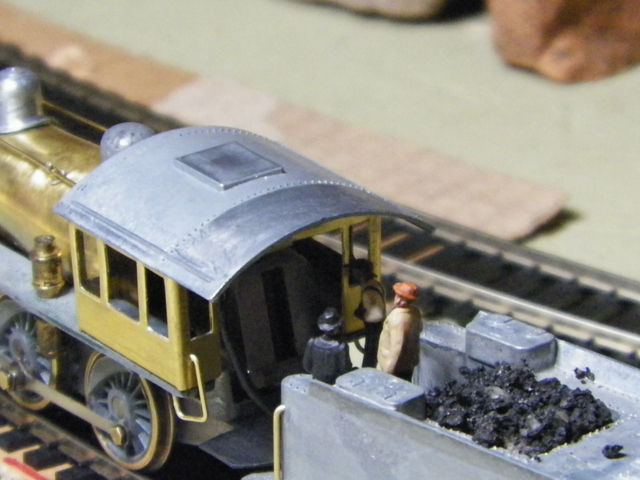
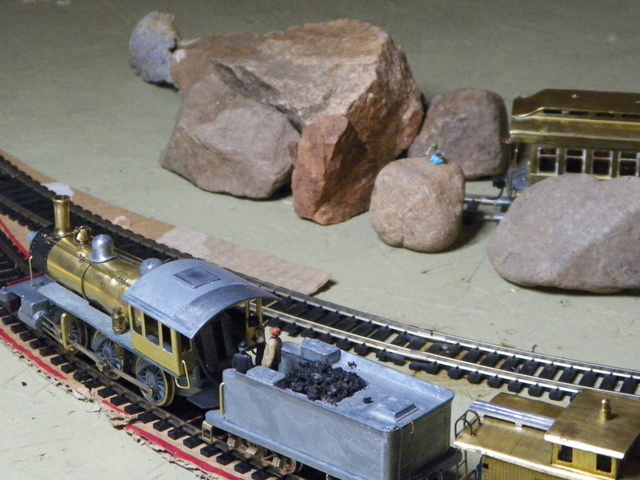
Posted - February 08 2014 : 10:55:56 PM
|
It's been a spell, but I did finally get back to this and got it up and running. For a while, I was thinking about how I wanted to paint and finish it (having removed the earlier dark green effort). In the end, I decided that if I wanted to get it actually running to try out the new guide bar yoke, I just better get after it and worry about getting it painted later. The little boys at the shop agreed.
Of the four efforts, number 3 turned to work out the best and is what is being run in the next photos . . .
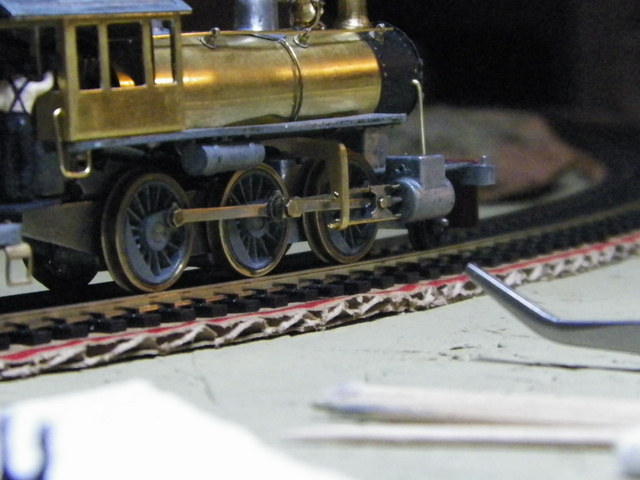
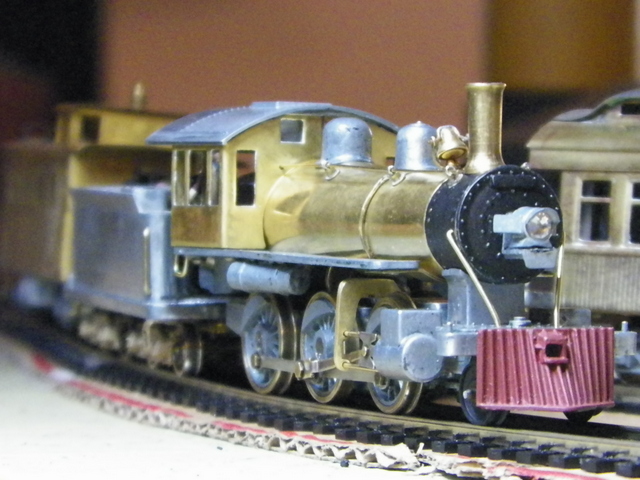
The locomotive cab deck plate is made from card stock which seems fine unless I "rough house" with the locomotive. I did the wires, but the features such as the "modernish" headlight are what came with the locomotive.
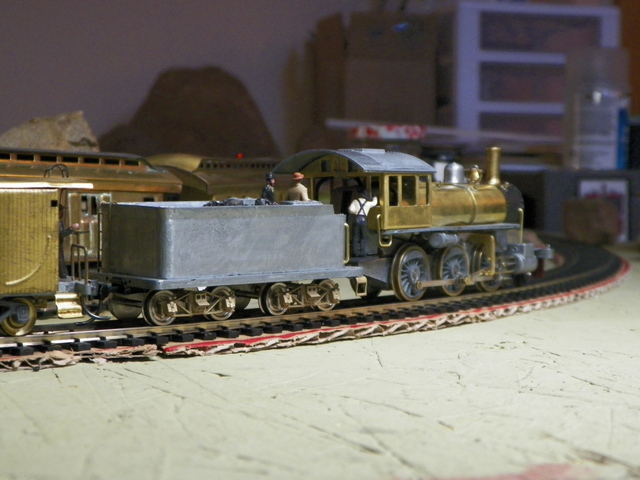
I was going to try and make the little brass plug in for the tender, but used a hex bolt in the existing threaded hole. Also used a hex bolt as the pin on the deck plate that couples the tender.
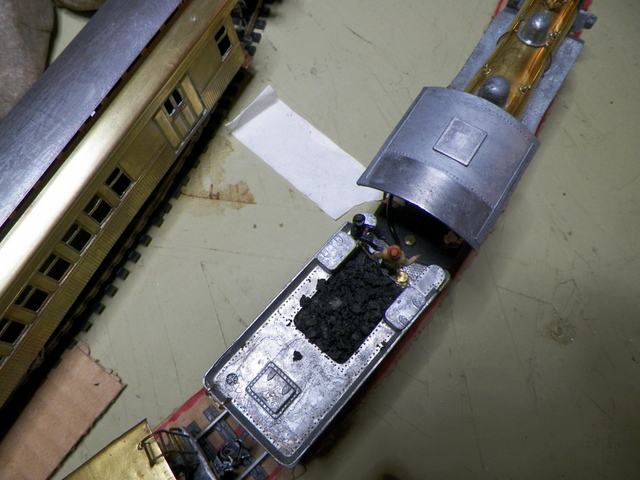
The coal in the tender is actually sifted from cinders along the railway than ran behind our house until some 70 years ago.
It runs better now than it did before the guide bar yoke, but that could be to the general tune up I kept on with as the build went on. It takes a fair amount of juice (1/2 throttle at least) to start up and needs 3/4 throttle to move steadily through the slow spots on my rails. I've had it pulling four of those brass cars, but it heats up pretty quick. My goal is to get it to pull at least 3 of them comfortably and hopefully a bit more slowly. The tender trucks are presently Precision Scale Company, and maybe I haven't tuned them properly, but they don't seem to roll as freely as they could or should. That basically is the deal with getting this little locomotive to pull good, is to try and get those heavy brass cars rolling as smoothly as possible, and then getting their couplers matched up and such.
I'll post a video of this thing running.
|
|
Country: USA ~
Posts: 2087 ~
Member Since: March 16 2013 ~
Last Visit: July 05 2018
|
Alert Moderator
|
|
|
|
Posted - February 08 2014 : 11:01:14 PM
|
Here's the video . . .
http://www.youtube.com/watch?v=l-r5t4F7Qns
|
|
Country: USA ~
Posts: 2087 ~
Member Since: March 16 2013 ~
Last Visit: July 05 2018
|
Alert Moderator
|
|
|
|
Posted - February 09 2014 : 09:56:59 AM
|
| hi barry yours puts mine to shame,briliant work,if you ever decide to make another yoke,bags one,ken
|
|
Country: United Kingdom ~
Posts: 8294 ~
Member Since: September 28 2006 ~
Last Visit: October 20 2021
|
Alert Moderator
|
|
|
|
Posted - February 09 2014 : 10:45:09 AM
|
| Thanks Ken. I don't believe mine really puts yours to shame . . . you've got some fine models. However, I could be into making you one. Perhaps a trade for some genealogy information (my great-great grandfather was a machinist in England before immigrating to the US)?
|
|
Country: USA ~
Posts: 2087 ~
Member Since: March 16 2013 ~
Last Visit: July 05 2018
|
Alert Moderator
|
|
|
|
Posted - February 09 2014 : 11:41:01 AM
|
| hi barry pm me your dads details will check out ken
|
|
Country: United Kingdom ~
Posts: 8294 ~
Member Since: September 28 2006 ~
Last Visit: October 20 2021
|
Alert Moderator
|
|
|
|
Posted - February 10 2014 : 10:24:48 AM
|
|
|
Country: USA ~
Posts: 2087 ~
Member Since: March 16 2013 ~
Last Visit: July 05 2018
|
Alert Moderator
|
|
|
|
Posted - February 10 2014 : 1:18:44 PM
|
quote:It takes a fair amount of juice (1/2 throttle at least) to start up and needs 3/4 throttle to move steadily through the slow spots on my rails. I've had it pulling four of those brass cars, but it heats up pretty quick.
Originally posted by Barry - February 08 2014 : 10:55:56 PM
|
Barry, that's a sharp looking engine and it'll look great with the rest of your equipment.
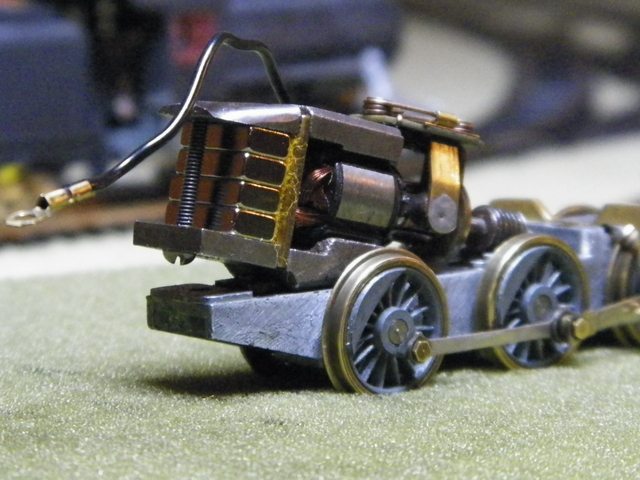
Among other things, the high amps, low power and overheating can be symptoms of a weak magnet in the motor. If the magnet's bad it can be replaced with rare earth magnets. If you touch something steel to the magnet, does it pull tight or is the attraction kind of wimpy?
I assume that you've already checked if the rest of the mechanism moves freely.
Carpe Manana!
|
|
Country: USA ~
Posts: 2417 ~
Member Since: September 17 2013 ~
Last Visit: June 17 2026
|
Alert Moderator
|
|
|
|
Posted - February 10 2014 : 1:50:15 PM
|
| Hey Don, No I haven't really done a good test on the magnet. I know that it attracts things because of the "missing screw" when you're assembling and then "oh, it's stuck to the magnet". I should consider replacing the magnet. I've seen a couple of photo posts about doing that and I just haven't gotten around to trying it. Tell me, is it the case, that if I mess up on putting the rare earth magnet in, that I could still stick the original magnet back in? Thanks for the tip Don, and if you have any details on which rare earth magnet I should get (for ease of fit, etc.), I'll be glad to hear them.
|
|
Country: USA ~
Posts: 2087 ~
Member Since: March 16 2013 ~
Last Visit: July 05 2018
|
Alert Moderator
|
|
|
|
Posted - February 10 2014 : 3:54:47 PM
|
quote: Tell me, is it the case, that if I mess up on putting the rare earth magnet in, that I could still stick the original magnet back in?
|
The old magnet is charged within the motor and looses part of its magnetism if it is removed from the motor or if the armature is removed. If your motor is weak, it may be that the previous owner did one of those things. That means that once you remove the old magnet you are committed.
quote:Thanks for the tip Don, and if you have any details on which rare earth magnet I should get (for ease of fit, etc.), I'll be glad to hear them.
|
I usually order the magnets from:
http://www.kjmagnetics.com/
They have a large selection of sizes and shapes. I order the block shaped magnets and stack them into the motor frame where the old magnet was removed. You'd need to measure the space either ahead of the screw that holds the old magnet or on either side of it, whichever would allow for the most magnet. These magnets are very intense and do not need to be as big as the old one.
The catalog listings will describe through which axis the magnet is polarized. For example, there is a 1/2 x 1/4 x 1/8" magnet polarized through the 1/8" dimension. These would be stacked so the 1/8" dimension is vertical in the motor. They'll naturally stack on top of each other so they're all polarized the same way. Side by side stacks want to point in opposite directions, but side by side stacks will stay put if they're polarized the same direction within the motor frame.
If changing the magnet reverses the motor direction, the magnets are in upside down. Pull the stack and flip it. If side by side stacks are not polarized the same way, the motor will not run.
Different thicknesses can be combined to add up to the height you need to fill in the motor frame. If you have some extra height in which a magnet will not fit, steel shims will carry the field across the gap. For example, a 9/16" space can be filled with 1/2" of magnets and 1/16" of steel.
The magnets will hold themselves in place, once installed.
All those words make it sound more complicated than it is. It's quite easy.
Carpe Manana!
|
|
Country: USA ~
Posts: 2417 ~
Member Since: September 17 2013 ~
Last Visit: June 17 2026
|
Alert Moderator
|
|
|
|
Posted - February 10 2014 : 7:14:03 PM
|
| Cool. Thanks Don.
|
|
Country: USA ~
Posts: 2087 ~
Member Since: March 16 2013 ~
Last Visit: July 05 2018
|
Alert Moderator
|
|
|
|
Posted - February 19 2014 : 11:56:49 AM
|
Don, I got off my butt and ordered magnets and put them in (your instructions were right on) and the performance of this engine improved significantly. Thank you very much for your teachings on this. And, that K&J Magnetics has good prices and shipped fast.
https://www.youtube.com/watch?v=0sN5lEkBvD0
|
|
Country: USA ~
Posts: 2087 ~
Member Since: March 16 2013 ~
Last Visit: July 05 2018
|
Alert Moderator
|
|
|
|
Posted - February 19 2014 : 12:45:32 PM
|
| great stuff barry,i can get them over here so will check them out ken
|
|
Country: United Kingdom ~
Posts: 8294 ~
Member Since: September 28 2006 ~
Last Visit: October 20 2021
|
Alert Moderator
|
|
|
|
Posted - February 20 2014 : 2:13:23 PM
|
Not to wear out the issue, but I just can't resist running this little train around the tracks. Still need to work on everything (e.g., getting the cars rolling easily and the coupler height adjusted and railings and brake wheels and so forth) . . . this video is of the locomotive at 45% throttle.
|
|
Country: USA ~
Posts: 2087 ~
Member Since: March 16 2013 ~
Last Visit: July 05 2018
|
Alert Moderator
|
|
|
|
Posted - February 20 2014 : 2:27:05 PM
|
| hi barry,looks brill,the brass bullet,ken
|
|
Country: United Kingdom ~
Posts: 8294 ~
Member Since: September 28 2006 ~
Last Visit: October 20 2021
|
Alert Moderator
|
|
|
|
Posted - March 26 2014 : 4:25:45 PM
|
thanks to 2 members on here am a step closer to having a complete mogul,ken
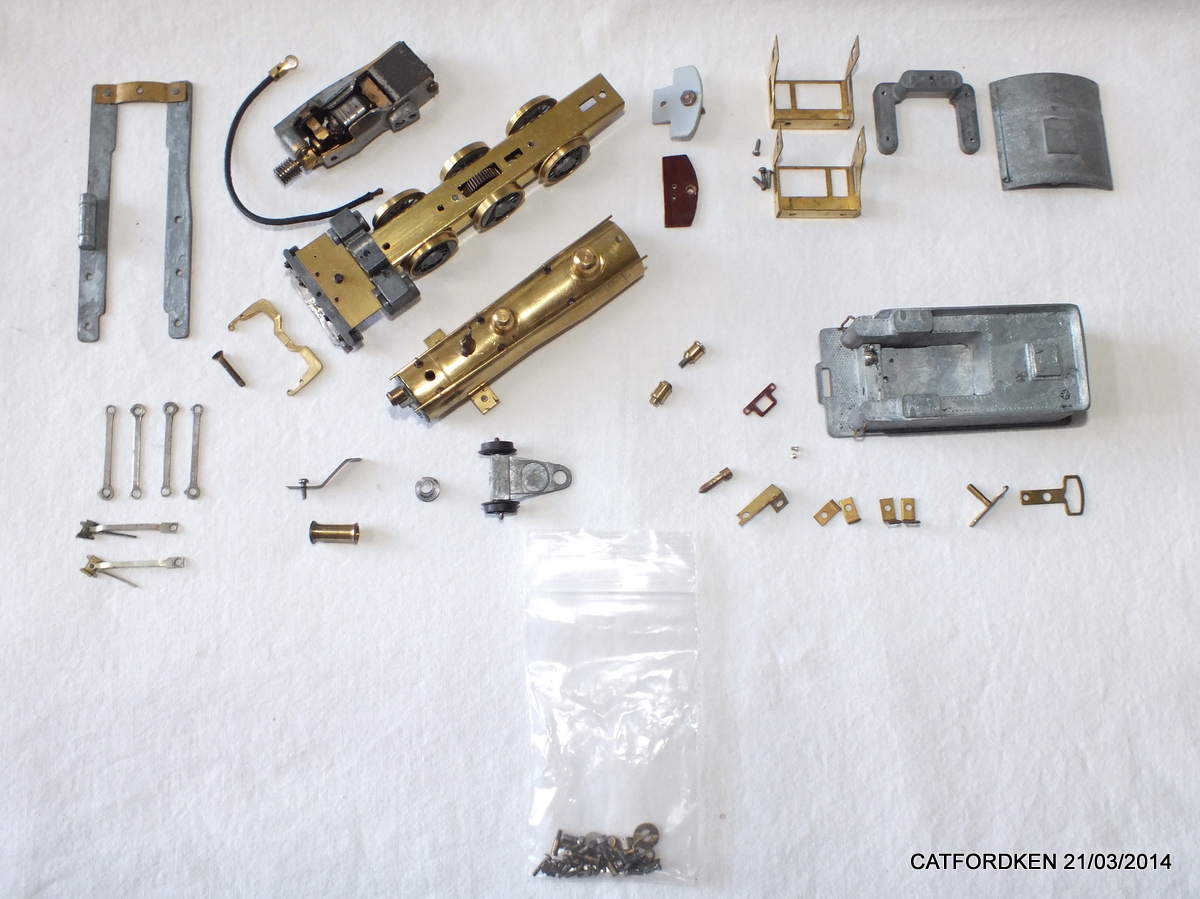
all i need now is 2 original trucks for tender
|
|
Country: United Kingdom ~
Posts: 8294 ~
Member Since: September 28 2006 ~
Last Visit: October 20 2021
|
Alert Moderator
|
|


