|
|
 Posted - August 03 2013 : 7:45:04 PM Posted - August 03 2013 : 7:45:04 PM


|
Last year, I repainted a Proto 1000 RDC3 for my own railroad and detailed the interior.
This past spring, I picked up a dummy Athearn RDC3 at a local swap meet and decided to give my lonely P1K a companion.
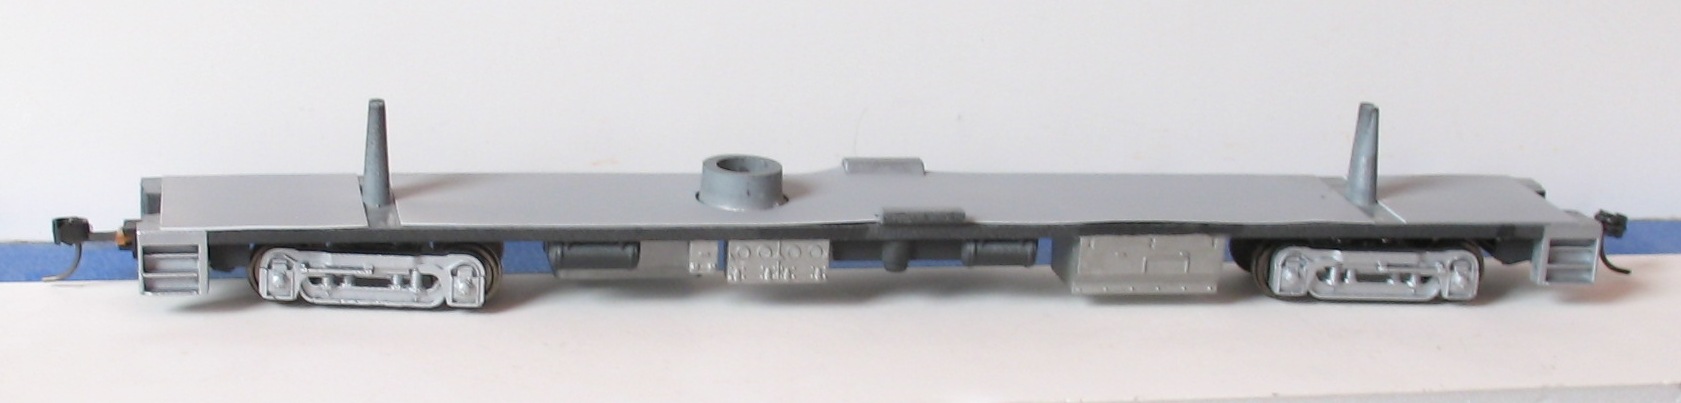
I soaked the metal frame in vinegar to etch the unpainted metal, on the sage advice of another modeler, before primer painting it. After completing the final paint work, I used double-stick tape to attach flat primer-colored "floor panels" to the top of the frame. The original window inserts were in excellent condition, as they fit into the window frame openings, but the optical quality is so poor that further interior detailing would not be worth the time and effort.
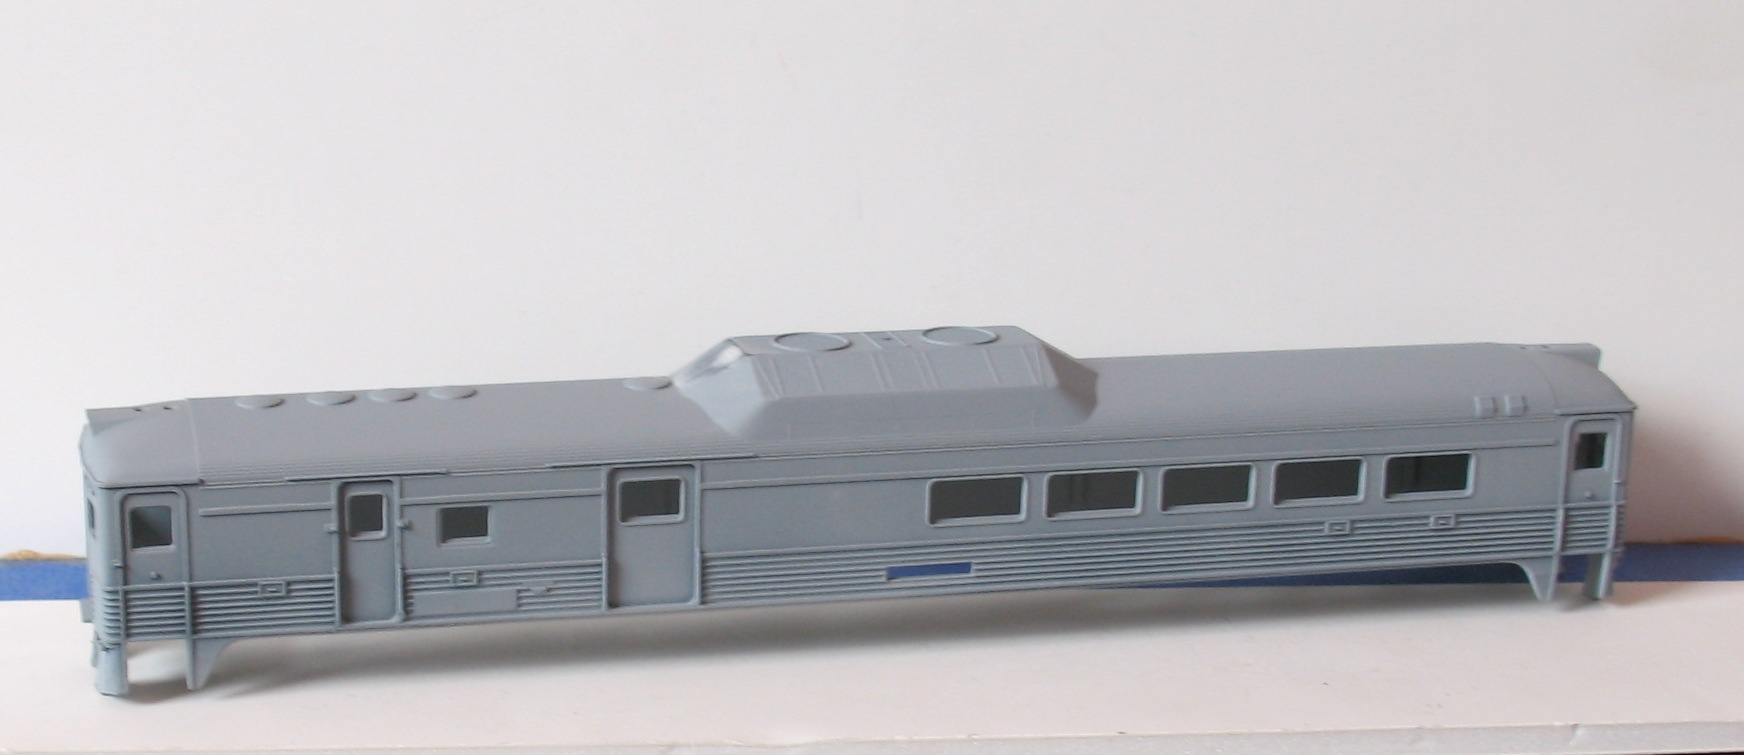
I then primered the shell, both inside and out, to bring some relfected light into the interior.
The shell was painted in my Minnesota, Sioux Lake & Western colors, and I had home-made decals left over from the original project to complete the detailing of this model.
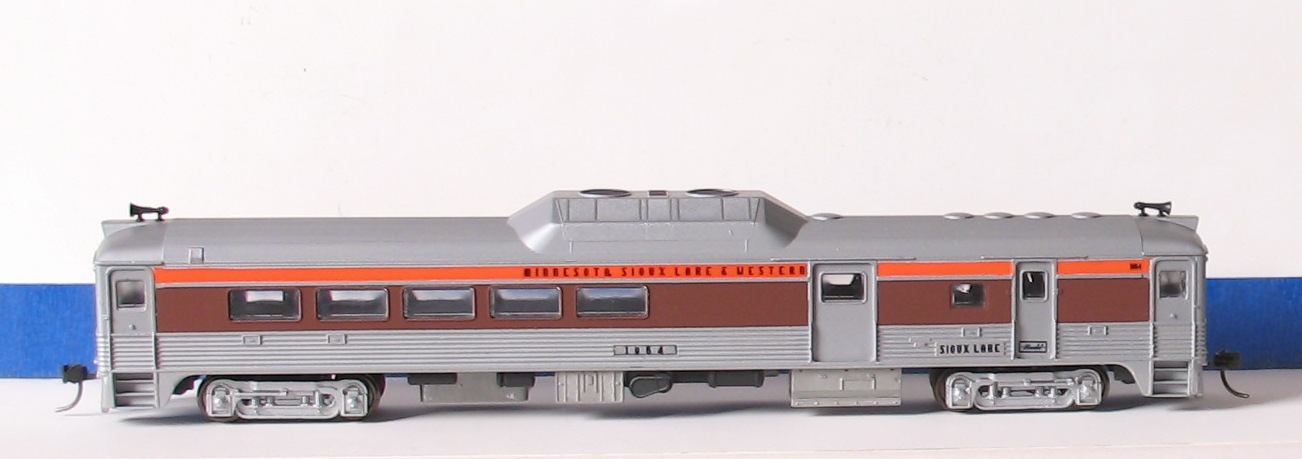
This dummy RDC can be easily pulled by my P1K RDC as a two car excursion train for seeing fall colors, traveling to upstate ski resorts, etc.
The fact that it is a bit shorter is not an issue- I will call it an "RDC4", which was
shorter than the other RDC's and close to Athearn's dimensions.
Siouxlake/ Ron
|
Country:  USA ~
Posts: 510 ~
Member Since: September 21 2011 ~
Last Visit: December 21 2014 USA ~
Posts: 510 ~
Member Since: September 21 2011 ~
Last Visit: December 21 2014
|
 Alert Moderator
|
|
|
|
Posted - August 03 2013 : 8:58:51 PM


|
Ron,
That looks really good1 You planning to add a full interior?
I bet that same way on the RDC-1 would look AWESOME with all the seats in it, as this one you have is the RDC-3. A little bit of cabinetry in the areas with the side doors would suffice!
Nice work!
~John
Many have tried to, and failed, ya just can't repair stupid... 
Do NOT try to Idiot-Proof anything!!!! God, will simply create a better......IDIOT!
|
|
Country: USA ~
Posts: 2911 ~
Member Since: March 26 2012 ~
Last Visit: January 14 2014
|
Alert Moderator

|
|
|
|
Posted - August 03 2013 : 10:09:44 PM
|
John- I priced some ready-made passenger seat interiors on E-Bay, but I'm really not willing to shell out $20 -some dollars plus shipping for one of those, all for a project that cost me a whole $2.00 purchase at a flea market. I will rely on the 3 foot rule for this one. If I come across an el cheapo interior at the next flea market, which is a good probability, than I will readily spend the time and effort to detail passenger figures (of which I have a bunch) and paint the interior for ths particular model. I did so on my P1K Proto RDC3, but that model was a Trainworld $19.98 purchase in 2005 and so the effort was valid.
One other thing- I had some metal 36 inch passenger wheels, which I used to replace the original plastic ones that were on the Athearn model. The thing rolls like a new tire!
Ron
|
|
Country: USA ~
Posts: 510 ~
Member Since: September 21 2011 ~
Last Visit: December 21 2014
|
Alert Moderator
|
|
|
|
Posted - August 03 2013 : 11:13:28 PM
|
| Ron, excellent painting and lettering. I always enjoy seeing what you come up with. - Thomas
|
|
Country: USA ~
Posts: 1091 ~
Member Since: July 07 2011 ~
Last Visit: June 13 2026
|
Alert Moderator
|
|
|
|
Posted - August 04 2013 : 09:17:24 AM
|
Ron I like the Milwaukee Road colors. And your use of the extension for locking the frame to the body as a number board, with the original board having a car name on it. it is the little things that make a good model.
frank
toptrain
" It's a Heck of a Day " !!!
|
|
Country: USA ~
Posts: 7538 ~
Member Since: August 07 2008 ~
Last Visit: December 06 2025
|
Alert Moderator
|
|
|
|
Posted - August 04 2013 : 12:53:35 PM
|
quote:John- I priced some ready-made passenger seat interiors on E-Bay, but I'm really not willing to shell out $20 -some dollars plus shipping for one of those, all for a project that cost me a whole $2.00 purchase at a flea market. I will rely on the 3 foot rule for this one. If I come across an el cheapo interior at the next flea market, which is a good probability, than I will readily spend the time and effort to detail passenger figures (of which I have a bunch) and paint the interior for ths particular model. I did so on my P1K Proto RDC3, but that model was a Trainworld $19.98 purchase in 2005 and so the effort was valid.
One other thing- I had some metal 36 inch passenger wheels, which I used to replace the original plastic ones that were on the Athearn model. The thing rolls like a new tire!
Ron
Originally posted by siouxlake - August 03 2013 : 10:09:44 PM
|
Ron,
I can agree with the cost of shipping.....These hobby shops or even people charging more then the actual shipping cost, are turning people away and don't even know it!
As for the added wheels and such anything to upgrade, the model always seems to help, even in dummy use!
I can't wait to see the interior when your done!
Question/thought....you added that flat "floor" to the model, why not add walls and or dividers to the interior and make one close to what the RDC would have actually had? Only thing that might be interesting to make would be the seats....PM me, I have castings I have made of seats that could help you, and thats something we could trade on!!!!
~John
Many have tried to, and failed, ya just can't repair stupid...
Do NOT try to Idiot-Proof anything!!!! God, will simply create a better......IDIOT!
|
|
Country: USA ~
Posts: 2911 ~
Member Since: March 26 2012 ~
Last Visit: January 14 2014
|
Alert Moderator
|
|
|
blaneo
Switcher
.JPG)
Status:
offline
| |
Posted - August 07 2013 : 08:13:23 AM
|
| Wow, it looks great! But then I am a fan of the RDCs anyway. Good work!
|
|
Country: USA ~
Posts: 96 ~
Member Since: December 03 2012 ~
Last Visit: June 24 2019
|
Alert Moderator
|
|
|
|
Posted - September 16 2013 : 10:58:18 PM
|
quote:Wow, it looks great! But then I am a fan of the RDCs anyway. Good work!
Originally posted by blaneo - August 07 2013 : 08:13:23 AM
|
I know I'm a little late to the party, but great job!
RBNicholson
RBNicholson
|
|
Country: USA ~
Posts: 96 ~
Member Since: September 12 2013 ~
Last Visit: November 19 2013
|
Alert Moderator
|
|
|
|
 Posted - September 16 2013 : 11:50:41 PM Posted - September 16 2013 : 11:50:41 PM
|
THIS is why I oughta have you do a custom paint on my Tyco SOO boxcar hehe 
|
|
Country: USA ~
Posts: 15028 ~
Member Since: February 23 2009 ~
Last Visit: June 14 2026
|
Alert Moderator
|
|
|
|
Posted - September 20 2013 : 01:38:08 AM
|
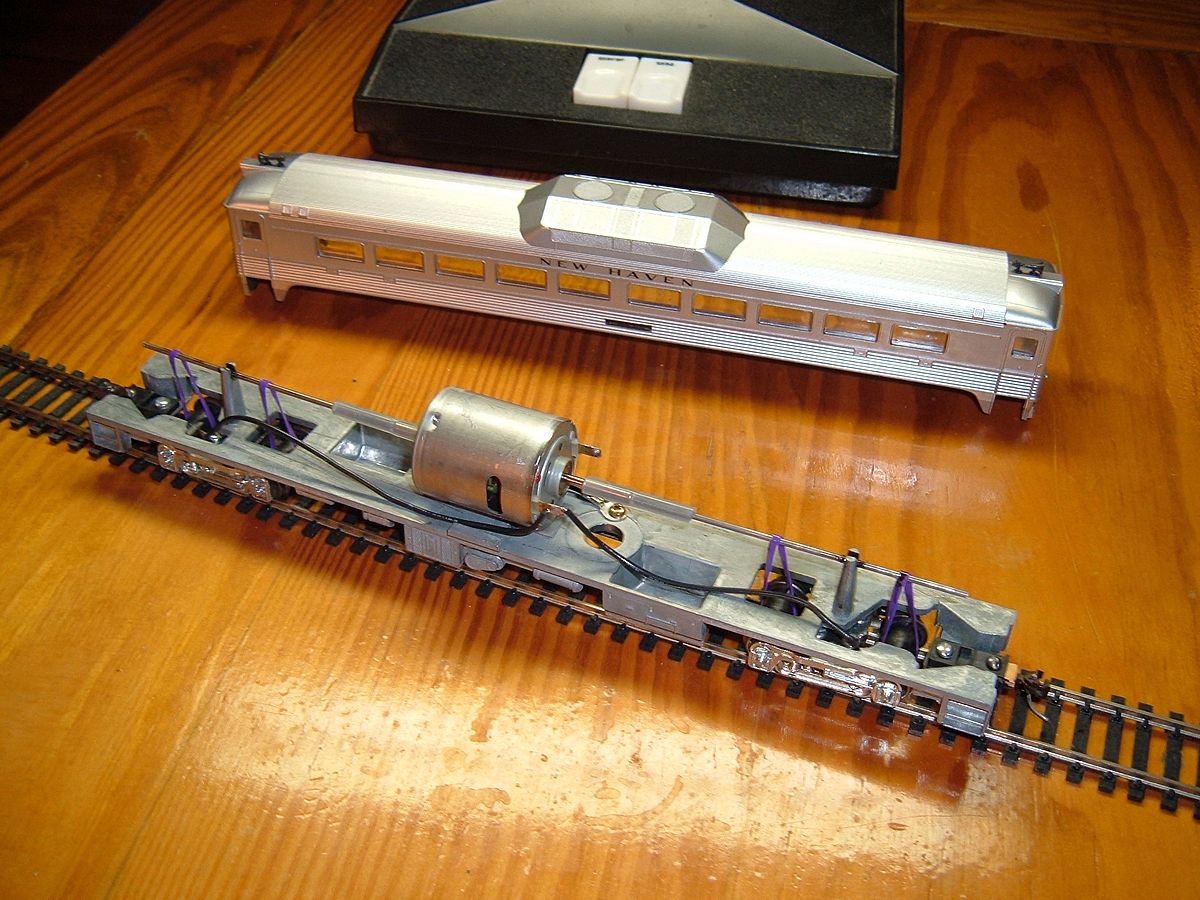
That's gorgeous, Ron. You could forgo the interior and power it this way, or use one like this to tow it. 
The Tyco Depot
|
|
Country: USA ~
Posts: 3927 ~
Member Since: June 20 2007 ~
Last Visit: November 19 2015
|
Alert Moderator
|
|
|
|
Posted - September 20 2013 : 4:24:42 PM
|
Ah, but that would require I re-replace the Intermountain wheels with the originals (which I still have), find some similar rubber bands to use. The motor, drive shaft and electrical work is now easy for me to do, but there goes the interior I might want to do still. However, there are another several swap meets coming up, and I might find a THIRD RDC3 to fiddle with. But if so, this one would be in a different livery, as too much of the same becomes visually boring. I will pin that idea (for a third one) to my projects list- so, thanks, Nels, for creating "more work" for me this winter!!!!!!!
Ron
|
|
Country: USA ~
Posts: 510 ~
Member Since: September 21 2011 ~
Last Visit: December 21 2014
|
Alert Moderator
|
|
|
|
Posted - September 21 2013 : 01:33:52 AM
|
Ron, you might be able to get the old drum axles over the Intermountain ones by drilling them out. That's a big 24 volt motor that All Electronics had about 5 years ago, but not since, unfortunately. It runs slow and smooth with a scale speed range, and is dead quiet. Together with the PVC hair bands it's actually a reliable runner. A very simple install, too: silicone fuel line tubing for shaft couplings, and 3M outdoor double-sided tape to mount the motor. Believe me, that stuff doesn't let go until you want it to, and even then it can be a fight. I nearly broke a diesel shell trying to pry a large lead weight out that I'd taped in with it. Had to use solvent to free it.
My commuters only have to squeeze themselves around that massive traction motor, and do their best not to get tangled up in the drive belts. Ya buys yer tickets and ya takes yer chances.
The Tyco Depot
|
|
Country: USA ~
Posts: 3927 ~
Member Since: June 20 2007 ~
Last Visit: November 19 2015
|
Alert Moderator
|
|
|
|
Posted - September 22 2013 : 09:52:13 AM
|
Nelson - this PVC tubing you speak of: it looks like something I need. Is this R/C model fuel tubing? Is there a specific size that you use?
http://tycodepot.com/
|
|
|
|
|
Posted - September 22 2013 : 12:29:00 PM
|
Jerry, that's the stuff: RC silicone fuel line tubing. Get the small size.
The Tyco Depot
|
|
Country: USA ~
Posts: 3927 ~
Member Since: June 20 2007 ~
Last Visit: November 19 2015
|
Alert Moderator
|
|
|
|
Posted - September 22 2013 : 4:24:26 PM
|
I agree with nelson, BUT, do yourself a BIG favor......Keep ALL oil and grease AWAY from the tubing, once installed, it ruins the "grip" on the shaft its on!!!!!
~John
Many have tried to, and failed, ya just can't repair stupid...
Do NOT try to Idiot-Proof anything!!!! God, will simply create a better......IDIOT!
|
|
Country: USA ~
Posts: 2911 ~
Member Since: March 26 2012 ~
Last Visit: January 14 2014
|
Alert Moderator
|
|
|
|
Posted - September 22 2013 : 4:58:30 PM
|
John, Nels, et al...
On that fuel line silicone tubing, I brought along a small motor with 2mm shafts to check which size of tubing was best- it has to be small and it needs to be a struggle to get it on the shaft, making me thing that the internal diameter of the tubing is something like 1.5mm or even 1.0mm.
I bought about 3 ft of it at the Hobbytown near me, so I can use it for other projects. The first use I made of it was to remotor an AHM GP-18, one I posted here quite a while ago.
I wiped the shafts with alcohol to remove any hand/skin oil, as that also could cause slippage, before pushing the fuel line onto each shaft.
Ron
|
|
Country: USA ~
Posts: 510 ~
Member Since: September 21 2011 ~
Last Visit: December 21 2014
|
Alert Moderator
|
|
|
|
Posted - September 22 2013 : 6:34:07 PM
|
John, I find that to be truer for the bands themselves, and though the PVC material seems oil resistant, they will slip. The great thing about silicone tubing is that it's impervious to oil, it's always best to wipe everything down with alcohol as Ron said. I keep the smallest amount of Teflon grease on the shaft support possible, but as long as the tubing has long enough sections of shaft to hold onto, a little oil migration isn't going to leave it spinning. If there's only a short amount of motor or gearbox shaft to work with, for e.g., I heat some small shrink tubing around it to give the silicone something to grab.
The Tyco Depot
|
|
Country: USA ~
Posts: 3927 ~
Member Since: June 20 2007 ~
Last Visit: November 19 2015
|
Alert Moderator
|
|