|
|
 Posted - October 10 2012 : 9:59:21 PM Posted - October 10 2012 : 9:59:21 PM


|
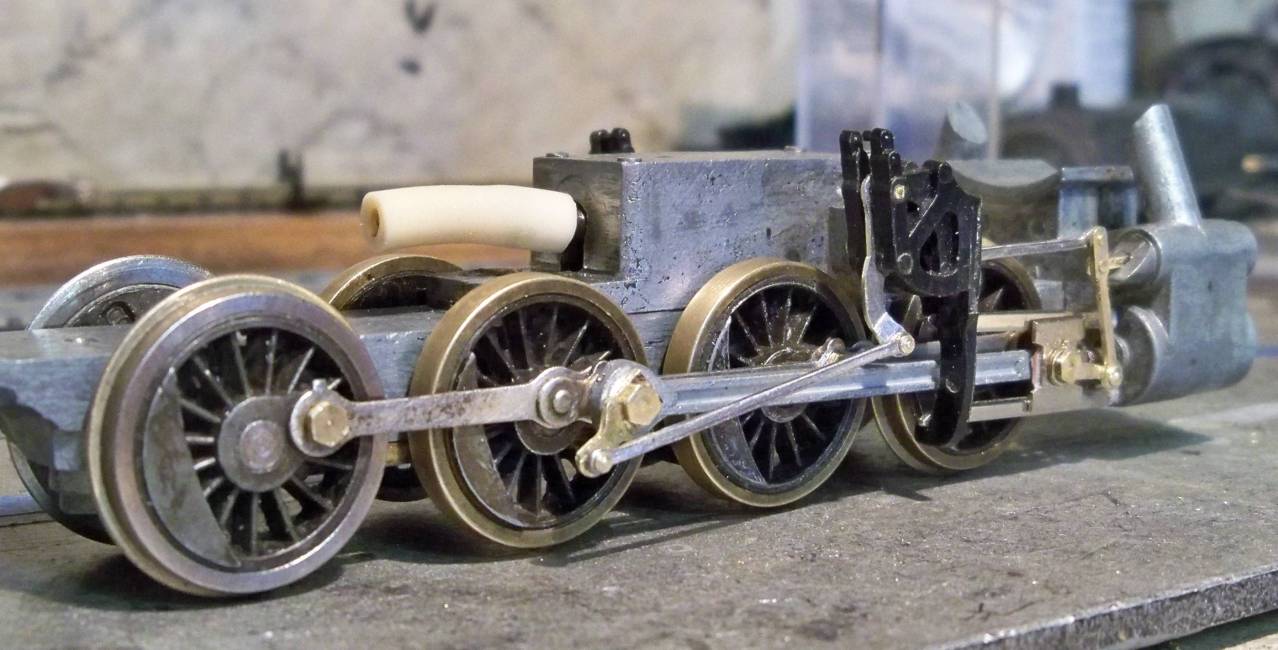
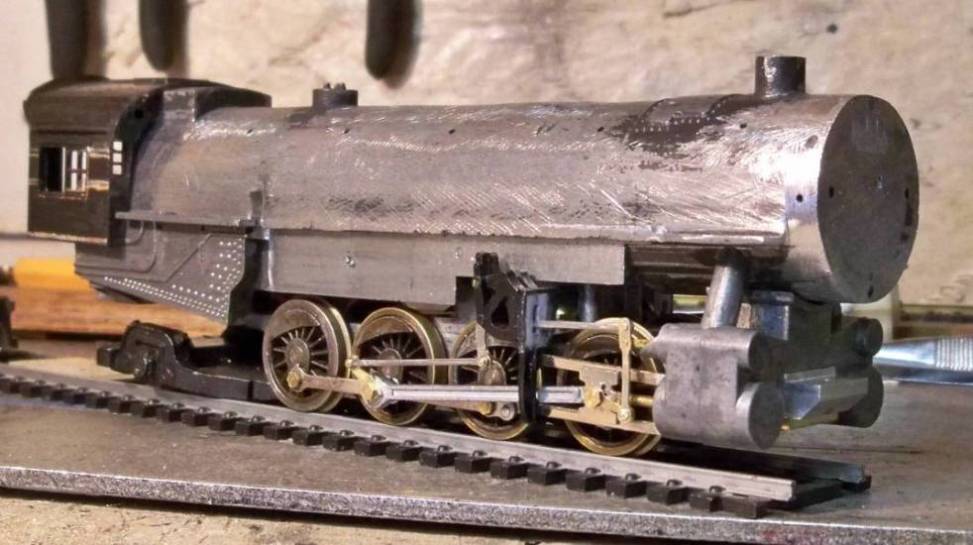
Here are a few photos of the Mantua Mikado I have been working on.
The crosshead guide hanger is a modified Tyco part with Hobbyline Berkshire valve gear hangers.
The main rods are Bowser. The connecting rods, crank pins, drivers, frame and cylinders are Mantua.
Almost everything else was built from scratch.
Ray
Edited by - Ray Marinaccio on October 26 2012 4:10:55 PM
|
Country:  USA ~
Posts: 1285 ~
Member Since: December 14 2005 ~
Last Visit: May 16 2019 USA ~
Posts: 1285 ~
Member Since: December 14 2005 ~
Last Visit: May 16 2019
|
 Alert Moderator
|
|
|
|
Posted - October 10 2012 : 10:53:59 PM
|
Ray, weren't those Chattanooga valve gear hangars? So you grafted the Berk ones onto them?
Also, what material is the white tubing?
The Tyco Depot
|
|
Country: USA ~
Posts: 3927 ~
Member Since: June 20 2007 ~
Last Visit: November 19 2015
|
Alert Moderator

|
|
|
|
Posted - October 10 2012 : 11:19:33 PM
|
quote:Ray, weren't those Chattanooga valve gear hangars? So you grafted the Berk ones onto them?
Also, what material is the white tubing?
Originally posted by NickelPlate759 - October 10 2012 : 10:53:59 PM
|
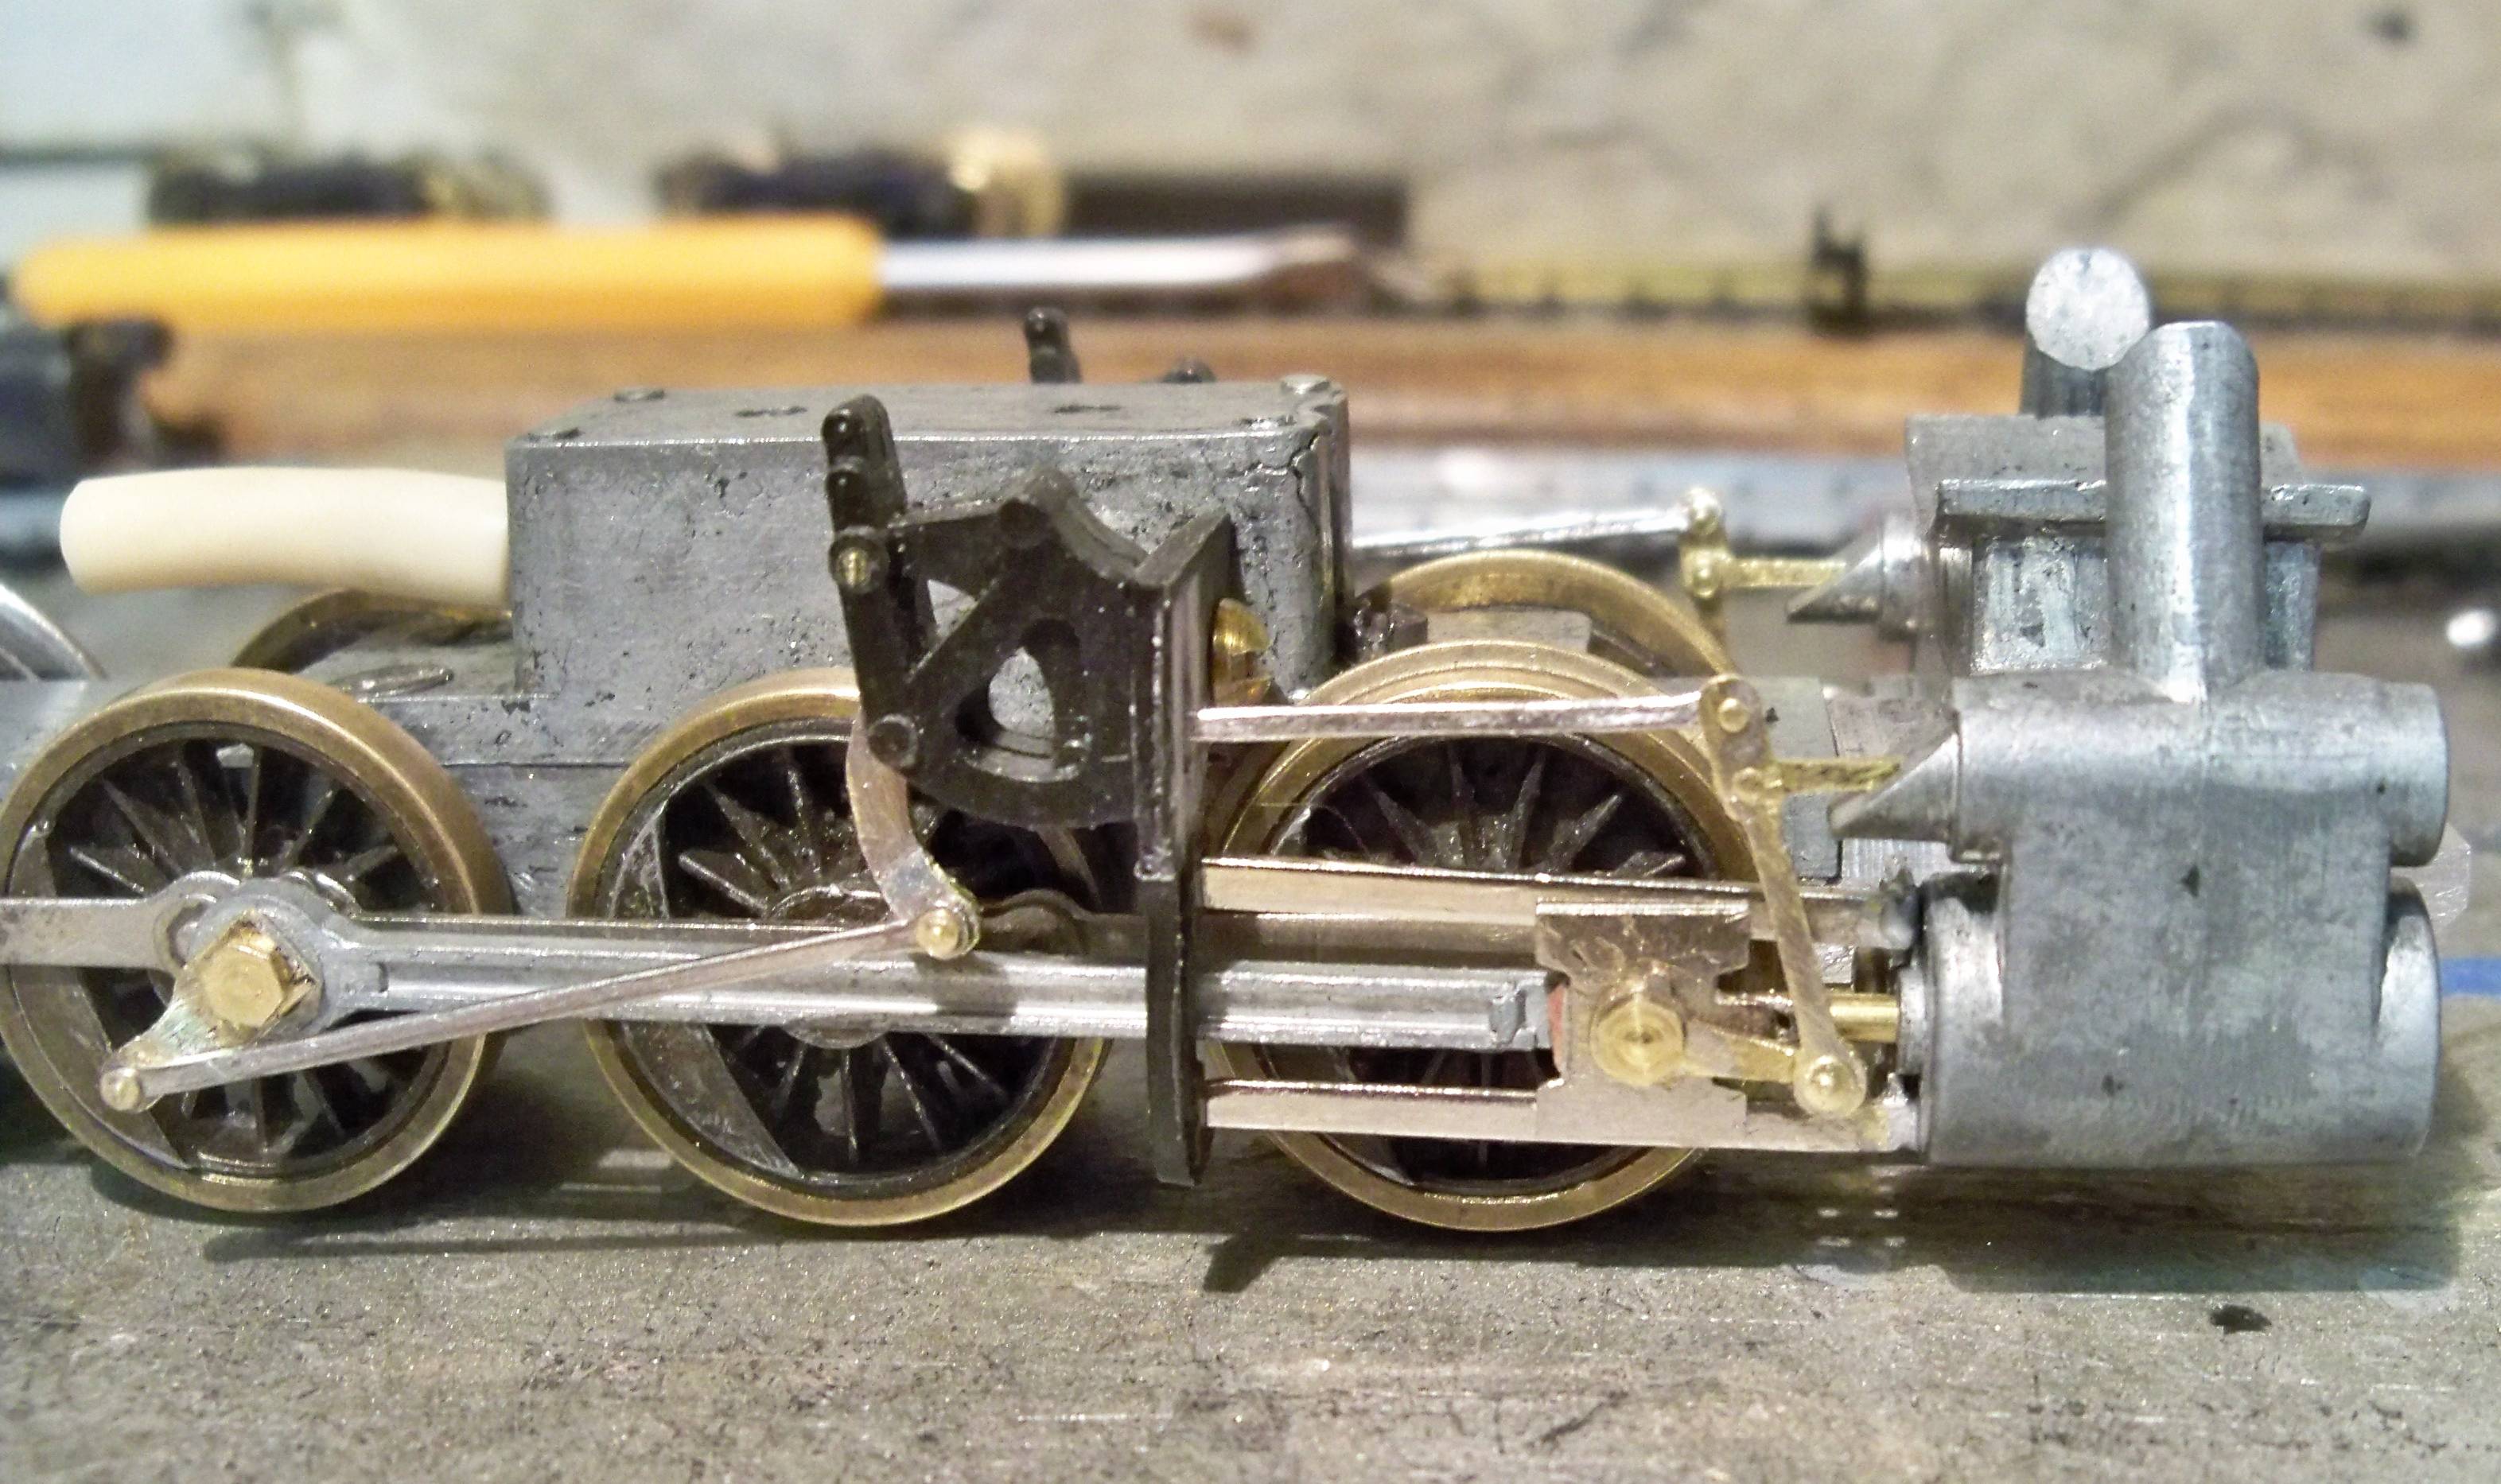
Yes they are (where) Chattanooga valve gear hangers.
I cut off the Tyco ends and glued the valve gear hangers from the Hobbyline Berkshire onto the Tyco crosshead guide yoke
I had to cut the center out of the yoke to make it fit the gear box.
The tubing is silicone

Ray
|
|
Country: USA ~
Posts: 1285 ~
Member Since: December 14 2005 ~
Last Visit: May 16 2019
|
Alert Moderator
|
|
|
|
Posted - October 11 2012 : 07:47:48 AM


|
Ray,
Where did you get the white silicone tubing from?
EDIT:
Forgot to mention, "As always, GREAT work!" What or how did you get glue to adhere to the old TYCO valve gear hanger? What type glue did you use as thats a slippery machine plastic, and I have yet to find a glue to stick to it.....
~John
Many have tried to, and failed, ya just can't repair stupid... 
Do NOT try to Idiot-Proof anything!!!! God, will simply create a better......IDIOT!
Edited by - EM-1 on October 11 2012 07:52:54 AM
|
|
Country: USA ~
Posts: 2911 ~
Member Since: March 26 2012 ~
Last Visit: January 14 2014
|
Alert Moderator
|
|
|
|
Posted - October 11 2012 : 10:56:52 AM
|
quote:Ray,
Where did you get the white silicone tubing from?
EDIT:
Forgot to mention, "As always, GREAT work!" What or how did you get glue to adhere to the old TYCO valve gear hanger? What type glue did you use as thats a slippery machine plastic, and I have yet to find a glue to stick to it.....
Originally posted by EM-1 - October 11 2012 : 07:47:48 AM
|
The tubing was something I pulled out of an old printer that I cannibalized.
I used PVC purple primer to glue that type of plastic.
Ray
|
|
Country: USA ~
Posts: 1285 ~
Member Since: December 14 2005 ~
Last Visit: May 16 2019
|
Alert Moderator
|
|
|
|
Posted - October 26 2012 : 4:19:49 PM
|
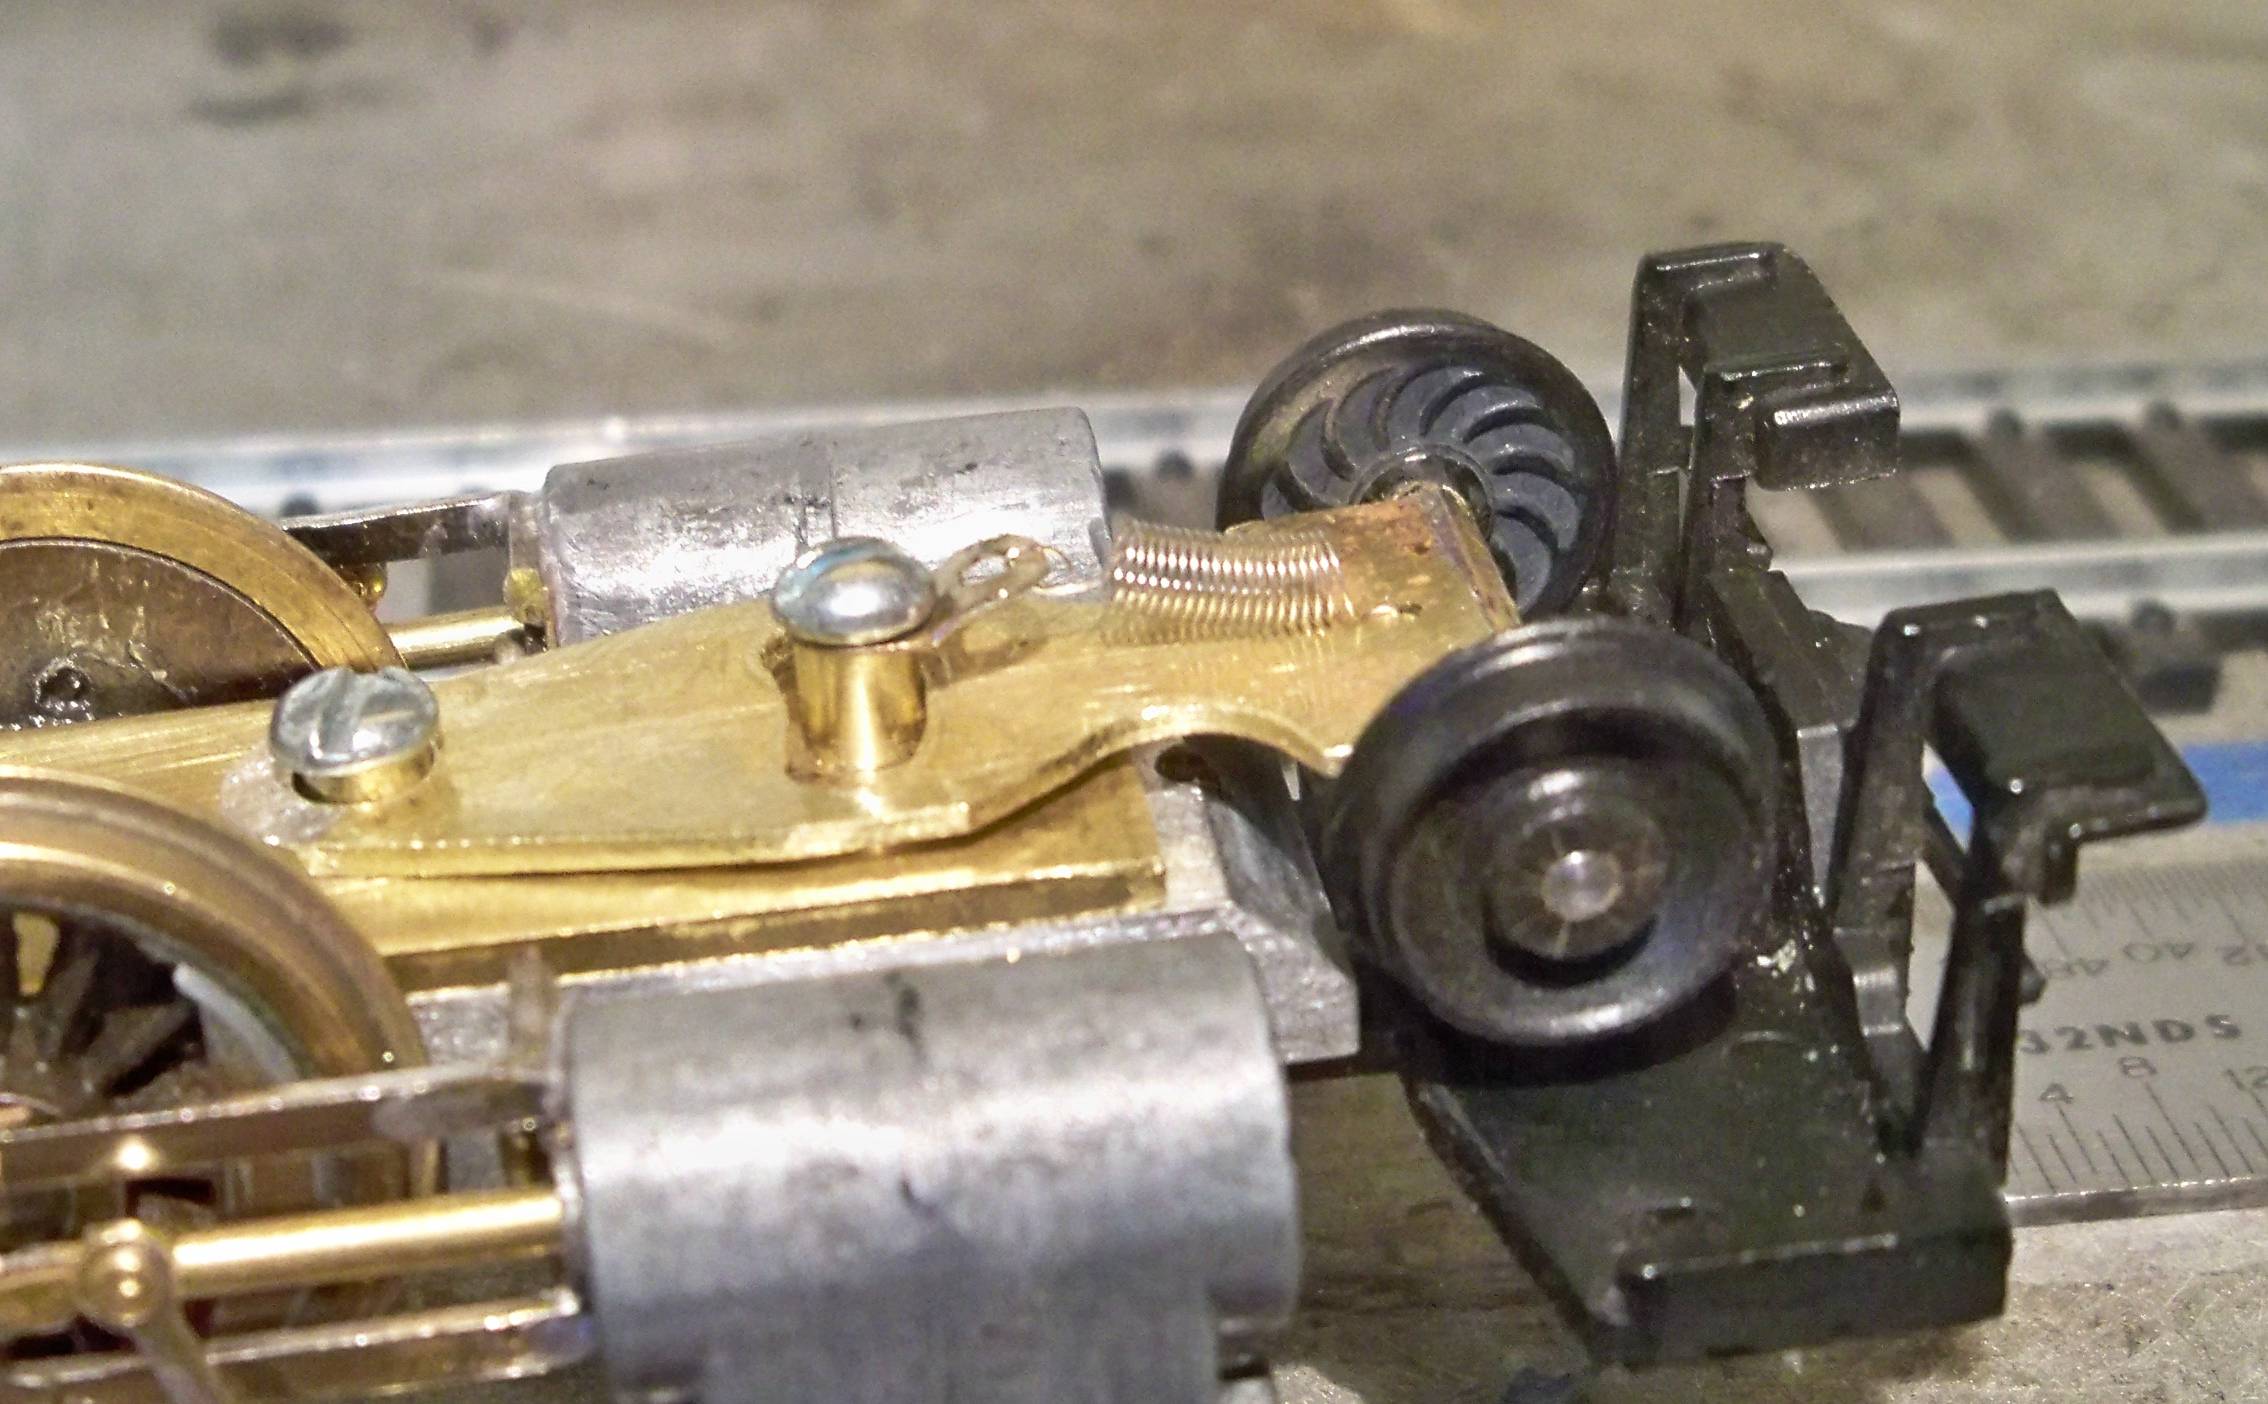
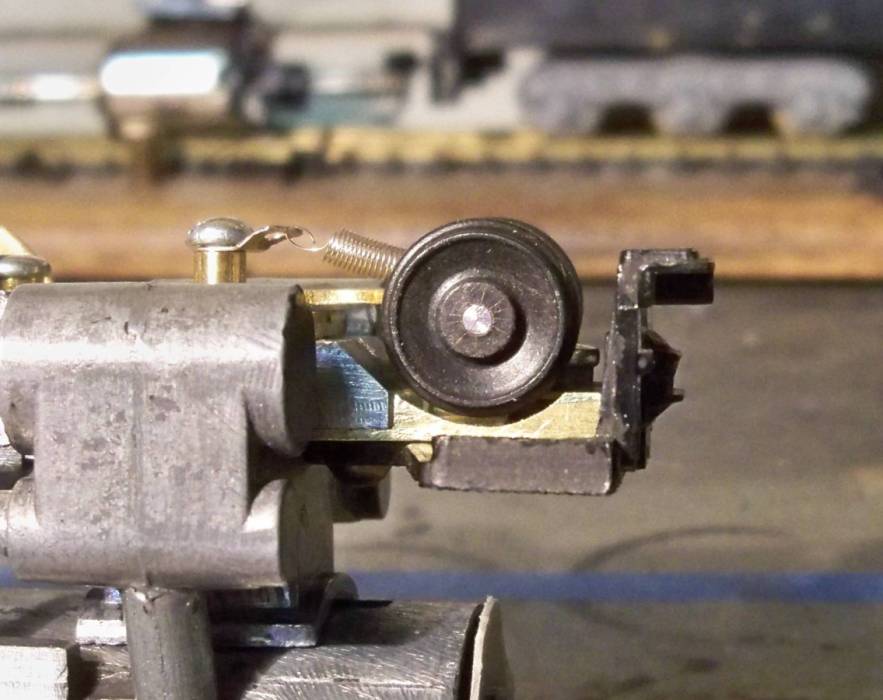
This is the pilot truck I built and a foot board pilot from a Tyco 0-8-0.
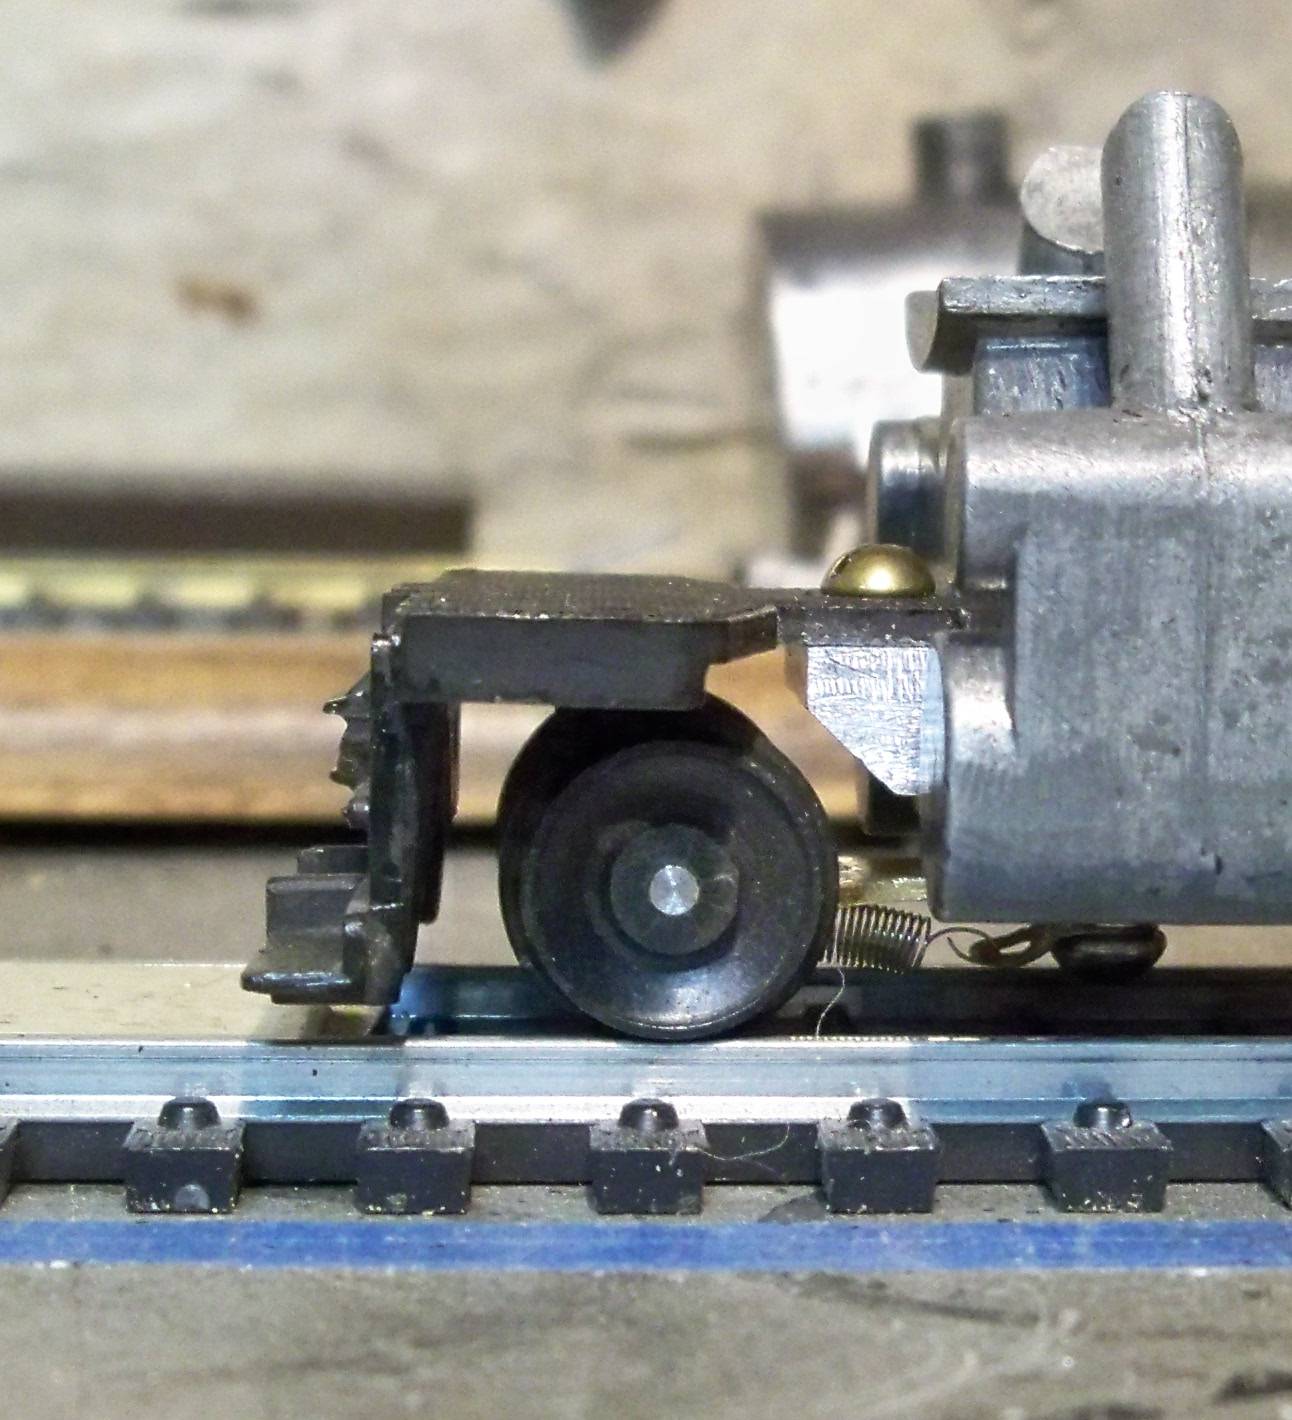
Ray
|
|
Country: USA ~
Posts: 1285 ~
Member Since: December 14 2005 ~
Last Visit: May 16 2019
|
Alert Moderator
|
|
|
|
Posted - October 26 2012 : 8:43:58 PM
|
Nice swivel arm, Ray. I take it the screw the centering spring is on is the one that goes up into the steam chest?
Those RP25 wheels Tyco had for a while were nice. I had them on a few red box cars. It's a shame they didn't stick with them, since I didn't have a problem with them tracking.
The Tyco Depot
|
|
Country: USA ~
Posts: 3927 ~
Member Since: June 20 2007 ~
Last Visit: November 19 2015
|
Alert Moderator
|
|
|
|
Posted - October 27 2012 : 12:08:24 AM
|
It is the bolt that holds the cylinders.
The rear screw that the pilot truck pivots on also holds the bottom plate to the frame.
I like the Tyco RP-25 wheels too and use them whenever I can find them.
Ray
|
|
Country: USA ~
Posts: 1285 ~
Member Since: December 14 2005 ~
Last Visit: May 16 2019
|
Alert Moderator
|
|
|
|
Posted - October 27 2012 : 01:15:50 AM
|
A little off topic here...........but I have to comment on Ray's camera! What type camera you using for these pictures? I got a good ole Wal-Mart special, thats from Kodak, BUT I can't seem to get "THAT"" close up with mine.....
As for the craftsmanship, as always, VERY nicely done Ray! I must say, you got to love those old Mantua's with the covered gearboxes! I LOVE 'em just for the sake of adding a serious can motor behind them! I wished, I could cough up just one good Mantua cast cover, so I could mold it for use on ALL the later models that didn't have them as then you could make up your own worm gear from an existing and bearings as well to fit them Mantua and make a better "transmission" so to speak....Not to mention be easier to add in a can motor too, and a bit more quiet running I do believe!
~John
Many have tried to, and failed, ya just can't repair stupid...
Do NOT try to Idiot-Proof anything!!!! God, will simply create a better......IDIOT!
|
|
Country: USA ~
Posts: 2911 ~
Member Since: March 26 2012 ~
Last Visit: January 14 2014
|
Alert Moderator
|
|
|
|
Posted - October 27 2012 : 02:22:34 AM
|
quote:A little off topic here...........but I have to comment on Ray's camera! What type camera you using for these pictures? I got a good ole Wal-Mart special, thats from Kodak, BUT I can't seem to get "THAT"" close up with mine.....
Originally posted by EM-1 - October 27 2012 : 01:15:50 AM
|
Mine is a Kodak Z950 from Wal-Mart
I take a larger photo then crop it, then resize it if necessary.
I would like to have a few more of the Mantua gear covers too.
I did buy a couple of the 80s era Mantua Power drive gearboxes. They are nice too.
I have also made my own enclosed worm mounts but they take awhile to fabricate because I never seem to record the dimensions to make duplicates from.
Thanks.
Ray
Edited by - Ray Marinaccio on October 27 2012 02:27:05 AM
|
|
Country: USA ~
Posts: 1285 ~
Member Since: December 14 2005 ~
Last Visit: May 16 2019
|
Alert Moderator
|
|
|
|
Posted - October 27 2012 : 02:40:16 AM
|
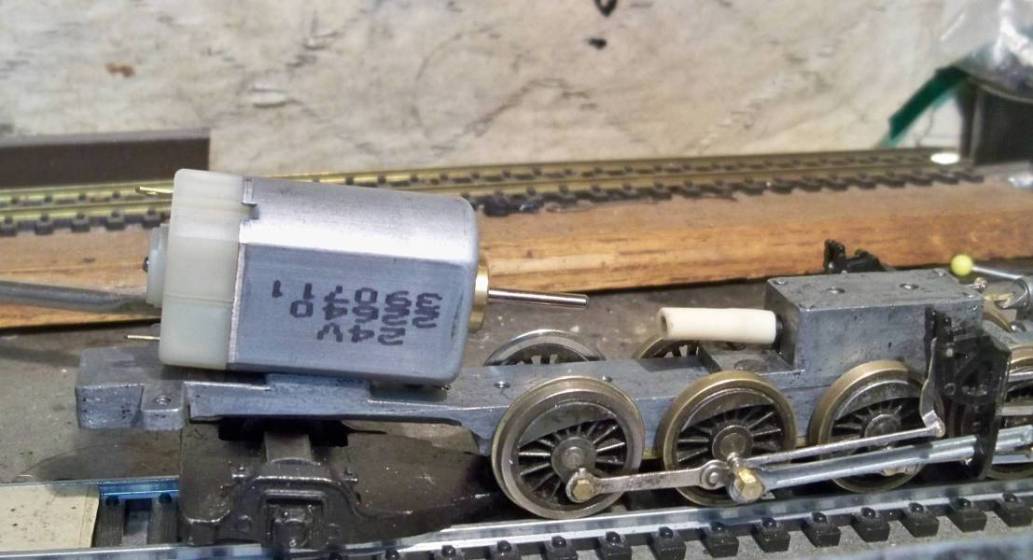
This is the motor I plan to use.
It is a 24 volt 5 pole motor I got for less than a couple of bucks.
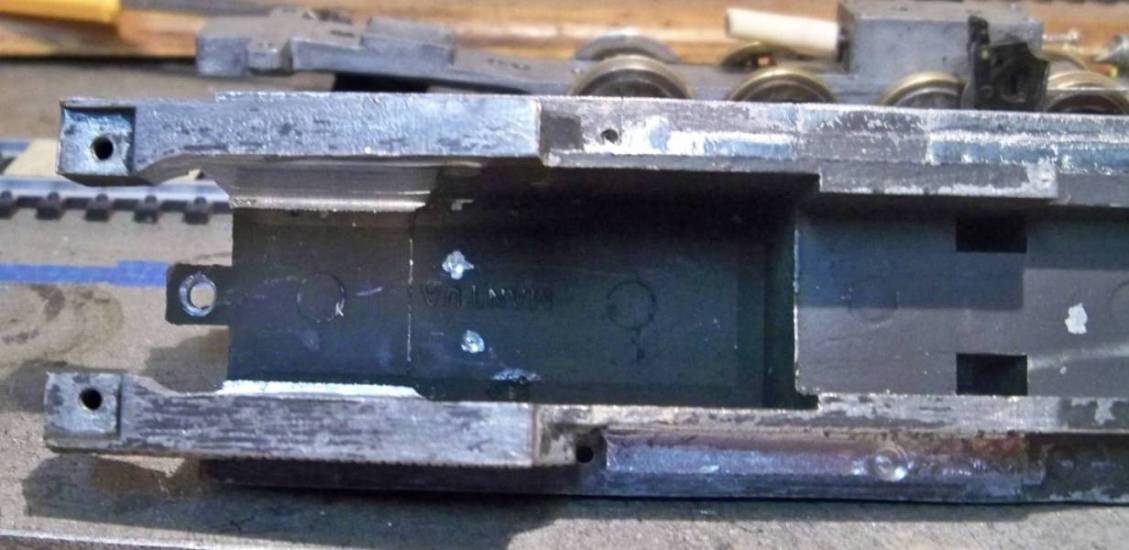
I had to do some milling on the inside of the fire box for it to fit.
The last photo shows what's left of the boiler after milling and filing off the unwanted details.
Ray
|
|
Country: USA ~
Posts: 1285 ~
Member Since: December 14 2005 ~
Last Visit: May 16 2019
|
Alert Moderator
|
|
|
|
Posted - October 27 2012 : 02:58:32 AM
|
quote: quote:A little off topic here...........but I have to comment on Ray's camera! What type camera you using for these pictures? I got a good ole Wal-Mart special, thats from Kodak, BUT I can't seem to get "THAT"" close up with mine.....
Originally posted by EM-1 - October 27 2012 : 01:15:50 AM
|
Mine is a Kodak Z950 from Wal-Mart
I take a larger photo then crop it, then resize it if necessary.
I would like to have a few more of the Mantua gear covers too.
I did buy a couple of the 80s era Mantua Power drive gearboxes. They are nice too.
I have also made my own enclosed worm mounts but they take awhile to fabricate because I never seem to record the dimensions to make duplicates from.
Thanks.
Originally posted by Ray Marinaccio - October 27 2012 : 02:22:34 AM
|
Ray,
I have a C182.....Does half decent video and I can get relatively close, but nothing like you have......what is your zoom capabilities?
Question, do you have ANY of the same Mantua gear boxes covers? Like the one pictured here on that 2-8-2? I'd mold that from resin plastic, and add in my own brass/bronze bearings to make it work! As the resin, might be more apt to "quite" the big mouth so to speak!?
Just a thought, let me know in a PM if interested!
Also that enclosed worm mounts but they take awhile to fabricate, you mentioned, I'd cast one of those too! It be much easier to use the casting to make them from you would have to merely make a bearing to fit in the proper place with the resin part. Nice thing, is that it does not get harmed by oils or grease, or that I'm aware of....So, might be a good idea, or so I think it would be!
If it does work, IT make it worth its weight in gold for those of use that want to do what you have pictured here with the can motor....I've been using the Canon DN 22's in mine and have to mill out the boiler shell inside to fit that big can in it but man, it makes a REAL difference in the pulling capabilities of those locomotives! Now to figure out a "coned" flywheel! to go between the worm, AND the motor!
~John
Many have tried to, and failed, ya just can't repair stupid...
Do NOT try to Idiot-Proof anything!!!! God, will simply create a better......IDIOT!
|
|
Country: USA ~
Posts: 2911 ~
Member Since: March 26 2012 ~
Last Visit: January 14 2014
|
Alert Moderator
|
|
|
|
Posted - October 27 2012 : 3:52:46 PM
|
I have that same motor. I think I got it form All Electronics. It's quite long, so I haven't put it in anything yet.
The Tyco Depot
|
|
Country: USA ~
Posts: 3927 ~
Member Since: June 20 2007 ~
Last Visit: November 19 2015
|
Alert Moderator
|
|
|
|
Posted - October 27 2012 : 4:53:06 PM
|
quote:I have that same motor. I think I got it form All Electronics. It's quite long, so I haven't put it in anything yet.
Originally posted by NickelPlate759 - October 27 2012 : 3:52:46 PM
|
That is where I got mine.
They are a little longer than the Cannon motor John mentioned (which I do prefer using) but these 24 volt motors were inexpensive so I thought I'd try a few.
Ray
|
|
Country: USA ~
Posts: 1285 ~
Member Since: December 14 2005 ~
Last Visit: May 16 2019
|
Alert Moderator
|
|
|
|
Posted - October 27 2012 : 7:08:12 PM
|
Guys,
whats the skew number on those 24 volt motors???? I'm interested in a few of those, myself!
~John
Many have tried to, and failed, ya just can't repair stupid...
Do NOT try to Idiot-Proof anything!!!! God, will simply create a better......IDIOT!
|
|
Country: USA ~
Posts: 2911 ~
Member Since: March 26 2012 ~
Last Visit: January 14 2014
|
Alert Moderator
|
|
|
|
Posted - October 27 2012 : 7:15:33 PM
|
They haven't had them in quite some time. A few years ago there was someone on eBay reselling them for quite a profit.
The Tyco Depot
|
|
Country: USA ~
Posts: 3927 ~
Member Since: June 20 2007 ~
Last Visit: November 19 2015
|
Alert Moderator
|
|
|
|
Posted - December 01 2012 : 01:48:23 AM
|
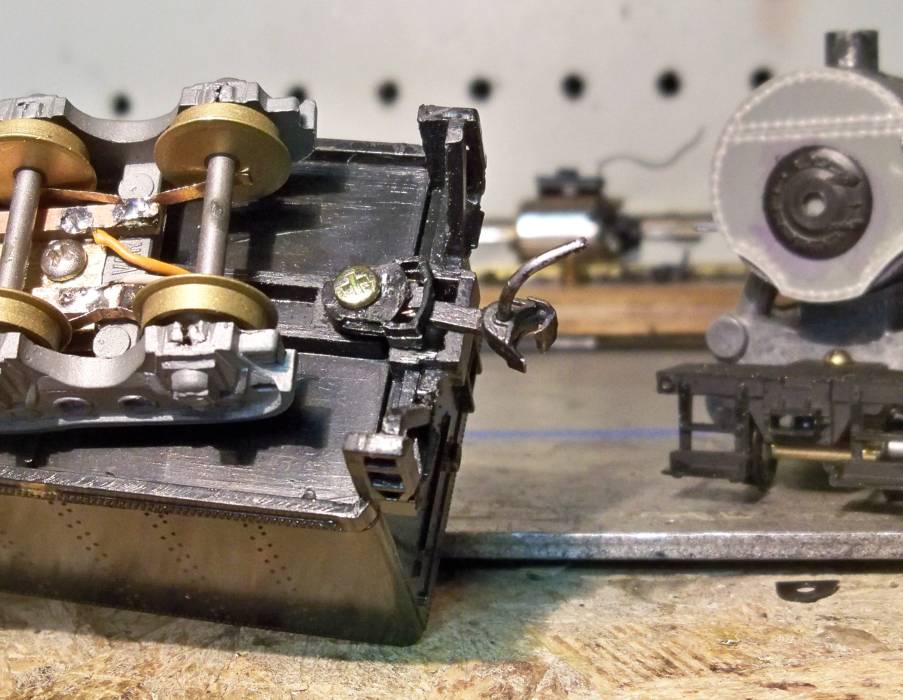
After mounting the motor and getting the tender put together, I was able to test run this project on the layout.
The tender is a Hobbyline Berkshire tender with Varney 6 wheel trucks.
I made brackets that fit into the trucks to hold the wipers for electrical pickup.
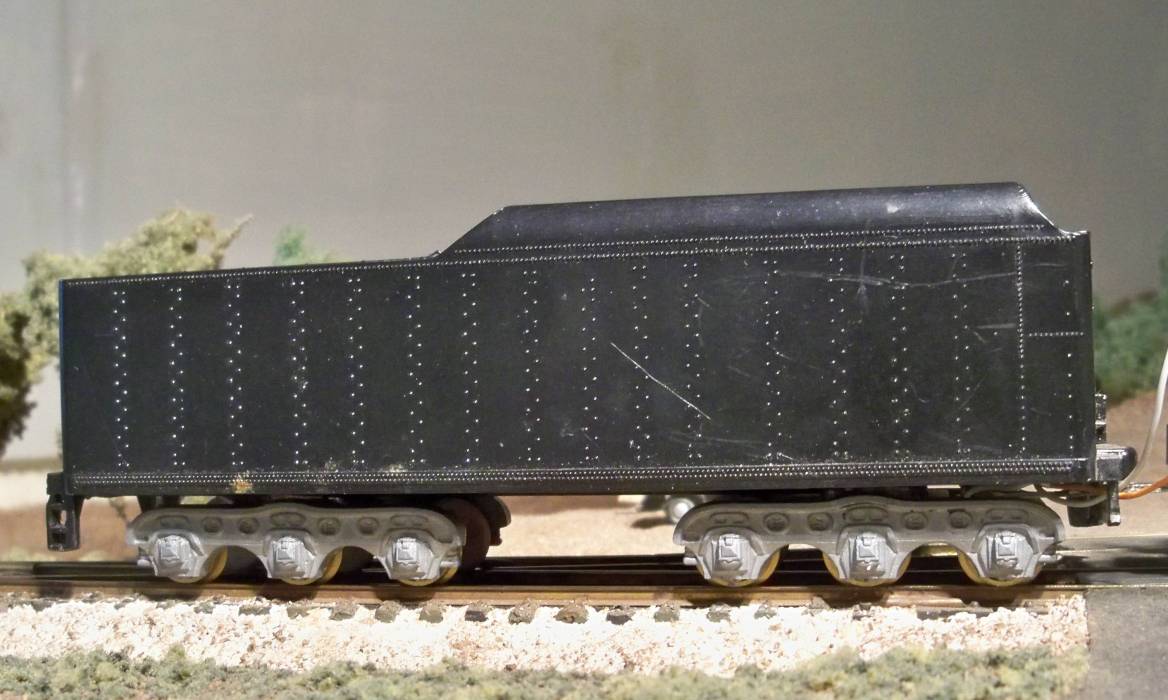
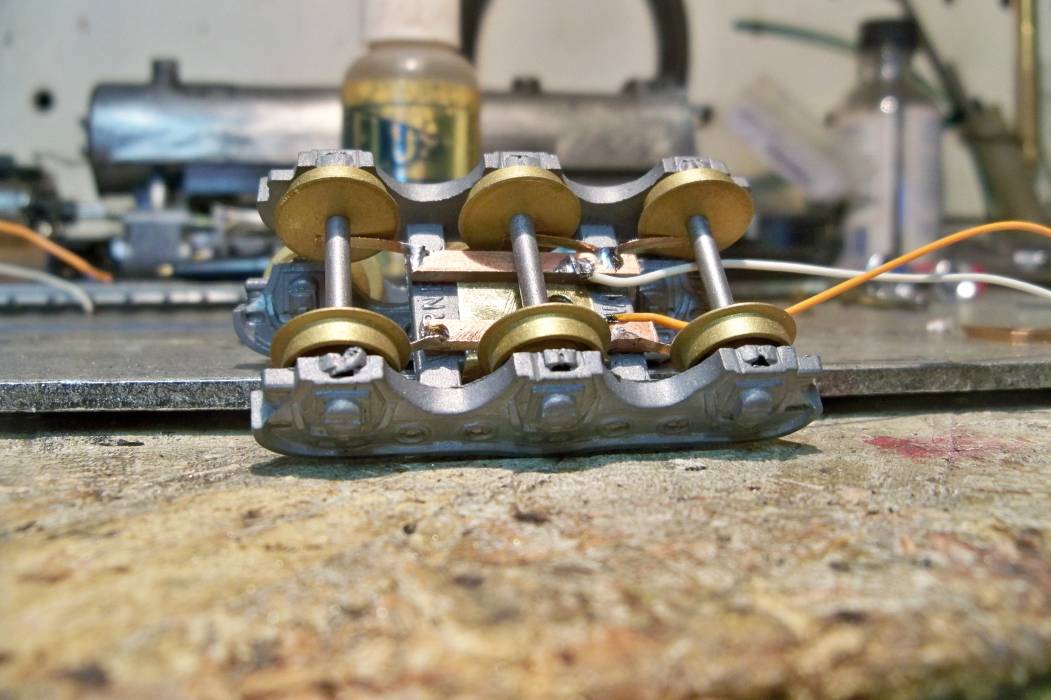
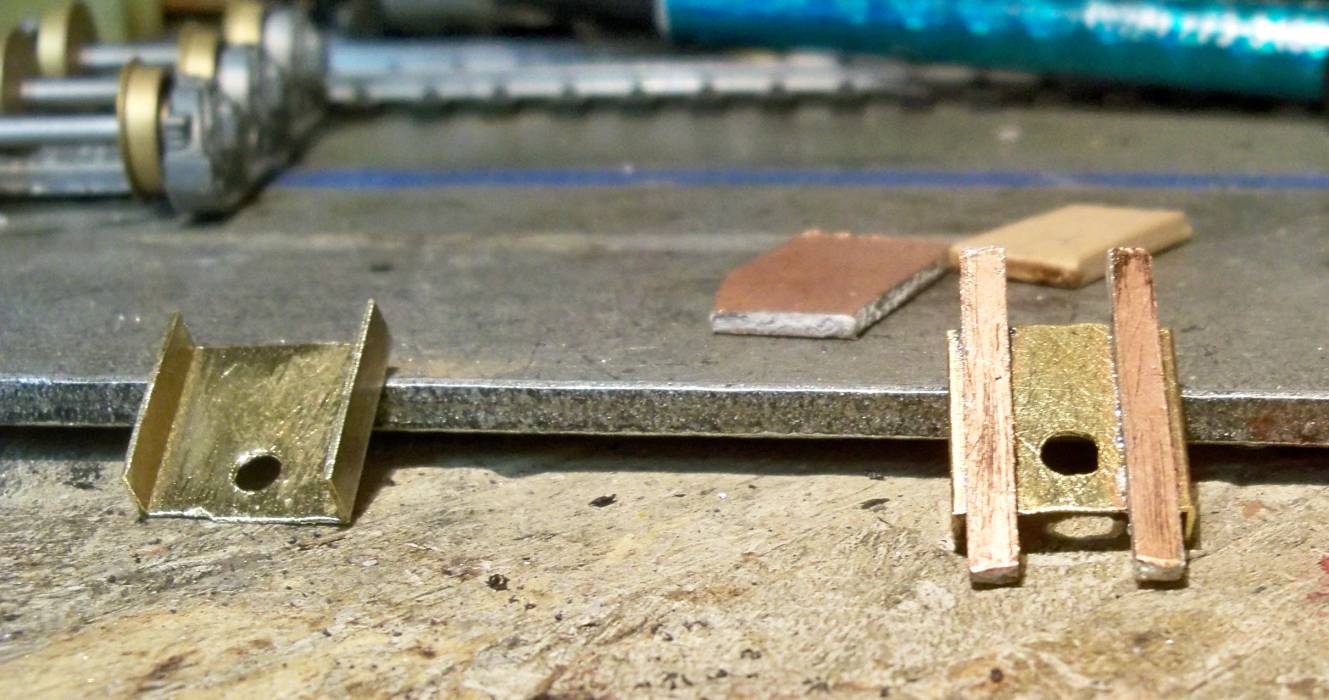
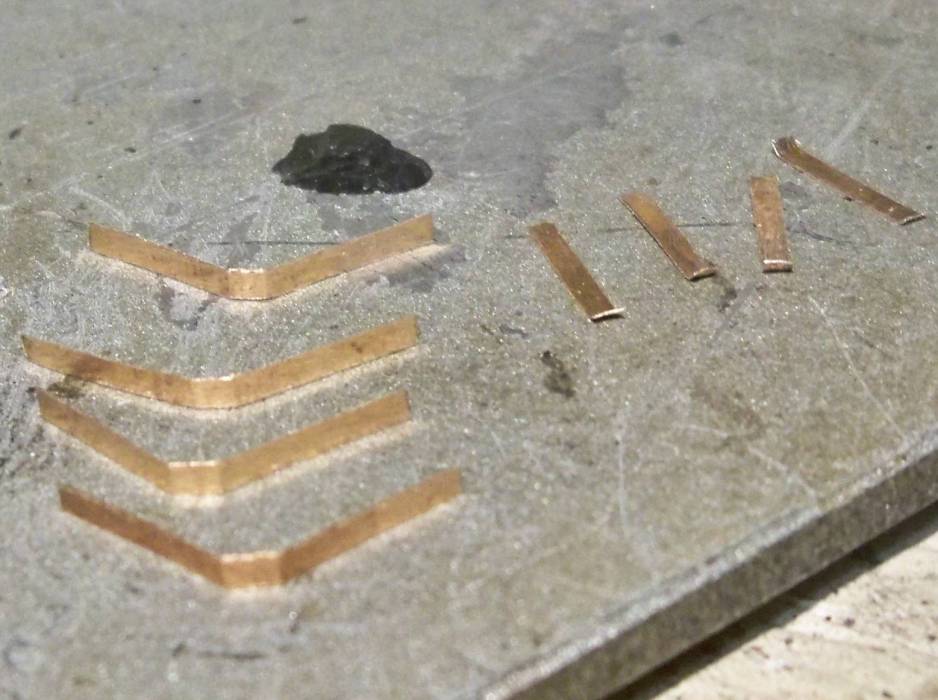
Ray
|
|
Country: USA ~
Posts: 1285 ~
Member Since: December 14 2005 ~
Last Visit: May 16 2019
|
Alert Moderator
|
|
|
|
Posted - December 01 2012 : 02:32:19 AM
|
Ray,
Again, AMAZING work! I got to get to a point to begin working on my old Arbour Models C&O H-8......
But, customers first is what I have to keep telling myself!
~John
Many have tried to, and failed, ya just can't repair stupid...
Do NOT try to Idiot-Proof anything!!!! God, will simply create a better......IDIOT!
|
|
Country: USA ~
Posts: 2911 ~
Member Since: March 26 2012 ~
Last Visit: January 14 2014
|
Alert Moderator
|
|
|
|
Posted - December 01 2012 : 10:38:51 PM
|
Wow, excellent craftsmanship Ray, what kind of tool do you use for your milling work? If you use a Dremel Tool which attachments to you use?
Proudly keeping Tyco Pluggers out of landfills since 2016
|
|
Country: USA ~
Posts: 821 ~
Member Since: December 26 2009 ~
Last Visit: July 08 2026
|
Alert Moderator
|
|
|
|
Posted - December 01 2012 : 11:03:04 PM
|
Can't wait to see it all done!
" Heck with counting 'em rivets, TRAINS ARE FOR FUN! Not called the Mad Scientist for nothing either!"
|
|
Country: USA ~
Posts: 3147 ~
Member Since: May 07 2007 ~
Last Visit: June 01 2026
|
Alert Moderator
|
|
|
|
Posted - December 01 2012 : 11:05:02 PM
|
Thanks,
I have a Sherline milling machine and lathe.
Alot of the work I have done with the milling machine can be done with a Dremel, saws and files. That's what I used to (and sometimes still) use.
John, Hope you can get caught up on customer work and get some of your own projects done. I can't wait to see that Arbour Models H-8 finished.
Ray
|
|
Country: USA ~
Posts: 1285 ~
Member Since: December 14 2005 ~
Last Visit: May 16 2019
|
Alert Moderator
|
|
|
|
Posted - December 02 2012 : 12:49:58 AM
|
Ray,
Thanks I too can't wait to get it done!
But with the Christmas rush on me, I'm working like 20/7..... all week! I got a ton of repairs and then trades as well and parts orders, I'd like out of my shop by the second week of December at the latest, if I can make that dead line......
IF all goes well, I hope to get a parts order out of brass detail parts and have them, by Christmas so I can go on with the brass detailing of the H-8......I get that far, by say January 1st, I'd be happy and ahead of the game!
~John
Many have tried to, and failed, ya just can't repair stupid...
Do NOT try to Idiot-Proof anything!!!! God, will simply create a better......IDIOT!
|
|
Country: USA ~
Posts: 2911 ~
Member Since: March 26 2012 ~
Last Visit: January 14 2014
|
Alert Moderator
|
|
|
|
Posted - December 08 2012 : 11:30:01 AM
|
Ray,
An ambitious project with excellent craftsmanship.
I marveled at the side rods and valve gear on another project too.
Alco Fan
|
|
Country: USA ~
Posts: 2496 ~
Member Since: August 03 2006 ~
Last Visit: September 17 2024
|
Alert Moderator
|
|
|
|
Posted - December 08 2012 : 12:50:47 PM
|
quote:Ray,
An ambitious project with excellent craftsmanship.
I marveled at the side rods and valve gear on another project too.
Originally posted by Alco Fan - December 08 2012 : 11:30:01 AM
|
Thanks,
I've built quite a few sets of valve gear for different locomotives and have more on the to do list. A glutton for punishment I guess. 
I can remember looking at those articles in the 60s and 70s RMC and MR magazines and wishing I could do that. It has taken alot of practice but I'm getting there.
Ray
|
|
Country: USA ~
Posts: 1285 ~
Member Since: December 14 2005 ~
Last Visit: May 16 2019
|
Alert Moderator
|
|
|
|
Posted - December 08 2012 : 12:53:51 PM
|
Ray,
I have to say you and I must read the same articles! I too have those issues and I have been doing such crazy crap ever since!
Nice tho, is that MR and RMC HAD issues back then, with articles like that. A lot to be desired of, today in the same magazines!
~John
Many have tried to, and failed, ya just can't repair stupid...
Do NOT try to Idiot-Proof anything!!!! God, will simply create a better......IDIOT!
|
|
Country: USA ~
Posts: 2911 ~
Member Since: March 26 2012 ~
Last Visit: January 14 2014
|
Alert Moderator
|
|
|
|
Posted - December 08 2012 : 1:29:43 PM
|
quote:Ray,
Nice tho, is that MR and RMC HAD issues back then, with articles like that. A lot to be desired of, today in the same magazines!
Originally posted by EM-1 - December 08 2012 : 12:53:51 PM
|
I guess it is up to guys like us to promote this area of the hobby now.
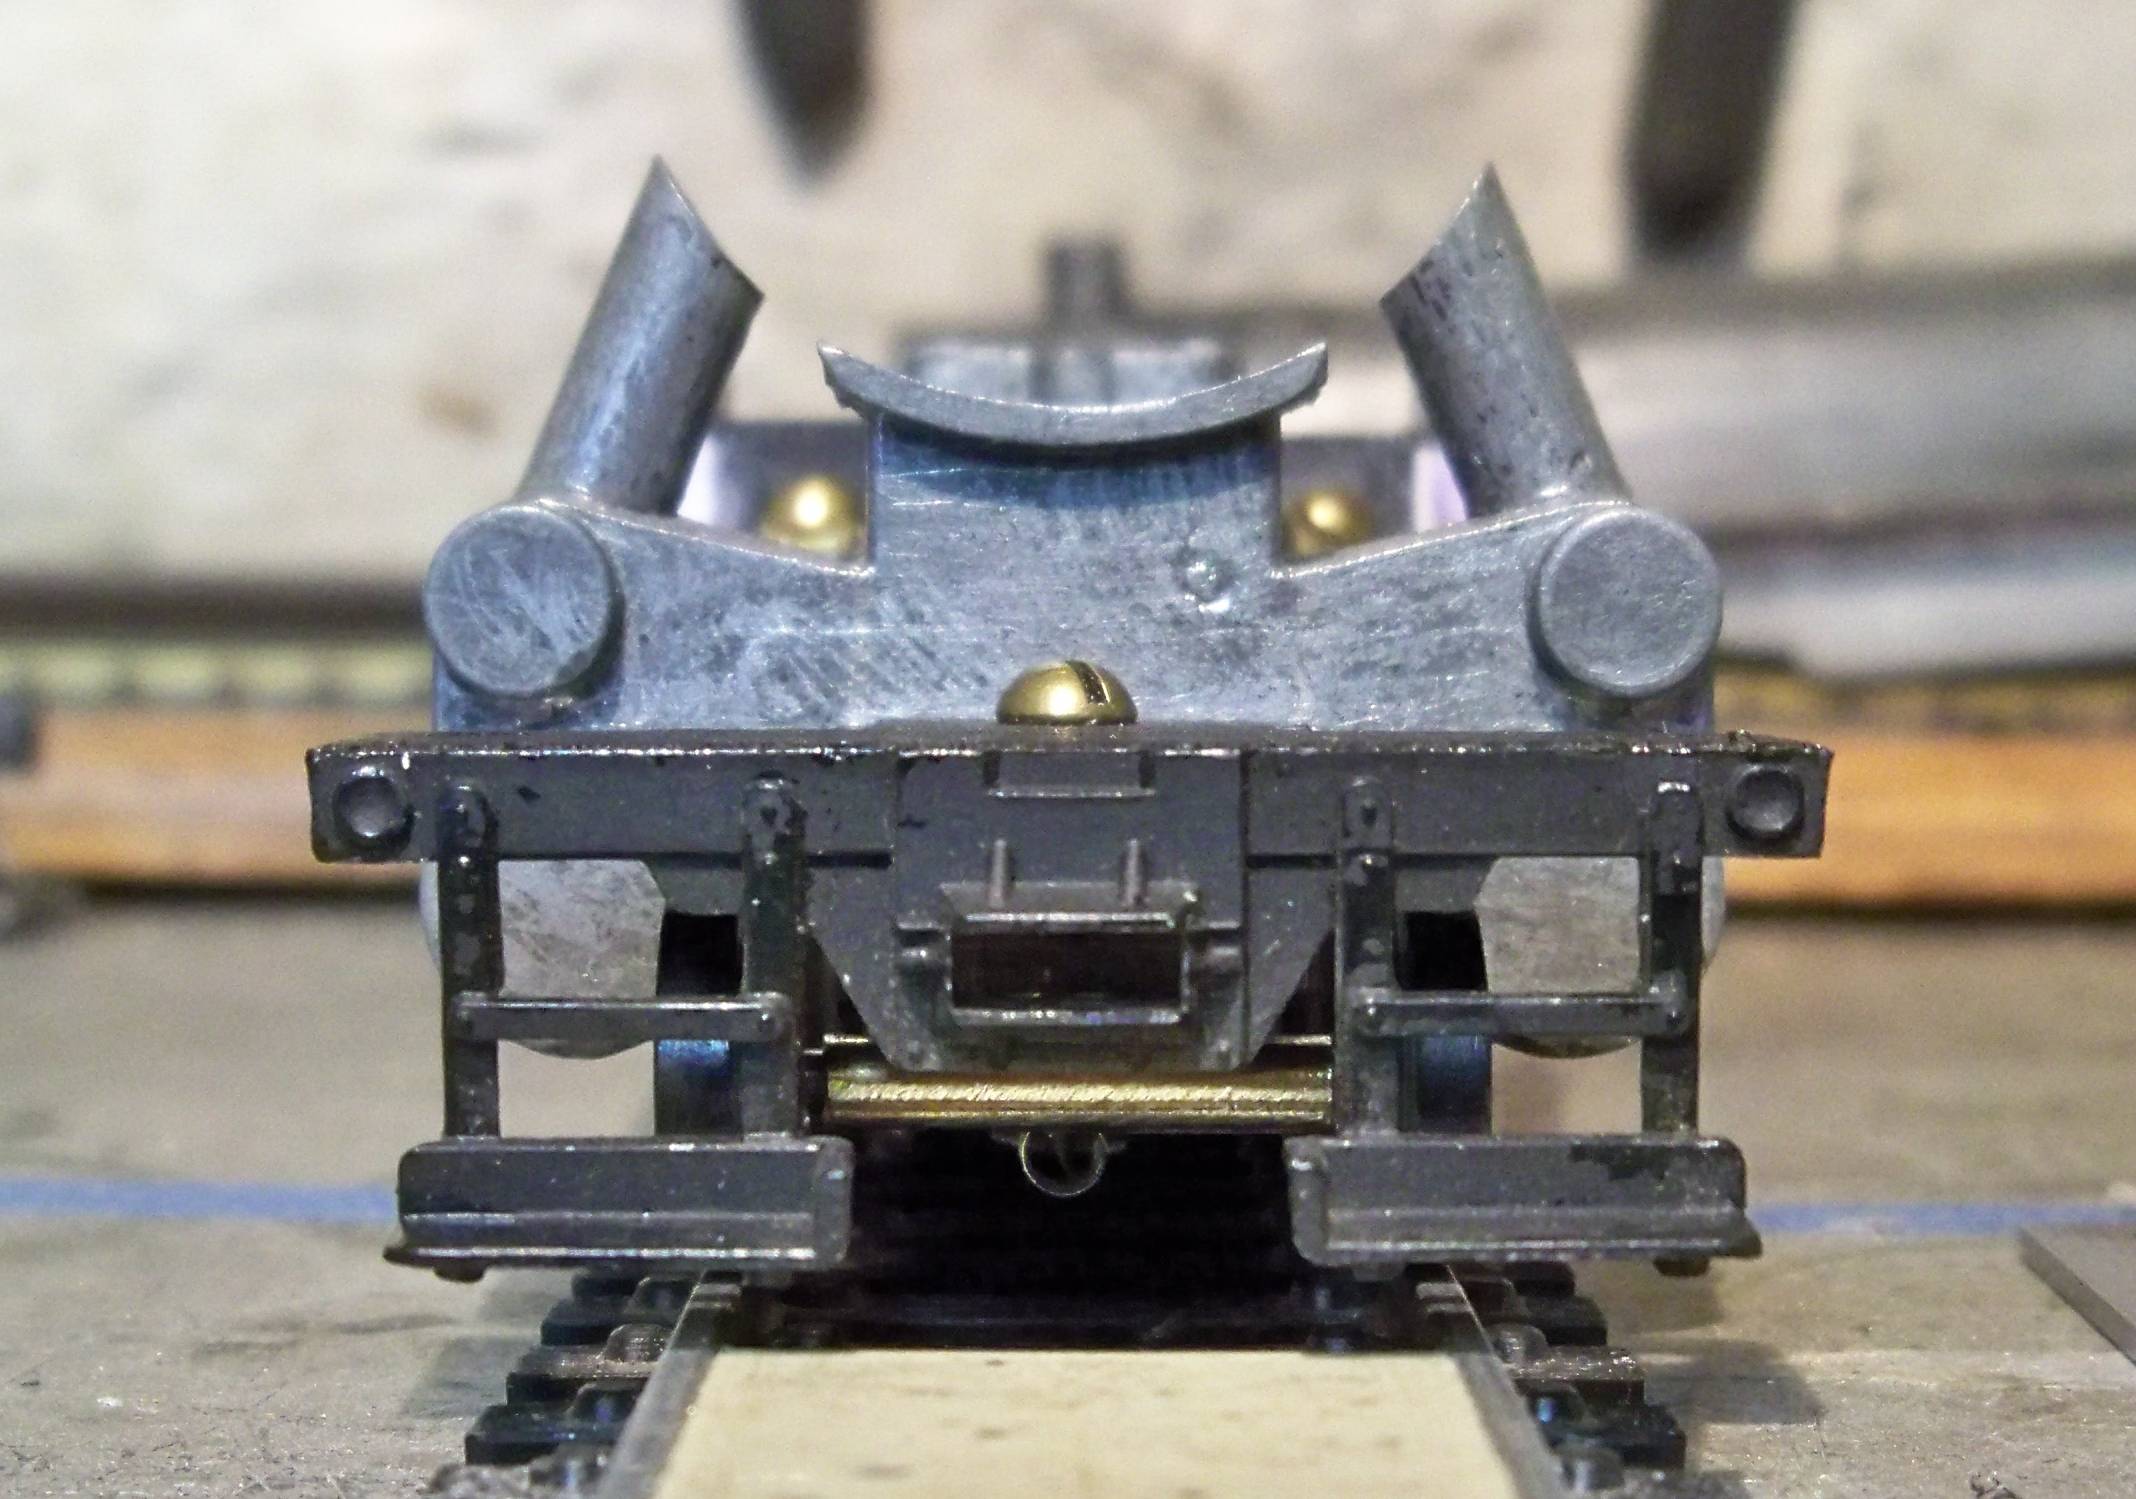
I have added couplers to the pilot and tender.
I made a frame extension to raise and support the Tyco pilot high enough to mount a low shank KD coupler in the pilot without modifying the front of the pilot.
The centering spring used is from an older series KD coupler.
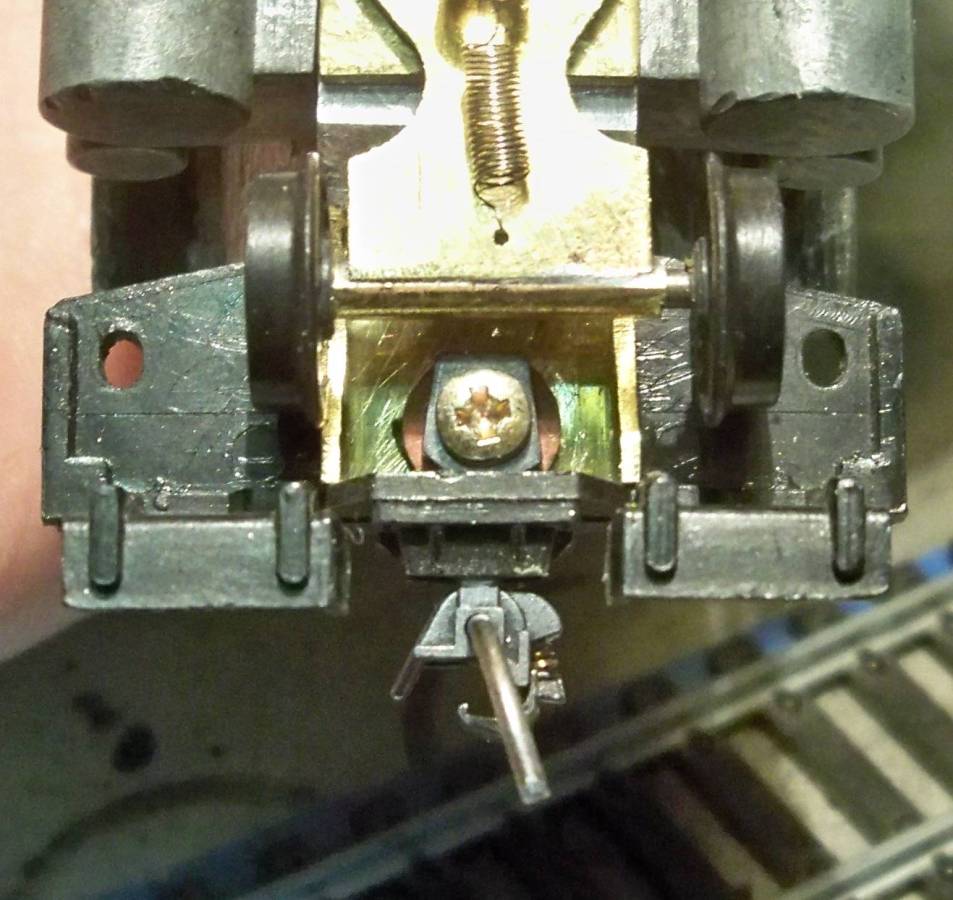
The coupler on the tender is a long shank 30 series to allow a little more swing to compensate for the overhang the long tender has on 18" radius curves.
Ray
|
|
Country: USA ~
Posts: 1285 ~
Member Since: December 14 2005 ~
Last Visit: May 16 2019
|
Alert Moderator
|
|
|
|
Posted - December 08 2012 : 3:14:57 PM
|
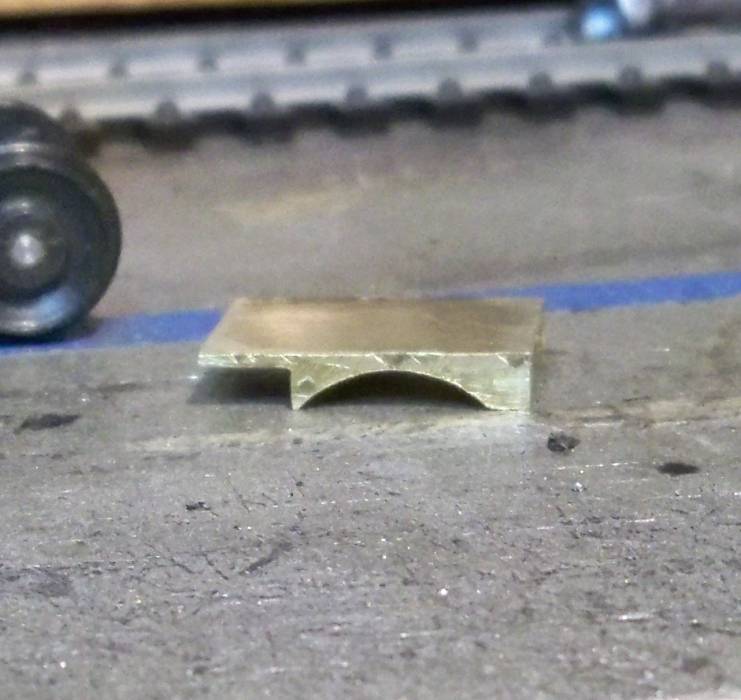
Ray,
That brass plate you machined to hold the pilot deck, how did you mount the pilot to it?
Overall, LOOKS GREAT!
Also, what did you use to make the round underside of the pilot plate? That was milled I know, but did you use a ball mill OR did you mill it vertically?
~John
Many have tried to, and failed, ya just can't repair stupid...
Do NOT try to Idiot-Proof anything!!!! God, will simply create a better......IDIOT!
|
|
Country: USA ~
Posts: 2911 ~
Member Since: March 26 2012 ~
Last Visit: January 14 2014
|
Alert Moderator
|
|
|
|
Posted - December 08 2012 : 4:14:42 PM
|
quote:Ray,
That brass plate you machined to hold the pilot deck, how did you mount the pilot to it?
Overall, LOOKS GREAT!
Also, what did you use to make the round underside of the pilot plate? That was milled I know, but did you use a ball mill OR did you mill it vertically?
Originally posted by EM-1 - December 08 2012 : 3:14:57 PM
|
The only thing holding the support to the pilot is the brass screw just in front of the cylinders.
The arch for the pilot wheels to clear was filed by hand.
Ray
|
|
Country: USA ~
Posts: 1285 ~
Member Since: December 14 2005 ~
Last Visit: May 16 2019
|
Alert Moderator
|
|
|
|
Posted - December 08 2012 : 7:01:25 PM
|
quote:
The only thing holding the support to the pilot is the brass screw just in front of the cylinders.
The arch for the pilot wheels to clear was filed by hand.
Originally posted by Ray Marinaccio - December 08 2012 : 4:14:42 PM
|
Ray, that extension looks machined!  You got some filing skillz. You got some filing skillz.  Still watching eagerly, even if I don't comment. Still watching eagerly, even if I don't comment.
The Tyco Depot
|
|
Country: USA ~
Posts: 3927 ~
Member Since: June 20 2007 ~
Last Visit: November 19 2015
|
Alert Moderator
|
|
|
|
Posted - December 09 2012 : 08:31:44 AM
|
Ray,
NOW I am impressed! FILLED? Holy CRAP......I agree with Nelson, that looks MACHINED! (I myself, would have machined it.....)
NICE WORK!
~John
Many have tried to, and failed, ya just can't repair stupid...
Do NOT try to Idiot-Proof anything!!!! God, will simply create a better......IDIOT!
|
|
Country: USA ~
Posts: 2911 ~
Member Since: March 26 2012 ~
Last Visit: January 14 2014
|
Alert Moderator
|
|
|
|
Posted - December 09 2012 : 12:05:14 PM
|
quote: You got some filing skillz.
Originally posted by NickelPlate759 - December 08 2012 : 7:01:25 PM
|
That came from years of practice and a sharp file.
Never under estimate the usefulness of simple hand tools.
Ray
Edited by - Ray Marinaccio on December 09 2012 12:06:06 PM
|
|
Country: USA ~
Posts: 1285 ~
Member Since: December 14 2005 ~
Last Visit: May 16 2019
|
Alert Moderator
|
|
|
|
Posted - December 10 2012 : 03:20:41 AM
|
Ray, what diameter of file did you use? And WHO made the file? I'ma gonna invest in me a few of those bad boys! Specially a few round ones, or half round ones!
I'm still in aw over the work that shows with that section you done.....I, myself, am spoiled to have a mill and not afraid to use it but DAMN thats awesome work with a file! WOW!
(I even have a "rail-Borr" thats for drilling through railroad rail), to add the bolts of a fish plate that I use to mill large flat surfaces......(For the materials I mill like this, the thing will NEVER get dull!) I made an arbor for it to be chucked right to the headstock spindle instead of being tightened in a chuck, nevermind the collect set.....it screws right like the head stock or the chuck and or collet does with M12x1 thread!
Anyway the rail-borr, works best at high speeds as its a "hole drill" really, as when used, it leaves little "slugs" of the rail thats its bored through, along with some serious shavings from the rail "web"!
~John
Many have tried to, and failed, ya just can't repair stupid...
Do NOT try to Idiot-Proof anything!!!! God, will simply create a better......IDIOT!
Edited by - EM-1 on December 10 2012 03:21:48 AM
|
|
Country: USA ~
Posts: 2911 ~
Member Since: March 26 2012 ~
Last Visit: January 14 2014
|
Alert Moderator
|
|
|
|
Posted - December 10 2012 : 12:25:22 PM
|
John,
I used a convexed shape file I picked up at a flea market. It's a bit larger than a normal needle file.
Ray
|
|
Country: USA ~
Posts: 1285 ~
Member Since: December 14 2005 ~
Last Visit: May 16 2019
|
Alert Moderator
|
|
|
|
Posted - December 10 2012 : 12:28:12 PM
|
| hi ray not much i can say that has not already been said,just to add love your work ken
|
Country:  United Kingdom ~
Posts: 8294 ~
Member Since: September 28 2006 ~
Last Visit: October 20 2021 United Kingdom ~
Posts: 8294 ~
Member Since: September 28 2006 ~
Last Visit: October 20 2021
|
Alert Moderator
|
|
|
|
Posted - December 10 2012 : 5:08:05 PM
|
quote:John,
I used a convexed shape file I picked up at a flea market. It's a bit larger than a normal needle file.
Originally posted by Ray Marinaccio - December 10 2012 : 12:25:22 PM
|
Ray,
I expected it to be a bit larger in diameter then a normal needle file (I have about 30 sets of different needle files....BUT, I have to admit, I'm lacking the larger (regular household/carpentry/metal work) standard sizes......Which a lot of times, is why I use the mill on such things, as I have end mills all the way to 1 inch in diameter! AND most if not all the "needle" files I have that are round, are tapered! Which never really gives a true thickness from one side of the item to the other....BUT I do have rotary files that again, I use in the mill! and in some cases, in the lathe!
Do you know what diameter that file it, that you have tho? I'll be looking for one of them for my own uses!
~John
Many have tried to, and failed, ya just can't repair stupid...
Do NOT try to Idiot-Proof anything!!!! God, will simply create a better......IDIOT!
|
|
Country: USA ~
Posts: 2911 ~
Member Since: March 26 2012 ~
Last Visit: January 14 2014
|
Alert Moderator
|
|
|
|
Posted - December 10 2012 : 7:39:46 PM
|
This is the type file I used.(only smaller, 1/4" wide)
Technically called a crossing file.
http://www.ottofrei.com/Crossing-Hand-Files/
I could have used a milling machine to make those cuts but a file works just as well if you have the experience.
Alot of the valve gear parts I make are done by hand. (maybe because I have been doing it long before I ever had a milling machine).
Ray
|
|
Country: USA ~
Posts: 1285 ~
Member Since: December 14 2005 ~
Last Visit: May 16 2019
|
Alert Moderator
|
|
|
|
Posted - December 10 2012 : 9:02:06 PM
|
Ray,
So the file you used is 1/4 inch diameter? WOW! Thats really good work to make a filed depression in brass that looks to have been milled in place instead of filed!
I too do a lot still by hand even tho I have 2 lathes and 2 mills.....But slowly, the mill is getting the more and more use as it does different things faster, and the thing is, I have to have precision, with speed, and doing a lot by hand doesn't always get done with speed!
Still thats awesome work!
~John
Many have tried to, and failed, ya just can't repair stupid...
Do NOT try to Idiot-Proof anything!!!! God, will simply create a better......IDIOT!
|
|
Country: USA ~
Posts: 2911 ~
Member Since: March 26 2012 ~
Last Visit: January 14 2014
|
Alert Moderator
|
|