|
|
 Posted - September 14 2011 : 12:55:24 PM Posted - September 14 2011 : 12:55:24 PM


|
I'm performing surgery on an old AHM Hustler, and I intend to swap out the 3-pole motor for a 5-pole out of a AHM BL-2 chassis. However, I ran into a snag - the brass BL-2 gear appears to be threaded onto the shaft of the motor? How are are you supposed to grip it without damaging the spiral gear fluting? I've tried manually to turn it, even using a soft grip with pliers to try to hold the gear, but I can't make it turn loose. I don't see anything locking it onto the shaft, either. Is there a trick to removing the gear safely? This may be an earlier model, I think some of my other BL-2's motors had plastic gears and would just pop off with some pressure. I will use one of those if I have to, rather than fight and destroy the worm gear's tooth instead. Just wondered if there is an easy way, or a simple trick, to removing worm gears. I have a press for them, but it's recessed so that won't work, and there's threading inside the worm gear, looks like two-tiered, so I"m sure it's threaded onto the shaft. Anyone experienced in removing these worm gears?
The AHM Hustler was a mess, the power contacts were out of place and bent up, motor was missing brushes too, so I've basically totally disassembled it, and going to rebuild it with new wiring, already reshaped the contacts, and as soon as I can prepare a 5-pole motor, will install that into it. Another neat trick I"m doing is I have some small wiring blocks with clamp contacts, so I can install a decoder, but if I wanted to, I could simply unscrew the clamps, and move the wires to run directly to DC and use the decoder in something else. I'll post pics later of my upgrade, I've already GOO'ed the wiring block into the Hustler chassis base. Might get a special paint job, as the shell is a mottled orange and black, from a botched paint job. Might be a good time to strip it down and prep it for a repaint.  Anyway, back to work at my real job. Anyway, back to work at my real job.
Jerry
" When life throws you bananas...it's easy to slip up"
|
Country:  USA ~
Posts: 3974 ~
Member Since: January 04 2009 ~
Last Visit: January 11 2019 USA ~
Posts: 3974 ~
Member Since: January 04 2009 ~
Last Visit: January 11 2019
|
 Alert Moderator
|
|
|
|
Posted - September 14 2011 : 2:09:20 PM
|
Well, I answered part of my question myself - the worm gear has an inner and outer thread, the outer is smaller, and takes a 2.5mm screw. I'm THINKING the inner might be counter-threaded, so you can back the worm gear off. Hard to see inside, even with a x10 microscope, lighted, like I have at work. But it also appears that there may be solder or a sealer inside on the threads, as a locking mechanism. SO, at this point, I do have a screw and some metric nuts to fit, but it's not moving when I tried to turn it CCW, so I decided to leave it for now, until a wiser ( or more experienced ) modeler can offer advice. I may just get another motor with the plastic gear to swap out, as that will be easier. But would still like to know how to disassemble this particular type AHM motor.
Jerry
" When life throws you bananas...it's easy to slip up"
|
|
Country: USA ~
Posts: 3974 ~
Member Since: January 04 2009 ~
Last Visit: January 11 2019
|
Alert Moderator

|
|
|
|
Posted - September 14 2011 : 4:26:42 PM
|
Jerry,
There should be a screw stored in the chassis for removing the worm. Simply drive the screw into the worm while holding the armature still... the screw is a standard CW thread. Some worms are tighter than others, in fact I sheared a screw off inside the worm on one unit because it was that tight. What looks like thread lock is grease that has turned green on the brass. It doesn't hurt to clean out the threads and lubricate them before attempting it.
Watch out for the bearing ring with 5 1mm balls in it, since it's very easy to lose them.
http://www.hoseeker.org/AHMRivarossiassembly/ahmclinerinstructionspage2.jpg
http://www.hoseeker.org/AHMRivarossiassembly/ahmbl2pg1.jpg
The Tyco Depot
|
|
Country: USA ~
Posts: 3927 ~
Member Since: June 20 2007 ~
Last Visit: November 19 2015
|
Alert Moderator
|
|
|
|
Posted - September 14 2011 : 7:11:02 PM
|
quote:Jerry,
There should be a screw stored in the chassis for removing the worm. Simply drive the screw into the worm while holding the armature still... ....
Watch out for the bearing ring with 5 1mm balls in it, since it's very easy to lose them.
Originally posted by NickelPlate759 - September 14 2011 : 4:26:42 PM
|
Ah, so that was what that screw was for. OK! Thanks for the warning on the bearings, too. I'll probably still use a different 5-pole, if there is one with plastic gear, and just leave this one alone, as it's working ok. If they're all like this one, I"ll use it. Definitely want a 5-pole in this Hustler chasis. 
Jerry
" When life throws you bananas...it's easy to slip up"
|
|
Country: USA ~
Posts: 3974 ~
Member Since: January 04 2009 ~
Last Visit: January 11 2019
|
Alert Moderator
|
|
|
|
Posted - September 14 2011 : 8:22:26 PM
|
Yeah, the 5 poles are a lot better. The bearings are heftier and they're a lot smoother and quieter than the 3 pole. I think the switcher you have is a Plymouth DDT, which was sold first by ATT, and currently by Model Power.
The Tyco Depot
|
|
Country: USA ~
Posts: 3927 ~
Member Since: June 20 2007 ~
Last Visit: November 19 2015
|
Alert Moderator
|
|
|
|
Posted - September 15 2011 : 1:03:38 PM
|
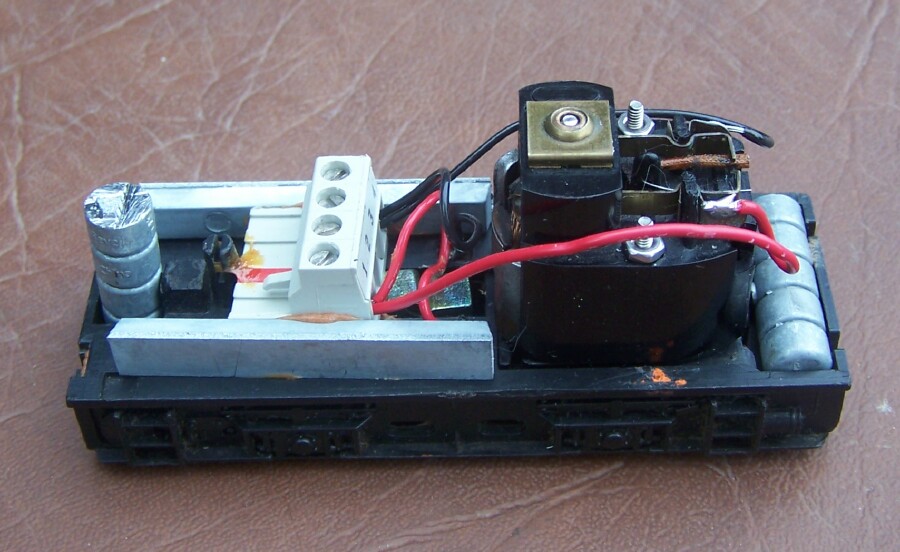
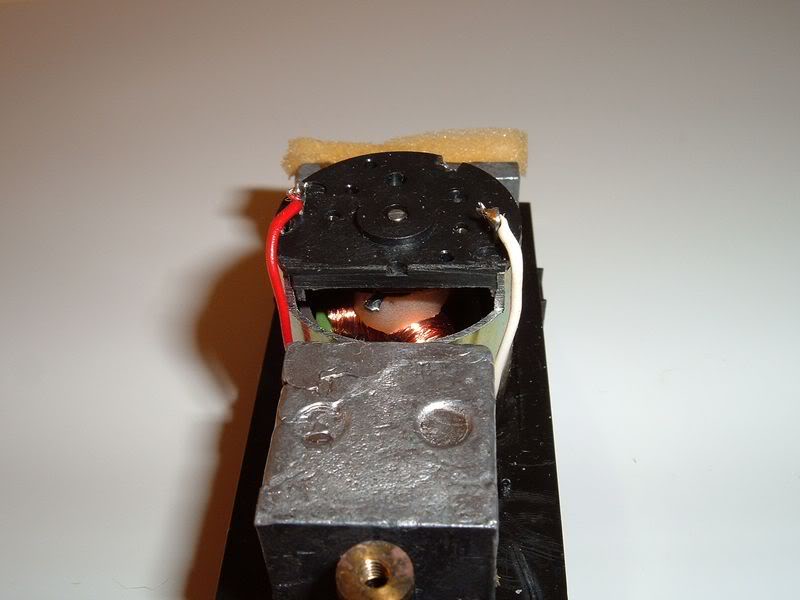
Well, I put the screw to the worm, and popped it off this morning. Carefully. Then went hunting for the 5 bearings inside. NOTHING! Just grease. No ball bearings whatsoever. Mine has a brass plate with a tapered bellhousing, which I guess rides on the chamfered , greased seat. Seemed to spin ok before I took it apart, so I suppose this version has no bearings, just a cupped bell to pivot on.
Anyway, after that examination, I swapped parts, I put the plastic plate on the 5-pole motor housing, with just the brass bushing inside. That way it'd mate up with the Hustler base as before. THen I found out that I'd need longer screws to hold it down,the 3-pole plate was threaded for self-tap screw, and no way to hold the motor plate to the housing anymore. So I found some extra-long 2-56 screws at work, and nutted them together. Problem solved! I took the wheel electrical contacts at this point, and reinstalled them and soldered new wires back to them. Also new wires to the motor,and then clamped them down in the new wire holder I glued in. I did check the motor before I did all that, it runs fine, and smoothly still.
So, at this point, it's just either jumper the contact wires to the motor wires, or install a DCC harness, which was my intent. I may test it at home first on some track with DC, before I install the DCC harness. I'll also clean up the wheels and gears at home, then grease them lightly and finish the undercarriage tune-up. Then it's just deal with the gawdawful painted shell I have. But the mechanical upgrade is about done and ready to test. I'll take some pictures tonight and post them, barring electrical storms, we're supposed to have T-storms throughout the evening. But I'll get pics anyway and post them of my project. It's looking good at this point. Anyone know if these 5-pole motors pull more than 1 amp? I intend to install a Dh123 decoder for now. Maybe some 1-amp fuses to protect it as well. Can't hurt, and will only lose a fuse if it pulls too much current. All I have for now, though. Lunch break is over. Back to the mines....
Jerry
" When life throws you bananas...it's easy to slip up"
|
|
Country: USA ~
Posts: 3974 ~
Member Since: January 04 2009 ~
Last Visit: January 11 2019
|
Alert Moderator
|
|
|
|
Posted - September 15 2011 : 8:05:24 PM
|
Jerry, here's a photo of the bearing ring. It consists of two bronze washers stamped into bearing races, and a 3rd turned into a bearing spacer. I think you just saw the bearing assembly from the outside.
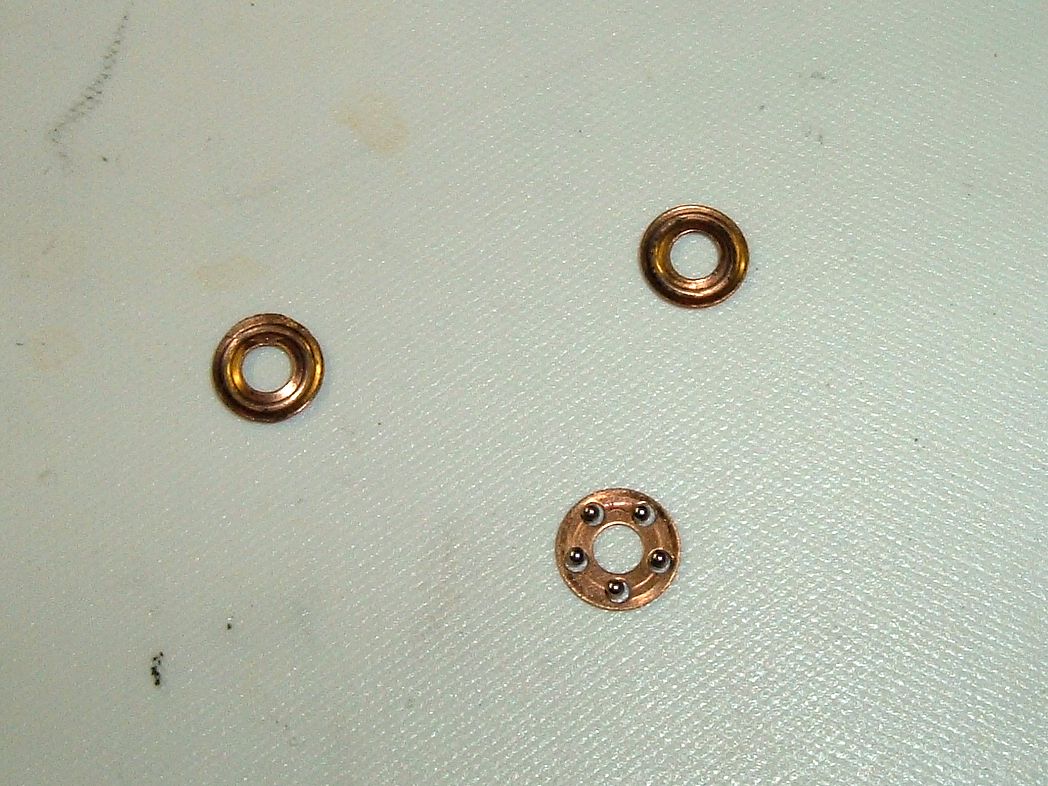
I have found units with two steel or brass washers between the worm and the truck, but I don't know if that was a production change or because someone working on them lost the bearings.
The Tyco Depot
|
|
Country: USA ~
Posts: 3927 ~
Member Since: June 20 2007 ~
Last Visit: November 19 2015
|
Alert Moderator
|
|
|
|
Posted - September 15 2011 : 8:18:10 PM
|
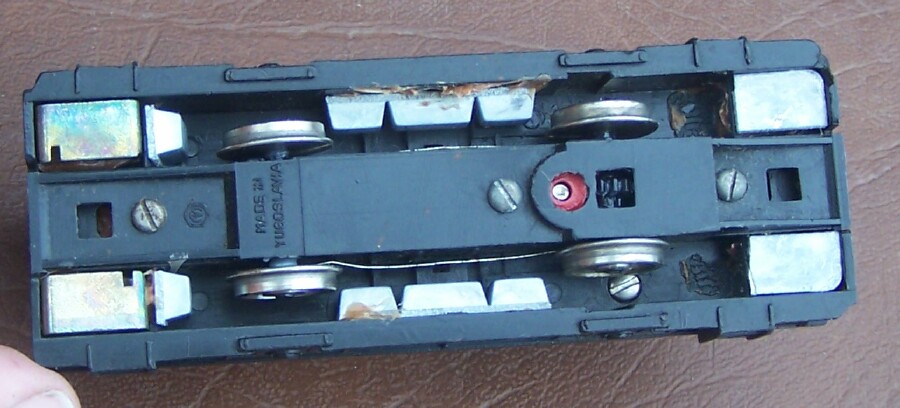
Well, here's my updated/upgraded AHM Hustler chassis. Took some mixin' and matchin', but I got the 5-pole motor installed, next is to clean up the wheels, axles and regrease them, and re-install tonight. Then it'll get a test lap or 3.  Anyway,here's some pics of the updated Hustler. Anyway,here's some pics of the updated Hustler.
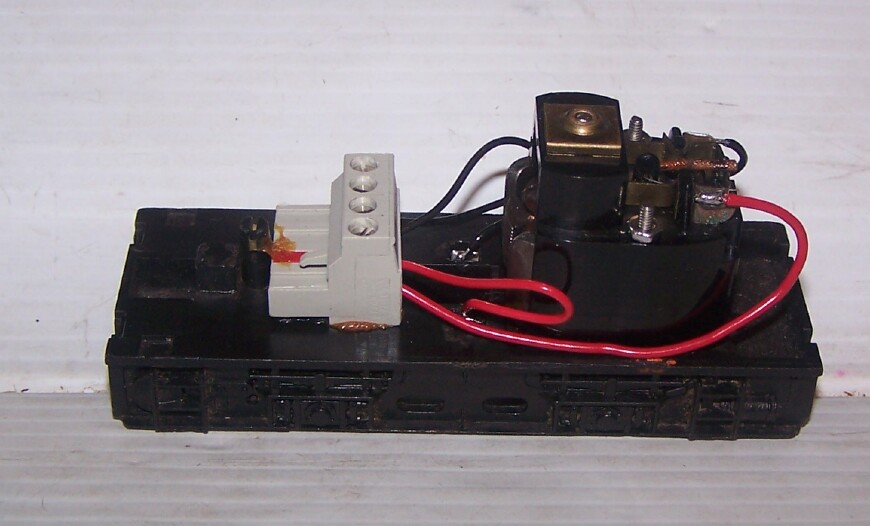
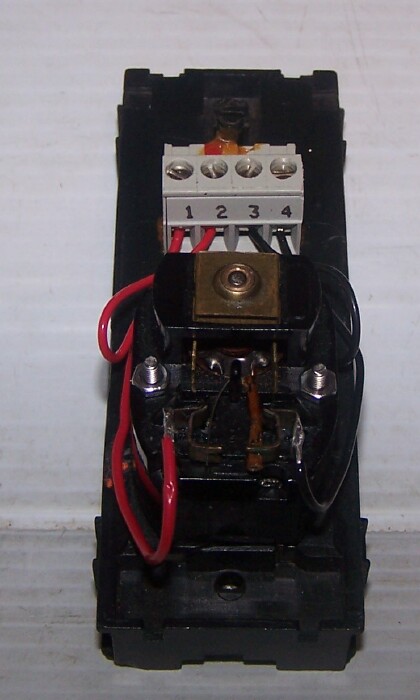
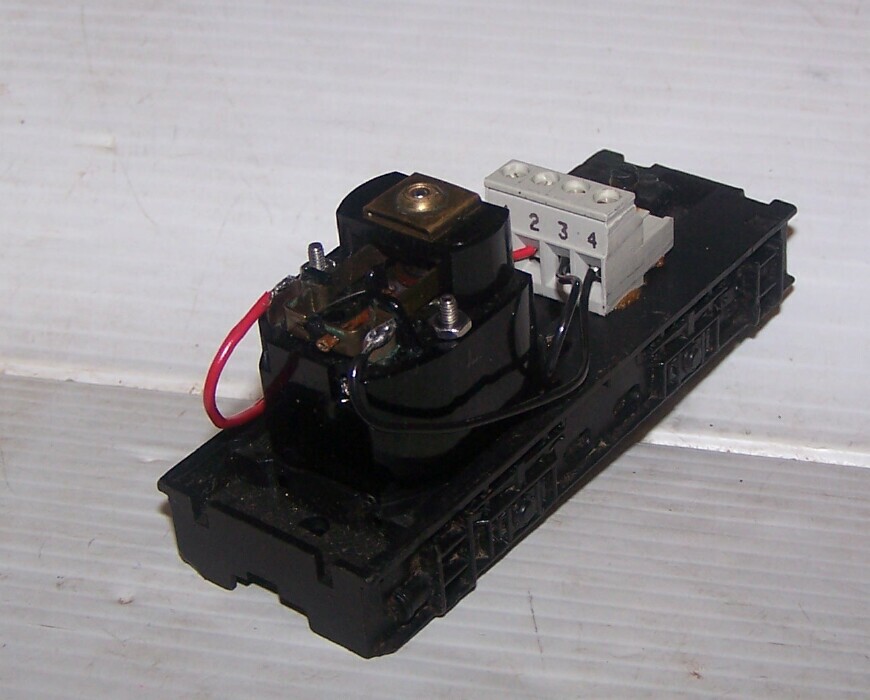
Fairly roomy inside, and it was a fairly painless upgrade. This will be my first Hustler I DCC, so hope to see it on the club's layout before too long. I'm thinking of making a custom streamlined body for it, and if it still has super speed, maybe call it the Toledo Torpedo. Or the Huffin' Hustler? Super Hustler? Or stick with my previous thought, the Mach .44 Well, I'll wait to see how it runs before I settle on a catchy moniker for it. Heh! Hope to have it running tonight, time to clean the axles of hair and crud, and get them reinstalled. Off to the work bench!
Jerry
" When life throws you bananas...it's easy to slip up"
|
|
Country: USA ~
Posts: 3974 ~
Member Since: January 04 2009 ~
Last Visit: January 11 2019
|
Alert Moderator
|
|
|
|
Posted - September 15 2011 : 8:36:52 PM
|
What about the chassis weight? With one driven axle, it needs all it can get.
The Tyco Depot
|
|
Country: USA ~
Posts: 3927 ~
Member Since: June 20 2007 ~
Last Visit: November 19 2015
|
Alert Moderator
|
|
|
|
Posted - September 15 2011 : 8:59:07 PM
|
I'd love to see two of those motors in the metal Cary Box Cab conversion of a Hustler!

-Gareth
"A is A"
-Aristotle
Law of Identification
|
Country:  Canada ~
Posts: 4200 ~
Member Since: January 08 2006 ~
Last Visit: November 09 2021 Canada ~
Posts: 4200 ~
Member Since: January 08 2006 ~
Last Visit: November 09 2021
|
Alert Moderator
|
|
|
|
Posted - September 15 2011 : 9:20:48 PM
|
quote:What about the chassis weight? With one driven axle, it needs all it can get.
Originally posted by NickelPlate759 - September 15 2011 : 8:36:52 PM
|
Uh, yeah, I need to reinstall that, too.
Jerry
" When life throws you bananas...it's easy to slip up"
|
|
Country: USA ~
Posts: 3974 ~
Member Since: January 04 2009 ~
Last Visit: January 11 2019
|
Alert Moderator
|
|
|
|
Posted - September 15 2011 : 9:23:41 PM
|
But your wiring block looks like it's in the way. The main chassis weight is quite large.
The Tyco Depot
|
|
Country: USA ~
Posts: 3927 ~
Member Since: June 20 2007 ~
Last Visit: November 19 2015
|
Alert Moderator
|
|
|
|
Posted - September 15 2011 : 9:51:54 PM
|
quote:
I visited Bowser's place in Montoursville, PA a few years ago, and bought one of those metal Cary bodies. On the website, it'd said they'd discontinued it, but they had a few left. So I got one finally when I was there last time. Whew! Haven't done anything with it yet, but at least I have one now to do the conversion.
Jerry
" When life throws you bananas...it's easy to slip up"
|
|
Country: USA ~
Posts: 3974 ~
Member Since: January 04 2009 ~
Last Visit: January 11 2019
|
Alert Moderator
|
|
|
|
Posted - September 15 2011 : 9:59:06 PM
|
Here's the picture of my BL-2 motor bottom plate. It doesn't look anything like that bearing set.
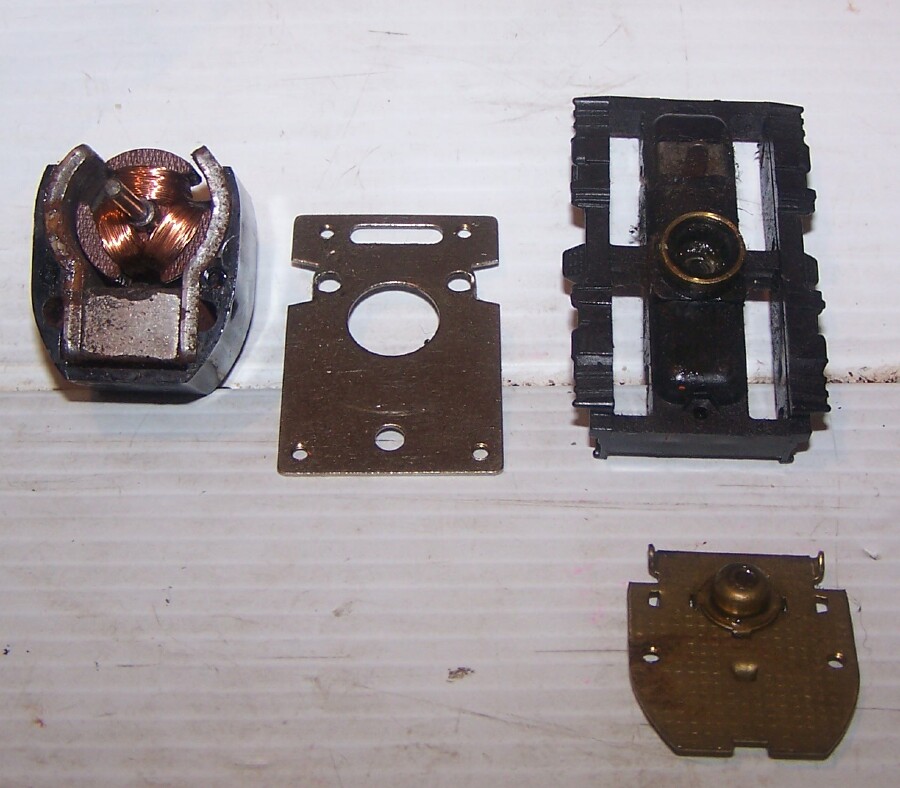
Looks like a brass cup and a tapered seat inside the truck assembly, and it just pivots on that. No bearings at all. Metal plate on the bottom, too,not plastic.
And here's the lucky AHM Hustler body, it's in sad shape, the headlight area is melted some, not sure what I'll do with that yet. GOnna strip it first and see what it looks like with no paint, and go from there.

Oh, I also found another AHM Hustler base chassis, and while in the basement, I found a motor I'd bought to turbo-charge one of my train engines. A radio shack 9-18V DC motor, 18,000 RPM under load. Heh heh heh. Maybe I can make one of these do Mach 4.4 ? We'll see! That motor BUZZES when it's got full power. Woooey! Well, let me finish this first Hustler re-motor project, then I'll start the 2nd one.
Jerry
" When life throws you bananas...it's easy to slip up"
|
|
Country: USA ~
Posts: 3974 ~
Member Since: January 04 2009 ~
Last Visit: January 11 2019
|
Alert Moderator
|
|
|
|
Posted - September 15 2011 : 10:02:25 PM
|
quote:But your wiring block looks like it's in the way. The main chassis weight is quite large.
Originally posted by NickelPlate759 - September 15 2011 : 9:23:41 PM
|
I'm going to move the weight around some. I may cut the original in half, and put it between the motor and block. Also there's room under the skirt, I may load that up with stick-on lead weight, to give it a low center of gravity. THAT will keep in on the track better, too. Especially at mach .44.
Jerry
" When life throws you bananas...it's easy to slip up"
|
|
Country: USA ~
Posts: 3974 ~
Member Since: January 04 2009 ~
Last Visit: January 11 2019
|
Alert Moderator
|
|
|
|
Posted - September 15 2011 : 10:52:51 PM
|
That's true, there is room under the skirts. You could probably fit some tape weights under there. When I installed a big Canon motor in mine, I had to keep reshaping the weight with a socket and a hammer to make it fit.
The bearing ring on the C-Liner/BL-2 truck goes inside the truck between the worm and the truck housing. Was there anything underneath the worm? If not, it was probably removed.
The Tyco Depot
|
|
Country: USA ~
Posts: 3927 ~
Member Since: June 20 2007 ~
Last Visit: November 19 2015
|
Alert Moderator
|
|
|
|
Posted - September 16 2011 : 07:24:41 AM
|
quote:
The bearing ring on the C-Liner/BL-2 truck goes inside the truck between the worm and the truck housing. Was there anything underneath the worm? If not, it was probably removed.
Originally posted by NickelPlate759 - September 15 2011 : 10:52:51 PM
|
just a couple washers as spacers. So it was probably removed, then. Didn't seem to have any problems pivoting. Doesn't matter anymore, as I used the 3-pole bottom plate with just the bronze bushing, so there's no need for bearings anymore anyway. I don't need the motor to pivot, as there IS no separate truck in the Hustler, as in the BL-2.
I think some taped-in lead weights on the bottom should do the trick, since there is plenty of room under there. And with such a low center of gravity, will make it harder to tip over, when it's hustling around the track.
Jerry
" When life throws you bananas...it's easy to slip up"
|
|
Country: USA ~
Posts: 3974 ~
Member Since: January 04 2009 ~
Last Visit: January 11 2019
|
Alert Moderator
|
|
|
|
Posted - September 18 2011 : 7:20:49 PM
|
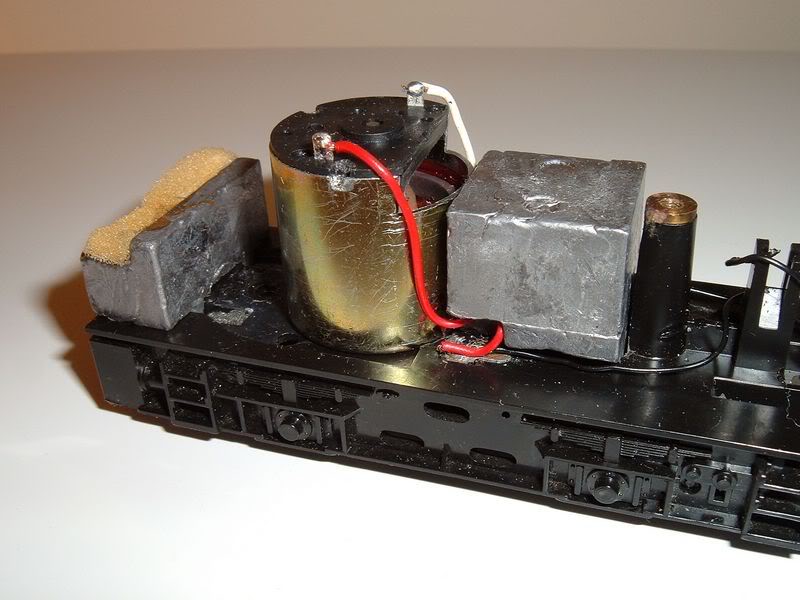
NEW PICS! UPdate Sept 17, 2011
I have mostly finished the chassis upgrade, added weights last night, it can probably use more, as it will spin the wheels when I hit the throttle all the way. At least it's not pulling a wheelie and jumping the track anymore! I'm not really sure it's better than the 3-pole, this 5 pole seems to take longer to start and jump out fast, one of my other 3-pole Hustlers starts out slower, and actually seems to have a higher top speed. Oh well, maybe this old BL-2 motor needs some run time to get it smoothed out. Anyway, here are the hot tub pics of it without body -
Still thinking of names for it, Hyper Hustler is a new one I came up with. LIke it wasn't hyper enough before? LOL Well, we'll see how it turns out when I get it DCC'ed.
Jerry
" When life throws you bananas...it's easy to slip up"
|
|
Country: USA ~
Posts: 3974 ~
Member Since: January 04 2009 ~
Last Visit: January 11 2019
|
Alert Moderator
|
|
|
|
Posted - September 18 2011 : 8:21:05 PM
|
Hey Jerry, have some lead! The only thing I'd recommend is to concentrate it as much toward the rear as possible... you need most of it over the driven axle.
Here's my MDT chassis with a low speed Canon motor that makes it run like a switcher. I realized last minute the motor wasn't going to clear the hood, so I had to cut the notch into the top. It's now the quietest engine I own.
The Tyco Depot
|
|
Country: USA ~
Posts: 3927 ~
Member Since: June 20 2007 ~
Last Visit: November 19 2015
|
Alert Moderator
|
|
|
|
Posted - September 18 2011 : 8:56:29 PM
|
quote:Hey Jerry, have some lead! The only thing I'd recommend is to concentrate it as much toward the rear as possible...
Here's my MDT chassis with a low speed Canon motor that makes it run like a switcher. It's now the quietest engine I own.
Originally posted by NickelPlate759 - September 18 2011 : 8:21:05 PM
|
Did you glue the motor in? Or somehow screw it in from underneath? I'm thinking of something similar with that Radio Shack 18k RPM motor, but the motor is slightly larger than the AHM, and the screw holes are centered, not offset like the original. So not sure how I'm going to mount it yet.
Jerry
" When life throws you bananas...it's easy to slip up"
|
|
Country: USA ~
Posts: 3974 ~
Member Since: January 04 2009 ~
Last Visit: January 11 2019
|
Alert Moderator
|
|
|
|
Posted - September 18 2011 : 9:12:21 PM
|
Jerry,
I did use the existing motor screw holes, and they took 2-56 screws IIRC (or I tapped them out, can't remember which). The screw heads ended up right above the rear wheels and wipers, so I had to grind the heads flat so they would clear them.
Here's the motor I used, in case you want a low speed switcher.
http://www.allelectronics.com/make-a-store/item/DCM-300/12-VDC-IRON-CORE-MOTOR/1.html
Those Radio Shack motors are fast and pretty noisy. I have one, but I've never used it in anything. With the Canon motor painted black, it's not that noticeable in the cab.
The Tyco Depot
|
|
Country: USA ~
Posts: 3927 ~
Member Since: June 20 2007 ~
Last Visit: November 19 2015
|
Alert Moderator
|
|