|
|
 Posted - December 31 2011 : 06:59:53 AM Posted - December 31 2011 : 06:59:53 AM


|
Athearn DD540X
What happens at your local Hobby Shop on a slow day? They start to put their heads together and scheme of Frankenstein-like creations. And so the following answers the question of “can a train use an R/C engine or two?”
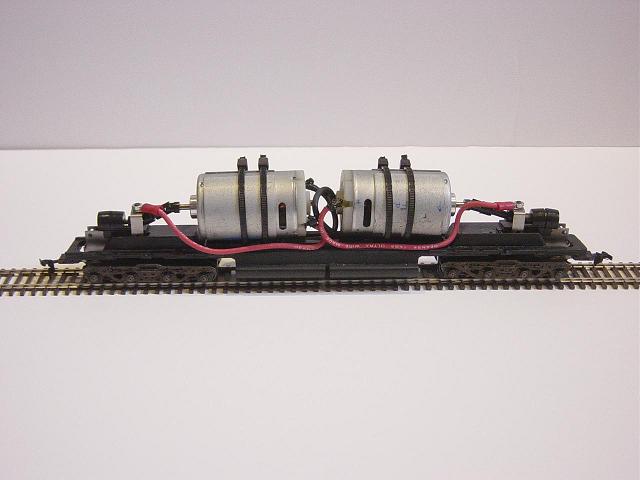
The best fit to answer the question is an older, Blue-Box era, Athearn DD40. It would have the space to fit, metal chassis, and with the drive couplers and shaft, will fit something larger. Two 540-size motors leftover from another project were deemed worthy donors.
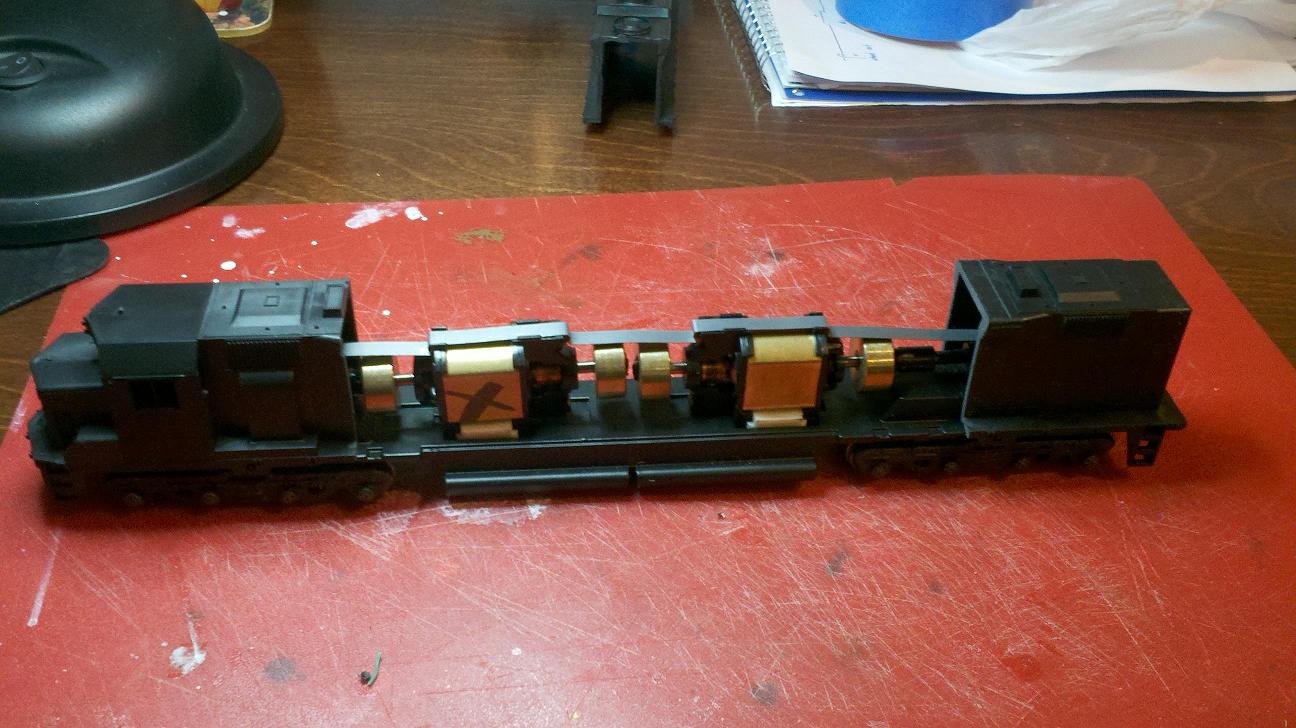
The first step was to mount the motors. They were connected to a DC power pack, and run to determine shaft direction. With the motors mounted back-to-back, they would need to run in opposite directions to allow for the same shaft direction. Spacing was determined on the frame, and then new mounting rails were constructed using .100” plastic stock. This will serve as an engine cradle, and also allow room to connect to the ground strips that will be under the motors. This is the same ground that the stock assembly used. Holes were then drilled through the new strips where the existing Athearn mounts were located. Cable ties will thread through these to hold the new motors in place.
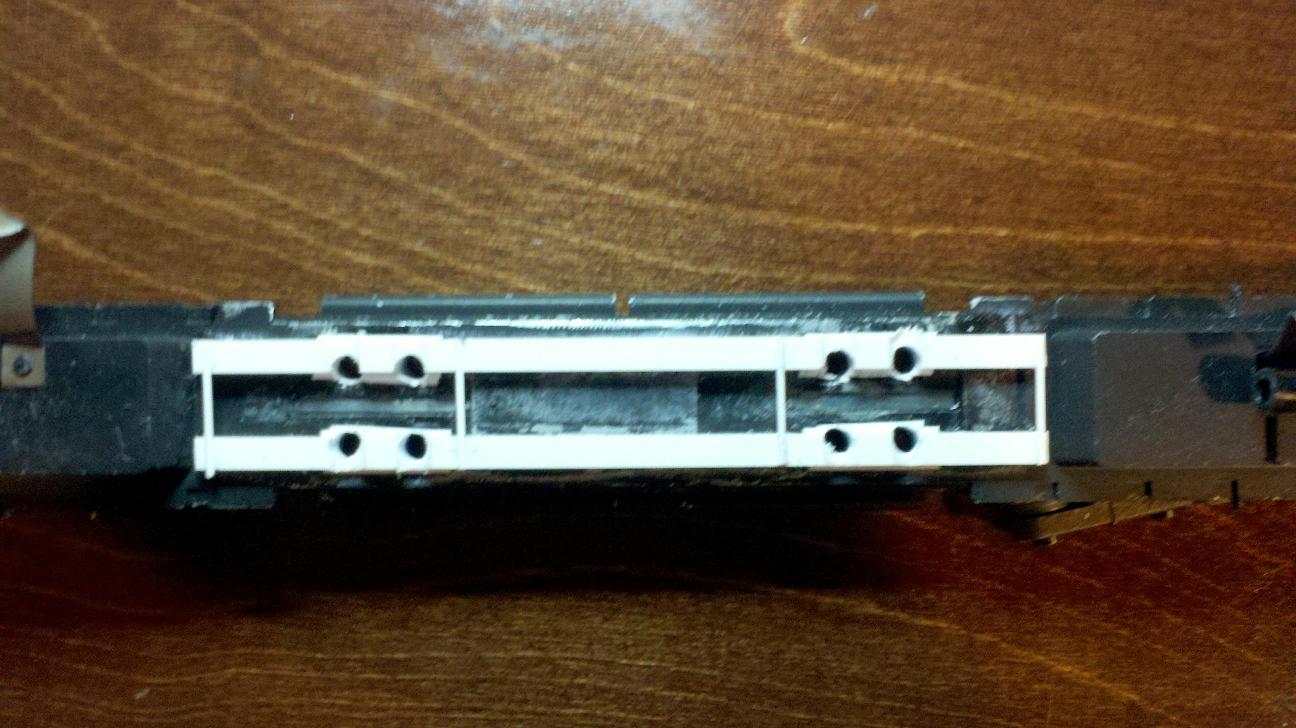
The ground cable is 16-gauge wire, and with a crimp connector on the end, was bolted to the grounding strip after drilling and threading a hole for the connecting screw. Once in place, liquid tape was applied to the connecting for insulating under the motor. The positive leads were also drilled and bolting to the existing clips on each end, and then both positive and negative leads were soldered to the correct clips on the end of the motors. These were covered with liquid tape.
The motors were connected using the original Athearn couplers and shafts, although they needed to be trimmed down to about half of their original length. This is due to the overall assembly being so much longer, but it does all fit.
Motor testing followed, and these are strong. The squeal that you would hear from an R/C car? Now on a train. One of the initial concerns was whether the load may be too great for a DC transformer, but the MRC 1370 was more than capable.
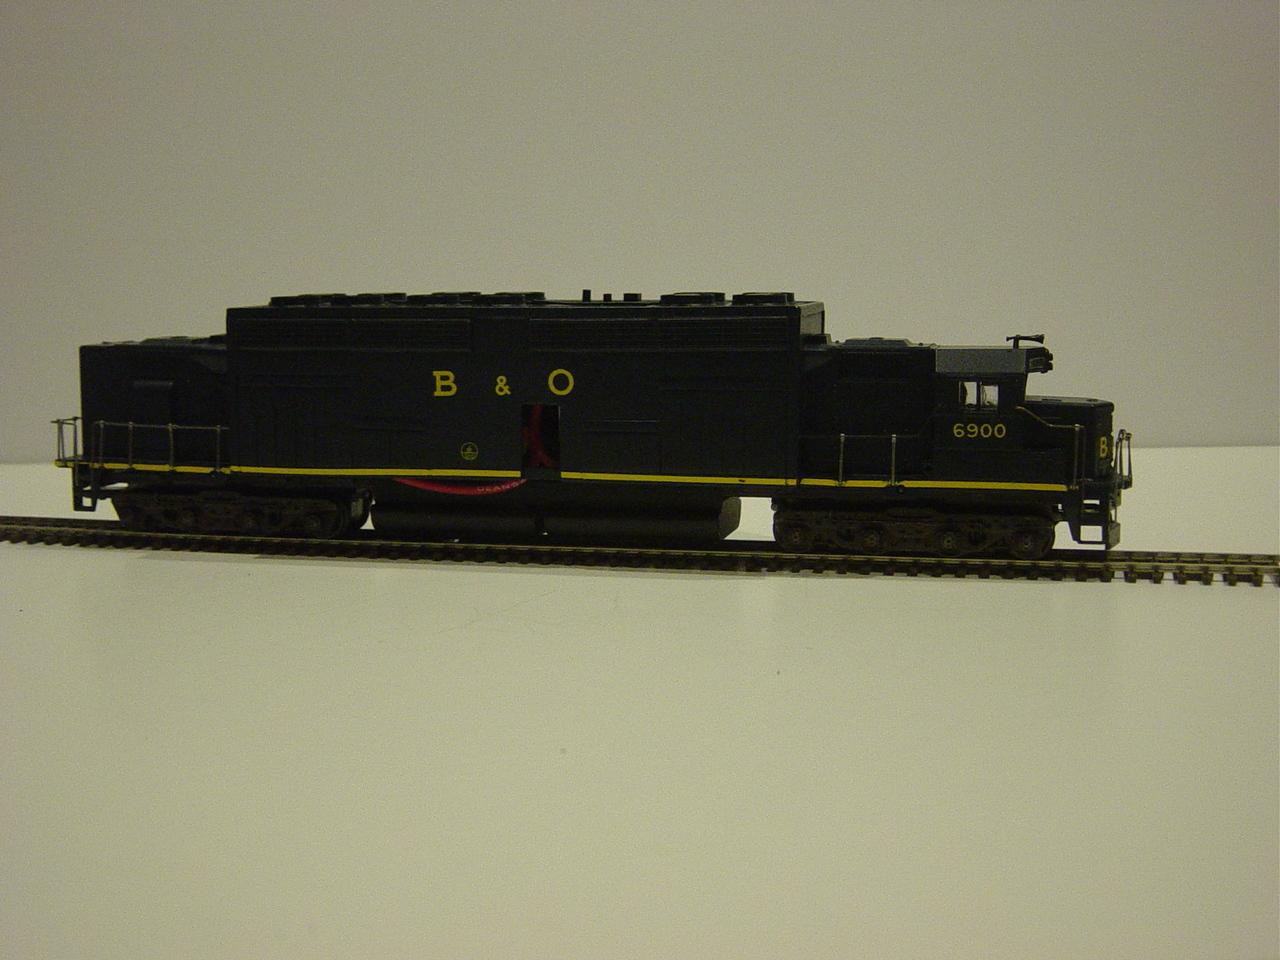
Modifying the shell was the most time-consuming part of the build. Many measurements later, it was determined that 158mm needed to come out, just aft of the forward stack. Slow and steady with a razor saw, and trying to keep the cuts as straight as possible, was key. Once complete, the cut ends were then block-sanded to square. These were then snapped on to another DD40 frame. Because of the necessity to keep them straight, it is easier to built the new section on-frame.
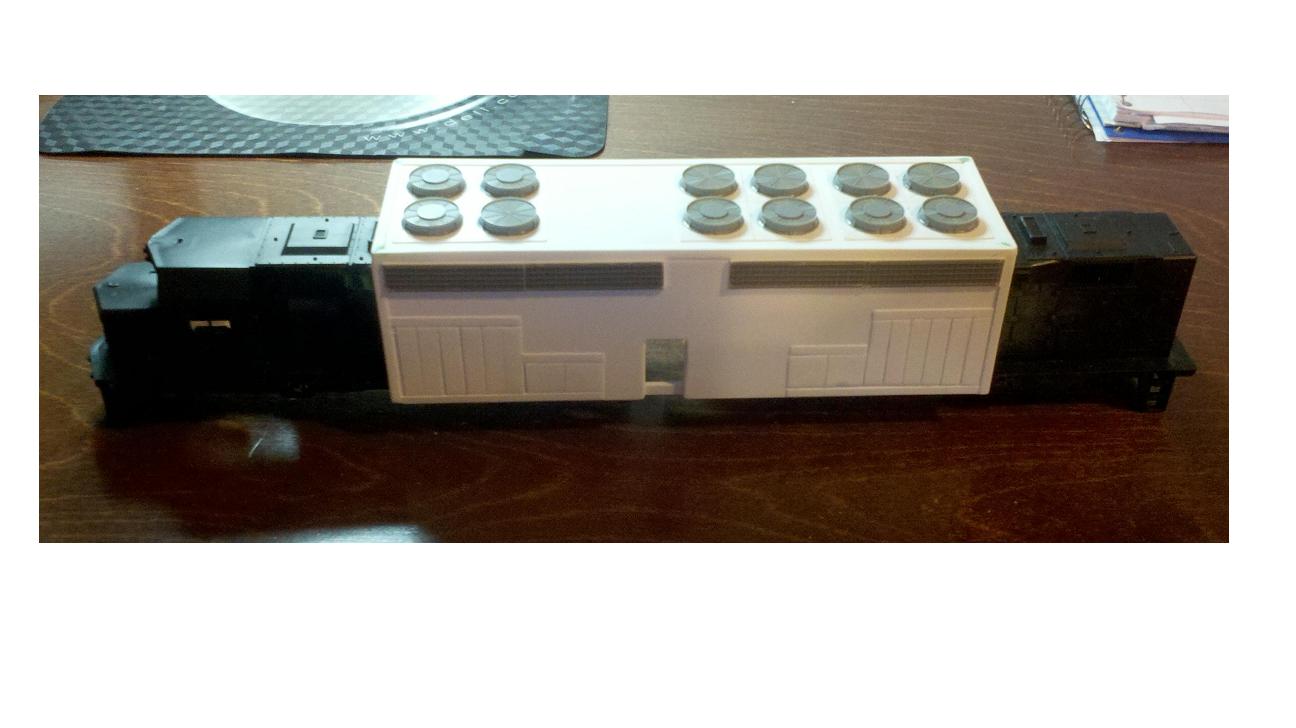
The new box is 158mm long, 45mm wide, and 45mm tall. It is built using 0.060 plastic sheet, then strengthened were possible using 0.060” strip. To try to minimize gaps and filling, there are angle pieces mitered in the corners. Side panels were simulated with 0.010 pieces. The vents are from Cannon and Company for EMD units. The fans on top are from Detail Associates; both are from Walthers.
Final sanding and some touch-up filling, and painting started with priming using Testors primer. The shell bottom was sprayed with yellow, masked, then the entire shell was sprayed with Floquil Dark Blue. Once cured, the shell was clear-coated with Future, and then decaled with some leftover Microscale B&O. (Note: the logo was going to be “B&OMG”, but the yellow on the custom decals was too transparent over the blue shell, so they had to be scrapped).
After these had dried for a few days, the shell was sprayed with Testors Dullcote. Final details were added, and the handrails were made using 0.025” wire, and a set of Athearn short stanchions.
Lessons? First, it added a lot of weight. The original weighed-in at 1 lb. 9 oz (710 grams), and the modified tips the scale at 2 lb. 5 oz (1.05 kg). And this added weight makes it more top-heavy than before, which makes curves treacherous. It has crazy amounts of power. So if there is HO-scale train drag racing, this one is ready.
|
Country:  USA ~
Posts: 46 ~
Member Since: December 11 2010 ~
Last Visit: October 16 2017 USA ~
Posts: 46 ~
Member Since: December 11 2010 ~
Last Visit: October 16 2017
|
 Alert Moderator
|
|
|
|
Posted - December 31 2011 : 07:13:53 AM
|
Its really neat that your LHS would do this. An intreseting study in R&D too, with the motors and well done body mods. I'd imagine that the original reaction to the DD40 is alot like the reaction to this model. Looks massive!
Thanks.
Alco Fan
Edited by - Alco Fan on December 31 2011 07:16:18 AM
|
|
Country: USA ~
Posts: 2496 ~
Member Since: August 03 2006 ~
Last Visit: December 06 2021
|
Alert Moderator

|
|
|
|
Posted - January 03 2012 : 4:06:56 PM
|
Wow! I think "Frankenstein" actually undersells it, somehow  Very interesting concept... I'll have to keep this in mind for some old shells I've got kicking around, next time I find an interesting motor. Not sure I buy into the aesthetics of it, but I love the "form follows brute force" school of thought so I can probably be swayed. Good craftsmanship at any rate. Thanks for sharing this one! Very interesting concept... I'll have to keep this in mind for some old shells I've got kicking around, next time I find an interesting motor. Not sure I buy into the aesthetics of it, but I love the "form follows brute force" school of thought so I can probably be swayed. Good craftsmanship at any rate. Thanks for sharing this one!
|
|
Country: USA ~
Posts: 2798 ~
Member Since: September 17 2010 ~
Last Visit: July 22 2015
|
Alert Moderator
|
|
|
|
Posted - January 03 2012 : 10:58:24 PM
|
Good lord! 
I think it also might have a problem with tunnel portals, signals, trackside pedestrians...
Very nice work, tho I think those Athearn universals are pretty much at their max angle.
The Tyco Depot
|
|
Country: USA ~
Posts: 3927 ~
Member Since: June 20 2007 ~
Last Visit: November 19 2015
|
Alert Moderator
|
|
|
|
Posted - February 20 2021 : 4:50:53 PM
|
quote:Athearn DD540X
What happens at your local Hobby Shop on a slow day? They start to put their heads together and scheme of Frankenstein-like creations. And so the following answers the question of “can a train use an R/C engine or two?”
The best fit to answer the question is an older, Blue-Box era, Athearn DD40. It would have the space to fit, metal chassis, and with the drive couplers and shaft, will fit something larger. Two 540-size motors leftover from another project were deemed worthy donors.
The first step was to mount the motors. They were connected to a DC power pack, and run to determine shaft direction. With the motors mounted back-to-back, they would need to run in opposite directions to allow for the same shaft direction. Spacing was determined on the frame, and then new mounting rails were constructed using .100” plastic stock. This will serve as an engine cradle, and also allow room to connect to the ground strips that will be under the motors. This is the same ground that the stock assembly used. Holes were then drilled through the new strips where the existing Athearn mounts were located. Cable ties will thread through these to hold the new motors in place.
The ground cable is 16-gauge wire, and with a crimp connector on the end, was bolted to the grounding strip after drilling and threading a hole for the connecting screw. Once in place, liquid tape was applied to the connecting for insulating under the motor. The positive leads were also drilled and bolting to the existing clips on each end, and then both positive and negative leads were soldered to the correct clips on the end of the motors. These were covered with liquid tape.
The motors were connected using the original Athearn couplers and shafts, although they needed to be trimmed down to about half of their original length. This is due to the overall assembly being so much longer, but it does all fit.
Motor testing followed, and these are strong. The squeal that you would hear from an R/C car? Now on a train. One of the initial concerns was whether the load may be too great for a DC transformer, but the MRC 1370 was more than capable.
Modifying the shell was the most time-consuming part of the build. Many measurements later, it was determined that 158mm needed to come out, just aft of the forward stack. Slow and steady with a razor saw, and trying to keep the cuts as straight as possible, was key. Once complete, the cut ends were then block-sanded to square. These were then snapped on to another DD40 frame. Because of the necessity to keep them straight, it is easier to built the new section on-frame.
The new box is 158mm long, 45mm wide, and 45mm tall. It is built using 0.060 plastic sheet, then strengthened were possible using 0.060” strip. To try to minimize gaps and filling, there are angle pieces mitered in the corners. Side panels were simulated with 0.010 pieces. The vents are from Cannon and Company for EMD units. The fans on top are from Detail Associates; both are from Walthers.
Final sanding and some touch-up filling, and painting started with priming using Testors primer. The shell bottom was sprayed with yellow, masked, then the entire shell was sprayed with Floquil Dark Blue. Once cured, the shell was clear-coated with Future, and then decaled with some leftover Microscale B&O. (Note: the logo was going to be “B&OMG”, but the yellow on the custom decals was too transparent over the blue shell, so they had to be scrapped).
After these had dried for a few days, the shell was sprayed with Testors Dullcote. Final details were added, and the handrails were made using 0.025” wire, and a set of Athearn short stanchions.
Lessons? First, it added a lot of weight. The original weighed-in at 1 lb. 9 oz (710 grams), and the modified tips the scale at 2 lb. 5 oz (1.05 kg). And this added weight makes it more top-heavy than before, which makes curves treacherous. It has crazy amounts of power. So if there is HO-scale train drag racing, this one is ready.
Originally posted by fritdude - December 31 2011 : 06:59:53 AM
|
IT'S ALIVE!
|
|
Country: USA ~
Posts: 5849 ~
Member Since: February 12 2014 ~
Last Visit: April 18 2024
|
Alert Moderator
|
|
|
|
|
|