|
|
 Posted - November 17 2012 : 4:24:24 PM Posted - November 17 2012 : 4:24:24 PM


|
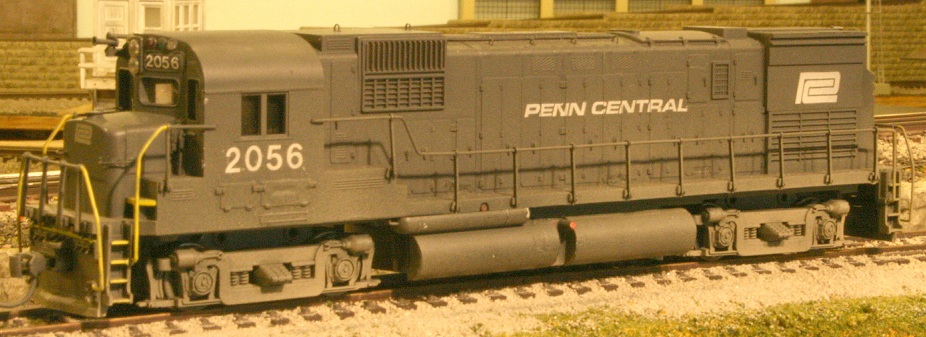
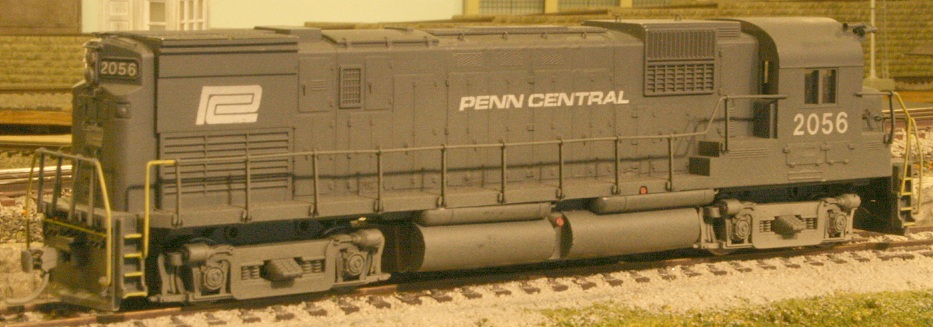
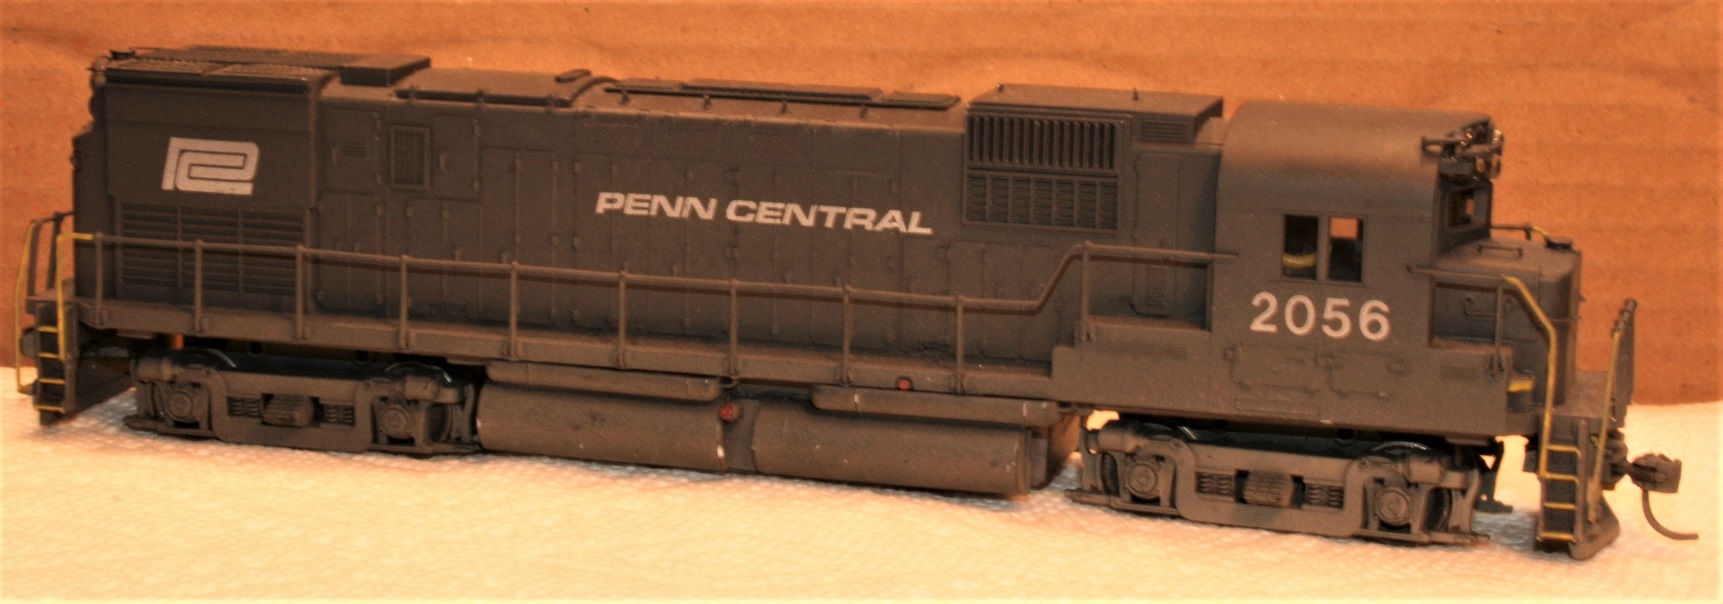
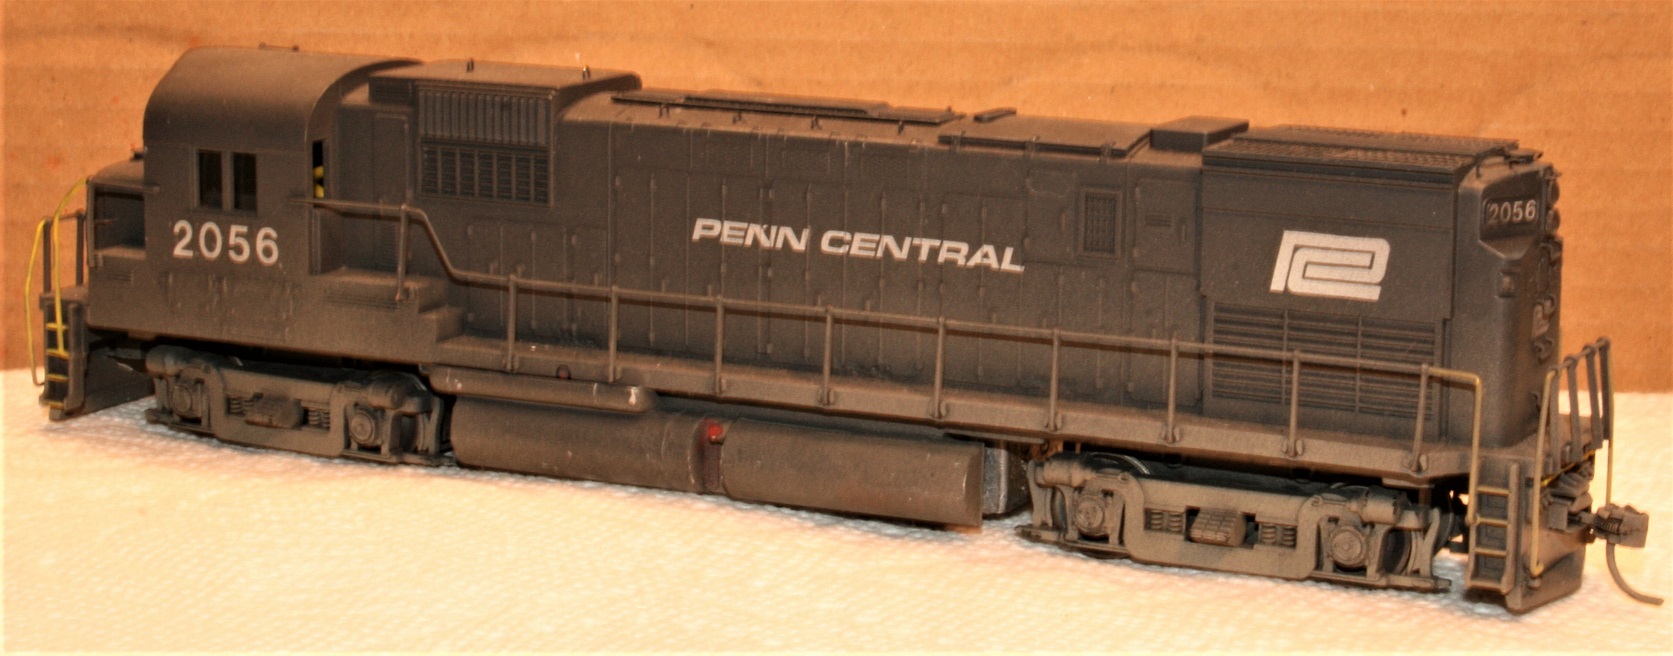
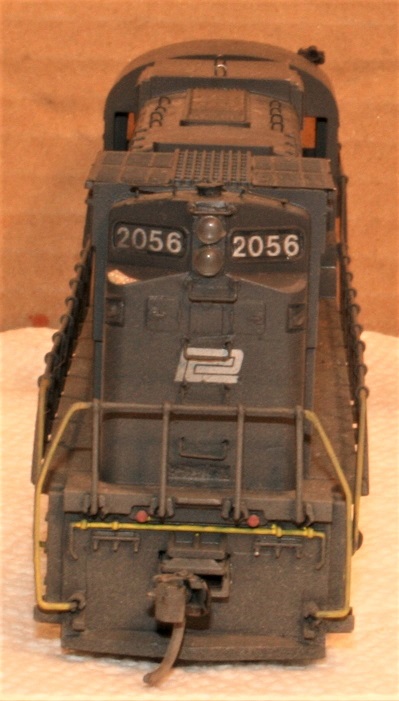
This is my latest project, I had a Rock Island Tyco C430 locomotive that had a dead power torque motor so I rebuilt this engine with a lengthened Athearn U-Boat frame and repainted it in Penn Central colors.
Here are some pictures of the project's progress..
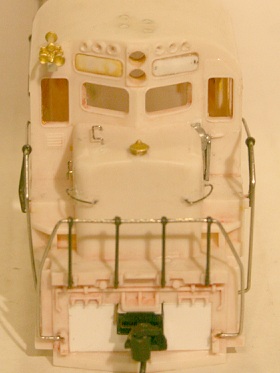
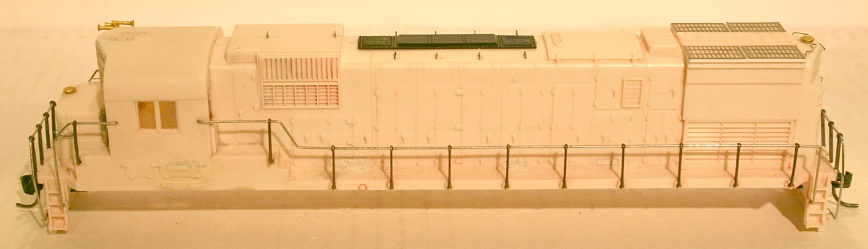
As you can see I removed the angular U-Boat style fuel tank and replaced it with plastic Alco fuel tank parts from Atlas. Other detail parts I added included hand brake, sand hatches, photo etched radiator grills, grab iron, lift rings, and horn. I also filled in the pilot and mounted Kadee couplers to the shell.
The engine runs like a charm and looks great, what do you think?
Proudly keeping Tyco Pluggers out of landfills since 2016
Edited by - Srenchin on November 17 2012 4:29:23 PM
|
Country:  USA ~
Posts: 818 ~
Member Since: December 26 2009 ~
Last Visit: March 20 2024 USA ~
Posts: 818 ~
Member Since: December 26 2009 ~
Last Visit: March 20 2024
|
 Alert Moderator
|
|
|
|
Posted - November 17 2012 : 4:32:23 PM
|
very nice
caboose 1
|
|
Country: USA ~
Posts: 352 ~
Member Since: November 09 2010 ~
Last Visit: January 21 2013
|
Alert Moderator

|
|
|
|
Posted - November 17 2012 : 4:37:47 PM
|
What a nice kitbash! You'd never know that once it was a Tyco!
" Heck with counting 'em rivets, TRAINS ARE FOR FUN! Not called the Mad Scientist for nothing either!"
|
|
Country: USA ~
Posts: 3145 ~
Member Since: May 07 2007 ~
Last Visit: April 04 2024
|
Alert Moderator
|
|
|
|
Posted - November 17 2012 : 4:45:55 PM
|
Yes, its amazing what a new paint job, some details, and some weathering can do for an old Tyco model. Of course if you compared it to the new Bowser version of the C430 you would probably see a lot of discrepancies.
Proudly keeping Tyco Pluggers out of landfills since 2016
Edited by - Srenchin on November 17 2012 4:49:58 PM
|
|
Country: USA ~
Posts: 818 ~
Member Since: December 26 2009 ~
Last Visit: March 20 2024
|
Alert Moderator
|
|
|
|
Posted - November 17 2012 : 5:20:55 PM
|
A really excellent kitbash. One of my favorite subjects Nice extra super detailing too. I wish I had done it first. Well done!
Creative,using the lengthened chassis and nice custom tanks.
This is a LOTW model.
Alco Fan
Edited by - Alco Fan on November 17 2012 6:23:43 PM
|
|
Country: USA ~
Posts: 2496 ~
Member Since: August 03 2006 ~
Last Visit: December 06 2021
|
Alert Moderator
|
|
|
|
Posted - November 17 2012 : 8:39:18 PM


|
Scott,
That looks AWESOME! I've never been a big ALCO an......BUT, I would have a few of those if my 2 main railroads I model had them!
As mentioned prior to my posting, you would NEVER guess that was a TYCO! LOOKS AWESOME! Gonna be in CN paint?
~John
Many have tried to, and failed, ya just can't repair stupid... 
Do NOT try to Idiot-Proof anything!!!! God, will simply create a better......IDIOT!
|
|
Country: USA ~
Posts: 2911 ~
Member Since: March 26 2012 ~
Last Visit: January 14 2014
|
Alert Moderator
|
|
|
|
Posted - November 17 2012 : 9:09:58 PM
|
Well done! The finished loco looks real sharp. 
|
|
Country: USA ~
Posts: 1083 ~
Member Since: July 07 2011 ~
Last Visit: April 17 2024
|
Alert Moderator
|
|
|
|
Posted - November 17 2012 : 9:47:52 PM
|
Another beautiful job! Do you have any pictures of what's under the hood, and how you lengthened the frame?
The Tyco Depot
|
|
Country: USA ~
Posts: 3927 ~
Member Since: June 20 2007 ~
Last Visit: November 19 2015
|
Alert Moderator
|
|
|
|
Posted - November 17 2012 : 11:27:28 PM
|
Nelson,
I don't believe Scott stretched the frame on that unit! The unit looks to have Athearn trucks, and the fuel tank seems to have positioned to the "tabs" that TYCO had on the true TYCO model in front and behind the TYCO fuel tanks.....
I could be wrong however, but I would say that the ends of an Athearn frame might be the only "frame" part used under this C430!
However it was done, was accomplished VERY nicely! (I re-power A LOT of shells with Athearn frames......)
With that being said, you look at my IHC FA-2, or ANY of my most current TYCO RF-16's, A or B units, and they will have Athearn frames, milled to fit the shells! As well as ALL my Bachmann diesels from the 1980's.....
~John
Many have tried to, and failed, ya just can't repair stupid...
Do NOT try to Idiot-Proof anything!!!! God, will simply create a better......IDIOT!
Edited by - EM-1 on November 17 2012 11:27:53 PM
|
|
Country: USA ~
Posts: 2911 ~
Member Since: March 26 2012 ~
Last Visit: January 14 2014
|
Alert Moderator
|
|
|
|
Posted - November 17 2012 : 11:59:15 PM
|
quote:Nelson,
I don't believe Scott stretched the frame on that unit!
Originally posted by EM-1 - November 17 2012 : 11:27:28 PM
|
quote:This is my latest project, I had a Rock Island Tyco C430 locomotive that had a dead power torque motor so I rebuilt this engine with a lengthened Athearn U-Boat frame and repainted it in Penn Central colors.
Originally posted by Srenchin - November 17 2012 : 4:24:24 PM
|

The Tyco Depot
|
|
Country: USA ~
Posts: 3927 ~
Member Since: June 20 2007 ~
Last Visit: November 19 2015
|
Alert Moderator
|
|
|
|
Posted - November 18 2012 : 01:32:53 AM
|
Nice work! I like it. Alot.
Ray
|
|
Country: USA ~
Posts: 1285 ~
Member Since: December 14 2005 ~
Last Visit: May 16 2019
|
Alert Moderator
|
|
|
|
Posted - November 18 2012 : 01:43:48 AM
|
quote: quote:Nelson,
I don't believe Scott stretched the frame on that unit!
Originally posted by EM-1 - November 17 2012 : 11:27:28 PM
|
quote:This is my latest project, I had a Rock Island Tyco C430 locomotive that had a dead power torque motor so I rebuilt this engine with a lengthened Athearn U-Boat frame and repainted it in Penn Central colors.
Originally posted by Srenchin - November 17 2012 : 4:24:24 PM
|
Originally posted by NickelPlate759 - November 17 2012 : 11:59:15 PM
|
You got me! What frame might have he used tho? VERY interesting! Its difficult to imagine what frame was used!
~John
Many have tried to, and failed, ya just can't repair stupid...
Do NOT try to Idiot-Proof anything!!!! God, will simply create a better......IDIOT!
|
|
Country: USA ~
Posts: 2911 ~
Member Since: March 26 2012 ~
Last Visit: January 14 2014
|
Alert Moderator
|
|
|
|
Posted - November 18 2012 : 02:58:22 AM
|
quote: quote: quote:Nelson,
I don't believe Scott stretched the frame on that unit!
Originally posted by EM-1 - November 17 2012 : 11:27:28 PM
|
quote:This is my latest project, I had a Rock Island Tyco C430 locomotive that had a dead power torque motor so I rebuilt this engine with a lengthened Athearn U-Boat frame and repainted it in Penn Central colors.
Originally posted by Srenchin - November 17 2012 : 4:24:24 PM
|
Originally posted by NickelPlate759 - November 17 2012 : 11:59:15 PM
|
You got me! What frame might have he used tho? VERY interesting! Its difficult to imagine what frame was used!
Originally posted by EM-1 - November 18 2012 : 01:43:48 AM
|
Actually I had to use two Athearn 4 axle U boat frames for this project, when I get a chance I will post pictures of the modified chassis. It all came down to the distance between truck centers, as I recall most 4 axle U boats have 36 foot truck centers and the C430s have 37 foot truck centers. One scale foot doesn't sound like much but when you put an unmodified Athearn U boat drive under the C430 shell, the trucks do look to far inboard from the steps to look right. I fixed this by supper gluing two frames together adding one scale foot in the fuel tank area. Since I mounted my couplers on the shell, I removed the coupler mounts from the chassis and I also sawed off the sides of the angular style GE fuel tank to accommodate the new Alco style fuel tanks. As I said, when I get a chance I will post photos of the mechanism for further clarity...
Proudly keeping Tyco Pluggers out of landfills since 2016
|
|
Country: USA ~
Posts: 818 ~
Member Since: December 26 2009 ~
Last Visit: March 20 2024
|
Alert Moderator
|
|
|
|
Posted - November 18 2012 : 12:17:36 PM
|
Scott,
sounds like you had fun! You used a Athearn Blue Box frame UboatB frame? I wonder if a UboatC frame might have been better?
Just an interesting thought! As you could have removed "meat" from the front or rear of each bolster and then chopped the angular GE tanks off to fit the ALCO fuel tank sides on.....
Did you add the tanks to the TYCO plastic "tabs" that came down from inside the shell or did you fasten them, to the frame you made to fit?
Nice work anyway but was a "wonder" for me as it looks really good.....NICE work!
~John
Many have tried to, and failed, ya just can't repair stupid...
Do NOT try to Idiot-Proof anything!!!! God, will simply create a better......IDIOT!
|
|
Country: USA ~
Posts: 2911 ~
Member Since: March 26 2012 ~
Last Visit: January 14 2014
|
Alert Moderator
|
|
|
|
Posted - November 18 2012 : 12:22:24 PM
|
Scott,
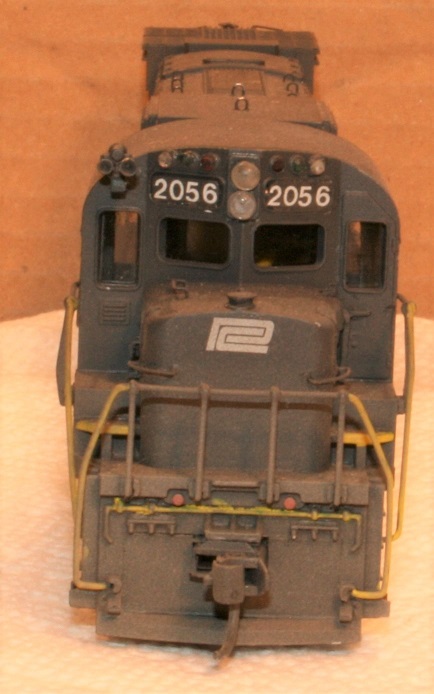
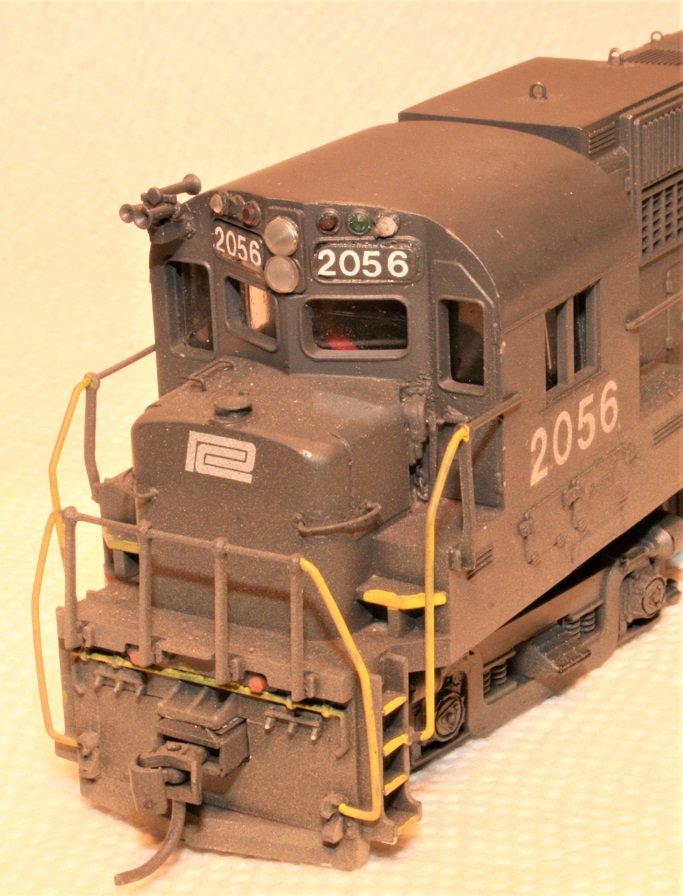
Another question on this model, did you use the TYCO pilot point thats at the bottom edge of your "filled in" pilots? I can't tell for sure, but that looks so much better then that gaping hole that was there for a swinging coupler!
I had a look but its difficult to tell what you had done in that area!
~John
Many have tried to, and failed, ya just can't repair stupid...
Do NOT try to Idiot-Proof anything!!!! God, will simply create a better......IDIOT!
|
|
Country: USA ~
Posts: 2911 ~
Member Since: March 26 2012 ~
Last Visit: January 14 2014
|
Alert Moderator
|
|
|
|
Posted - November 18 2012 : 10:56:36 PM
|
quote:Scott,
sounds like you had fun! You used a Athearn Blue Box frame UboatB frame? I wonder if a UboatC frame might have been better?
Just an interesting thought! As you could have removed "meat" from the front or rear of each bolster and then chopped the angular GE tanks off to fit the ALCO fuel tank sides on.....
Did you add the tanks to the TYCO plastic "tabs" that came down from inside the shell or did you fasten them, to the frame you made to fit?
Nice work anyway but was a "wonder" for me as it looks really good.....NICE work!
Originally posted by EM-1 - November 18 2012 : 12:17:36 PM
|
I suppose I could have used a six axle U-Boat frame, I would have to go back and check the measurements. I ended up purchasing a beat up Athearn U30B I found on ebay for this project because in addition to the frame I also needed the trucks, drive train, and motor. My local hobby shop had plenty of second hand four axle U boat frames in his parts bin so I just ended up using what was available. As for the fuel tank detail, I ended up discarding all of the original Tyco parts below the side sills including those goofy looking plastic tabs. The fuel tank detail and the air tanks on my rebuilt model are all Atlas parts super glued to the modified Athearn frame.
Proudly keeping Tyco Pluggers out of landfills since 2016
|
|
Country: USA ~
Posts: 818 ~
Member Since: December 26 2009 ~
Last Visit: March 20 2024
|
Alert Moderator
|
|
|
|
Posted - November 18 2012 : 11:05:53 PM
|
Nice work
|
|
Country: USA ~
Posts: 2507 ~
Member Since: January 31 2006 ~
Last Visit: October 21 2017
|
Alert Moderator
|
|
|
|
Posted - November 18 2012 : 11:08:24 PM
|
quote:Scott,
Another question on this model, did you use the TYCO pilot point thats at the bottom edge of your "filled in" pilots? I can't tell for sure, but that looks so much better then that gaping hole that was there for a swinging coupler!
I had a look but its difficult to tell what you had done in that area!
Originally posted by EM-1 - November 18 2012 : 12:22:24 PM
|
I'm glad you noticed the filled in pilots! I personally think one of the best things you can do to improve the appearance of a Tyco hood unit is to fill in the gaping hole around the couplers and then body mount the couplers to the shell. The Tyco C430 shell I had to work with was in excellent condition with pointed pilot bottoms intact. Of course it was only after finishing the model that I noticed that the prototype PC C430's didn't have this feature . Oh well, as I said before, if I wanted a perfect C430 model I would have just waited for Bowser to release their version. But what fun would that be... . Oh well, as I said before, if I wanted a perfect C430 model I would have just waited for Bowser to release their version. But what fun would that be...
Proudly keeping Tyco Pluggers out of landfills since 2016
|
|
Country: USA ~
Posts: 818 ~
Member Since: December 26 2009 ~
Last Visit: March 20 2024
|
Alert Moderator
|
|
|
|
Posted - November 19 2012 : 11:49:29 AM
|
Very nice.
I'm doing something similar with a TYCO to make an SCL C430.
If it's not too much trouble can you tell me the part number for those photo etch grilles?
and how did you make the recess pocket for the hand brake?
Unspoken expectations are premeditated failures.
|
|
Country: USA ~
Posts: 825 ~
Member Since: December 22 2008 ~
Last Visit: March 16 2015
|
Alert Moderator
|
|
|
|
Posted - November 19 2012 : 5:04:00 PM
|
EM-1 should be getting a bunch of U-Boat frames fairly soon. 
The Tyco Depot
|
|
Country: USA ~
Posts: 3927 ~
Member Since: June 20 2007 ~
Last Visit: November 19 2015
|
Alert Moderator
|
|
|
|
Posted - June 20 2015 : 3:36:18 PM
|
Hello
My name is Blane and I'm really interested about your post on upgrading an old TYCO C-430. Your post is actually what helped me decide to pick up a pair of old TYCO C-430s on eBay to turn into much better models than they are. I already have a Bowser C-430 in the demo scheme but the cost of acquiring any more from them is out of the question. Plus I wanted to see how to upgrade an older model to improve both detail and running quality. I know you said that you used an old Athearn U-Boat frame and I actually have one of those around as well to possibly use. On another site, someone kitbashed a C-430 from Atlas and Stewart parts and used a B23-7 frame and motor from Atlas for his model.
I'm curious about the detail parts you used as well as what handrails you used for the final product. I really like what you did with the unit and the final product is definitely something to be proud of.
Blane P
|
Country:  Canada ~
Posts: 1 ~
Member Since: June 20 2015 ~
Last Visit: June 20 2015 Canada ~
Posts: 1 ~
Member Since: June 20 2015 ~
Last Visit: June 20 2015
|
Alert Moderator
|
|
|
|
Posted - June 20 2015 : 6:51:14 PM
|
This is why people should give Tyco stuff a chance, because they can turn out awesome like this.
-Steve
"A lot of modellers out there who go to these train shows see broken HO stuff and go, 'This is useless' when, in reality, they can still be used for modeling whether it's as a prop on your layout or a cool project to make something old new again."
|
|
Country: USA ~
Posts: 3533 ~
Member Since: February 17 2014 ~
Last Visit: January 11 2023
|
Alert Moderator
|
|
|
|
Posted - June 20 2015 : 11:40:02 PM
|
| Very nice Scott. Nice craftsmanship.
|
|
Country: USA ~
Posts: 2087 ~
Member Since: March 16 2013 ~
Last Visit: July 05 2018
|
Alert Moderator
|
|
|
|
Posted - May 26 2016 : 04:08:30 AM
|
What did you use for the radiator grills?
Modeling on the cheap
|
|
Country: USA ~
Posts: 137 ~
Member Since: December 08 2015 ~
Last Visit: June 26 2017
|
Alert Moderator
|
|
|
|
Posted - May 26 2016 : 6:12:01 PM
|
| Wow!
|
|
Country: USA ~
Posts: 11192 ~
Member Since: December 09 2013 ~
Last Visit: April 17 2024
|
Alert Moderator
|
|
|
|
Posted - May 27 2016 : 01:16:14 AM
|
Going to be getting one soon, and plan on detailing it, so was wondering what he used.
Modeling on the cheap
|
|
Country: USA ~
Posts: 137 ~
Member Since: December 08 2015 ~
Last Visit: June 26 2017
|
Alert Moderator
|
|
|
|
Posted - December 26 2019 : 7:11:59 PM
|
| With the c430 project I'm doing, this is incredibly useful. Any more pics of the inside?
|
|
Country: USA ~
Posts: 1549 ~
Member Since: October 10 2019 ~
Last Visit: January 04 2024
|
Alert Moderator
|
|
|
|
Posted - December 27 2019 : 9:33:11 PM
|
quote:With the c430 project I'm doing, this is incredibly useful. Any more pics of the inside?
Originally posted by BlaxlandAlex3 - December 26 2019 : 7:11:59 PM
|
I am currently out of town but I will get some chassis photos of this unit posted as soon as I can.
Proudly keeping Tyco Pluggers out of landfills since 2016
|
|
Country: USA ~
Posts: 818 ~
Member Since: December 26 2009 ~
Last Visit: March 20 2024
|
Alert Moderator
|
|
|
|
Posted - December 27 2019 : 9:43:51 PM
|
quote: quote:With the c430 project I'm doing, this is incredibly useful. Any more pics of the inside?
Originally posted by BlaxlandAlex3 - December 26 2019 : 7:11:59 PM
|
I am currently out of town but I will get some chassis photos of this unit posted as soon as I can.
Originally posted by Srenchin - December 27 2019 : 9:33:11 PM
|
Great! Do you think you could go a bit in depth about all the parts and stuff you used to detail it? I plan to follow in your footsteps with mine.
Thanks!
|
|
Country: USA ~
Posts: 1549 ~
Member Since: October 10 2019 ~
Last Visit: January 04 2024
|
Alert Moderator
|
|
|
|
Posted - December 29 2019 : 9:10:55 PM
|
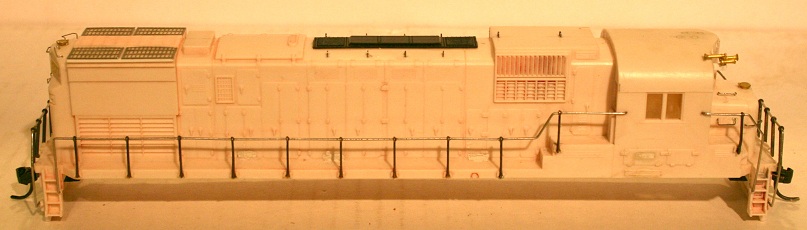
There has been quite a bit of interest in this old C430 project I made several years
ago so here are some new pictures of this locomotive. As you can see the shell
is just a standard Tyco shell with some extra details added....
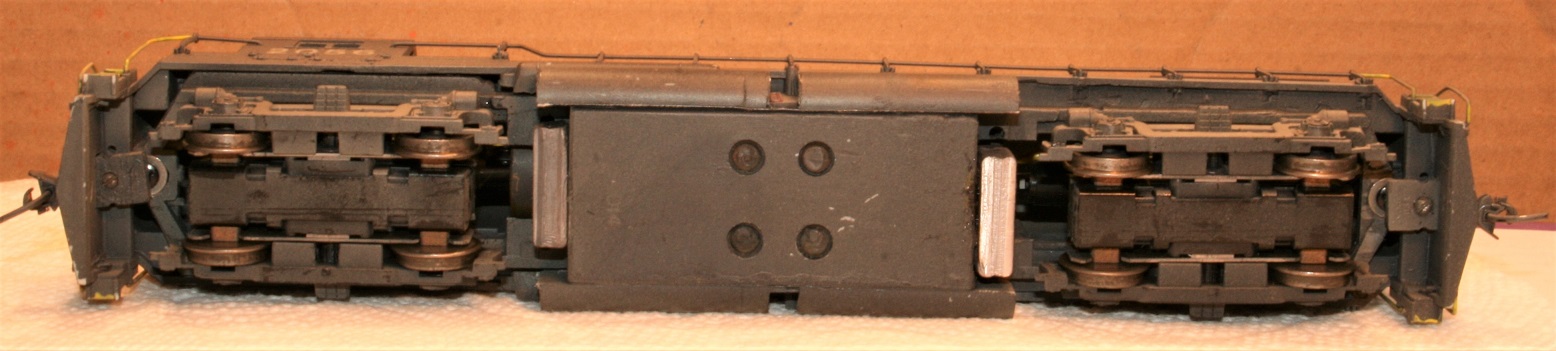
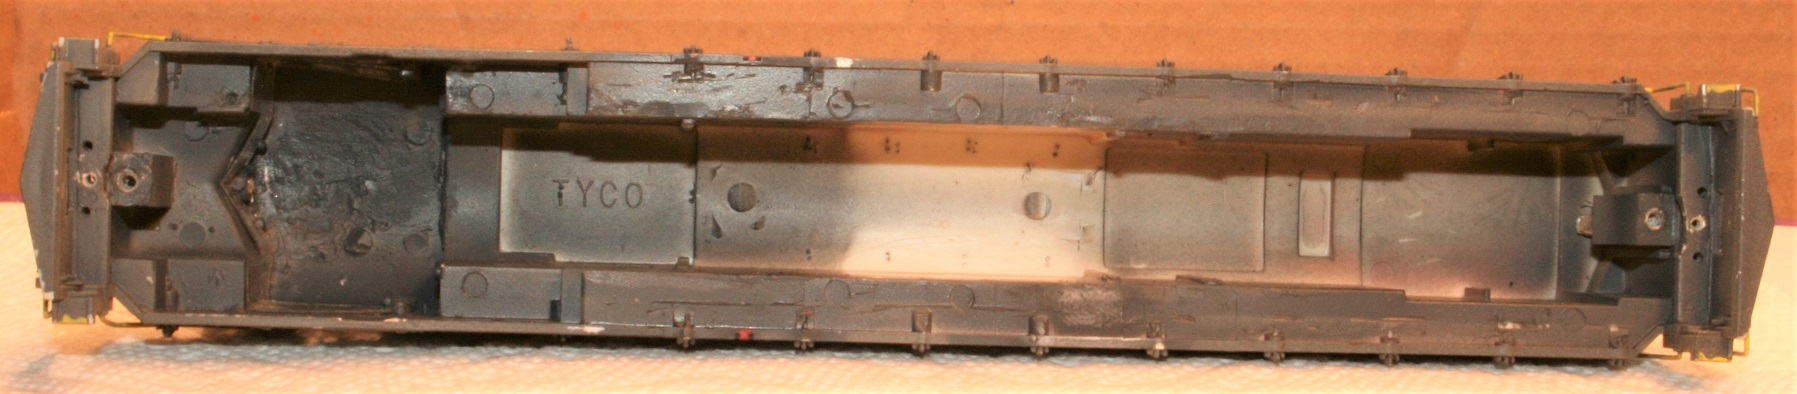
This is what the chassis looks like from the bottom, note the way I mounted the couplers to
the shell and the shell to the chassis....
To remove the shell, you first have to remove the couplers...
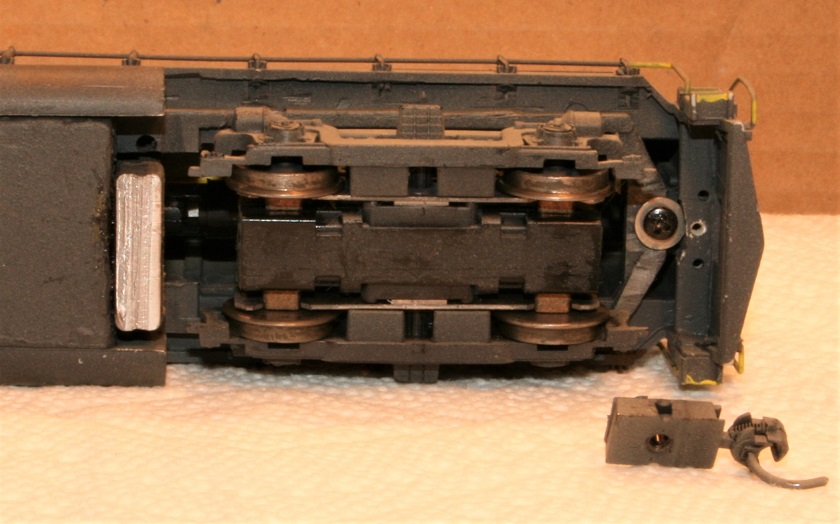
Here the screw holding the shell to the chassis is removed...
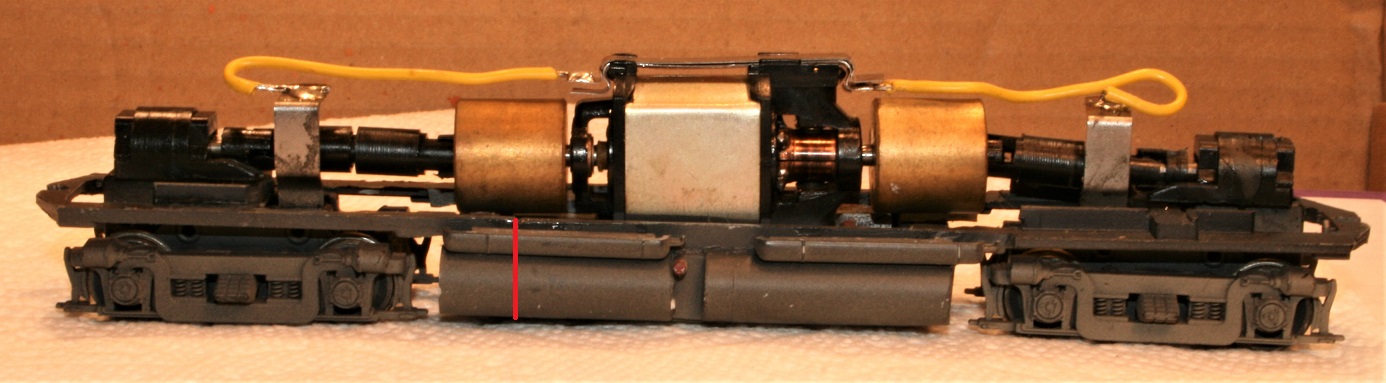
The chassis is basically an Athearn 4 axle GE "U-Boat" mechanism lengthened by one
scale foot. This was done by splicing two U-Boat frames together adding one scale foot in the fuel tank area,
the red line shows where the two frames were epoxied together. Note that I needed
to lengthen the drive line between the front truck's gear tower and the flywheel to accommodate
the stretched chassis. A manufacturer called "A Line" makes an Athearn Universal Coupling
Assortment kit that provides the parts for this modification.
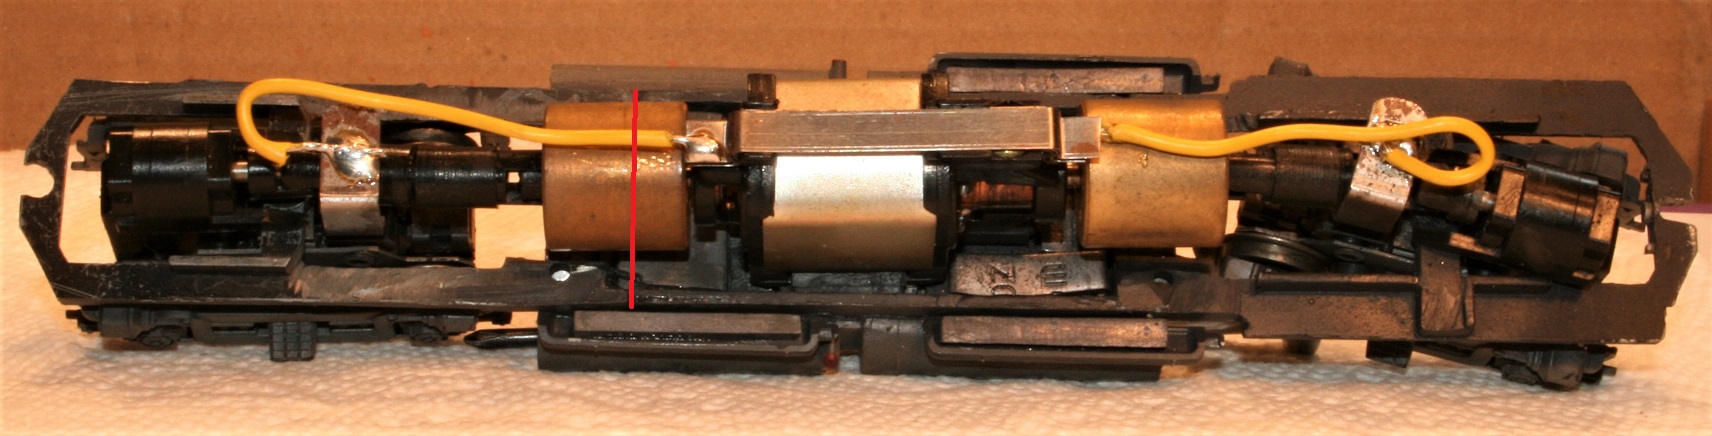
This top view of the chassis also shows the splice line.
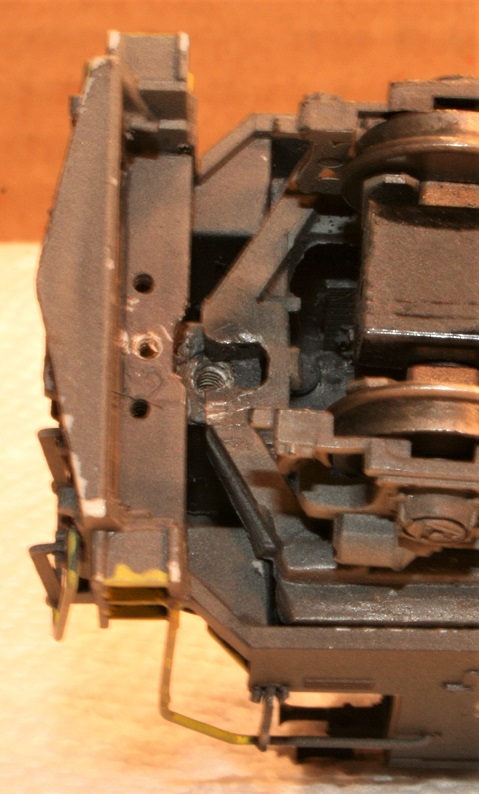
In order to attach the shell to the frame, I added styrene square rod to the interior of the shell
to create mounting posts...
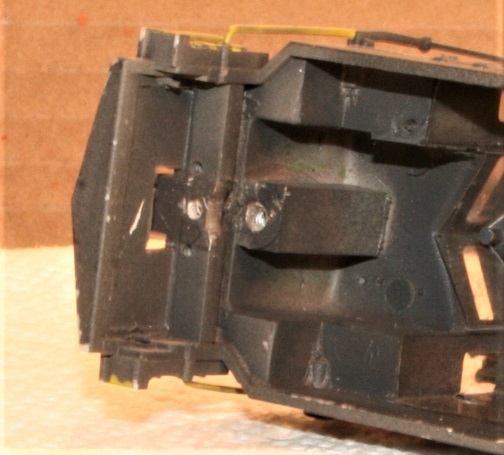
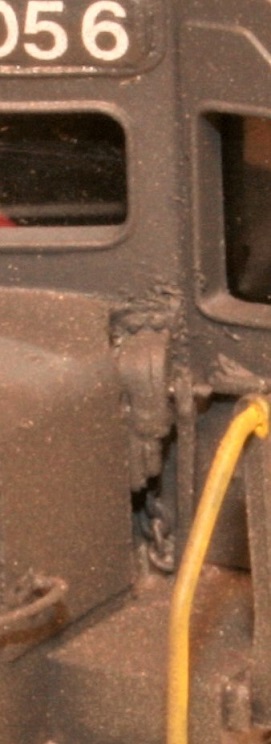
Note how I used styrene plastic to fill in the pilot and provide a place to mount the Kadee coupler pockets.

The hardest part of this project was cutting the Athearn frames apart, I used a Dremel tool at the
time but now I would use my band saw. The rest of the project was pretty easy, just a matter of
applying detail parts and painting. Feel free to ask any questions for clarification.
Proudly keeping Tyco Pluggers out of landfills since 2016
Edited by - Srenchin on December 29 2019 11:26:47 PM
|
|
Country: USA ~
Posts: 818 ~
Member Since: December 26 2009 ~
Last Visit: March 20 2024
|
Alert Moderator
|
|
|
|
Posted - December 29 2019 : 10:34:10 PM
|
It has been a while since I made this model but I think the following parts list is fairly complete.
(Note: I used Walthers part numbers for reference unless otherwise noted)
Cal Scale
190-461 Alco FA Dynamic Brake (roof panel) plastic
190-529 Alco RS Corner Grab Irons
190-574 Alco Sand Filler Hatch
Detail Associates
229-1106 Alco Lift Rings
229-2202 Drop Grab Irons
229-132 Hand Brake (You will need to make a notch in the short hood next to the front cab door to add this part)
229-148 Head Lights (I did not replace the headlights on my model but I would if I had to re-do this project)
229-2718 GE Grills 8-40B
or
229-2723 GE Grills C 44-9
or
229-2717 GE Grills 8-40C
A Line
116-12030 Universal Coupling Assortment (for modifying Athearn Mechanism for the longer chassis frame)
Atlas (Order directly from manufacturer)
#930521 C 424 Duel Fuel Tank Cylinders
#930522 C 424 Air Tank Set
Note that I did not include a horn, choose a horn that matches your prototype!
Proudly keeping Tyco Pluggers out of landfills since 2016
Edited by - Srenchin on December 29 2019 11:15:44 PM
|
|
Country: USA ~
Posts: 818 ~
Member Since: December 26 2009 ~
Last Visit: March 20 2024
|
Alert Moderator
|
|
|
|
Posted - December 30 2019 : 08:41:36 AM
|
Omg thank you! This is extremely helpful, especially on where you got the detail parts! Thank you! I may do something different with the chassis, metal splicing is not my strong suit!
Thank you!!!
|
|
Country: USA ~
Posts: 1549 ~
Member Since: October 10 2019 ~
Last Visit: January 04 2024
|
Alert Moderator
|
|
|
|
Posted - December 30 2019 : 10:39:13 AM
|
quote:Omg thank you! This is extremely helpful, especially on where you got the detail parts! Thank you! I may do something different with the chassis, metal splicing is not my strong suit!
Thank you!!!
Originally posted by BlaxlandAlex3 - December 30 2019 : 08:41:36 AM
|
This was my first experiment with splicing a chassis and it worked out quite well. If you have a Dremel
tool the process is not hard if you use the big metal cutting discs. (If you don't own a Dremel tool, this is a great
opportunity to invest in one). However if you have another strategy to make a chassis for this shell I would
love to see it, feel free to post in this thread if you like.
Proudly keeping Tyco Pluggers out of landfills since 2016
Edited by - Srenchin on December 30 2019 10:43:17 AM
|
|
Country: USA ~
Posts: 818 ~
Member Since: December 26 2009 ~
Last Visit: March 20 2024
|
Alert Moderator
|
|
|
|
Posted - December 30 2019 : 10:55:32 AM
|
quote: quote:Omg thank you! This is extremely helpful, especially on where you got the detail parts! Thank you! I may do something different with the chassis, metal splicing is not my strong suit!
Thank you!!!
Originally posted by BlaxlandAlex3 - December 30 2019 : 08:41:36 AM
|
This was my first experiment with splicing a chassis and it worked out quite well. If you have a Dremel
tool the process is not hard if you use the big metal cutting discs. (If you don't own a Dremel tool, this is a great
opportunity to invest in one). However if you have another strategy to make a chassis for this shell I would
love to see it, feel free to post in this thread if you like.
Originally posted by Srenchin - December 30 2019 : 10:39:13 AM
|
Yep, I've got a dremel, alright, I may have to give in to it!
Is it ok if I post the progress on mine here?
|
|
Country: USA ~
Posts: 1549 ~
Member Since: October 10 2019 ~
Last Visit: January 04 2024
|
Alert Moderator
|
|
|
|
Posted - December 30 2019 : 2:07:31 PM
|
| Also, what thickness of styrene did you use to fill in the pilots, and where did you get it?
|
|
Country: USA ~
Posts: 1549 ~
Member Since: October 10 2019 ~
Last Visit: January 04 2024
|
Alert Moderator
|
|
|
|
Posted - December 30 2019 : 8:34:53 PM
|
quote:Also, what thickness of styrene did you use to fill in the pilots, and where did you get it?
Originally posted by BlaxlandAlex3 - December 30 2019 : 2:07:31 PM
|
I think I used .080" thick styrene for this project, but .060" or .100" would work as well.
There are two major suppliers of styrene sheets, strips, and shapes that I rely on.
Evergreen Scale Models and Plastruct. Walthers carries both brands or you can order
directly from the manufactures.
If you have never worked with styrene I would recommend getting a few sheets and strips in various
thicknesses to experiment with.
Remember, for my C430 I used styrene to also build up a place to mount my couplers and
to create interior mounting posts (made from .250 X .250 Strips) to assist in attaching the
shell to the chassis.
Proudly keeping Tyco Pluggers out of landfills since 2016
Edited by - Srenchin on December 30 2019 8:43:20 PM
|
|
Country: USA ~
Posts: 818 ~
Member Since: December 26 2009 ~
Last Visit: March 20 2024
|
Alert Moderator
|
|
|
|
Posted - December 30 2019 : 8:41:42 PM
|
The biggest flaw in my model are the truck side frames, Penn Central's C430 locomotives
rode on Alco's unique Hi-Adhesion trucks rather than on the standard AAR type B trucks
that are found on my model. When I made my model I couldn't find any "Hi-Ad" side frames
so I compromised with the AAR type B's.
However if I had to do this model over again I would purchase "Hi-Ad" side frames from
this 3-D printer here...
https://www.shapeways.com/product/KQGCXH6AB/alco-hi-ad-trucks-n-ho-o?optionId=62297541&li=marketplace
Proudly keeping Tyco Pluggers out of landfills since 2016
|
|
Country: USA ~
Posts: 818 ~
Member Since: December 26 2009 ~
Last Visit: March 20 2024
|
Alert Moderator
|
|
|
|
Posted - December 30 2019 : 8:46:29 PM
|
quote: quote: quote:Omg thank you! This is extremely helpful, especially on where you got the detail parts! Thank you! I may do something different with the chassis, metal splicing is not my strong suit!
Thank you!!!
Originally posted by BlaxlandAlex3 - December 30 2019 : 08:41:36 AM
|
This was my first experiment with splicing a chassis and it worked out quite well. If you have a Dremel
tool the process is not hard if you use the big metal cutting discs. (If you don't own a Dremel tool, this is a great
opportunity to invest in one). However if you have another strategy to make a chassis for this shell I would
love to see it, feel free to post in this thread if you like.
Originally posted by Srenchin - December 30 2019 : 10:39:13 AM
|
Yep, I've got a dremel, alright, I may have to give in to it!
Is it ok if I post the progress on mine here?
Originally posted by BlaxlandAlex3 - December 30 2019 : 10:55:32 AM
|
Yes, feel free to document your project in this thread, I would like that very much!
Proudly keeping Tyco Pluggers out of landfills since 2016
|
|
Country: USA ~
Posts: 818 ~
Member Since: December 26 2009 ~
Last Visit: March 20 2024
|
Alert Moderator
|
|